Windows 10 loads the processor. What is NT Kernel & System? Full access to the System process with TrustedInstaller permission
Occasionally, users of Windows 7 or 10 (less often other versions) face system loading due to NT Kernel & System. The problem is the long processing of commands, strong brakes in computer games and browsers work. It is not clear why the 7 and 10 version operating system more often exposed to this problem. And it arises, as a rule, quite spontaneously, it seems that the user did nothing and the RAM loads almost 95%.
What is NT Kernel & System?
Process "NT Kernel & System" resides in all windows os. This system program and it works in background. It is difficult to find an exact definition, but it is possible to establish her work. It is responsible in part for handling the established third-party programsand if they start to behave inadequately, then “NT Kernel & System” starts loading the processor. This should include all updates, improvements, game engines, etc.
Normal load when running NT Kernel & System
How to remove the CPU load
We have prepared several solutions and methods to help you turn off such a high booting windows 7/10.
We clear system garbage
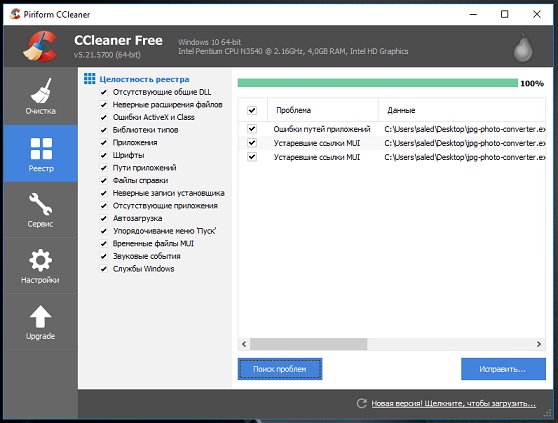
When the user has been working on the operating system for a very long time without proper care, too much software "garbage" accumulates. Its cleaning will help to return the former speed in work.
Roll back driver
A very interesting point is the newly installed drivers in Windows 7/10. Their libraries are not always successfully integrated with all processes and services - hence there is an overload through “NT Kernel & System”.
We lower load by disconnecting

Remember that the problem when NT Kernel & System loads the Windows system (7/10) does not arise just like that, most likely you have installed updates or third-party software. In a pinch, reinstall Windows uniquely solve the problem at the root.
The inherent Windows 8 problem with the activity of the System process, loading system resources, migrated and version upgrade Windows 8.1, and in the current Windows 10. System Process can load 95-100% of the disk, processor or rAM. It is not necessary that the computer was low-powered. The problem is encountered even among owners of devices with powerful hardware.
In Windows 10 Task Manager, not yet updated to Anniversary Update, the System process may appear as “System and Compressed Memory”. But no matter how this process is displayed in the task manager different versions Windows its executable file - ntoskrnl.exe.
Problem activity of the System process may occur periodically when performing certain user or system tasks. But there are also such cases that this process stably loads the disk, processor or RAM, regardless of what operations are performed on the computer. Below we will look at what the process is, why it can load system resources, and how the issue with its problematic activity is solved.
System Process
The System process is an important component of Windows, its executable file ntoskrnl.exe is the core file of the operating system. System is responsible for many system functions. It can not be completed, without it, Windows simply will not work. For this process, the options for changing the priority in the system's task manager are not even available.
Why System process loads a processor, disk, or consumes a lot of RAM
The reasons why the System process may be active with the CPU load, hDD or RAM, a lot. Among them, in particular, such as: a weak or overheated processor, a slow or hard-working hard disk, severe fragmentation of the latter or the presence of broken sectors in it, operation of individual antiviruses and firewalls, problems with Windows updates, malware infiltration, etc. The System process’s use of large amounts of RAM in Windows 8.1 and 10 is to improve the performance of these systems by compressing data and placing it into RAM instead of unloading it into the paging file.
Before you start the following radical ways to combat the activity of the System process, you need to check your hard disk for errors and bad sectors. Also, it will not be superfluous, especially if it was held a long time ago At elevated temperatures, the processor can block new processes in order to protect themselves from combustion. If demanding anti-virus products are installed on a low-power computer, for example, from Eset, Dr.Web, Kaspersky Lab, you need to test the behavior of the System process without them. If the assumption is confirmed, it is necessary to resort to the protection of more lightweight alternatives. By the way, Kaspersky Anti-Virus provides for setting the priority of using hardware resources.
If the activity of the System process, loading system resources, is observed immediately after install windows, you should wait until the disks are indexed and updates are installed. Reinstall Windows Because of the problematic activity of the System process, in most cases there will be no positive results, and this process will load system resources again in time. But, perhaps, the problem will be solved if it originated in 64-bit Windows on a computer with less than 4 GB of RAM, and 32-bit Windows was selected for reinstallation.
The following ways to solve a problem with the activity of the System process will affect important system settings. Before applying these methods, it is desirable to create a restore point or backup copy Windows Not all of these methods will be effective in each particular case, they must be tested separately. To apply the methods you need administrator rights.
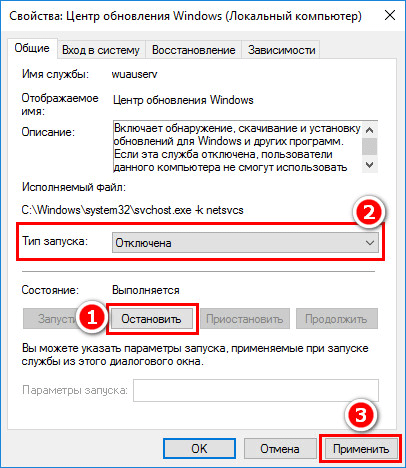
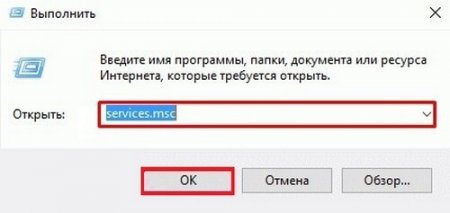
Most of the ways to deal with System activity will be to disable the system windows services. You can get into the “Services” snap-in either in Windows 8.1 and 10 Task Manager,
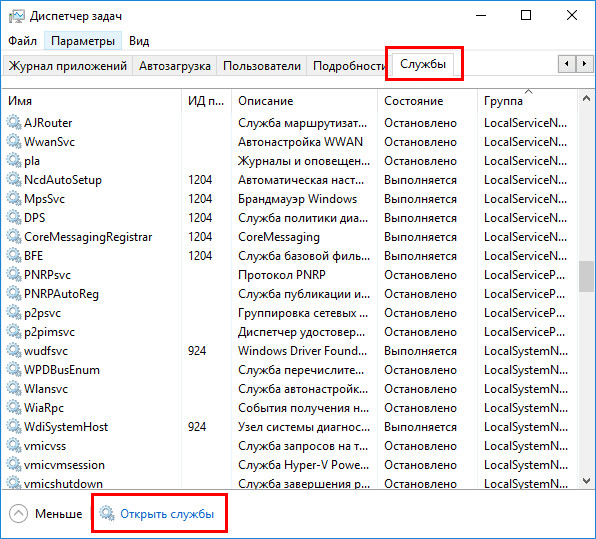
either by typing in the internal search field or the Run service:
Refusal of automatic updates of Windows
Frequently provoked System process activity with a load on a hard disk or a processor — getting and installing Windows updates. System in conjunction with active processes Windows Defender Antimalware Service Executable and installation of updates Windows Modules Installer Worker can completely paralyze the computer. To absorb all system resources, this trinity sometimes does not even need the activity of third-party user programs. In this case, you can opt out of system updates automatically and take this process completely under your control. It will be necessary to periodically, for example, leave the computer on at night and manually start a search and install system updates.
In Windows 8.1, automatic updates are disabled in the Update Center inside the control panel.
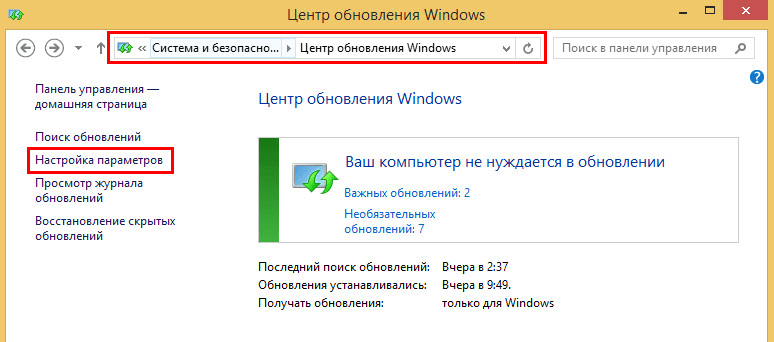
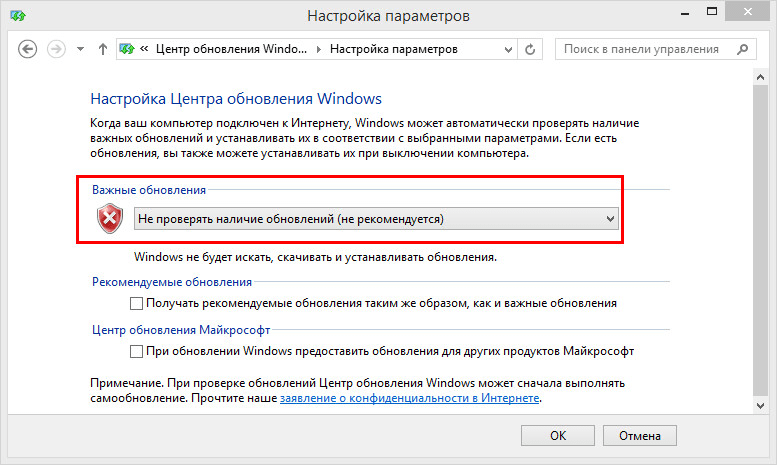
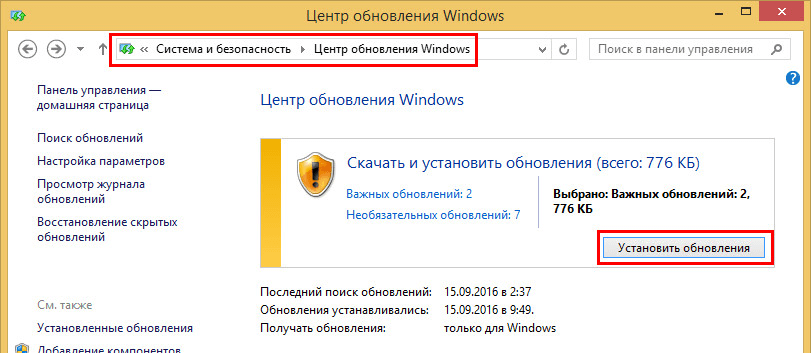
It also runs the search and install updates manually.
In Windows 10, the ability to completely refuse to install updates, which is present in early versions system, abolished, and instead, users received an alternative in the form of deposits at the time of updates that are not related to security.
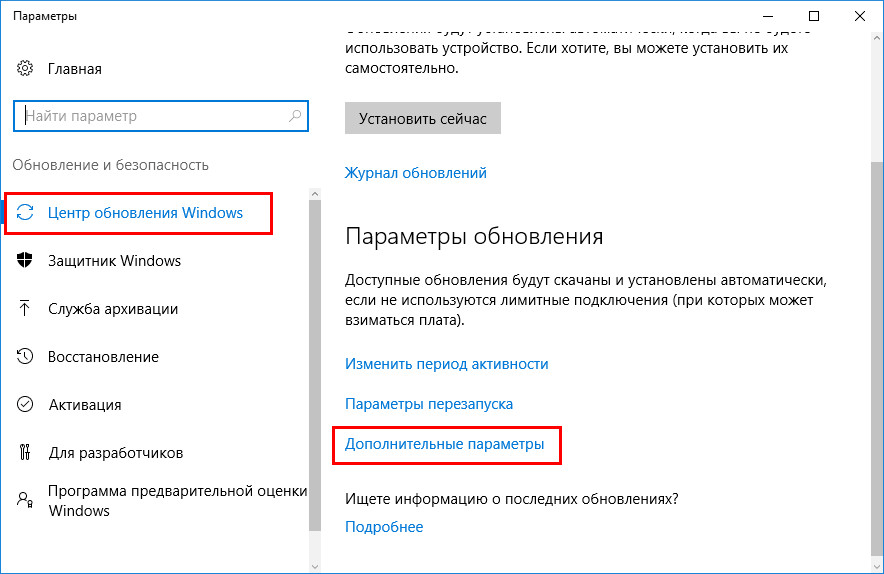
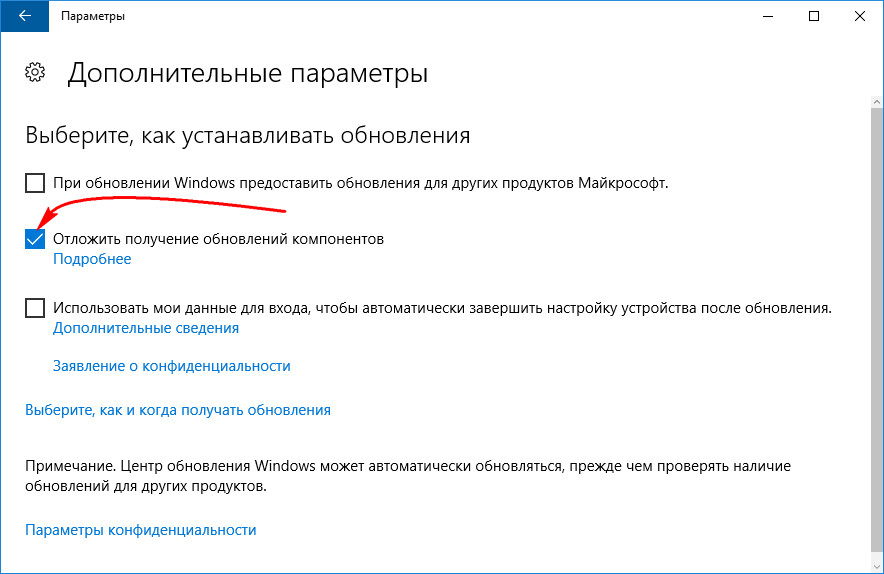
Completely opt out of Windows 10 updates by disabling system service Center windows updates. We select it in the “Services” equipment.
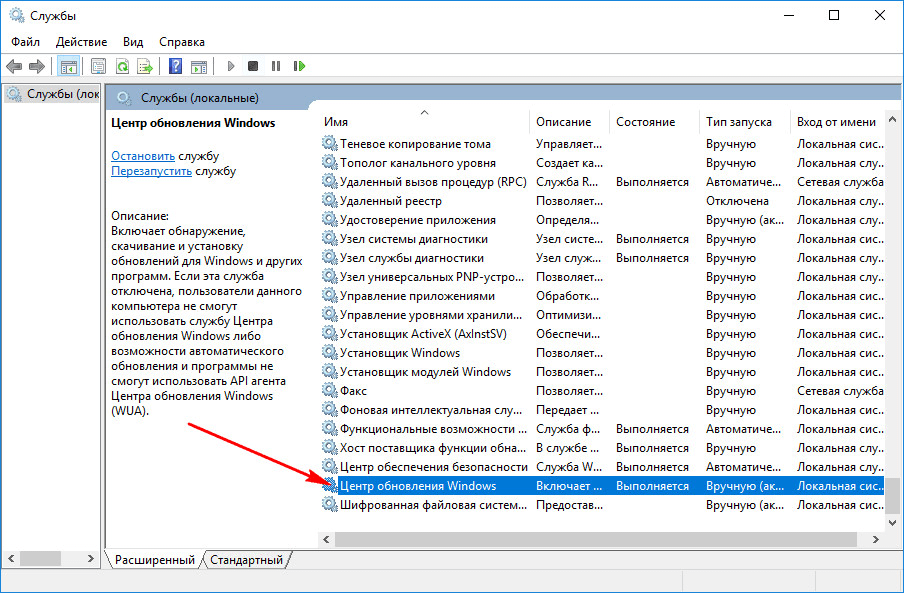
Stop, disable, apply changes.
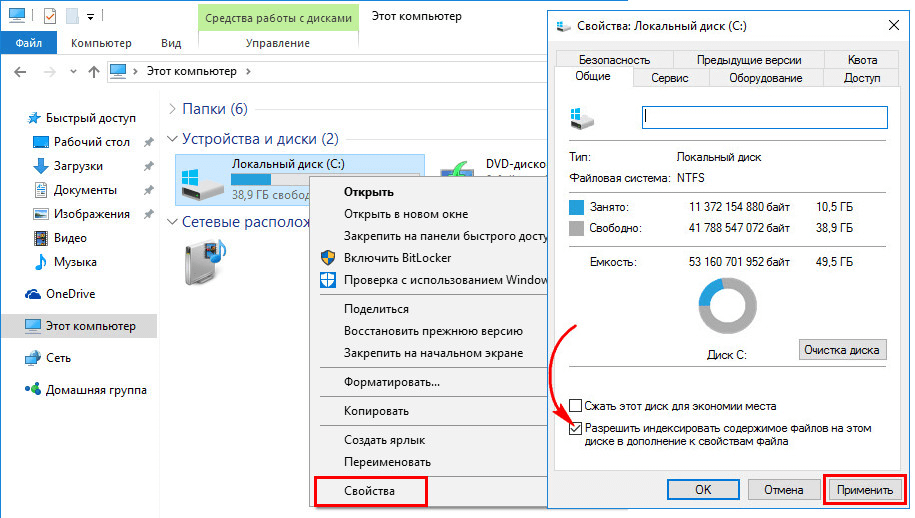
Disable C indexing
For the sake of computer performance, you can turn off the file indexing service. When searching for files for this operation will take more time, but the system will get rid of the constantly active process, which regularly uses the resources of the processor and RAM. In the "Services" snap-in, select "Windows Search".

Service stop, disable, apply changes.
![]()
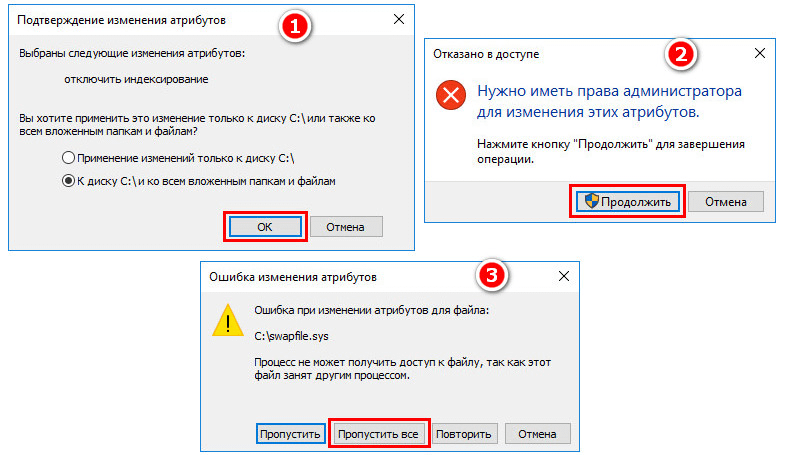
In the appeared window, we indicate the second item - “To disk C: \\ and to all subfolders and files”. Click "OK". Next, confirm the operation with the button "Continue". And when a window appears, notifies you of changes in attributes, click the “Skip all” button.
We are waiting for the operation to complete and restart the computer.
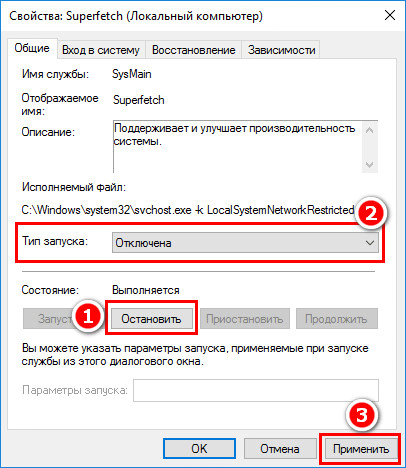
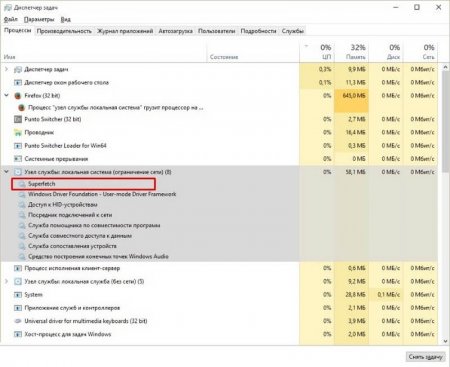
Disable Superfetch service
Appeared in windows version Vista SuperFetch service, which then migrated to all versions of the system, is designed to speed up the launch of programs and open files. This service keeps track of which programs and files the user uses most often, and loads them into RAM. Appearing in Task Manager as a System process (or “System and Compressed Memory”), the Superfetch service can actively access the hard disk and load it up to 100%. If you disable this service, it is possible that the launch of individual programs and files will be slower, but the background operations that prevent work with the computer as a whole will disappear. Superfetch should automatically shut down on computers with SSDs, since this service will reduce the usage resource. solid state drives. However, SSD manufacturers recommend checking this point and, if necessary, turning off the Superfetch manually.
To disable the Superfetch, run the registry editor. Enter the query in the internal search field or the Run command:
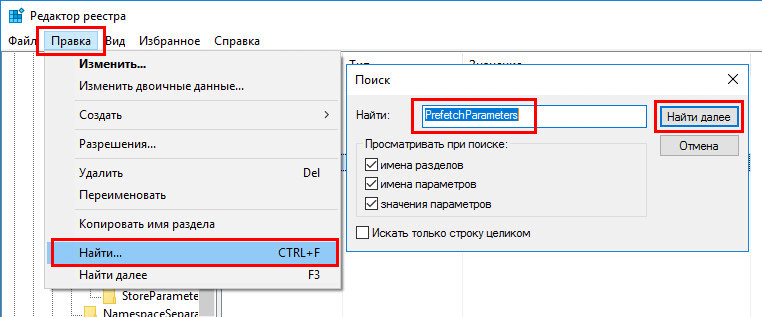
The search should result in a registry key:
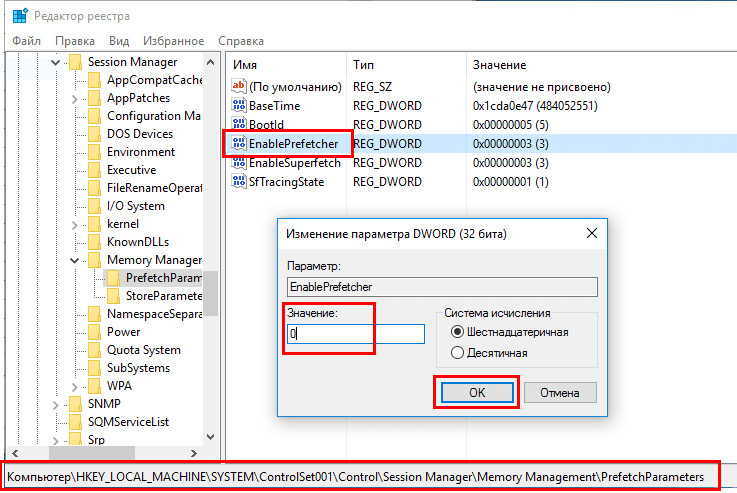
HKEY_LOCAL_MACHINE \\ SYSTEM \\ CurrentControlSet \\ Control \\ SessionManager \\ Memory Management \\ PrefetchParametersOn the right, double-click on the “EnablePrefetcher” parameter and set the number 0 in the “Value” column. Click “OK”.
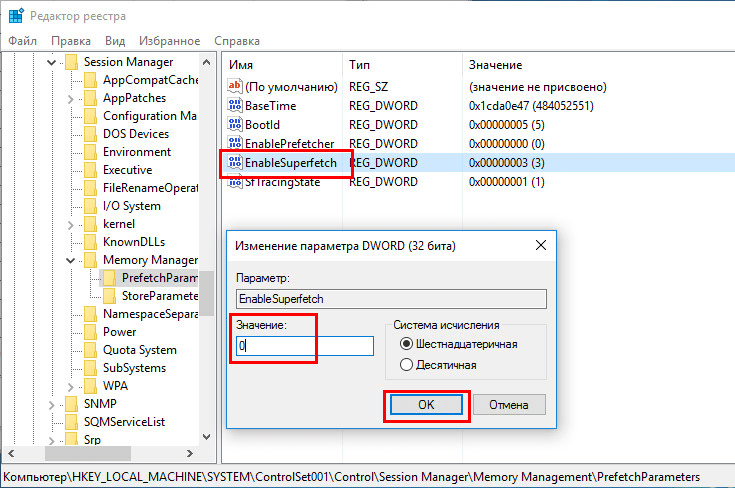
Also, the number 0 is set in the column “Value” of the parameter below - “EnableSuperfetch”. Click "OK".
Go to the "Services" snap-in and open the Superfetch service.
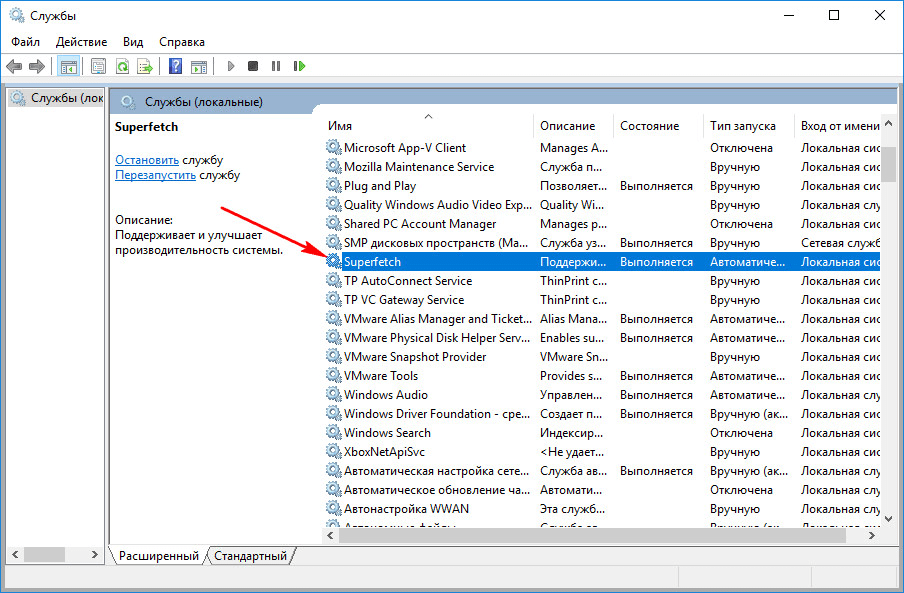
We stop the service, disable it, apply the changes.
Reboot the computer.
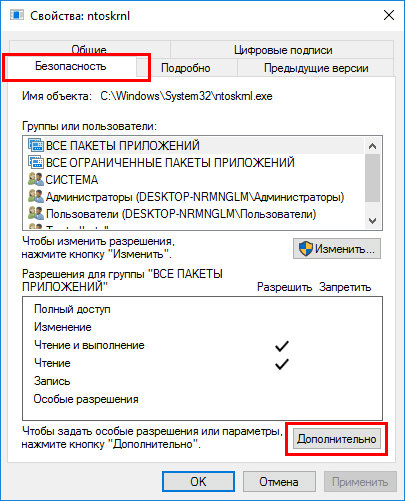
Full access to the System process with TrustedInstaller permission
On averaged and powerful computers The problem with the activity of the System process, which loads the processor or disk, can be solved after this process is accessed with trustedInstaller resolution. In the Windows task manager on the System process we call context menu, select "Properties". Switch to the "Security" tab. At the bottom, click the "Advanced" button.
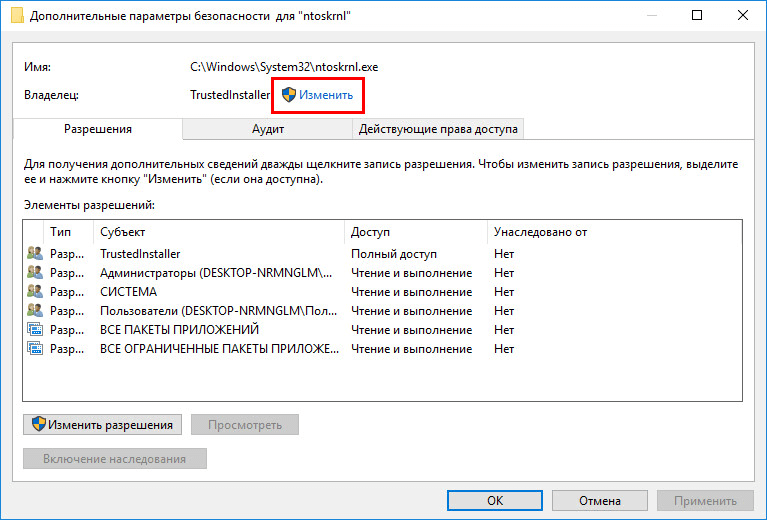
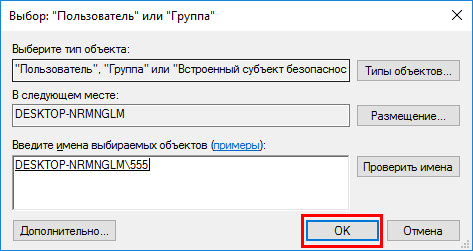
In the additional security settings window that opens, at the top, in the “Owner: TrustedInstaller” column, click the “Change” button.
Enter the username for local accounts windows records or address emailif used account Microsoft. Click the button "Check Names".
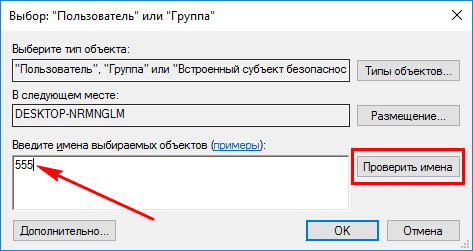
After checking click "OK".
Returning to the advanced security settings, click "Apply", then - "OK."
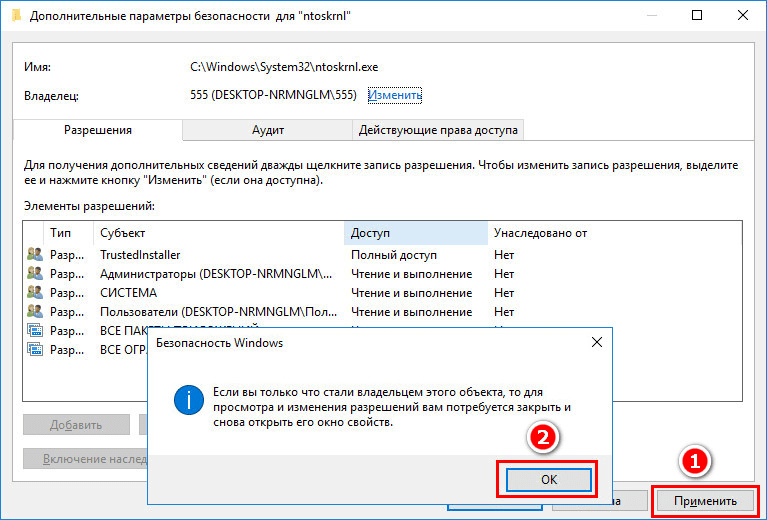
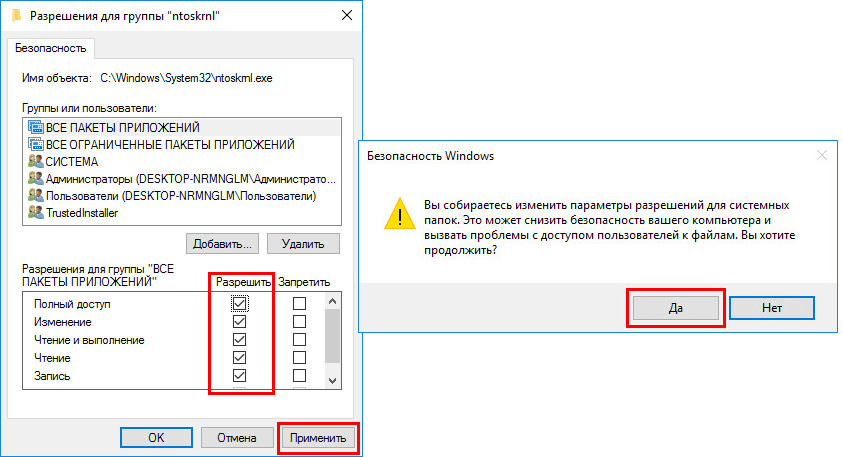
In the properties of the System process now click "Edit".

Below, in the column “Allow”, we tick off all the available parameters, as indicated in the screenshot. Click "Apply". And we confirm the decision in the window that will appear later.
Have a great day!
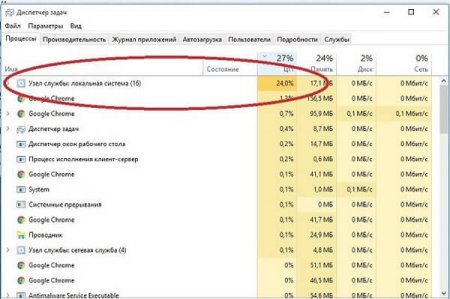
Have you ever played a game on a computer, or, doing paperwork on Windows 10, encountered the fact that you suddenly had strong brakes, and then you saw some kind of message about the service node and the local system? Fortunately, this problem can be solved!
This failure, podminayuschy a decent amount of power, can greatly interfere with the user in the work. Actually, then you will be able to find out what to do with a problem characterized by how - Service node: local windows system 10 loads a disk and the processor for 100%. It is often important to identify the so-called root of all lags, because failure can take a fairly large percentage of PC resources. But maybe you are lucky, and while such a problem you have not appeared, or you still have not moved to the "top ten", but the transition you have in the plans. We offer a closer look at the details of the problem and methods of its normalization.
Causes
Before you start looking for a way to solve the problem on your PC, it is useful to know what circumstances provoke it. It may be:
- Computer virus infection.
- Violation of the integrity of some OS files.
- A typical operating system failure.
- There is a problem with the software update files.
- Work resource-intensive anti-virus program.
Troubleshooting Methods
This problem has several solutions, and the easiest method is to reboot. This is the first thing to try. But what other ways are there?
- The second in complexity will be the system diagnostics for computer viruses.
- You can deal with the problem with the help of auxiliary software.
- In some cases, you should turn off the functioning "Update Center".
- You can deal with the problem with the help of the “Task Manager”.
- You should also diagnose the OS files for integrity and damage.
- Remove "broken" windows files 10.
- You can also disable the service "Superfetch".
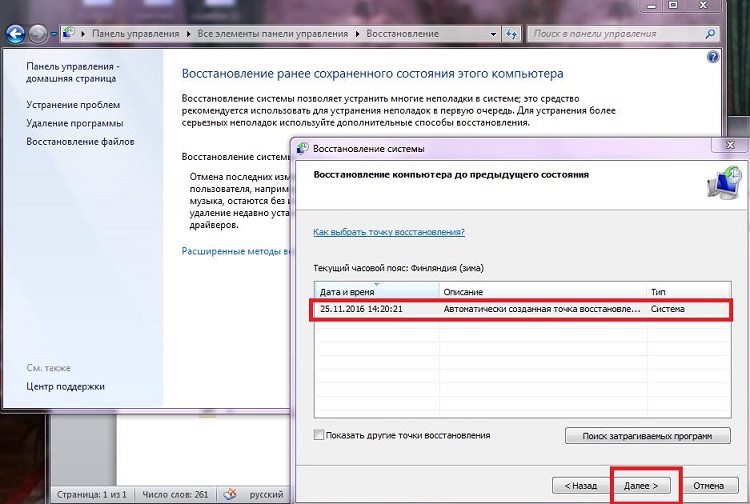
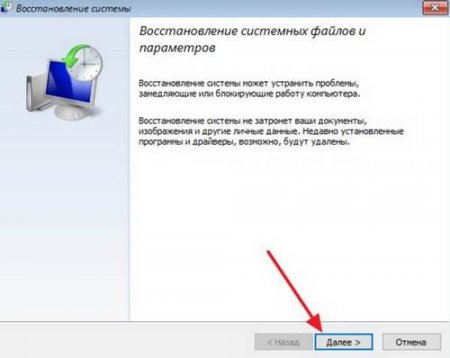
- One of the most obvious exits is the use of the System Restore function.

We offer to get to know them a little closer!
Before you begin to look at the solution methods in detail, you need to figure out how to activate specific teams and services.
- Command to execute "Windows" + "R".
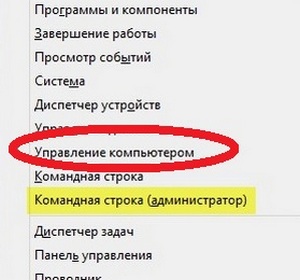
- Opening access to the "Command Line" on behalf of the administrator. Hover the cursor on the "Start" icon, press the right mouse button and find " Command line (Administrator)".
- Task Manager - a well-known shortcut key - “Ctrl” + “Alt” + “Delete”or press the right mouse button by hovering the mouse over the “Start” button and find it.
OS Reboot and Virus Check
If the situation is not "leveled" after a reboot, we start the program to remove viruses. But first, restart the PC, because in specific situations this may be enough. If it did not help, then you should check the computer with a reliable and proven antivirus. After scanning the system and removing all threats, you should reboot again.
![]()
Turning off the "Update Center"
For the execution of this technique, you must first get into the section called "Services".
Task Manager
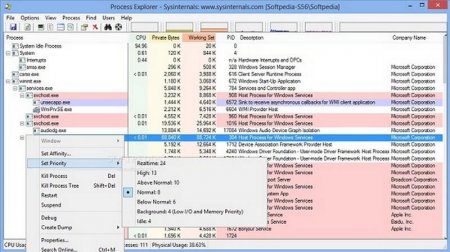
In this way, we resort to using the “Task Manager” to deal with incorrect system activity.
- Activate the Task Manager using any of the methods discussed above.
- In it, we need the Processes tab.
- Now you need to find, and then turn off (complete) it.
- When all three operations have been done, the final remains - restarting the system.
Diagnose system data for file damage
Remove damaged updates
Disable Superfetch
This service is responsible for speeding up the applications that are most often used by transferring some files to RAM, but this operation needs a lot of power.
- You again need to fall into the "Services" section (in one of the ways this process is described above).
- We are looking for by opening the menu by clicking on the name right click mouse - disable it.
- Restart the system.
- Through the "Start" button by clicking on its icon with the right mouse button, go to the "Control Panel".
- In it, we should find a tab called "Recovery".
- Inside it we are looking for the “Discovery of System Restore”.
- We select a convenient point to correct the data and make a return to the OS.
The use of additional software
Sometimes, to solve this problem, you should use auxiliary software. A sample of such tools can be. She is responsible for tracking OS loads. In a sense, it is similar to the “Dispatcher”, but it is distinguished by the fact that it is not only able to stop a specific process, but also the ability to suspend it for some time, and later restore its functioning. This software can be useful because it will allow you to win some power to solve the difficulty.
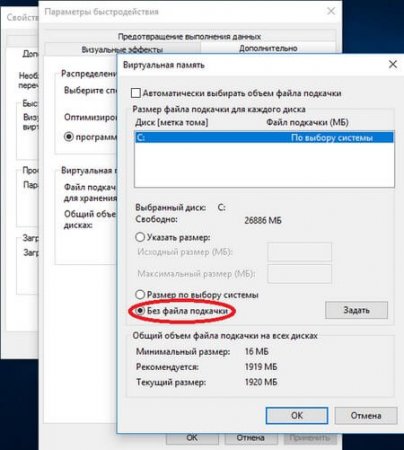
Disable paging file and fast download
In the first case, you will be required to terminate the functioning of the paging file. But this is done only if the amount of RAM on the computer is more than 2 gigabytes. If there is a smaller or equivalent volume, the condition may be complicated. If your computer allows you to deactivate the paging file, then follow the steps below.
- First you need to find the “Computer” icon, then right-click on it. The next step is to find the section "Properties".
- In it we go to the "Advanced" section, we need the "Speed" item, click on the "Parameters" button.
- In the resulting menu, go to "Advanced", there should find "Virtual Memory" and click on "Change."
- If necessary, remove the mark from the automatic selection of the size of the paging file.
- Set the line “Without paging file” and click on the “Set” icon, then click “Ok”.
Another way is to turn off the fast boot.
- To carry out this operation, you need to get to the "Control Panel". From there go to the "Power".
- There we will need the "Actions of the power buttons." In it we find the line of parameters unavailable at the moment.
- Remove the mark from the line of quick launch.
Conclusion
Now it was told about the reasons for which the "Service Knot" captures the available computer power. All sorts of ways out of the formed excesses were dismantled. Now, if you encounter such a problem, you know what ways there are to get rid of it. But it is worth remembering that the surest way to solve this problem is to prevent it from occurring. Update a functioning antivirus in a timely manner and check the system for threats a couple of times a month!
That's all! Leave comments, rate the article and share it with friends. Thank!