What does it mean to request permission from the trustedinstaller. Disable TrustedInstaller. Why the service consumes too much system resources
With the release of the seventh version of Windows, absolutely all users are faced with a problem when the system does not allow to edit, view or perform other actions with some files and folders, saying that this requires permission from TrustedInstaller Windows 7. What is this service, how to disable it and manipulate protected files, see below. So let's get started.
However, when you try to delete some files from your computer, the message “Access is denied to the folder” appears and says “make changes to this folder”. Looks like you still don't have the latest application in your operating system. A window similar to the one that appeared in step 4 will appear, and you need to repeat step 4.
Check Replace all child object permission entries with inherited permissions from this object. You can also apply these changes to other protected files to fully control them. But remember that you should always understand the likely consequences of your complete control and know what you are doing before taking any further action.
TrustedInstaller Windows 7 - what is it?
The component itself first appeared in Windows 7, after which it migrated to the eighth and tenth modifications, so the proposed solutions can equally be applied to them. But first, let's stop at the service itself? In the simplest sense, TrustedInstaller is a kind of virtual user who “selects” the rights of ordinary users and administrators for unauthorized interference with the structure of system files, preventing them from making random or intentional changes affecting the stability of the OS.
To give you full control over a file or folder and stop a potential message “You need permission to perform this action,” you must first take ownership of the current owner and then give yourself permission to read, execute, or change.
There are several ways to take control and give full control over files or folders, and doing it manually using the Properties tab is a dozen or more steps that can be complicated and time consuming. Here we will list 6 free tools that allow you to own folders and files and give you complete control so that you can get or change them. Take the owner's registry file. Although it is not a technically independent tool, one of the most simple ways ownership of files, folders, or even entire disks is the import of a simple command set into the registry.
The service operates on the basis of the Windows Resource Protection (WRP) technology, which protects the system directories, DACLs and ACL folders, registry keys and the corresponding files from being modified even at the level of the user having administrator rights.
That is why when you try to access and a warning appears that the file or directory is protected it is not difficult to understand if you refer to the security policies. Roughly speaking, it is a component of self-defense. operating system, which is a preventive means of preserving health when trying to intervene. However, despite all the limitations, it is quite simple to bypass such a lock. More on that later.
Soon a window will open command lineafter which you can access and open or move objects. Convenient feature - the ability to undo the change later after you have done what you need, or provided ownership of the wrong files. The "Cancel" button restores the original permissions if they were previously changed. However, the good news is that the installer is completely free of ads at the time of writing, so this is not a concern.
One plus is the inclusion of a pause option that keeps the command window open until you press a key. This can be useful for troubleshooting if you are not yet granted permission to access the file or folder. Property is a portable program with separate 32-bit and 64-bit executable files.
Why does the service consume too much system resources?
Many users complain that the TrustedInstaller service loads the processor to an incredible degree, making it difficult to execute user processes.

Yes, indeed, the load on system resources for active trustedInstaller process can be observed. As a rule, these are two situations: windows update and viral infection.
Editor's Note. If you were in a situation where you cannot for any reason change or delete a specific file or folder from your computer, followed by a message that says the following. It is also a kind of security mechanism designed to prevent you from removing any important components, be it by accident or on purpose. This is definitely useful featureespecially if you do not expect the computer, as it will not allow you to remove a potentially important element.
Now that this is the case, you do not have the right to rename, edit, or delete any of these files. If you want to do this, you will have to seize the property and in the steps below, we will show you in detail how to do it. Removing old versions can save you some space, but if necessary you will not be able to go back to old version.
If a user in the Task Manager sees that the TrustedInstaller is loading the processor too much, you should first try to complete this process and then perform a deep system scan for viruses, malicious codes, and any other threats. To do this, it is best to use an anti-virus package not installed in the system, but independent portable utilities like Dr. Web Cure It! or Virus Removal Tool "Kaspersky Lab."
TrustedInstaller: what is it?
You should now have permission to rename, edit and delete files after using the above mentioned method of mentioning. Be careful with the newly acquired power. Many users are looking for a way to solve this problem. Some have tried to turn off this process in order to save precious resources, but this is not very good advice, and we certainly do not recommend it. As you can see, although this is somewhat annoying, this process is important and should not be turned off.
![]()
The best solution would be to check using the Rescue Disk disk utilities, which have their own graphical interface, and the verification module is loaded before the operating system starts.
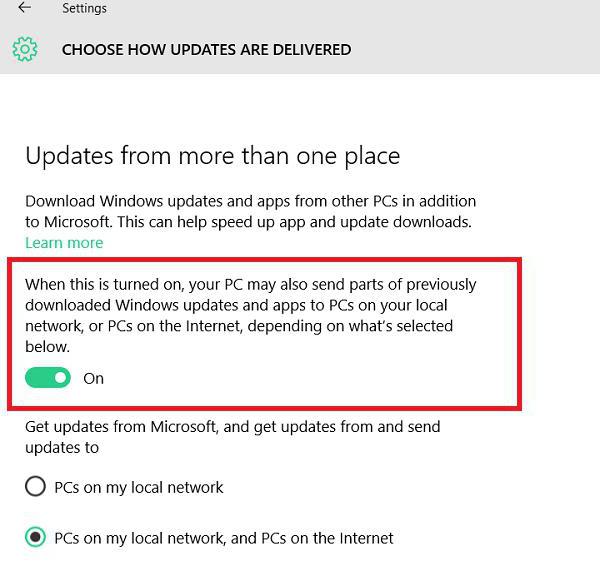
In the second case, in order to avoid increased load on system resources, you can simply disable the automatic update of the system in the "Update Center". As far as appropriate, decide for yourself.
Open the control panel and go to the System and Security section. Automatic installation of updates. Download the updates, but let me choose whether to install them. Check for updates, but let me select, download, and install.
What it is?
Then open the control panel again and go to the System and Security section. This time open “Administration” and then go to “Services”. Go to the General section, and then change its startup type to manual. If you want to turn it on, you will have to do it manually. However, remember that you will still need to support this process, because your system still needs to be updated to be as efficient as possible.
Component location
Now let's take a look at the TrustedInstaller software component itself. Where is this service located? The default location is the Windows system folder, which has a servicing directory.
The TrustedInstaller.exe file located there is an executable component. windows services Installer (installer modules). Often, it is not possible to start it manually, modify it, or perform any other actions with it. It has protection against deletion and substitution.
How to unlock TrustedInstaller from files and folders
Our guide will simply allow you to choose when best time to upgrade your system, not your computer, choosing it for you. To change something, you must have permission to full access. If you are locked again, you can use this method to fast recovery your rights. In any case, you must log in as an administrator. The program is installed and will be available in context menu as a function "Take the property."
Disable trusted installer - set permissions for full access
There, the “owner” is a trusted installer. Click "Edit" and enter your username, which you assigned to your account user in the field "Enter the name of the object that will be used." Then close the window.
Set permissions for full control
Often a mysterious account that needs to be deleted is included in the field “groups or user names”TrustedInstaller: how to disable the service?
Now directly on disabling this component. We presume that the user understands all the consequences of deactivating the TrustedInstaller service. How to disable it? The whole process boils down to getting absolutely all the rights in the system for changing files and folders.
So, selecting the desired file, right-click and call the properties line, where in the new window on the security tab, click the Advanced button.
To do this, click "Edit", and in the next window, click "Delete." Then you must add different permissions for full access. To do this, click "Add" and add permissions. The next screen shows where the permissions should be added.
This is especially annoying when you move your system to a new one. hDD and want to remove the old one. Power permissions: in order for you to have full access to files and folders, you must actually take responsibility for the object and “Properties, security, advanced, owner”, and then provide “Full Control” in the “Permissions” section. However, since you are not authorized to change property rights or rights, this fails. However, entering complex commands manually is cumbersome and error-prone.

In the next window, we use additional parameters and go to the owner's tab, where we use the change from TrustedInstaller to the admin group. Confirm the changes by clicking the "OK" button. In the pop-up message, do the same.
This is only half the deactivation of TrustedInstaller. How to disable the service for a specific file completely, it will be clear in the next step. To do this, go back to the properties window and on the security tab, selecting the administrators group, click the “Change” button.
If you then click on a locked file or locked folder in an account with administrator privileges right click mouse, you will find the new entry "Take the property" in the context menu. This means that you must agree with the user account management dialog box to get the actual administrator rights for the action. Depending on the number of files in the folder, the process may take several minutes.
You can then delete the file or folder as usual. Well, we know that you drew this user on your machine, and in this article we will tell you. This curious inhabitant of our operating system comes with the same and is part of its fauna. Reliable Installer, means in English "Reliable Installer", a curious name, is not it? Actually, install what is said for installation, install a little. Do not think that you have a tiny dwarf living on your car and installing weird things.
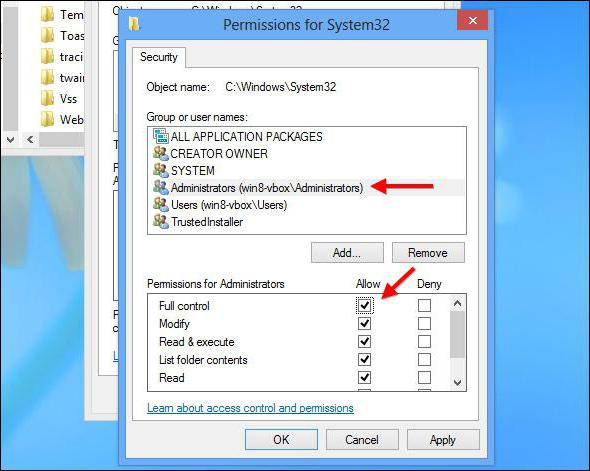
In the permissions window, tick all the items on the list and confirm the changes. All necessary rights are obtained. Accordingly, the file can then be deleted, moved, copied, or even modified.
How appropriate is a trip?
Finally, there is one more important moment related to the TrustedInstaller service of Windows 7. What it is, it is already clear how to deactivate a component - too. Naturally, a natural question arises: is it worth it?
By and large, the user who never accesses the system files, to deal with such procedures and it makes no sense. At best, you can only disable automatic system updates, so that TrustedInstaller does not load resources.
But when the specific is installed on the computer softwarewhich needs to be given access to changing system files and configuration, here comes the understanding of the specifics of the Windows 7 TrustedInstaller module. What is it? Permissive system, without obtaining the rights from which the program simply will not work.
Instead of the total
Finally, it can be noted that the TrustedInstaller component itself usually does not block user files or applications. Its main purpose is to protect system components. So there is no special point in deactivating the process. However, the load on the system is short-term (only for the period of installation of the system updates packages). In most cases, this will take a maximum of 5-10 minutes depending on the configuration and speed of the Internet connection. So you can suffer.
As for the permissions for the installed software, you need to be extremely careful and know that granting rights to perform any actions with system files will not cause any harm. Among other things, viruses that affect this particular component are often disguised as the original service and even have the same name in the process tree displayed in the Task Manager. But to determine the viral process can be completely elementary by the absence of a description or signature of the publisher, especially if there are several. But this is a big rarity. If you have a sufficiently powerful antivirus software at the entrance of infection, you can not be afraid. Yes, and the component itself has a fairly strong protection.
Hello, friends! Not so long ago when trying to make changes to system files I am faced with this situation. The system protection worked, which blocked the ability to delete / edit, despite the fact that I had full administrator access. I found a way out and I want to tell in this article how to remove Trustedinstaller in Windows 10.
This technology appeared in XP. Its purpose is quite logical. After all, if an inexperienced user accidentally deletes or changes important files, it can harm the system. Accordingly, protection against such careless (or deliberate) actions is necessary. But I know what I'm doing. And do not try to stop me!
What is TrustedInstaller.exe? This is a process that constantly runs in the background and loads the processor. Accordingly, it can be turned off if you are sure that your manipulations will not lead to a disastrous result. Now I will tell you what to do if an error message appears asking you to request permission from the above service.
Granting permissions to folders and files
If you want to delete certain directories or files, but receive a notification about the lack of access, you should get full rights to manage these resources. By default, all important data is “owned” by TrustedInstaller.
Immediately emphasize that the following instruction works not only in the “top ten”, but also in all previous windows versions. Go!
- Open the properties window of the desired object that you want to delete or rename. To do this, right-click on the file / folder and select the very last item in the context menu.
- Go to the "Security" section and click on "Advanced":

- Above will be listed the owner, who does not quite like us. So, click "Change":
- Further:

- To find all users of this PC, you need to select "Search". Sometimes this process slows down a bit, but it’s worth waiting for the results, choosing the right “user” and pressing “OK” once, and in the next window - again.

- Do not forget to tick the box below to change the owner:

- We confirm the changes "OK" and try to perform an action that was previously prohibited.
Many may say that there are other (simpler) ways to change rights. But I personally like this method. Not so difficult. Once done according to the scheme, remember the order and the next time you will be able to do everything with eyes closed. You can tell in the comments how you act in such situations.
But, there are cases when it is not enough just to do the above steps, you also need to install permissions. Trustedinstaller does not remove windows folder ten? Let's figure it out!
How to set permissions on folders and files
- Open the properties of the object (where they are, read the instructions above).
- Go to the already familiar tab of the security settings. And there we click on "Advanced" (remember, we already did that?). Only now we should add the user to the “white list” if he is not there.

- Through the search we find the subject and for it we give full access:
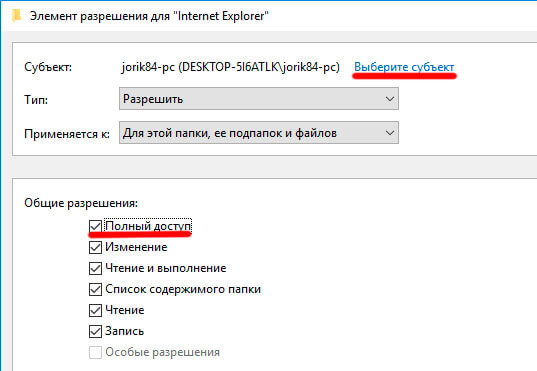
- After that, we return to the previous window and there we do not forget to put a tick next to the long inscription: “Replace all permission records.” (Located at the very bottom). Click "OK".
- Now we try to delete / change / disable the required object. Difficulties should arise. In extreme cases, restart the computer.
A little hint! If even after the implementation of my instructions, an error message appears, then try to remove the read-only checkbox in the properties of the folder or file.
By the way, you can use these step-by-step algorithms and for the reverse situation, when you need to install protection for certain resources so that no one can harm the system. This is very important if you work as a computer administrator and want to protect the fragile Windows OS from the “not-too-direct hands and curious minds” of your colleagues.
Sincerely, Victor!