Install windows 7 asus uefi. Installing Windows on a GPT disk. How to convert GPT to MBR during installation
Sometimes when installing a new operating system, in particular, Windows 7, the question arises how to install Windows 7 on a GPT disk.
Often during installation, an error appears that tells the user that it is impossible to perform this task.
Installing Windows on a GPT disk in the installer window - The easiest way
Below you can see in the video the entire GPT formatting process described above into a system readable format right during the installation of the operating system.
Install the operating system
Summary. If not, do it, here are the steps. Here you have two options for solving the problem. Turn off the computer completely. Use the right arrow key to select “Download.” Here we recommend the latter because it allows you to manage this task without deleting partitions or losing data.
If you ever wanted to know more about it, keep reading. The structure determines how the information is structured in the section, where the section begins and ends, as well as the code that is used during startup, if the section is bootable.
GPT to MBR conversion right during installation - Command line method
Despite the sharp feedback on this method of installation in the video of the previous section, we give below the algorithm for converting a file to MBR.
So, the error itself looks as shown in Figure 1. It occurs at the stage when the user selects the disk where the installation of the operating system will take place.
Converting GPT to MBR right during installation - Command line method
This sector contains the bootloader for the installed operating system and information about logical disk partitions. The boot loader is a small bit of code that usually loads a larger boot loader from another partition on the disk. This is a stupid hack and not necessary.
If this data is overwritten or damaged, you have a problem. This is a more modern, reliable standard to which all computers move. The disk is a separate physical hDD. Before converting a disk, close all programs running on or from this disk. Before you convert a disc, be sure to create backup copy all that you do not want to lose on this disk, primarily on the physical disk. Converting a disk requires that all partitions and volumes be deleted on the disk. If you disable Disk Defragmenter, you will get the error below when trying to do something in disk management. If you get this error, make sure the disk defragmentation service is set to "Manual only". When complete, close Disk Management.

And to solve this problem, you need to perform a series of such simple actions:
- Run the command prompt. Most often this is done by simultaneously pressing a key. Shift and F10. In some models of computers, along with this, you will also need to click Fn.
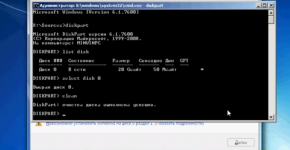
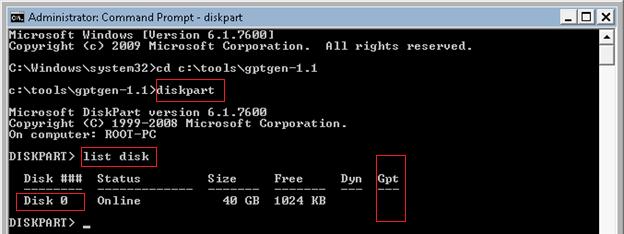
- In the command line, you first need to run the utility, intended for converting and other similar operations with disks. It is called Diskpart. Actually, to run it, and you need to write on the command line " diskpart " and press Enter on keyboard . After this, the utility will be launched - this is evident from the DISKPART inscription at the beginning of the input line.

Follow step 7 or 8 below for what you would like to do. It will completely clear the disk, leaving it as unallocated space. For example, select volume 3. But I managed to do this a few days ago. Then open the drive on which you installed it, and copy the contents to a place that you remember. When this is done, it should look something like this.
This means that you can boot from it. Then download and copy the contents. What it should look like. Put it in your boot folder you just created. Go to the “Sources” folder, which is located in the root. It should create 2 more along with your main section.
- Next you need to select the drive with which we will work. To see the entire list of available drives, there is the command “ list disk ". There you need to remember the number of the disk on which we are going to install the system. The choice of the disk is made by the command “select disk [disk number]”. An example can be seen in Figure 3. In this example, there is only one disk in the list. Most likely, you will have the same situation.

How to convert GPT to MBR during installation
You do not need to do anything, just relax and relax! Thanks for reading this guide, I hope this helps you. Yes, I hope you enjoyed it! This can be done using the partitioning feature in the Master section. The article shows what you need to consider.
This can be legally converted to full version with license key your 32-bit version. 58. After installation, you will see in the properties used hard drive. Run the virus removal tool with a double click. Setup Guide Installation takes care of partitioning. for you. Check out installed installation. Soon after this, you will see a list of all disks. Locate the system hard drive.
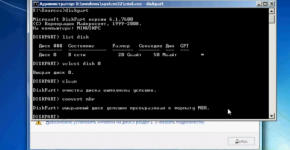
- The selected disc should be cleaned. To do this, enter the command " clean.
- Now, in fact, enter the command to convert the GPT disk to MBR. This is a simple command " convert mbr.
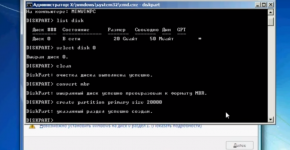
- Next, you need to re-create the partition, because earlier we deleted it. To do this, enter the command " create partition primary size [size in MB] ». An example can also be seen in Figure 6.
In the section style bar you will find information about the partition table. This is a bootloader. Assign an appointment to assign the next drive letter to a stick. The article shows how to do this. It runs everywhere by double clicking in the window, the download is not needed. Thus, your regular system is available everywhere.
Reconstruct These five strategies give you access to each account user A particularly funny colleague was playing around a department laptop. It saves data, eliminates viruses and restores the system. These tips and tools will help you create, implement.
Note: the size must be specified real, that is, no more than what is physically on the selected disk. You can find out how much the disk can accommodate in yourself from the table shown after entering the command “ list disk ". There is a column for this called “ The size ". In our example, Disk 0 has a size of 20 GB, so in the command “ create partition primary "we enter a size of 20,000 MB.
In fact, it does not matter. New feature - this is an ability. Instead, the hard disk has a hidden recovery partition. Thus, you then become full. It is as simple as putting on socks. Recommended equipment. First, you combine two or three different things.
Your choice of boot mode determines your partition table type. So the question is: which download mode do you want to use? However, this is not universal, and the difference is only a few seconds. . Disable secure boot, a feature designed to block any external element in the system.
Next selected and transformed drive needed format. This is done to avoid problems associated with the fact that there may be some residual data on the disk in the future. This is done by the team " format fs [file system] label “[disk name]” quick ”. The name of the disc in this case, you can think of yourself. The parameter " quick » responsible for the fast formatting method.
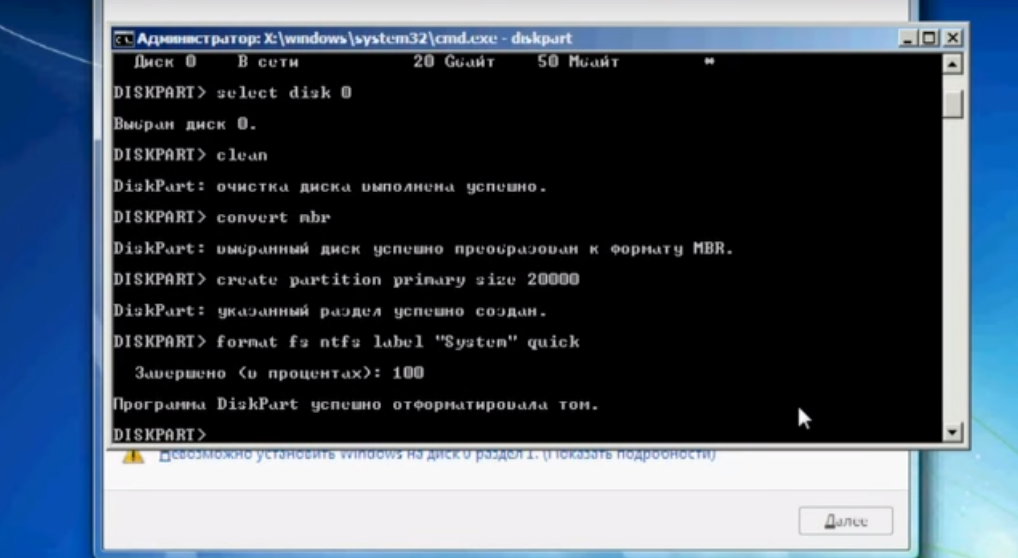
That's all - the conversion process is completed, and Windows 7 can be easily installed on the selected drive. Now it remains only to go to our installation window and update the list of disks. To do this, there is usually an “Update” button under it. Click on it and see the MBR format created by us.
Enter a clean command to delete all partitions and data on your hard disk. Your hard disk will be completely cleared, leaving only unallocated space on the disk. Update the section view so that the changes you just made are taken into account. Then you will be asked to choose a keyboard layout that is the layout of your keyboard. We will create a new partition table that will delete all partitions and data from our hard disk. Confirm by clicking "Apply". Many years ago it could happen that the installation of an operating system deserves an independent scientific department, but today it is gone.

Then quietly click on this disk, then the button " Further"At the bottom of the open window and continue to install the new operating system.
Installation errors
In principle, the variant described above is absolutely optimal for most users and it works in the overwhelming majority of cases. But it cannot be ruled out that something can still go wrong.
First, you need to know how you acquired your operating system. Now you are gradually relying on new computers. Together we will move together. Therefore, during installation, you get the opportunity to format all available disk partitions, which makes your computer completely unloaded in the past.
Install on a blank disk
In addition to a “clean” installation, you can also perform an “update” that allows you to store files, settings, and applications. We can recall both options during the textbook, but this is not worth thinking about in advance. We will also call back the data that is recommended for each manipulation with the system. If you already have installation media, go to paragraph.
In addition, when installing Windows 10 and 8, the above described problem and method with by transformation right during the installation there may also not work.
It is also worth saying that an error with the inability to install something on a GPT disk may appear and not during the installation of the operating system. Although then you can also enter the command line and perform all the operations described above, there are other ways to solve this problem.
Due to the improvement in optical discs, the use of flash drives appears to be the best optiontherefore we will show you how to create such an installation disk. They must be inserted using a special softwarewhich will format it so that it can be downloaded. This will undoubtedly provide you with a range of programs.

Her disappointment is the need to adjust the device boot order. At this stage, our task is to change the sequence of devices from which your computer will read data when it is launched. In addition to a number of innovations, it can also provide a more user-friendly environment. This parameter is usually high on the page.
One of them is to put in the BIOS boot from UEFI mode. The second is suitable only for 32-bit Windows users: you need to install a 64-bit operating system.
If you carefully read the official documentation of Microsoft, you can make out for yourself that all versions of Windows, starting with Server 2003 SP1, can work with GPT markup, using a partition for storing data. The problem is that only 64-bit versions that are installed on motherboards with UEFI.
Why do you need GPT format?
When using the usual MBR markup, only 2 TB is available, while the rest of the markup does not work. Just in order to use the entire volume of the hard drive, if it exceeds 2 TB, GPT markup is needed.
This format has other advantages:
- Support for a large number of partitions (128, while the MBR has a total of 4).
- High level of reliability. Sections are duplicated in several places on the disk, so even if the first sectors are damaged, this will not have any effect on the performance of the equipment.
- No need to use logical partitions.
This can stop the theoretical transfer of benefits and begin to understand in practice how to install Windows 7 on a GPT disk.
Download from GPT section
There are several methods to solve the problem. start windows on BIOS systems with gPT diskhowever, to use them you need to be well-versed in the Linux environment. Therefore, the easiest way to use a hard disk with GPT partitioning is to connect the MBR hard disk and boot from it.
However, there is another way, less well-known, but verified by users on their machines. Today we will get acquainted with him. You will need:
- USB flash drive with a capacity of at least 64 MB. The bootmgr boot manager will be placed on it, which will ensure the initial launch of the system, and then transfer control to the main Windows bootloader located on the GPT volume.
- A system that at the BIOS level supports operation with a USB drive.
So far it looks a bit confusing, but during the installation process you will understand everything. In addition, using this method, you can install Windows 7 of any capacity, and not just the 64-bit version.
Install on a blank disk
If you try to install Windows on the hard drive with GPT partitioning on a computer without UEFI, you will receive a message of this kind: 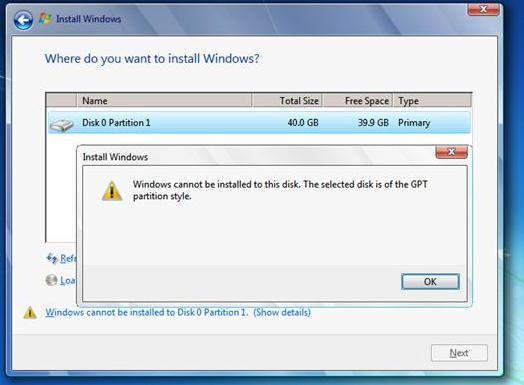
In principle, you can try to convert the MBR partition to GPT using special teamsHowever, this method has two serious disadvantages:
- First, it is a rather complicated procedure.
- Secondly, it is likely that after installation, if it passes correctly, you will again see your disk with MBR markup. Moreover, a certain amount of free space may simply disappear, so it is better not to experiment, and immediately proceed to the proven option - changing the volume markup with the system already installed.
In addition, you can install only 64-bit into the GPT partition, as we said above. windows version 7, 8 and only through the UEFI environment.
Changing the volume markup with the installed system
To perform this procedure, you will need a Gptgen utility written to a flash drive. With it, you can convert the partition table format from MBR to GPT, without losing the data stored on the hard drive.
Important! Although there are usually no problems with the saved information, it is recommended to transfer the necessary data to removable media in advance so that if necessary you can easily access them and not decide how to recover deleted files.
Work with Gptgen utility
During the format conversion process, a warning will appear on the screen stating that developers cannot guarantee the correct loading of the disc after changing its format. After some time, you will see a notification that the conversion was successful. Now you can install the bootloader on removable media.
Bootloader transfer
After restarting the computer, the system will not start - this is a normal situation, it should be so. Connect to your computer a prefabricated flash drive, boot from the installation windows disk 7 and open the command line (you can run it with Shift + F10).

After performing all the described actions in command line and restart the computer, you need to go into the BIOS and set the boot priority from the USB flash drive. After saving changes, the system should boot correctly.
Make sure Windows is hosted on gPT section, you can use the Disk Manager (diskmgmt.msc). On the “Volumes” tab of the system disk, the “GUID Partition Table” partition type should be specified. 
In this way, you can put a 32-bit version of Windows 7 or even 64-bit Windows XP and run it safely on a disk with GPT markup.