What to write windows to disk. Burn Windows to disk using Nero
Hello.
Quite often, when installing the Windows operating system, you have to resort to boot disks (although, it would seem, recently, bootable USB flash drives have been increasingly used to install).
You may need a disk, for example, if your PC does not support installation from a USB flash drive or when this way errors and OS are not put.
The same disk can be useful for windows recoverywhen she refuses to boot. If there is no second PC on which you can burn a boot disk or USB flash drive, then it is better to prepare it in advance so that the disc is always at hand!
And so, closer to the topic ...
What is needed disk
This is the first question that novice users ask. The most popular discs for recording OS:
- CD-R is a 702 MB disposable CD. Suitable for recording Windows: 98, ME, 2000, XP;
- CD-RW - reusable disc. You can write the same OS as on the CD-R;
- DVD-R is a 4.3 GB disposable disc. Suitable for recording Windows OS: 7, 8, 8.1, 10;
- DVD-RW - reusable disc for recording. You can burn the same OS as on DVD-R.
The disk is usually chosen depending on what OS will be installed. Disposable or reusable disc - it does not matter, it should be noted only that the write speed to one-time higher several times. On the other hand, is it often necessary to write the OS? Once a year ...
By the way, the recommendations above are given for the original Windows OS images. In addition to them, there are various assemblies in the network, in which their developers include hundreds of programs. Sometimes such collections are not for everyone. DVD disc fit in ...
Method # 1 - Record boot disk in UltraISO
In my opinion one of best programs for working with ISO images - this is UltraISO. And the ISO image is the most popular format for distribution. boot images with windows. Therefore, the choice of this program is quite logical.
To burn a disc in UltraISO, you need:
1) Open the ISO image. To do this, launch the program and in the "File" menu, click the "Open" button (or the key combination Ctrl + O). See fig. one.
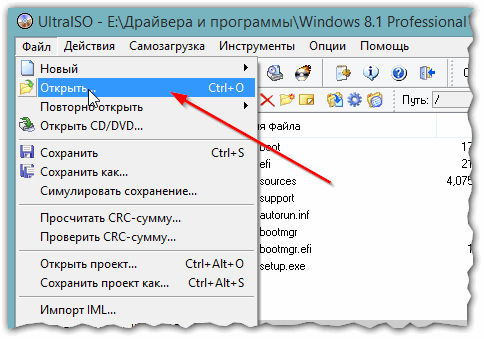
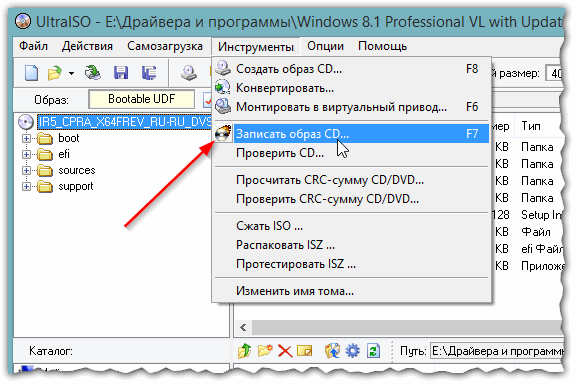
Fig. 2. Burn the image to disk
3) Then you need to choose:
- - write speed (it is recommended not to set the maximum value to avoid write errors);
- - drive (actual, if you have several of them, if one - then it will be selected automatically);
- - ISO image file (you need to choose if you want to record a different image, not the one that was opened).
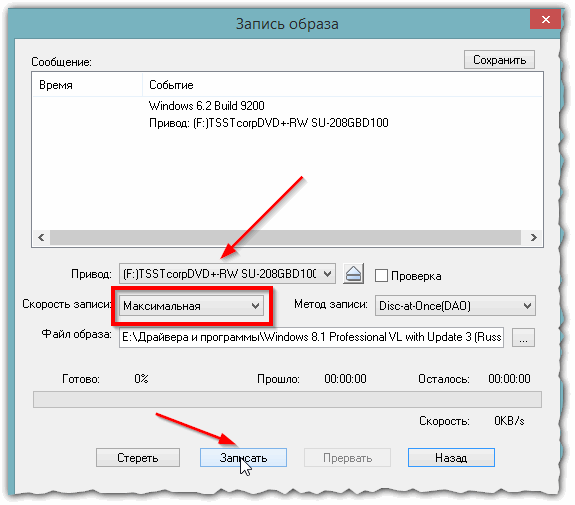
Fig. 3. Record Settings
Method # 2 - use CloneCD
A very simple and convenient program for working with images (including protected ones). By the way, despite its name, this program can record and DVD images.
Clonecd
Official site: http://www.slysoft.com/en/clonecd.html
To get started, you must have an image with Windows format ISO or CCD. Next, you launch CloneCD, and from four tabs choose " Burn CD from existing image file".

Fig. 4. CloneCD. The first tab is to create an image, the second is to burn it to a disk, the third copying of a disk (a rarely used option), and the last one is to erase the disk. We choose the second!
Specify the location of our image file.
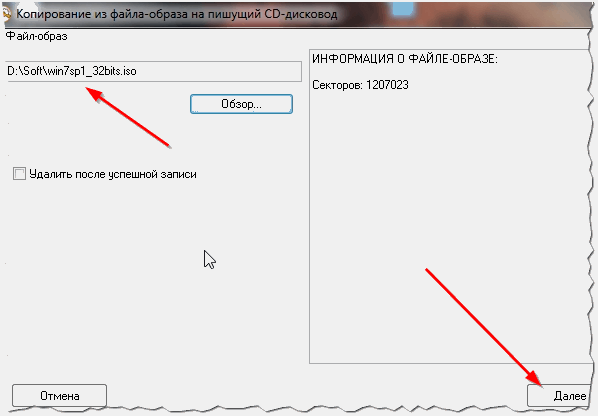
Then we specify the CD-Rom from which the record will be kept. After that we press write down and wait for about min. 10-15 ...
Method # 3 - Burn Disc to Nero Express
Nero express - one of the most famous programs for recording discs. To date, its popularity, of course, has fallen (but this is due to the fact that the popularity of CD / DVDs has fallen as a whole).
Allows you to quickly burn, erase, create an image from any CD and DVD. One of the best programs of its kind!
After starting, select the tab " work with images", then" write the image. "By the way, a distinctive feature of the program is that it supports much more image formats than CloneCD, however, the extra options are not always relevant ...
Operating systems are improving every year, but this does not mean that installed Windows serve you forever. Unfortunately, operating system crashes are not uncommon, and therefore you should always have a spare boot on hand. windows disk, which will allow just an hour or two to reinstall the system and re-get a workable computer or laptop. However to burn to disk Windows 7, you need to know a few rules and subtleties, which we will examine in detail in this article.
The usual way for us is impossible, because in this case we will get just a set of files that will not start the system installation at the right moment. Therefore, the disk need write down windows image 7 . The finished system image can be downloaded, or you can record it yourself using programs. UltraISO or Daemon Tools Lite. Please note that UltraISO it is distributed for a fee, and its demo version allows you to create only images that do not exceed 300 MB, which may not be enough to capture the image operating system. Therefore, we recommend that you use Daemon Tools Lite.
After the image is created or downloaded, we just have to write it to disk. In order to burn boot disk Windows 7we advise you to download free program Astroburn Lite, which is available for download on the official website of the developer.
1. Download and install Astroburn Lite
2. Go to the "Image" tab:
3. Using the "Explorer" look for the image of Windows 7 on the hard disk and specify the path to the image in the program.

4. Put the disk in the drive and select this drive in the program. When a disc is inserted, in the left part of the program window there is indicated the free space on the disc, as well as the volume that the selected image will occupy. If you put a blank disk of the required volume, then there remains only burn to disk Windows 7. If you put a DVD-RW with recorded files, you must first clear it. This operation can also be performed in Astroburn Lite.

5. In order to burn a Windows 7 image to disk, it remains to perform only a couple of small steps. First you need to select the recording speed of the disc. We advise you not to chase at high speed, but choose the middle one. And in order to verify the quality of the recorded image of the operating system, select the option “Check”. Note that the test takes a few more minutes after burning the disc.

As you see burn to disk Windows 7 It is not difficult, and in exactly the same way you can record the image of any other operating system. Also, some operating systems allow you to create a Live CD or Live DVD - media from which the operating system runs without installation. You can also burn a live CD using Astroburn Lite, and this operation is very similar to burn a Windows 7 imageBecause a live cd or live dvd is also created using images.
Burn boot disk windows 7 it is very important, because this simple and simple operation will help you to quickly restore your computer in case of any failure. Also, a disk with Windows 7 is needed after buying a new computer or laptop, which is often either sold without an operating system, or the default OS is uncomfortable or unusual for you.
If you have an operating file windows systems in ISO format, then create a boot disk is not difficult. Many users simply dump ISO files onto an optical disc, after which they do not understand why Windows does not start automatically in BIOS. The thing is that the image must be recorded correctly. Beginning with Windows Vista, Microsoft introduced the ability to work with the ISO format without additional software, however, to create such a file, you had better turn to programs with fine-tuning the image. The subtleties of creating a disk with Windows 7 and the recording process you will see in this article.
Creating an image for writing Windows 7 to disk
For starters, you need all the files for install windows 7 convert to disk image. Only then the resulting file is recorded on a CD or DVD.
The most common programs for creating an ISO are Daemon Tools and Ultra ISO. The principle of their operation is as follows: they take all the files that you need to convert, and are converted into a kind of archive, which imitates the assembled installation disk. Unfortunately, create an ISO embedded using Windows yet impossible. Therefore, install on your computer one of the proposed programs.
- Go to the official website of the Daemon Tools developer at https://www.daemon-tools.cc and select the Daemon Tools Lite 10 tab, as this is the simplest utility. If you need more features than just writing a boot disk, then refer to other tabs. This software is paid, however, you are given a demo version for a trial period.
- As soon as you download the installation file to your computer, proceed to unpacking and directly installing the program: it will take quite a bit of time, just follow the instructions on the screen.
- Open the software and select the "New Image" tab.

- Click on the link “Create image with data”.

- You will be in the ISO image creation window. Click on the plus icon in the upper right corner of the window to select the Windows 7 distribution.
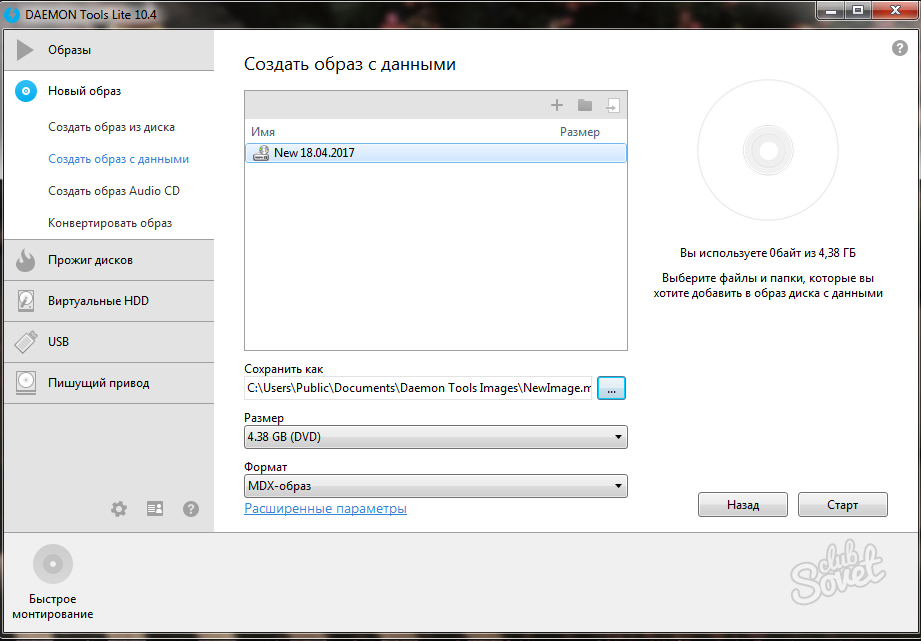
- Specify location folder installation files. After that click "Open".

- You will see the distribution at the top of the window. In the “Format” line, set the ISO value and click on the “Start” button.
Creating an image takes a couple of minutes, depending on the size of the file.
Once the procedure is completed, your file will be on your desktop, and you will be ready to start recording it.

How to burn Windows 7 to boot disk
You now have two choices:
- Using Daemon Tools Lite.
- Built-in software Windows.
How exactly to do this is purely your decision, however, it is worth noting that recording with embedded programs is much easier and faster, and with Daemon Tools it is more functional. Look at both recording options.
How to burn Windows 7 to boot disk via Daemon Tools
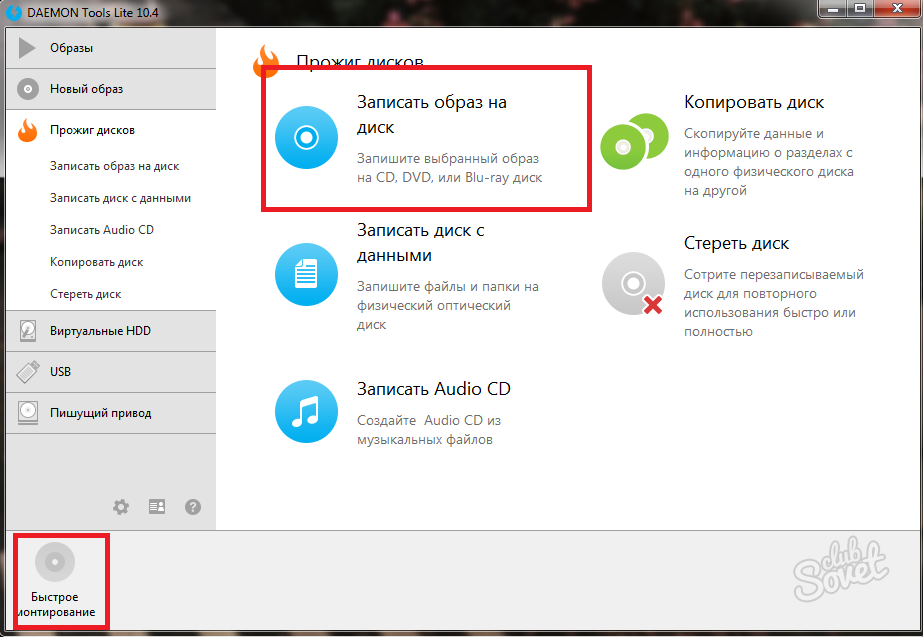
- Go to the program in the tab "Burn discs."

- You can choose the tab “Burn image to disk” or “Quick mount”.
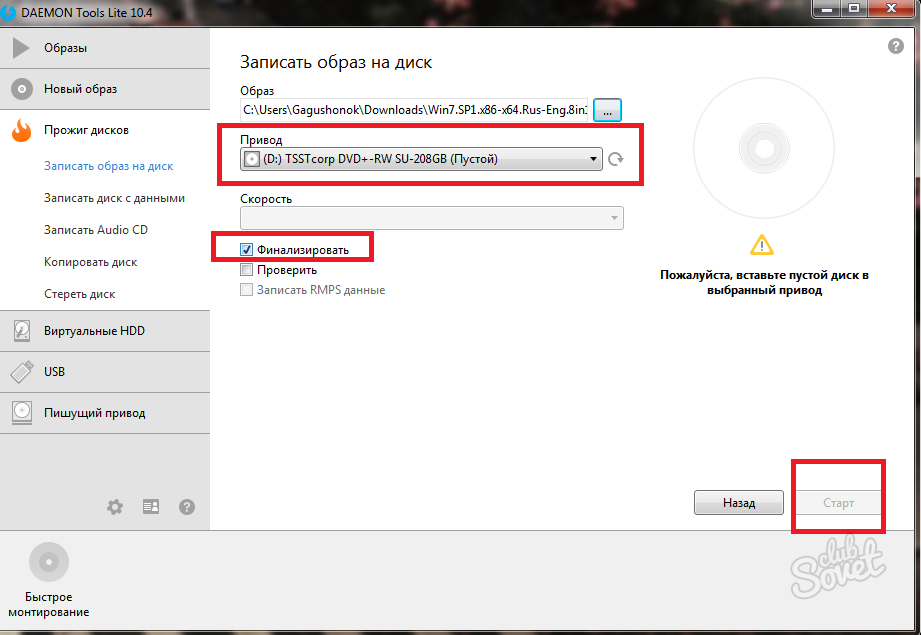
- Click on the three points next to the first row. So you can add ISO.

- Specify the folder with the location of the ISO image obtained with the operating system.

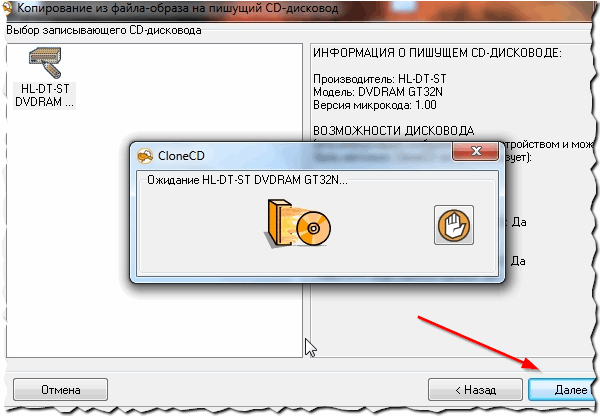
It remains to specify the following data:
- In the second line, put the drive, which is your DVD drive.
- Check the box next to the word “Finalize”.
- Click "Start".
Make sure your disk is inserted, otherwise the settings will fail.
Within a few minutes the image will be written to disk. When launched in BIOS, this file will open as an installation file.
How to burn Windows 7 to a boot disk using system tools
Built-in utility allows you to easily burn the ISO to disk, but to make any additional settings you can not.
- Click on Windows 7 right click the mouse.
- Select the line “Open with”.
- Find the item "Image Recording Tool windows drivesAnd click on it.
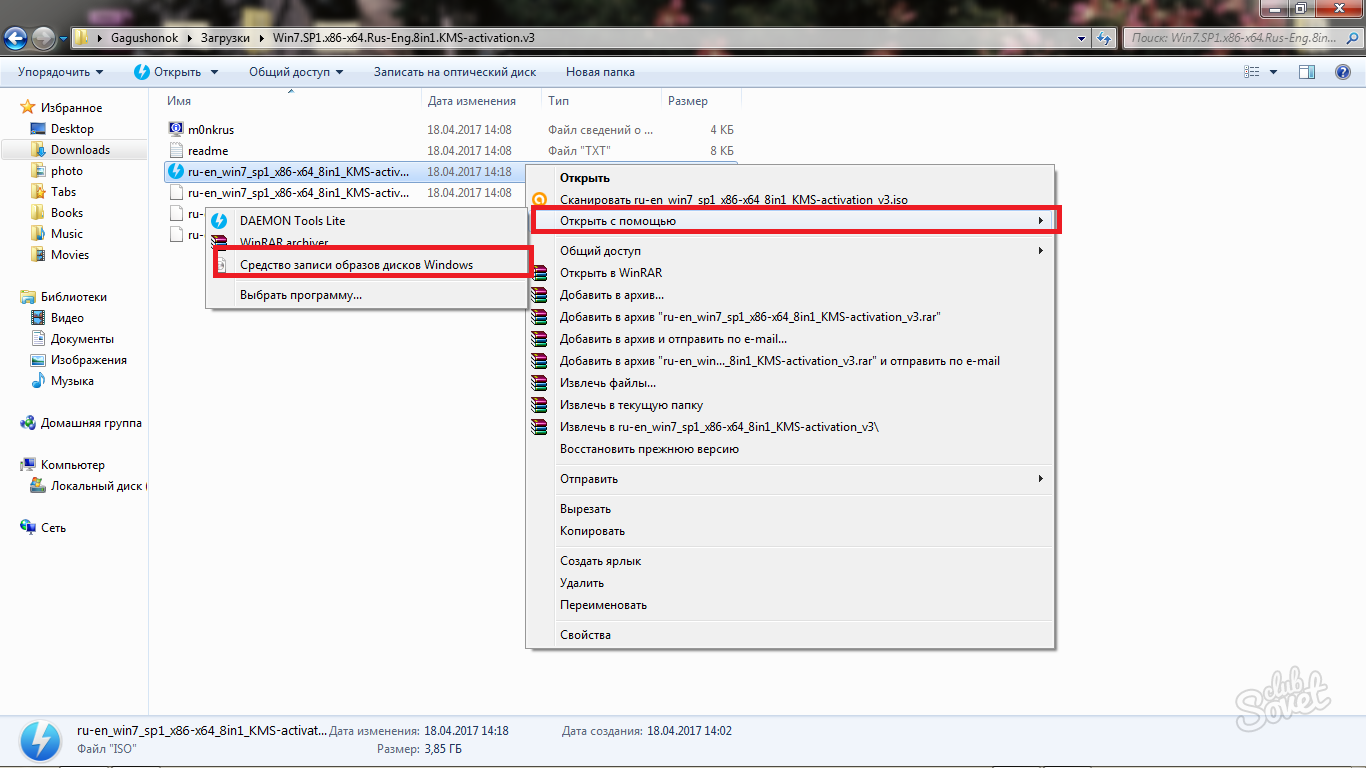
- You only need to specify the drive and put a tick next to the words "Check disk after recording."
Click "Record" and wait a few minutes.

Now you know that creating ISO systems and writing this file to disk is not difficult at all. If you are unable to install the Daemon Tools program, try contacting UltraISO, or simply download the operating system already in this format. Most of the discs with Windows 7 are written this way.
In order to create a Windows installation disk, you can use various programs. But most quickly this process occurs with the use of Nero and UltraISO software. How to write Windows to disk with their help, will be discussed below. In addition, will be presented alternative option. It involves the use of a disk image recorder for Windows.
Burn Windows to disk using Nero
You need to start this process by downloading the Nero program, if you hadn’t previously installed it on your PC. This can be done at this link. Then install it software. After that, you should be done preparing the Windows image. You can download it. Next, you need to put a blank disk in the drive of your PC, and then proceed as follows:
- Open the Nero program on your computer. In the main menu of the software, select "Save", and then click on "Burn image to disk." Now point the way to windows filethat you previously downloaded to the PC.
- A window will appear on the screen called “Final Record”. It is necessary to click on the arrow in its right side, as a result of which the settings will appear. In them, set the minimum possible speed for creating a disc, and then click on the “Record” button.
- When Nero writes Windows to disk, it displays the corresponding message on the PC screen. You will need to click on the "OK" button. After that, you can remove the finished disk from the drive.
Burn Windows to disk using UltraISO
You can create a Windows installation disk with UltraISO software. Download it by clicking this link. Then install the program and follow this instruction:
- Download the Windows image, and then click on the file once with the right button. From the pop-up menu, select the line “Open through the UltraISO program”.
- Install a blank disk of the required size (minimum 700 MB) into the disk drive. Then, in the main menu of the UltraISO program, select the “Burn” option. Then set the lowest speed for creating a disk: this is required in order for the data to be recorded correctly and no further disruptions in the functioning of the Windows operating system were observed. Then again click on the “Burn” button and wait until the process of recording the operating system image is completed.
Alternative way
If you have none of the previously announced programs on your PC and you do not want to download them, but you are using Windows 7 or Vista, you can use alternative way create an installation disk. To do this, you must act as follows:
- Download the Windows image on the PC. Find it on your computer and double-click it. Then the Windows Disk Image Burner application will open. You need to click on the "Run" button.
- Wait for the boot disk process to complete. A system message will notify you about this. Then you can use the finished disk to install the Windows operating system.
Here we downloaded from torrents or from somewhere else the required disk image in ISO format and we need to burn it to disk. Take your favorite program Nero and write, yes. Or some other kind of free CDBurnerXP, DeepBurner or whatever. However, there are special programs for this. Let's see how they can be used to burn our ISO image to disk in Windows 7.
ImgBurn program
Perhaps the first program that comes to mind when it comes to recording images is free. Imgburn. In essence, it’s a very handy little program with lots of useful features. With its help, the task of downloading Windows 7 as an image and writing to a disk becomes just kindergarten. In particular, it allows you to view the parameters of the disk, select the recording mode, record not only images and much more.
Overall, ImgBurn provides excellent and reliable way burn our ISO image to disk. Moreover, it can be used to simply write files and folders, check the quality of the disc, etc.
By the way, a useful nuance - in the window by the link above you can find a bunch of files for translating ImgBurn into any language. So do not forget to find the scroll page, find the field in the language table Russian and click on the button Click here to download the file Russification.
Install ImgBurn in the usual way. And pay attention - when installing, be sure to remove all the checkboxes in the window shown below, otherwise a mega-useless tag called the Ask Toolbar will be installed in the browser. Nafik-nafik this crap. The program will then ask if you need to be updated regularly and the installation is complete.
Now add the Russian language. The Russian.zip file obtained earlier must be unpacked into the ImgBurn installation directory in the Languages folder (C: \\ Program Files \\ ImgBurn \\ Languages). Then open the menu Tools\u003e Settings and in the field Language select Russian.
Now the program will change. As you can see, it consists of two windows. In the top you can select the desired mode of operation, and in the bottom will be presented detailed information. The bottom window, of course, can be closed, although the program will resist and warn that this window is very necessary. Not really, so decide for yourself.

As you can see, all the actions that can be done with ImgBurn speak for themselves. You can burn a disk image, create an image from a disk, check a disk, select files or folders and burn them to disk or create an image from files or folders.
The easiest way to use the program is to right-click on the disk image and select the command Burn using ImgBurn. Please note - there is a command in this context menu , which we will talk about later.

A new window will open. You can see the parameters of the optical drive (and select if there are several), activate the test recording mode, select the recording speed, etc. By default, you can do nothing, just click on the post icon below.

That's all. Click the button OK upon completion of the recording. In fact, ImgBurn program is capable of much, it has a lot of interesting features, so do not be lazy to read Help. But once we are interested quick way burn the ISO image in, on it for now and dwell. And separately Img Burn will be described later in the corresponding article.
ISO Recorder
This program is quite simple as a carrot, very small and is used exclusively for recording images. . On the page, select the version for Windows 7 x32 or x64.
Download ISO Recorder and install, there are no nuances when installing. The program after installation will be immediately in Russian - very nice.
Now the algorithm is the same. Click the right mouse button on the ISO icon and select the command Copy image to CD / DVD. A program window will open.
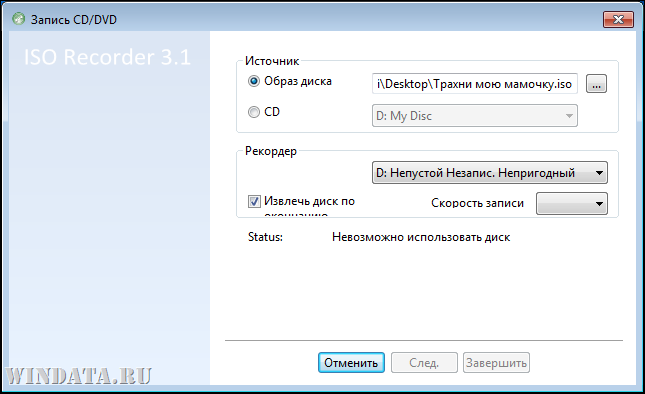
As you can see, in the program, everything is simple to impossibility. We have already indicated the disk image (or you can select it manually), indicate the recording speed and click on the button Track., then the recording will start. Simple and tasteful.
By the way, after installation iSO program Recorder replaces standard program image captures that exist in Windows 7. Therefore, from context menu the command will be gone . To return it you need iSO files reassign the association with the basic image recorder in Windows 7. You will find it known to everyone and who does not, in the site search site :)
Burn ISO using Windows 7
Well, this method is the easiest and available without installing any programs. In Windows 7, by default, there is a built-in tool for recording disk images, which can be called up by right-clicking on the image and selecting the command .

A window will open in which you need to select a disk recorder (your optical image) and click on the button Write down. Actually, everything :) You can also check the box Check disc after burning.

Now attention: a question in the studio. Why do I need to install other programs, if the recording of ISO images in Windows 7 is available initially?
The answer is very simple: not everyone trusts the Windows 7 writer. No, it is good. But sometimes limping (s)
Sometimes it happens. A man writes down without thinking iSO images built-in program in Windows 7, then safely spoils a couple of discs and ... looking for a better life.
Perhaps this is an accident. Probably no. However, there is a perception that the built-in recording tool in Windows 7 provides, let's say, not the best recording quality.
Therefore, if you do not want to play roulette and use a tool that (not necessarily, but possible) is able to spoil your recorded disc or image - use the programs described in the article. For example, the same program ImgBurn is just a miracle as good;) Known for its reliability and convenience in work, so we recommend.