How to transfer data from an old computer. The method of transferring data from the android to the iPhone.
When you buy (shiny or matte) the new iPhone 7 or iPhone 7 Plus, you will need to transfer data from the old iPhone 4s, 5, 5s, 6, 6s to your new iPhone. No matter what you use with iTunes and cable, or iCloud and the Internet, but the first thing you have to do is back up your old iPhone, and then restore everything to the new iPhone. The process is simple, but I will describe it step by step!
If you make an encrypted backup of the data of the old iPhone with using iTunesand then restore it to the new iPhone. All information will be transferred, including passwords. In addition, it will save a lot of time and effort in working with backup.
How to transfer data to a new iPhone using iTunes
You will need a Lightning cable or a 30-pin cable (if it is an iPhone 4S or an older model).
Depending on the size of backup copy, applications and music, will have to wait some time. Do not disconnect iPhone until restoration from backup is complete. Upon completion you can use.
How to transfer data to a new iPhone using iCloud
If you use iCloud cloud storage, you can take a backup copy of the iPhone from there, and transfer all the data on wireless network. For starters, it is better to start creating a backup manually before installing it on the new iPhone. It will be a guarantee that all the latest information has been archived and transferred. 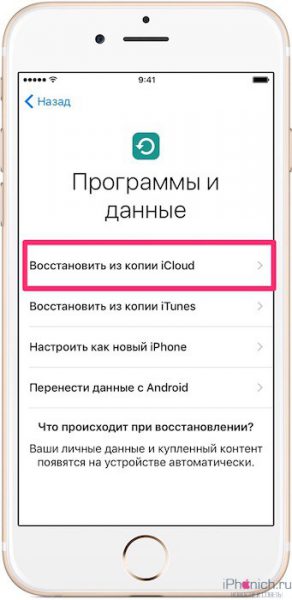
- Take your old iphone.
- Make sure your iPhone or iPad is connected to Wi-Fi. (If it is discharged, plug it in to charge.)
- Go to old iphone at Settings
- Choose an item iCloud
- Find and go to the point Backup
- Press on Create backup
- When the backup is finished, turn off the old iPhone
- Remove the SIM card from old iphone
Be sure to wait for the backup to complete before continuing.
- Install your SIM card in the new iPhone and turn it on.
- Start customizing it., choose a language, connect to a Wi-FI network.
- On the page IPhone setup select item Restore from iCloud copy
- Log in to your account iCloud. (Enter your Apple ID and password.) And click Further
- Choose last backup from the list and type iCloud password (if required)
Depending on how much data will be loaded, including music and applications, this will take some time. Be in the Wi-Fi area as much as possible to speed up the process.
Your iPhone may become very hot during the process, as well as the battery gets very hot during recovery. Do not worry, after recovery, he will return to his place.
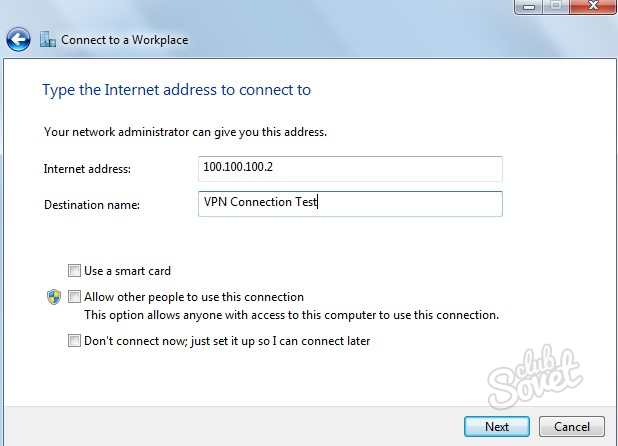
How to transfer data to a new iPhone from an old smartphone to Android or Windows
If you decide to switch from an Android smartphone or Windows phone, you can also transfer some data from it to the iPhone, although not everything, for example, you can not transfer applications.
- How to transfer data to iPhone from Windows Phone smartphone (in development)
Have questions about data transfer?
If you have any problems or any questions about transferring data to a new iPhone, ask them in the comments!
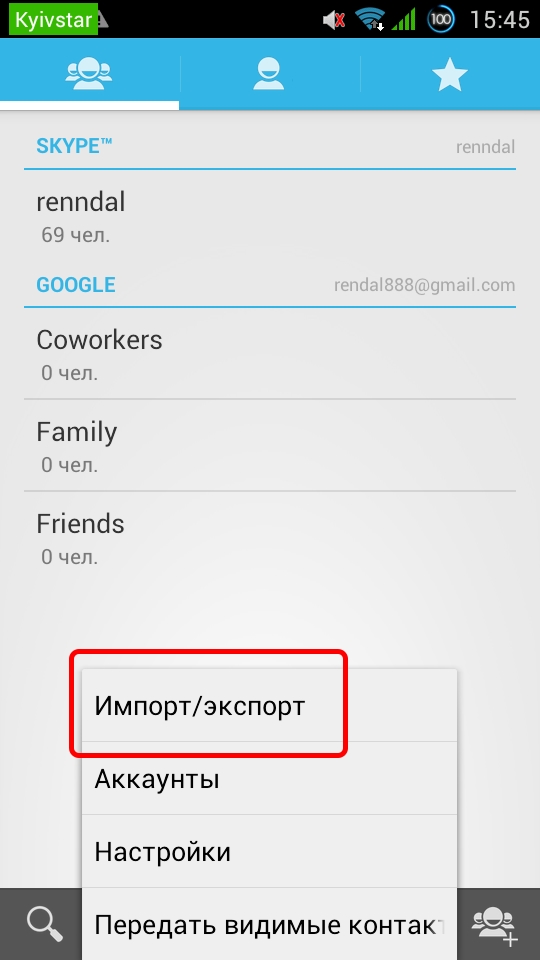
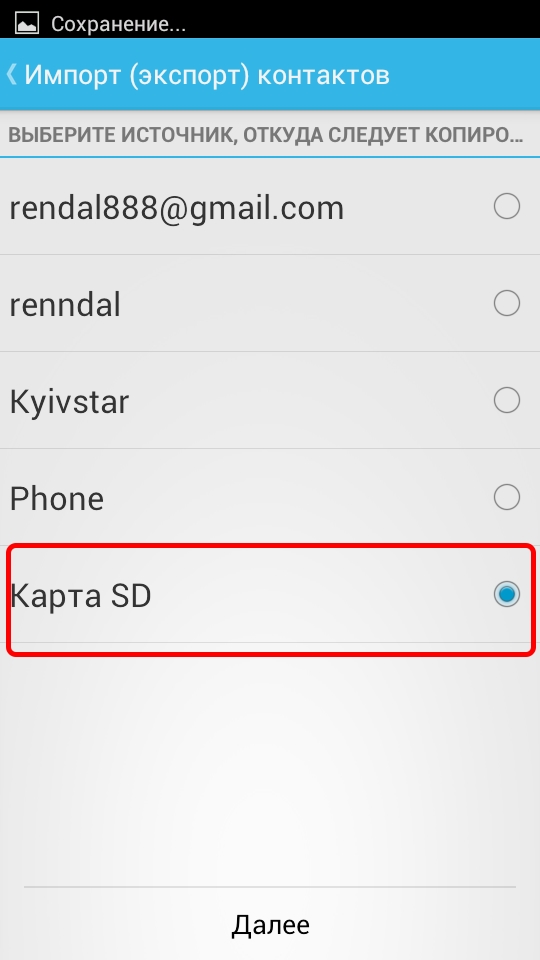
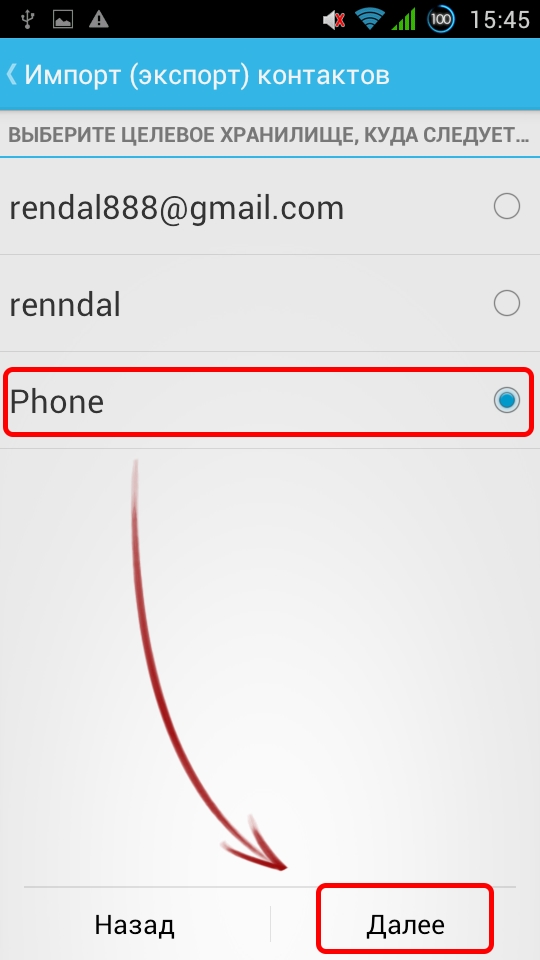
If you have appeared new iphone and you have a question how to transfer everything from the old iPhone to the new one, then in this article I will show how to transfer the programs and all the files from the old iPhone to the new one.
1. Create a backup in iTunes
First we take an old iPhone and connect it to iTunes by cable or Wi-Fi.
Then click on the iPhone icon in iTunes, scroll down to the backup copies item and click create a copy now.
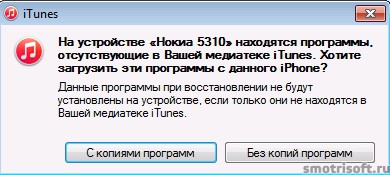
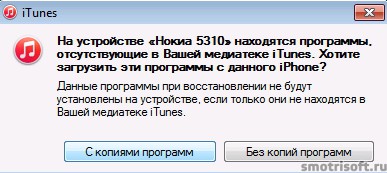
You will receive a notification. On the device "Here is the name of your iPhone" are programs missing in your iTunes library. Want to download these software from this iPhone? These programs will not be installed on the device during the restore, unless they are in your iTunes library.
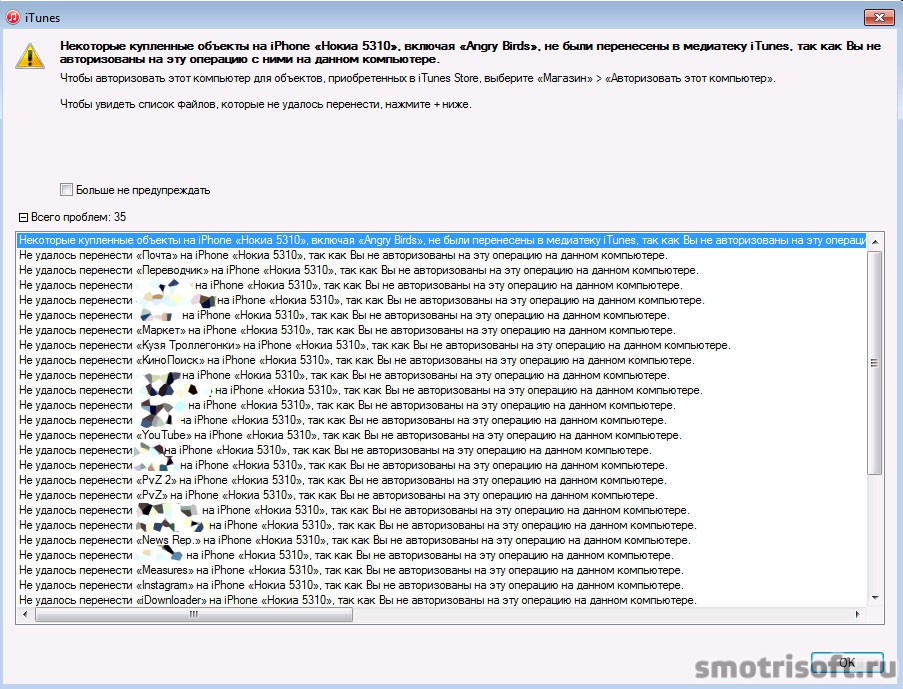
Can get out the error. Some purchased items on the iPhone, including the “program name here”, were not transferred to the iTunes library because you are not authorized to do this operation on this computer. To authorize this computer for items purchased from the iTunes Store, choose Store\u003e Authorize This Computer. To see the list of files that could not be transferred, click + below.
![]()
You can click on the + bottom and open the entire list of applications that could not be transferred from iPhone to iTunes.
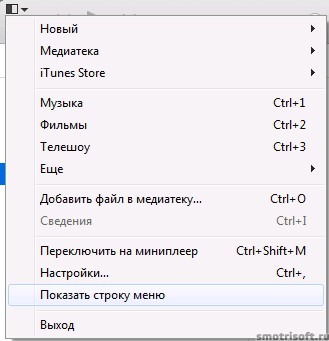
Now in iTunes, on the top left, click on the menu button\u003e show menu bar.

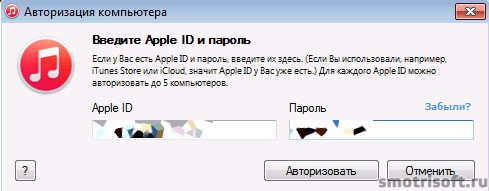
Now enter your Apple ID and password.
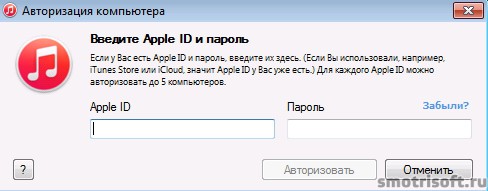
And click Authorize.
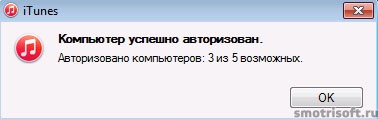
The computer is successfully authorized. Authorized computers: 3 out of 5 possible. In total, you can authorize 5 computers for transferring purchases from an iPhone to a computer in iTunes.
From the bottom in iTunes, click Apply.
Also click sync.
Now click create a copy now to create in iTunes a copy of the old iPhone and all its files, then to transfer to the new iPhone.
There may be a warning on the iPhone device, there are programs that are not in your iTunes library. Want to download these software from this iPhone? These programs will not be installed on the device during the restore, unless they are in your iTunes library.
Push with copies of programs. So that all programs are transferred to iTunes, in order to transfer them to a new iPhone.
The transfer of purchases from iPhone to iTunes begins.
After the transfer of purchases is over, we click to synchronize, just in case.
Backup on computer created. Now you can transfer all files from this iPhone to a new one using iTunes, since now in iTunes lies a copy of the files from the old iPhone.
All you need is a copy in iTunes to transfer files from the old iPhone to the new one, copy in iCloud just in case, as well as a copy of contacts also in case. After making a backup copy in iTunes from the old iPhone, you can proceed to the transfer of information to the new iPhone.
By the way, do not forget after you switch to a new iPhone on it , to protect your new iPhone from theft and hacking.
2. Create a copy from the old iPhone in iCloud.
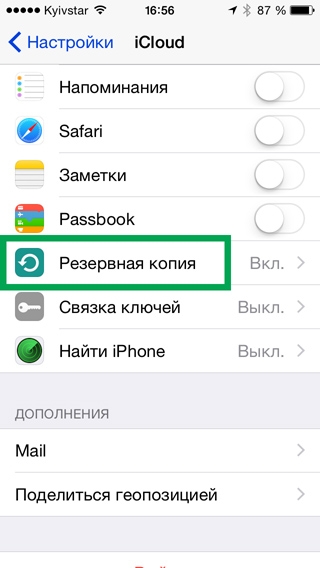
Now we take into the hands of the iPhone and go on the iPhone in Settings\u003e iCloud.
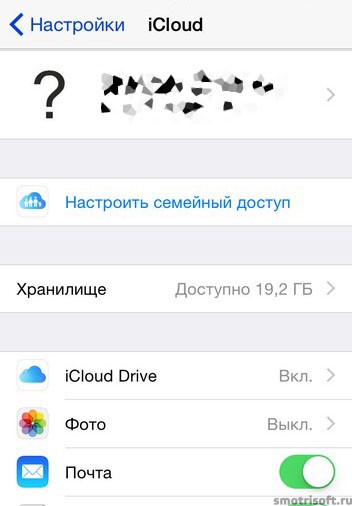
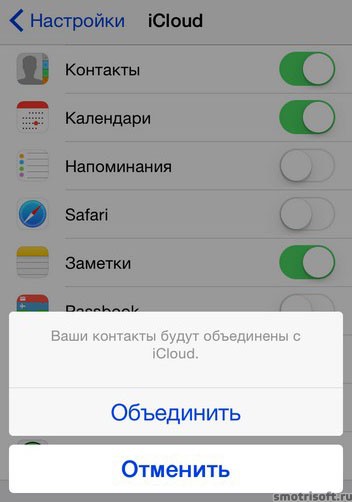
Scroll down to the Contacts item and turn it on if it is turned off.
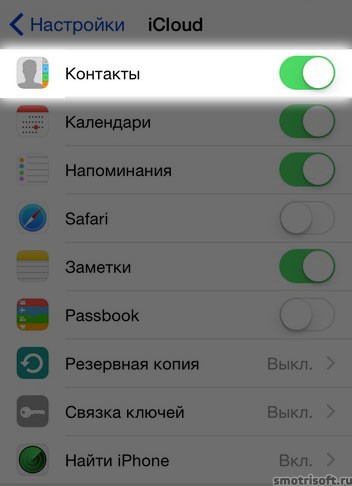
Your contacts will be merged with iCloud. Push merge. This will copy our contacts from iphone to iCloud, so that you can take them from iCloud, if you erase everything from iphone.
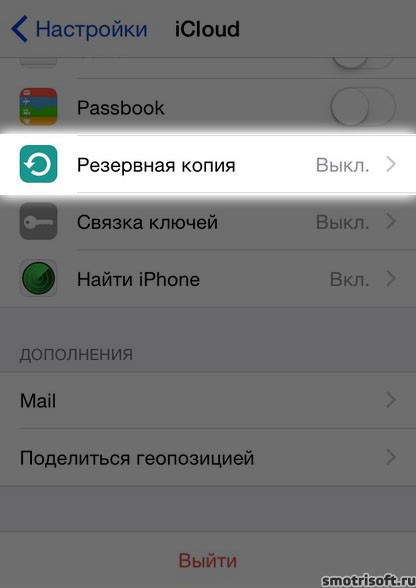
Now go to the backup.
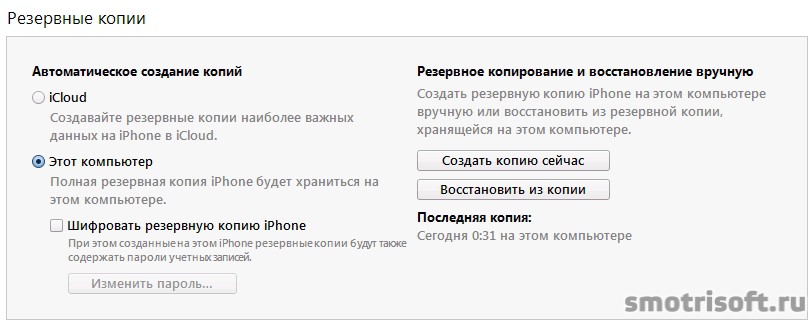
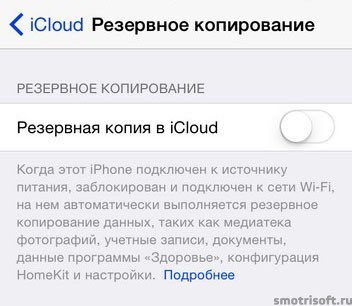
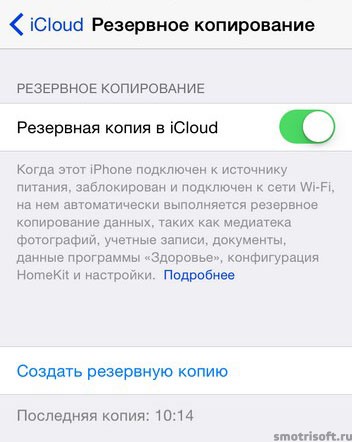
When the iPhone is connected to a power source, locked and connected to wi-Fi networks, it automatically backs up data such as photo library, user accounts, documents, Health data, HomeKit configuration, and settings.
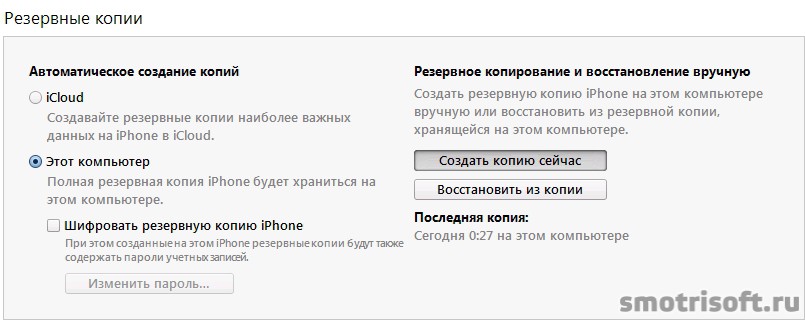
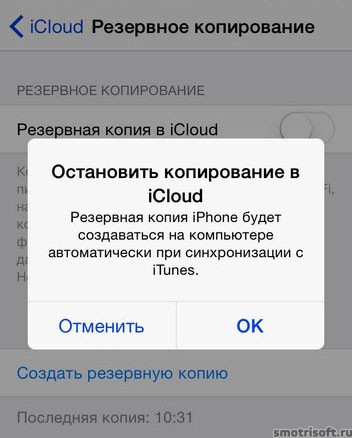
Backup to iCloud. IPhone backup will no longer be automatically created on your computer when you sync with iTunes.
Click OK.
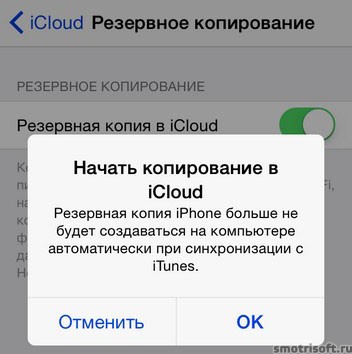
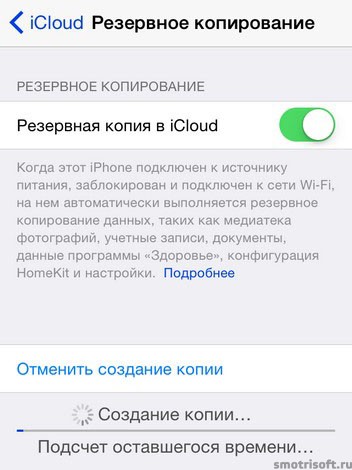
Now the backup will be made in iCloud click to create a backup.
The creation of a copy of all the files from the iPhone to iCloud begins, now we wait until the copying of data is finished.
Now, in the event of something unforeseen, you have a complete copy of the old iPhone and on your computer in iTunes and in iCloud.
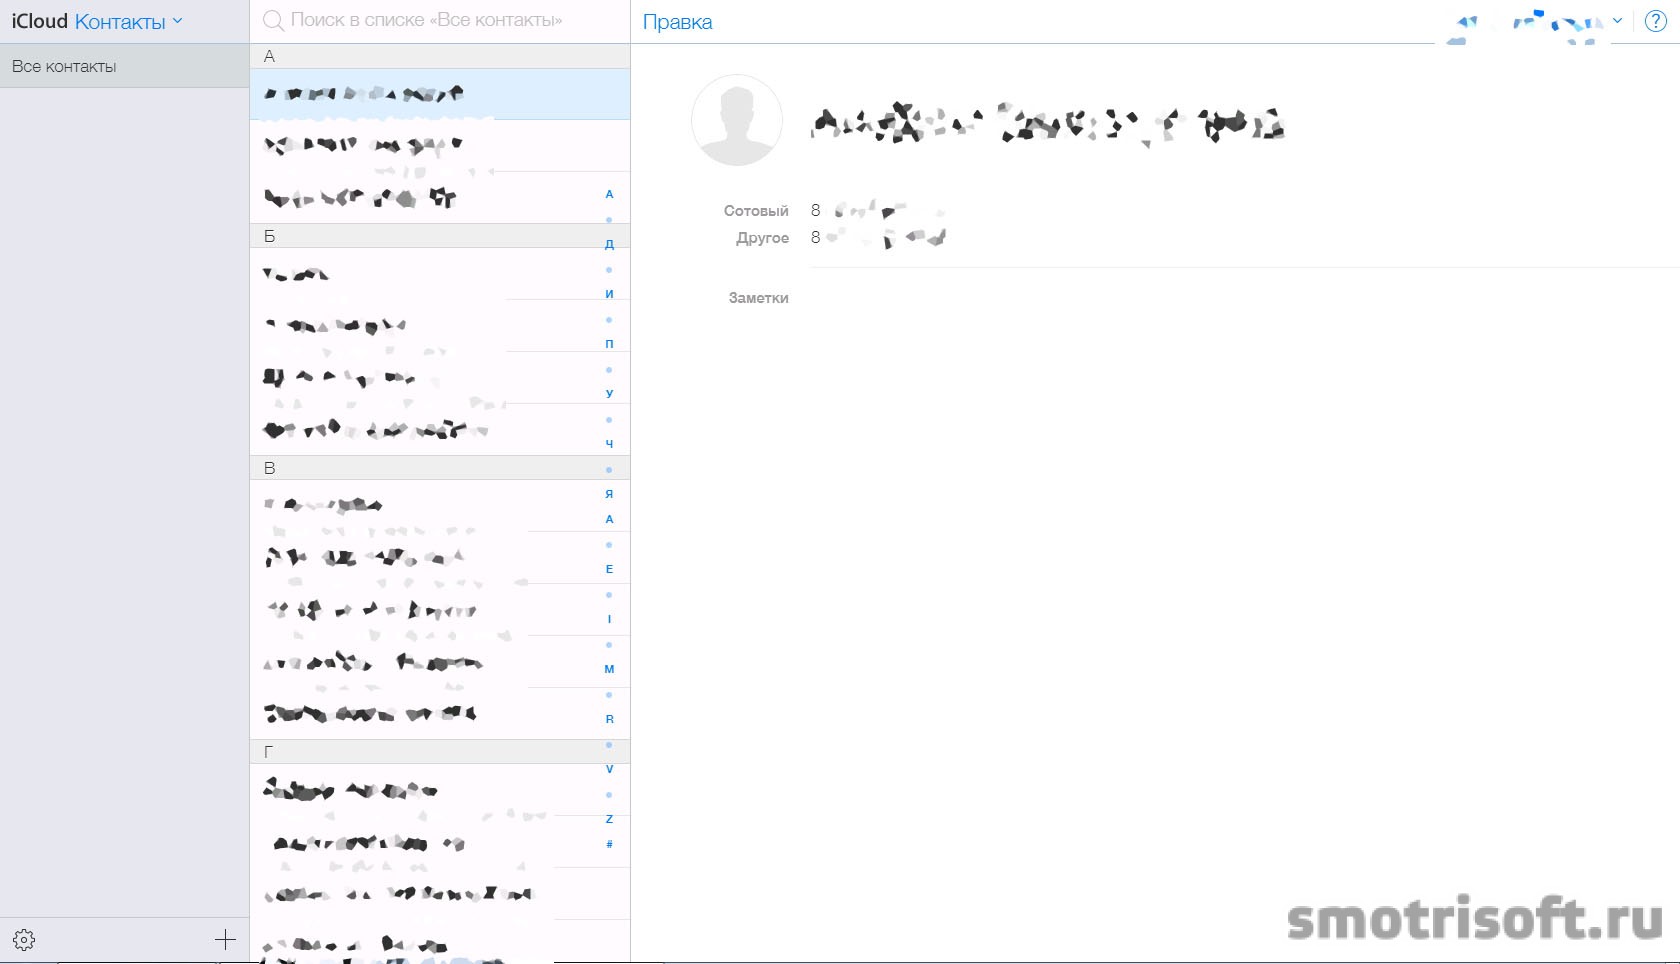
3. Save contacts with iCloud on your computer
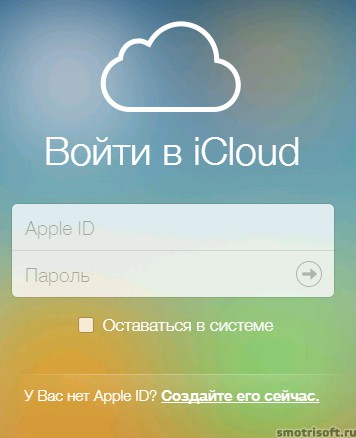
This step is needed just for extra peace of mind; in addition, we will keep a list of all contacts from an iPhone to your computer. Go to iCloud and enter your Apple ID and password.
iCloud is cloud service Apple's where you can store your backup copies of iPhones, iPads and other files from your Apple devices. The aiklaud is located at icloud.com.
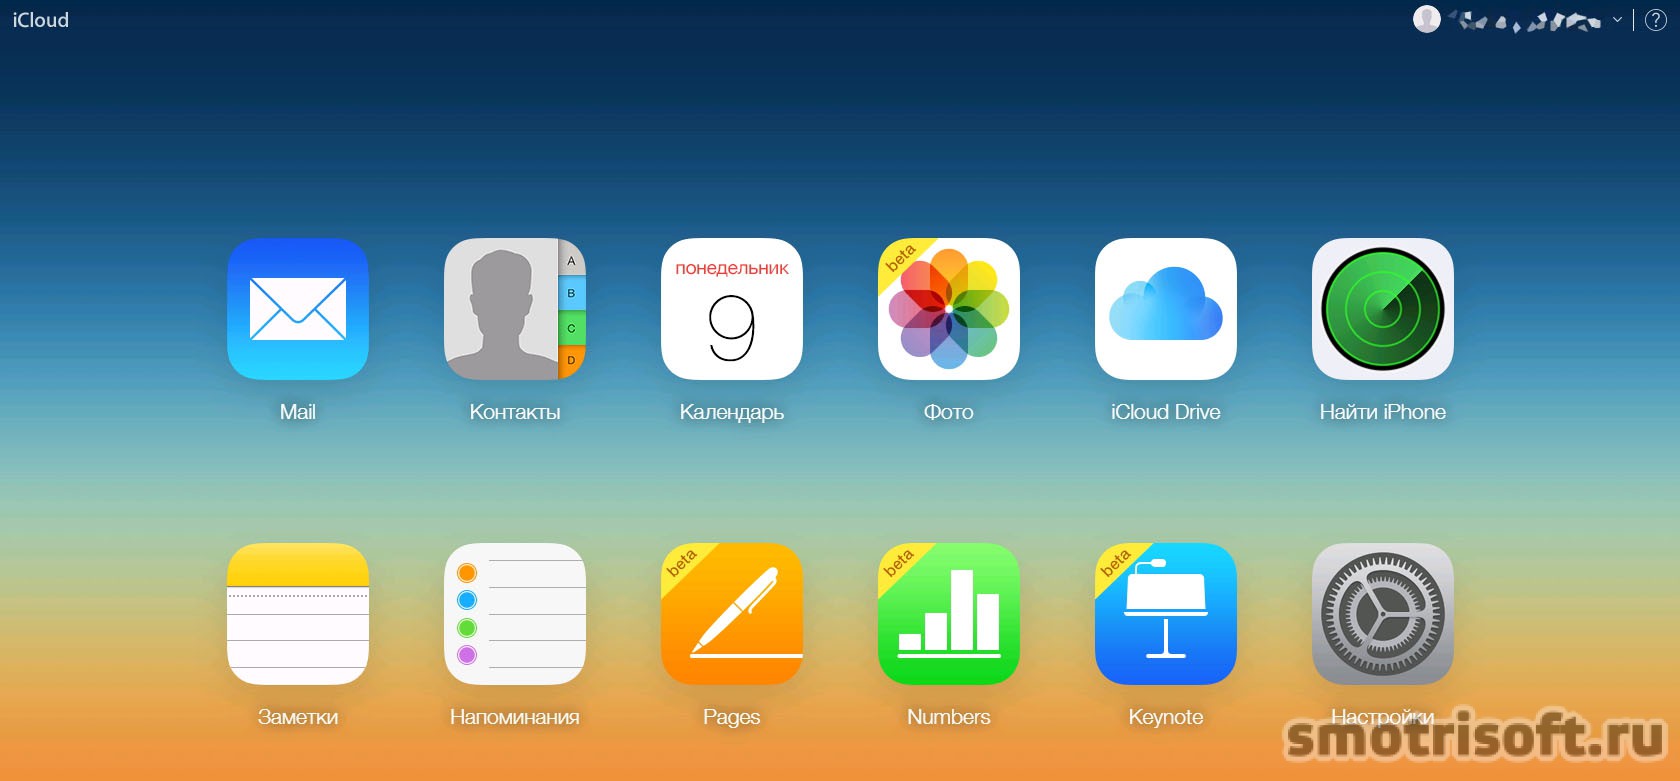
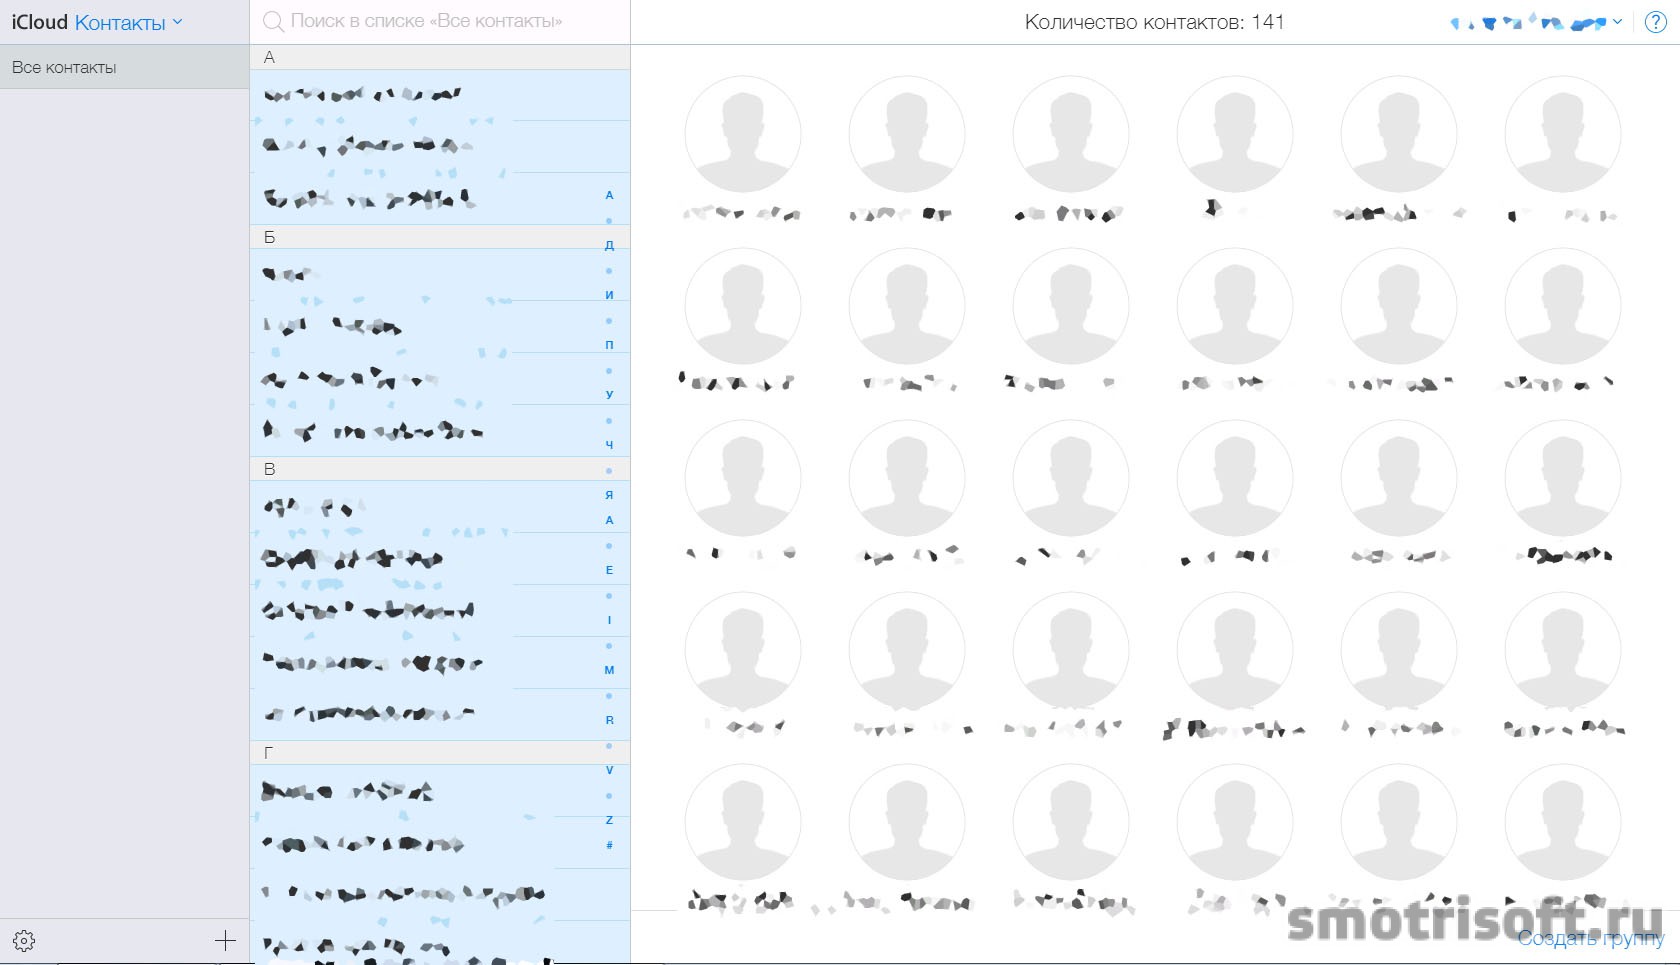
Going into iCloud select contacts.
The contacts display your contacts from the iPhone and you can save them to your computer from here.
Select all contacts by pressing ctrl + a on the keyboard.
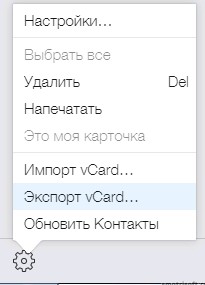
Now, after selecting all contacts, click the settings icon on the bottom left and select Export vCard to export all contacts from iCloud to your computer in the vCard file.
Now you have a file on your computer with the name Exportirovannye vCards iz iCloud.vcf with a list of your contacts.
Now, in which case, you can always import all contacts from this file to your iPhone. For example, now I’ll delete all my contacts from iCloud. I select them all in iCloud and click on the settings icon on the bottom left and choose to delete.
Are you sure you want to delete the selected contacts? Select Delete.

And now click again on the settings icon on the bottom left and select Import vCard ...
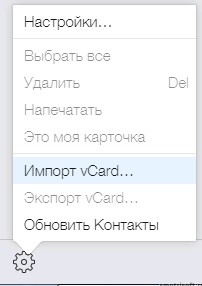
All contacts from this file that was on the computer are transferred to iCloud.
And if synchronization of contacts in the iPhone is enabled in Settings\u003e iCloud, they will be transferred to the iPhone.
But all the photos that were assigned to the contacts will have to be assigned a new one, since the photos of the contacts are not transferred in the vCard file. But this is only if you delete them from iCloud, and then import them from a vCard file. And if we restore the iPhone, then the photos to the contacts will also be transferred.
Here you have a vivid video tutorial on the topic of saving contacts from an iPhone to a computer.
4. Transfer the information to the new iPhone
To activate and use the new iPhone you need to insert a SIM card into it.
If you switch from an old iPhone to a new one (for example, from 4S to 5S, then you will need to change the size of the SIM card from micro SIM to NANO SIM. To do this, simply call the operator's reference number and contact the consultant and tell me what you want to replace your micro SIM on NANO SIM card, you will be asked to give your passport details and if you need to change your SIM card urgently, then the wealth of a new SIM card within 24 hours costs about 200 rubles, but you can order delivery of a new SIM card for free, then it will be delivered in a couple of days. )
Or you can go to the mobile operator’s salon of your operator (taking your passport with you) and say that you want to change the micro SIM card to a Nano SIM card. But once again I will repeat it only if you switch from the iPhone 4S to 5, 5C, 5S or the sixth iPhone. Since the new iPhones use only Nano SIM cards, because they are smaller and take up less space on the phone.
By the way, I switched from an iPhone 4S to 5S and noticed the changes that I described in the article.
After you get your hands on a nano sim after 15 minutes, a message will come to your number that work will now be done with your number. And you will turn off your old micro sim card so that only nano sim will work. To activate the iPhone and start setting up it must be inserted SIM card
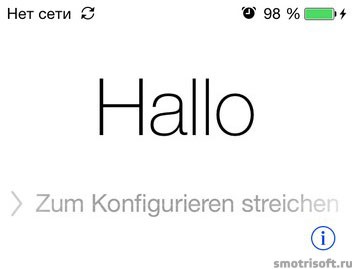
Turn on the new iPhone. The initial greeting will be in several languages, but all you need to do is to swipe from left to right? to unlock iphone.
Next, connect the iPhone to the computer via cable and turn on iTunes. Now click on the iPhone icon that appears in iTunes and select Restore from backup and click continue. This is so that all the data from the old iPhone transferred to the new one.
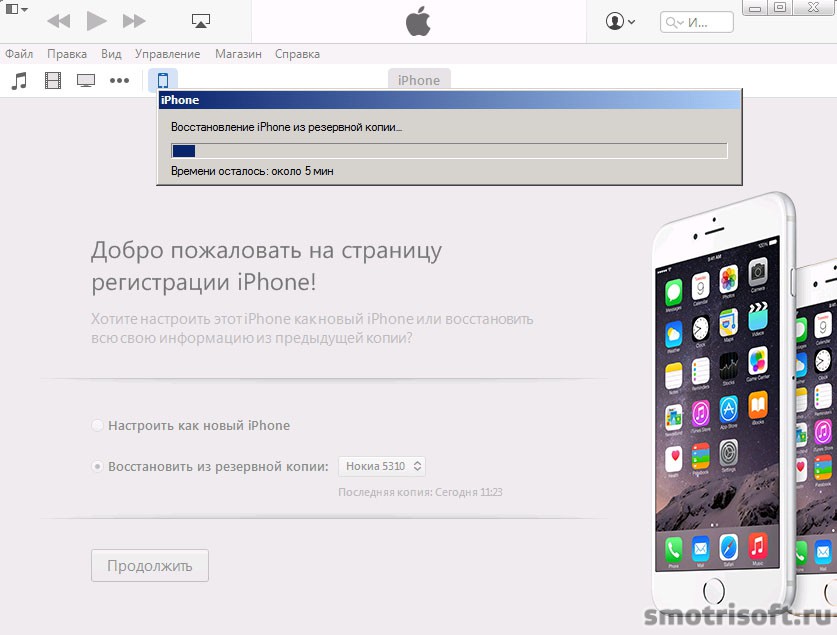
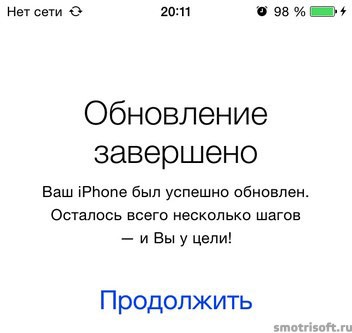
Now we will wait a couple of minutes while the data from the old iPhone, which is stored in the iTunes backup, is transferred to the new iPhone. After the update is complete. Your iPhone has been successfully updated. There are only a few steps left - and you are at the goal!
We take a new iPhone and click continue.
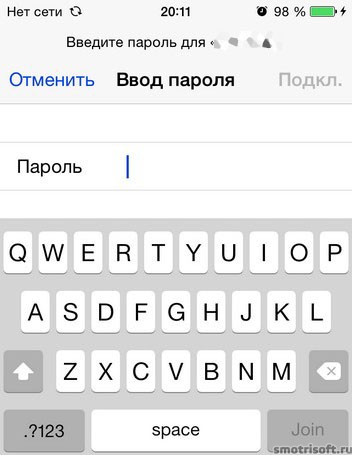
Now if you had a password on the old iPhone, enter it on the new one and click Join.
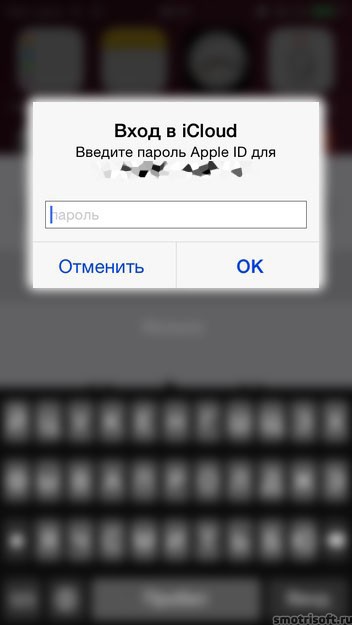
Now you need to configure iCloud. To complete the iCloud setup, you must enter the Apple ID password for your account. Enter the password from Apple ID and click next.

ICloud settings are updated.

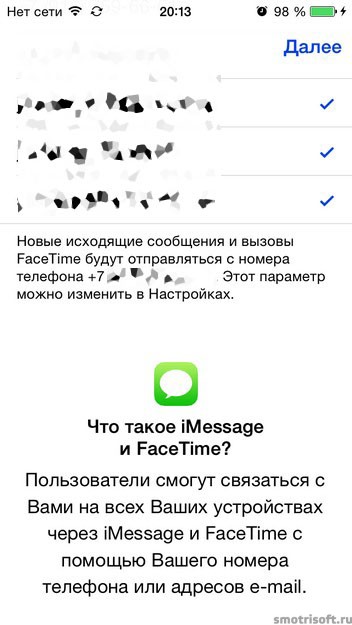
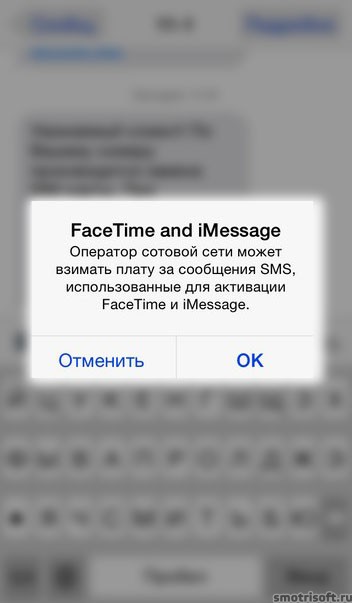
Now configure iMessage and FaceTime. Choose your numbers and e-mails.
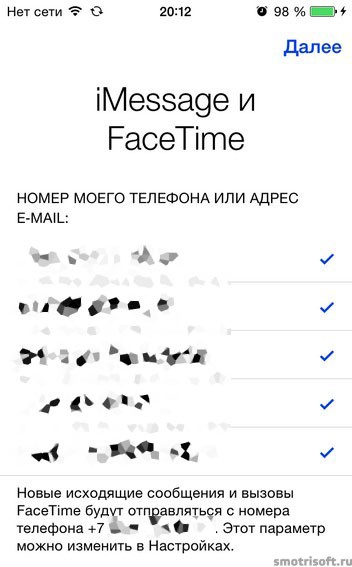
Users will be able to contact you on all your devices via iMessage and FaceTime using your phone number or email address.
In simple terms, iMessage is a free message between iPhones, iPads and MacBooks.
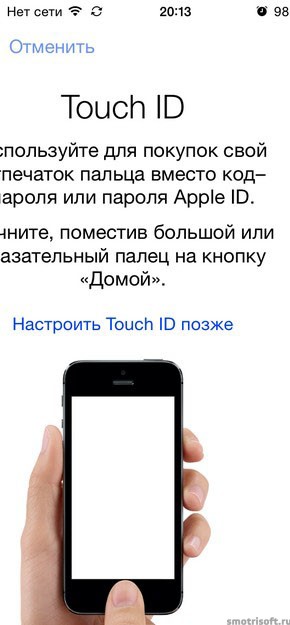
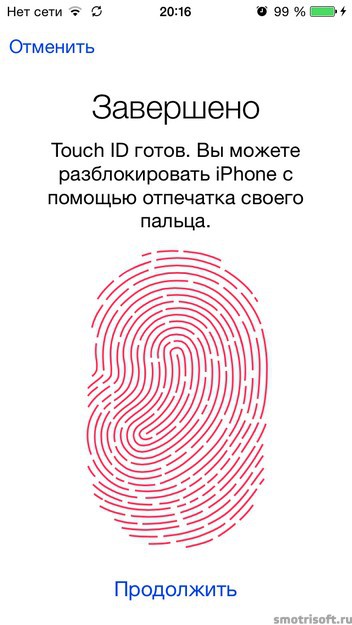
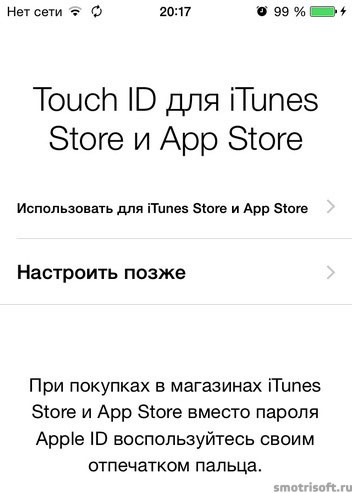
If you are switching to an iPhone 5S or newer, then you will need to configure Touch ID on it. This is a fingerprint scanner, which is located on the Home button. It allows you to not enter passwords, but simply scan the fingerprint.
Use your fingerprint for purchases instead of a passcode or apple password Id. Start by placing your thumb or index finger on the Home button.
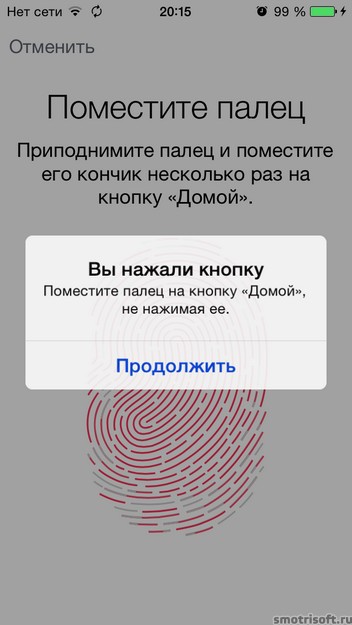
We put any convenient finger (most often which you use to press the "home" button.
Place your finger. Lift your finger and place its tip several times on the "home" button. At the same time, it is not necessary to press the button, just apply it.
Touch ID is ready. You can unlock your iPhone using your fingerprint. After setting up the Touch ID, click continue.
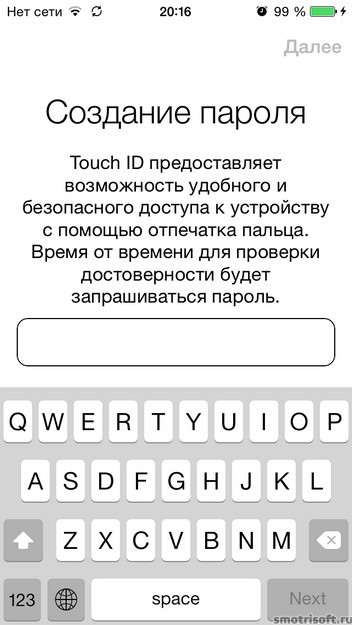
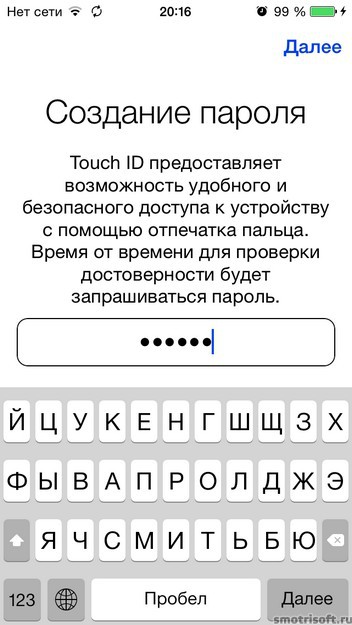
Touch ID provides convenient and secure access to your device using a fingerprint. From time to time a password will be requested for verification.
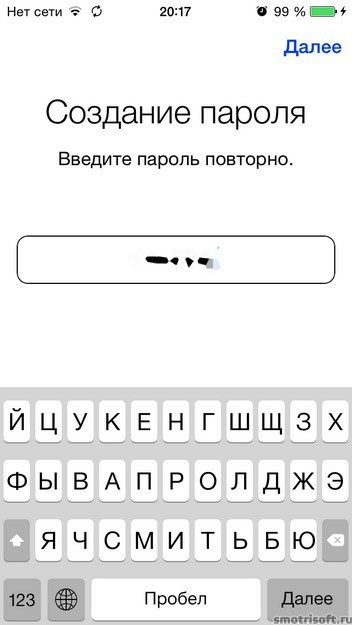
You also need to create a password, because if the Touch ID does not recognize a fingerprint three times, you will need to enter the password. We come up with a password.
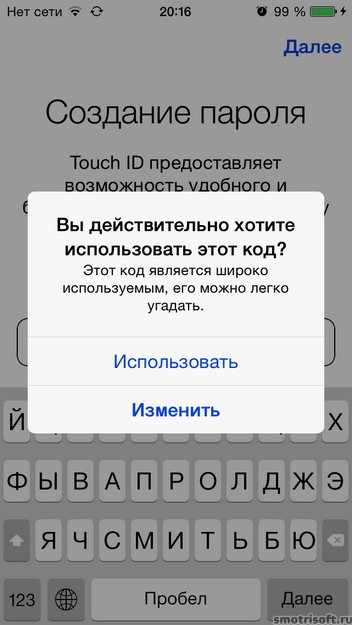
If you use a password that is too simple or common, you will be warned: Do you really want to use this code? This code is widely used, it can be easily guessed.
If you want to use this code, click use; if you still want to use another code, then click edit.
After creating the password, we confirm it and click next.
Touch ID (fingerprint) can also be used for the iTunes Store and App Store, so as not to enter a password, but simply attach a finger. Choose Use for iTunes Store and App Store or choose to configure later.
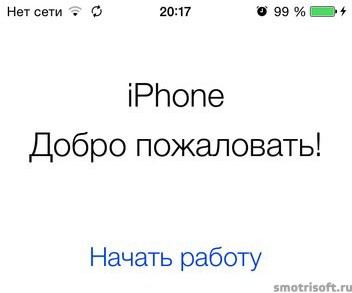
Now everything is set up on the new iPhone. Click Start Work.
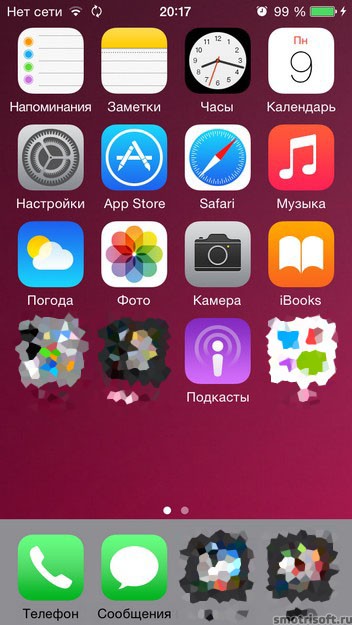
All your applications from the old iPhone are already on the new iPhone. Also, all contacts, SMS, notes, reminders, music, video, Internet browser bookmarks, podcasts, everything is transferred to the new iPhone.
After a couple of minutes or seconds on the new iPhone, you will be prompted to log into iCloud to enjoy the features of iCloud. Enter your Apple ID password and click OK.
Then you will need to activate FaceTime and iMessage. Operator cellular network may charge for SMS messages used to activate FaceTime and iMessage. Click OK.
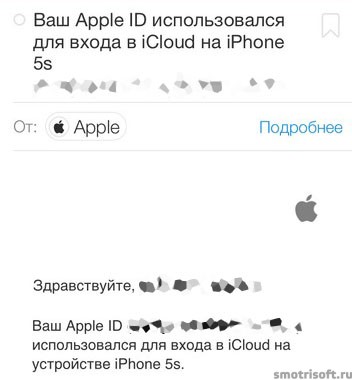
After you activate iMessage, you will be notified by email that is attached to your Apple ID that your Apple ID has been used to sign in to iMessage on an iPhone.
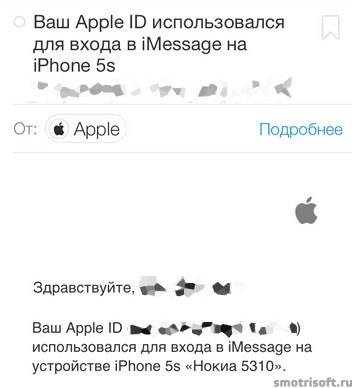
Just ignore this email, as we ourselves used iMessage on the new iPhone.
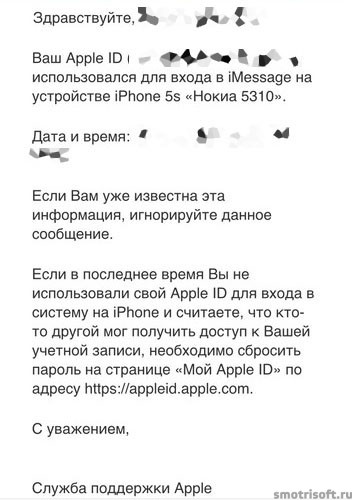
And it will also receive a letter stating that your Apple ID was used to log in to iCloud on an iPhone. We simply ignore this letter, since nobody has hacked us through iCloud, and we ourselves used iCloud on the new iPhone.
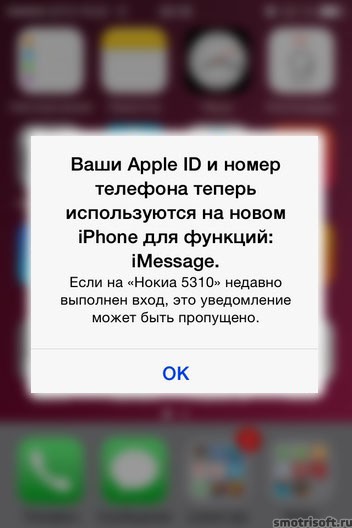
Your Apple ID and phone number are now used on new iphone for functions: iMessage.
Also on the new iPhone, you can turn off the backup in iCloud and use the backup in iTunes, well, or you can leave and use back up in iCloud.
5. We erase the information from the old iPhone.
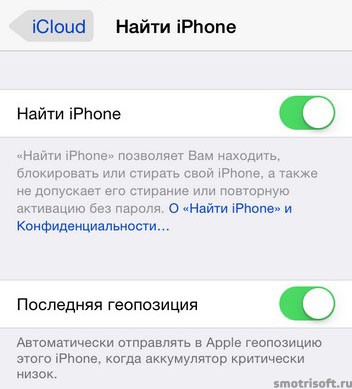
Now we take the old iPhone and go to Settings\u003e iCloud\u003e Find iPhone.

Turning off the function to find the iPhone on the old iPhone, as we no longer need it since we will now track where the new iPhone is (after all, we will use it).
Click on to find the iPhone.
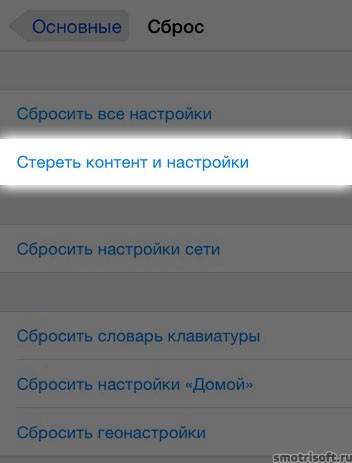
Now we go to the old iPhone in Settings\u003e General\u003e Reset and click to erase content and settings. To remove all the data from the old iPhone, since we have already transferred them to the new iPhone.
In order to transfer the necessary information from one gadget to another, you must use special application entitled Move to iOS. This is a new development from the company APPLE which allows you to simply and quickly save all the information on new device This is not only photos and videos, but also SMS, MMS, contact list, browser bookmarks, accounts, audio files, books and much more.
Before you start directly transfer the necessary should make sure is that on the device with Android version 4.0 systems, or some of the later ones. Also for such a procedure is necessary uninterrupted connection to WiFi network and the appropriate power sources for these devices. Check if there is an iPhone plenty of room, for portable data.
The next step will be download and setting Move to iOS apps. The safest thing to do is from the official site.
Then connect to the Internet and go to the " Programs and data"On the iPhone. On Android smartphone run downloaded application, click continue, read the license agreement and click that you agreed with it, and in the upper right corner click on the link " Search code». 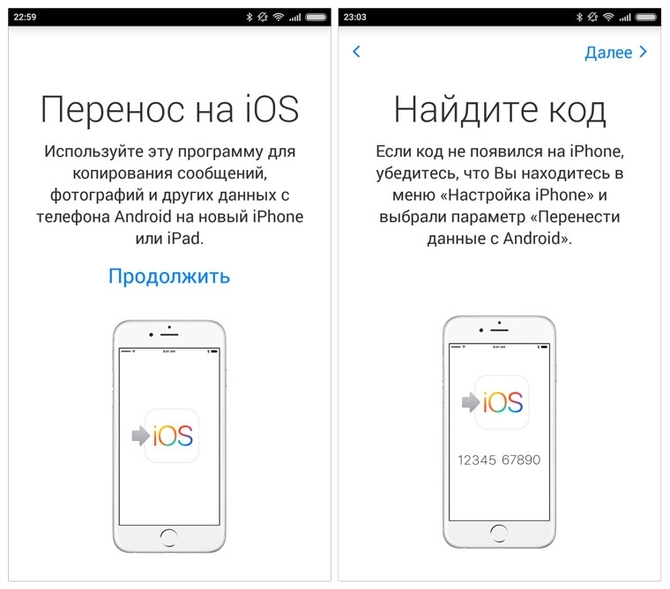
Meanwhile on the iPhone, go to the function " Data transfer with Android ". After that, the screen should appear code of 10 digits, which is necessary introduce on android smartphone
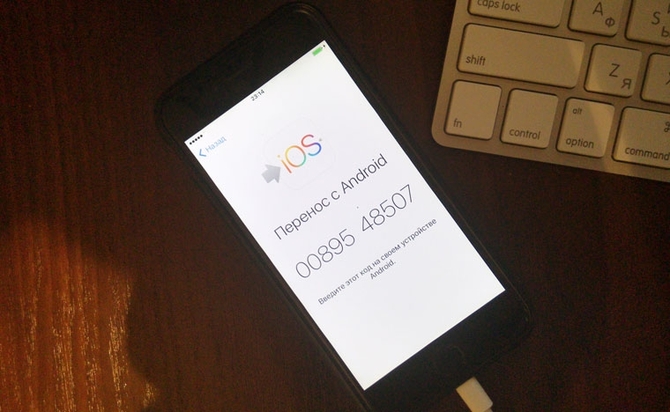
Then press the button " Further"And then the transfer process will begin. Upon completion of the procedure, gadgets will let you know about it using notifications. During the transfer, you can not minimize the application, disconnect the charger or connect to WiFi.
Transfer data from iPhone to iPhone
We use iCloud
One of simple ways will take advantage iCloud function
. To do this, on the phone from which information will be transmitted, activate the program. 
Going into the application, select necessary sections to send to another device and create a backup.
Now left turn on phone, on which information will be saved, and in the settings menu select the section “ Recover copy from iCloud». 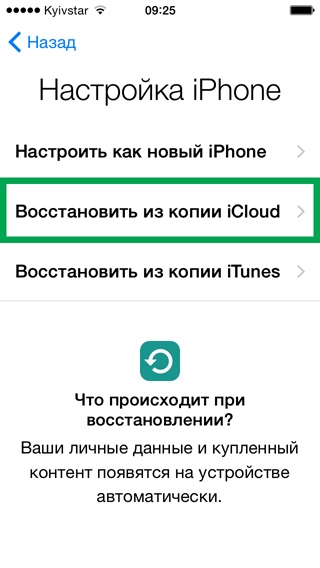
We enter account information. 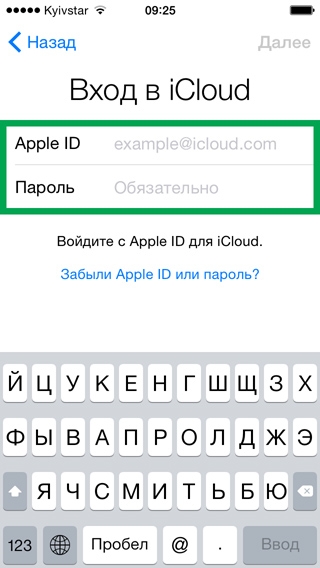
Accept agreement. 
AND chooseWhich items will be saved on the smartphone. The procedure is complete. 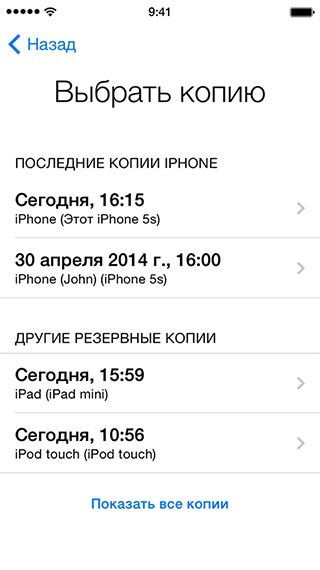
Transfer via backup
This method is even easier and faster. The only caveat is that the data in the phone to which information will be transferred, will be removed and only those moved from the previous device will be saved.
To do this, connect the source device to computer using a USB cable. Run the application iTunes and in the settings we select creation of backup copy (it will remain on the computer). 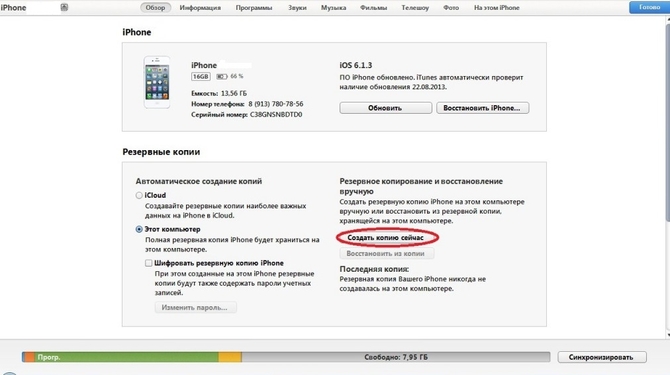
In the same way we connect second phone and run the program, choose it recovery backup copy. 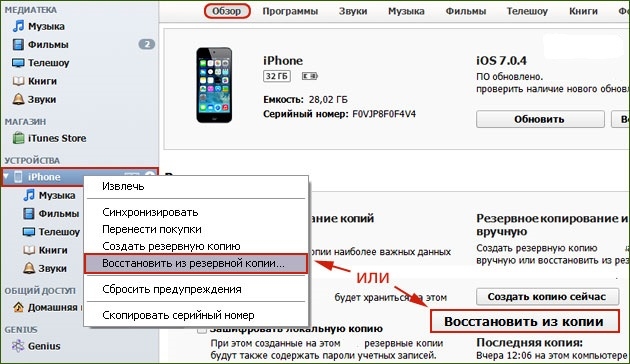
And wait for the end of the transfer.
We transfer data from the iPhone to the android
Sync via google
This method is used to move contacts, for this they synchronize on iphone through account. 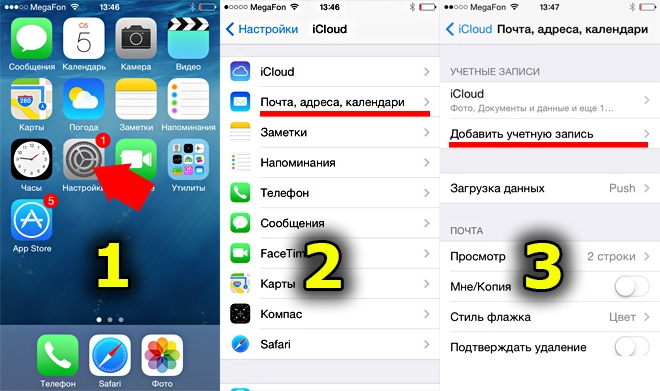
Add account.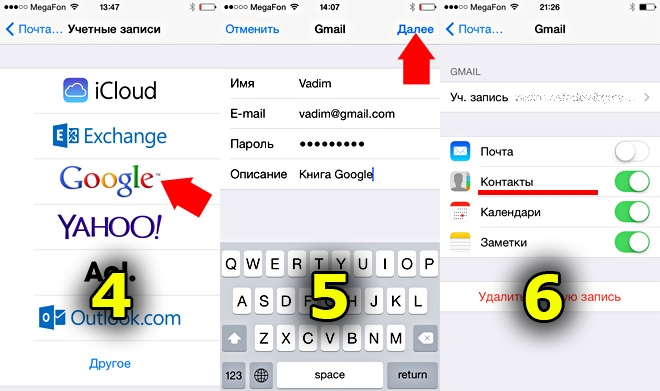
After all the work done, you can check the contact list by logging into your Google account via mail.
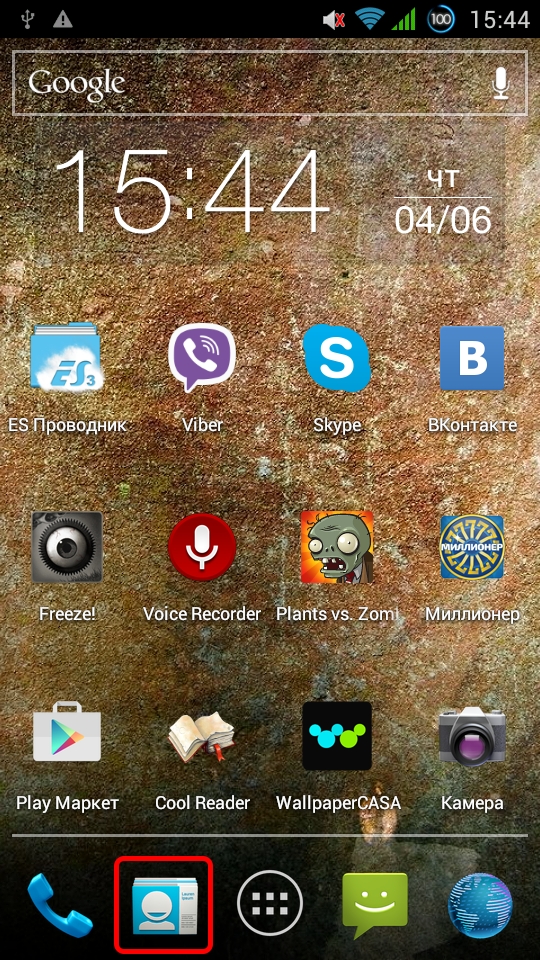
To save them on the android device, select the menu settings.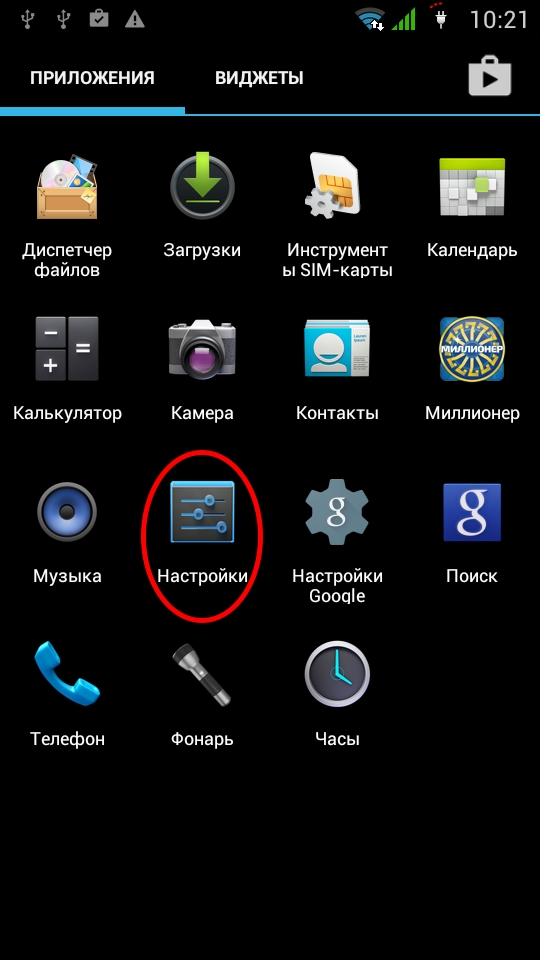
Item " Accounts & sync». ![]()
Click on the section " Add account"And select the desired items to transfer to the phone. 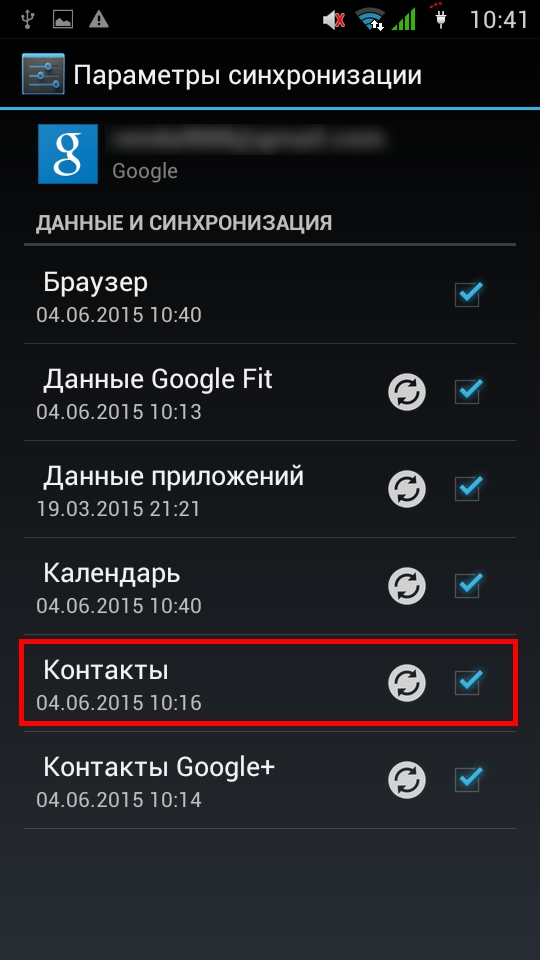
Transfer data using Outlook.
With this method it is necessary transfer information to the Outlook server. 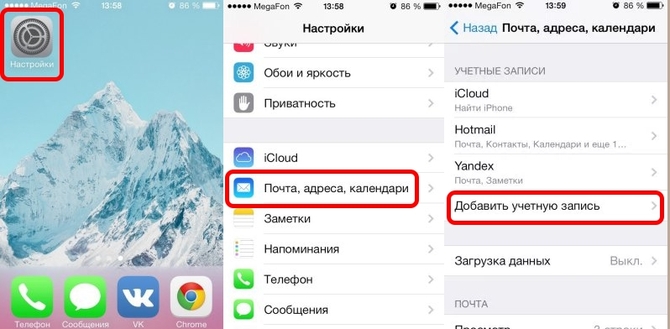
Click on the section " Add account", Create an account and select the necessary items for transfer. 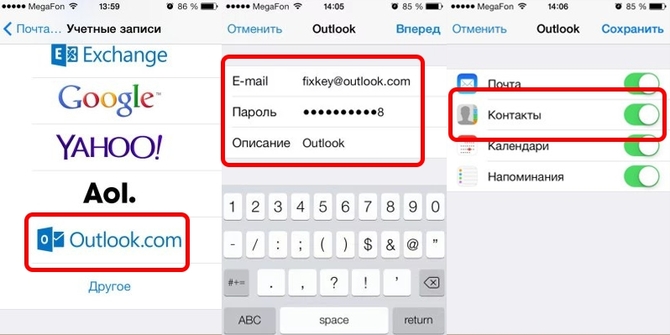
After that, all information will be synchronized, and you will only have to synchronize them by logging into the server through the Android phone.
Transferring contacts via iCloud
The algorithm is quite simple: go to attachment with iphone and sync data through apple account Id. Further save information on the androyd device according to this scheme:
There is a similar way to transfer data through an application. MC Backupwhich operates on the principle of the iCloud server and the algorithm of actions will be practically identical to.
Bump Transfer
This application allows you to share data between gadgets in minutes. For this you need to establish it on both phones in the settings allow geolocation and running the application choose information necessary for the transfer, then click on the " Connect". At the end of the transfer will pop up notification about the completion of the process.
The days when a single PC was shared among all the members of a family, or even a larger number of people, are long gone. With the current relative cheapness and diversity of computer equipment, having a home stationary computer, as well as a portable laptop or netbook, is a common thing. Therefore, the possibility is more relevant than ever. fast transfer files from computer to portable device.
You can transfer the files you need from your computer to a laptop in several ways. Using a flash drive, it makes sense to transfer information in cases where the volumes are relatively small - up to 20 gigabytes. However, this method is not fast and requires constant monitoring by the user. Alternatively, you can use a USB drive with a large capacity, but such devices are not cheap. Adherents of the "old traditions" can use as a "mediator" CD / DVD discs. Here it is only extremely inconvenient to transfer information in such a way of multiple rewriting, and there is a chance that each next entry may be unreadable, and accordingly the last one.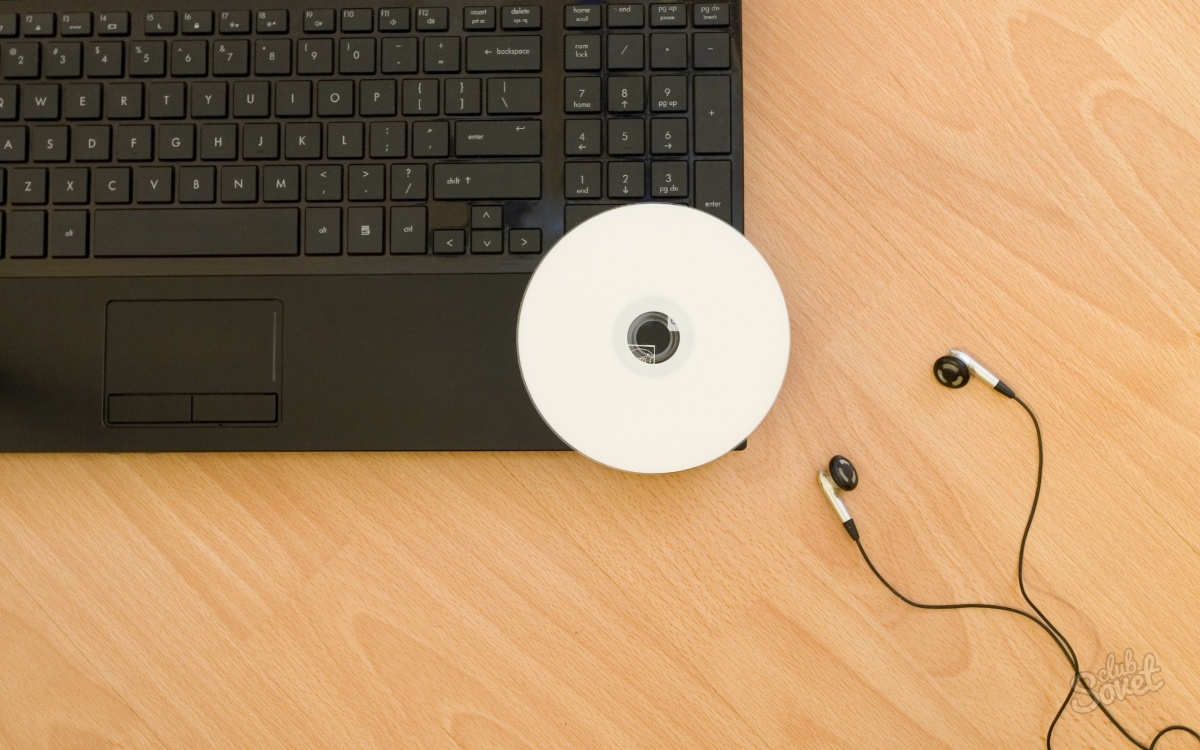
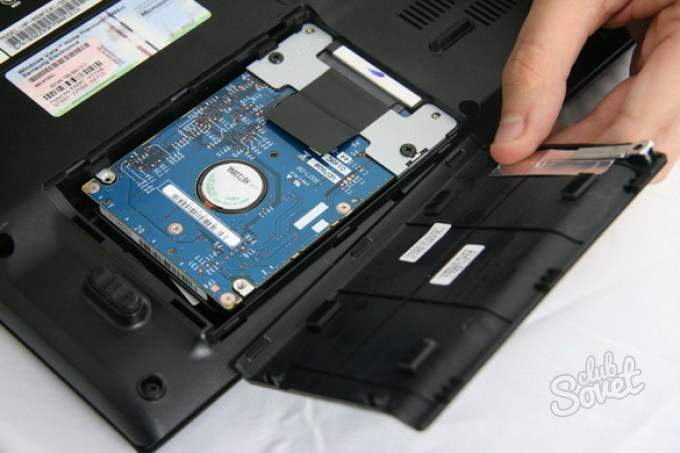
![]()
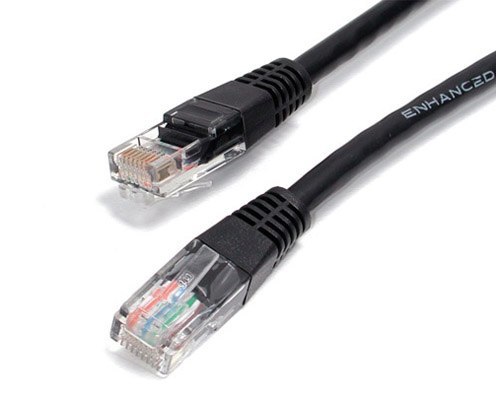
In addition to all the above methods of copying information, you can also use a USB 2.0 adapter. You can connect any model of hard drives to this device. Also, this adapter performs many other useful functions.