How to launch a new iphone se. How to activate iPhone using iTunes
Today we will be the first time enable and activate our iPhoneIn my case, this is the iPhone 5S. I will tell you in detail how this is done, as well as point out the mistakes and problems that I had in the process of activating my iPhone.
Preparing for iPhone activation
Before we start the first inclusion, we need to prepare in advance so that the process goes smoothly and without errors.
What we need:
- At least 20-30% charge.
- Access to the Internet via Wi-Fi or through a PC / Laptop with the latest version of iTunes and connected Internet.
- Nano sim card.
If your device is completely flat, take USB cable and connect it to a computer or electrical network through the adapter that comes in the kit.
if you have Wi-Fi, then check that it is available and you have access to the Internet.
If not, then you need your computer or laptop, which will be connected to the Internet. You need to download and install the latest version of the application on it (your computer) iTunes from the official site, link: http://itunes.apple.com/.
After the preparatory stages, you can start the activation.
IPhone activation
We will activate the iPhone with a SIM card, and accordingly the activation will consist of the following steps:
- Turning on
- Basic settings
- Connect to computer and activate
- First start
IMPORTANT! If your phone is locked, then to activate you will need a SIM card of the operator on which it is locked!
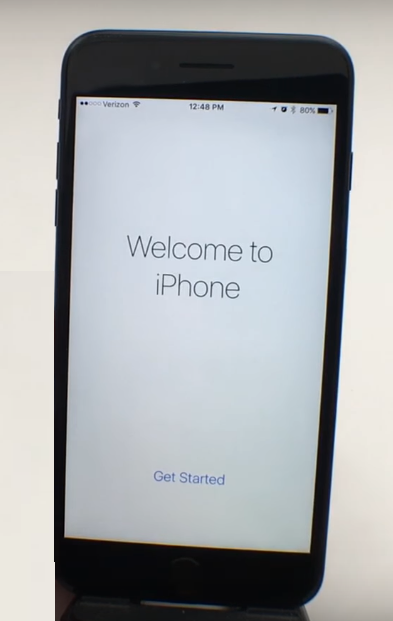
Turn on the device
In order to turn on the device, you must press and hold the button for a few seconds. "Inclusion"which is located on the top of the device. See the photo below.
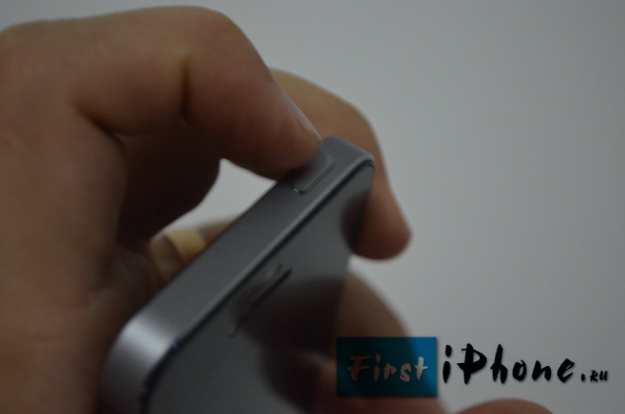
If everything is done correctly, then a silver apple will appear on the iPhone screen, which means you can proceed to the next stage.

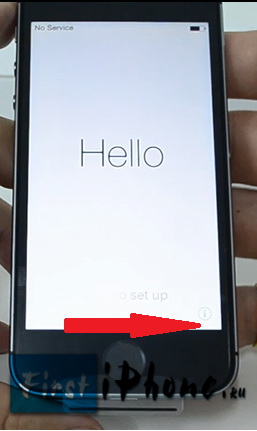
Basic settings for iPhone
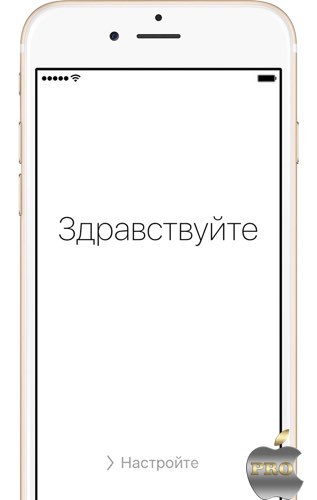
After turning on the device, you will be greeted in various languages on the screen. Now, with a flick of your finger, from left to right, we run along the bottom of the screen.
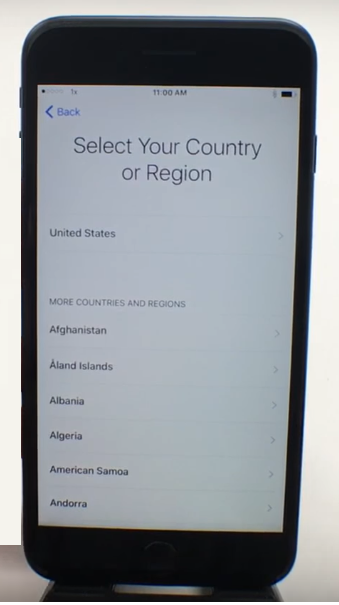
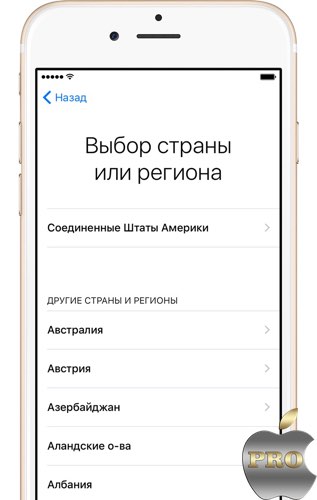
Then we choose the language we need, it can be any of the list. 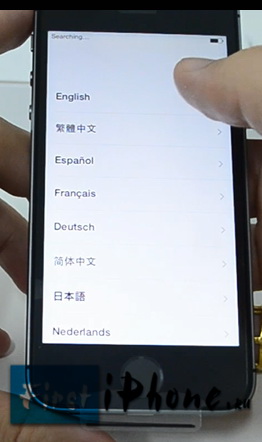
In the next step, choose a country. ![]()
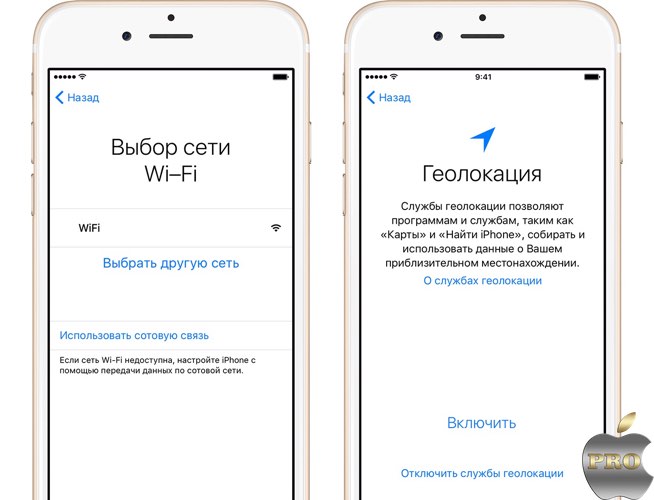
Next we need to connect to Wi-Fi or connect our device to a computer / laptop (PC) for further activation. 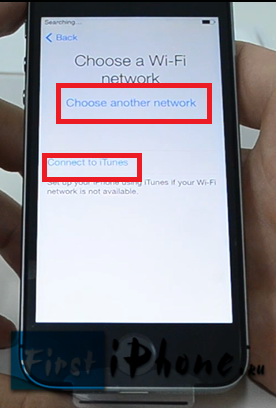
If you have Wi-Fi, then select it from the list and enter the password. For those who do not have it, you will need to activate via iTunes on your PC.
Connect the phone to the computer and continue activation
We will need our USB cable and computer / laptop (pc). We connect the cable to the iPhone, and then to your PC. 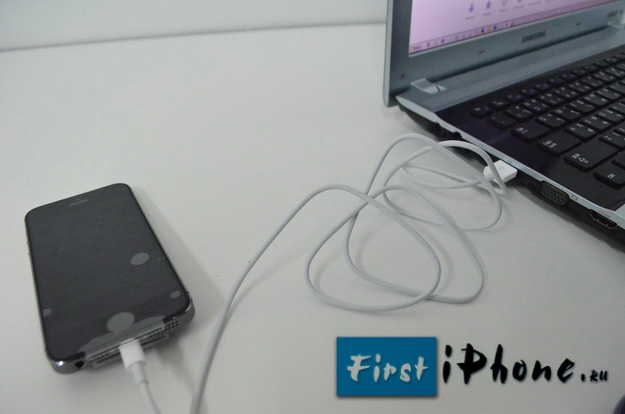
After that, on the screen of your phone you should see the picture as in the photo below: 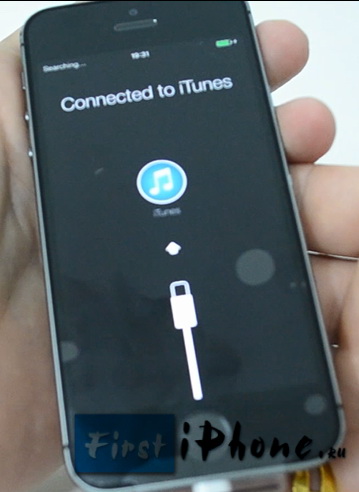
The first thing you need to do after connecting is to enable or disable. They are required to use GPS, Google maps etc. They can be enabled now or later after installation. I decided to turn them on immediately. 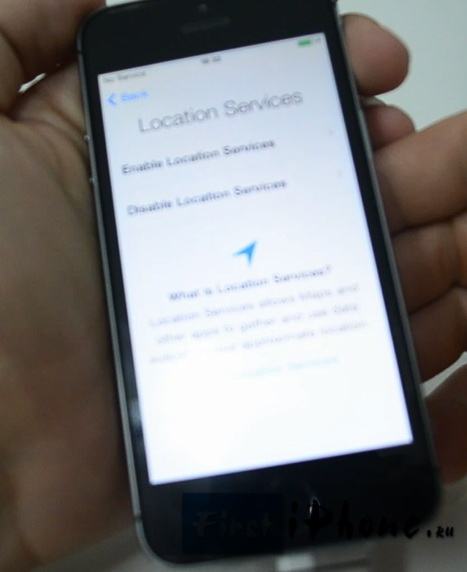
In the next step, we select the item "Set the phone as new", since this is our first inclusion and we still have nothing to restore. 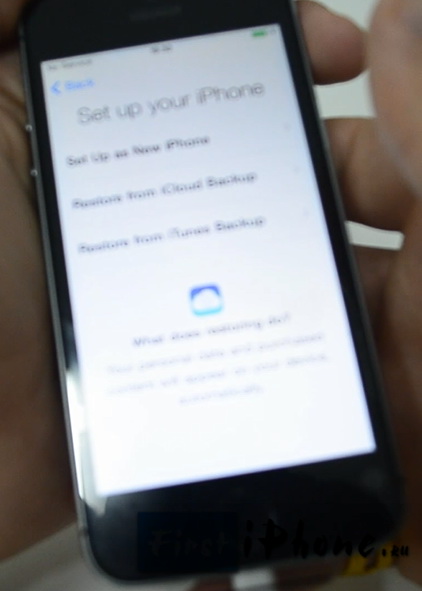
For owners of the iPhone 5S there is one item that you can do right away or put it off for later. I decided to do it right away, if you too, then click on "Set Up Now"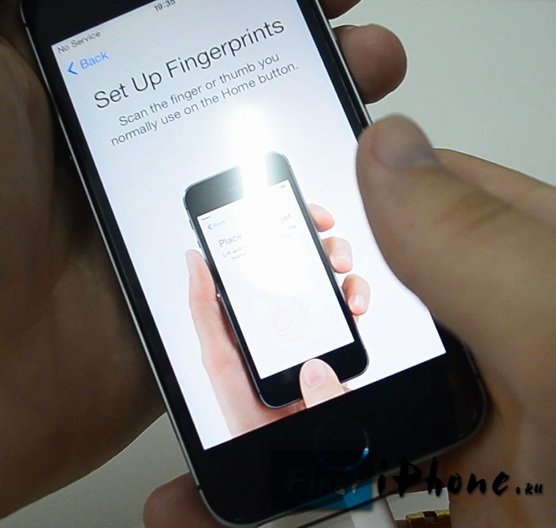
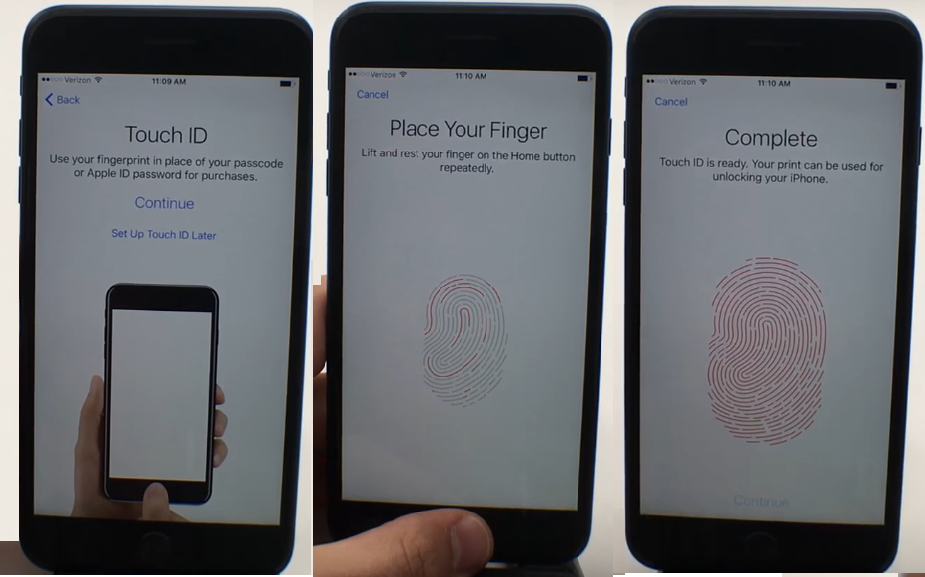
Now we need to press and release the button several times (approximately 10-20) "home", as shown on the screen of your smartphone. If you did everything correctly, you will see a picture and a message like mine in the photo below. 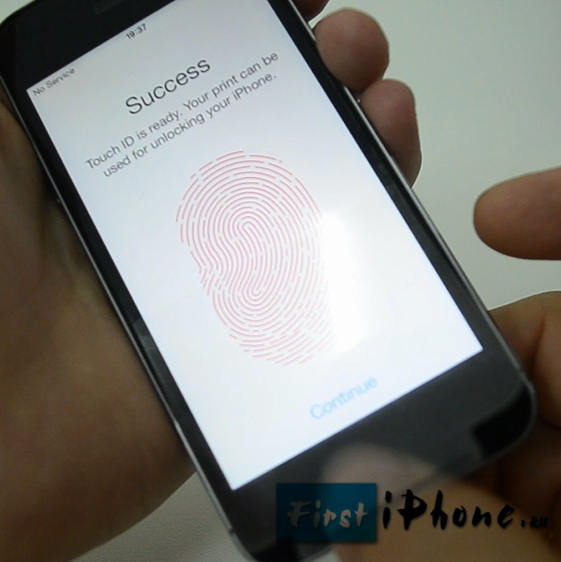
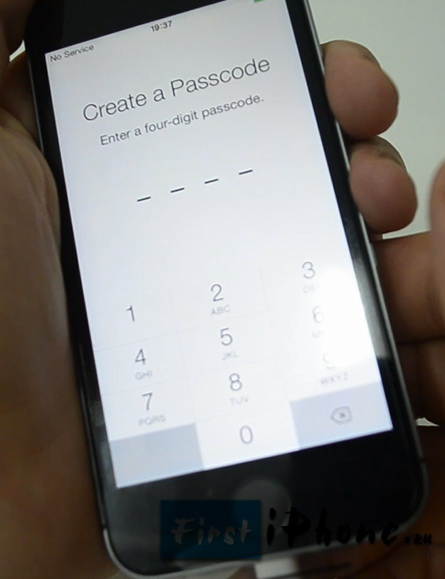
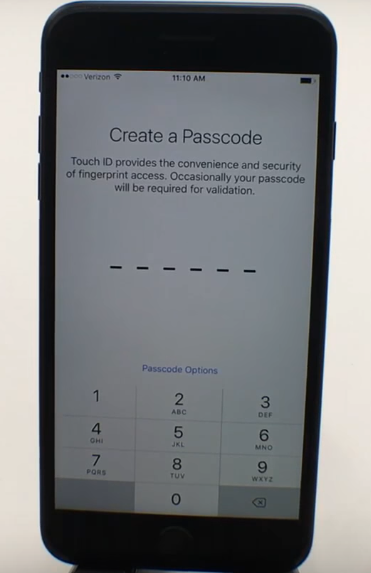
Since we set the fingerprint, then you need to set a password. After all, not always we will have the opportunity to remove it. For example, you can be in gloves or with a dirty finger you need, who knows what? Therefore, for convenience, there is a digital combination that you also need to set and remember.
The next and last step is "diagnostics"i.e. you need to decide whether to allow the phone or not, send data to the Apple server. This can be either error data or some other. I decided not to do this, and accordingly chose “Don’t Send” (do not send).
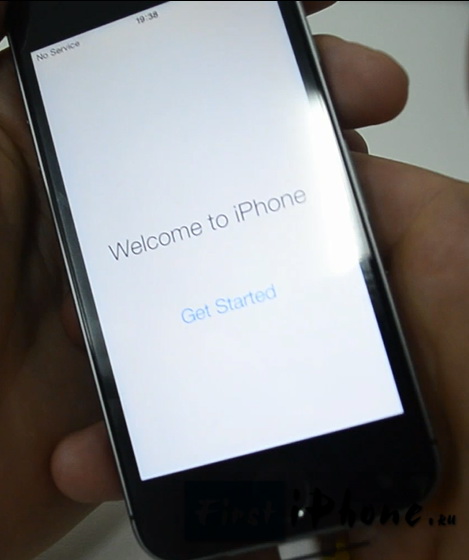
After that, you will see a welcome greeting on your screen! This means that you have successfully installed and activated your iPhone! Congratulations!
If something did not work out for you, then I advise you to look at the problems that arose in my process of my first launch, as well as watch the video where I described everything in detail.
IPhone activation issues and solutions
I will describe the problems that I had when I activated my IPhone 5S, as well as their solutions.
- If you do not remove the factory film from the phone, then it is almost impossible to press the Home button (round, on the front, bottom of the phone). Therefore, when the phone was automatically blocked, you had to press the power button (on top of the phone).
- Because of the lack of Wi-Fi needed a computer.
- Since I was old iTunes version, I could not connect the phone to the computer. I had to first download and update it to latest version.
- For iTunes updates it must be closed, otherwise it will not be updated, but will give an update error.
- To remove a fingerprint, you must remove the factory film otherwise it will not work, because the sensor does not recognize it from under the film.
These are the problems I had at the stage of my activation and first launch, I hope my experience will allow you to avoid them.
I also advise you to take a look at the Apple Support page, there are already many answers to problems with activation, link: http://support.apple.com/kb/ts3424?viewlocale=ru_RU&locale=ru_RU.
IPhone Activation Training Video
You can leave your questions and comments in the comments below.
Good day! On October 20, the iPhone 6 was stolen from me. Until now, the police have not found it. They say that Simka has not yet been inserted. But I check on the internet using the code it says there that the activation lock is on so that the new user activates this device I need an Apple ID and password for the current owner. Husband erased all the data from the phone, it turns out we can not track it to find the iPhone. Tell me if it is possible to enable activation lock without a sim card?
Good day! On October 20, the iPhone 6 was stolen from me. Until now, the police have not found it. They say that Simka has not yet been inserted. But I check on the Internet using the code there it says that the activation lock is enabled so that the new user activates this device. You need an Apple ID and the password of the current owner. Husband erased all the data from the phone, it turns out we can not track it to find the iPhone. Tell me if it is possible to enable activation lock without a sim card?
Good day! On October 20, the iPhone 6 was stolen from me. Until now, the police have not found it. They say that Simka has not yet been inserted. But I check on the Internet using the code there it says that the activation lock is enabled so that the new user activates this device. You need an Apple ID and the password of the current owner. Husband erased all the data from the phone, it turns out we can not track it to find the iPhone. Tell me if it is possible to enable activation lock without a sim card?
Good day! On October 20, the iPhone 6 was stolen from me. Until now, the police have not found it. They say that Simka has not yet been inserted. But I check on the Internet using the code there it says that the activation lock is enabled so that the new user activates this device. You need an Apple ID and the password of the current owner. Husband erased all the data from the phone, it turns out we can not track it to find the iPhone. Tell me if it is possible to enable activation lock without a sim card?
Good day! On October 20, the iPhone 6 was stolen from me. Until now, the police have not found it. They say that Simka has not yet been inserted. But I check on the Internet using the code there it says that the activation lock is enabled so that the new user activates this device. You need an Apple ID and the password of the current owner. Husband erased all the data from the phone, it turns out we can not track it to find the iPhone. Tell me if it is possible to enable activation lock without a sim card?
04 April 2016 A lot of new features and capabilities have appeared in the new iPhone. Here are ten of our favorite tricks for new iphone SE!
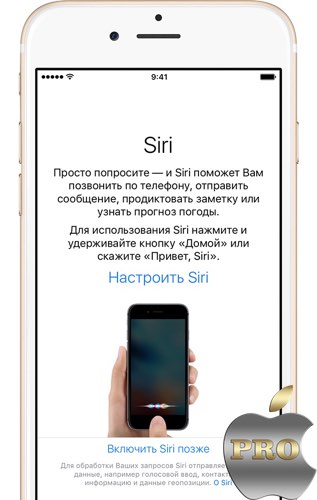
Use "Hey Siri" without unlocking.
Siri has always been a useful companion on the iPhone, but she has received some new tricks lately. One of the best additions is the mode speakerphone, allowing you to ask her questions, even without unlocking your iPhone. Turn this new feature in Settings\u003e General\u003e Siri\u003e Allow "Hey Siri". You need to set up Siri by repeating this phrase several times, and then you will work.
Live photos of live photos are like magical photos from harry potter. Whenever you take a photo with this mode turned on, you will get a few seconds of video before and after the photo was taken. This is quite surprising, but it can also use a lot of additional memory space (and the iPhone SE starts with only 16 GB). You can disable this feature by clicking on the icon (three circles) in the center of the top of the camera application; yellow means it's on, and white means it's off.
Night Shift is a brilliant new addition to iOS 9. After switching on, it will shift the color temperature of the display during the day, making things look warmer in the evening (more yellow, less blue). Scientific studies have proven that it will make it easier for you to go to bed in the evening, avoiding the influence of bright blue light. You can turn it on in Settings\u003e Display and Brightness\u003e Night Shift

Unfortunately, this function does not work in Russia yet, but if you often travel abroad, but know that Apple Pay works in the iPhone SE, thanks to the NFC chip and fingerprint reader. You can use the service of payment for all types of goods and services, both in the real world (for example, shops and subways) and on your iPhone (when ordering from ASOS, for example). This is an easy-to-use payment method that is worth trying.
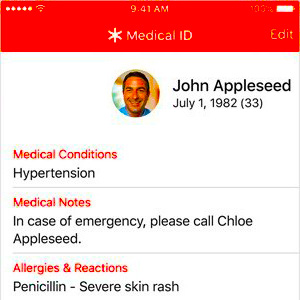
One of the lesser-known additions to iOS 9 was the medical ID. The idea is that even if you are unable to speak, the rescuer will be able to see information such as date of birth, blood type, allergies and emergency number. It is worth setting it up once if you end up needing it.
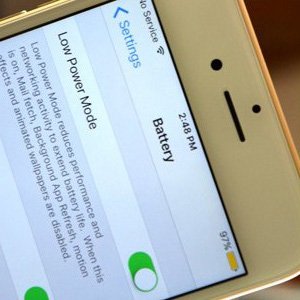
Low Power mode is a new addition to iOS, offering a way of stretching the life of your battery. Your iPhone SE will offer you to turn on the mode at 20% and 10% of the battery charge, but you can turn it on earlier if you want to go to Settings\u003e Battery. The mode turns off syncing and some visual effects, and turns the battery icon into yellow so that you know that power saving mode is on.

The iPhone SE comes with some elegant animated backgrounds created from thousands of high-resolution photos. You can find them in Settings\u003e Wallpapers\u003e Select New Wallpapers\u003e Dynamic.
The new battery consumption section in the settings menu is really useful, since it shows with a large list how much battery each application consumes. If you are looking for a reason why your iPhone is not working as long as it used to be, you can simply find it here. Once you have identified energy-intensive applications, you can remove them or limit their work.
After the acquisition of a new IPhone 7 or IPhone 7 plus you need to hold initial setting devices. Without activation, you can not use the phone. Let us consider in more detail how to activate the IPhone 7 with the help of several actions.
Smartphone activation
The basic setting of the phone will take 15-30 minutes (before activation, you need to insert into the iPhone the operator's SIM card mobile communications). Turn on the smartphone and wait for the welcome screen to appear. Now hold down the Home button for 3-5 seconds and in the appeared window select a language.
Connect to a Wi-Fi network. Wait a few seconds until the phone detects all enabled access points. Then click on the name of the network. Enter the password and wait for the connection to the Internet.
![]()
Confirm your phone number.

If desired, enable location services. They allow you to work with satellite maps and with the service "Search for a lost IPhone."

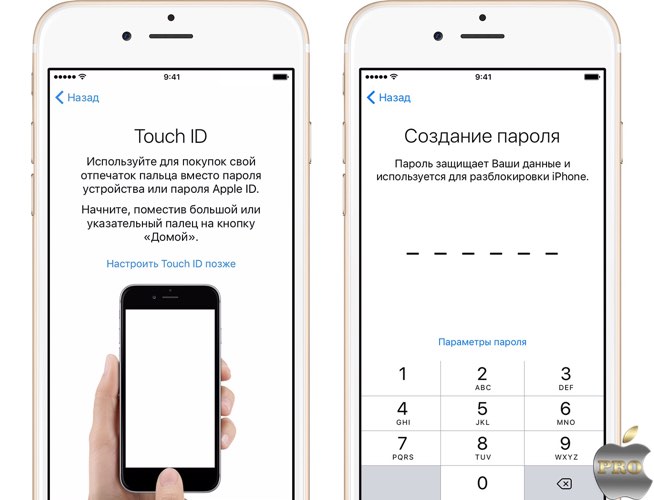
Configure Touch ID. This feature only allows you to access your smartphone data. Place your index finger on the Home button, wait until the Complete window appears. In the future, you can save more of your prints to the Touch ID database.
Create a numeric password. If for any reason you cannot enter using the Touch ID, the phone will require this code.
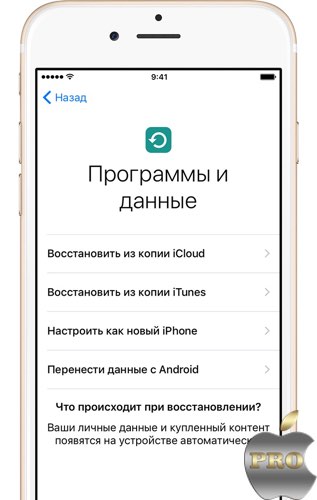
Recovery. Select the configuration method: "New device", "Recovery using iTunes", "recovery from iCloud". The second and third options allow you to bind to your iPhone an already existing account in iCloud or iTunes (all user data is saved). Recovery mode from iCloud / iTunes takes from 30 minutes to several hours.
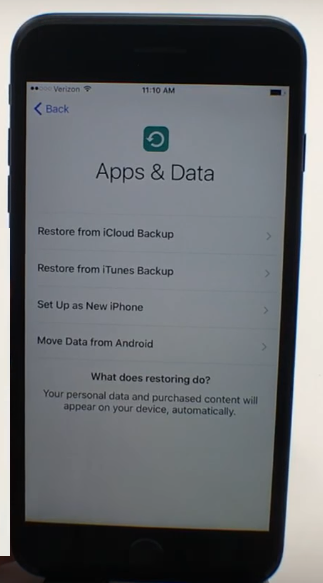
IPhone how to activate and restore data, if you previously used a phone on Android? In this case, in the "Data and Applications" window, select "Move data from Android". Enter username and password from account Google and wait for the automatic copy of the data.
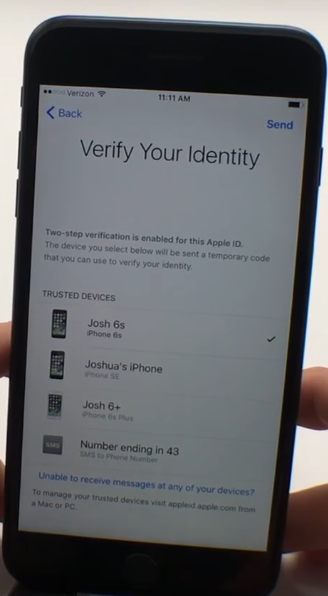
Two-step verification. At this point you can add trusted devices, to which the verification code will be sent, in case of loss of access to your smartphone.
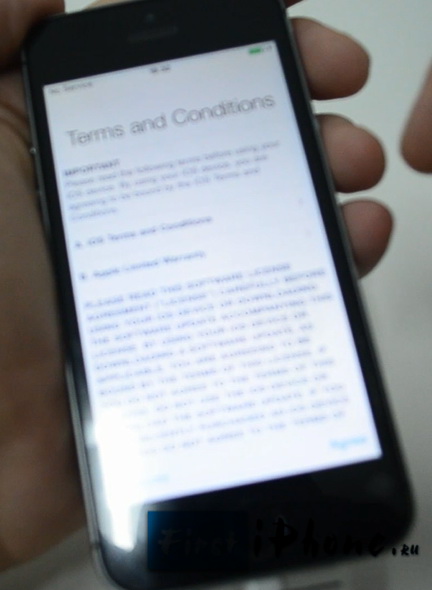
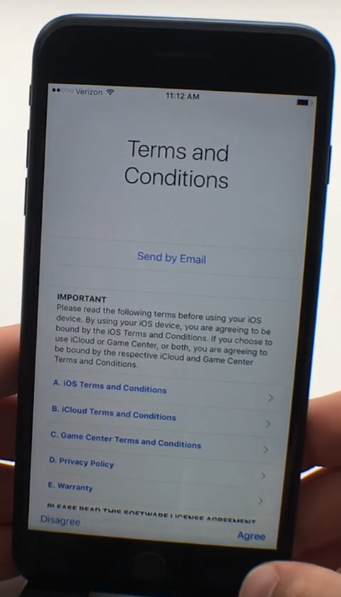
Accept the terms of use of the device and wait for the configuration of your IPhone.
OS update
A new line of iPhones running iOS 10. First version operating system IOS 10 is pre-installed on all phones. In October, Apple released a new firmware version (10.2). Also, in the future we plan to release other updates. During the first launch of the phone, the firmware will be updated “over the air”. Thus, whenever you buy your IPhone 7, you are guaranteed to get newest version OS
After data recovery and identification settings, the Software Update window will appear. If a new firmware is available for your region, it will be displayed in the corresponding list of updates.
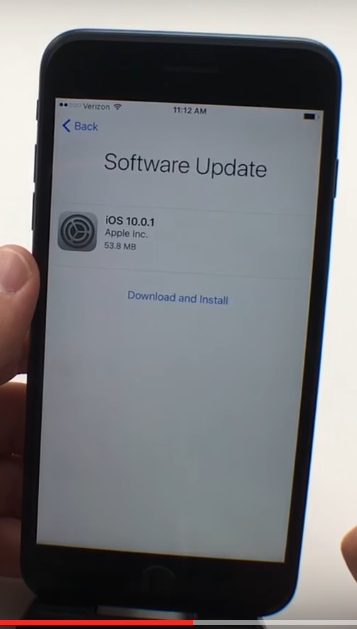
Click on “Download and Install” to start the OS update process. To download the software, you must enter your personal Apple ID and password. Next, the phone will start the update process, during which you will be shown information about new features and services. Immediately after the upgrade, you can turn on Siri and choose a comfortable degree of pressing the Home key.
Hello dear friends! Long thought, why would it be so useful to write on the eve of the New Year and the decision came by itself. Certainly in connection with the upcoming holidays, the number of iPhone owners has increased significantly. So the number of questions on using the gadget has increased, correct setting and optimizing it battery life.
Initial iPhone Setup
First of all, I want to warn you that you shouldn’t go to the abstruse seller’s offers to set up an iPhone and create an Apple ID for a symbolic amount. Firstly, you can do it yourself with this small manual without any problems, and secondly, I repeatedly had to fix the jambs for such top managers (Apple ID will be ugly, they won’t let the owner know the answers to test questions). So send them nafig, we all set up and create. And immediately another important recommendation - be sure to keep the check, despite the fact that Apple’s international warranty (1 year) obliges official service centers to repair and service without a check, it will be useful for you if you sell the phone. Thus, you can easily prove that the iPhone was bought in the store and you are not a huckster.
Attention! Depending on the phone model and software version, the settings described above may differ slightly.
1. So, press the cherished power button and see such a screen.
2. Choose a country, region.
3. Connect to WiFi, or use cellular. Further proposed to enable or disable geolocation services. I, as a rule, turn it on, and then, already at the stage of detailed configuration, I turn off geolocation for applications where it is not needed. The fact is that it pretty well reduces the battery life of the phone, so it’s better to turn off all the excess. I will tell you more about this further.
4. If you have purchased iPhone models 5s and higher, you can configure the Touch ID feature that allows you to access the phone, as well as the AppStore and some fingerprint applications.
Next, you need to come up with a six-digit numeric password, required if it is impossible to unlock the iPhone by fingerprint. By the way, if there are a lot of six numbers for you, you can set a 4-digit password, for this, click on “password settings”.
5. If the purchased iPhone is not your first and you have done it wisely backup copy data from the old device, you can select the appropriate item. Or set up as new.
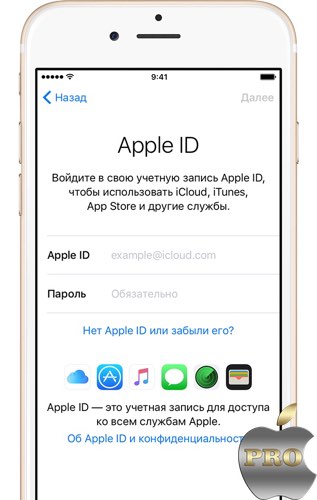
6. Now we are invited to enter the Apple ID, or create it. If you do not have this identifier, I advise you to click "No Apple ID" and then skip the creation step. A little further I will tell you how to create an Apple ID without a credit card.
7. Siri. Since not very long time, Apple’s voice assistant has acquired Russian and has learned to more accurately recognize host requests. It helps me a lot, especially while driving.
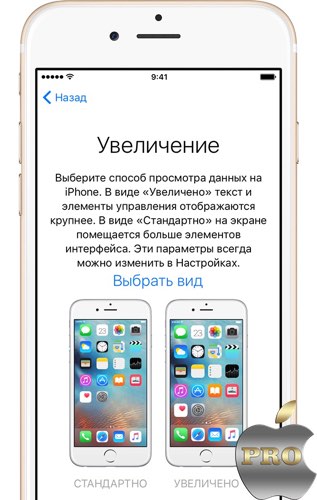
9. This step is for owners of the sixth and later iPhone models. The system suggests to choose one of two options for displaying information on the screen: “standard” and “magnified”. If there are no problems with vision, then the “standard” is the most.
10. Press "start work", drumming ... and now our eyes finally got the phone's home screen. Congratulations 🙂
This is me to the fact that the following tips are purely advisory in nature and are not a dogma. It all depends on which of the two user groups you belong to.
2. Import contacts to iPhone. About all simple ways Transfer contacts to the iPhone, read this small.
3. And now we will return to the question of setting up geolocation services (settings\u003e privacy\u003e geolocation services). I recommend to turn on geolocation (select “when using the program”) for the following points:
- Cards
- Camera. Your pictures will automatically be assigned a geo-position.
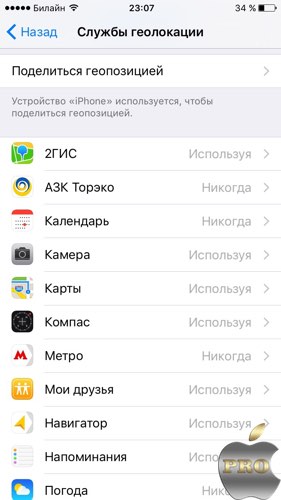
All other checkboxes are optional.
Scroll down the list and select " system services". Disable:
- Geolocation iAd
- Compass calibration
- WiFi networks
- Diagnosis and use.
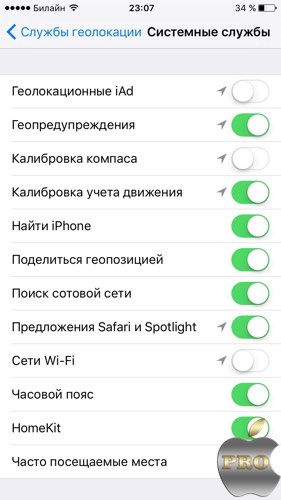
Be sure to leave the "find iPhone" switch on, the rest is optional. If necessary, you can always adjust the geolocation settings for you.
4. Software Update. Do not forget to update iOS in a timely manner (settings\u003e basic\u003e software update), as a rule, with each new firmware, Apple improves stability and performance. But not always :). Keep in mind that for this procedure, it is extremely necessary to have stable WiFi if you are upgrading over the air (without a computer). Since the updates weigh in the region of 1 GB and not everyone can afford to drop all mobile traffic on this business.
For a complete introduction of the coolest features of iOS 9, read
5. Understand iTunes. Unfortunately, many newbies cannot make friends with iTunes. I think the reason lies in the fact that Apple decided to cram into it too large a list of functions. Here are a couple of articles for you to read.
7. Installing applications. If you have already created an Apple ID, now you just need to go to the AppStore, select the desired application, download it and launch it.
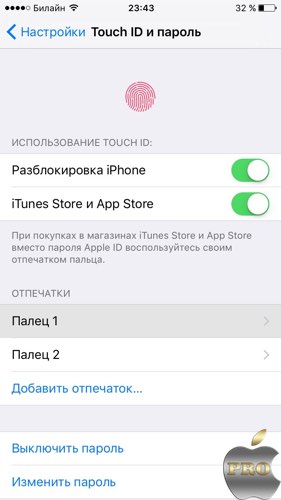
By the way, if you don’t want to enter a password every time you download applications and content, you can activate fingerprint access in the Touch ID settings (settings\u003e Touch ID and password).
On this, perhaps, I finish my brief guide. I sincerely hope that with these tips I was able to save someone from mistakes. Of course, this is not a complete list of everything that can be customized and optimized. Therefore, I am waiting for your comments with recommendations.
Happy New Year! I wish new iPhones and their successful operation! 🙂