Account is not confirmed in the iPhone. If there is no access to the device that uses the iCloud Keychain service. How to configure iCloud keychain feature
To access Apple’s branded services such as iCloud, App StoreiMessage, Facetime, etc. The user of the iOS device needs a personal account called Apple ID. This account consists of a login - it serves as the email address to which the identifier is associated and the password set by the user, taking into account a number of security requirements.
At first glance it seems that such a classic login / password protection seems to be enough, but many users believe otherwise. And, in fact, there is reason for concern. Think for yourself, find out someone's email address Nowadays it is a silly thing - we leave it literally everywhere. It’s also not so difficult to figure out the password - various hacker programs that allow you to select secret codestoday there is a mass.
Understanding this sad scenario, Apple offered the user a new type of protection: for users of old i-devices who cannot upgrade to iOS 9, a two-step test, for those lucky enough to have a younger apple, two-factor authentication.
In general, both methods of protection are very similar, they assume that after specifying the username and password of the identifier, the user must also enter special code. In this article we will tell you what a code is. apple checks ID, where to enter this code and how to enable two-step verification / two-factor authentication for your device.
Two-step test
So what is a two-step test? This is an additional measure to protect access to Apple’s branded services — if you enable two-step verification, the attacker will not be able to log in to this or that i-service, even if he knows the login and password of your personal identifier. For access, he will also need a special code.
In particular, a two-step test protects when trying to unauthorized access to the Apple ID edit page, in iMessage, FaceTime, all content purchase services, as well as in cloud service iCloud - which is especially important, because if an attacker finds himself in your “cloud”, he will not only get access to all your personal data that you back up, but will also be able, for example, to block your iOS device by turning on the lost mode and requesting money for unlock
How do I enable two-step verification?
In order to perform the inclusion of a two-step test, you need to use this simple guide:
Done! Check is activated. Now try to go, for example, in your personal Area on iCloud.com, after entering your login and password, you will be required to indicate in the special window the code sent to the trusted gadgets. If the entered code is not suitable, access will be denied, despite the fact that you know the login and password.
An important point! The most reliable scheme is to use a trusted person as a trusted device of a smartphone and here's why. Imagine having your iPhone stolen, finding out your Apple ID and trying to log in to iCloud to get some confidential information. If you specify the phone number of your iPhone, that is, the stolen one as a trusted person, then the attackers will easily get a verification code and bypass the two-stage verification. If the code comes to another device, the scammers will first have to figure out which one and steal it as well.
How to turn off the two-step test?
If for some reason you find that such a “complex” type of access to proprietary services no longer suits you, you can always disable it, for this:
- Follow this link and enter your Apple ID settings personal account by entering your personal account password and login.
- Click the “Security” menu, then “Edit”.
- Select the "Disable two-step verification" option.
- In the next window, you will be asked to specify your date of birth and verification questions - after you enter these parameters, you will be able to re-use only a couple of login + password to log into all i-services, but you will also be required to log in to your Apple ID management account. answer the questions asked.
Information about the successful disconnection of two-step verification will come to you in the mail.
Two-factor authentication
Two-factor authentication, as well as two-step verification, is an additional measure to protect the entrance to Apple-branded services. Only in the situation of working with two-factor authentication, the security mechanism turns out to be more thoughtful and perfect, according to the “apple” giant.
How to configure two-factor authentication?
As we said above, two-factor authentication is an option not available to all users, but only to those who own mobile i-devices with iOS 9 and more recent versions of the platform loaded on board. Does your gadget meet this requirement? Then we tell how to enable authentication:
That's all! We activated the protection, now we need to configure it:
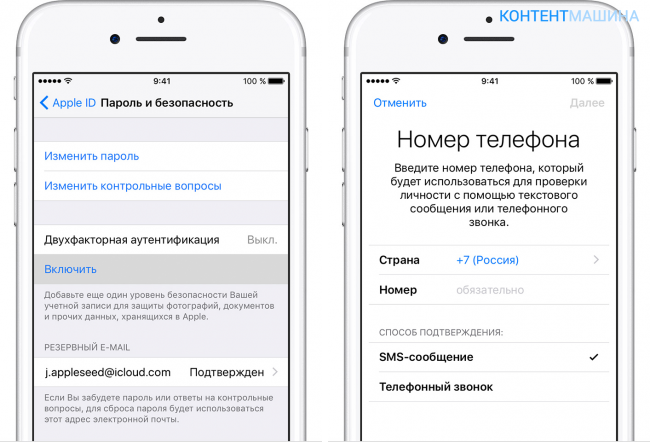
- In the window that appears after authentication is activated, enter the trusted phone number and convenient way to send the code.
- Wait for the code to the specified number.
- Tap "Enable ...".
Done! Protection activated. It operates according to the principle of two-step verification - when you try to log into one or another Apple service, you need to enter not only the login and secret cipher ID, but also a special verification code.
Mac owners can activate two-factor authentication using the following simple instructions:
- Click the menu "Apple", then "System Settings" / "iCloud" / "Account".
- Select the section "Security", click "Enable ..."
Important! Your Mac should have El Capitan OS or a more recent version of the platform installed.
How to turn off two-factor authentication?
In general, the “apple” giant categorically does not recommend disabling protection, but if you decide to do this, you need to go to the Apple ID management page, specify the login, password and verification code, and then select “Edit” / ”Disable ...” in the “Security” submenu. ".
Two-step verification and two-factor authentication: is there a difference?
An attentive reader couldn’t have a question - if the work of the above Apple ID security systems is so similar, then what is the difference between them and why authentication is declared a more advanced user security mechanism. Frankly, there is no direct answer to this question.
Apple itself on the official support page reports something like the following. Allegedly two-factor authentication is an updated protection service that uses more advanced methods for specifying scanned devices and sending confirmation codes, as well as optimizing work in general.
That is, as you can see, the differences seem to be indicated, but nothing is clearly clear. So it remains to trust the company and if your device supports two-factor authentication, choose this type of protection. At the same time, it is important to note that before activating this type of protection, you must first disable two-step verification, if it has been enabled.
Summarize
Well, now you know what two-step verification and two-factor authentication are, how to enable and manage these options. In addition, you realize the importance of activating data protection mechanisms. You can read more about two-step verification and two-factor authentication in the “Support” section of the Apple site.
Apple devices are known to allow two-step authorization. This security method performs at least two authentication checks — a password and a trusted device — to access the account.
Two-step, or as it is also called, two-factor authentication (2FA) provides reliable protection data, since passing it requires not only knowledge of the password, but also physical access to one of the keys, in our case, this is an iPhone or iPad.
Needless to say, we strongly recommend using it on any account on which this is possible. Moreover, if the service does not support 2FA, you should think twice before using it, if the security of your data is important to you.
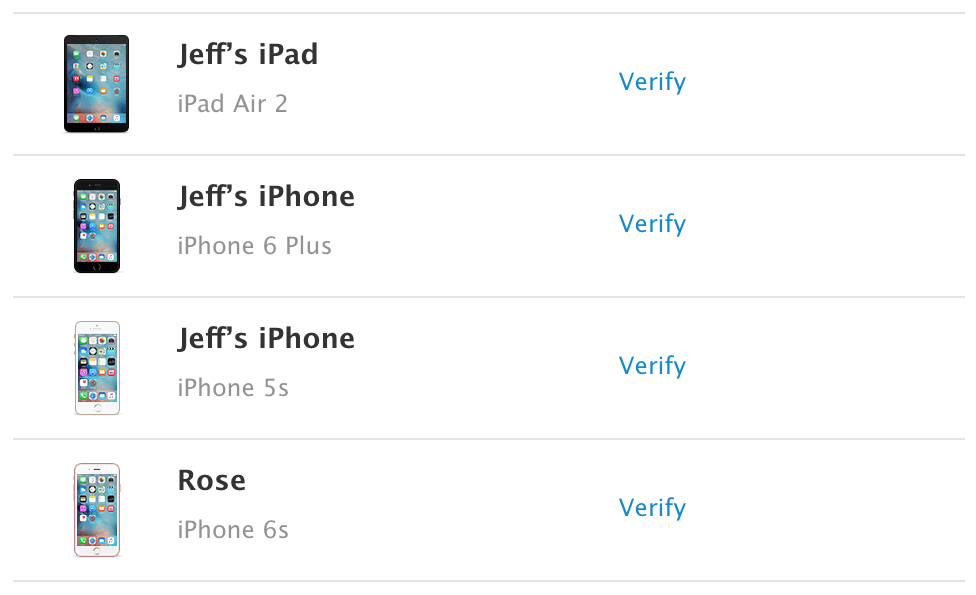
If two-step authentication is enabled on your Apple ID (which, in a good way, needs to be done), then you most likely met with a window that asks you to confirm that you own this account. This screen should list some of your apple devices and at least one certified phone number. These devices act as access keys.
Have you ever wondered what requirements the devices on the list should meet? Or maybe it was necessary to add or remove a device from this list? In this tutorial we will talk about managing trusted devices for 2FA.
How to add a trusted device
To add a device as one of the authentication keys, you just need to enable the Find iPhone service on your iPhone, iPad or iPod Touch. As soon as you enable the function, the device will automatically be added to the trusted list. After that you will need to confirm the addition of this device.
Step 1: Login to iCloud and turn on the Find iPhone service on the device you want to trust in Settings\u003e iCloud.
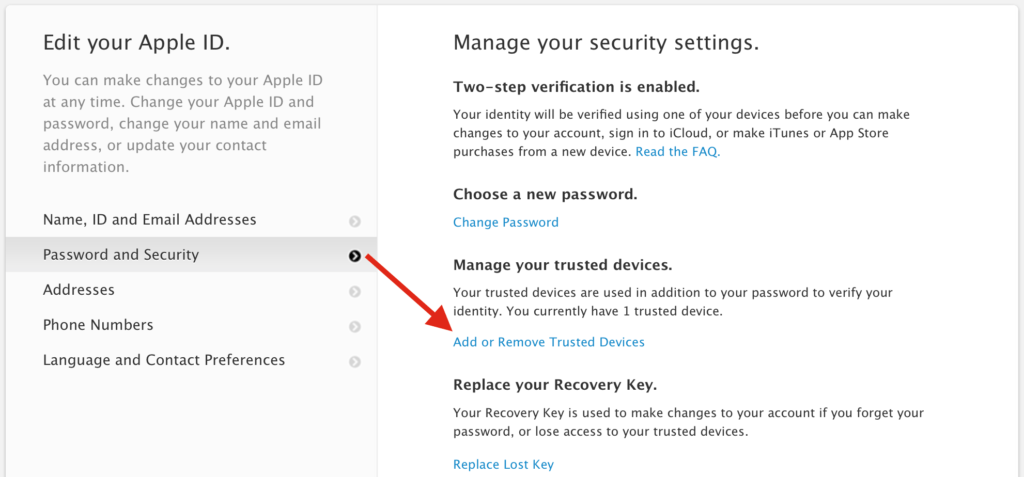
Step 2: In Safari, log in to My Apple ID, go to Password and Security\u003e
Step 4: This device will receive a four-digit verification code.
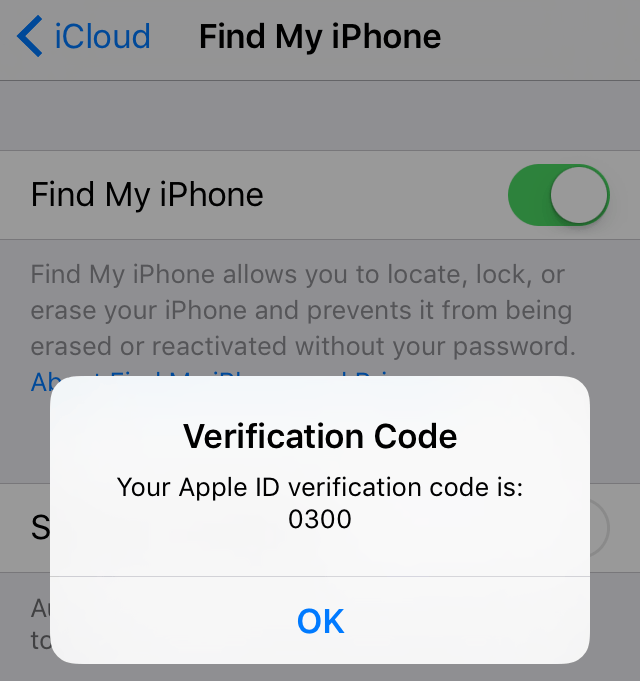
Enter this code in the Safari field and click Confirm Device.

Now you can verify that the device is verified as trusted. Now, whenever you need to use two-step authentication to login to your Apple ID, you can use this device as a key.

How to remove a trusted device
Not surprisingly, devices can also be removed from the trusted list. When you log out of iCloud or disable Find iPhone, your device ceases to be trusted, but it still appears in the list as a possible trusted one.
Step 1: Turn off the Find iPhone feature.

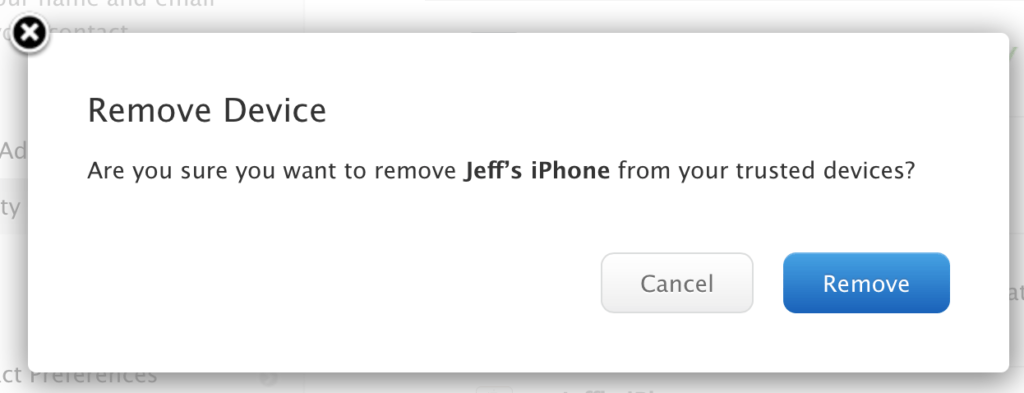
Step 2: In Safari, log in to My Apple ID, go to Password and Security\u003e Add or Remove Trusted Device.

Confirm the deletion.
Here, in general, that's all. In this simple way, trusted devices for two-step identification are added and removed. You will often work with this list, especially if you like to constantly log out and use different devices.
To have access to Apple services, each user must register an account, which is called Apple ID. Like any other account, this also consists of a login and password. As a login, an email address is used, which users "shine" always and everywhere, so it is easy to learn it. Given the large set of programs for the collection and cracking of the password, you can access Apple ID today. Apple understands this, so they offer users current protection — two-step authentication. True, this requires a special code, and many users simply do not know where to enter the Apple ID verification code.
By the way, Apple offers a two-step test for users of iOS 8 (and previous), and for those who are more lucky (for iOS 9 and up), two-step authentication. You should still know where to enter the Apple ID verification code, because both methods are similar to each other.
What is a two-step test?
This is an additional protection, thanks to which no one will get access to the Apple ID, even if he knows the login / password pair. Access will still require a specific set of numbers, which he will not have.
If you do not know where to enter the Apple ID verification code, see the following instructions.
- Go to the official website appleid.apple.com. Enter the username and password, secret cipher.
- We study information about the verification, which is issued automatically. Next, click "Continue." It may be that the information about two-step verification will not be displayed. You can find it in the section "Change - Security - Configure - Two-step verification".
- In the next window, you must enter a phone number. It will receive codes in SMS to perform the check. It is not necessary to choose your phone number. You can specify the number of parents, wife, etc.
- On the next page you need to check the phone you specified. You should receive a code in SMS. Enter it in the window that appears. If not, then click on the button "Send code again."
- After entering the code, the program will offer to select auxiliary gadgets to obtain a verification code. Here you can specify additional trusted smartphones. Each trusted smartphone will have to be confirmed via SMS.
- After confirmation you will see the recovery key. It is complex and unchangeable. It must be kept in a safe place - it will be used in the event that you suddenly forget the password to your Apple ID account or simply lose your trusted smartphone.
- In the next window you will have to enter the recovery code again. This may seem strange to someone, but this is normal. This step focuses the user's attention on the importance of the key. Specify the code from the sheet, not copying it programmatically.
- Last, we accept the verification conditions.

That's it. Check is activated. Now when trying to log in apple account ID will need Apple ID verification code. Where to enter it, you now know. The attacker also knows, but he will not be able to enter the account, since he simply will not have a trusted smartphone.
By the way, it is best to specify a trusted phone not your own, but a close relative. If suddenly someone steals your iPhone, then he can easily log in to Apple ID, because the verification code will be on the same phone.
2-step authentication

There are no practical differences between verification and authentication. At least the user will not notice them. In both cases, you need to know where to enter the Apple ID verification code. In both cases, an SMS with a verification code comes to the phone, after which you specify which account access opens.
Enable authentication in the settings. There is a menu item "Password and ...". Also, authentication may be available in the iCloud settings, in the Apple ID tab - "Password and Security". Click on "Enable". Protection will be enabled, but not yet activated.
Now we need to configure authentication. Enter the trusted number, wait for the code, confirm the smartphone. Now the protection is activated, then you need to figure out where to enter the Apple ID verification code. When you log into any service Apple will need to specify a username and password. And then the code will be sent to SMS. It must be entered after the login / password pair.
What is the difference?

It is easy to see that there are practically no differences between two-step verification and authentication. In both cases, you need the Apple ID verification code to log in, so what's the difference?
Apple argues that two-step authentication is more reliable and modern protection. And although the user does not see the difference, the authentication system more effectively checks devices and sends confirmation codes. Overall, optimization is much better.
Now you know where to enter the Apple ID verification code. But before you need to include protection.
Conclusion
I strongly recommend using this protection. Regardless of what you have operating system (old or new), use two-stage authentication or verification, because this protection negates any efforts of thieves to find out access to the account. Well, if you do not know where to enter the Apple ID verification code, then there will be no problem with this, because the user interface is so simple that even a child can figure it out.
Learn more about the “Bundle” function. iCloud keys».
What is iCloud Keychain?
ICloud Keychain stores current usernames and passwords to websites from the Safari browser, data credit card and information about wi-Fi networks from all approved devices running iOS 7.0.3, OS X Mavericks 10.9 and later.
In addition, it saved accounts Mail, Contacts, Calendar, and Messaging services synced with all of your Macs. And when you log in to Facebook, Twitter, LinkedIn and other Internet accounts, iCloud automatically adds usernames and passwords to all devices.
How does iCloud Keychain protect my personal information?
ICloud Keychain synced with passwords and credit card information is stored only on approved devices. When iCloud Keychain is enabled on a new device, other devices on which this function is configured receive a request for confirmation of an additional device. After confirmation, iCloud Keychain automatically starts updating information on the new device.
Protection of information iCloud keychains in storage and during the transfer is provided.
If used, the device is considered trusted when performing the login. To enable iCloud Keychain, no additional device approval is required.
How to configure the iCloud keychain feature?
After iphone update, iPad or iPod touch Before the Setup Assistant will ask you to configure the iCloud Keychain. If you missed this step, and now you want to install the iCloud Keychain, follow the steps below.
- Click Settings\u003e [Your Name]\u003e iCloud.
- IOS 10.2 or more early version select Settings\u003e iCloud.
- Tap Keychain and slide the slider to enable iCloud Keychain.
On mac running OS X Mavericks 10.9 or later:
- Choose Apple ()\u003e System Preferences and click the iCloud icon.
- Select "Keychain Bundle". If necessary, you can set a password to unlock the screen after sleep mode or after activating the screen saver.
- Enter your Apple ID and password.
- Follow the onscreen instructions.
On every device you want to add. When iCloud Keychain is enabled on a new device, other devices on which this function is configured receive a request for confirmation of an additional device. After confirmation, iCloud Keychain automatically starts updating information on the new device. If used, you can enable iCloud Keychain without getting approval from the device.
What is iCloud security code?
When setting up the iCloud Keychain feature, you can create an iCloud security code. This can be a six-digit code, a complex alphanumeric code, or we can create an arbitrary code for you. The iCloud security code is used to authorize additional devices in the iCloud Keychain feature. In addition, it allows you to identify the user and open access to other features of the iCloud Keychain feature, for example, to restore its data in case of loss of all devices.
How can I configure the iCloud keychain feature on a new device so that approval from another device is not required?
If you do not have access to any of your devices on which the iCloud Keychain feature is configured, you can still on another device if you have:
- ICloud security code.
- Devices with a phone number specified when setting up iCloud Keychains, and the ability to send SMS messages. An SMS with a confirmation code is sent to this number. If this number is not available, contact Apple Support to verify your identity and complete the function setting on the new device.
After the setup is completed, the iCloud keychain settings will be transferred in push mode from the cloud to the new device.
If used, enter a password and a six-digit verification code that is automatically displayed on trusted devicesand authorize a new device. Then enable the iCloud keychain.
Can Apple Support recover iCloud security code?
Not. If the number of incorrect iCloud security code entries exceeds the allowed threshold, you will lose access to the iCloud Keychain feature. In this case, contact Apple Support to verify your identity and re-enter your iCloud security code. After a certain number of incorrect entries, iCloud Keychain will be removed from Apple servers and will have to be reconfigured.
Can iCloud Keychain be configured so that information is not stored in iCloud?
Yes. When setting up the iCloud Keychain feature, you can skip the step of creating an iCloud security code. Then the relevant data will be stored locally and updated only on devices approved by you.
If you do not create an iCloud security code, Apple will not be able to assist in restoring the iCloud keychain.
To configure the iCloud keychain feature without creating an iCloud security code, follow these steps:
On an iPhone, iPad, or iPod touch:
- Select Settings\u003e [your name]\u003e iCloud and click Keychain. In iOS 10.2 or earlier, select Settings\u003e iCloud and tap Keychain.
- Enter your Apple ID password.
- When you are prompted to use the device password as the iCloud security code, click Generate Another Code.
- Open Advanced Options, then select one of the following options.
- "Do not create a security code." If you do not create an iCloud security code, your iCloud keychain is stored locally on your device, not on Apple servers, and will only be updated on devices that you have approved.
- Choose Apple ()\u003e System Preferences.
- Click the iCloud icon, and then select the Keychain check box.
- Enter your Apple ID password.
- Click Advanced, then choose one of two options.
- "Get a random security code."
- "Do not create a security code." If you do not create an iCloud security code, your iCloud keychain is stored locally on your Mac, not on Apple servers, and will only be updated on devices that you have approved.
- Follow the on-screen instructions to complete the iCloud keychain configuration.
What happens if I disable the iCloud Keychain feature on my device?
When you turn off the iCloud Keychain feature on your device, you are prompted to select an action: save or delete stored passwords and credit card information. When you select the first option, the data is not deleted, but not synchronized when they change on other devices.
What credit card information is stored in iCloud Keychain?
ICloud Keychain stores credit card numbers and expiration dates. Credit card security codes are not stored or filled automatically.
Does iCloud Keychain work with third-party software?
Yes. Developers can update programs to work with iCloud Keychain. Then the passwords saved by the programs will be synchronized with the passwords on other devices running iOS 7.0.3, OS X Mavericks 10.9 or later versions on which these programs are installed.
Can I delete my iCloud Keychain data from Apple servers?
Yes. Follow these steps on iPhone, iPad, iPod touch, or Mac devices using iCloud Bundle:
On an iPhone, iPad, or iPod touch running iOS 10.3 or later:
- Click Settings\u003e [Your Name]\u003e iCloud.
- In iOS 10.2 or earlier, select Settings\u003e iCloud.
- Click Keychain\u003e Advanced.
- Turn off the Confirm with Security Code option.
- Disable the iCloud keychain feature on all devices where it is enabled.
On a Mac with OS X Mavericks 10.9 or later:
- Choose Apple ()\u003e System Preferences. Click iCloud, then select "Account".
- Deselect Allow Confirmation With Security Code.
- Disable iCloud Keychain on all devices where it is enabled.
After completing these steps, the data from your Keychain will still be stored on local devices, but until iCloud Keychain is disabled, changes will not be synchronized with other devices. If you want to send keychain data in push mode to all your devices, but not to the cloud, but do not create an iCloud security code.
Publication date: 06/20/2017