Xiaomi Mi Wi-Fi USB Adapter - Visual Instructions
Using a Wi-Fi USB adapter as an access point in Windows 7
You can get an access point using a modern USB Wi-Fi adapter, using it asthe point wi-Fi accesswith the support of the latest Virtual Wi-Fi technology (implemented in uSB drivers devices). It is possible to connect several Wi-Fi clients to the access point with the help of technology.Virtual Wi-Fi (supported by Windows 7). Unlike Ad-Hoc mode (“point-to-point”), Virtual Wi-Fi has the ability to connect multiple devices and use a more reliable encryption method (WPA2).
Implement Virtual WiFi in Windows 7
Virtual WiFi is implemented in Windows 7 at the kernel level and allows you to organize a software access point (Soft Access Point or virtual access point), if manufacturers wireless adapters implemented in the drivers of their devices support for this mode of operation. Virtual WiFi technology allows you to connect up to 100 clients to a software access point.
For use as an access point is perfectWi-Fi USB D-Link DWA-140 adapter. The device has support for Virtual Wi-Fi technology. Easy installation: you just need to connect the D-Link DWA-140 adapter to a computer with an internet connection, after which Windows 7 will detect the device and automatically download and install the driver.
A list of Wi-Fi USB adapters is available at the following links: Virtual Router. These links allow you to download special applications for using the Wi-Fi USB adapter as an access point, since there is no integrated application in Windows 7. I advise you to use Connectify Lite version, as the functionality of the free Lite is quite enough and the need for the Pro version disappears. Connectify Lite can also work in Ad-hoc mode, which allows you to create a network between two clients (point-to-point). You will need this mode if the manufacturer of your USB adapter does not implement Virtual Wi-Fi support in its drivers, but the client must support it in order to connect in Ad-hoc Wi-Fi mode. Very often, this mode is not supported by computers and laptops.
Instructions for setting up a Wi-Fi adapter as an access point
Connect to computer wi-fi USB adapter and install the drivers from the disk or download from the device manufacturer’s website (if Windows 7 does not install them itself when connected to the Internet).
Install Connectify on your computer (link to the application above), after installation in the program icon will appear. Open the program and in the window that appearsset wireless network namein field Hotspot Name,and in the field Password Set a password to connect to this network. You will enter this password on your wireless clients when you first connect to a Wi-Fi network.In field Internet Select the network adapter with which your computer is connected to the global network.
In field Advanced - Wi-Fi select the wireless adapter that will act as the access point. AT Advanced - Security modefor the adapter works as an access point (Access point) Only WPA2-PSK encryption can be used.
Attention! If the Wi-Fi client does not support such encryption, you will need to connect it in Ad-Hoc mode with WEP encryption (Ad-Hoc, WEP). Due to the vulnerability modeAd-Hoc, Open I highly recommend not to use it.
After making all the settings click Start Hotspot.Now inturn on any Wi-Fi client and search it wireless networks. Find your network in the list (the name starts with Connectify) and connect to it using the previously entered password in the settings.To shut down virtual point access click on the buttonStop Hotspot.
Information technology does not stand still, every day miniature wireless devices are beginning to get up more and more sophisticated operations. More and more ways are becoming available.connect multiple computers to the internet at home. For example, todaymake internet on 2 computers possible using modern USB WiFi adapter turned by manipulating Windows 7 into a full-fledged wirelesswi-Fi access point (t. Access Point) . To a similar improvised access point, obtained from the USB adapter, you can connect several wireless clients at once -laptops , communicators and even other computers with YUSB Wi-Fi adapters. Such a connection is made possible by the Virtual Wi-Fi technology, the support of which was incorporated in Microsoft Windows 7. Compared to the configuration in the Ad-Hoc mode, in the Virtual WiFi configuration, we have the ability to connect several devices to the USB adapter and use stronger encryption (WPA2 PSK instead of WEP).
Virtual Wi-Fi operation scheme
What USB adapters can be turned into an access point using Virtual Wi-Fi technology
Any USB adapter, the manufacturer of which has implemented support for Virtual Wi-Fi technology in its drivers, will be suitable for our purposes. This is a key point in this undertaking. If there is no support for “Virtual Wi-Fi”, then the work of the USB adapter asaccess points also impossible.
As an example for writing this guide, we will useWi-Fi USB adapter D-Link DWA-140 . It is distinguished by the optimal ratio of price and quality, while it has the support of 802.11n and is widely distributed in the trade network. But the most important thing, of course, is the presence of Virtual Wi-Fi technology support in the drivers. this device. You do not need to install any special drivers; you just need to connect the DWA-140 to a computer with Internet access, after which Windows 7 will download latest version drivers when you first connect and automatically install the device.
Working with other models of Wi-Fi USB adapters as an access point using Virtual Wi-Fi technology is also possible. You can find a list of compatible models on the websites of software developers that can be used for customization, this is -Virtual Router and Connectify. In fact, these programs are graphical shells that work with the netsh snap-in in Windows 7 through the console. These programs make this process not only intuitive, but also user-friendly. Why Microsoft didn't make its own graphical management interface - it remains a mystery ...
At the preparatory stage, we recommend that you download one of the above programs. The Virtual Router is completely free, and Connectify, even without a purchase, has all the necessary functionality, so there will be no problems with their further use. If you choose any particular program from these two, then Connectify has more opportunities, since it can also transfer the USB adapter to Ad-hoc mode, which allows you to create a peer-to-peer network. This is useful if the manufacturer of your USB adapter does not implement Virtual Wi-Fi support in its drivers. Then the connection via Ad-hoc can become a lifesaver, the main thing is that the Wi-Fi client, which you will connect to the USB adapter via a wireless network, supports the Ad-hoc connection mode. Almost all communicators and smartphones do not know how to do this, unlike laptops and PCs.
What needs to be done to make it work?
So let's get started. First of all, download the Connectify program to your computer, which will act as an access point from the USB Wi-Fi adapter. You can download iton the manufacturer's website .
Next, connect to your computer usb adapter and install drivers for it. There is one delicate point here, it is better to trust Windows 7 itself to download the drivers for the USB adapter, so the higher the probability that they will already be with the support of Virtual Wi-Fi technology. If you have Internet access on the computer in which you plug the USB adapter,operating system it will download all the necessary. If it turned out that Windows could not find the necessary drivers in the update center, then use the drivers that came on the disk with the wireless device.
Then install Connectify to yourcomputer here everything is very simple and is no different from most installations that you have repeatedly had to perform. After installation, an icon from the Connectify program will appear in the tray (see Figure 1)
Fig. one
Next you need to set a name for our wireless network ( SSID), which you can specify in the field Hotspot name. Unfortunately, in free version Connectify cannot remove the prefix at the beginning of the network name. Therefore, the first part of the name will always contain the name of the program at the very beginning.
In field Password should set a password to connect to the wireless network. For reliable protection It is enough to specify a password consisting of 8 characters, in which capital and capital letters, numbers and special symbols. You will enter this password on your wireless clients when you first connect to a Wi-Fi network.
In field Internet you must select the network adapter through which this PC accesses the Internet. In our case, this is Connection by local network, one of the two network cards installed in the computer and connected to the provider via network cable (see fig. 1).
Let's look at the possibilities in the field. Advanced (see fig. 2)
Fig. 2
In option Wi-Fi Sets the type of wireless adapter that we turn into an access point. Actually, if you have only one Wi-Fi adapter in the computer, then there will be no problems with the choice here. If there are two adapters, then it is necessary to choose among them a USB device, which we will use as an access point.
Next we look at the option Security modethat controls the type of encryption in our wireless network. Selected option of the adapter as an access point ( Access point) makes it possible to use only WPA2-PSK on the network, which imposes certain requirements on compatibility with wireless clients. If your wireless client does not support such encryption (for example, it is very old), then you will have to try to pick it up in Ad-Hoc mode using more simple WEP encryption ( Ad-Hoc, WEP). By the way, it is also vulnerable to hackers who can access your home network). The password for the WEP option must be 5 characters. Option Ad-Hoc, Open We do not recommend using it, because anyone can hook onto such a network, and the data will be transmitted through it without any encryption. In the latter case, your passwords from ICQ, email and social networks I can become the property of intruders.
So, the basic wifi settings made, it remains only to run our access point from the USB adapter. Although, wait ... Why the access point? Essentially we succeededWi-Fi router from computer and USB adapter! After you press the button Start hotspot, we will have another NAT on the network and even a DHCP server (see Figure 3):
Fig. 3
Well, almost everything! We just did wireless router from USB adapter and computer. Now you can connect to it the first wireless client. We turn on a laptop, smartphone or tablet and do a search for wireless networks nearby through the built-in tool for working withWi-Fi . We find there our network, the name of which begins with Connectify- and connect to it using the password we specified when configuring the encryption settings in Connectify. After connecting with our improvised Wi-Fi router from scrap materials in the tab Clients Information about the wireless clients connected to the access point will appear (see Figure 4).
Fig. four
The power of the wireless signal from the received own hands Wi-Fi routersurely can't compare with anyD-LINK DIR-655 but it should be enough for one room. You can connect several more devices to it and connect to the Internet at the same time. If you want to turn off an impromptu access point, then just click on the button Stop Hotspot (see fig. 5)
Fig. five
That is, perhaps, all that I wanted to say about setting up the program Connectify.
Good afternoon, the community!
I have a desire to organize at home Wi-Fi point access for mobile devicesvia available USB Wi-Fi network card. The workstation is always on, and the table is lying USB whistle TP Link WN321G, why not use. Included is a software that allows you to switch the network card to the access point (AP) mode. However, in order to do this, you need to manually start the TP Link utility, and then select the mode in it. Of course, there is no question of any autorun of the access point when the computer is turned on.
Having read the manuals a little, it was possible to implement it quite simply and without using utilities, standard means Windows Perhaps this little instruction will be useful to someone.
So. Step one. We stick USB Wi-Fi network card. AT network adaptersA new interface is expected.
To create a virtual adapter, which in Windows will play the role of an access point, you can use the following commands:
netsh wlan set hostednetwork mode = allow ssid = my_name key = my_passs
Netsh wlan start hostednetwork
Where my_name is the SSID name of our network, and my_passs is the password (8 characters)
Save the code in a bat file and run it with administrator rights. We see the new Microsoft Hosted Virtual Adapter.
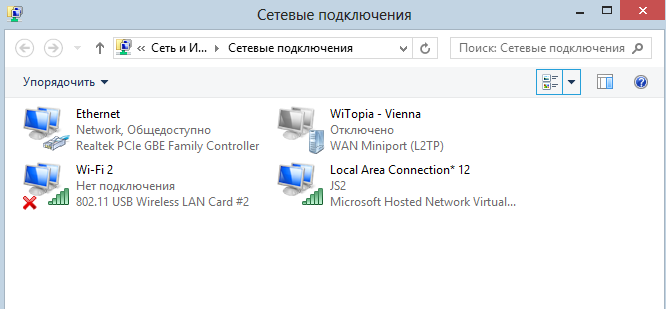
The next step is to distribute the Internet via the Ethernet interface. To do this, in the properties of your adapter, select the Access tab, and enable the access permission option with the virtual network name.

Conveniently, these settings are saved even after we stop virtual network.
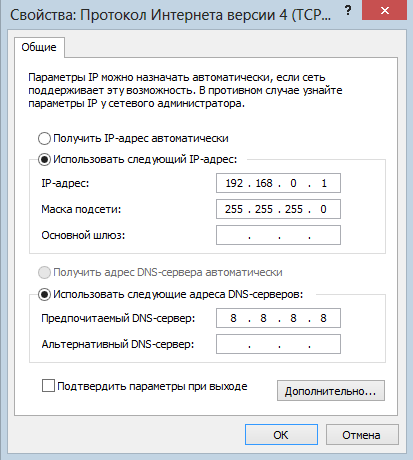
Additionally, you can specify the DNS in the settings of the virtual adapter.
It remains to add the launch of the bat file through the task scheduler. I recommend doing a postponement of the assignment for 15 minutes. If this is not done, then my network did not rise. I use the task scheduler, not autorun because execution with admin rights is required (UAC is enabled).
That's so easy, and without the use of third-party utilities, you can raise the access point on Windows.
Tags: wi-fi adapter, access point
Another small, but very proud device, which you can not do without if you want to connect your desktop computer to wireless internet. (Mi Pocket) competes with the most inexpensive devices of this type, while providing a little more options than others.
Xiaomi produces several models of wifi adapters, a characteristic feature of which is the presence of built-in flash memory of different sizes. We have on the test was the most budget option, which we purchased in a well-known store.
It is slightly larger than a ruble coin, due to which it will not interfere with the protruding parts from the USB port of the computer or laptop. Our copy is brand white, although there is a whole palette for sale.

The delivery package is also very budget - it is a small packing bag, a cap on the USB port and a string.

The adapter supports 2.4 GHz, Wi-Fi 802.11N, up to 150 Mb / s is the most first level, but it is enough for everyday work with the Internet.
Installing Xiaomi Mi Wi Fi adapter and access point mode
In order to fully use the device I needed to do a certain job of finding drivers and software. This is due to the fact that the Xiaomi Mi WiFi Adapter is made exclusively for the domestic market and all programs for it are in Chinese. But of course, craftsmen-programmers have already managed to work and translated part of them into Russian, part into English. I have collected them into a separate archive, which needs to be downloaded from our repository, and now I will tell you how to properly install all this farming.
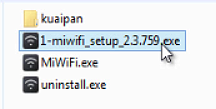
First, install the file on your computer 1-miwifi_setup_2.3.759.exe - This is a Chinese original program with drivers. After that, copy the two remaining files “MiWiFi.exe” and “uninstall.exe” and the folder “kuaipan” to the folder where you installed the program - and replace the originals with them. These are standard-language substitutes translated into understandable language. We start the established program - it will ask to insert the adapter into the PC.
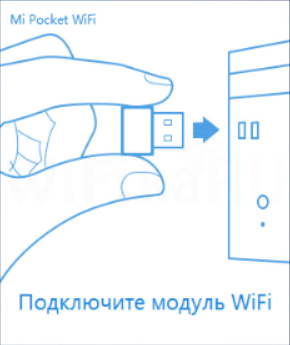
We connect the adapter to the USB connector of the computer - it is automatically recognized and starts working in the access point mode, generating the network SSID and password to connect.
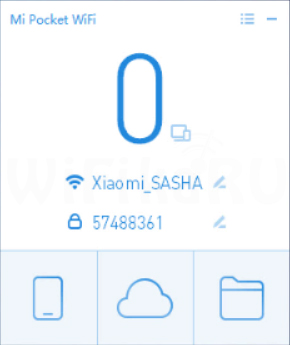
After connecting to this point of the smartphone, a new window informing about this was opened, and in the main window of the program the number “1” appeared by the number of connected devices.

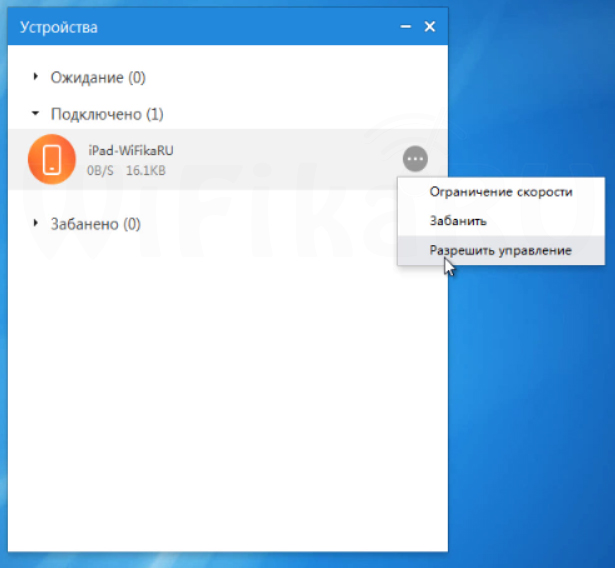
If you click on this figure, a list of connections will open and the ability to manage them - limit the speed or ban.
In the main window of the program there are three main menu items - let's take a closer look at them. The first is a call to the same netlist, so we’ll skip it.
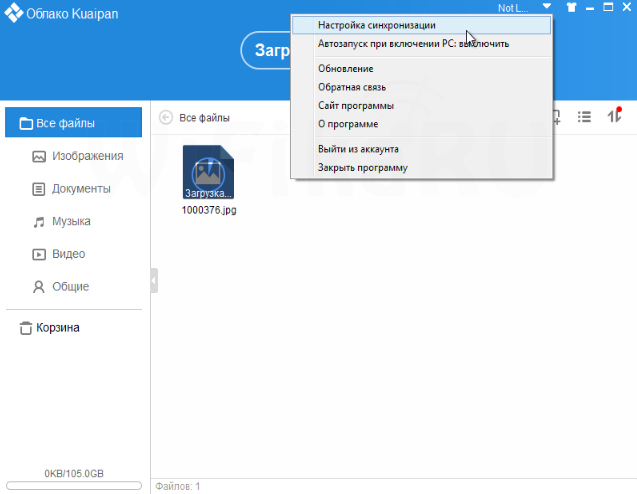
Second - launch cloud service Kuaipan, with which you can share files over the Internet between gadgets and computers.
It is immediately available for download without registering 105 gigs of cloud storage for documents.

This is in principle more than enough for everyday needs, but it is even better to have account, then the place will immediately increase to 1 terabyte. To do this, go to the menu "Not Login", section "Sync Settings".

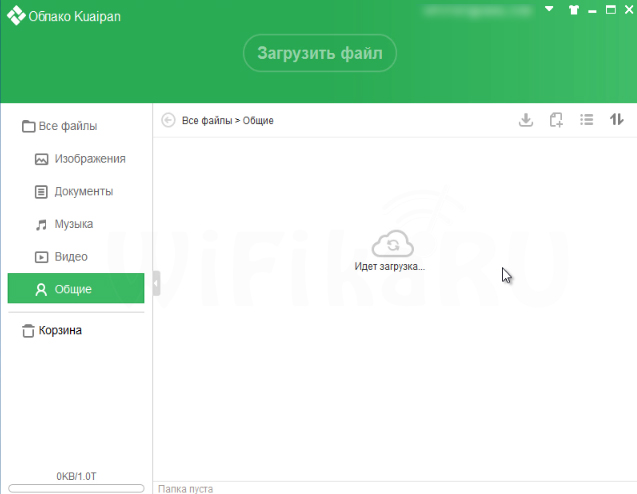
After that, the program changes color to green - now you can upload files here and then download them when logging in to the service on another computer.
If the MiWiFi program is not installed on another computer, then you can enter the service through the site kuaipan.cn - the site in Chinese, through the plugin-translator in the browser we do the translation into Russian. Then either we go through the account on Kuaipan again, or, like me, I select at the bottom in the list I authorize through Xiaomi.

We fall into your account, where we find the downloaded files. Here you can delete them, rename or share them.
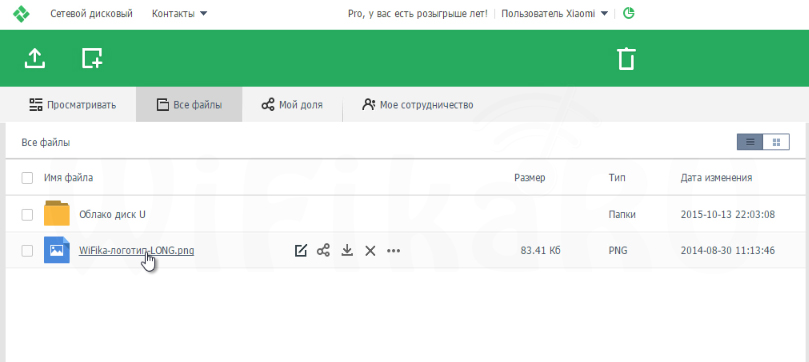
Third point as a folder - sharing files inside your home network using the built-in flash memory adapter. Download the file here, after which it will appear in the list.
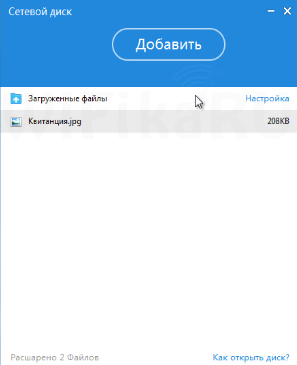
Now, to download it from another computer, click on the link "How to open a disk?". For access from a PC or laptop, a link to the IP address will be displayed. For downloading from a smartphone or tablet - QR code. In my opinion, a very cool solution for those who need to transfer files from one computer to another via WiFi, but at the same time cannot share folders on the computers themselves.

WiFi adapter mode, or client
Now let's try to switch the Mi Pocket Adapter to the mode of receiving a signal from the router to the computer. To do this, select the menu "Client Mode"

After rebooting, select via standard windows application access point, connect and information appears in the program window.

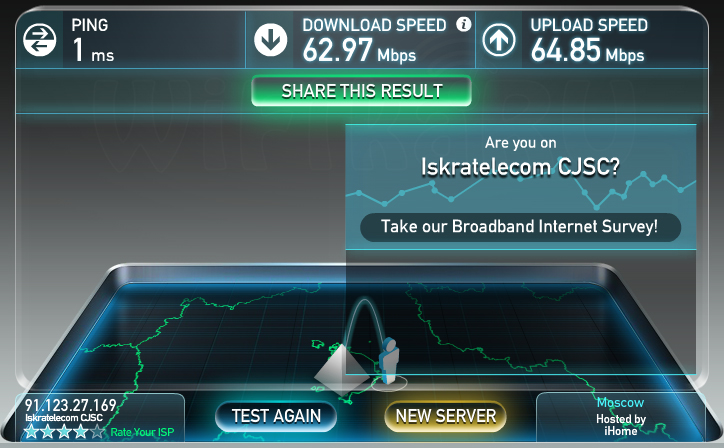
Speed tests
In terms of speed, we did not expect anything special - after all, the device is budget and specifications do not shine. But at the same time, the adapter copes with its tasks perfectly and, surprisingly, does not squander the Internet speed.
Access point from Wi-Fi adapter
1) Download and install the program for free.2) After when the installation utility Ralink completed, we restart the computer. After Windows restarts, the Ralink icon will appear in the tray (lower right corner of the screen where the watch is).
3) Click the icon Ralink right click mouse, and select "Switch to AP"
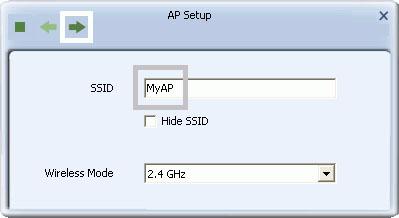
4) A window with settings should appear in front of us:
5) Setting up the program will be clear from the pictures and small explanations:
Configure the security of your network.
Click the Setup AP button to start configuring your AP.

Enter your network name (SSID) using up to 32 ASCII characters.
Click on the arrow to go to the next settings screen.
SSID: This is the name of your network. Leave the default, or write your name for ease of use.
Hide the SSID: We enable this feature at the end of the settings to hide the name of your network from computers or hackers devices. (if nessesary)
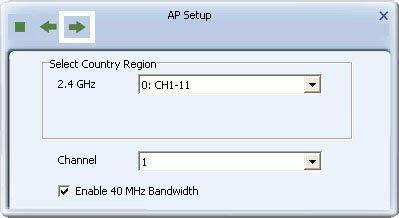
Wireless Mode: Choose a wireless mode that is compatible with the standards supported by the devices on your network. IEEE 802.11b / g / n all support 2.4 GHz, while IEEE 802.11a supports 5 GHz. If the hardware is compatible, keep the default.
In the list "Select Country / Region" leave unchanged. Click the arrow to go to the following settings.
Channel: Leave this default if there are problems in the network, change the channel, select the one on which the broadcast is least clogged. If you have enabled, “Allow BW 40 MHz”, select a channel with minimal clogging of the air.
Allow BW 40 MHz: Activating this feature can increase the bandwidth available for your wireless connection. This mode is supported only by IEEE 802.11n devices. If the computer or device associated with the AP does not support this feature, the bandwidth is reduced to its default level.
Configure the security of your wireless network.
It is recommended to choose the most high level protection.
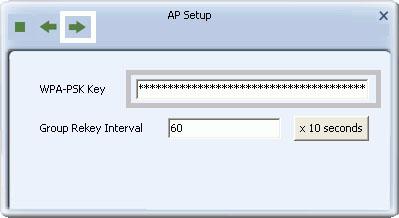
Authentication: Choose the most powerful security mode supported by your network. Options include Open, Shared, WPA-PSK, WPA2-PSK, or WPA-PSK / WPA2-PSK.

In the WPA-PSK field, enter the security key with 8-63 characters, it must contain "0" - "9", "a" - "z", "A" - "Z", and spaces.
Key Change Period: The interval after which the AP re-queries the group key. It works in "x 10 seconds" and "x 1000 packets" modes. Leave the default setting.
Adjust transmitter power.
No package exchange among customers: If enabled, then damage to the sent AP packets or packet routes sent by network users to other users on the same network is disabled.
Beacon interval (ms): The interval between frames "malfunction".
Transmission power: transmit power. If the network is within the same room, then you can put a minimum level of power.
Idle time (60 - 3600) (s): Maximum connection time of a computer or device that may be inactive before the device is disconnected from the network.