Disable windows 7 system recovery on boot. Disable automatic recovery. Disable Windows recovery through the registry
System recovery is a function that is designed to solve problems that have arisen in the OS due to a malfunction or incorrect actions of the user. But in addition to the positive assignment, the tool has a number of significant flaws that force PC owners on Windows to disable system recovery. This can be done in three ways:
- Through the user interface;
- Using the group policy editor;
- Using the registry.
Reasons for Shutdown
There are two main reasons for which you may need to disable the rollback feature:
- Viral threat.Some malware prescribed in the recovery environment. That is, after removing the virus without confirming the user, the procedure for rolling back the OS is initiated at the time when Windows was infected;
- Efficiency. The more information stored on the hard disk, the more massive the recovery point. In some cases, its volume can reach several gigabytes, and if there are several points?
If you decide to disable system recovery, it is important to remember one thing: in case of loss of important system files due to a virus or other failures that could seriously damage Windows, instead of rolling back, you will have to completely reinstall the OS with possible data loss.
Disable OS recovery through the shell
The easiest way to disable system recovery. Ideal for inexperienced users, as the steps are quite simple.
Algorithm:
It is worth mentioning about the use of disk space. If the computer has low memory, reducing this figure (the default is 5 GB, but if necessary, the volume automatically expands) is a great alternative to disabling system recovery. So, a gigabyte will be enough to store one or two checkpoints per reserve.
Disable Windows recovery through the registry
For inexperienced users, it is better not to go into the registry, since there are a lot of important parameters for the OS, which can be changed by completely disabling Windows.
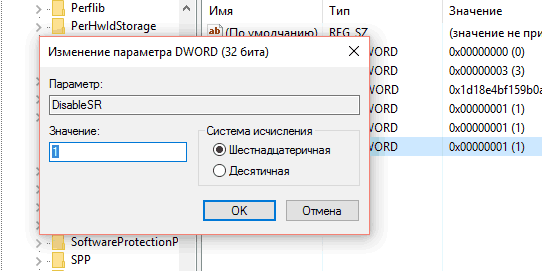
Despite the complexity, the method is worth its use. Using the registry, you can disable system rollback in any situation, even if the virus has blocked the ability to enter the recovery tool through the user interface. The main thing is not to change any third-party parameters in order not to complicate the situation.
Disable Recovery through Group Policy Editor
This method will help if you can not turn off the rollback function in the usual way through the control panel. Algorithm:

After these actions, the rollback tool on Windows 7 will cease to operate.
Disable automatic recovery
Automatic OS rollback appears, as a rule, after a power failure and abrupt shutdown of the computer. From an objective point of view, the possibility is of little use and rather annoying, therefore many users would like to get rid of it. For this:
- We start the console on behalf of the administrator;
- Enter the command to disable the automatic rollback of Windows:
bcdedit / set bootstatuspolicy ignoreallfailures
Pressing enter will disable the function.
Video for clarity, which details how to disable the rollback tool through the easiest way - the user interface:
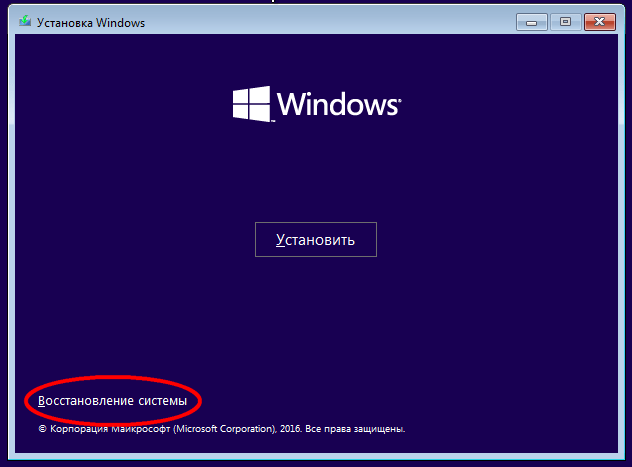
If you experience serious problems that do not allow Windows to boot normally, the built-in wizard usually offers to perform a repair. However, if an error occurs during the recovery process itself, the process may loop and the system will start recovery at each new boot. Of course, reinstall Windows solves the problem, but you lose everything installed programs. Well, if you have taken care of creating a full backup copy system, and if there is no such copy?
However, this is not a sentence. You can try to "knock out" the system from the recovery cycle, using this instruction. All you need is an installation CD with Windows and a little attention. Having installed the boot from external media in the BIOS, insert the disk and boot from it. The Windows Setup menu appears.

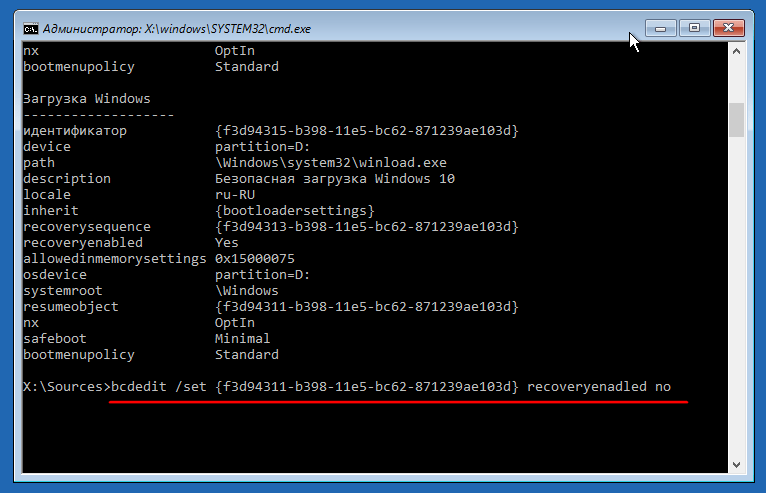
Run the bcdedit command in the console that opens.
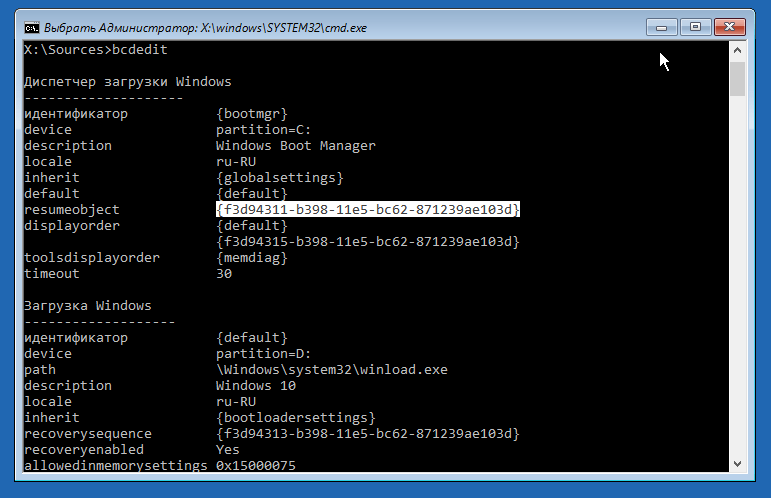
As a result, you will receive a list of boot options. In the first “Windows boot” block, find the resumeobject line and copy the identifier opposite it.

Now run the bcdedit / set (GUID) recoveryenabled no command, substituting your ID in place (GUID).
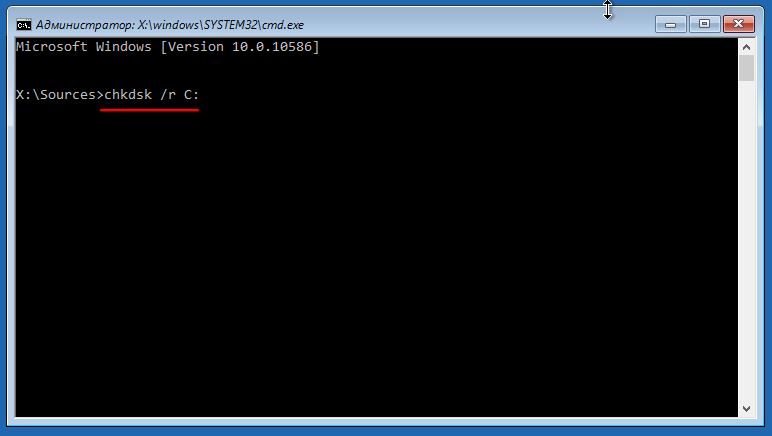
Thus, automatic recovery will be disabled and the cycle will abort. Deactivating the recovery procedure, however, does not eliminate the errors that caused it. Therefore, it is highly advisable to check file systemby doing in command line chkdsk / r c:.
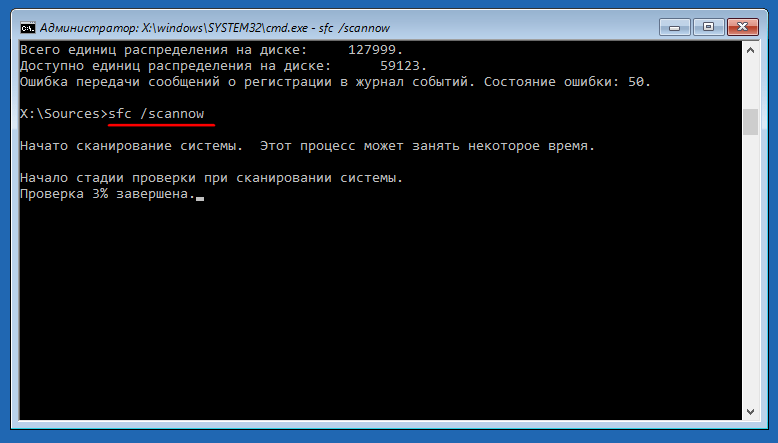
And if it does not give positive results, you can run the command sfc / scannowaimed at recovering damaged system files.
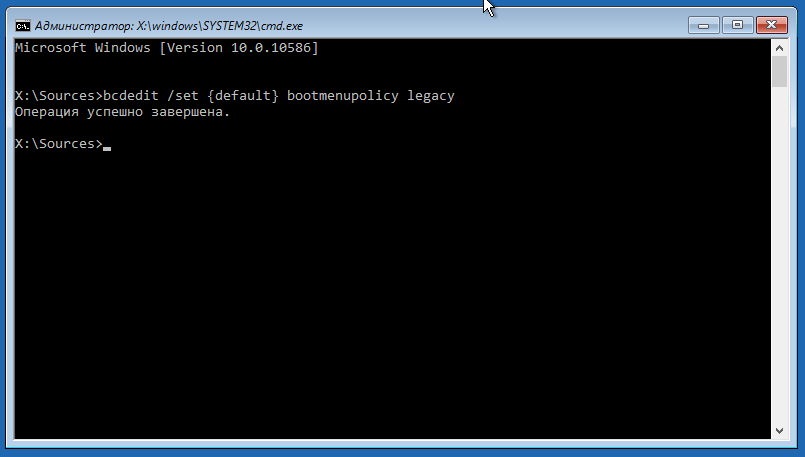
You can also turn on the boot manager, called, as in Windows 7, by pressing F8 immediately after turning on the computer. To do this, run the bcdedit / set (default) bootmenupolicy legacy command in the running console.
If all this does not help to start Windows, you will most likely have to go to radical options - reinstalling or resetting the system to its original state.
Have a great day!
Integrated master windows recoveryIt usually offers to restore the system when serious errors are detected that prevent the OS from booting. However, when a problem appears during a recovery operation, the process loops, and the system, after a restart, restarts recovery. Solving such a problem will help reinstall the system, but in most cases there is no such possibility due to the loss of installed programs.
However, there is a solution. Pull the system out of the recovery cycle, possibly due to this manual. You will need a bootable media with Windows and a little time. Having set the BIOS to boot from an external device, insert the storage medium and run it from it. You will see the Windows installation menu.

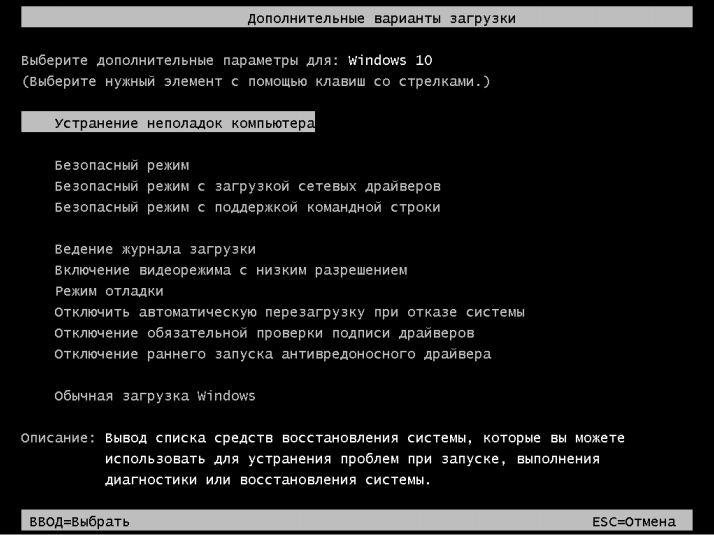
Click “System Restore” -\u003e “Troubleshooting” -\u003e “Advanced Settings” -\u003e “Command Line”.
In the console that appears, run the bcdedit command.
As a result, you will see a list of loading criteria In the Windows Boot Manager box, find the resumeobject line and copy the identifier (GUID) across from it.
After that enter the bcdedit / set (GUID) recoveryenabled no command, substituting the GUID copied above.

As a result, automatic recovery will be turned off, and the cycle will end. Next, you need to eliminate the errors that caused the loop. To do this, run the file system for verification by entering into the console chkdsk command / r c :.

In addition, you can enter the command sfc / scannow, which will restore the system files.