How to temporarily disable windows 10 protector. How to enable, configure and disable Windows defender - detailed instructions
Windows Defender is Microsoft's own antivirus, which has begun to integrate into all versions of their operating systems since 8. The native protection system works in such a way that if you do not install a third-party anti-virus product, it alerts you to security, but as soon as you download and install another Antivirus, a tool from Microsoft will turn off automatically and give way to a new program. Formerly windows Defender scolded, but after the 2016 update, it was seriously improved and began to receive more and more positive reviews. Whatever it was, the choice of antivirus is your purely personal matter, so in this article we will discuss in detail the topic - how to disable windows defender 10 forever and for a while.
We will talk not only about how to neutralize a regular antivirus, but also provide several ways to do this, of course, also show how to turn off the program for a while, then to return the protection. This may be necessary, for example, when installing a game with a crack. There is a situation when the Windows defender informs us that the application is disabled and does not want to work. This problem we'll figure it out too.
After the August 2016 update, the antivirus icon began to appear on the taskbar. The icon can be removed, while the defender himself will continue to work quietly. To do this, do the following:
- Open Task Manager (right click on the free space of the taskbar).

- The task manager itself will open, we need to go to the “Startup” section and right-click on the “Windows Defender notification icon” entry, in the appeared menu select the “Disable” item.
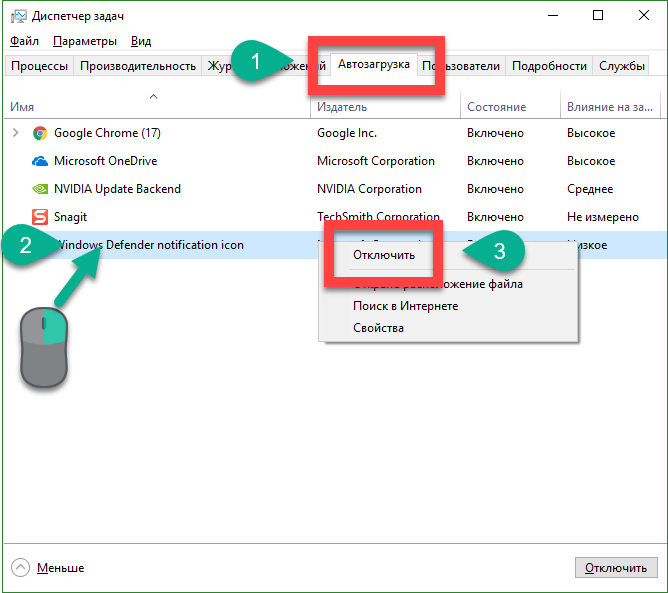
After that, the icon will disappear from the taskbar and will no longer be displayed. For the changes to take effect, you must restart the computer.
Disable any antivirus, like Windows defender, is possible only for a while or for the purpose of replacement. There are situations when we want to install useful program, but for some reason, it is perceived as a virus. That's when you need to get the defender to change his opinion. But in such a situation, it would not be right to deactivate the antivirus, but to add the program to the “white list”. How this is done we will describe a little below.
Another option that requires disabling Windows Defender is to replace it with another antivirus that you download from the network yourself. Microsoft envisioned a situation of replacing security software with a third-party one and when installing another antivirus, the protector automatically shuts down. Sometimes it does not work and then you have to manually disable the program.
Disable Windows 10 Defender
We are starting to turn off Windows Defender. Before you do this, carefully read the previous section. Deactivating a full-time anti-virus without installing a new one can result in loss of personal data or a system crash.
Check antivirus activity
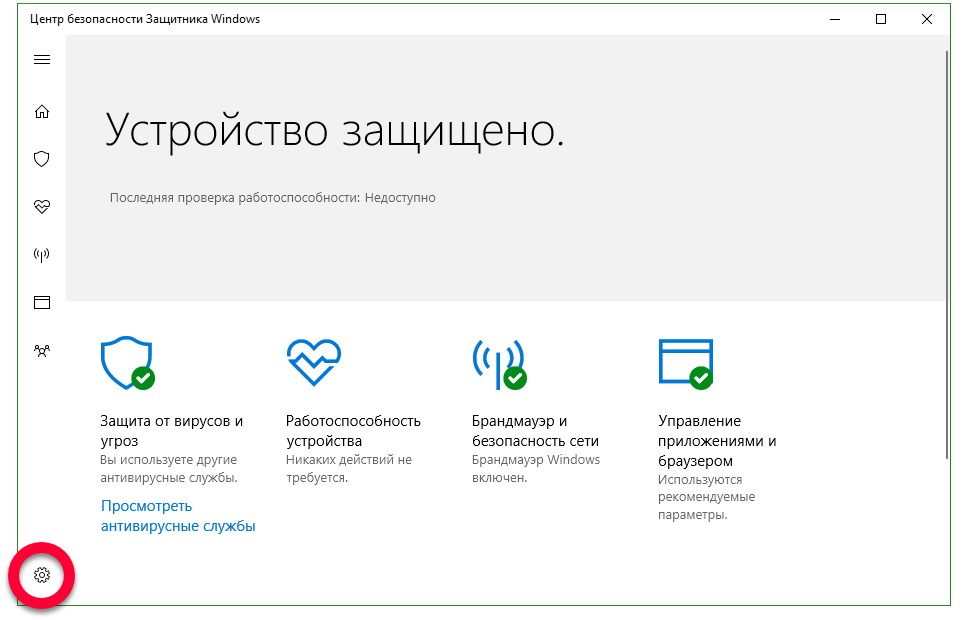
- Initially, you need to open the control panel, namely the security center section. The easiest way to do this is by searching for “dozens”. Click on the magnifying glass on the taskbar and enter the word “protector” there, then select the desired result from the search results.

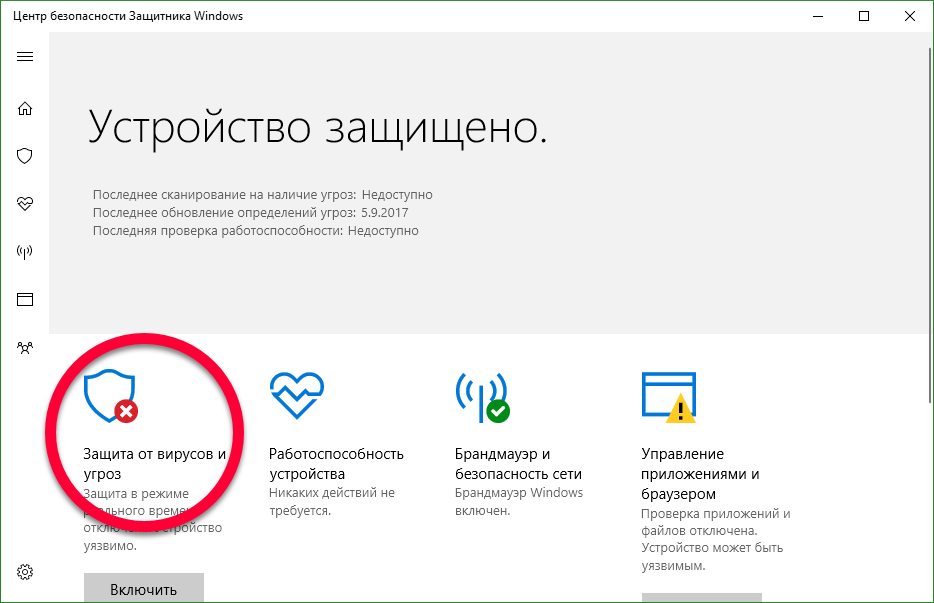
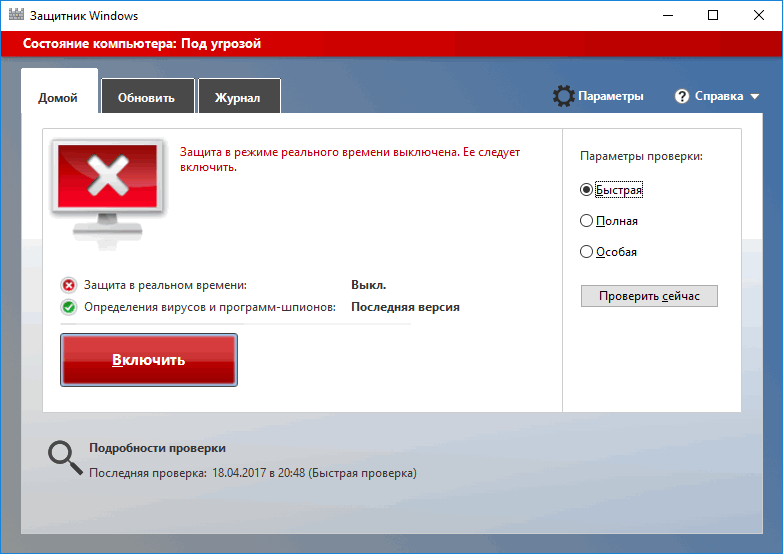
- If you see a window in which the defender notifies us about the complete security of the PC, it means that it is active, and we can proceed to turn it off. If, on the contrary, no action is required, the antivirus is already disabled.

Disable Windows Defender using the program interface
This is the first, easiest and safest way to disable standard antivirus. If this option does not work for some reason, you can proceed to more complex and effective solutions, we will describe them below, but for now let's proceed to disabling the Windows 10 protector through its software interface.
- Open the defender himself (we described how to do this in the previous section). Also, you can run antivirus from Microsoft through the system tray. To do this, simply double click on the program icon.

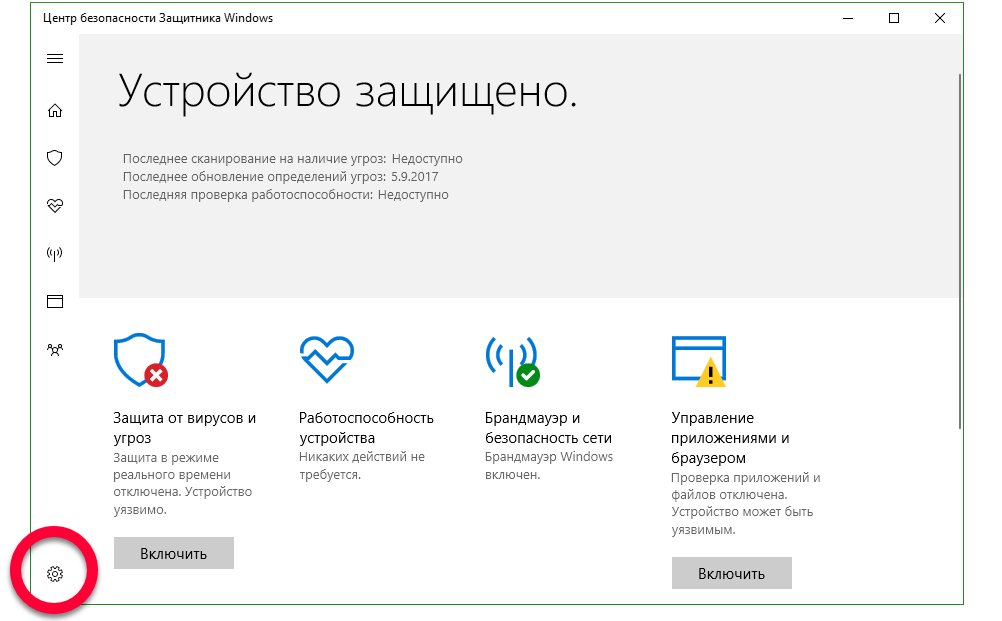
- In the window that opens, click on the gear icon, this is the program settings that we need.
- In the settings window, select the section "Settings for protection against viruses and threats."

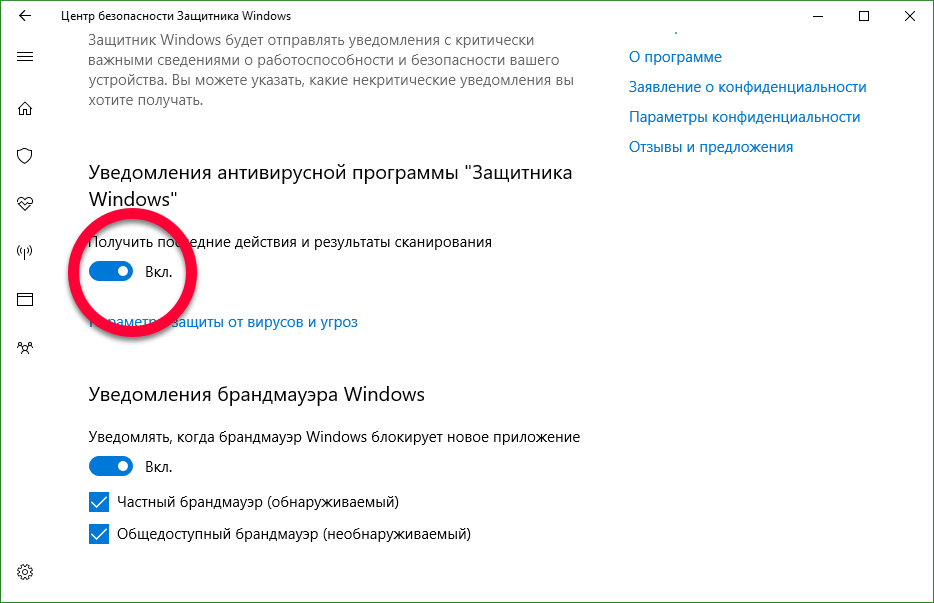
- Disable triggers indicated in the screenshot.
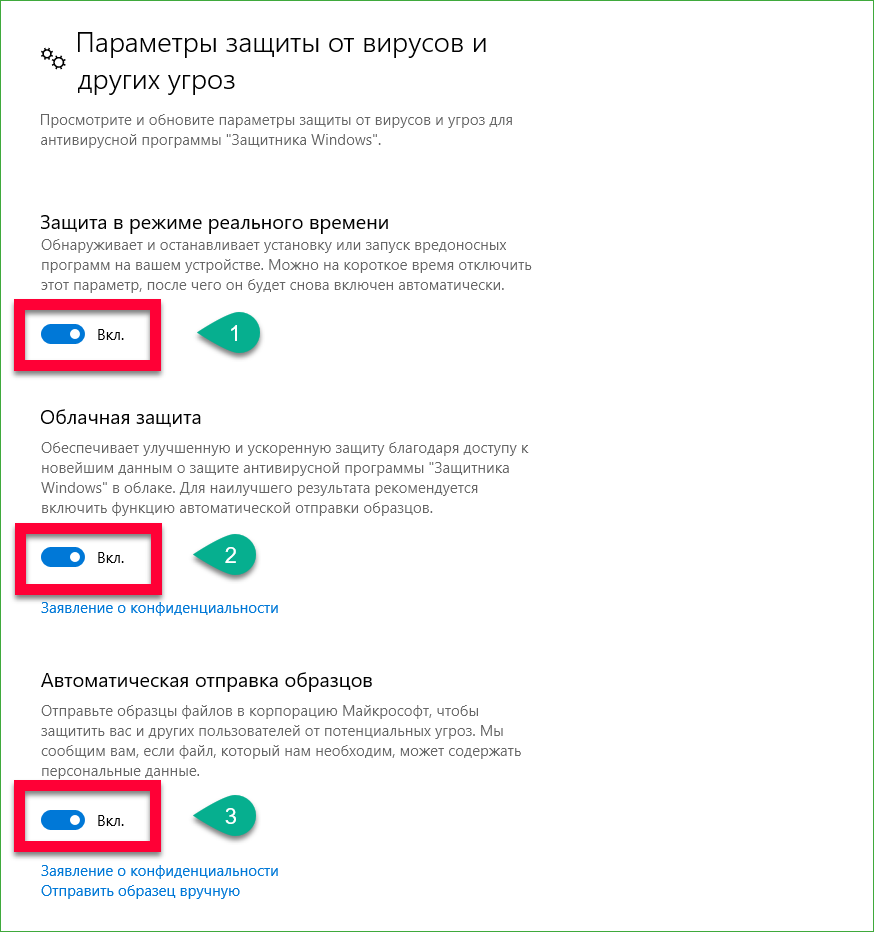
The protection will be deactivated, but after a few minutes it will turn on again. This option is suitable only for those users who need to stop the antivirus for a while, for the rest there are more effective instructions.
Disable antivirus using Group Policy Editor
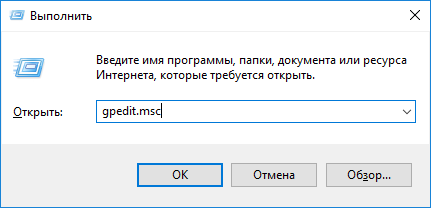
Completely disable the defender of Windows 10 with the help of a standard tool - the editor of the local group policy. To begin, let's launch it, you can do it through the Run program. Use the key combination Win + R.
- Open the utility and enter the command “gpedit.msc” without quotes into the text field, then click “OK”.

- Open the path indicated in the screenshot in the left pane of the editor and select the key “Turn off antivirus program Windows defender” in the right part of it.
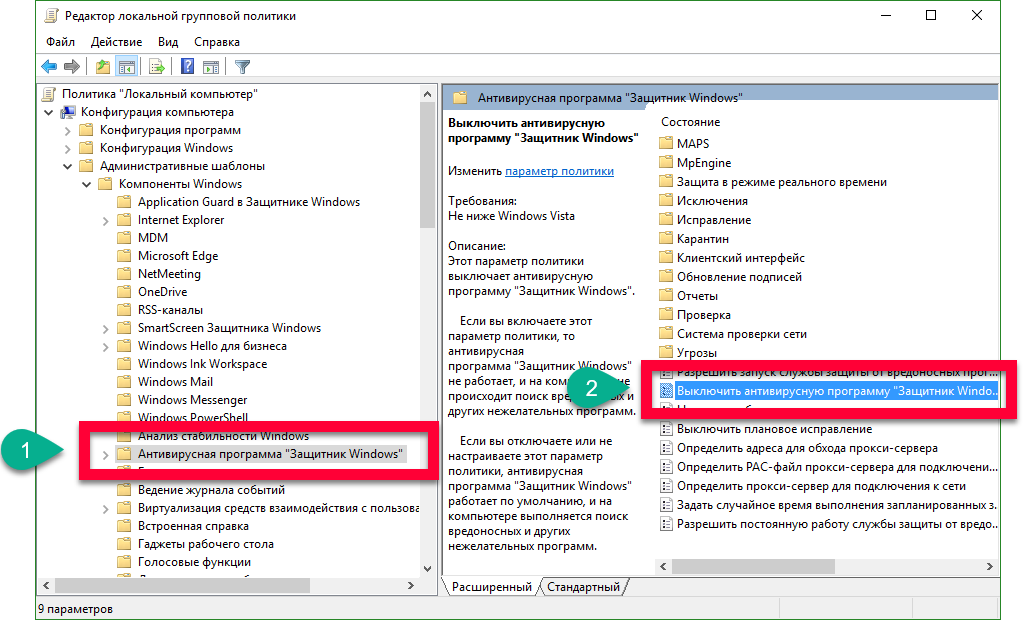
- Double-clicking the left mouse button on the selected item will open a new window, in which we will be able to disable the defender. Put the check box checkbox in the “Disabled” position and click “OK”.
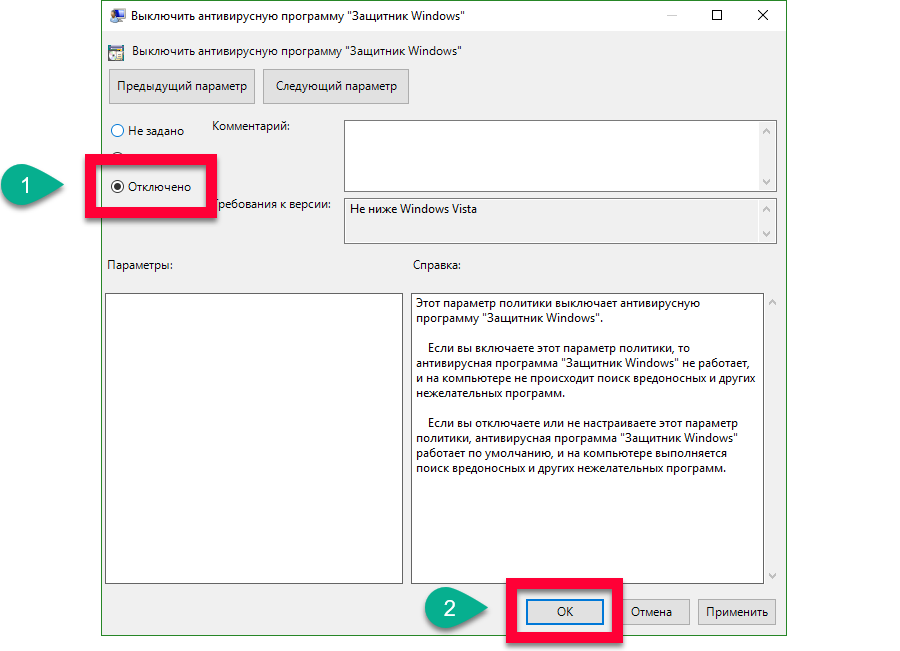
After restarting the system, Windows defender will be disabled.
Group Policy Editor does not work in Windows 10 home, it will have to perform an operation through the registry.
Disable Windows 10 Defender through Registry Editor
Consider another way that will allow us to deactivate the service of a regular antivirus. To do this, we need a registry editor, it is present in all windows versions.
- Run the Run utility using the Win + R hotkeys. Next, enter the command "regedit" without quotes and click "OK".

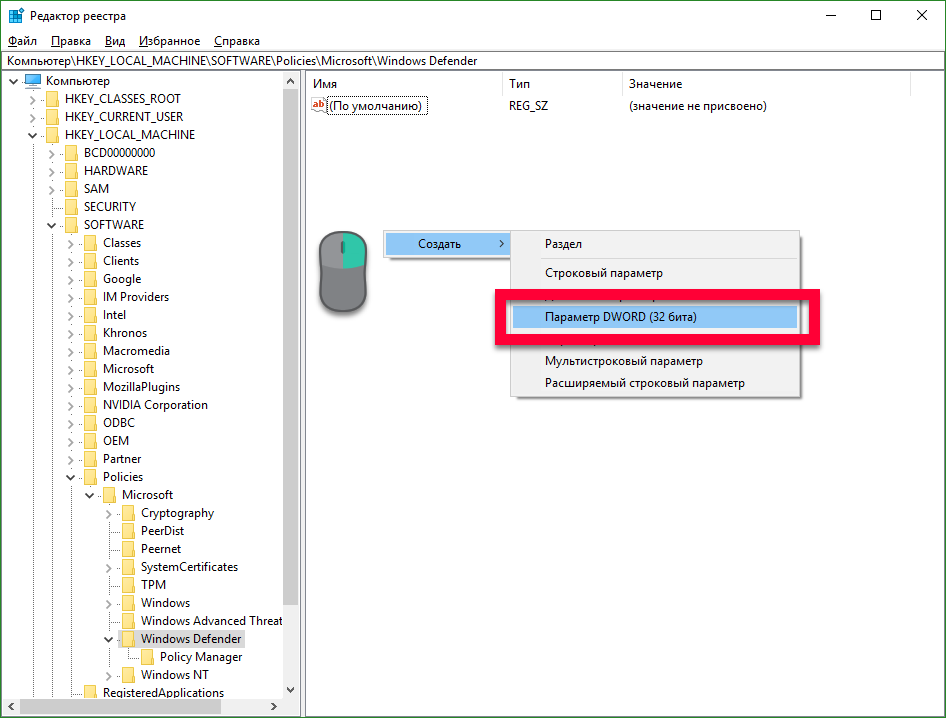
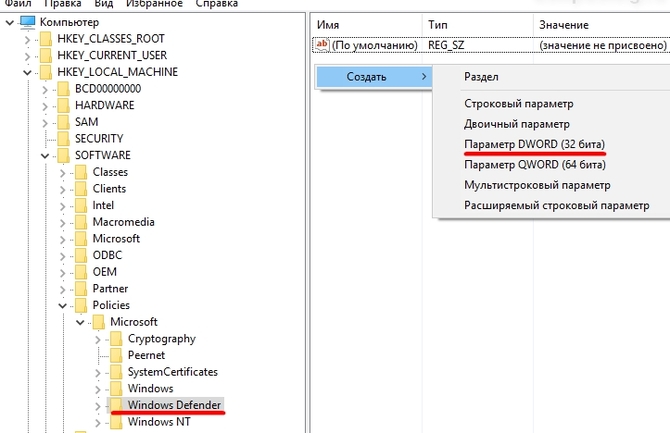
- The registry editor will open, we need to go along the path that is indicated in the screenshot.

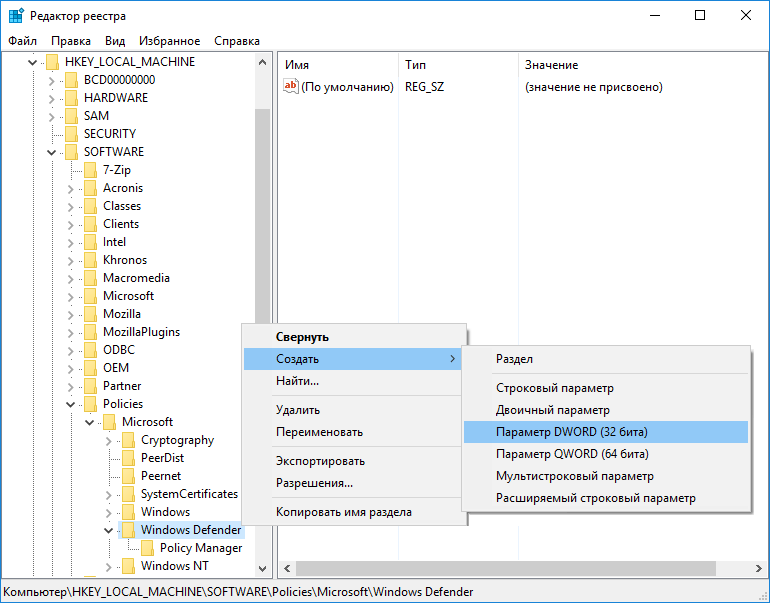
- Now you need to create a new key in the right pane of the editor. To do this, click on the empty space with the right key of the manipulator and select the item “Create” - “Parameter DWORD (32 bits).
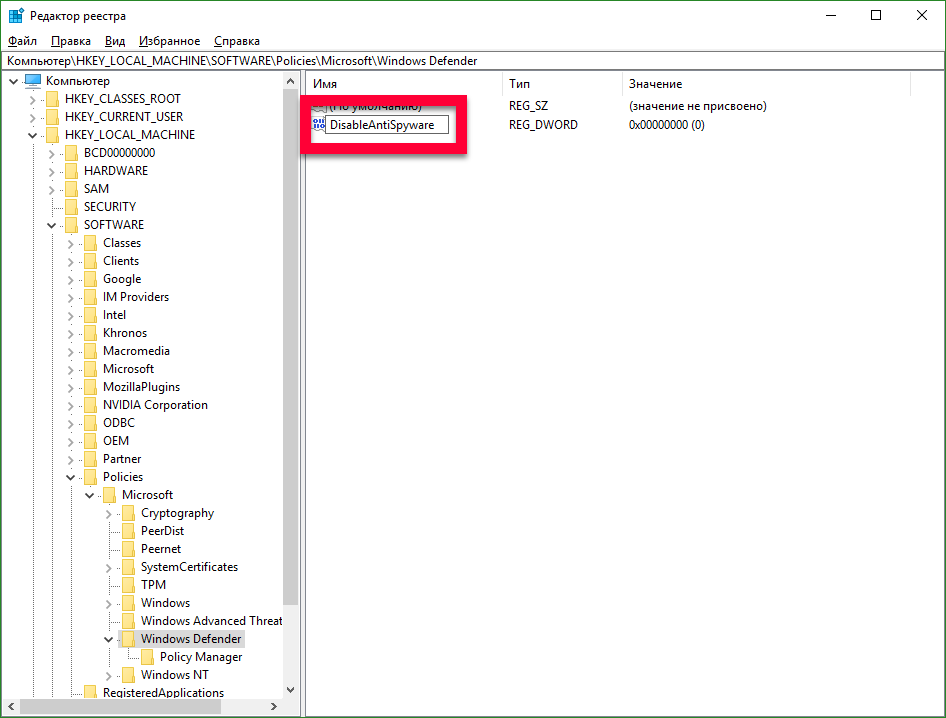
- Enter the name of the new key “DisableAntiSpyware” and click “Enter”.
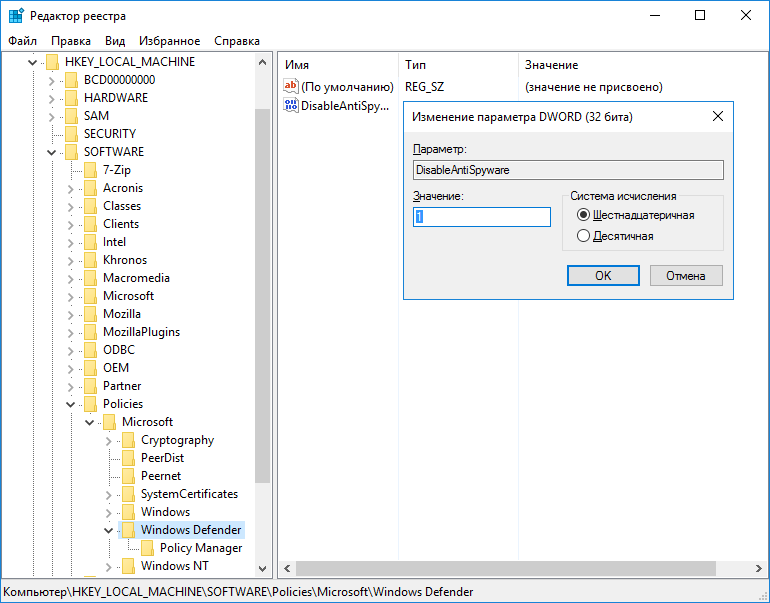
- Double click on the created record and set the value to "1". This will disable the Windows defender, if necessary, you can activate it again by setting the key value to “0”.
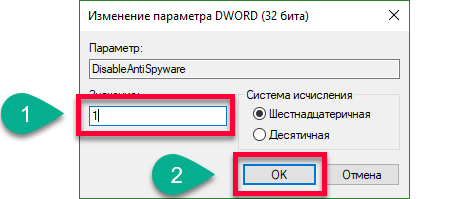
Attention! If you already had a key named “DisableAntiSpyware”, just set the value to “1”, you do not need to create anything.
Done, the system will notify you that Windows defender is disabled. The icon in the notification area will disappear only after restarting the computer.
Disable Windows 10 protector using third-party software
If for some reason it was not possible to disable the native antivirus, you can resort to another way - third-party programs. There is a huge amount of such software, but it is better to use the utility we have tested, called Win Updates Disabler. In one of the articles we talked about, this program was used there. You can download the application a little lower, but for now let's figure out how to work with it.
- Open the program that you have already installed by this time and tick the box next to “Disable Windows Defender” (other items should not be checked).
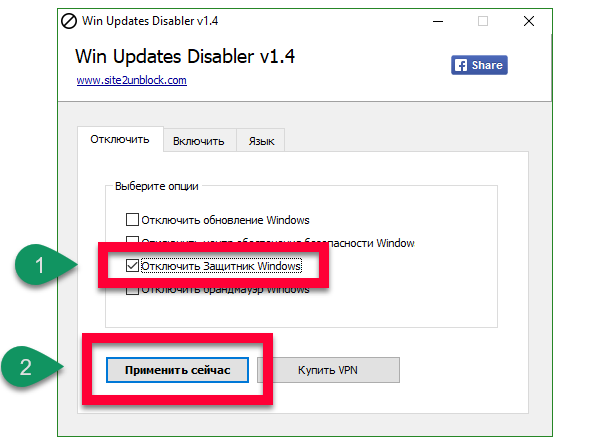
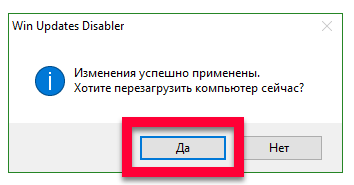
The program will notify us that the changes are applied and that you need to restart your computer in order for them to take effect. We agree and click "OK".
You can also use another, more functional program Destroy Windows 10 Spying or DWS, which you can also download on this page. The application was created to disable spyware functions in Windows, but here we have the function we need - deactivating the protector. Let's look at how this is done.
- Download the program and run it (installation is not required). Go to the “Settings” tab, check the box next to “Enable professional mode” and “Disable Windows Defender”.

- Now you need to apply the changes, go to the "Home" section and click on the button indicated in the screenshot.
![]()
- After pressing the key, the Windows defender will turn off and we will be prompted to restart the PC. We do this by first saving all the data and closing the programs.
![]()
Attention! When working with DWS, not only the regular antivirus is disabled, take a look at the screenshot before applying the changes.

Disable Windows Defender with PowerShell
There is another way to deactivate the built-in defender. To do this, you need to run command line or PowerShell. The choice of environment depends only on you, but in fact, and in another case, the tool must be called solely on behalf of the administrator. Getting started.
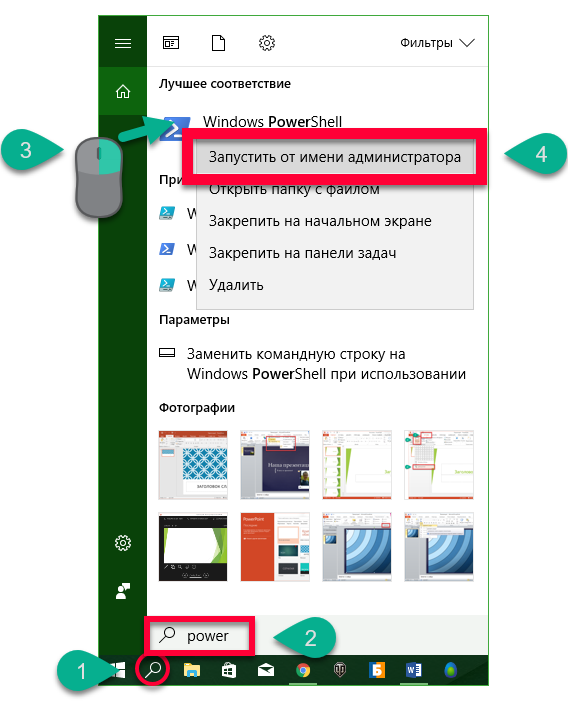
- Again, use the search in the taskbar, click on the magnifying glass icon, enter the phrase "PowerShell" in the search field and right-click on the result, selecting the "Run as administrator" option.
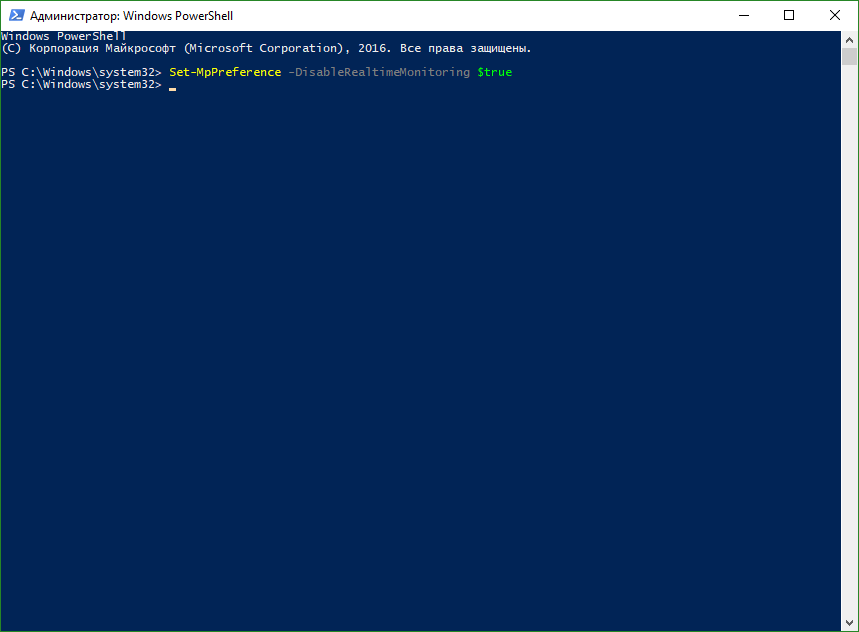
- When the shell opens, insert the command "Set-MpPreference -DisableRealtimeMonitoring $ true" without quotes and press Enter. The system will think a little and go back to standby. This indicates the success of the operation. It remains to close the window and reboot the system.
The same can be done through the command line, do not forget to run it on behalf of the administrator.
Disable Not Protected Notification
Protection is disabled, but now another problem has emerged, constant notifications that our computer is no longer protected and under threat, this is done for security purposes, but if you consciously disable antivirus, you should know what you are doing.

Let's turn off notifications that only interfere with work.
- Using the standard search tool Windows 10, we find and open a security center.

- As you can see, the regular antivirus is already disabled.
- Click on the gear icon and go to the Windows Security Center settings.
- Switch the trigger and disable notifications, everything is simple. You can also remove messages from the firewall.
Adding an application to the white list of Windows 10 protector
Disable antivirus is not necessary. You can simply add a program that he “scolds” to the so-called trusted zone or white list. We will consider an example of adding a file or folder to trusted files using the example of Windows 10 Pro 64-bit defender. Getting started.
- We open our antivirus by clicking on its icon in the system tray (you can also launch the program through a search, in the manner described above). Click on the icon with the image of the gear and go to the program settings.

- We click on the inscription: "Settings for protection against viruses and threats."
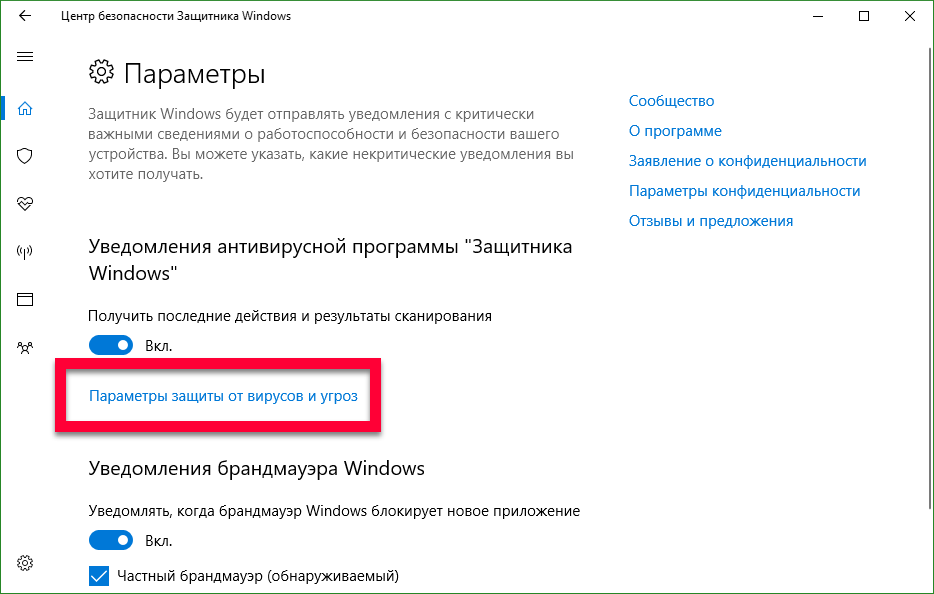
- Scroll the window to the item “Add or remove exceptions” and click on it.
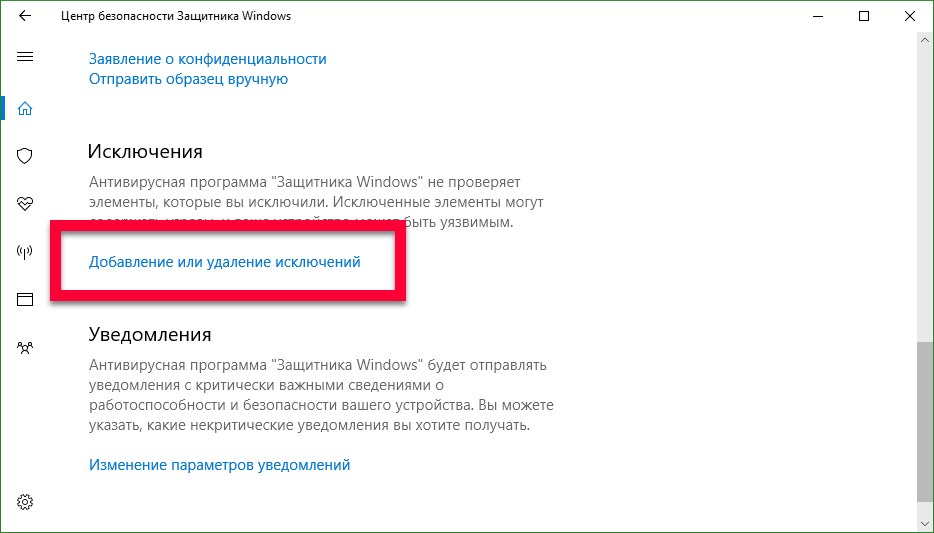
- Click on the inscription: “Add an exception” and in the drop-down menu select the object that interests us.
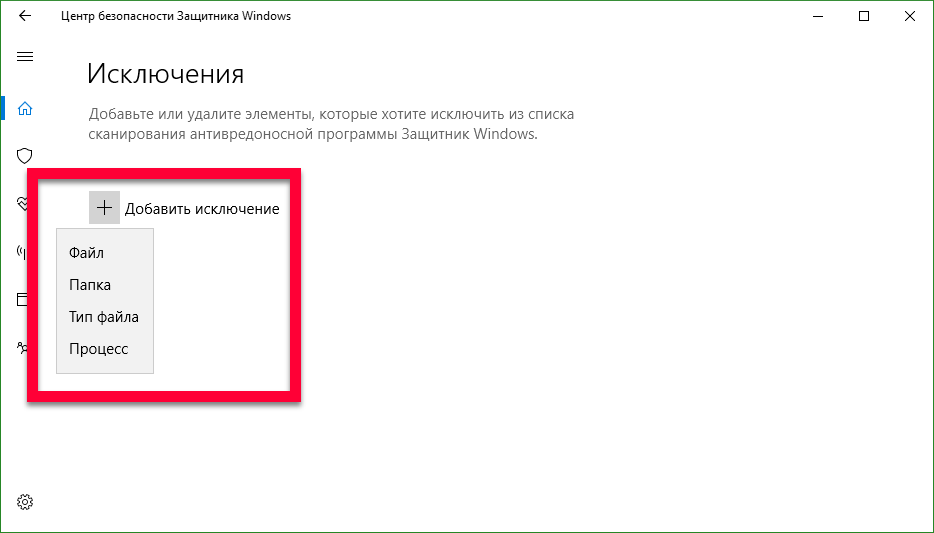
There are the following options:
- file. Allows you to add a specific file in a single quantity, for example, .exe;
- folder. Makes it possible to add a whole directory to exceptions. It may be necessary when there are too many objects and adding them one by one is inconvenient;
- file type. Adds a file extension and excludes all objects with this extension from the scan area;
- process. You can enter the name of the process to which the defender should not pay attention.
Let's execute adding in quarantine on a directory example. Click on the plus sign and select "Folder". In the window that opens, left-click on the desired directory and click the "Select Folder" button.
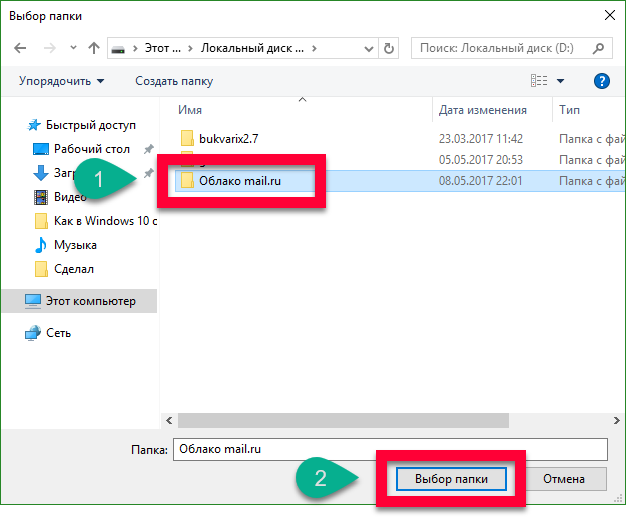
The folder has been added to the anti-virus exclusions, now it will not scan it and look for viruses. From here, you can also delete the object and force the program to check it again.

Summing up
Many users ask a question - how to remove Windows Defender? This can not be done, but we have learned to turn it off at once in several ways. It is important to understand the danger that our computer is exposed to without antivirus software installed on it. You need to deactivate protection only for the purpose of replacing it as soon as possible, or for a brief installation session of a program that the defender perceives as a virus.
Video about disabling Windows 10 protector
Hello, dear blog readers site. Windows 10 Defender (or wnidows defender as it is called) is a few modules that are combined to protect your computer from potential threats. He tracks changes in the system that he considers to be considered potentially dangerous and blocks the modules that pose a threat to the system. In fact, a defender is a program that has all sorts of settings in its arsenal. AT previous versions Windows disabling the protector was not a problem, but with the arrival of a new operating system, Microsoft has updated the entire security system and now shutting down is not so easy. So, let's see how to disable windows 10 protector.
If you find that your defender is disabled and you want to turn it on, the second part of the manual describes how to turn on the defender.
Turn off windows 10 protector
Method 1: Temporarily disable the protector.
Step 1: As I said earlier, the standard shutdown method in the new operating system does not work as in previous versions. This method now only temporarily disables Windows Defender and if you do not turn it on, the system automatically turns it on. However, if you only need to turn off for a while, take any actions with the computer and re-enable it - it will do. The first thing to do is to enter the control panel. Click right click click on the “Start” button and select “Control Panel” from the drop-down list.
Launch Control Panel
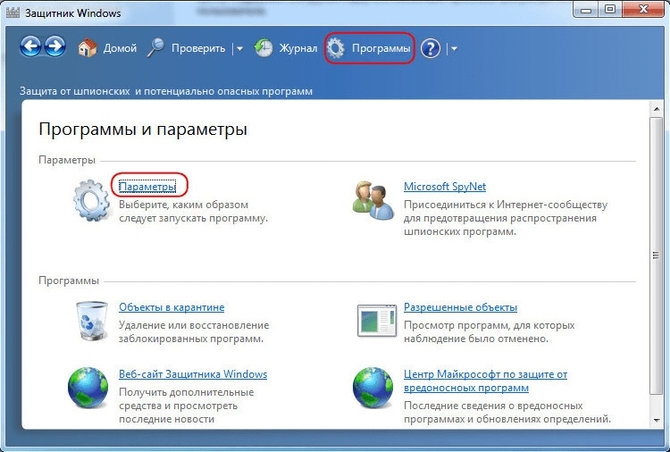
Step 2: In the control panel, find the Windows Defender menu item and launch it. The defender management window will open in Windows 10.
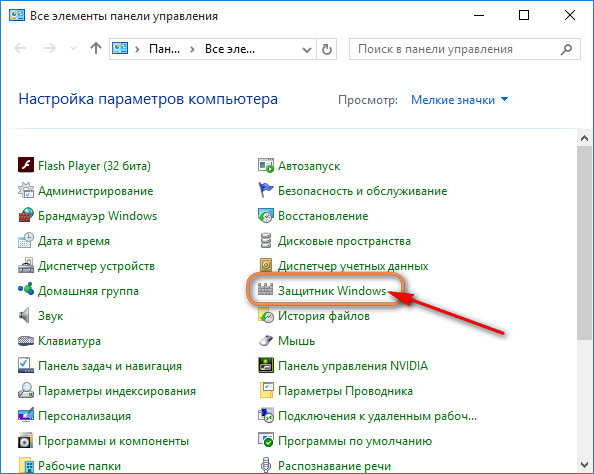
Run Windows Defender in Control Panel
Step 3: Find the gear called "Parameters" and open them.
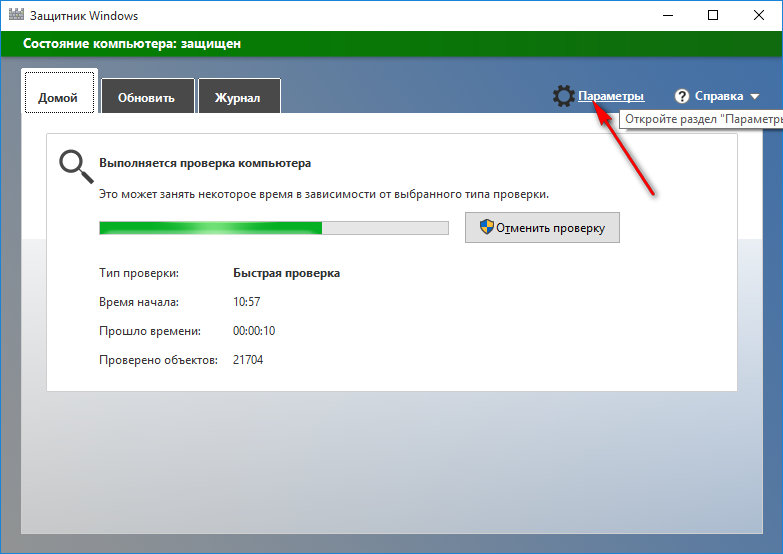
Open the settings to disable
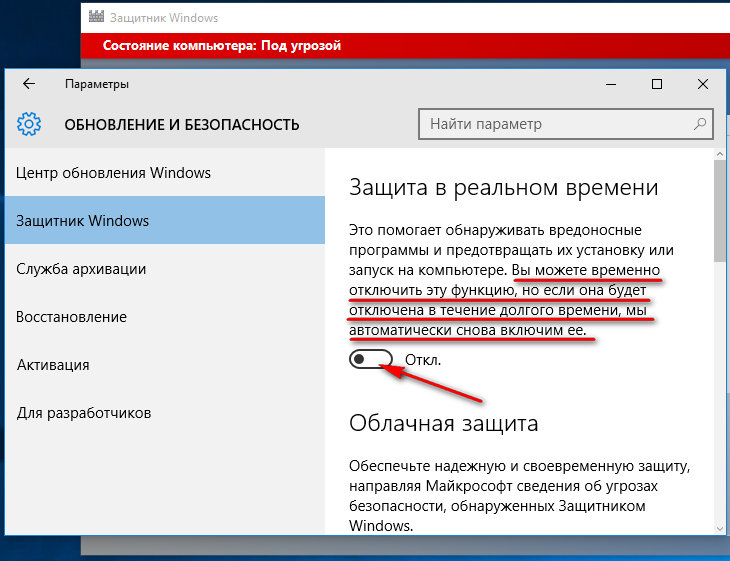
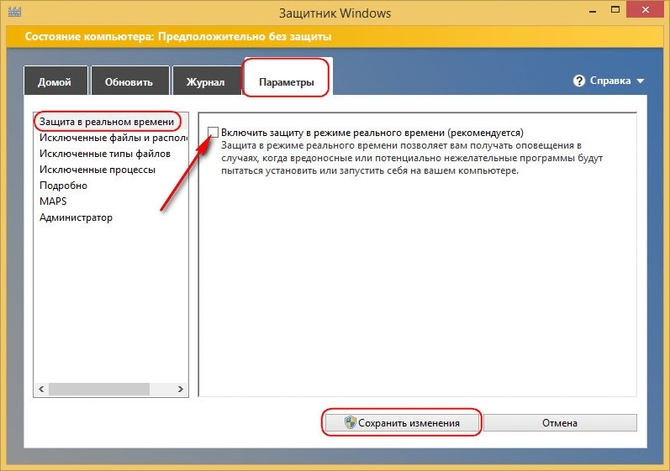
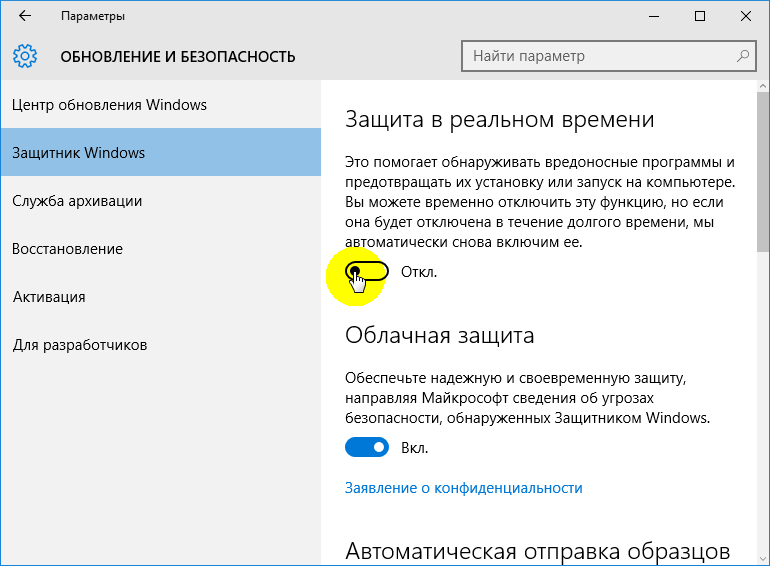
Step 4: After clicking “Settings”, the update and security management window will open. On the left in the menu, select the item "Windows Defender" if, for some reason, this item does not open automatically. In the control window, you can disable real-time protection. Microsoft's annotation immediately warns that the shutdown will be temporary and if the protection is turned off for a long time, they will automatically turn it on again. Press the switch and turn it to the “Off” position. If you did not close the main Defender window, you will see how after switching off the window changed color from green or yellow to red. This means that real-time protection is disabled.
Method 2: Disable full defender.
note that this way does not work in the operating system Windows 10 Home (Home). The service required to disable it is missing.
Step 1: Launch the Local Group Policy Editor. To do this, press the key combination Win + R and in the line "Open:" enter to start the command gpedit.msc and press Enter or OK.

To run the editor, click Win + R
Step 2: If this editor is installed and working for you, the system will launch a management window. Open tabs one by one. Computer Configuration -\u003e Administrative Templates -\u003e Windows Defender -\u003e. In the right part of the window, find the “Turn off real-time protection” control parameter and click on it twice with the left mouse button and launch it.
![]()
Locate in Windows Components windows line Defender
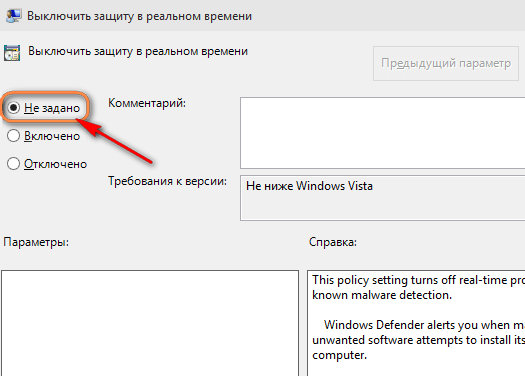
Step 3: By default, the parameter is set to Not Set. In order to disable Windows Defender, you must set it to the "Enabled" state. Do not make a mistake at this step and do not accidentally click on the “Disabled” parameter, thinking that disabling means disabling Defender. In this case, you must turn on the “Turn off real-time protection” option. Here is such a mess :).
![]()
Defender off
Turning on a defender after a temporary outage does not require any additional actions. The system itself will perform all actions on inclusion. If the service was disabled through the “Local Group Policy Editor” by you, you most likely know how to turn it back on, if someone else disconnected or what is worse malware, you need to manually enable Defender.
Step 1: You must run the "Local Group Policy Editor" via the "Run" command. To do this, press the key combination Win + R and in the line "Open:" enter to start the command gpedit.msc and OK.
Step 2: Sequentially open the left side of the window Computer Configuration -\u003e Administrative Templates -\u003e Windows Defender -\u003e Real-time Protection. In the right part of the Local Group Policy Editor window, find in the Status column the “ Disable real-time protection."And click on it twice with the left mouse button by running it.
Step 3: If the defender is off, the status will be in the “Off” position. All you need to do is transfer the state to the “not set” position.
Defender off
Windows Defender is a built-in software utility that intended to search and block malicious software (for example, virus programs, spyware, etc.). System protection occurs in real time. In addition, the program can clean up Windows from unnecessary and obsolete files.
So, the built-in program allows you to prevent infection of your PC in one of two ways. In mode real time it will help stop the spread of the virus by blocking the malware before it starts. This method is very effective for neutralizing threats while surfing the Internet.
The second method provides scanning system and user files for threats. This type of check is performed automatically by the schedulewhich is set by the user (for example, when you turn on or turn off the computer or some time after it starts up so that all services have time to boot). You can also start the scan, and you can do it yourself at a convenient time for the user, while selecting the necessary files and folders.
How to disable the defender on Windows 10
The user can carry out this action in several ways.
We use group policies
Windows Group Policy Editor is an embedded software in the Windows 10 operating system. To disable the antivirus, you must:
- Key combination Windows + R opens the menu execution commands. In the line you need to enter the command gpedit.msc and press Enter.
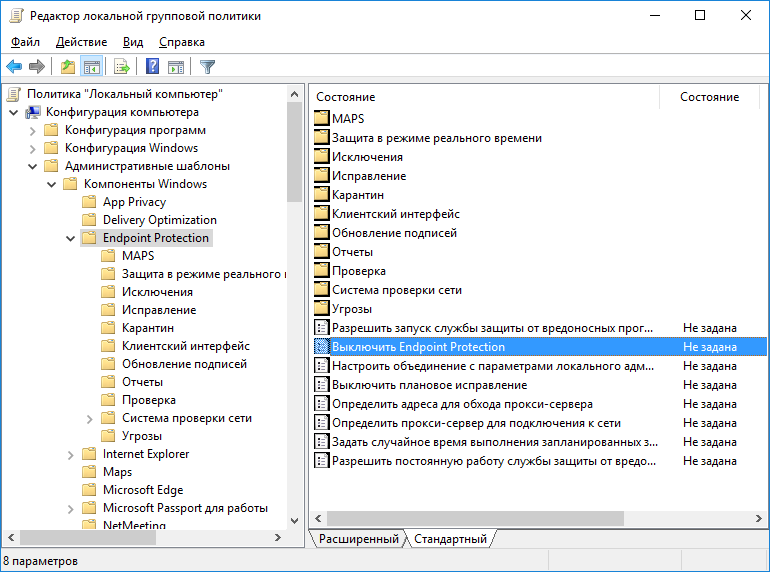
- The following program section opens: Computer Configuration-Administrative Templates-Windows Components- Endpoint Protection.
It is important to know: in some versions of the operating system, this section may be called security software Windows.
Making changes to the registry
A complete shutdown of the antivirus can be done through the registry:
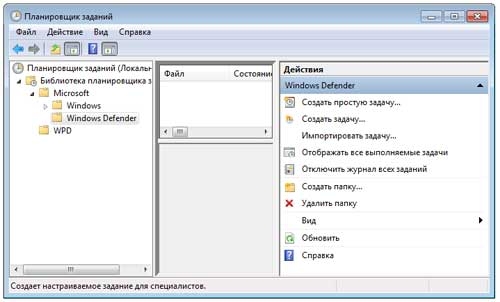
Via Task Scheduler
To disable the built-in antivirus through the scheduler, you must:
Standard way - through settings
The easiest way to deactivate Windows Defender is to disable through the menu settings. For this you need:

How to disable windows defender on Windows 8
In Windows 8, disable the built-in defender much simpler, than in latest version OS For this you need:
But, after restarting the PC, the antivirus may turn on again and you will need to perform a complete shutdown. the following actions:
Disable defender in Windows 7
The procedure for disabling the built-in antivirus in Windows 7 is in many ways similar to the 8th version of the operating system:
Defender or antivirus - what to choose
Before the PC user is the choicewhat to choose built antivirus or third party software. TO benefits Defender Windows should include:
- Deep integration into the operating system.
- Constant updates.
- Free
pros third-party antivirus:
- A wider range of effects.
- More features (cleaning unnecessary files etc).
- Fresh updates.
So, functionality protector and antivirus are almost equal. Therefore, users need to independently decide which option would be more acceptable for them.
Windows Defender is an anti-virus module integrated by the developers of the operating system to protect it from all sorts of virus attacks, spyware and other threats from outside. Despite these seemingly useful featuresmany users tend to turn it off completely. Why is this happening? The fact is that this operating component windows systems 10 and its predecessor, Windows 8 provides only basic protection, while eminent antiviruses provide a much larger list of tools to ensure system security. And therefore, to eliminate conflicts and correct operation of separately installed antivirus software, it is desirable to disable the same protector. Sometimes the installers themselves successfully cope with this task. antivirus softwareand sometimes it has to be done manually. How to disable the defender of Windows 10, we'll talk in this topic.
Temporarily disabling Windows 10 protector
This is perhaps the very first way to try to remove the defender, which resorted to puzzled users. Unfortunately, this method provides only a temporary shutdown of the security module. However, it is worth considering. To do this, using the "Windows + I" hot key combination, open the "Settings" section, where we immediately select the "Update Center, Security" option.
After the done actions, the system will warn you about the protection being disabled by a corresponding notification in the notification area.
In order to re-enable the defender, you will need to perform the same actions, returning the switch to its original position, or go directly to the interface of the protection module itself and activate it there. To do this, simply press the "Windows + S" hotkeys and enter this system protection component. By the way, with the full list useful combinations hotkeys provided in Windows 10 can be found.

Then simply activate the system protection.
note: in the defender's interface, only the activation function is available. In a word, it is impossible to remove or, more correctly, disable the built-in system protection service.
Disable protector in the group policy editor
Unlike the previous method, this method allows you to completely remove the activity of Windows Defender without time restrictions. To do this, we will use the system utility "Run", launched by simultaneously pressing the "Windows + R" keys and the specialized editor launch command group policies "Gpedit.msc".
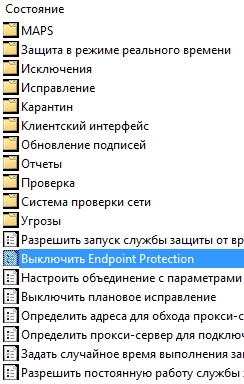
Next, select the folder “Endpoint Protection” and in the right field we find the “Enable Endpoint Protection” policy setting.
After that, double-clicking the right mouse button on the selected group policy parameter will go to its settings section, where we activate the “Enabled” tick. The system will give a detailed explanation of the settings you have chosen.

Disable the defender through the system registry
You can permanently turn off the defender through the system registry. To do this, re-enter the command to start the registry editor "regedit" in the "Run" window.

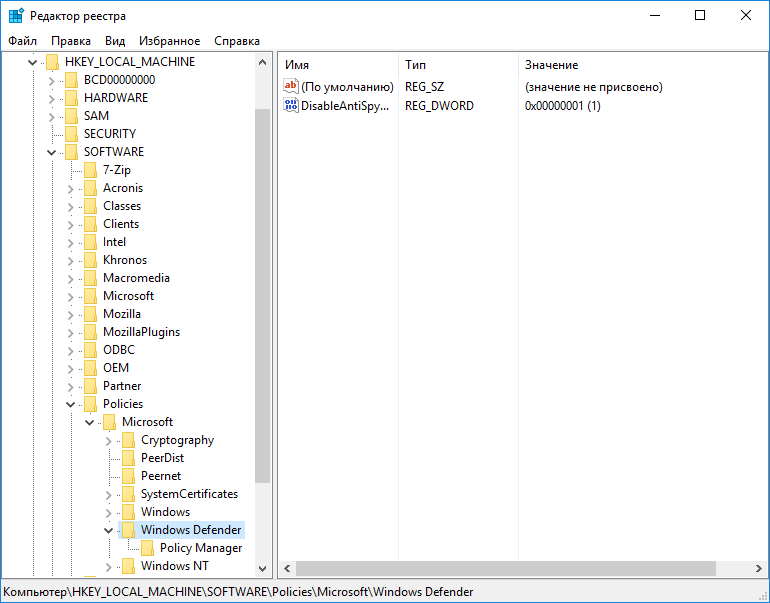
Then we find the folder "Windows Defender", the path to the directory which is displayed in the screenshot below.
After click on the desired folder with the right mouse button and create a new parameter «Dword». A new entry “DisableAntiSpyware” will appear in the list, the settings of which are responsible for the activity of Windows defender.
Next, click on the newly created parameter “DisableAntiSpyware” with the right mouse button and click “Change”. Then set the value "1", responsible for disabling the Windows security module.
To re-enable the defender, change the value “1” to “0”.
Disable defender third-party utility
Well, in conclusion, consider, perhaps, the easiest way to turn off the Windows 10 built-in security service. This is about third-party program “Updates Disabler”, which will have to be downloaded and installed separately. Earlier we mentioned it in the article "". Along with the functions described in it, this program also does an excellent job with deactivating Windows Defender. From the user is only required to run the program and put the appropriate checkboxes in its settings.

Do I need a windows 10 protector or do I need to disable it? Is windows 10 protector enough to be completely safe?
Defender windows 10 (Defender) is not required. You do not get full protection, but it can even block what is not harmful to your system.
As soon as you install the antivirus, windows 10 protector will immediately turn off completely forever, more precisely, until you remove the antivirus - they are not compatible.
Initially, after installation or reinstall windows 10, you certainly do not have antivirus, and the defender is on by default.
You first start installing various applications and drivers. Usually, almost all PC owners do this.
They may absolutely not pose a danger to your computer or laptop, just do not have a subscription certificate.
Very often the defender simply blocks them and the only way to continue the installation is to turn it off.
How to stop windows 10 protector
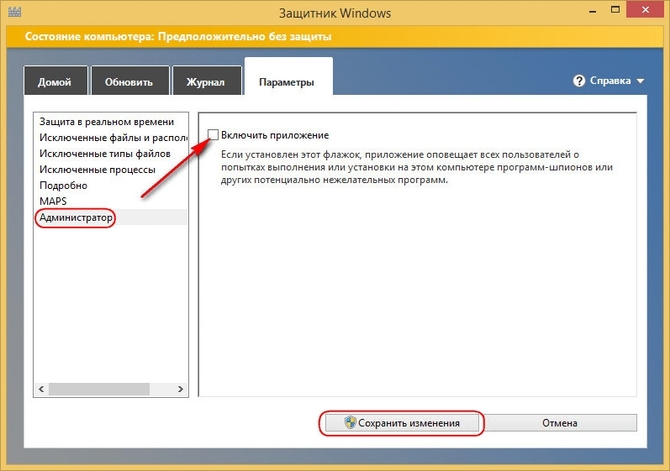
To disable it, go to the "windows defender" section. See the window as shown.
We are interested in the string parameters - click on it. If you have an antivirus installed, then instead of the disable option, you will receive a message that the application is disabled.
If there is no antivirus, you will see the line “Real-time protection” and for some time you can disable it.
I repeat - “for a while”, because in a few minutes it will turn on again on its own, but during this time you will be able to do the work that it has blocked.
If this turn of affairs does not suit you, then there are two ways to completely disable forever - through the registry and group policy.
Full shutdown of windows 10 defender through group policy
Write in the search or utility execute the word: gpedit.msc. If, then the application will appear at the top, if it starts immediately after clicking "OK".
In it, you need to go along the path: “computer configuration” -\u003e “administrative templates” -\u003e “windows components” -\u003e “windows defender or protector”.
ATTENTION: if you have the final version installed, then instead of the one described above, go to the components section ..., look for the line “EndpointProtection” and after opening this folder the section “Real-time Protection”.
Now, on the right side, click (twice) on the line "turn off real-time protection", (some may have a different name -Turn off Windows Defender).
 Next, put the "black dot" on "enabled", click "apply", "OK" and exit the editor - the defender will be disabled forever.
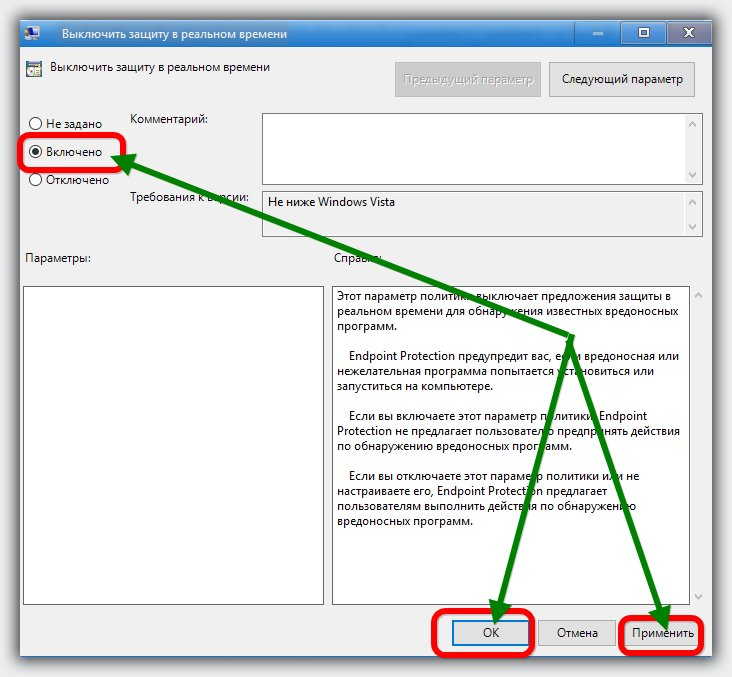
Disable defender windows 10 permanently through the registry
Permanent defender service can be removed through the registry. To do this, in the utility execute or in the search enter the word: regedit and run it.
After that, find the registry key:
HKEY_LOCAL_MACHINE \\ SOFTWARE \\ Policies \\ Microsoft \\ Windows Defender
In it, you need to create another DWORD parameter. Call it DisableAntiSpyware. If it already exists, do not create another one, just give it a value of 1.
Although it is written above that the described procedures will disable windows 10 protection completely and forever, this is a bit wrong, after returning the changes made back, you will receive parameters such as they were - if you want to turn it back on.
I always turn it off completely forever, but if you do not use an antivirus, then it is better to let it be turned on - you will still get some security from external invasions. Successes.