How to do duplex printing
Printing is one of the simplest processes associated with computer technology. However, it also carries a lot of interesting surprises that even experienced users do not know about. We are ready to reveal some of them.
Typically, a user types in MS Word or in built-in notepad from a computer (from a laptop). Implementing your plan is recommended in two simple ways.
- indicate the required number of copies;
- selection of a separate section of text or pages for printing;
- type (single or double-sided printing);
- orientation (portrait or landscape);
- required format (usually A3, A4, A5 are standard);
- field sizes and other parameters.
If all this is not done, then by default a A4 document with a portrait orientation in the amount of one copy will be printed.
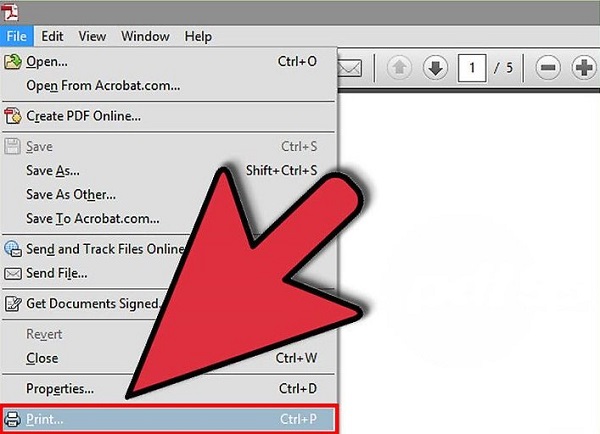
A text document may also be presented in a distributed Pdf format. To open it, a free reading program from Adobe must be installed on the computer. If not, then you can print by dragging the PDF file directly to the browser. Next, the familiar “File” - “Print” commands. All that remains is to select a printer and, if necessary, make page range settings.
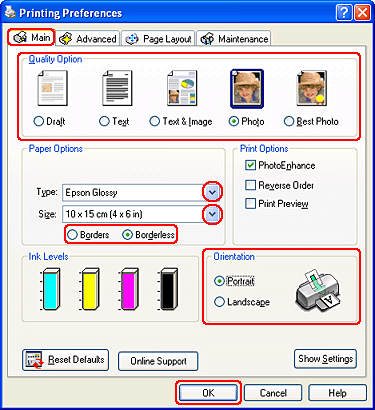
To display the printing parameters that are relevant to the user, it will be enough to click "Properties" and select the print quality, its color, and adjust the layout.
There are other printing features through Adobe Reader.
- Covers can be printed through the “Cover” window.
- In the “Quality” tab there is an economical mode that helps to reduce toner consumption. And to save paper, the commands “Layout” - “Type of print” you can choose the option “Two-sided”. All that remains is to click "Print."
How to print a photo or picture
Images are displayed from a computer in a slightly different way. First of all, it concerns the acquisition special photo paper. It can be glossy or matte - the main thing is that the quality will differ from the result obtained on plain paper.
After selecting an image, you can begin to print it.
Print directly from the Internet
Sometimes there is no time to copy and save interesting information from the Internet into a separate file, and the user decides to print it directly from the browser. Sometimes this solution is the most optimal, given that in MS Word it is possible that the entire text is displayed incorrectly, so the general content of the result will still have to be edited. However, online printing also has its “pitfalls”. It is worth getting to know them better.
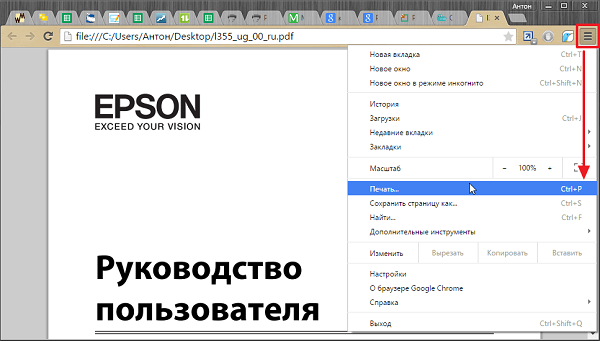
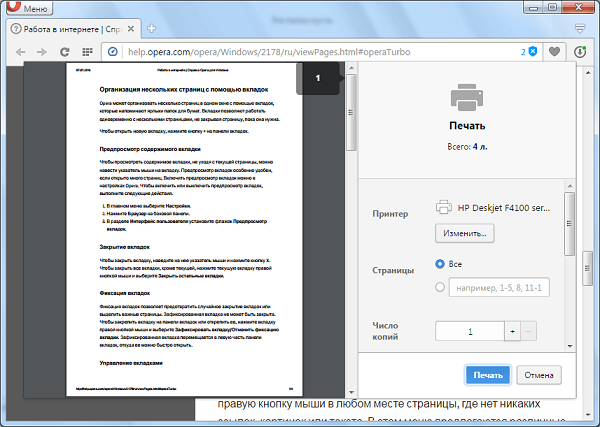
Any standard web page will contain not only text - extraneous materials (advertising, links, pictures) are also present here. If you want to get only printed text, you need to select it with the left mouse button, holding it like that until the very end of the document.
Further, while still holding the computer mouse, you should simultaneously press the combination of the "Ctrl" and "P" keys already familiar to us. This combination will open a special window: in it the user will set the print settings. Commands may vary for each browser. We give detailed algorithms for the top 5 most popular.
Google chrome
You can print from Google Chrome from your computer after configuring these commands.
- In the menu that appears on the right, you can see preview area. On the left side there are all settings that remove excess information. Another useful bonus is a number, which will show the required number of sheets, which will go to such a printout.
- There are options for choosing the number of copies, layouts and colors (or monochrome in black and white).
- To correctly remove all unnecessary elements, it will be enough to put a checkmark in front of the item " Simplify page". This action will reduce the number of pages.
- The "Advanced Settings" section will help improve print quality - you must specify a resolution of 600 dpi.
Opera
Opera with its settings is similar to “Google” - the rules for working in the dialog box are the same. It is additionally recommended to use the options:
- simplify pages
- choose a quality of at least 600.
Yandex
Printing via Yandex browser is also similar to the two already discussed above. Only in the pop-up window is it worth highlighting layout simplification point - this will remove unnecessary items. Then you can send the contents to the printer.
Mozilla firefox
Need to print from Mozilla Firefox? Then in the print dialog it is worth paying attention to the following settings.
- The most relevant is the pro tab fragment selection.
- After specifying the print range, it will be enough to click “OK” to print the necessary information.
Internet explorer
Printing from the Internet with Internet Explorer is in many ways similar to Mozilla. You can configure it like this.
- If it is necessary to print only the selected fragment, it is necessary to mark the “Selection” setting. Or, on the contrary, “All” if you plan to print the contents.
- Here is present quick launch button. She bypassing all the settings will immediately start printing everything presented on the screen.

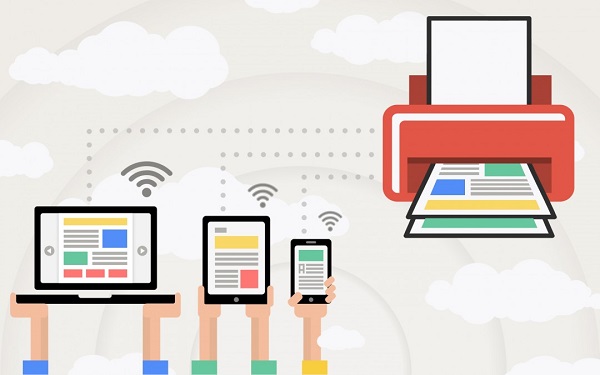
How to print from a smartphone
Working with browsers indirectly affects the issue of printing from the phone. More precisely, there is no problem with this - today a large number of services have appeared that will help to send the necessary information to the printer directly in online mode.
In the case when the printer does not have technologyBluetooth orWi-fi, required to register with Google Cloud Print. This service technology will allow you to carry out your plan from anywhere in the world with an Internet connection. The service allows you to work with almost all printing devices currently available, but this connection is best with Cloud ready devices. But even the simplest printer is fully connected to this "cloud" printer:
- launch Google Chrome browser
- select the advanced option in the settings menu;
- in the bottom you need to find "add printer";
- then you should log in using your Google account;
- once again, “add printer” will remain, than the user will confirm the registration.
It is important to understand: for the plan to take place, the equipment must be connected to a device with an Internet connection.
On the phone you need to do the following.
- Download to your smartphone Cloud Print. Connect to it through an account.
- Select a file.
- Again, select your printer in a new screen.
- Make settings.
- Click on "paper plane" - the information will go to print.
How to perform duplex printing
Some modern devices have a print function on both sides of the sheet. To start it, you must do the following.
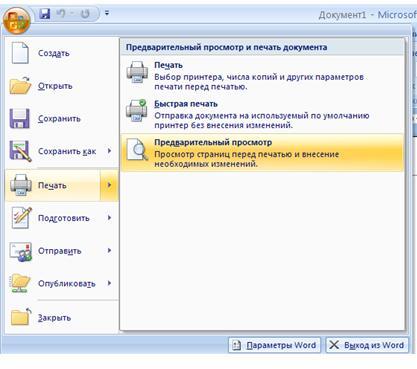
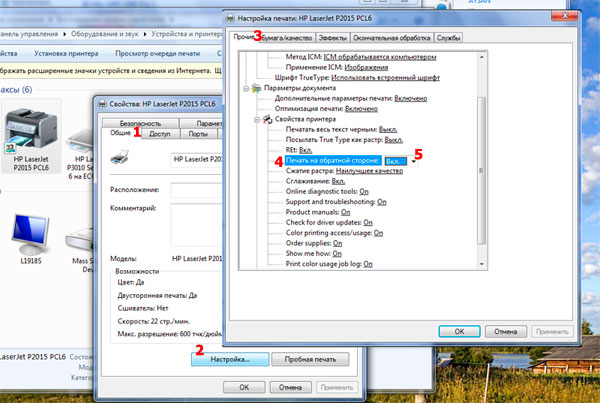
- In the upper right part of the document, click on the Office icon, and we will find ourselves in the necessary section. Select "Print", which will open a familiar window (you can also run the combination ctrl + p).
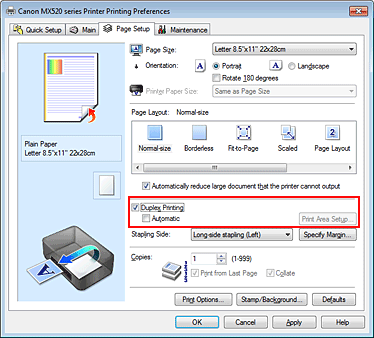
- Select “Properties”, which opens a window that distinguishes between different models. If there is double-sided printing (or called "Printing on both sides of the sheet", "Printing with a back"), then it will be enough to activate it.
- If there is no such mark, the function “Duplex printing” is marked with a tick in the dialog box. After the fingerprints of the pages located on one side of the sheet, a mention appears in the Word document about the need to turn the result over and return it to the feed tray.
There is one more manual way printing on both sides, which consists in sending alternately first all the odd, and then the odd pages of the document. But in this case, a large percentage of errors is not excluded (especially with a large number of sheets). Of course, you can select only even or odd pages - such a parameter is present in the “Enable” tab, which appears in the lower left corner of the same dialog box for sending to print.
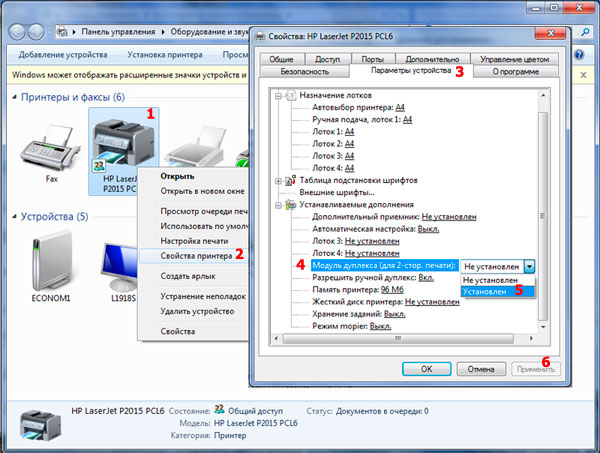
You can see whether the device has the ability to perform two-sided printing in the commands "File" - "Print" - "Options". In MFPs, technology will automatically support this possibility. Among these models can be noted, for example, Canon Pixma mg3140 - easy to use and provides printing, scanning and photocopying in one device.
In order for such printing to occur without human involvement, duplex can be used in the machine - this is a method in which paper after printing on one side will go back in the printer without turning over.
Own book
Speaking of double-sided printing, it turns out that it is quite possible to print your own book without resorting to the services of printing workshops. Moreover, this can be done both through the printer settings and in the Word document itself.
Book printout through the settings on the printer laser type occurs as follows.
- After choosing the “File” - “Print” commands, go to the printer settings. All modern devices have a feature that helps print multiple pages per sheet. Here it will be necessary to select sequentially “Mode” - “From left to right”. So the device sequentially prints pages 1 and 2 on one sheet.
- To correctly print the entire book, it is important that the total number of pages of the reproduced document be a multiple of four. Otherwise, it will be necessary to determine which U-turns can be left empty or make breaks there.
- We define and enter the sequence of pages for both pages of the sheet - we do this through a comma. After that, you can send it to print.
- We raise the pages that have come out of the device and, without changing their position, we refuel them again in the tray on the printer. Sheets cannot be turned over! After this, it remains to print the second range of pages, that is, repeat all the same steps described earlier.
- Concerning the set range of pages, you should do this: on one side there will be numbers: 1.4, and on the second - 2.3. This is repeated with all pages of the document.
You can configure the printing of the file as a book directly in the settings for printing from a computer. However, in this case there is a risk of skewing fonts and other settings. For those who are determined to try, such an algorithm is proposed.
- Via “File” - “Print” select 2 in the parameter “Number of pages per sheet”.
- Set numbers 1 and 4.
- Print a page on the printer, turn it over and repeat the whole procedure again for numbers 2,3.
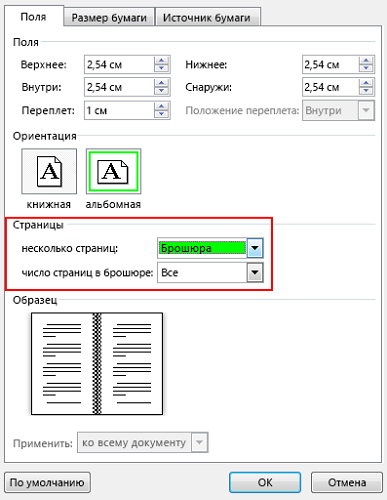
For versions of MS Office 2007 and newer, you need to proceed in a slightly different sequence: "Page Layout" - "Options" - "Fields" - "Multiple Pages" - "Brochure".
You can collect text "book" and in the veryWord. For registration, you need so many editor tools.
- The first step is to determine the correct page orientation. You can do this in the "Page Layout" tab. Now in “Page Settings” in orientation, select “Portrait” (with a sheet height greater than its width).
- Next is the “Field Setting”. Without leaving the "Page Settings", you must click the "Fields" button, then "Mirror Fields". This will help to make the left margin wider in odd documents, and vice versa in even ones.
- Through “Fields” - “Custom Fields” you can leave space for binding. In the dialog box that opens, select "Fields" - "Binding" and enter the required value. Do not forget to save.
- To select your own book format, you need to go through the "Page Settings" - "Size". In the drop-down list, select the required value.
- For your own style, select "Home" - "Style". In the appropriate tabs, you can experiment with the font and paragraph.
- Before sending text for printing, you should familiarize yourself with the options for printing text in the dialog box of the printer itself. Pages can be displayed both automatically and after manual user configuration.
Test Page Output
Printing this page is a check of the correct settings and the amount of supplies on the printer. It is on it that you can evaluate whether the equipment settings are suitable by default or whether you need to set your own parameters. This feature will also help you in time to see problems with Canon, HP, Epson and other brands.
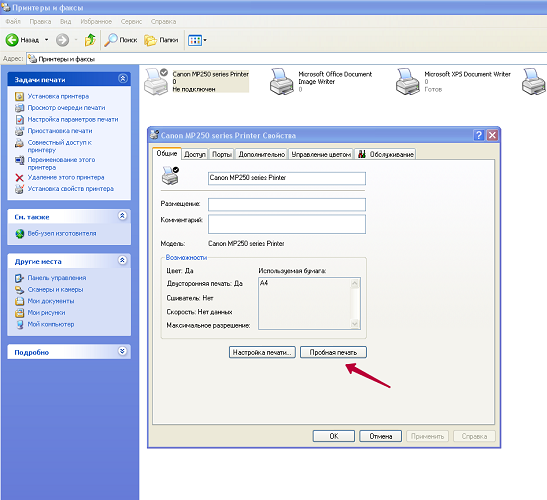
Here's how to get a test page. based on windows operating system.
- From the "Start" (Taskbar), you must select "Control Panel", in which you should find "Printers and Faxes" ("Devices and Printers"). In the field that appears, select the current printer, which starts with the right mouse button.
- In the menu that appears, the following commands and tabs are sequentially selected: "Properties" - "General" - "Test Print".
- The first time you complete such a task (or a long idle time), you must wait 15-30 seconds to start the launch.
What should be on the test page:
- graphics;
- text and other samples of all colors in which the device operates;
- the printer must be free of printing defects (on an inkjet - traces and streaks of ink, on a laser - light and dark stripes);
- lack of distortion and roughness.
If all the information presented through the test print suits the user, then you should click on "Save the default settings."
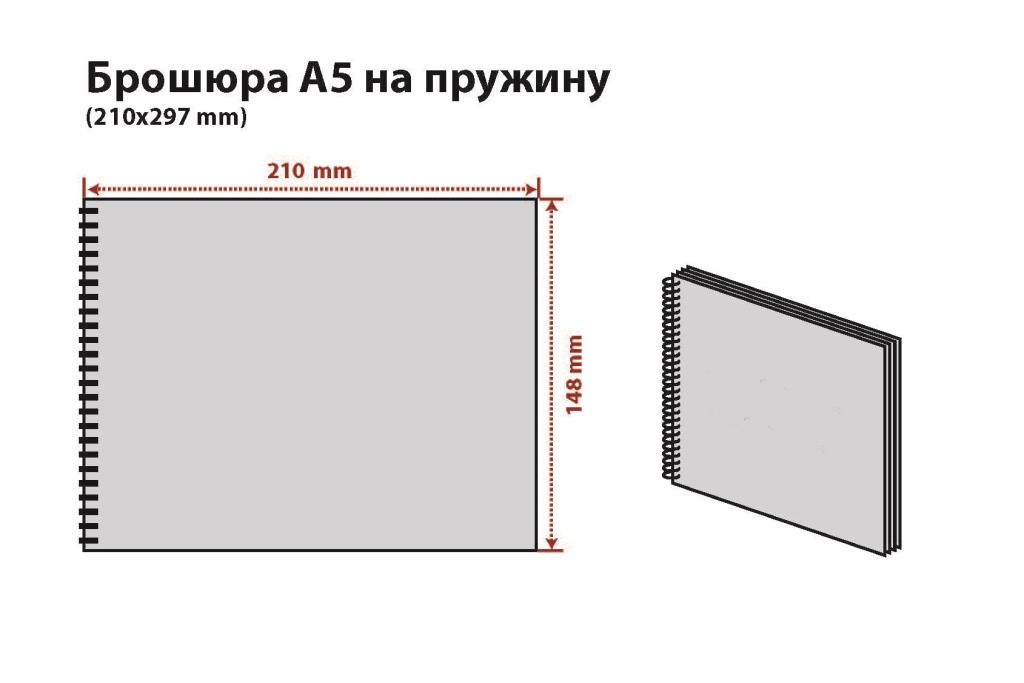
Need print out a brochure on both sides can occur for everyone, because this is the most economical and easiest way to create a product presentation or reference material. Today, the market offers a huge selection of printers with double-sided printing, when the technology itself puts the pages in the right way, and the user does not need to do anything. You just need to specify the necessary parameters at the very beginning, and at the end, collect the sheets and fasten them in any convenient way.
Step-by-step instruction
Modern printer models with the ability to print directly on two sides of a sheet are expensive and not everyone can afford it. Therefore, to print a brochure, you must use either a regular printer or contact a printing house or copy center. Last option for those who do not want to bother, but about the first we will describe in detail below.
- We open the Word document and start changing the settings according to this scheme: File - Page Settings - Multiple Pages - Brochure - OK. After that, the page size of the document will change. By the way, immediately adjust the size of the fields - not more than 1.5 cm.
- You must adjust the number of pages so that it becomes a multiple of 4. If you do not, then in the middle of the brochure will be empty pages.
- Then select the "Print" menu or press the combination Ctrl + P at the same time. We select the option "Two-sided printing", then the option "All pages" and click OK. The printer will automatically paginate the pages.
- After the printer finishes printing, you need to get the sheets and change their order - shift one sheet from the first stack to another. The resulting stack of pages is again placed in the paper tray of the printer.
- Attention! The position of the sheets “empty side up” or vice versa depends on the model of the printer, so the correct option can only be determined by trial and error. Before printing, you need to practice on unnecessary papers in order to do everything right the first time.
- After the printer prints the text on the back pages, you need to check the layout of the sheets and, if necessary, fold them in the correct order. At the end, you can begin to fasten the finished brochure.
- Pay attention to the margins of the pages. The left and right margins should be equal so that when the leaf is folded, the text does not move. To avoid such errors, you can select the Mirror Fields function and set the desired dimensions in the Binding category.
- Using the zoom function, you can place 2/4/6/8 or even 16 pages of a booklet on one side of a sheet. However, this will greatly reduce the font of the text.
- If you scaled the document (reduced or enlarged), then the size of the internal fields will also change. Be sure to keep this in mind so that there is enough space for stitching the brochure.
- Typically, the Word program focuses on custom pagination. For example, if on your document the first page goes with the number 6, then for Word it will be the sixth, which means that in the end the sequence of pages will be incorrect.
- If there are no letters or other printed characters on the page, then the editor does not automatically include it in the print job. If such blank pages are needed in the brochure, then simply put at least one inconspicuous symbol on them.
Following the above steps and tips, you can print a brochure on both sides without any problems.
Today I was asked to make a two-sided copy of sheet A4, as They didn’t know how to put the sheet in the printer. And then it dawned on me that there is a universal way to turn the sheet, regardless of the type of MFP.
The algorithm is based on the fact: all printers and MFPs print the beginning of the page on the far half of the sheet; which is hiding in the paper compartment, but does not crawl out of the compartment for viewing by the user.
Two-sided printing algorithm (source sheet and result sheet rotate once):
1. Let the source sheet lie in the scanner so that when it is photocopied, the front side of the result sheet is obtained. The copy button is pressed, we get the filled front side of the result sheet;
2. The source sheet is flipped in a vertical plane, the axis of rotation passes along the long side (so that the source sheet lies down with only one change: the back side). In this case, when you click on the copy button, we get just the back of the source sheet;
3. Next, rotate the result sheet 180 degrees in the horizontal plane, the axis of rotation pierces the result sheet in its center. This corrects the situation when the reverse side of the printed result sheet is "upside down." We start printing.
The main mistake in double-sided printing is incorrect turning of the result sheet (incorrect execution of point 3). You just need to remember that the result sheet rotates ... like a spinning top or something ...
Note: if the printer prefers to use paper sideways (landscape orientation), or you use manual feed, the last step 3 is performed in the same way as step 2.
(added 01/30/2014): Now I will describe the turning of the result sheet in the case of printing from a PC to a printer, along with a different wording. Let the first side be printed text up:
- put the sheet on the palm of your hand, like a cell phone - and turn the sheet from palm to palm. The printed side will be on the bottom. This is similar to paragraph 2 above, but only here the source sheet does not exist, we work only with the result sheet;
- the analogy of paragraph 3 is fulfilled: the “top” of the sheet is 180 degrees. The printed side is down and upside down.
The same rule applies when printing manuals, abstracts: when 1 page produces 4 pages of A5.
(added 05/14/2014): a few days will pass - and I will finish my the program to version 1.2, giving her the ability to do the correct page order not only for single-sided printing, but also for automatic two-sided printing. Using the program with this article will give good results, and using it with printers that support automatic duplexing will turn all the action in 1 click.