File structure android. The internal device of Android systems
File system os android
so in this article, as you might have guessed from the title, we’ll talk about the general structure. file system android Description of main directories, formatting methods, backup and so on. The article is mainly aimed at beginners. I hope the rest will be interesting to read.
linux file system structure
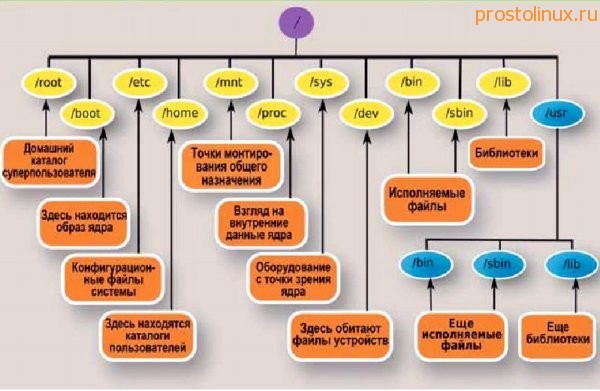
android does not have many of the usual disks - such as with or d. The root of our file system is: "". all other directories are attached to the root directory. Consider some of them:
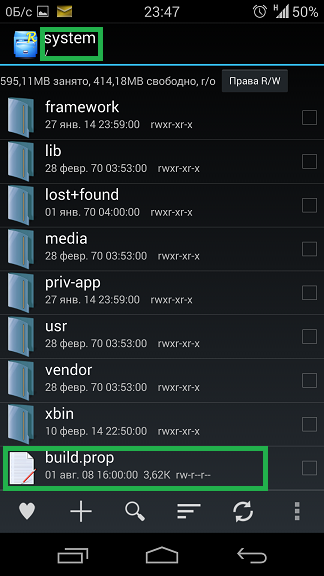
system- by the name you can already guess that the system files are located here (something like we can see in the OS from Microsoft c: windows). The files in this folder are unchangeable by default. They are intended for the functioning of the operating system. Also here are the built-in applications that are built into the OS. If we get root rights then we can make our changes in this directory. However, it should be done carefully for deleted files and folders will not recover by themselves. In this case, only a flashing or backup will help us. Something interesting can be found in the folder systemmedia. In the archive bootanimation.zip There are pictures that make up the animation when the device is turned on. Even in the root of the system folder, you can find the file build.prop which contains a lot of settings, from the description of the device to the density of the screen (for configuring this config there are many third-party applications).screen
Data - Unlike systems, stored files are stored here. In under categories app Just stored apk installed by us programs. screen
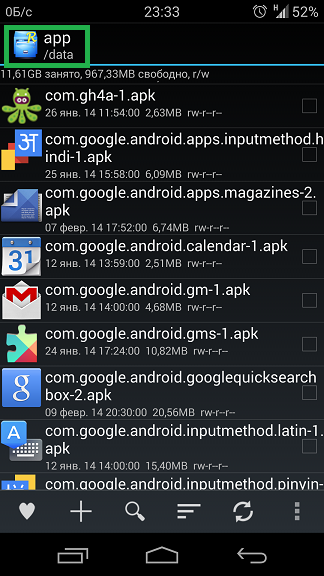
If we need an apk file of any application, then we can easily find it there. And in datadata data of these installed programs.
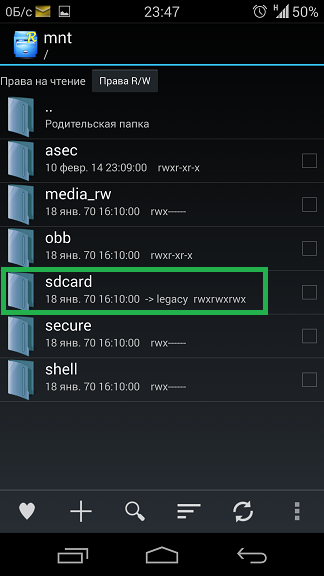
Mnt -In this section, user memory is mounted (for example, if you install a flash card). Thus, if we place our txt file in the root of the flash card, then the full path will look like this " mntsdcard file". The built-in disk for smartphones without support for memory cards is also mounted here. screen
How to do wipe (reset) on android
there are several ways to format. About several of them below
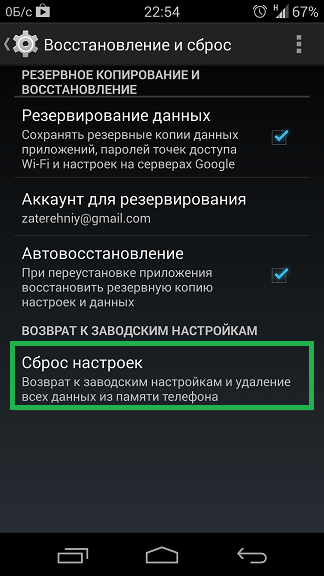
1. reset via settings. Go to settings \u003e\u003e restore and reset \u003e\u003e reset settings. Clears all settings and removes the set by. Before this, you can backup some settings by ticking the corresponding item. After the reboot, the device will ask whether to restore this data.
screen
2. reset via recovery. Useful in the situation when the device does not turn on. You will need root access and an appropriately installed recovery. Depending on the installed recovery, the location of the items may vary. I have a point advanced wipe. Contains:
dalvik cache - cache formatting virtual machine dalvik.
System- formatting the system partition.
Data - delete all third-party applications in the device's memory as well as user settings.
cache - cache removal
format sdcard - formatting the memory card. Delete all that is on the memory card.
format sd-ext- formatting the section on the memory card (if such a section was created. For example, to mount the script of the referring application when installed on the card).
3. formatting using the service code. If you dial * 2767 * 3855 #. immediately after dialing, a reset will occur. Be careful.
So for example, deleting the contents of a folder datadata we will remove the settings and application data but not the applications themselves. This can also be done from the settings of the "delete data" application. When you delete the folder, the date will be deleted. installed applications.
Wishes, amendments, additions to the article, please leave in the comments or to me in a personal. article will be supplemented. Thank you readers, success.
-----------------
You can leave comments in the Article Catalog section. middleware, is a set of libraries (Libraries), designed to solve common problems that require high efficiency. That is, it is this level that is responsible for providing implemented algorithms for higher levels, supporting file formats, encoding and decoding information (for example, multimedia codecs), drawing graphics, and much more. Libraries are implemented in C / C ++ and compiled for a specific hardware devices with which they are supplied by the manufacturer in a pre-installed form.
Here are some of the low-level libraries:
- Surface Manager - the Android OS uses a composite window manager like Compiz (Linux), but more primitive. Instead of drawing graphics directly to the display buffer, the system sends incoming drawing commands to the voice-over buffer, where they accumulate together with others, composing a certain composition, and then displayed to the user on the screen. This allows the system to create interesting seamless effects, realize window transparency and smooth transitions.
- Media Framework - libraries implemented on the basis of PacketVideo OpenCORE. With their help, the system can record and play audio and video data, as well as output static images. Many popular formats are supported, including MPEG4, H.264, MP3, AAC, AMR, JPG and PNG. In the future, OpenCORE will be replaced by a simpler framework, Stagefright.
- SQLite is a lightweight and productive relational database engine used in Android as the main database engine.
- 3D libraries - used for highly optimized drawing of 3D graphics, using hardware acceleration if possible. Their implementations are based on the OpenGL ES 1.0 API.
- FreeType is a library for working with bitmaps, as well as for rasterizing fonts and performing operations on them. This is a high-quality engine for fonts and text display.
- LibWebCore - libraries of the well-known browser engine WebKit, also used in desktop google browsers Chrome and Apple Safari.
- SGL (Skia Graphics Engine) - an open engine for working with 2D graphics. The graphics library is a product of Google and is often used in their other programs.
- SSL - libraries to support the same cryptographic protocol based on OpenSSL.
- libc is a library of standard C language calls, an analogue of glibc (GNU libc from Linux) for small devices. It is called Bionic.
Fig. 1.5.
At the same level is the Android Runtime - application runtime environment. Its key components are a set of standard libraries and virtual machine Dalvik. Each application in the Android OS runs in its own copy of the Dalvik virtual machine. Thus, all running processes are isolated from the operating system and from each other. The architecture of the Android Runtime is such that the work of the programs is carried out strictly within the framework of the virtual machine environment. Due to this, the core of the operating system is protected from possible harm from its other components. Therefore, the code with errors or malware will not be able to spoil the Android OS and the device based on it. Such a protective function, along with the execution of the program code, is one of the key for the Android Runtime.
The level above is the Application Framework, sometimes called the application framework level. It is through application frameworks that developers get access to the API provided by lower-level system components. In addition, thanks to the framework architecture, any application is provided with the already implemented capabilities of other applications that are allowed to access. The basic set of services and systems that underlie each application and are part of the framework include:
- A rich and extensible set of views (Views) that can be used to create visual components of applications, such as lists, text fields, tables, buttons, or even an embedded web browser.
- Content Providers that manage data that some applications open to others so they can use them for their work.
- A resource manager (Resource Manager) that provides access to resources that do not carry code, such as string data, graphics, files, and others.
- Notification Manager, through which all applications can display their own notifications for the user in the status bar.
- The Activity Manager, which manages the life cycles of applications, stores data on the history of work with activities, and also provides a navigation system for them.
- Location Manager (location manager), allowing applications to periodically receive updated data on the current geographical location of the device.
At the top of the Android software stack lies the Applications level (Applications). This includes a set of basic applications, which is preinstalled on the Android OS. For example, it includes a browser, mail client , program for sending SMS, maps, calendar, contact manager and many others. The list of integrated applications may vary depending on the device model and android version . And besides this basic set, the level of applications includes all applications for the Android platform, including those installed by the user.
As a rule, Android applications are written in Java, but there is an opportunity to develop programs in C / C ++ (using the Native Development Kit). Exotics can be called using Basic (using Simple) and other languages. You can also create your own programs using application designers, such as App Inventor.
1.6. Kernel Features
The kernel is the most important part of the Linux OS, and unlike its other parts, it was almost completely transferred to the Android OS. However, in the process of transferring about 250 patches were applied to the core.
In the Android OS kernel, it was decided to abandon the means of interprocess communication of the Linux OS and instead create a single mechanism called Binder. Binder allows you to call the methods of one process from another process, passing arguments to them and getting the result, just as the methods are called within the same process. Binder does this job with minimal memory usage.
To enable debugging on small devices, debugging information has been added to the kernel. serial port and implemented support for the logcat command.
Big changes touched work with memory. The traditional Linux shared memory shmem has been replaced by ashmem. The same problem, but at the level of physical memory, is solved using the pmem driver. A special out of memory handler, called Viking Killer, has been added; in the simplest case, it just kills the process, but more complex rules can be set.
New security settings have been added to the network stack; file system support for YAFFS2 flash drives is included in the kernel.
1.7. Java machine Dalvik
Dalvik Virtual Machine is part of the Android mobile platform. it virtual machinesponsored by Dan Bronstein. It spreads like free software under BSD-compatible Apache 2.0 license. In many ways, this fact played a role in google solution abandon JME (Java Micro Edition), which would need to get a license from Sun. Therefore, the corporation, whose goal was to create an open operating system, developed its own virtual machine.
Unlike most virtual machines (the same Java Virtual Machine) that are stack-oriented, Dalvik is register-oriented, which cannot be called a standard solution. On the other hand, it is very well suited to work on RISC architecture processors, which include ARM processors, which are very widely used in mobile devicesoh.
Dalvik was designed specifically for the Android platform. The fact that the platform builds all processes as isolated, each running in its own address space, was taken into account. Virtual machine optimized for low memory consumption and work on mobile hardware. Starting with Android 2.2., Dalvik uses the JIT (Just-in-Time) compilation. As a result of these features, fast and productive virtual machinethat can not affect the operation of applications in general.
Dalvik uses its own bytecode. When developing an Android application, they are translated by the compiler into a special machine-independent low-level code. When executed on a platform, Dalvik interprets and executes such a program.
In addition, Dalvik is able to translate Java bytecodes into native format codes and also execute them in its virtual environment. The program code is written in Java, and after compilation everything. class files are converted to .dex format (suitable for interpretation in Dalvik) using the special utility dx, included in the Android SDK.
1.8. Bionic
Bionic is a standard C language library distributed under the BSD license (Berkeley Software Distribution? Distribution system software in source code, created for the exchange of experience between educational institutions) and developed by Google for Android. In bionic, there are some non-Android POSIX functions that are available in the full glibc implementation.
The main differences bionic:
- BSD license: Android uses the Linux kernel, which is under the GNU General Public License (GPL), but Google wanted to isolate Android applications from the effects of the GPL. The GNU libc, which is commonly used with the Linux kernel, is under the GNU LGPL license, as an alternative to uClibc.
- small size: bionic object code is much smaller (about 2 times) than glibc and slightly smaller than uclibc.
- bionic is designed for processors with relatively low clock speeds.
- a truncated but effective implementation of the POSIX threads.
1.9. Overview of Java Application Programmer Interfaces
For Android application programmer - a set of interfaces in the Java language. Consider how it is organized. At the heart of the set are packages that are included in the Java language standard, such as java.util, java.lang, java.io. They are on any platform where java applications can run, and are non-specific for Android. Extensions adjoin them, which are not included in the standard of the language, but de facto have long been standard - javax.net, javax.xml packages.
Also included in Android less common java extensions - package org.apache.http, the most solid implementation of the HTTP protocol. The org.json package is responsible for serializing JavaScript objects and supporting AJAX technology. The org.w3c.dom package provides the document object model
In certain models of tablets based on the Android platform, some components from the above list may be missing.
All "android" tablets are controlled by one of the versions of the mobile operating system from Google. However, older versions may not support some of the modern applications.
All versions of the most popular mobile operating system have a common basis. We can imagine operating system Android as a multilayer structure. Computer engineers call this the software stack. The elements at the top of the stack are what the user sees during his interaction with the operating system. On the bottom of the stack are those parts of the operating system that interact directly with the hardware of the device.
So, at the lowest level are the hardware components themselves: processors, sensors, wires, and printed circuit boards. The next layer is the core of the operating system. The kernel is sometimes also called embedded (or proprietary) software. More commonly known is the English definition of “firmware”. This software controls the hardware resources of the device, controls them and their distribution.
This part of the operating system "translates" into the language of hardware components those commands that the user gives through a convenient graphical interface. A sample kernel for Android is the open source operating system Linux 2.6.
Android libraries are located above the operating system kernel. They are sets of instructions that a device follows in processing various types of data. An example is the orientation library in three-dimensional space. It contains all the instructions that the Android device requires in order to recognize changes in its position in space and respond to them.
At the same level of the software stack are the root libraries needed to support applications written in the Java language. Java is a programming language from Sun Microsystems. More recently, Java-enabled phones have been very common. Currently, they are increasingly being replaced by smartphones.
Android virtual machine is located at the same level of the operating system software stack. This piece of software is creating a virtual operating environment, which is also otherwise called a virtual operating environment. A virtual machine simulates a physical device with a separate operating system. Google designed this layer so that each application running on the Android operating system functions as a separate process. Thus, if one of the running processes fails, the rest will remain unaffected. The virtual machine also plays the role of a memory manager.
The next level is the application framework. It is the basis for all applications "android" device. The application infrastructure is the link between applications and the rest of the operating system.
Google recommends that developers create applications that interact with this layer as part of the application programming interface () developed by the search giant operating system. Developers need only to familiarize themselves with these API-related rules. They don't need to think about technical specifications every "android" tablet.
The top level of the software stack contains the user interface and all applications of the android tablet. This part of the operating system is constantly seen by the user. But behind this attractive and colorful layer hides a lot of boring, and interesting only to specialists of the code.
Like any other operating system, and other hardware resources of the tablet.
Based on computer.howstuffworks.com
# facts | How does Android work? Oleg Dovbnya
- Transfer
In this article we will look at the architecture of Android applications.
Frankly, I find the official Google on this topic not very useful. Responding in detail to the question “how”, she doesn’t explain at all what and why. So, here is my version, and I hope it will bring some clarity. Yes, by the way, I fully approve of reading Google articles, because they contain useful information, which I do not intend to repeat.
Android OS architecture - a bit of history
As is often the case in IT, many things cannot be explained in isolation from the history of the emergence of specific software. That is why we must turn to the origins of the Android OS.The development of the Android OS was launched in 2003 by the young company Android Inc. In 2005, this company was bought by Google. I believe that the main features of the Android architecture were identified during this period. This is not only the credit of Android Inc; Google’s architectural concepts and financial resources have had a decisive influence on Android’s architecture. Next I will give a few examples.
If you remember, 2003-2005 was marked by increased attention to AJAX applications. I think this had a fundamental impact on the architecture of Android: in many aspects it is closer to the architecture of a typical AJAX application than to the desktop GUI application written in Java, C #, C ++, VB, and so on.
I do not know why it happened. My guess was someone from Google invented at a time when rich Internet applications (Rich Internet Applications, RIA) in the spirit of Google Docs or Gmail were considered to be the solution to all problems. In my opinion, this idea can not be called neither good nor bad. Just remember that Android applications are very different from desktop ones.
The influence of the architectural philosophy of Eclipse is noticeable in choosing the principle of GUI implementation, which is more like SWT than Swing.
In the standards for the design of the Android code there is a “Hungarian notation”, born within the walls of MS. It can be assumed that the person who wrote these standards was previously engaged in the development under Windows.
Android architectural levels
The Android operating system has three very different and highly separated levels:- It is based on a modified and trimmed version of Linux, as I mentioned in one of my previous articles.
- Above the Linux level is the application infrastructure layer, which contains the Dalvik virtual machine, a web browser, a SQLite database, some infrastructure crutches, and a Java API.
- And finally, the level of Google-written Android applications. Generally speaking, they are an extension of the infrastructure level, since the developer can use these applications or parts of them as building blocks for their own development.
Linux level
Imagine that you are an architect in a young company. You must develop an OS for a new type of device. What are you going to do?Roughly speaking, you have two ways: to implement your own ideas, starting from scratch, or use the existing OS and adapt it to your devices.
Implementing from scratch always sounds exciting to programmers. At these moments, we all believe that this time we will do everything better than others do, and even better than we ourselves did before.
However, this is not always practical. For example, the use of the Linux kernel has significantly reduced the cost of development (perhaps somewhere already excessively large). Agree, if someone decides to create something resembling the Linux kernel in its current state, it will need several million dollars.
If you are in charge of Android Inc, then by definition you cannot have that much money. If you run Google, then you will find that kind of money, but you will most likely think twice before spending it on creating your own OS. You will also spend several years before you reach the current state of Linux; several years of delay may be too late to enter the market.
In this situation, Apple decided to build a Mac OS based on Free BSD. Android Inc decided to use Linux as the basis for Android. Both BSD and Linux sources are freely available and provide a good basis for any development, be it Apple or Google.
But at that time it was impossible to launch standard Linux on a mobile device (now this is no longer the case). The devices had too little RAM and non-volatile memory. The processors were significantly slower compared to the processors of computers where Linux is commonly used. As a result, Android developers decided to minimize system requirements Linux.
If we consider Linux on high levelthen it is a combination of the core (without which it cannot be avoided) and many other optional parts. You can even run one core, without anything else. So, Google is forced in any case to use the Linux kernel as part of the Android OS. In addition, optional parts were considered and the most necessary were selected. For example, the IPTables network firewall and the Ash shell were added. It is curious that it was Ash who was added, not Bash, despite the fact that the latter is an order of magnitude more powerful; this decision was probably based on the fact that Ash is less resource intensive.
Android developers have modified the Linux kernel, adding support for hardware used in mobile devices and, more often, inaccessible on computers.
The choice of Linux as the basis had a huge impact on all aspects of the Android OS. Building Android, in fact, is a variation of the Linux build process. Android code is running git (a tool designed to manage linux code). And so on.
Let it all be interesting, but you will most likely never touch all these specific moments until your goal is to develop Android applications. The only exception may be a review of the file system using the ash commands. The main thing that you should know when developing applications for Android is the level of application infrastructure.
You may ask how to be if you need to develop a native Android application? Google strongly discourages doing this. Technically, of course, this is possible, but in the future you will not be able to distribute this application in the normal way. So think twice before starting native Android development, unless of course you are working on the Android Open Source Project (AOSP), i.e. Android OS itself.
Application Infrastructure Level
Despite some similarities Apple iOS and Android OS, there are significant differences between the architectural solutions at the infrastructural level of both OSs.Apple decided to use Objective-C as a programming language and runtime environment. iOS apps. Objective-C looks like a more or less natural choice for an OS based on Free BSD. You can think of Objective-C as regular C ++ with a custom preprocessor that adds some specific linguistic constructs. Why it is impossible to use standard C ++ on which Free BSD is written? I think the reason is that Apple is trying to do everything in its “Apple” style.
The basic idea is that iOS applications are written more or less in the same language as the OS behind them.
Android applications are very different in that sense. They are written in Java, and this is a completely different technology than C ++ (although the syntax is inherited from C ++).
I think the main reason is that the same application needs to work on different hardware. This problem only occurs for the Android OS; The guys from Apple have no such problem. iOS only works on its own production equipment, and Apple fully controls the entire process. For Android, the opposite is true: Google does not control hardware manufacturers. For example, the Android OS runs on x86, ARM and Atom processors (in the comments, x86 includes Atom, and Android runs on x86, ARM, PPC and MIPS - translator's note). At the binary level, these architectures are incompatible.
If the architects of the Android OS chose the same path as the architects from Apple, Android developers would have to distribute several versions of the same application at the same time. This would be a serious problem that could lead to the collapse of the entire Android project.
In order for the same application to work on different hardware, Google used container-based architecture. In this architecture, the binary code is executed by a software container and is isolated from the details of the specific hardware. Examples are familiar to all - Java and C #. In both languages, the binary code does not depend on the specific hardware and is executed by the virtual machine.
Of course, there is another way to achieve hardware independence at the binary code level. As one option, you can use a hardware emulator, also known as QEMU. It allows you to emulate, for example, a device with an ARM processor on the x86 platform and so on. Google could use C ++ as a language for developing applications inside emulators. Indeed, Google uses this approach in its Android emulators, which are based on QEMU.
It is very good that they did not follow this path, because then someone would have to run the OS on an emulator, which requires much more resources, and, as a result, the speed of work would decrease. For achievement best performance emulation was left only where it could not be avoided, in our case in Android applications.
Be that as it may, Google has decided to use Java as the main language for developing applications and their environment.
I think it was a critical architectural solution that put Android apart from the rest of the Linux-based mobile OSs that are currently available. As far as I know, none of them have binary compatibility at the application level. Take for example MeeGo. It uses C ++ and the Qt framework; Despite the fact that Qt is cross-platform, the need to do different builds for different platforms does not disappear.
Choosing Java, you had to decide which virtual machine (JVM) to use. Due to limited resources, using standard JVM was difficult. The only possible choice was to use a Java ME JVM developed for mobile devices. However, the happiness of Google would be incomplete without developing its own virtual machine, and Dalvik VM appeared.
Dalvik VM differs from other Java virtual machines in the following:
- It uses a special DEX format for storing binary codes, as opposed to the JAR and Pack200 formats, which are the standard for other Java virtual machines. Google has said that the DEX binaries are smaller than the JAR. I think they might as well have used Pack200, but they decided to go their own way.
- Dalvik VM is optimized to run multiple processes simultaneously.
- Dalvik VM uses a register-based architecture against stack architecture in other JVMs, which leads to an increase in execution speed and a decrease in the size of binaries.
- It uses its own set of instructions (rather than the standard JVM bytecode).
- It is possible to launch (if necessary) several independent Android applications in one process.
- Running an application can span multiple Dalvik VM processes in a “natural way” (later we will discuss what this means). To support this, added:
- A special object serialization mechanism based on the Parcel and Parcelable classes. Functionally, they pursue the same goals as Java Serializable, but as a result, the data is smaller and potentially more tolerant of versioning class changes.
- A special way to make inter-process calls (inter process calls, IPC), based on Android Interface Definition Language (AIDL).
- Prior to Android 2.2, Dalvik VM did not support JIT compilation, which was a serious performance hit. Starting with version 2.2, the speed of execution of frequently used applications