Checking the operation of windows 7 memory. Eliminating possible problems associated with the operation of the utility. Windows version limitations
When a blue screen of death appears on the monitor of the device, it’s time to think about checking random access memory. In addition, the RAM must be tested when the computer restarts or hangs.
Check RAM on Windows 7 will help standard tools, but if another OS version is used, you will need to download a special program from the Internet. Almost always software crashes, seemingly illogical, turn out to be related to RAM problems.
Exclusion method
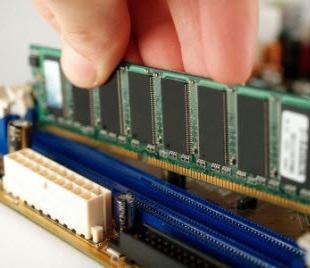
The first version of the check does not provide for the launch of additional utilities. It is possible when using multiple slats of RAM. In case it is alone, the application or another device will be required to test. You must take turns removing the slats of RAM and look at the overall stability of the system. This option is good because it allows you to check slots at the same time. motherboard. If one of the slats functions normally in another device without leading to failures, it is quite possible that the cause of the failure is in the motherboard. When, after removing a single strip, the computer starts working normally, it is the one that is faulty. Thus, the Windows 7 Memory Testing Tool does not need to be run.
It is worth noting that the physical extraction of the slats does not take much time, and checking when using special programs characterized by a longer process. This is especially true when the amount of RAM is large. If a completely new memory module is installed, and the blue screen remains even during the BIOS boot, it is possible that the processor or motherboard does not have the support of the manufacturer’s device that released it. In this case, you should check with the official site of the company, which is the manufacturer of the motherboard. You may need the latest BIOS firmware.
How to check the RAM in Windows 7?
To run the firmware that can test the RAM, you must perform the following steps:
1. Go to the "Start".
2. Go to the "Control Panel".
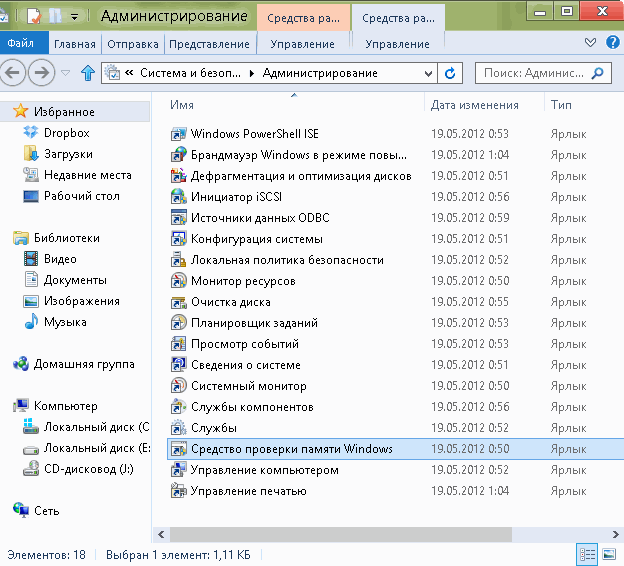
3. Open “Administration” and select “Windows Memory Checker”.
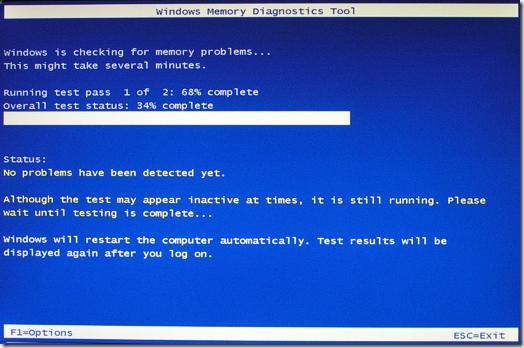
It should be extremely attentive. Before you run the check, you will need to close all applications and save important documents. When the button “Reboot” is clicked, all programs that require additional actions from the user will be forced to end. Next, the computer restarts, after which the testing of the RAM automatically starts. It is carried out in two stages. They take a small amount of time if the amount of RAM is two gigabytes, and the memory is good. Otherwise, the test may be delayed. During the testing period it is recommended to refrain from unnecessary clicks on the buttons. If there are defects in RAM, information about errors will appear at the bottom of the screen. After finishing windows checks 7 The computer automatically restarts, a report is generated on all RAM problems that are found by the system.
Memtest86 +
It should be noted that the identification of problems with RAM tools Windows 7 does not always show high efficiency. To perform more serious and deeper tests, you will need to use the Memtest86 + program. It is presented in a free version and is easily used on any device with any operating system. The program is available in three versions:
Bootable ISO (designed to create a bootable disc by burning an image with a CD or DVD burner;
Auto Indtaller For USB Key (not always suitable for older devices);
Pre-Complied for Floppy (an archaic solution for those who do not have USB jacks, write a CD-drive, but have a drive).
Creating a bootable flash drive
You need to go to the official site Memtest86 + and download the desired distribution. After that, you need to unzip it. For these purposes, it is proposed to use 7-zip or the famous Winrar. When the launch of the program is complete, you must select the drive, which will become bootable.
Bootable CD / DVD
Sometimes you cannot perform a RAM check from a flash drive. The system crashes when using a specific flash drive driver. There are also situations where the drive may not be at hand, the BIOS is outdated and unable to load the device from USB devices. In such cases, you have to write the distribution to disk. For this program is intended Ultra ISO. After it is installed, double click on any iSO file opens it in this application. Then you need to select the tools menu and the option “Burn image”. Memtest86 + is a small program, so the recording will take place very quickly.
Memory check
After the distribution package is written to a USB flash drive or disk, you need to go to the BIOS. You need to do this in the process of turning on the computer by clicking on the "DEL" button. When the program is launched, you should select the USB flash drive or CD-ROM in the First Boor Device column. When all actions are performed correctly, a reboot follows automatic check of memory. The utility performs nine different tests, but after they are completed, the program goes into a loop and starts all over again. As a rule, the first successful two or three tests make it clear that there are no problems with RAM.
Prevention
Often to failures operating system causes dust system block. In this case, OS testing is not required. It is necessary to blow through all the internal space of the device, paying special attention to radiators and slots. It is advisable to remove all devices, excluding the processor, from the sockets, carefully wipe the contacts. It should be neat with chips, as the slightest damage can lead to disruptions.
Appears on your monitor too often, even on the newly installed OS, the first thing to do is to check the RAM. Also, RAM should be tested if the computer restarts or hangs by itself. Checking the RAM on Windows 7 can be performed using standard tools, but if you are using a different version of the OS, you will need to download a small utility from the Internet. Almost always, software malfunctions, which at first seem illogical, are caused by RAM problems.
Exclusion method
The first way to check does not require running additional programs. It is relevant if the PC uses more than one strip of RAM. If the bar is one, you will need an application or another computer to test it. Alternately remove one bar of RAM, check the overall stability of the OS, if the problem persists, remove the next one and so on. This method is also good because you can test the motherboard slots right away. At the same time, if one bracket will work normally in another computer, without causing failures, it is possible that the motherboard is to blame. If, after removing one of the slats, the computer began to work normally, it means that it is faulty, and the Windows 7 memory checker may not be started. In addition, the physical extraction does not require much time, and testing using the application can take a long time, especially if the amount of RAM is large.
If a completely new computer is installed in the computer and the image does not appear even at the stage of loading the BIOS, it is likely that the processor or motherboard does not support the device of the manufacturer that released it. Check out the official website of the company that released motherboardIt is quite possible that the BIOS firmware of the latest version will solve this problem.
How to check RAM in Windows 7
So, to run the built-in Windows utility, which will test the RAM, follow the path "Start - - Administration", in the list that opens, select "Windows Memory Checker".
Be careful. Before testing it is necessary to close all applications and save the necessary documents. After clicking on the "Restart" button, the system will forcibly terminate all programs that require additional actions from the user.
After the reboot, the RAM check will automatically start. Windows 7 runs it in two stages. Each will take about 10 minutes if the amount of RAM is two gigabytes and the memory is good. Otherwise, the tests may be delayed. At this time, refrain from unnecessary clicks on the mouse and keyboard. If the RAM is out of order, fill in the error information at the bottom of the screen.
When the RAM check completes, Windows 7 will automatically restart the computer and report on any RAM issues found.
Memtest86 +

Detecting RAM issues using Windows 7 is not always effective enough. For more serious and deep tests, it is better to use the Memtest86 + utility, which is completely free and can be used on any computer, no matter what OS is installed.
It comes in three options:
- Bootable ISO (created to create a bootable disc by burning an image with a CD or DVD burner).
- Auto Indtaller For USB Key - (not always suitable for older devices, creates bootable USB flash drive, and not all computers released a few years ago are able to boot from USB).
- Pre-Complied for Floppy (absolutely archaic solution for those who have neither USB sockets, nor a writing CD-drive, but there is a drive).
Creating a bootable flash drive

Just go to the official site Memtest86 + and download the necessary distribution. Then it must be unzipped, for this you can use 7-zip or the popular Winrar. After starting the program, you will need to select a drive that will later become bootable. Be careful do data backup, all information on the flash drive will be deleted in the process of recording a new one.
Bootable CD / DVD
In some cases, a flash drive cannot be checked from the flash drive. Windows 7 sometimes crashes when using a specific flash drive driver, or the drive just won't be at hand, or maybe the BIOS is outdated and can't boot the computer from USB devices.
If the flash drive cannot be used, best solution There will be a recording of the distribution kit on a disk. And help this program Ultra ISO. If you install it, double clicking on any ISO file will open it in this application. After opening the Memtest86 + file, select the tools menu. Then click on the item "Burn image". Memtest86 + is a very small program, so recording will end in less than a minute.
Memory check
After writing the distribution kit on a USB flash drive or disk, you need to enter the BIOS. To do this, you need to press the "DEL" key while turning on the computer. When the BIOS settings utility is launched, in the "First Boor Device" column, select your USB flash drive or CD-ROM.
If all actions were performed correctly, after a reboot, the automatic check of the RAM will begin. The program does nine different tests, but after they are completed, it goes into a cycle and starts all over again. If the first two or three tests were successful and without errors, most likely, RAM is all right.
Prevention
Very often, RAM failures are due to the dustiness of the system unit. When this check, the RAM (whether Windows 7 is installed on the computer or any other version of the OS) is not needed. Open the lid of the system unit and purge all the internal space. Pay special attention to radiators and slots. In this case, all devices except the processor, it is desirable to remove from the socket and wipe the contacts. Also, do not be amiss to wipe the contacts of the slots themselves. This procedure saves not only from dust, but also from metal oxidation.
Performing these actions, be very careful with the microcircuits, the slightest damage to them will damage the device. It is best to use an eraser or alcohol to wipe the contacts. Especially often it helps if the memory strip is several, and testing each one can take a long time. After wiping the contacts do not rush to insert the RAM bar in its place, wait a bit, let it dry.
Hello, dear readers, Trishkin Denis in touch.
The computer consists of several key boards and elements. One of them is RAM. In case of problems with the PC, this element is in most cases not the source. Nevertheless, there are still moments when you first need to check the RAM in Windows 7, and only then try other tools.
RAM (RAM or random access memory) is the part of the computer system in which the executable code is stored and intermediate data is stored on this moment processed by the processor. It is volatile. This element is considered to be one of the key ones, and therefore the operation of a computer is impossible without it.
If there are problems with this component, it usually manifests itself in two processes: the constant restart of Windows or the appearance of a blue screen of death.
to increase
What to do?( )
First you need to find out whether the emerging instabilities are associated with this component or with others. This will make it clear what needs to be done next.
In case of a RAM failure, there are only two options:
1 Component burned out. In this embodiment, when turned on, all the coolers start to rotate, but nothing else happens.
2 Element works partially. Crashes could occur in one or more chips. Here the situation will not be so obvious. The operating system may run for a certain period of time, loading the RAM. At the same time during the launch of a resource-intensive program, Windows will reboot, freeze or show the screen of death.
In the first case, everything is clear - you need to replace the component. In the second, you first need to fully test the memory for errors. This can be done with standard application system or special program.
Embedded Solution in Windows( )
If you manage to boot the OS, then this element is not burned. To find out the specific causes of failures, you need to run the appropriate health check program.
For this:
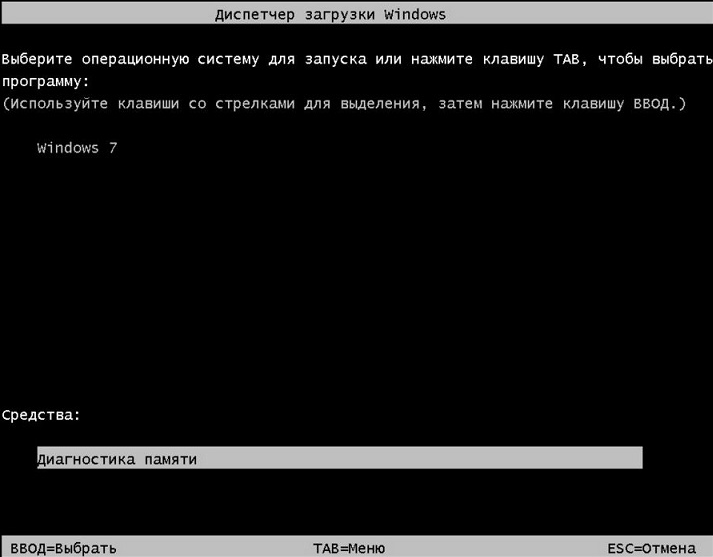
In addition, you can run the diagnostics wizard the next time you start Windows. To do this in the OS Boot Manager, you need to click " Tab"And select" Diagnostics
![]()
to increase
What to do if errors were found?( )
Immediately you need to understand that to correct the error and return everything, as it was before, will not work. If there are faulty components, you must contact the place of purchase. Well if the device is covered by warranty. Otherwise, the chance to replace the damaged module is minimal.
Interesting to know! In Windows, in case of detecting a RAM problem, it is recommended to contact the component manufacturer directly in order to obtain all the necessary information to eliminate the error.
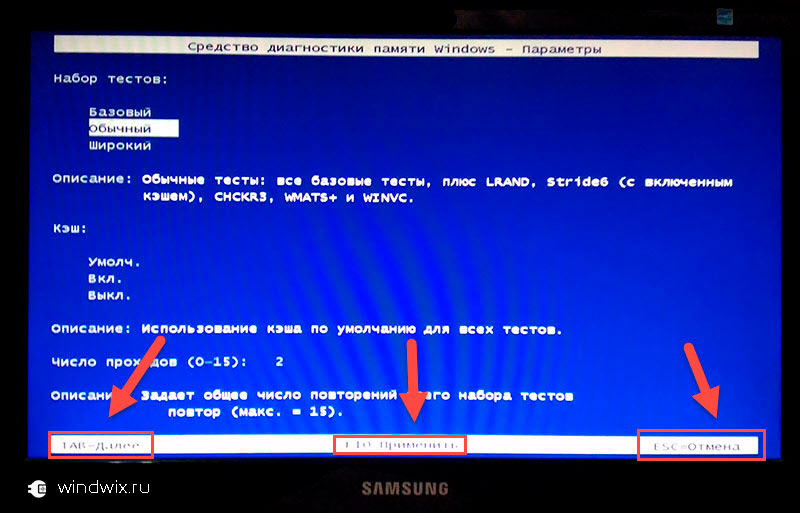
Extra options( )
If there are suspicions that there are some problems with RAM memory, it is recommended to run diagnostics with standard parameters. But at the same time you can customize the process. As already mentioned, for this you need to click " F1».
In the window that appears, install:
To proceed to setting the next parameter, click “ Tab". To return - " Esc". After specifying everything you need, click " F10And testing will begin.
to increase
Program for checking Memtest( )
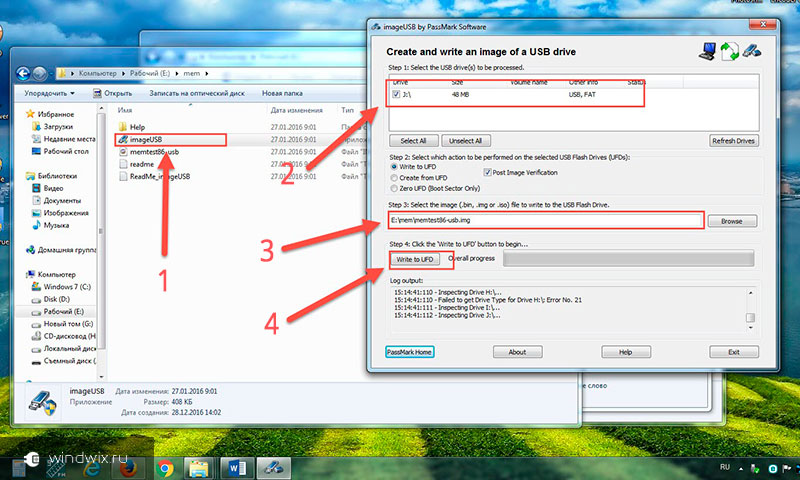
This product is considered the best for checking RAM. It is compatible with latest versions Windows starting with vista. To identify problems with RAM, this application launches eight different tests in turn. Each of them is designed to verify its own area, including the frequency of work. For the proper functioning of the program you need to do boot disk or flash drive.
For this we find a program that is already offered in the image of * .iso. After that, it needs to be written to disk or a portable storage device - by running the downloaded imageUSB file.
to increase
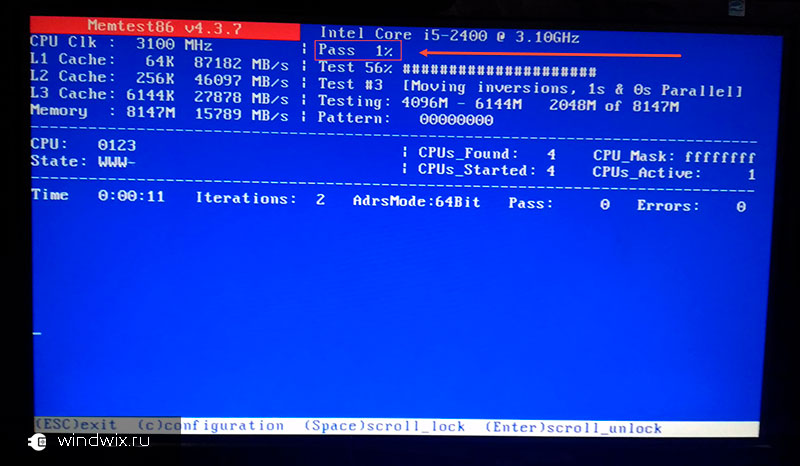
Then we insert a disk or USB flash drive into the computer and reboot. We need to set the BIOS to boot from a flash drive or use the boot menu - for a more detailed explanation of how to do this, use. After that, save, reboot and throws us on the test window.
to increase
Important! Diagnostics should be done only in this way. If you decide to try to check the RAM from under Windows, this can lead to a premature reboot. As a result, you will not achieve the desired results.
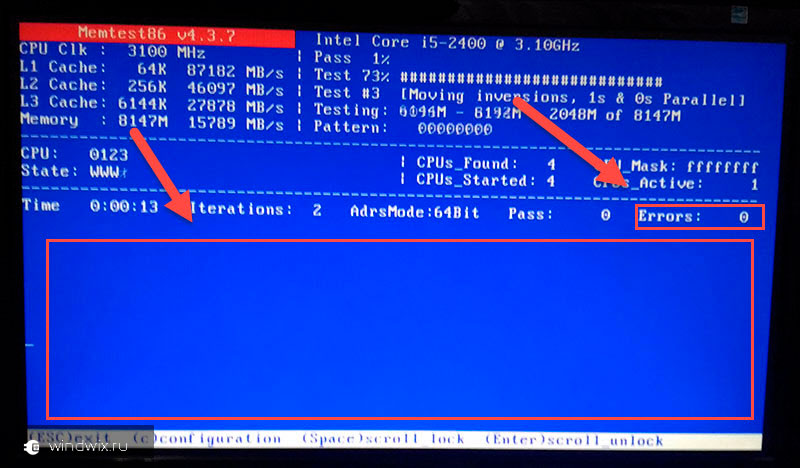
If errors are detected, red lines appear on the monitor, which contain all the necessary information.
to increase
It is also necessary to clarify that in the case of using multiple memory planks, you need to check them alternately. Otherwise, it is simply impossible to determine which module has failed.
It must be remembered that even though RAM is not considered to be the “heart” of a computer, it is nevertheless an important node, which is also energized for work. Therefore, any overvoltage in the system is negatively reflected, as well as on other elements.
In the case of constant use of a computer under heavy loads, many experts recommend installing an additional number of coolers on the case - how much to fit on the rear panel. This will help to cool not only the memory strip, but also the other elements.
In addition, in the market of technology today you can find additional components for cooling RAM. They are:
It should be noted that in addition to the problems associated with the production or operation, the working memory may also stop working due to one general malaise - dust. In this case, the computer does not start at all, and even gives out sounds, the designations of which are simply impossible to find in any user manual.
Computer builders often during the creation of a new machine install RAM boards in the first connectors that are closer to the processor. If you have noticed this and at home, it is advisable to move them away. To enable dual channel mode, you can install them in slots of the same color. This should increase the speed of work.

to increase
Dust is collected most of all near the places where the fans are installed. Therefore, the first connectors are the most exposed to dusting.
Personally, at some point my computer gave a blue screen of death. At that time I did not know what to do with it. I was repelled by the principle " turn off / on" or " disconnect / connect". And then I reinstalled the bar further, after having cleared it and the slots had fallen off. Everything worked and more BSOD because of this, I did not appear.
Dust in fact is the enemy of all electronics. You can use a brush or a soft brush to clean it. It is necessary to clean the grooves in the connectors and the pins themselves on the board. You can also use a soft eraser for this procedure. After its impact on the metal parts, you can immediately notice that they will become lighter.
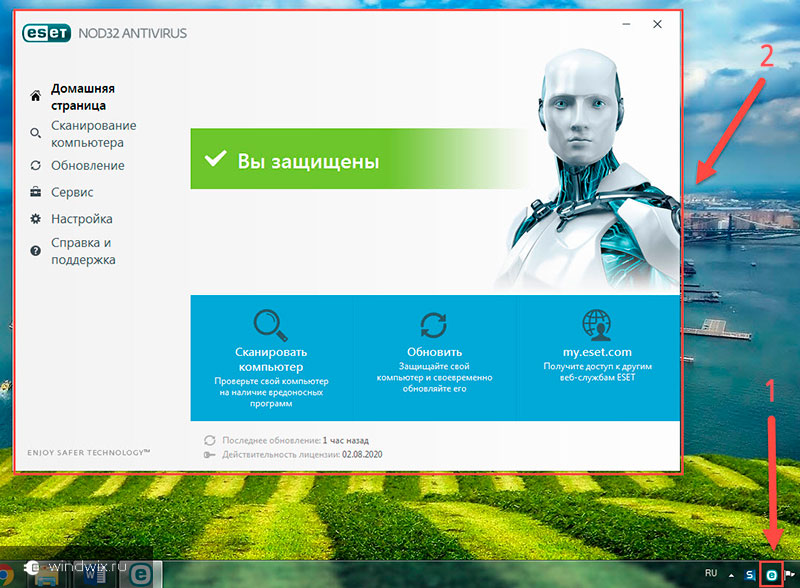
Damage caused by the virus( )
Separately, it should be said that there are some viruses whose action can lead to the failure of RAM-memory. Fortunately for many users, this program is not common on the “world wide web”, and you can meet it extremely rarely. In addition, antiviruses are trying to look for similar software not only on individual devices, but also on the Internet, cleaning it out. This only proves once again that it is better to have a security program on your PC.
to increase
Another sure method is to use only proven resources. Unfortunately, it is not always possible to realize that you have already left the borders " secure internet“Looking for the information you need.
Although RAM is not considered the most important component in a computer, nevertheless, no machine will work without it. It is a device that operates in the apparatus longer than the rest of the components. Despite this, there are still situations where this element fails.
Hope the article helped you. Subscribe and tell friends about me.
AT system requirements for games or programs, the item “necessary RAM” is encountered. It is also called physical. This puts many users in difficulty.
But, if you look in more detail, then its definition will not cause any difficulties.
There are many ways to determine the amount of RAM using internal operating system tools and third-party programs. Consider the most popular and simple ones.
You can find out the amount of RAM installed on your computer through the control panel. You can open it in the "Start" menu. It can open in the form of categories with sub-items or a multitude of icons.
You can change the type of view in the upper right corner of the window. There we choose the option “Small icons” and go on the label “System”. You will see a window to view basic information about the PC.
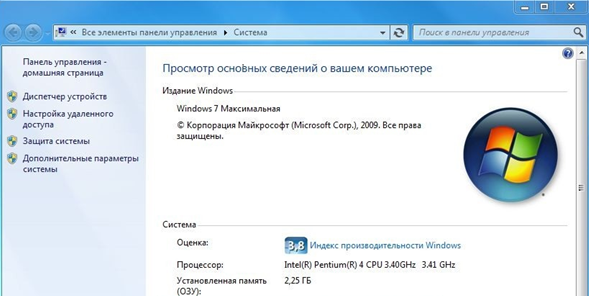
In the image, the RAM value is highlighted in green.
A quicker way to open this window is to right-click on the “Computer” icon on the desktop and select the “Properties” item.
The easiest way to learn about RAM is open
tie windows of basic information about the computer through the combination of keys Win + Pause.
Alternative methods for viewing the amount of RAM:
- Third-party programs. The most popular is CPUID CPU-Z. It has a simple interface and high functionality.
- Task Manager. The "Performance" tab will indicate the amount of physical memory.
- DxDiag information. Allows you to get detailed specifications of the machine, including the "RAM".
Rest of the way how can I see the RAM on Windows 7 much more complex in execution. Therefore, it is recommended to use those described above.
Restrictions windows versions
Different versions of Windows have limitations on the amount of RAM. 32-bit (32 bit): The initial version at the software level supports 2 GB.
The remaining versions are 4. 64-bit (64bit): Primary and Home Basic support up to 8 GB, Home Extended - 16, Professional and Maximum - 192.
The capacity of your system can be seen in the same window, but in the “System Type” item.
Used amount of RAM
High load and lack of free "RAM" on the computer can lead to slow work, its slow work. In this case, the PC will begin to "slow down" and "stupid." The easiest way to find out is the amount of free “RAM” through the Task Manager.
It is invoked through the key combination Ctrl + Alt + Delete and the selection of the corresponding position in the window that appears. You can also click it. right button mouse over the Taskbar (bottom bar of the screen where the Start button is located) and selecting the “Start Task Manager” option in the appeared context menu. In the window itself, select the "Performance" tab.
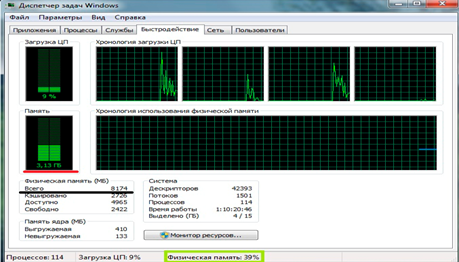
The black color on the image indicates the total volume. In the green box is the percentage of busy memory. The lower it is, the faster the PC will work. A red color highlighted its use at the moment.
Windows "eats" about 1 GB of "RAM". The rest of the consumption occurs due to programs running on the computer. You can view it in the “Processes” tab.
Increase in speed
In order for the PC to function faster and not “slow down”, you should free up more RAM on it. To do this, close all programs that are not needed.
After all, each extra tab of the browser consumes from 20 to 500 MB of "RAM", and open programs can "eat" it much more.
The need to check the RAM (RAM) is dictated by the frequent occurrence of the following situations in the work of Windows 7:
- The emergence of a "blue screen of death" (BSOD).
- Computer freeze.
- Unstable or incorrect computer operation.
- Critical errors when running applications.
In all such cases, the most likely "culprit" is RAM, and it must be checked. There are several ways to test RAM in Windows 7.
Built-in test Windows 7
Unlike previous versions Operating systems that required use third-party applications to analyze the performance of this computer node, in the seven for this is provided a built-in tool. It can be run in two ways:
- Of command line.
- From the control panel.
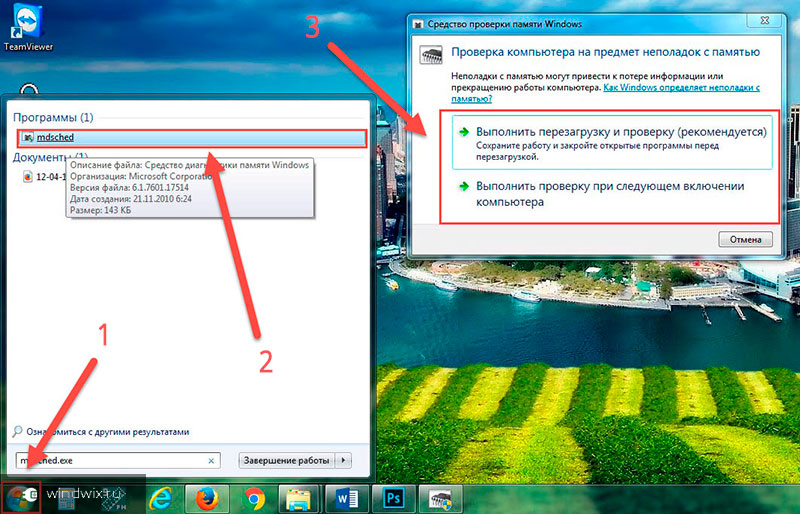
To run this tool from the command line, you need to click Start, type mdsched in the search bar, press Enter. A window similar to the following will appear:
This window shows two options for running the built-in RAM test:
Which option to choose depends on the user's intentions. Needless to say, when choosing the first option, you need to save your work and complete the applications you are running, which is what the message in the window reminds you of.
To run this tool from the control panel, select “Administration”, and in the list that appears in the right part of the window, select “Windows Memory Checker”:
Further actions of the user and the computer are the same as when running the test from the command line.
Built-in memory checker settings
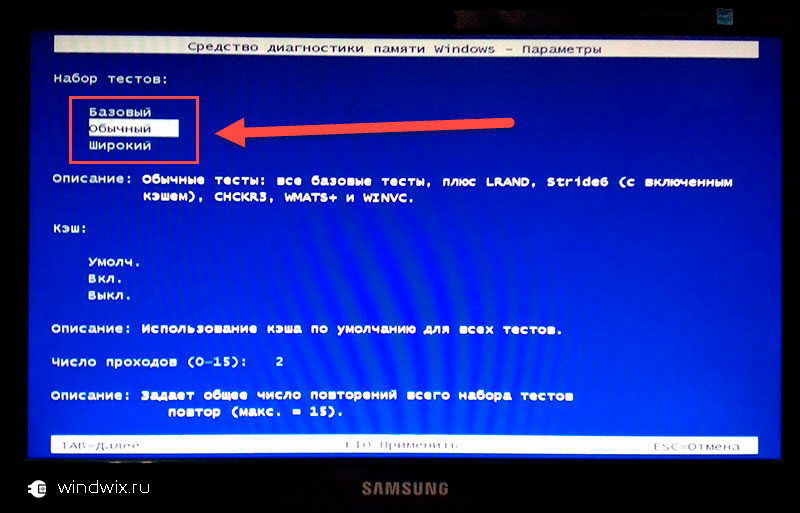
It is recommended that you first run this tool with the default settings. If no problems with RAM were found, then you can conduct a more detailed analysis. To do this, you need to run the embedded test again and press the F1 key when it is executed, after which the settings menu is displayed, using which you can move with the arrow keys and Tab. This tool provides three modes of analysis, differing test suite and completeness and time of passage:
- Basic (Basic) - the duration of a few minutes.
- Standard (Standard) - takes about an hour.
- Extended (Extended) - up to several hours.
At default settings, all tests are conducted in two passes. This value can be changed from 0 to 99. If you specify 0, the test will run indefinitely until the user stops it, which can be done by pressing the Esc key.
The successful completion of the RAM test is indicated by the appearance of a window of the following type:

Memory check at boot
This is another way to run the embedded test, which is used when, due to problems with RAM, it is not even possible to load Windows. To start it after powering on the computer, use the F8 key to display a menu with additional boot options, then press the Esc, Tab and Enter keys successively:
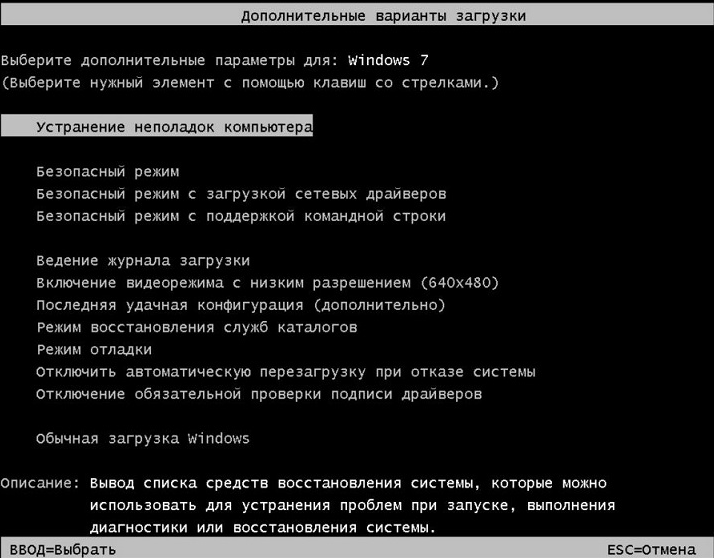
The built-in diagnostic tool will start:

Upon completion of the test, an automatic restart of Windows 7 will occur and its normal operation will begin.
Checking RAM with Memtest86 utility
Many third-party utilities have been developed for RAM tests, but Memtest86 is deservedly considered the “king” among them. It differs from many similar programs in that it has its own loader and runs from bootable media (for example, from a USB flash drive or CD). This allows it to more accurately diagnose the performance of RAM. Unfortunately, this utility has two drawbacks:
- The need to obtain bootable media from the iso distribution file. It is hardly necessary to attribute this to shortcomings - that is why the program does not require the presence of any OS, and does not depend on it.
- Quite a lot of test time (more than 1 hour).
In which cases it should be used:
- Of course, the first and most frequent case is that the OS boot does not complete, or BSOD appears.
- With unstable PC.
- Diagnostics of purchased and non-working RAM modules.
- To fine tune timings when overclocking system components.
What to do if tests find problems
If when testing in any way errors were detected, or the tests could not even be completed, then this is a clear sign that one or more of the slats of RAM are faulty. What to do in such cases:
- Do not rush to acquire new strips. First, remove all the strips from the slots and reinsert. Just remember to turn off the computer and remove static electricity from yourself by touching the computer case.
- If it takes great effort to remove and install the slats, it means either you forgot about the slats latches, or you incorrectly insert them.
- Gently wipe the contacts of the slats with an eraser to remove plaque formed as a result of their contact with air and subsequent oxidation.
- Install the plates in the slots of the motherboard, turn on the computer and repeat the testing. It is possible that the test will end successfully.
In contact with