Abd android what is it. Letter attributes of access rights. Consistent actions with the team
Many of you have come across a situation where root rights on Android tablet or a smartphone, installing a new firmware, restoring the system and other things, it was necessary to connect it to a computer and execute a series of adb or fastboot commands via a command prompt window (terminal).
Most enter these commands, not understanding what they mean, simply by following the instructions found on the network. And if you want to get a more complete picture of what is happening with their implementation, today we will get acquainted with a dozen basic commands that every advanced Android user should know.
But before you begin to familiarize yourself with these teams, let me remind you that before your tablet or smartphone can carry them out, you must take care that your computer is installed Android SDK , and on the tablet or smartphone itself, the option “ USB debugging ».
How to install the Android SDK, which contains the adb and fastboot programs, read in this article.
Also I remind you that in Android 4.2 and higher, the “USB Debugging” item is hidden, and you can read how to access it.
For those who have forgotten how to launch a command prompt window in Windows, I remind you that the easiest way to do this is by clicking on “Start”, after which you will need to enter cmd in the search window and press the “Enter” key.
After all preparatory work are finished, you can connect the device to a computer with using USB cable and start learning commands.
1. The adb devices command
This is probably the most important of all ten teams, which will be discussed. Using it, we can find out if the computer sees your Android device, and if it does, can it communicate with it through terminal commands.
If everything is fine, then after entering the adb devices command in the Windows command window or Linux terminal, you should see a line with the text List of devices attached, followed by a line consisting of the serial number of your device and its status - offline or online:
![]()
The offline status means that the device is in sleep mode. The online status indicates that the tablet or smartphone is ready to carry out your commands.
2. The adb push team
With the adb push command, you can copy files to your tablet or smartphone. In this case, you must specify the path to the folder where you want to place the file on the device and the folder on the computer from which the file will be copied. It is not necessary to specify the second path if the file is located in the same folder as the adb program.
Here is an example of copying a video file superfreak.mp4 from a computer to a device in the folder / sdcard / Movies using the command adb push superfreak.mp4 / sdcard / Movies /
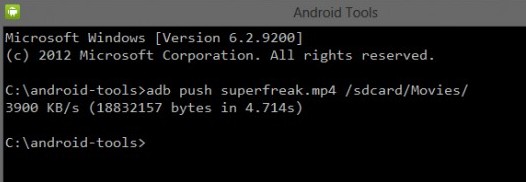
For Windows users, I want to remind you that in Android, when specifying the path to files and folders, the forward slash is used /, and not the reverse, as you used to.
3. The adb pull team
If a adb command push is used to transfer files to an Android device, then adb pull is used to copy files from the device to the computer. As in the previous case, you must specify the path from where you want to take the file on the device and the path where you want to place the file on the computer. It is not necessary to specify the second path if you want the file to go to the folder from which you started the adb program.
Here is an example of copying the file superfreak.mp4 from the folder / sdcard / Movies / of your tablet or smartphone to the worker windows table 8 users Jerry, C: \\ Users \\ Jerry \\ Desktop
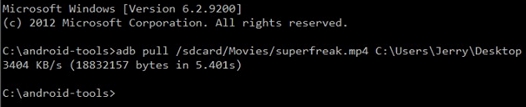
If you want the file to go to the folder from which you started adb, just type the command adb pull /sdcard/Movies/superfreak.mp4
4. adb reboot command
This command is often used in the process of obtaining root rights or installing a new softwarewhen you need to accept the changes we made on our device. After you enter the adb reboot command, your tablet or phone will reboot.
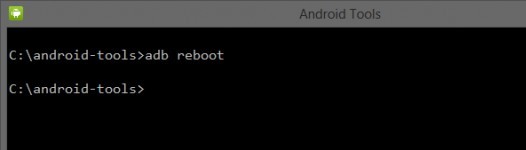
This command is also important because it can be placed inside scripts, which allows the device to be rebooted after all necessary operations are performed automatically.
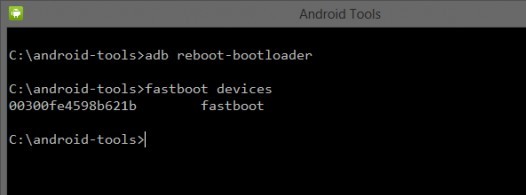
5. The adb reboot-bootloader and adb reboot recovery commands
With the help of adb, you can not just reboot your Android device, but also reboot it into the bootloader. This mode is needed so that we can unlock the bootloader, which is necessary to gain root rights and further install alternative firmware.
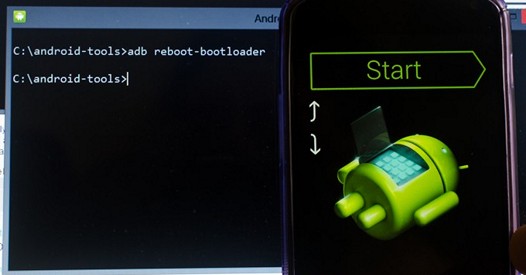
Some devices can be loaded into the bootloader using a specific key combination when they are turned on, but often the adb reboot-bootloader command is the only way to access the bootloader.
Likewise, the adb program can be used to access the recovery menu of a tablet or smartphone or recovery. This can be done using the adb reboot recovery command.
6. Team fastboot devices
If you have overloaded your tablet to bootloader mode, it will stop accepting adb commands. In this mode, we can communicate with the device using the fastboot program.
Using the fastboot devices command, you can find out if your device can receive commands from this program in bootloader mode. Since fastboot is a very powerful tool, some manufacturers of Android devices do not provide access to this program in bootloader mode.
As with adb, after entering the fastboot devices command you should see serial number your device.
Often the reason for the inoperability of fastboot is the lack of Windows drivers your device.
7. Team fastboot oem unlock
Some manufacturers (for example, HTC or Asus) produce special utilities that allow you to unlock the bootloader of their tablets and smartphones, after which you can install alternative recovery programs on them, such as ClockworkMod or TWRP and firmware from independent developers (custom firmware).
However, in many cases, unlock bootloader Android devices You can use the program fastboot. It's very easy to do this - when your tablet or phone is in bootloader mode (point 5), just enter the following command in the command window: fastboot oem unlock.
After that you will need to follow the instructions that will be displayed on the screen of your tablet or smartphone.
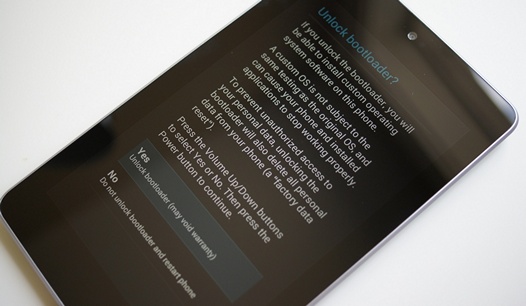
Attention! After executing the fastboot oem unlock command, your device will be completely cleared of the programs you have installed and your personal data will also be deleted.
8. adb shell command
The adb shell command often confuses some novice users.
There are two ways to use this command. If you simply type the adb shell text in the command window and press the Enter key, you will “get” into the terminal mode, or the command shell of your Android device, where you can execute any Android shell commands.
Below you can see the result of running the ls command in the Android shell environment.
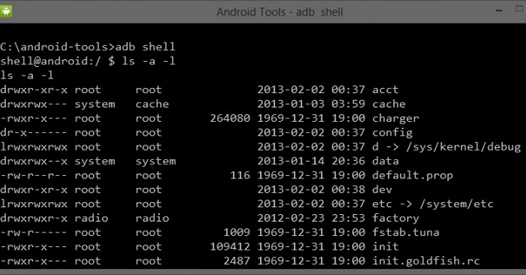
This mode is well known to Linux users and Mac computers. If you are familiar with the bash shell commands, then you will have no problems with working in this mode. Otherwise, I do not recommend using adb shell mode, unless you understand the purpose of all of its commands, since in this mode you have full access to files on your device and you can accidentally make irreparable changes in the operating system.
The second way to use adb shell is to execute a single Android shell command using this construct: adb shell<команда>. For example, you can change file permissions using a command like "adb shell chmod 666 / data / file name"
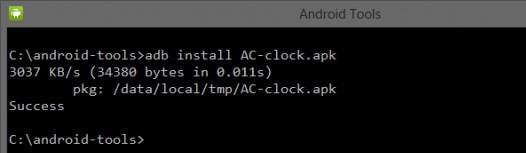
9. adb install command
With the help of the adb program, you can not just copy files to the device and back. This program also allows you to install applications on your Android device as apk fileov For this, there is the adb install command. It is a bit like the push command: you must specify the path where the file with the application you want to install is located. Therefore, the easiest way is to first copy the apk file to the folder with the adb program, after which you can install the program with the command adb install FileNameApplication.apk
If you need to update the application, then in this case you need to use the -r switch and the command will look like this: adb install -r FileNameApplication.apk.
Using the -s switch, you can install applications on a memory card (if your firmware allows you to do this). The -l switch allows you to block the application during installation (by installing it in the / data / app-private folder). There are other keys for more advanced features, but their description is the topic of a separate article.
10. adb uninstall command
And finally, you can delete applications from your tablet or phone. To do this, use the command adb uninstall FileNameApplication.apk
This command has the -k option, which, when deleting an application, does not delete its data and cache, but leaves it on the device.
Bonus: adb sideload team
This team is very useful for owners of Nexus tablets and smartphones - with the help of it they will be able to update the official firmware on their devices. In other words, if your smartphone or tablet did not receive updates in the air, you can download the new firmware from the official site, and update the device “manually”.
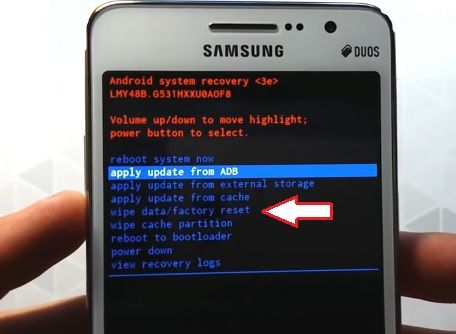
After you download the firmware file to your computer and connect the tablet or phone to it, you will need to reboot your device into recovery mode, select "Apply update from ADB", and then enter the following command on the computer in the command line window: adb sideload xxxxxxxx.zip, where xxxxxxxx.zip is the name zip file with firmware.
More detailed instructions how to update the firmware of Nexus devices manually you will find in this material.
Related materials:
I learned that this Apply update from ADB is included in the toolkit for software developers, being one of the components of the Android SDK. Using Apply update from ADB, installing the necessary drivers, and transferring the device to direct interaction with the computer via the USB interface, you get full control over it.
The features of the console utility Apply update from ADB allow you to perform the following operations:
- Installation and removal of any, including pre-installed, applications;
- Transfer files to the device and extract them;
- Backup Creation operating system;
- Installing new ones, including custom ones;
- Android recovery in case of damage system files.
If you still do not know about the existence of a voluminous folder on your smartphones, I recommend to visit the corresponding article.
Apply update from ADB installation methods
You can use ADB in several ways. Installing the ADBKit package will be the easiest and most suitable for most users. It contains the utility itself and the dynamically linked libraries needed for its interaction with the cooperative windows system. A separate set of universal drivers for Android devices is installed. You can download the necessary files on the ADB Shell project website. The page is English, but the Commands section contains detailed description control commands.
The Apply update from ADB utility is a console application, so the command is used to work with it. windows line. The recommended installation location for the Android Debug Bridge package is the root directory. The folder where the ADBKit is being unpacked must not contain Cyrillic characters. All of these recommendations ultimately simplify the user's work in command line, minimizing possible errors when entering control commands, by reducing the path to the files.
Android device to work in the console mode must be switched to "debug USB". After connecting the cable to the computer, select "Charging Only". In this way, you will prepare a device for interacting with the computer. I hope you understand what it is Apply update from ADB. The sequence of actions described is well shown in this video.
In it, you will learn how to install and run the utility in the Windows command console. In addition, it contains the syntax of the main commands required when flashing the device. Work utility Apply update from ADB c Android smartphone, after transferring to the interaction mode with the console, are well shown in the following material.
For more advanced users, we can recommend the installation of a set of Software Development Kit designed for Android developers. The SDK regularly receives updates needed to create applications that support new devices. Due to this, a set of drivers for your Android devices will always be kept up to date. It is best to download the Development Kit toolkit from the official page, while not confusing it with the full set of Android Studio utilities.
Finally
What is the Apply update from ADB? A variety of models of devices running Android OS, a modified version of Linux, does not allow for universal recommendations for their configuration. This material is intended to indicate the right direction of the search and provide the basics of using the Android Debug Bridge toolkit. Using these recommendations, you can connect to the computer any mobile device and perform actions with it that are not available through the official utility manufacturers.
In contact with
What is ADB? Adb commands for Android. In this article, you will learn what ADB is for what users need it, as well as how to manage it using commands in the Android terminal. Well, let's start learning adb android commands…
Meet ADB
ADB (android debug bridge) is a tool for debugging, detecting errors in applications, unlocking devices on Android OS and much more. Official documentation in English can be read on this site.
Download ADB
You can download ADB with the official Android SDK development environment or download small adb installer, Installation takes place in the root of the disk WITH:\\
Take care that drivers are installed on the PC, and USB debugging is enabled on Android.
Adb teams android and linux
Adb commands can be divided into 3 types, directly for the Adb command, FastBoot () and the Android command.
Adb Commands
1. Check for connected Android, checks if the PC sees your smartphone or tablet.
To make sure that everything is working fine and the computer has recognized Android, you must enter the adb command:
adb devicesthis screen shows that Android is connected
If you have did not appear a similar message, it may be necessary to check the presence of drivers on the PC, the integrity of the cable, the performance of the USB port.
2. Android connection by WI-FI
In order to connect Android via WI-FI network, you need to get the ip address and port of the device, the ADB Wireless application will help you with this (Root is required)
after that enter the command:
adb connect ip: portFor example, like this:
adb connect 192.168.0.14 light555Learn more about how to connect Android via WI-FI - USB debugging.
3. Installing applications on Android
In order to install any application from a computer on Android, enter the following command:
adb installHow to use and example:
In order to use the Adb command, you need to install the application. Write:
adb intsall C: papka_gde_y_vas_hranitsya_prilogenieimja_priloginija.apkThat is, write a command adb install The path to the application and the name of this application.
4. Send any file on Android
adb pushHow to use and example
To use the Adb command to send a file from PC to Android is necessary. Write:
adb push C: papka_gde_hranitsya_fileimja_file / sdcardThat is, write adb command file path, file name and place where to save this file.
5. Receive Android file on PC
In order to accept absolutely any file from an Android device to a computer, there is a command:
adb pullHow to use and example:
In order to use the Adb command to receive a file from Android on a PC, it is necessary. Write:
adb pull / sdcard / xxx / Sex_s_Pameloy_Anderson C: papka_gde_budet_hranitsya_fileThat is, write adb command path to the file which is on Android, the name of the file and the place where to save the file on the PC.
In order to restart Android after any operations performed, or reload into a special mode, there is a command:
adb rebootExample of use:
Commands will restart Android
adb reboot adb reboot normalboot bootloader
adb reboot bootloaderThe team will restart Android to Recovery mode
adb reboot recovery7. Go to android controlafter which you can use the commands of the Android OS
The full potential of Android is revealed after you switch to Android management where many linux commands are available. For this there is a command:
adb shellCommands in the Android terminal
Superuser or Root. Allows you to perform absolutely all actions, from creating, modifying, modifying, to deleting specific system files: To do this, enter the command:
suBefore entering the command
suuser is a guest in the system (many actions are blocked) and is indicated at the beginning of the terminal with a dollar sign
$after entering the command
subecomes the admin and in the terminal is designated as the American number
#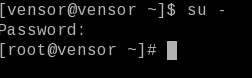
and a live example:
2. The command to go to the folder (in the future and it will be more correct to name the directory instead of the folder)
In order to move between sections and directories in Android, there is special team:
cdAn example to switch from the / sdcard section to the / sdcard / xxx / porno / hot_girl section
cd / sdcard xxx / porno / hot_girlIn order to return from the partition to the directory above or back to / sdcard
if we are in the directory / sdcard / xxx / porno / hot_girl - hot_girl
we will be in the catalog
/ sdcard / xxx / porno /if you need to go to / sdcard then
cd ../ ../ (as many times as necessary) Attention on Android and other Unix systems Primer and Primer or PrimER files are completely different files.3. Move / Rename file or directory.
Moving and renaming a file directory is performed with only one command:
mvExample Rename file
mv /sdcard/xxx/hot_porno/Alenka.avi /sdcard/xxx/hot_porno/kruto.aviExample Rename folder:
mv -r / sdcard / xxx / hot_porno / sdcard / xxx / superExample of how to move a file:
mv /sdcard/xxx/hot_porno/Alenka.avi /sdcard/xxx/Alenka.aviExample of how to Move a folder:
mv -r / sdcard / xxx / hot_porno / sdcard / hot_porno4. See what is inside the directory
In order to find out which directories and files to contain from the place where you are located use the following linux command:
lsExample of use:
ls / sdcard / xxx / hot_porno /will issue a message
Alenka.avi Pamela.avi Anderson.avi ls -a ls -a / sdcard / xxx / hot_porno /will issue the following message:
Alenka.avi Pamela Anderson.avi .Skrutiy_File.avi5. Copy file or folder (directory).
In order to copy any file or folder and move it to either:
cpExample Copy file:
cp /sdcard/xxx/hot_porno/Alenka.avi /sdcard/xxx/Alenka.aviExample Copy folder:
cp -r / sdcard / xxx / hot_porno / sdcard / hot_porno6. Connect the section (reconnect) and disconnect.
To find out what sections exist in Android, connect or disconnect:
mount (connect section) and umont (unplug section)Find out which sections are branded in this momententer
mountTo attach a section:
mount / dev / block / mmcc121 mount / systcodeTo detach a partition:
umount / dev / block / mmcc121 umount / systcode7. Create a directory (folder)
To create a folder somewhere, use the command:
mkdirExample of use:
mkdir / sdcrad / android_file8. Delete directory (folder) or file
If you need to delete any file or folder linux command:
rmAn example of how to delete a file:
rm /sdcard/xxx/hot_porno/Alenka.aviAn example of how to delete a folder:
rm - r / sdcard / xxx / hot_porno9. Display the contents of the file on the screen (read)
If you are faced with the task of displaying the contents of a text file:
cat cat /sdcard/books/Tolstoy_kniga_voyna_i_mir.txtand get
- Eh bien, mon prince. Genes et Lucques ne sont plus que des apanages, des estates, de la famille Buonaparte. Non je je vous previens, pe si vous ne me dites pas, que nous avons la guerre, si vous vous permettez encore de pallier toutes les infamies connais plus, vous n`etes plus mon ami, vous n`etes plus my faithful slave, comme vous dites.10. Display the contents of the file on the screen (read in reverse order)
If you are faced with the task of displaying the contents of a text file, but from end to beginning:
tac11. Show full path
In order to understand which section and directory you are in:
pwdExample: if you are in any directory and you need to find out the full path (for example, we are in the system partition, the app directory)
pwdwill issue a message
/ system / app /12. Create empty file
To create a text file:
touchFor example, create a file 666.txt in the / sdcrad directory
touch /sdcard/666.txt13. Creating a Backup from a partition and restoring
dd ifAn example of creating a backup on the Sd card
dd if = dev / block / mmcblk0p1 of = sdcard / efs.imgExample of restoring a partition with backup copy with Sd card
dd if = / sdcard / efs.img of = / dev / block / mmcblk0p114. View the space occupied by the file.
In order to understand how much it takes something:
du du systcodeSetting permission, rights to files and directories
To find out what rights the files and directories need to write such a command.
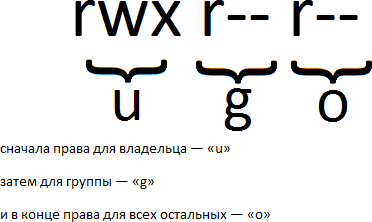
ls -nPermissions
Write them here like this - RWX (alphabetic) or 777 (tsifirnom)
Access rights are shared
1. Access files
2. Access to the directory
Letter Access Attributes
r - read data files and directories (read)
w - change the contents of files and directories or write to them, but not delete (write)
x - file execution or permission to enter the directory
There are three groups of users.
« user"- the owner of the file or director
« group"- member of the group to which the owner belongs
« world"- the rest, not related to the 2nd groups
The procedure for recording access rights is as follows.
first, permissions are set for the owner - " u»
after the group - " g»
and at the end for the rest - " o»
for example
The owner of the file has the right to read (r), write (w) to it and execute (x), the rest are read only.
Digital attributes of access rights
r - read 4
w - record 2
x - execution 1
“-” no rights 0
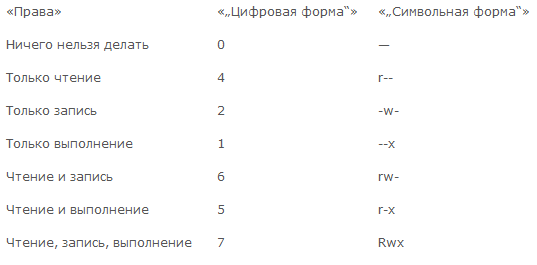
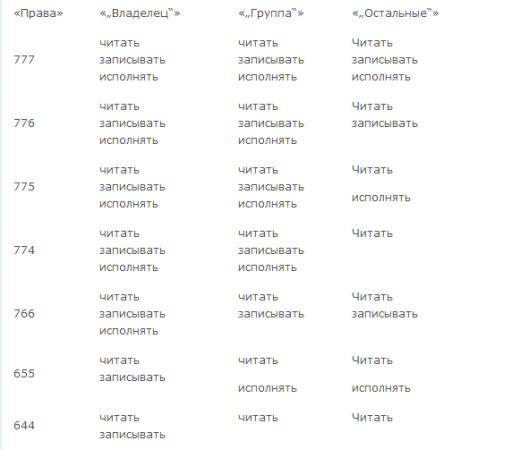
The sum of their values means final rights for user and groups.
7 (rwx) = 4 + 2 +1 full rights
5 (r-x) = 4 + 0 + 1 reading and execution
6 (rw-) = 4 + 2 + 0 read and write
4 (r-) = 4 + 0 + 0 read only
For beginners, a calculator online may be useful - a link.
You need to set the right command
chmodfor example
chmod 777 * - sets read and write permissions and execution for all files and folders
chmod 755 file.avi
Hard and symbolic links
In Linux, including Android, there is such a thing as a link - that sounds like a “label” in a normal, familiar language. There are two types of links:
- Hard links
- Symbolic links or symlinks
What are the differences between hard and symbolic links?
Symbolic links - create a shortcut that indicate the exact location of the file or folder where the shortcut refers. If the file or folder is moved, the symbolic link will be broken. In order to clearly understand what a symbolic link is - in Windows XP or Windows 7 there are shortcuts to programs on the desktop, which are referred to the folder with the program, or rather the exe-shnik.
How to create hard and symbolic links
ln ln -sToday we will talk about two unfamiliar functions that a user encounters when flashing his Android device in the Recovery menu. We will explain what Apply update from cache and Apply update from ADB are and briefly describe the process of working with these options when installing updates or flashing a device.
Apply update from cache - special function android phones used when updating the operating system. Contained in the Recovery menu. Can be used to apply update file from your cache folder mobile phone or another Android device.
Installing firmware via cache
Firmware from Apply update from cache (cache) is not common among users. But its use remains one of the only methods in the absence of a computer at hand. Using wi-Fi networks You can download data for the OS to your phone. Ordinary Internet can also help, but the process will take a long time.
The bottom line is to put the program files (firmware or updates) in the cache directory. Access to Root-human user must be open.
Recovery menu option Apply update from ADB - can be used to install software updates using a computer - a bridge is created between the PC and Android via a USB cable. It is used most often and is very convenient.
All actions from the OS pass through the ADB debugging bridge. Thanks to him, you can make different modifications to Android. Very often, access to such a possibility is hidden from the consumer by the settings of the manufacturer itself. Consider both ways of flashing.
Firmware via ADB tool
Firmware would not be possible to execute without an auxiliary command SIDELOAD. It is capable of extracting files from ZIP archives. As it is known, they store program data. You can replace this action only with the help of the bootloader, still performing actions from the Recovery menu. Such a solution as fastboot -w update for Android devices is not relevant at all.
What the user needs to have
- Laptop or regular computer. With some windows versions There may be minor problems. Especially if it is Vista or Windows 8.
- Android drivers with latest patches.
- Software for operating with OS - ADB RUN.
- Connect via USB.
- We check the correctness of the connection system in the phone.
- Archiver ZIP with updates.
Consistent actions with the team
- Establish communication between the smartphone and the computer.
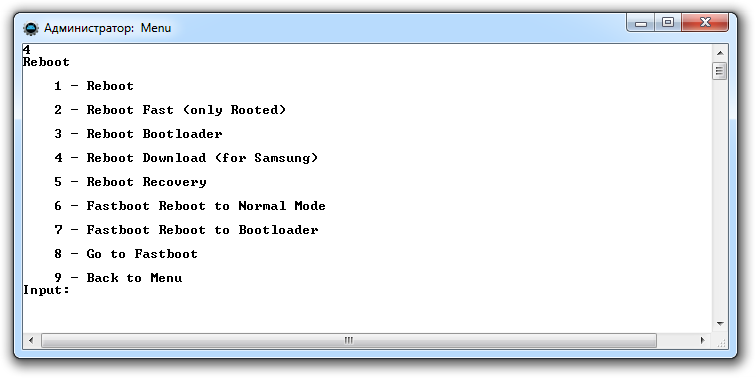
- Log into downloaded aDB program RUN. On the menu Reboot device search for familiar Reboot Bootloader or Reboot Recovery.
- On the smartphone, select the item SIDELOAD.
- We make a return to the very beginning. In the menu and go to Move -\u003e Sideload
- Moving the archive itself with updates zIP format. To do this, open the item Copy ZIP to Directory - here we put it.
- We click Install ZIP. Find the moved files. Activate.
- The firmware should start.
If a failure occurs, make sure to activate the sideload command. It can also help reboot the device and re-run all the items. And finally, a detailed video instruction on the firmware of Android devices and menu operation. Recovery.
The adb sideload command is very beautiful and with its help you can easily perform a firmware update or restore Android if it does not boot!
Once again about what the ADB SIDELOAD command is for - this command is necessary in order to execute the ZIP archives from the recovery menu or if the bootloader is missing. This command has an analogue of fastboot -w update, but many Android devices have the fastboot utility not working, so adb sideload is a universal tool.
How does ADB Sideload work?
The ZIP archive update is located in the folder with the adb utility, the smartphone or tablet is transferred to recovery mode or bootloader mode. The adb utility starts and the command is written. adb sideload<название_файла>.zipafter which the archive is copied to Android and then flashed.
Required for ADB Sideload
- Computer or laptop (OS Windows XP / Vista / 7; 8 / 8.1 - problems are possible)
- Download the Android driver and after install it
- Download the branded program of the site - ADB RUN
- Android device charge of at least 40% or more
- Original, undamaged microUSB cable
- Enable USB Debugging on Android
- ZIP archive update
Instructions for using ADB Sideload
This article will offer two options for how you can use adb sideload, first way - a demonstration of how everything works from beginning to end, second way - automated site, without unnecessary actions and scribbling hands.
Method number 1
And should get the following answer:
C: / ADB / adb / progbin\u003e adb devices List of devices attached NA36XWxxxxxxxxx If we get an answer (error):
C: / ADB / adb / progbin\u003e adb devices List offline NA36XWxxxxxxxx offline Then you need to make the computer trusted.
If we get an answer (error):
C: / ADB / adb / progbin\u003e adb devices List of devices attached That is, there is nothing, after attached, the device is not visible (reinstall the driver, change the USB port, change the USB cable)
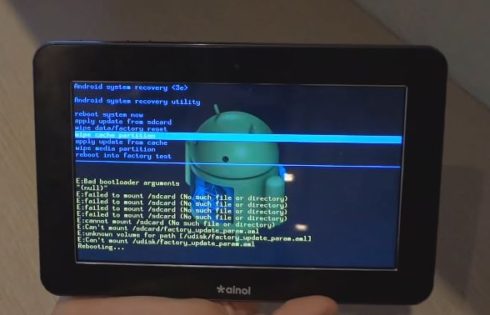
5. We transfer the device to the mode Recovery or mode Bootloader
6. Depending on the Recovery, in some cases it is necessary to enable forcing the transfer mode and installing Sideload on the device:
If you have a standard or CWM Recovery it may be called
- install zip from sileload
- apply update from ADB
and this menu can be in the main section of Recovery, Advanced or Install ZIP. 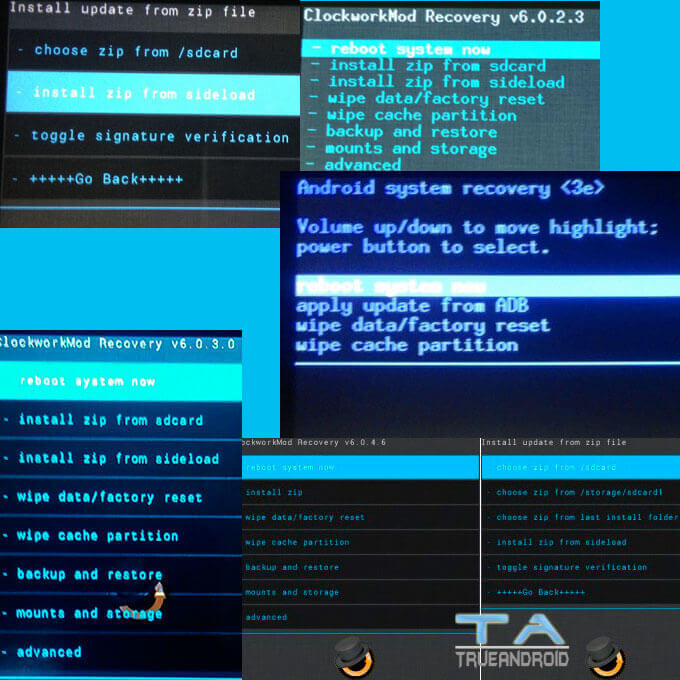
If you have TWRP Recovery
To activate sideload go to Advanced -\u003e ADB Sideload and drag the bottom slider to the right: 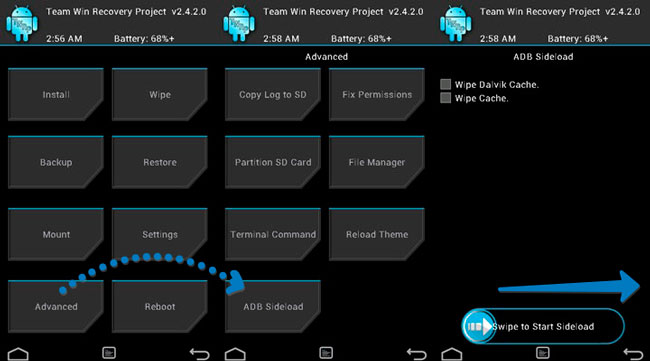
7. In ADB RUN we write the following command:
XXXXXXXX.zipWhere XXXXXXXX - the exact name of the zip firmware to be updated (taking into account CAPITAL or structural, as it is written, the names otherwise you get an error)
After that, the update (firmware) update on Android and the update will begin.
If you get an error error: closed - did not activate sideload on Android
If you get an error error: device not found
Method number 2
- If you get an error error: closed - did not activate sideload on Android;
- If you get an error error: device not found - does not see Android, change the kernel, recovery, restart Android and again switch to mode.
That's all! For more articles and instructions, see. Articles and Android Hacks . Stay with the site Android +1 , then it will be even more interesting!