How to print a small image on large paper. How to print the text on the printer: step by step instructions. To use the network type
If you need to solve a problem that is related to how to print a photo, then first, check whether the printer is connected and whether it sees operating system your computer. Just in case, check the level of ink in the cartridges cartridges so that printing does not stop at the most important point. In addition, to answer the question of how to print a photo, you should decide in advance on the images you want to print. In general, printing photos on a printer is very simple, the main thing is to follow the instructions below.
But what happens when you need to print multiple copies of the image or do you want to have different sizes for all your relatives? Suddenly, things are not so simple. You will also learn why contact sheets can be your tool of choice in some scenarios. But what happens when you need to print multiple copies of an image on a sheet of paper, for example, on a sheet of paper prints of your children?
Suddenly it's not that simple. Size and move this image to the desired position and repeat to fill the page. You can print one image several times on a page by collecting several copies of the image manually into a new document. To fill the page different images, copy and paste each of them into the page; then size and move them to position.
detailed instructions
- To solve a problem related to how to print a photo from a computer on a printer, find the desired image and double-click it with the left mouse button to open it with the appropriate program.
- Start the print command by clicking on the corresponding icon located on the software toolbar for opening photos and pictures.
- In the window that opens, specify all the necessary parameters that will allow you to print photos in the right way, otherwise the result may disappoint you. And to begin, select the device with which you are going to solve the problem of how to print an image using a printer.
- Also select the print quality for your purpose. If it is not an important parameter, then in order to save paint it is better to put its value on the average.
- Decide on paper size, number of copies required, and print style.
- At the end, save your changes and run a print command on your printer.
If you are going to print several photos from a computer to a printer on one page, then follow these several steps:
Although this method works, it requires more effort from you than is usually necessary. All printer drivers at the university support printing multiple pages on one sheet. Another, unfortunately, is the place where this property can be used. Usually it can be found in the printer properties under the pages on the sheet.
If you simply print 4 pages on one sheet, the order of the pages does not match what you want. To customize the page you need to install several pages on the sheet, as well as pages on the sheet. In addition, the pages per sheet should now also be set to 2 in the printer properties. Here you can choose to print the so-called "brochures" in the print dialog.
- Click on the photos you need while holding down the Ctrl button.
- Open up context menu any of the selected image by clicking on it for it right click mice. Find the item called "Print" and click on it.
- In the opened image print window you should specify the number of copies and the specific size.
- Be sure to use the preview function of the received images, so that the problem of how to print a picture on a printer from a computer has been solved really successfully, and you do not have to reprint it is impractical to expend paint with paper.
- If the result that you saw on the screen, having resorted to the preview, you are satisfied, you can safely click on the button to start the printing process.
In general, as you have probably seen, answering the question of how to print a photo using a regular printer is very easy and simple. The main thing that you initially knew what results you want to get, because it is from them will depend on the print setting. In addition, in any case, do not be lazy to use such a convenient feature as a preview.
Brochures provide the ability to display up to 9 pages in the correct order and in a reasonable format on one page. Sometimes you have to change the orientation of the page for handwriting. Or is the page too wide? Then take the next step. Please note: all changes listed below are saved forever! If you are not sure, remember the existing settings so that they can be restored in case of doubt!
Basic printer settings

Or you do not like the page background? Enable or disable background printing. By default, the background color or background image is turned off when printing. If you want to change this, proceed as follows. Again, the setting is saved upon restart and must be changed manually. Further changes on all cards of this mask should be made only with the appropriate knowledge! Incorrect settings may cause the browser to stop working!
What if the printer does not print a photo?
- So, if the device does not print images on photo paper, then the problem may be in it. Somehow, the printer cannot detect it. Try to print the image on a regular sheet, and if you succeed, then the source of the problem is the photo paper you bought earlier.
- In addition, perhaps this kind of problem is connected with the print head, which prints the text, but the photo does not. In this situation, it is, but if you do not succeed, then contact any reliable service center.
- An unlikely but possible source of the problem may be the ink in the cartridge, which has very little left to print a full-blown photo.
- Eliminating such a failure is to reinstall or.
- Most likely, the reason that the printer does not print photos, but at the same time prints documents with text, is the lack of device drivers. In this case, no print errors will pop up on the PC monitor and the computer will see the connected equipment, but the message about the absence of drivers will appear on the device display. The fact is that the printer still has internal drivers that are designed to correct work devices, recognition of various commands, etc. In general, such a malfunction may occur during the execution of manual reconfiguration of the device. To eliminate it you need the help of professionals.
- Another one possible reason the problem described may be related to the softwarewhich is used to open an image and print it further. Try to remove it, then install and print the image again using plain paper.
Storing any information on paper is a more reliable option than making copies on a hard disk or in cloud storage. The password from such a copy will not be lost, and the file will not be accidentally deleted from the hard disk.
If you do not have access to a widescreen printer, the most in a simple way printing a large image is to divide it into several parts and print each one on separate sheets of paper. Many other image editing programs also offer these basic tools.
Click "View", "Rules" if the rules are not yet on the left and top of the image. Hold down the mouse button, click and drag the top ruler down to create a blue horizontal guide. Place the guide in the volume you want for the height of each image.
There are many situations when it is the paper version of the document, photo or file that is needed. Delivery of work at the university, printing notes and tablature for playing musical instruments, printing photos. And of course, only paper versions of documents are notarized.
How to print the text on the printer: device connection and driver installation
Printing any file produced by the printer: laser or inkjet, black and white or color. The paper is placed in a special tray, a print command is sent to the computer, and after a while the user has the finished document in his hands. So it is. In theory. In practice, almost all printer owners are faced with problems related to how to print text on a printer.
Use the Scale tool located at the bottom of the toolbar to make sure the manual is exactly the way you need it. Select the Move tool located at the top of the toolbar to adjust the direction of the guide when you release the mouse button.
Create more horizontal and vertical guides to create separate pieces of the image for printing. Make sure each segment fits a piece of 8. 8 by 11 inch paper with a 1-inch frame around each image. Therefore, no detail should measure more than 7, 5 by 10 inches.
So, the new device is purchased and delivered home. The power cord is connected, but still the printer does not print text. Many immediately call friends or masters to eliminate the problem. But do not panic.
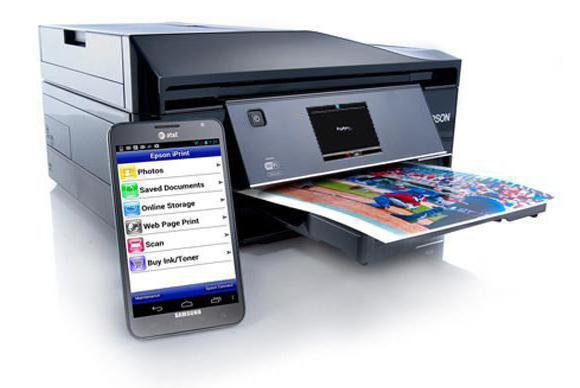
First you need to check whether the printer is connected to a personal computer. Special cord is usually included as standard. Also modern printers support Wi-Fi connection. It is enough to set the appropriate settings and print files from any device connected to the network: a computer, laptop, tablet or smartphone.
What if the printer does not print a photo?
Use the mouse to draw a rectangle around the first segment of the image. The tool follows the guide and is set using a segment. Click File, Print to see the specific printer dialog box. Enter your choice for print quality and paper type. Repeat this process for each image segment.
Click View, Show Grid. A check mark will appear next to “Show Grid” and the grid will appear on the image. Click “Image”, “Adjust Grid” and the “Adjust Grid” window will appear. Select "Line Style" from the drop-down menu. Enter the “Split” dimensions of each segment, making them no larger than a sheet of paper. Leave a difference of 0 pixels.
Next, you need to install drivers for the printer. The manufacturer attaches to the device a special disk. But if it is lost, then you can find the drivers on the official website of the manufacturer. After installation, you can go to solving the problem voiced above - how to print text on a printer?
Printing Images
Often users are faced with a situation where it is necessary to print an image that is not part of text document. To print a picture on a color printer or in black and white, you will need to click on the image with the right mouse button. From the drop-down menu, select "Print."
Use the Select Rectangle tool in the top row of the toolbar to select the first segment. Enter the dimensions of the image you want to place with the size of the copied segment. Click File, Print to display a specific printer dialog. Enter a selection for print quality and paper type.
If your drawing is ready, you will most likely want to print it. Printing a floor plan consists of several stages. Therefore, you must select a print area. The print area is a kind of contour that will be printed. The Print Area icon, located in the right pane, is used to specify the print area in the layout. The dimensions of the print area do not need to be changed; they are automatically adjusted in the layout when the print area "sits down" on a certain part of the drawing. Blue dots at the beginning of the area should stretch the print area so that it overlaps the required floor plan. The print layout is a stack of stacks, most often standard A4 pages, on which the printed area is printed in advance. In the Names edit box, enter a meaningful name for the report set.
The next step is tuning. A dialog box appears in front of the user where you can make changes when printing. So, you can change the paper size and its type, print quality. Also, the user can select the location of the image on the sheet: in the whole page, on a half-sheet, a quarter and so on.
And it is important “Form of pure form” and “Form of pure form”. The number of total surface area, regardless of the number of sheets. Useful values can be found in the menu after pressing the key. Values can be arbitrarily changed according to your printing needs. Keep the “Minimum Border Size” and “Stamp Overlays” with the given values. We recommend alignment at the top of the desktop. For more information, contact us. Anything found inside the yellow orbital region will be printed.
If the printer, like the image, is color, and the finished printout must be black and white, the user will need to go to “Settings” and select “Printer properties”. In the pop-up window, select "Specify cartridge for printing." Here you can choose how the image will be: color or monochrome.
Preview
Printing text files is more difficult. Before you understand how to print text on a printer, you need to familiarize yourself with a feature such as “Preview”.
Objects urinating outside the yellow orbital region will not be printed. There are currently no items to print. You must add them before printing to the print layout. You can add a print area from the floor plan, text, north, description fields, and space models to the layout. This is an icon in the right pane.
The following dialog box appears. In it, you must select the previously created print area, that is, the plan of the plan. It is still necessary to determine the scale at which the printable area will be printed. You can enable frame printing around the print area. It is recommended to print around the print area if you want to print several print layouts in one layout. The option "Print raster" allows you to print the grid. The bitmap will be printed only if it is displayed in the layout.
Before printing, it is worth checking out how the text will fall on A4. For this and need a preview. AT latest versions text editor "Word" it automatically turns on after pressing "Print" or the key combination Ctrl + P. In older versions, you must use the combination Ctrl + F2.
More information can be found in the help. Print areas behave similarly to a layout in a print layout. You can select them, move and change their parameters. Elements in the print layout should not exceed the yellow orbital region. In such cases, items outside the yellow ornamental area will not be printed.
The text "My Home" is inserted incorrectly - it exceeds the area with yellow orbits, so part of it will not be printed. The confirmation dialog box does not start right away, but the program displays other printing options. Important data is the "Number of pages horizontally" and "The number of pages vertically." other important information is “Print Pages” - the edit box shows the range of pages to print. Here you can change the number of pages to be printed. Print the drawing using the “Print!” Button.
Here the user can see how the document will look on paper. And if the need arises, correct the fields and select pages for printing.
Printing text documents
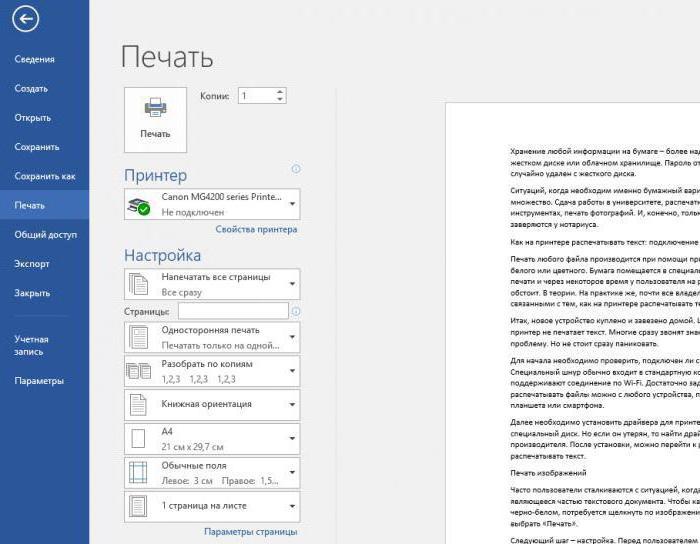
When the document has been completely edited, all the typos have been eliminated and the necessary footnotes have been added; This can be done with the help of hot keys Ctrl + P.
In the window that appears, you can choose:
- The number of copies of the file.
- Printer.
- Type of printing: the whole document, individual pages or a specific interval.
- Type of printing: one-sided or double-sided.
- Page orientation. There are several options for how to print a page: book format or landscape.
- Sheet format.
- Set the fields.
- The number of pages per sheet.

After the appropriate settings have been made and the printer is turned on, the user only needs to press the “Print” button and wait until the machine displays the finished sheets of text.
Advanced printing options
Before printing an important document on a color printer or monochrome, experts recommend a test print. Desirable color. This will allow you to determine which printer settings you need to change.
To open the printer settings, you must:
- Enter the start menu.
- Drive into the search box "Printers".
- Select "Printers and Scanners".
- Click on the active device and select "Manage".
- Click on "Print Settings".
- In the "Home" tab, change the "Print Quality" and "Color / Intensity" to the appropriate values.
You can change the settings during any printing. It is also important to occasionally clean the nozzles for better print quality.