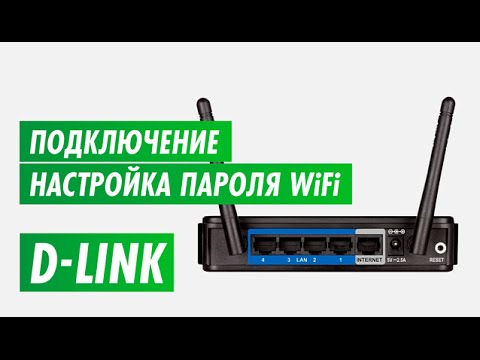
How to set up a new router. How to configure the router novice user
How to connect and configure WiFi?

Now almost all family members, including children, have devices that provide access to the Internet: laptops, tablets, smartphones, etc. Therefore, sooner or later there is a need to purchase a WiFi router (home router).
After its acquisition, the question "How to connect and configure WiFi?".
How to connect a WiFi router correctly
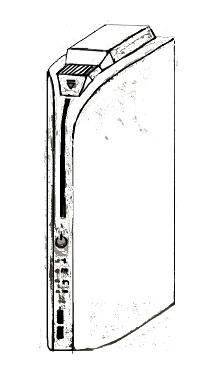
On all WiFi routers there is a single standard for the location of connectors on the back of the device:
- wAN port - is designed to connect the cable of the Internet provider;
- 4 LAN ports - for connecting computers or laptops using a network patch cord;
- “reset” button to reset all settings;
- power connector.
To connect and configure WiFi, you just need to connect the patch cord and network cable to the appropriate connectors and connect the device to the power supply.
Configure the router
For normal operation of the device, it is important not only, but also to set up a Wi-Fi network correctly.
- Setting up a network connection. After the router is connected to the computer, a new icon will appear in the Network Connections folder. Enter the properties of this network connection and open the Internet Protocol (TCP / IP) editing window. Most providers use a Dynamic IP connection, so in the settings, specify the automatic retrieval of the IP address and the DNS server. Or enter the parameters specified by the provider.
- Configure the distribution of WiFi. The router is configured through any Internet browser by entering the IP address of the router in the address bar. For most routers - 192.168.1.1, for TrendNet - 192.168.10.1, for D-Link and NetGear - 192.168.0.1. After entering the user name and password (admin by default), the router's administration panel will open in which you need to make the settings specified in the instructions for the device.
When parameterizing home LANs, quite often the question arises of how to configure the router. It is a key element of this system and everything else depends on its high-quality functioning. All modern devices of this class support the work both by wire and by the so-called Wi-Fi standard. In general, a very convenient device for organizing a small network. It is because of this that the demand for them is increasing, and the question “how to set up a router with your own hands” is becoming increasingly important. It is not always possible to call a specialist in regional centers or small villages. Services to their cheap can not be attributed. All this together leads to the fact that people tend to do this procedure on their own. There is nothing complicated in it; with a certain preparation such an operation can be easily and quickly performed.
 Switching
So, how to set up a router on your own? The first stage consists of the correct connection. First connect the power supply. The box together with the plug connects to the outlet. And the wire is installed in the appropriate "seat" on the back of the router. Further there we find the yellow connector and in it we connect the wire from the provider. At least, most manufacturers distinguish it from the rest. Then you need to connect a twisted pair, one end of which is suitable for any of the blue "seats" of the router, and the other end to connect to a computer or laptop. Then you need to check the correctness of switching and, if everything is normal, you can turn on the power button (it is usually located on the back side). We described the first stage of one or any other manufacturer). Next comes the software configuration.
 Work with software
Each router comes with a CD with a software module for setting it up. But the developers went further. An alternative embodiment of this operation is that it is possible to parameterize such network equipment using a browser. It is on the second variant that we will stop our choice, since it is more universal. With it, you can use both ASUS router and device from another manufacturer. First, launch the browser installed on your PC (for example, Internet Explorer). In its address line type "192.168.1.1" and press the button "Enter". After the done manipulations, a window will appear in which you need to enter your login and password. For products "ASUS" it will be the same line - admin. But for Zyxel values are different. The login is the same as the previous manufacturer, and the password is “1234”. For the rest of the products you need to look at the documentation on it, where you can find this information. Next, you need to make the following values in the router:
- set the name of the network;
- put a password on it with WPA2 encryption level;
- if necessary, select the range of operation and the possible values of the device addresses.
Save the changes and reboot it. Now the network is configured and can work.
Conclusion
This article is about how to configure the router. Even a novice user is quite capable of this. In short, it all comes down to organizing the correct connection, entering the "Settings" menu and setting the network name, as well as a password to access it. All other parameters in most cases remain the default, and this is quite enough for normal operation.
For a very long time, I was going to write this instruction, but it still didn’t work. And now, finally, the long awaited moment has come 🙂.
In this article, I will tell you, and show everything in detail in the pictures how to set up a Wi-Fi router without a computer. Having only the router and tablet itself. Well, or a smartphone. Moreover, it does not matter which operating system your tablet (smartphone) runs on. This can be Android, iOS, or Windows Phone. Can be customized from iPad, or iPhone.
I was often asked in the comments if it was possible to set up a router with only a phone or a tablet. What to do if the house does not have a computer, laptop, netbook, etc. Yes, and it is not difficult to imagine a case when you do not have a computer, but then there are many mobile devices that can connect to the Internet via Wi-Fi. And you decided to buy a router that would distribute the Internet to your devices.
But, here comes the problem: “How can I set up this router if I do not have a laptop. And there is for example just a tablet. Where to find the instruction, and can it be done at all? ”Yes, it is possible. I'll tell you now. Of course, you can borrow a laptop, for example from friends, and set it up according to this manual. ““. But, it is not necessary.
What do we need?
We need the router itself, and some kind of mobile device that can connect to a wireless network. From which we will carry out the setting. Well, the Internet should be in your house, I think this is clear.
I checked everything and everything works. The whole process, I will show the example of the same router Tp-Link WR841Nand tablet ASUS MeMO Pad FHD 10that runs on android. You may also have another device, such as a smartphone. Just on the tablet is much more convenient, due to the larger screen.
As for the router itself, it can be any, not necessarily Tp-Link. If you have such as Asus, D-Link, ZyXEL, etc., then only the control panel will be different. And so, in general, everything will be the same as in this manual.
Preparation: we connect the router
First of all, I advise you to do a full reset on your router. It does not matter, it is new from the store, or has already worked somewhere, the settings need to be cleared. Perhaps it was already set up, and we don’t need any old settings. Because of them, many problems may arise. Therefore, we look at the article ““, and we do as it says. Made? Great, continue. If something doesn’t work out, just continue, let's hope that there are no settings we don’t need.
Attached to the antenna router (if they are removable), then plug in the power cord and plug it in. In the blue WAN connector we connect a network cable, the Internet. Which provider has spent your home (It would be good to be sure that the Internet is working and paid for. And then, during the configuration process, problems may arise, and you will think that the router is to blame for everything, or the configuration method).

Connected, the indicators flashed, everything is fine. If, after switching on to the network, the indicators on the router do not light up, then it is possible that it is turned off with a button, which may be on the case of the router itself. Check it out.
Now we take in hand a tablet, smartphone, phone (what you have there), and move on to the next item in our instructions.
Getting started configuring the router from the tablet
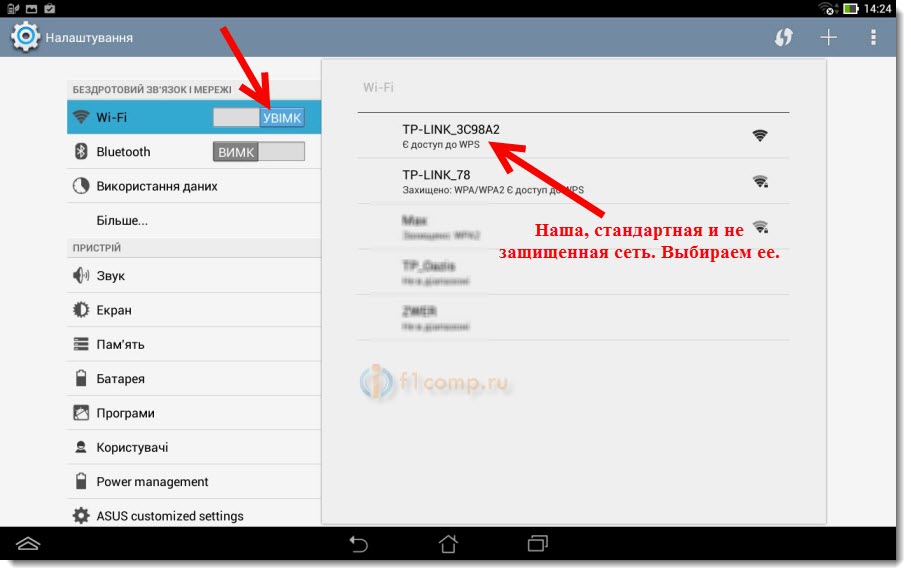
By default, Wi-Fi protection is not installed, and your network is open. Now we will connect the tablet to it. (this is in my case, when I continue to write the tablet, I will enter the device from which we are setting up).
Go to the network connection settings (we need to turn on Wi-Fi).
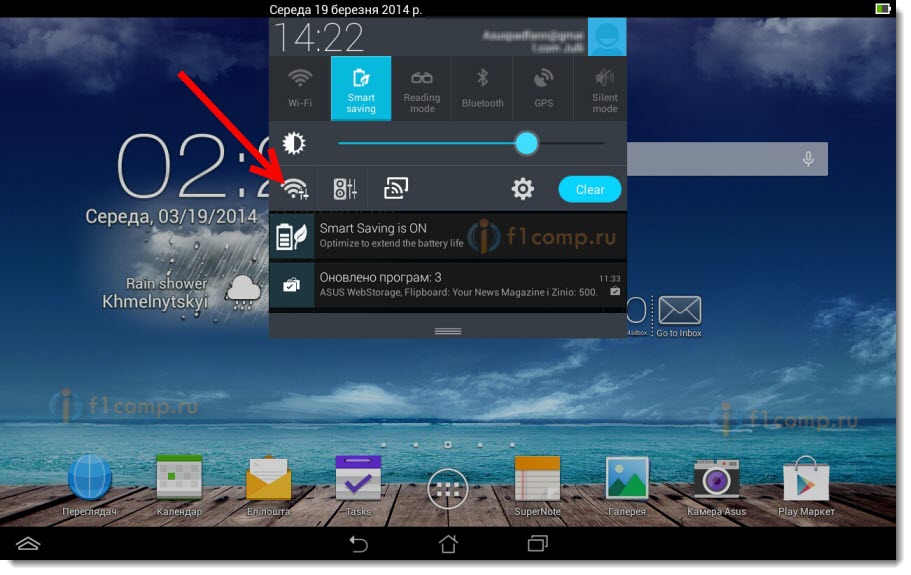
Here, attention! It will have a standard name and will be open. It is important to choose our network. If in doubt, just turn off your router from an outlet. (turn off and turn on Wi-Fi on the device itself)and see if the network disappears. If so, then this is your network, choose it.
A window will appear. Just push Will connect.

If everything is good, then the status will appear near the network. Connected“, And a network tick icon will appear at the top.
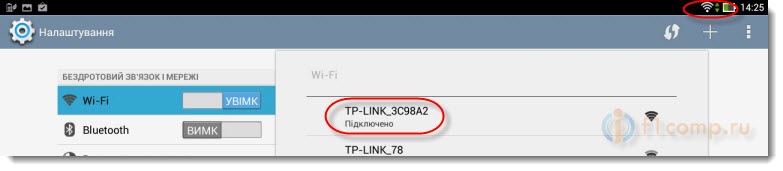
Everything, our tablet is connected to our wireless network. You can proceed to the settings.
Configure the router through the browser on the tablet
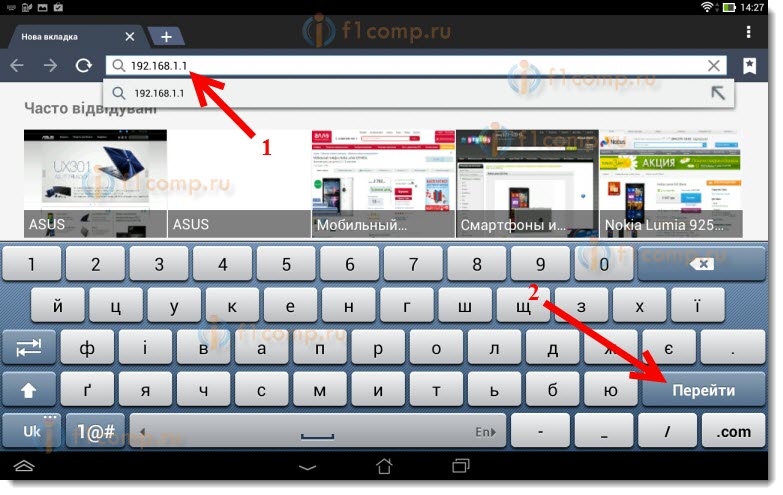
We need to launch any browser. He definitely is on your device. This may be Google Chrome, or some other standard.
In the browser, click on the address bar with your finger and enter the IP address of our Router. Usually this 192.168.1.1 , or 192.168.0.1 . You can view this address, and the standard login / password below your router. They must be listed there.

So, we type this address in the browser, on the tablet, and press the button Go to (open, etc.).
A window will appear asking for username and password. Enter the standard ones, usually admin and admin, and click To come in.

So we got into the settings of our new router. Paul affairs, already done 🙂.
We set parameters for connection to the Internet
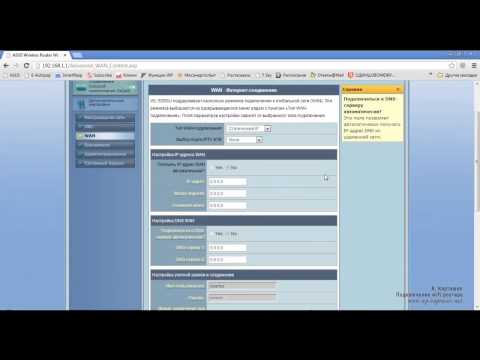
First of all, we need to configure the router to work with your ISP. What would he be able to connect to the Internet and distribute it over Wi-Fi. For this, we need to know the parameters that your provider gave you. You need to know the technology that he uses (Static IP, Dynamic IP, PPPoE, L2TP), and depending on the technology, the necessary parameters. All these data, you can check with the support provider. At the same time, specify whether the provider binds to the MAC address.
Attention! If the provider binds to the MAC address, then you need to call in support of your provider, and ask, bind the Internet to the MAC address of the router. View the MAC address of the router, can be below, on a sticker.
This is the main point. If you make a mistake here, your devices will be.
These parameters need to be set on the tab Network – Wan. On the contrary WAN Connection Type we choose the necessary technology. And already on the basis of a certain technology, we set all the necessary parameters: name, login, static IP, or DNS.
Then, when all the settings are specified and checked, press the button Save to save the settings.

Pay particular attention to the settings I wrote about above. As I said, they are the most important.
Wi-Fi network setup
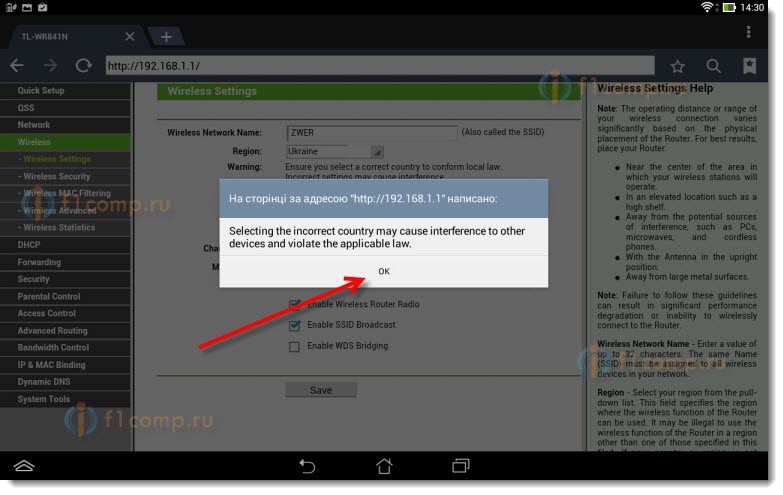
Opposite point Wireless Network Name, set the name of your Wi-Fi network (write only in English letters, you can numbers). This name will be displayed on all devices.
On the contrary Region, specify the country where you live.
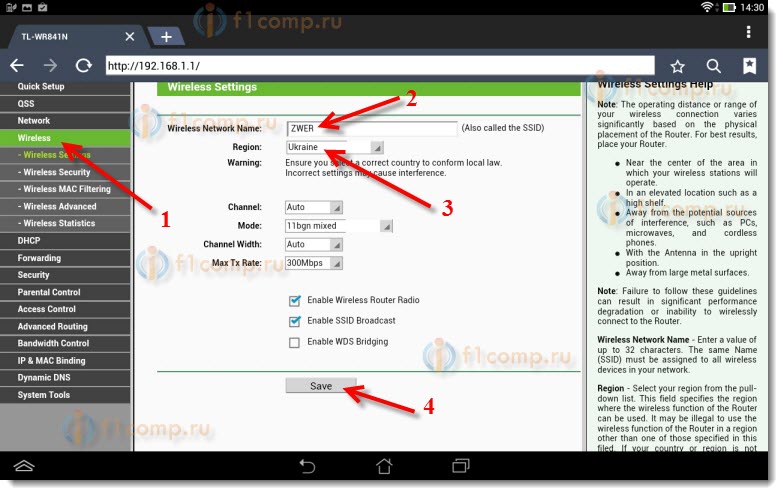
If a window appears, just click Ok.
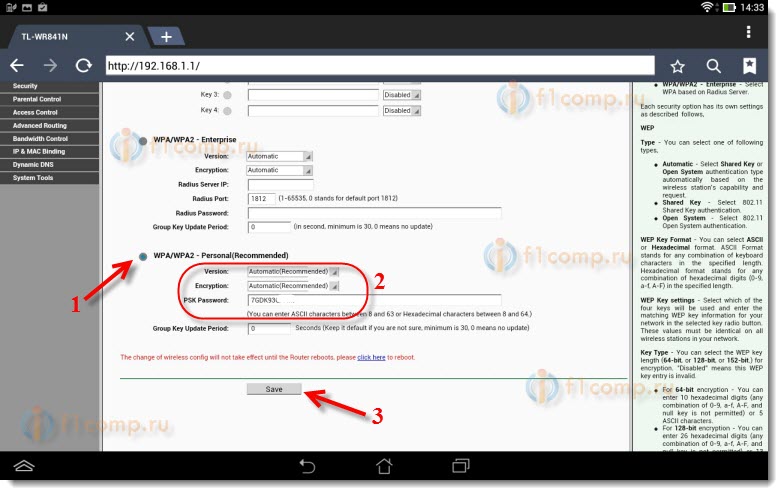
We install protection on a wireless network
Open item Wireless – Wireless security.
Choose WPA / WPA2 - Personal (Recommended).
Opposite point PSK Password make and write a password. It will be used to connect to your Wi-Fi. Use English letters and numbers. Make a password of at least 8 characters. Keep the register of letters, it matters.
Be sure to write the password on a piece of paper and put it in a safe place so as not to forget. And then, you have to reset all settings and re-configure.
Change the password for access to settings
We need to change the standard admin and admin, which are used to enter the settings of the router. That no one but us could get access to the settings.
Click the tab System tools – Password.
Set a standard username and password. And below, set your new data. I left the username admin, I came up with my password.
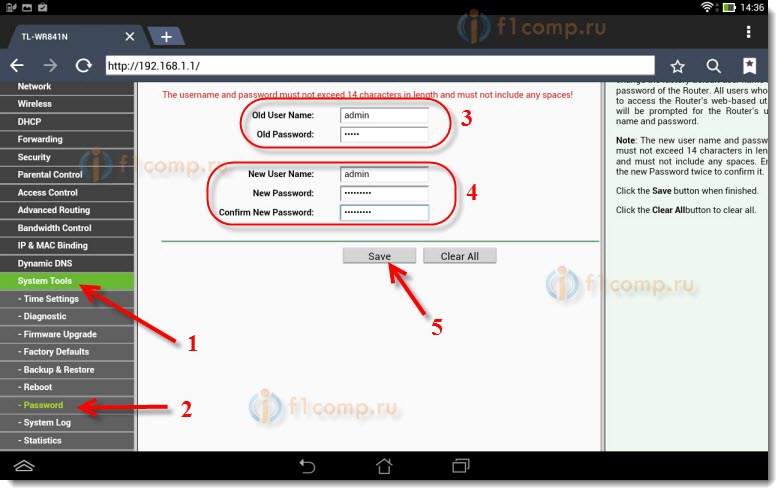
After pressing the button Save, a window will appear again asking for login and password. You must specify the new data (which you indicated above)and push the button To come in.

We will again get to the control panel.
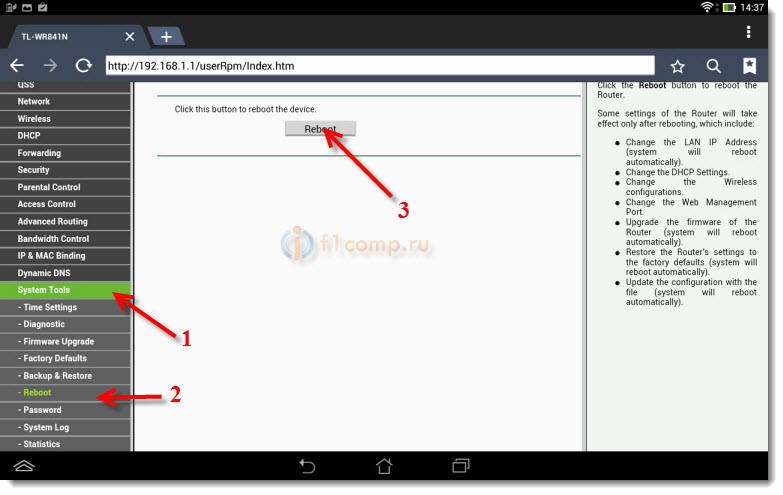
Setup is almost complete. It remains only to restart our router.
To do this, go to the menu item System tools – Rebootand click on the “ Reboot“.
The restart status will go.
After the reboot process is over, an error will most likely appear on the tablet that it is impossible to open the address 192.168.1.1 ... This is normal. Just our tablet will disconnect from the router, and it will not automatically be able to connect (further, it will connect automatically). Since we installed the protection on the network, and after a reboot, it has already earned.
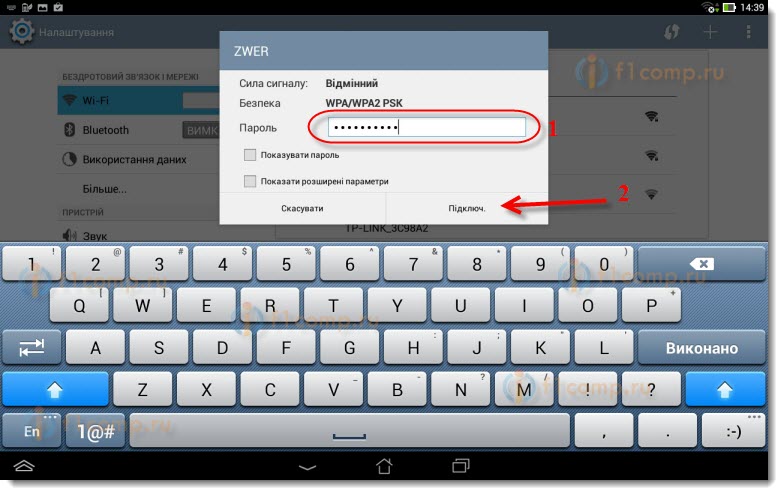
It is necessary to reconnect the tablet to our network by entering a password. To already be able to use the Internet.
To do this, again open the quick access panel to the settings, and click on the network settings icon.
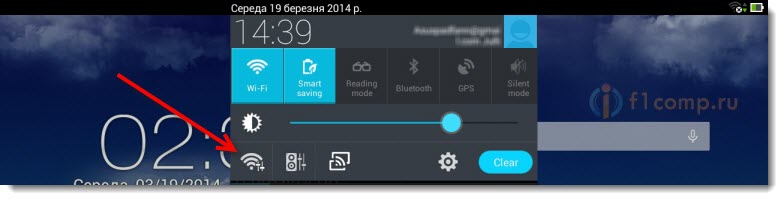
Turn on Wi-Fi, and choose our network. It will already be with the name we specified in the configuration process.

Enter the password to Wi-Fi (which we also indicated in the setup process)and press Will connect.
All is ready! Go to the browser and open the site!
![]()
You can connect other devices to the network!
May occur for example, or. About this, I also wrote.
Afterword
A huge article turned out, a lot of screenshots, but in a different way - no way. I tried to make the article as clear and simple as possible.
As you can see, you can configure the router without a computer, but simply from a mobile phone or tablet. I think that even from the TV can be customized. And this is no big deal. The main thing is to follow the instructions, and check the settings that indicate that later there would be no different problems.
If you have any questions, comments, or suggestions, then I will be happy to hear them in the comments!