How to backup applications and data on an Android device on the example of a Samsung Galaxy S4 smartphone
When it comes to creating backup data or restoring to quickly and reliably, many Android users think about what and how, in this article you will find many ways to and how to backup and recover later!
Why backup?
1. On your personal Android, a lot of information can be stored which is very valuable for, which is either not allowed to be lost or for example you are planning to move from one Android devices to another! Of course, when it comes to Google services, for example, everything is very simple, I entered my login and password, I waited 2 minutes for it to be completed synchronization with google server and the data is all in place, but with other applications you will have to suffer in order to quickly make a backup and recover.
Method # 1 - backup to Android and restore using standard ADB tools
Thanks to Google, who took care of creating a backup, the method is not perfect, but still better than nothing!
And so what do you need for this?
- Turn on uSB debugging on Adnroid;
- Download the site’s branded program. ADB RUN(from version 3.21.35 and older);
- If not installed pC driver; install;
- USB cable.
Instructions how to make
backup and restore using adb run
Create backup
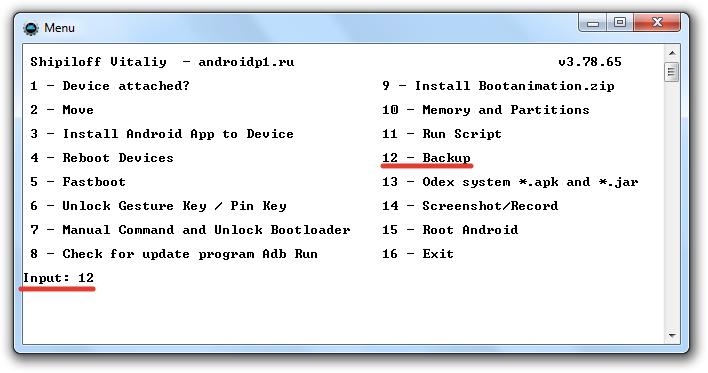
1. Start Adb Run and select the Backup menu.
2. Select the first item Adb backup

3. Take Android smartphone or tablet and click the backup button (you can not create a password)
![]()
Restore from backup
1. To recover, select Adb Restore
2. Take Android smartphone or tablet and click the Recover data button
Method number 2 - using custom Recovery (root)
First of all, custom Recovery should be installed! How to do it and what, you can learn in detail from the article download and install recovery.Creating a backup is not exactly a backup - this is creating an image of the current state of the firmware
!
Once installed Recovery log in to it.
Select the Backup and Restore menu.
Select the Backup menu item to create backup copy

Select the Restore menu item to restore

Method №4 - DataSync (root)
DataSync program is suitable for those who need to perform backup application data as well instant movement them on other device. If you need to create backup copies of the applications directly, and not just their data and settings, then this application is not for you. More details on how it works this application Datasync.
Method number 5 - OBackup (root)
OBackup - It creates backups like Online Nandroid Backup, only this time the application has an intuitive graphical interface, and you can send a backup to a cloud drive. In detail Obackup.
Method # 6 - Titanum Backup (root)
Method number 7 - Helium (root / root)
A very interesting tool to create a backup. The principle of operation of this application is similar to the work of ADB debugging tools, more precisely based on this way, only with a choice for which application to back up. This application does not work on Motorola.
The Helium application can work without Root rights, but if they are even better (if you do not have root rights, you need Android to the computer).
How to create a backup using Helium?
1. First, download the application from the official app store. Google play
 free version
 If absent Root rights then you will also have to download and install the add-on on the PC
You may also need to install drivers on your PC ( for non Root devices), which are presented on the PC add-on download page
Creating rk in Helium on Root devices
Run the application, give up from the offer to enter Google diskso this function does not work quite honestly (backup, but recovery works only in the paid version of the application)

If you are interested in the question: how to make a full backup of your Android gadget, then this article will describe the basic methods that will solve this issue. Agree, we live in an era of technological boom and mobile devices, have become an integral part of it, we store a lot of valuable information on them that needs to be copied and stored.
Backup or backup to Android
Basically, there are three methods: cloud, software and system recovery, we will consider everything in stages and try not to miss a single item. Let's start with the easiest and gradually move to more complex ones.
Google cloud service
Almost every Android device is tied up under a valid Google account, if you don’t have one, then first create an account for this, follow this link. After the account is created, go to the menu -\u003e settings (personal section) -\u003e backup and restore.
And we check that there are ticks everywhere, if you did not have a record, then click "Backup account"And add key, enter all the data from a previously registered record.
In order to configure what the gadget should memorize, go back to the previous menu and go to "Accounts and sync", there we mark the items that need to be backed up.
Important! On the smartphone or tablet, synchronization should be active, usually it is in the top drop-down menu.
z
This is the most primitive way, and is not able to save your messages, applications, and so on, in order to do this, read on.
Program method
For this we need a program, how to download and install it, we described earlier, therefore we believe that you already have it, it is also necessary for the device to be. Now follow the instructions:
1. Run the program MyPhoneExplorer;
2. Connect the gadget to the PC with a cable;
3. Press F1 or in the menu File -\u003e Connect (phone with Android OS and method USB cable);
4. We are waiting for a minute;
5. As soon as the phone connects, go to “Miscellaneous” -\u003e “Create Backup”;
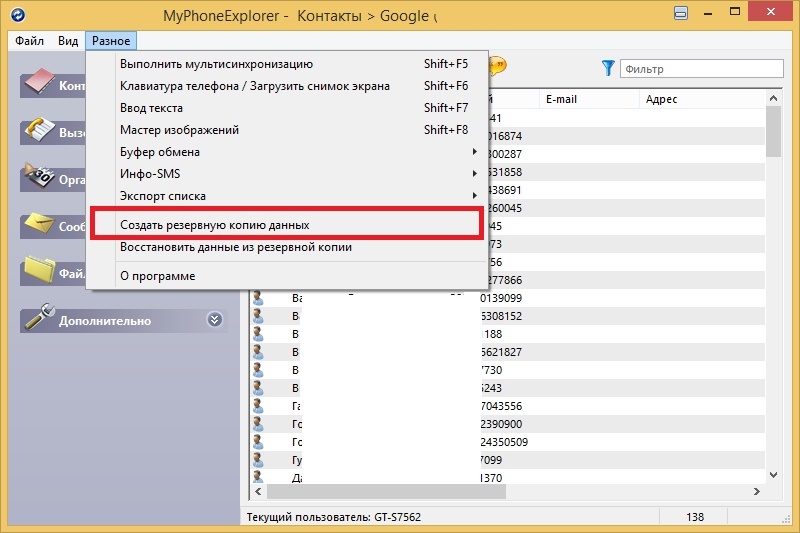
6. Select the folder for backup;
7. We mark all the points that need to be saved;
8. Click "Backup";
9. Go to “Miscellaneous” -\u003e “Restore from Backup”.
Titaniumbackup
There is also a method for creating copies using the application, but you will need root-rights and the application itself.
To make a copy:
1. Open TitaniumBU Pro;
2. Go to the section "Backup";
3. Click the sheet icon with a check mark (upper right corner);

4. In the backup section: “Make RK all user software and system data ";
5. To restore, go to the section below and tap on the required item.
The path by which the RK file will be available. (backup) is specified in the application settings.
Rom manager
Another option using the application, how to install and configure it, we described earlier, so we will not repeat, you will also need.
Open the utility, go to the item “backup and restore” and select “Save current ROM”, then enter its name.
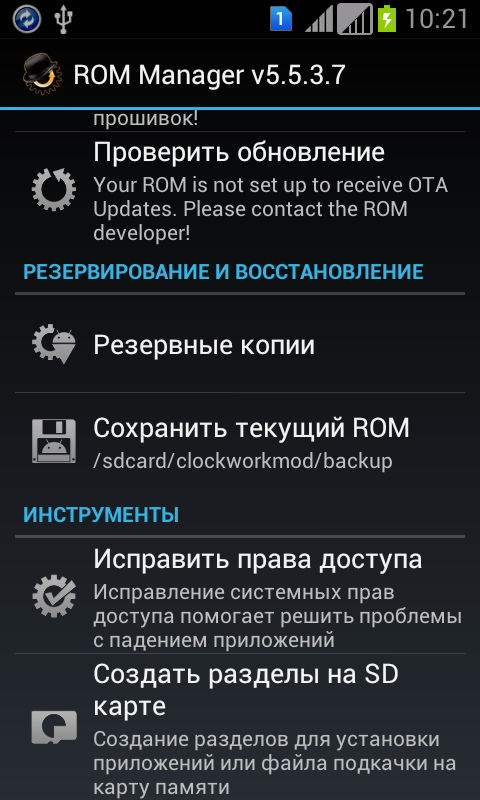
By default, it will be saved to the memory card / sdcard / clockworkmod / backup
To restore, tap the “Backup copies” item.
After that, the Android will be overloaded into the system recovery and a copy will be created, or, on the contrary, a recovery will be performed.
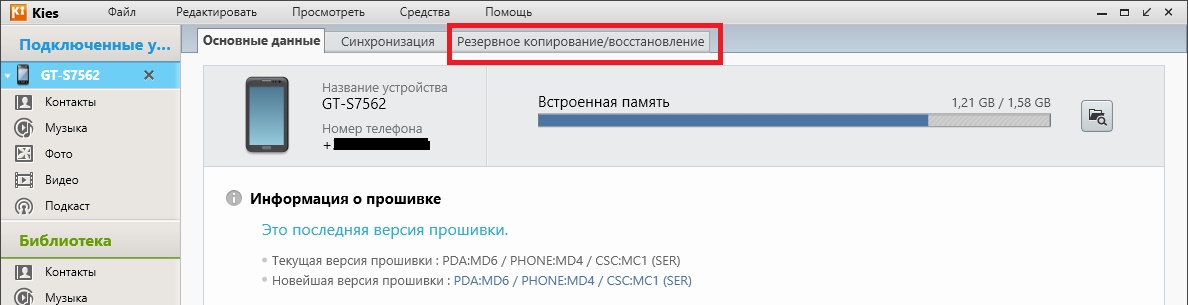
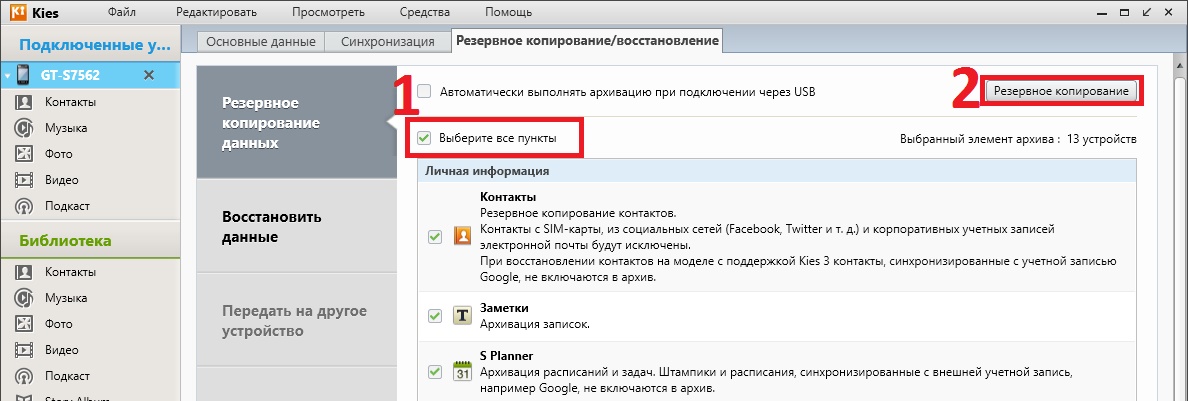
For smartphones and tablets from Samsung
The manufacturer took care of its users and released a special program, so it will assume that you already have it. Next, proceed according to the instructions.
1. Run the kies;
2. Turn on uSB debugging on Android;
3. We connect with a cable smartphone or tablet to a personal computer;
4. We are waiting for the program to determine the model;
5. Go to the item "Backup / Restore";
6. Select the desired items and click "backup";
Do you know that before receiving a root or performing any experiments with a mobile device, you should familiarize yourself with the information on the topic: “how to backup Android”.
A considerable percentage of users of mobile devices are interested in unlimited privileges (root-rights) and all sorts of experiments with software. They get them after the root.
As a result, these users often begin to look for information about what to do when it does not load, this or that error appears, how to install the system application back, etc.
Well, if the device will work with malfunctions or boot in a circle, but much worse when it turns into a "brick". Even in the latter case, not functioning software can be brought back to life, just by rolling back the software.
How to make a backup of Android and consider in the framework of this article, and touch on not only the firmware, but also programs, photos, and any other information.
Content:Android developers offer a basic set of backup functions, and carried out in automatic mode.
In the device settings, you only need to put a tick in front of the necessary items, and all the required information after resetting the configuration of the smartphone or its firmware will be restored after.
Backup Android via ADB
The first, in addition to the above, the method of solving the problem is also proposed by Google. It is far from the most convenient, but it has a place to be. So, to create a backup should:
Instructions for use of the utility is as follows.
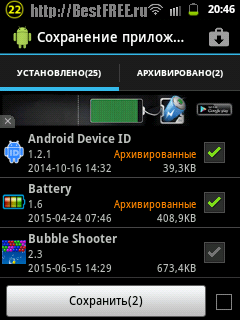
- Call the application and click on the item "Backup".
- Choose “ADB Backup” to back up information on your smartphone / tablet.

Fig. 3 - Run the reservation in the program
- On the gadget we tap on the icon "Create backup ...".

Fig. 4 - We confirm the creation of a backup
Enter the password if it is required, or leave the field to encrypt information blank.
- Waiting for archiving files.
To roll back the operating system with all applications and related information, do the following.
- We connect the device via USB.
- Run ADB and select "Backup".
- In the next window, click "ADB Restore".

Fig. 5 - Recovery window via ADB tool
- On the device we tap on the icon "Recover data" after entering the password if the backup has been encrypted.

Fig. 6 - Confirmation of resuscitation of data on the device
The main drawback of Google’s Android backup methods is the lack of support for applications that are not available. Yes, and with the convenience of work a lot of questions arise, so it’s easier to transfer your software, their settings and achievements through third-party programs.
We reserve only the necessary information
We will consider only a few programs that are highly appreciated by users. First on the list is Titanium Backup.
Titanium backup
The utility does not need to be presented, but root-rights are necessary for its work. Its functionality includes: backup and recovery of applications, freezing them and complete uninstallation, transferring programs to the SD card that do not support this by default, automating many processes, working with multiple copies of a single application.
Titanium Backup supports call history, SMS and MMS, point data wireless access to the Internet, address book, calendar information and is able to synchronize data with cloud services.
The most common use of the utility is to transfer settings and personal information between devices or firmware.
First of all, perform following requirements.
- We release the necessary for backup the amount of memory on the SD card or the internal memory of the device.
- Get root-rights.
Sometimes you may need to activate debugging via USB, but it happens very rarely.
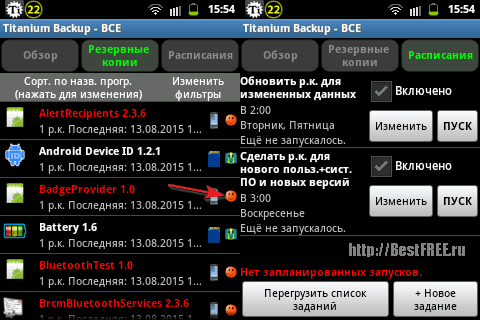
- Go to the group actions menu by clicking on the checkmark icon at the top right or call the command “ Groupactions "through the button" Extras. Menu".
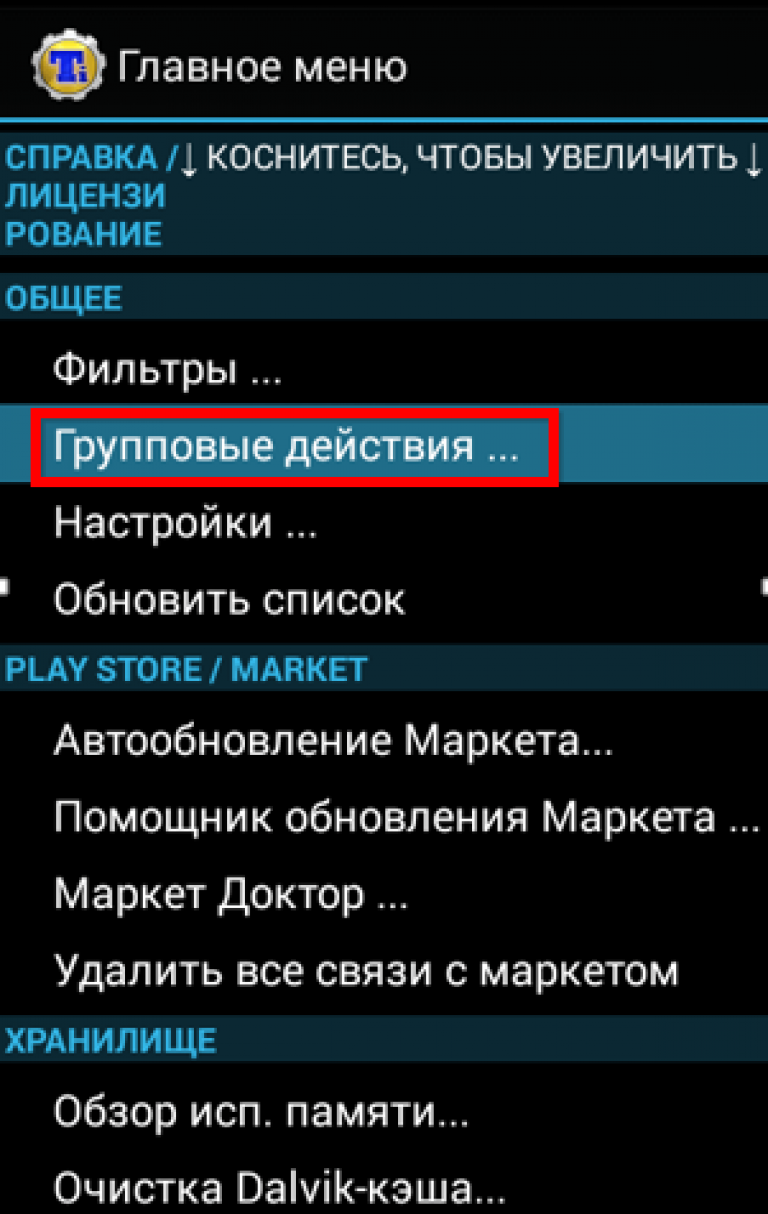
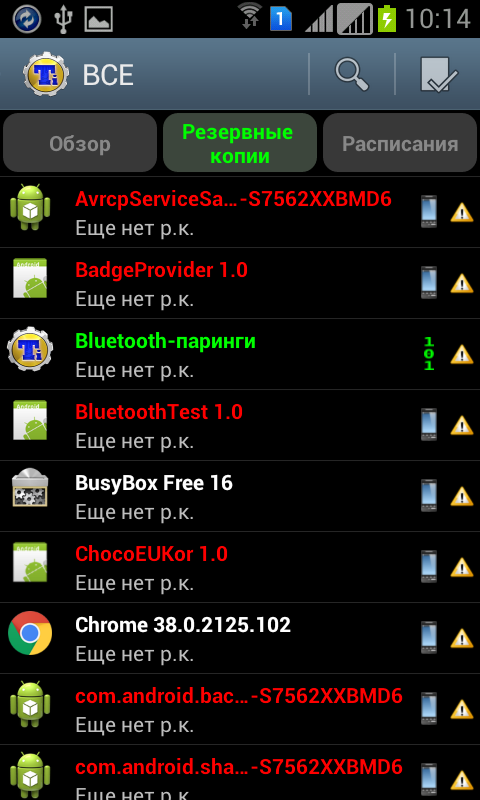
Fig. 7 - Titanium Backup Group Actions Window
Here is a list of batch actions:
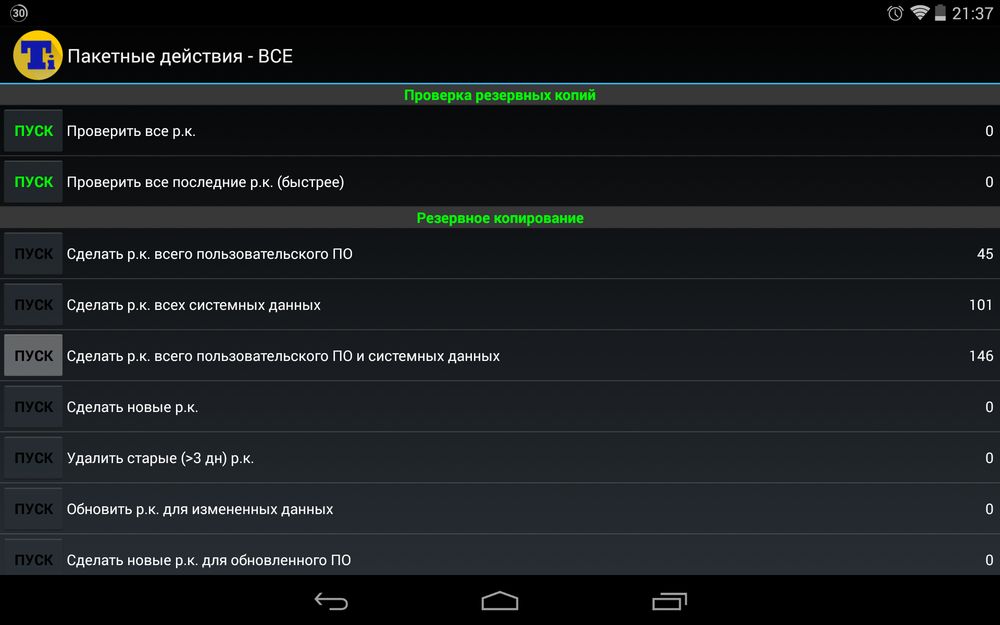
Fig. 8 - List of batch actions for backing up information in Titanium Backup
- reservation of all applications with their data;
- copy only system software with settings;
- combining the first two options;
- creating a new backup without affecting the existing one;
- removal of old backups;
- update of the existing copy after the changes (SMS arrived, contact added);
- analogue of the previous version, but concerning third-party software (installed / uninstalled the application, changed its settings);
- combining the two previous options;
- the same as the 8th method, but with the inclusion of changes relating to system applications.
After clicking on the "Start" button near the desired option, depending on the option, it will be possible to select programs / games and data to be backed up.
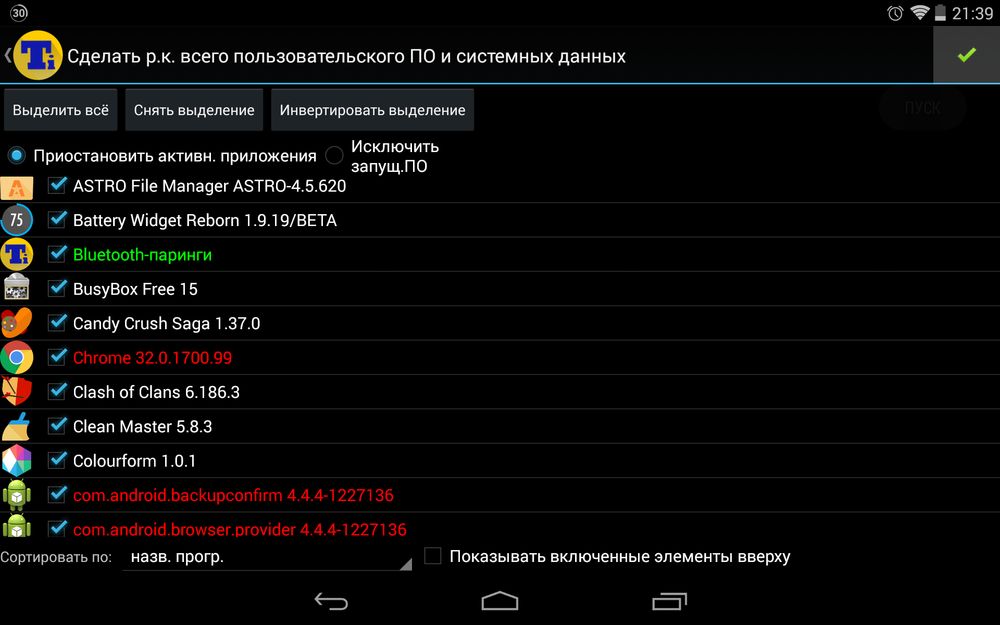
Fig. 9 - Application Selection Interface in Titanium Backup
Top right click on the checkmark icon to start.
Roll back if needed will help the same menu of batch actions, where the following operations are available:
- restore only missing applications;
- reanimation of all information contained in the archive installed programsoh;
- rollback only data relating to system services and programs;
- combining the two previous points;
- replacement of new versions of programs and games on the contained in the archive.
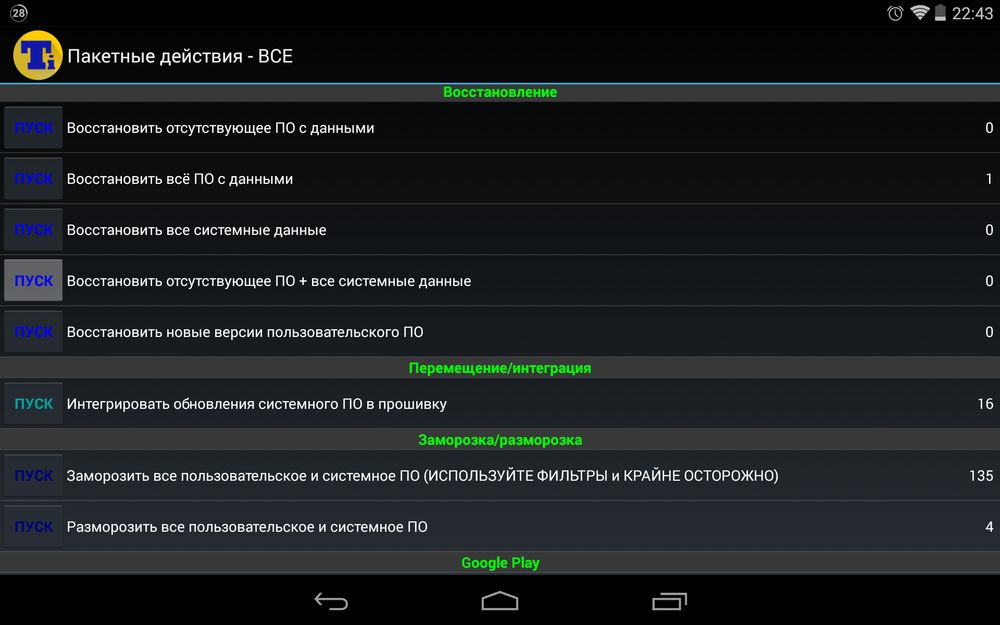
Fig. 10 - List of batch software recovery operations via Titanium Backup
Backup and reset
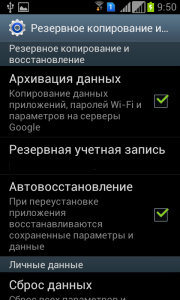
To buy Titanium Backup, you can and do not spend money, smartphones / tablets already contain all the tools to protect themselves from data loss. In the settings item "Backup / Reset" options are available for manual and automatic archiving of applications with all files, and other parameters of Google. The backup will be stored on the servers of the corporation, and to rollback you will have to connect to wireless network.
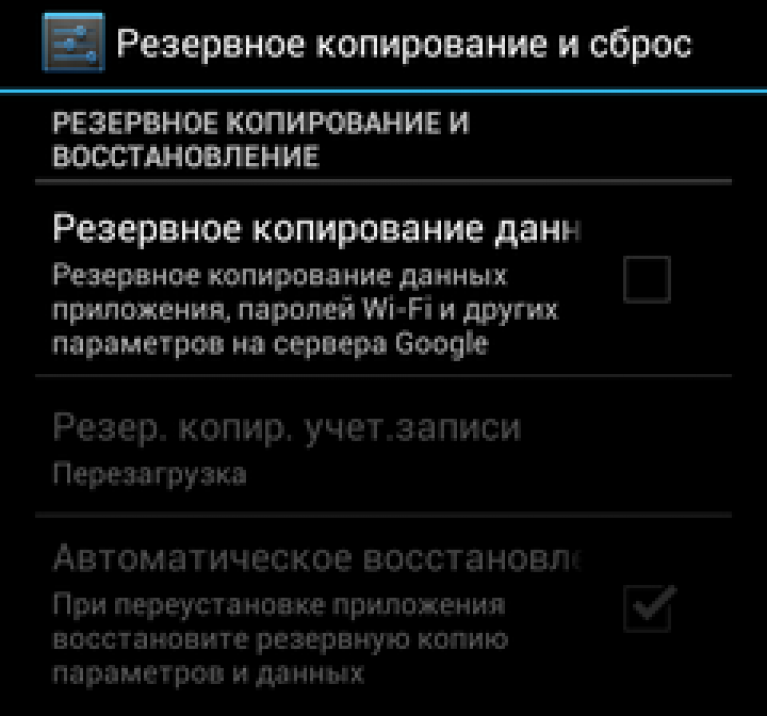
Fig. 11 - Backup window interface and device reset parameters
After flashing the device or resetting its state, the system will offer to load the data stored on the remote server.
Backup android - Full Backup
Today I decided to tell and show one of many ways to make a full backup of your phone or tablet. This action will take several minutes of your time, but in the future it may save you from losing important information and your time. In order to make a full backup of the phone or tablet - Root rights must be installed on it, how to do this can be found by clicking on the link in the video
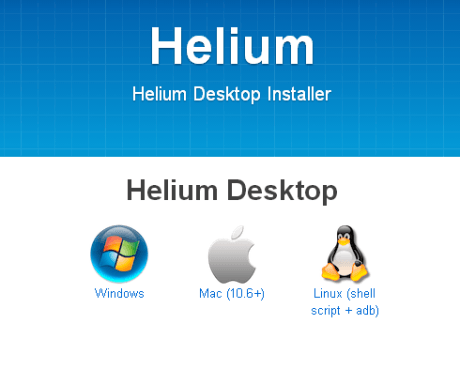
Helium - App Sync and Backup
Unlike competitors, Helium does not require rooting, although if there is a routing, it will reveal its full potential. For phones without superuser rights, you will have to install the additional Helium Desktop application on your computer.
Supports a large list of data, which does not include information about system applications, and they themselves even with the root.
Some programs are not supported, they are displayed at the bottom of the software list, but Helium remembers and distinguishes between all devices where it was launched and copies created for them.
Consider how to backup Android on devices without root.
- After starting the program, activate USB debugging in the gadget settings.

Fig. 12 - Enable USB debugging in mobile device settings
- Run computer version Software and switching devices.
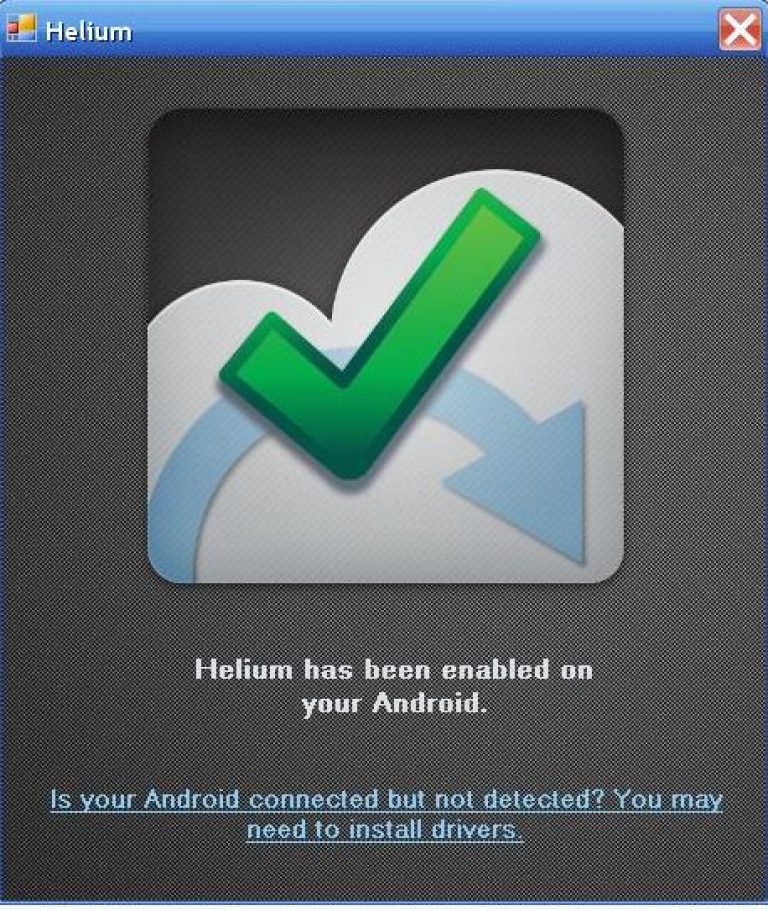
Fig. 13 - The result of a successful connection - a green check mark
An article about how to make backup copies of important data on your Android device in advance and restore them in case of system failure or flashing.
Modern smartphones, although they got a full-fledged operating system (for example, Android), all the same, in the first place, remain telephones - means of communication. They keep all our contacts and emails. This data does not want to lose, but sometimes there are various failures and breakdowns that lead to almost complete erasure of the device's memory ...
If you have encountered such a situation, then you probably know how difficult it is to literally re-create all the necessary data. However, this could not happen if you had attended to the creation of backup copies in advance!
In today's article, we’ll talk about how to backup Android in general and its individual databases (for example, Contacts, Messages, etc.) in particular.
A bit of terminology
Before you begin directly to the practice of creating backups, it is useful to understand a little about the terms that we will meet. The key ones are "" and "recovery".
"Ruth" (from the English. "Root" - "root") - a concept known to most users of systems based on the Unix kernel (including Android). It implies that the user has access rights to the OS root directory and the ability to modify files in it.
If you have a root on your device, then you can create some backups as simple as possible even without third-party software. Without rights, you can also create some backup copies, however, it is not so convenient to do it. Therefore, obtaining a root is highly desirable.
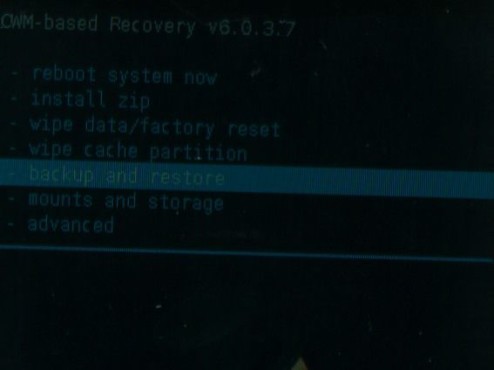
"Recovery" (from the English. "Recovery" - "recovery") - a term referring to purely mobile devices. This is a menu system that resembles a computer's BIOS, which boots up to booting the system itself and allows you to install service packs, restore backups, or clear the device’s memory.
![]()
Recovery can be staffed (that is, standard for a specific firmware) and custom (Clockworkmod Recovery (CWM) and Team Win Recovery Project (TWRP) are the most popular). Custom recovery usually contains more features, but does not exist for each device. Yes, and the installation of the existing one does not guarantee success, since by performing various manipulations at the firmware level you risk disrupting the performance of your device.
Backup contacts
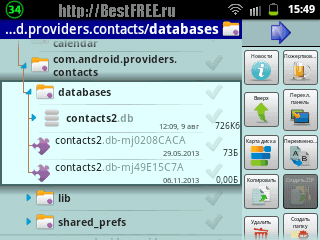
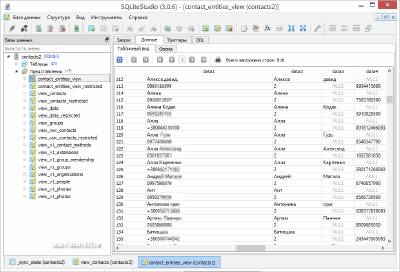
Backing up phonebook contacts in Android can be called one of the simplest tasks in terms of backup. This is facilitated by the fact that everything is stored in a simple database of the popular SQLite format in one real file, which, if there is a root, can be easily copied directly from the phone to a PC.
There is a database with numbers in the root directory at the address: /data/data/com.android.providers.contacts/databases/ and has the name "contacts.db" or "contacts2.db" (depending on the firmware):
You can copy the above file, save it on your computer and even edit it with special programs (for example, free SQLite Studio):
However, it is not necessary to have a root or rummage in the root folder in order to backup the phone book. It is quite easy to export it by regular means of import / export. To do this, open the contact list, call its menu and find the item "Import / Export" in it, activate and select where you want to save (or where to restore) the phone book:
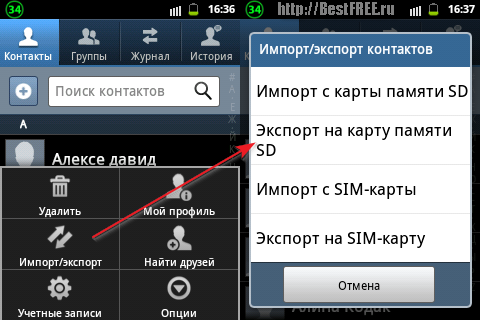
The result of such simple manipulations will be a file of the vCard format, which can be used both to restore the contact database in the phone, and for viewing on a PC.
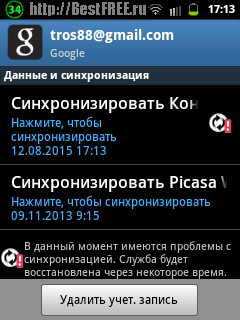
Go to "Settings" - "Accounts and sync", click on your account and on the screen that opens, you can synchronize contacts, gallery (you need to connect to the Picasa service) and Calendar:
Naturally, there are other ways to save phonebook backups. To do this, you can use numerous applications for Android (for example, Super Backup: SMS & Contacts) or Windows (for example, MoboRobo). But we will talk about them a bit later, since their specialization is quite broad.
Backup messages
Often our SMS-correspondence can be no less valuable than the phone book. Through SMS, we can receive and send important passwords, phone numbers, etc. Therefore, backup SMS can sometimes be very necessary action.
Unfortunately, there are no regular tools for importing and exporting messages to Android. However, if you have root, you can copy the database with your correspondence from the root folder to the address: /data/data/com.android.providers.telephony/databases/mmssms.db.
If there is no root, you will have to resort to help. third-party applications for Android or Windows. One of top apps for Android in this area is SMS Backup & Restore:

The application allows you to create backup copies, view them and, of course, restore. Among the additional amenities specifically SMS Backup & Restore worth noting:
- the ability to backup only selected conversations;
- text search function in backups;
- mMS backup;
- preservation of message formatting;
- ability to select a storage location ( inner memory, external SD card, "cloud" services).
The application is intuitive, does not require root and works on almost any device.
Application backup
In addition to storing phonebook backups and messages, often application backup. In principle, if you are connected to Google Play and download applications only from there, you can use the installation history and re-download everything that you had. However, it often happens that we establish what is not on the Playmarket ...
In this case, you can do in several ways:
- Use proprietary software for PC (like, KIES for Samsung).
- If you have root, save the application APK files to your PC or memory card.
- Use special applications for Android.
KIES is certainly a useful thing, but it does not work with all devices. Therefore, I cannot recommend it as a universal one, alas ... There is the MoboRobo phone manager already mentioned, however, he refused to work with my phone (even after installing the drivers).
Therefore, we proceed immediately to the option with the presence of the root. In this case, we can go to file system and manually save all the necessary APK files. Depending on whether this system application or third-party, as well as where it is installed, you need to look in one of three places:
- System: root / system / app /.
- Third-party installed on the phone: root / data / app /.
- Third-party, moved to the memory card: mnt / asec /.
Having found and saving the necessary applications, you can easily install them in the future. And in order not to search manually, in some file managers (for example, Total Commander), the list of installed programs has already been moved to a separate section:
If there is no root, and somehow you need to make a backup, then the most universal way to do this is to use special applications, like Super Backup: SMS & Contacts:
This application allows you to make backups:
- applications;
- contacts;
- messages;
- call log;
- calendar;
- bookmarks.
That is, if you do not have root, then this application will help you to archive almost everything except system files. However, if you have Super Backup root: SMS & Contacts can not only save application APK files, but also include all your files in the archive settings! Given that the application weighs a little (a couple of megabytes), I can recommend it as a "must have" on any Android device.
Full backup system
Making a full backup of your Android device is not easy. Really full backup provides for the preservation of the firmware image and everything that is installed on the device.
This can be done only with the help of a special console utility ADB (abbreviated from the English "Android debug bridge" - lab. "Android debug bridge") or custom recovery (in standard means no copy / restore).
The main difficulties of using ADB are:
- the need to install a driver for your device;
- selection and configuration of the desired package of console applications;
- need for knowledge of ADB teams and the principles of breakdown hard drive in a unix-like environment.
If you still decide on the full backup data way, I recommend that you familiarize yourself with the matter. Well, Google, of course, has not been canceled by anyone :)
The second method using custom recovery is much easier. The capabilities of the popular CWM and TWRP already include creating backup copies of the entire device and restoring them. The main problem is that the above-mentioned recovery does not exist for all models of devices.
If you are lucky, and among the models declared on the official websites, your device is listed, then installing custom recovery is quite simple. Download the update.zip archive and place it in the root of the memory card, then turn off the phone and boot into regular recovery mode (on my Samsung galaxy Y for this you need to turn on the power button with simultaneously holding the central and volume up buttons).
In your recovery, find and activate the item "apply update from sdcard", "install update", "install zip" or something similar. After that, select the downloaded archive from the recovery and wait for a while until all the updates are applied.
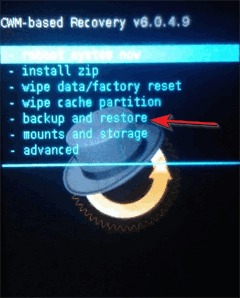
In the new recovery you will have the item "backup and restore", which is responsible for creating backup copies and restoring the device with their help.
Above, we have considered, so to speak, more hard options for backup, however, almost a full backup can be made by means of installed applications. One of the most powerful and popular in this category is:

This application allows you to make the most complete backup copies of the user-installed and system programs with the preservation of all the settings, but always requires root-rights. The only thing that Titanium Backup does not save is the firmware itself, so it is worth noting that, sadly, you will not be able to do an absolutely complete backup.
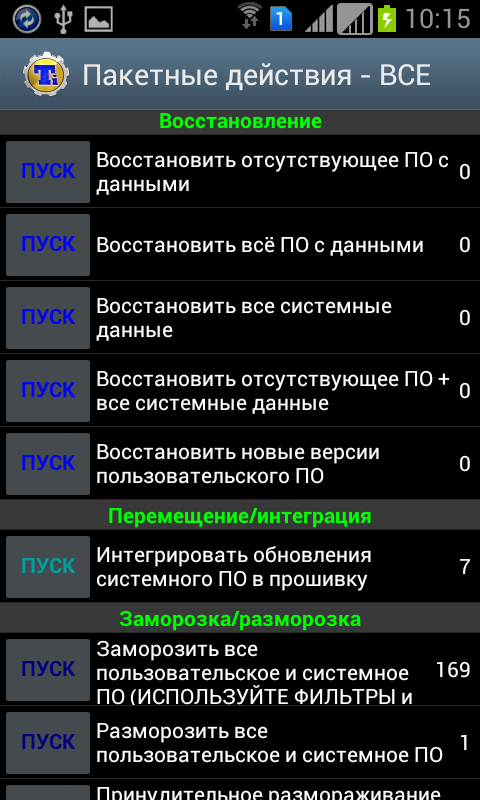
On the main screen of the application there are three tabs: "Overview" with a list of features, "Backups" with a list of installed software and its backup marks, as well as "Schedules", where you can set the frequency of automatic backup. However, all the real power is in the Titanium Backup menu, and more specifically in its “Batch Actions” section:

We are interested in the section "Backup" and the item "Make rk all user software and system data." The number on the right displays the number of applications being archived, and the Start button on the left allows you to start creating a backup. Before launching, you can manually select the programs that should or should not be included in the backup, and then all that remains is to click the Start button again.
In addition to batch functions, Titanium Backup allows you to back up or delete selected applications (including pre-installed ones) manually, as well as create backup copies on a schedule. To do this, use the corresponding tabs of the main screen:
On the Backup copies screen, notice that all the applications in the list differ in the color of the spelling of their names and the icons on the right. The names of user applications are written in white, and system and preinstalled in red. Also, if a backup was previously created for the application, then on the right you will see a smiley, and under the name of the backup date.
Titanium Backup is the most versatile backup application, but not the only one. You can also try Online Nandroid Backup (full backup), Helium, DataSync and some others that may or may not work on your device :)
Results
So, we have considered almost all the basic ways to backup Android. As you can see, for some types of data (for example, Contacts), there are regular backup mechanisms that do not even require root. And, for example, a full backup of the system, in addition to the root, will require you either to make changes to the firmware of the device, or to master the console ...
Although, not everything is so bad. If you are not one of those who almost every week reflash their devices, then in most cases it will be enough for you to save all your applications, contacts and correspondence, which is easy to do with special programs. And, if from those, in any case, sooner or later you will have to get acquainted with the console;)
People say that if I knew where you were going to fall, you would have spread straws. So a timely backup is that “straw” that will always help you to keep your data on your mobile device safe and sound! Therefore, we make backups and may not meet us on the way of a thick polar fox :)
P.S. Permission is granted to copy and cite this article, provided that the active link to the source is indicated and the authorship of Ruslan Tertyshny is retained.
Contacts, photos, progress in games - smartphones contain no less necessary information in their memory than hard drives computers. Back up copy android allows you to eliminate the loss of important data, securely storing them on Google servers or on your computer.
Backup to google servers
For the full-fledged work of Android, you need a Google account - a Gmail mail account, with which you can log in to any service from a global corporation. Therefore, a backup copy of Android in Google is the easiest way to save content and settings. To back up contacts, data of some applications, calendar and disk, just add a Google Account in the settings and enable synchronization.
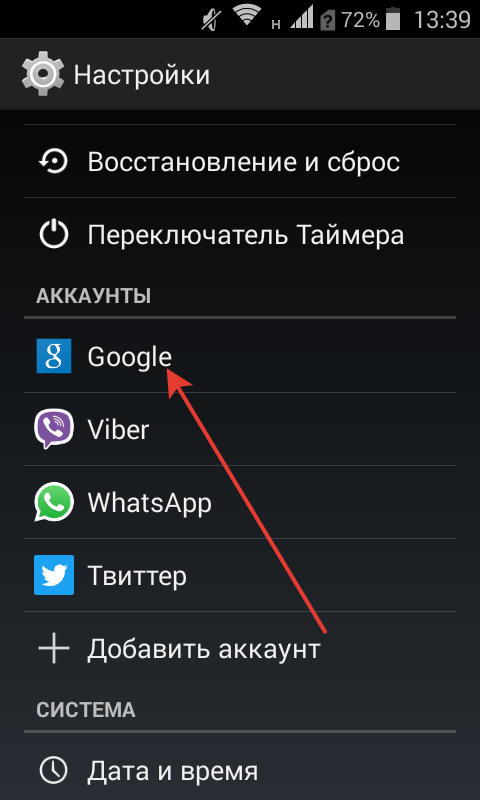
Marked data will be automatically saved to Google servers. To restore them to your phone from backup or transfer to another device, just add an account and enable synchronization. 
In the settings of the phone there is also a “Restore and reset” section. Here you need to enable backup, add a Google account to sync and activate auto-recovery, which will help to restore a copy of the settings and data of some applications when they are reinstalled. 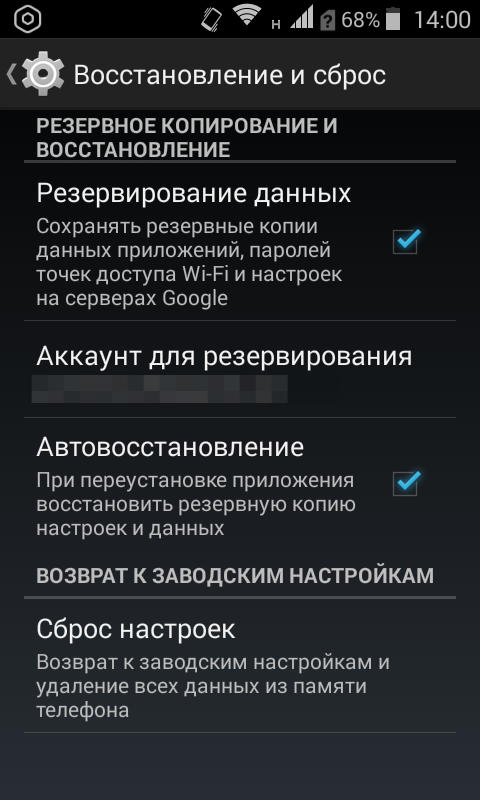
On Google servers, important information is saved, but, for example, the progress in the game can not be transferred to another device using this synchronization. If you want to save absolutely all the data, then you need to know how to make a full backup.
Backup via Recovery
The standard Android recovery menu (Recovery) has extremely limited functionality — resetting settings and installing updates. But if you put an alternative Recovery (for example, Clockworkmod) on your phone, you can perform a number of operations, including backup. In fact, it will not be a backup copy of the data, but a full-fledged copy of the system. 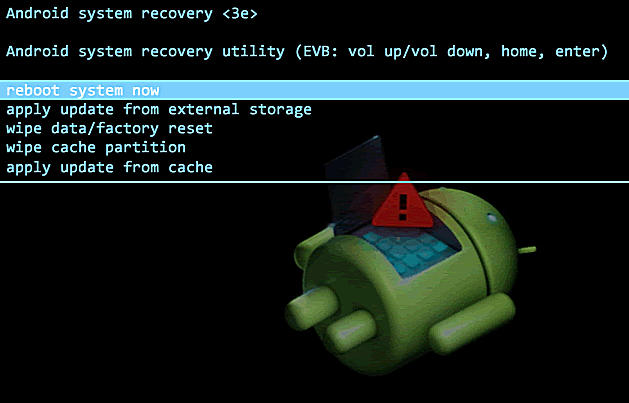
If you do not know what a custom Recovery is, and you have never installed it, then it is recommended to immediately proceed to the next item in the guide, which describes how to create a backup using the Android backup program on a PC, called Adb Run.
If you have a custom Recovery, then it will not be difficult to make a cast of Android:
- Turn off the phone, go to Recovery (usually you need to hold down the "Volume +" and "Power" keys).
- Using the volume rocker and power button, open the “Backup and Restore” section.
- Select “Backup” to create a copy of the current firmware status.

The backup will be saved to a memory card, to a folder with the name “CWM” or “TWRP” depending on what Recovery costs. Then there are two options:
- Store the system image on a memory card.
- Connect the phone to the computer and transfer the backup to hDDso as not to hammer memory mobile device large amount of data.
To perform a restore android data after backup through Recovery, you need to make sure that the image of the system lies in the corresponding folder on the SD card. Then you should go back to Recovery, open the “Backup and Restore” section and go to the “Restore”. A list of available to restore backups will appear, from which you need to select the appropriate system snapshot.
Using Adb Run
If you want to back up Android to your computer, bypassing the creation of a backup in the Recovery menu and setting up google account, then use the free utility adb run. For it to work, two conditions must be met:
- On the phone, USB debugging is enabled.
- Mobile device drivers are installed on the computer.
Drivers must be for the model that you connect to the computer. If the conditions are met, you can proceed to create a backup.
The backup is stored on the computer in order to return the data to the phone, you need to run Adb Run again and go to the “Backup” section. Here you should open the subsection “Adb Restore” and select the desired backup, after which the data will be copied back into the memory of the mobile device and to the SD card. 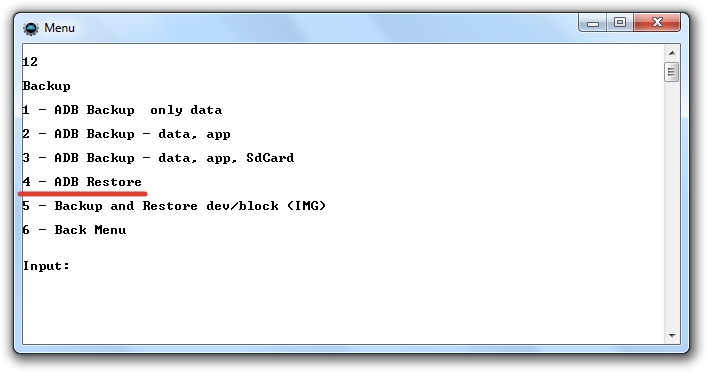
Ways to create a backup on Android are not limited to the described tools. AT Play market You can find a dozen applications (with or without root) that allow you to save different amounts of data — Safe Backup, Super Backup, Titanium Backup. But before applying the capabilities of the application, be sure to read user reviews about its work - some programs are unstable.