Update tp link tl wr741nd. Pokrokova OpenWRT firmware for the TP-LINK TL-WR741ND router from Windows.
Routers are spared their own firmware for various reasons. Add functionality, solder USB port or just add stability to the router robot.
I have a router on the remaining stable firmware with 3 WiFi and 2 Ethernet slow down 4 times a day. It’s not scary anymore, but it’s better to re-vandage Yogo Nabridlo. I wanted stability. Following a search and reading of the selected log on OpenWRT. The article has already presented cover instruction without pardon, as I happened to go through.
Krok 1, flashing to the rest of the official firmware
First, sho varto zrobiti, tse it is necessary to put the rest of the native firmware.
You can know the new firmware for TL-WR741ND, for the older version.
- Turn the router over and check the version of the locks with the new one, focusing on the stickers on the case.
- Download the archives with the rest of the firmware.
- Flash the router with firmware from the archive in the best way. System tools -> Backup copy& Update (System Tools -> Firmware Upgrade).
Krok 2, start and install OPENWRT
Follow the same file, which is appropriate for the version of your model. Do not nehtuyte tsim rule! Possibly two options file system to get started: JFFS2 and SquashFS. Judging from the observations, varto upload your choice on SquashFS-files. The word factory in the name of the file means that such a file must be uploaded to your device over the factory (native) firmware. the file with the word sysupgrade will need to update OpenWRT, so. It is loaded after the factory firmware.
We have a custom firmware, so we need to install the firmware with the factory tag.
Below is one firmware with a different hardware version of the add-on, you can choose the one up to which your router lies, in order to select the version Krok 1:
Download factory firmware and in the greatest way. System Tools -> Backup & Update (System Tools -> Firmware Upgrade).
Krok 3, enters the WEB interface of the firmware
After a successful firmware, we will need a working router with a web interface. That's why we go to the firmware through the browser. Farther away like this:
Enter the address of the router in the address row 192.168.1.1
Pressing a key Enter And the web interface of the router appears. We prefer those who prompted us to enter Username and Password. Username is input root, the Password field is left empty. Onslaught Login.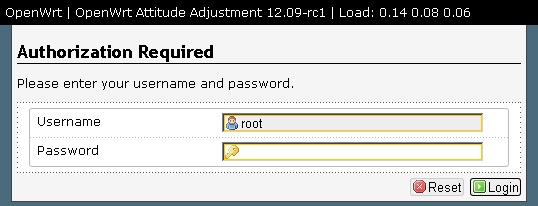
At the same time, the firmware ended, you spent it on the web-interface of the Openwrt firmware.
Krok 4
We press on network -> Interfaces -> wang -> Edit
We choose the protocol we need, I have PPPoE. We enter the login to the Internet in a row PAP/CHAP username, and the password is PAP/CHAP password. Onslaught Save&Apply.
Turn back to Interfaces, pushing on each division, choosing a row WAN that onslaught connect. Internet of lashings. 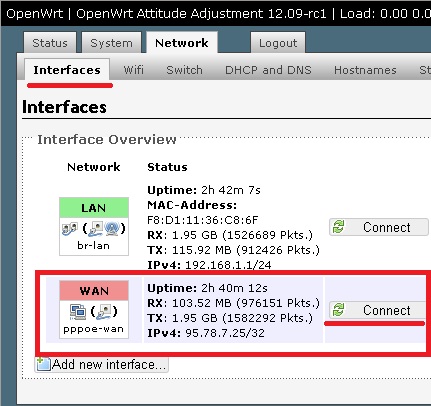
Krok 5
It’s possible that it’s going to be so self-sufficient, like the Internet is connected so briefly.
Let's go split network ->WiFi -> edit(yakscho є) or Add(like nothing has been created). In retail General Setup change ESSID, having named your measure, then we go to Wireless Security. in a row Encryption collectable WPA-PSK/WPA2-PSK Mixed Mode. in a row key write password in wi-fi merezhі. Onslaught Save&Apply.
Turn around at the branch WiFi that onslaught connect. Wi-fi patches.
Krok 6, Russian firmware
In order to Russify the firmware, we need to go to the distribution System -> Software-> i click on the button Update List.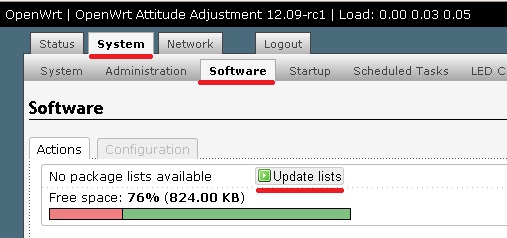
Whose next is pressing on Available Packages, select L. We know the file s im'yam " luci-i18n-english we press the button Install. On the request, you are welcome, you are pushing OK.
The current package was taken over, now it is necessary to zastosuvat yoga. Vіdkrivаєmo razdіl System -> Language and Style-> language -> Ukrainian. After which we press the button Save & Apply.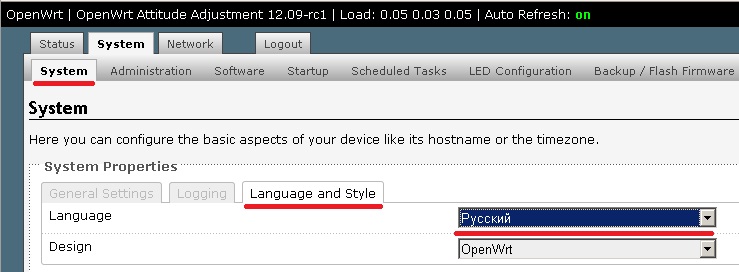
Onovlyuyemo side (pressing on the keyboard F5) and Russian interface.
Krok 7, we set the password on the router
We go to the branch System -> Management. Installable Router password. Onslaught save and zastosuvati.
Krok 8, the final stage
-> Vikonati re-advancement.
I live! Let's talk about the tl wr741nd router today. The Tp-link company is one of the leading manufacturers WiFi routers. "tl-wr741nd" - not one of them popular models. Її vіdmіnna rice vіdіnshih - high quality for an equally low price. But at the bagatioh, the process of robotic work with a cim router causes little problems. The main ones are: loss Wi-Fi security, as well as periodically resetting the router. Someone might think that the problem is with the annex, but it is not so. The main problem lies in wrong patching that firmware tp link tl wr741nd. In this article, I will write a report instruction about setting up the tp link tl wr741nd router. So, I will report about the firmware of the router. We will look at the improvement of the Internet for different providers and places.
Zmist:
Starry look and significance of elements on the router
Standard old look. White body, black front panel with indicators, also one antenna.
Let's take a look at the meaning of the indicators (bulbs) on the front panel.
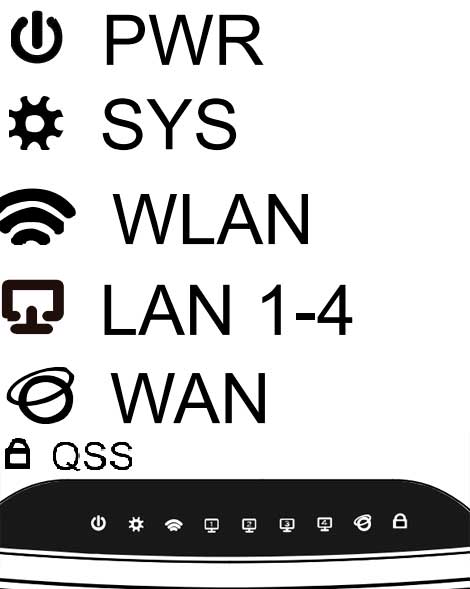
- PWR - life light bulb. If it’s on fire, it means that the router is working. It doesn’t light up when the router is turned on, which means that the VIN is not working, or you forgot to press the power button on the back panel of the router (we’ll talk about the button below).
- SYS - icon system parameters yakscho blimaє, so everything is fine. Do not blink, but just burn (sound when it is turned on), then, you need to adjust the parameters. Don't burn - systemic pardon.
- WLAN - Wi-fi icon, if it blinks - everything is fine, data is being transmitted successfully. It doesn’t blink, but just burn - a systemic pardon, next re-vantag the router (just turn it off, and then turn it off). Do not burn and do not glare, then, Wi-Fi is turned off and it is necessary to turn on yoga (as described below).
- LAN (1-4) - If the computer is connected to the router to one of the LAN ports, the light will flash.
- WAN - Denmark indicator is on, if the WAN port (which is blue) turns on the Internet provider's wire and data is successfully transmitted. If it doesn’t burn when the arrow is directed, it means that the wire is broken, or the provider has turned on the signal (stopping the service).
Now let's take a look at the back of the router.
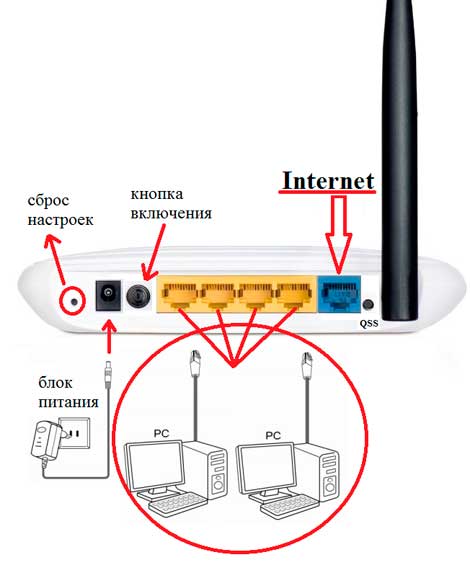
- Button to reset the settings to standard. Zastosuvannya: press and tighten for about 10 seconds (or touch until all the paws on the front panel light up and go out at the same time).
- Block of life - I'm guessing, everyone has figured it all out.
- Button to disable/unmute the router.
- Port LAN - to connect the wire of the router with the computer.
- Internet - the port to which you insert the provider's wire.
Connecting a computer to the tp link tl wr741nd router
I'm the rajah of all installing a routerchild bezperedno on the dart, and not on WiFi. Tse save you from zayvih problems, for quiet, hto vyrishiv from the cob connect to Wi Fi. Since you have read the respectfully written text above, you have already understood that the ISP's Internet wire can be inserted into the blue port. One end of a short dart, which is in the kit (patchcord), is inserted into one of the ports, and the other end is in the network card of the computer or laptop. Let's turn on the router.
After notification, the router is guilty of automatically connecting to the computer. For whom in nalashtuvannyah lace pattern May cost otrimannya ip addresses automatically. Let's figure out how to reverse it:
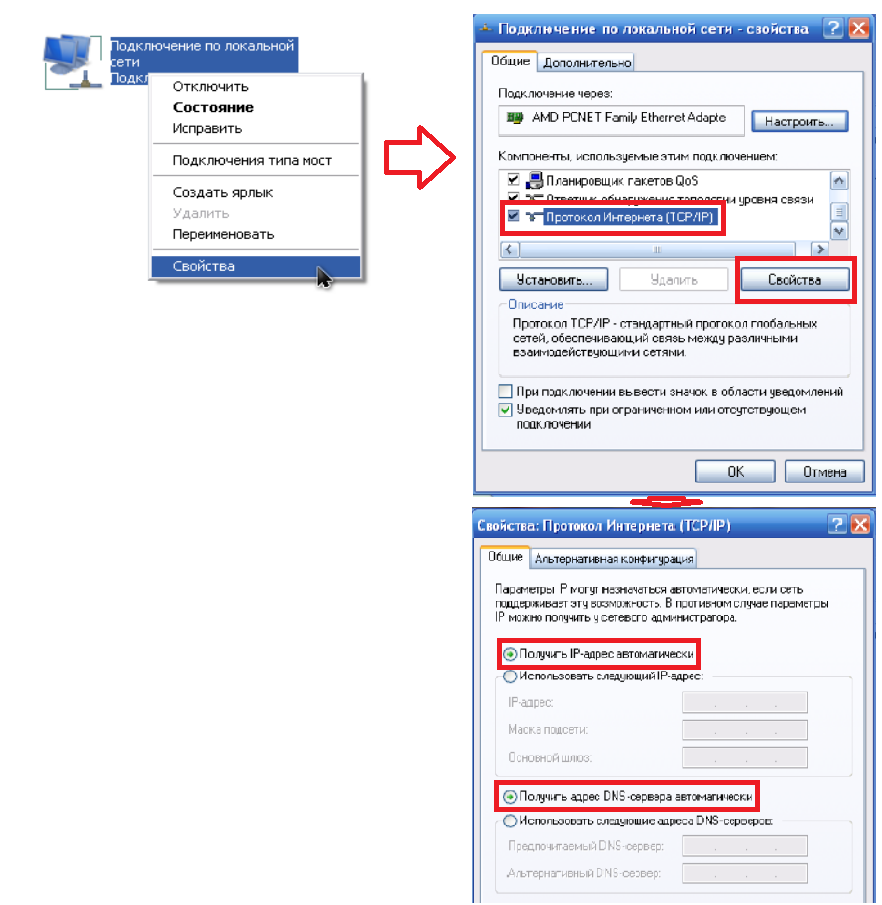
Windows XP
Start >> Control Panel >> we know "Merezhevі podklyuchennya"
Connection by local lines, clicknemo right button mouse and select the item “Power” >> In the list with checkmarks, we know “Internet Protocols TCP / IP”
At the vіknі we put specks opposite the punctures, de є the words "Automatically"
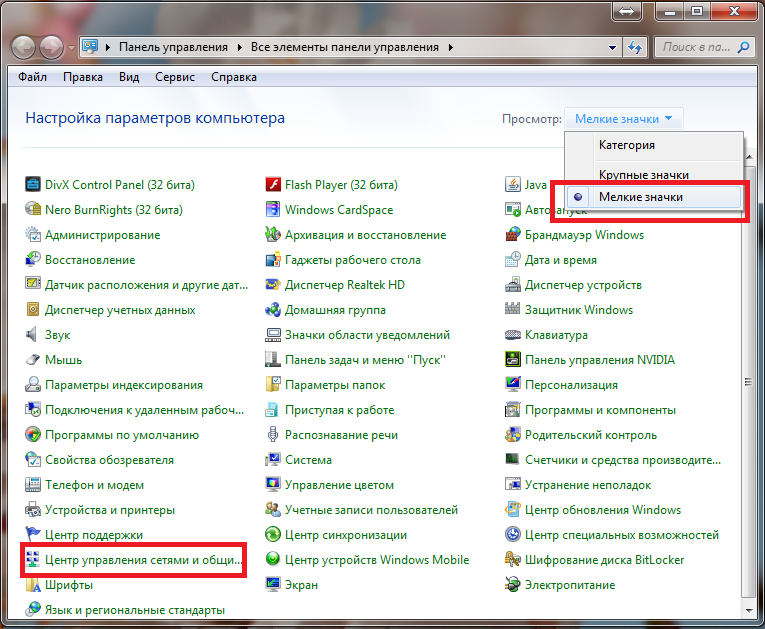
Windows 7
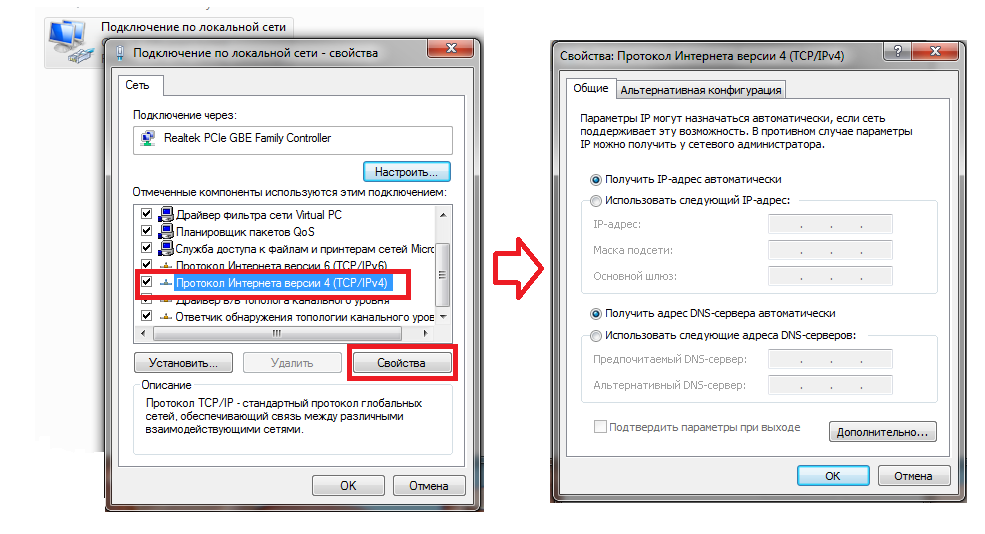
Start>>Control Panel (choose "Small Icons")>>Master Control Center double access. Then select "Change adapter parameters", then "Connection by local network", then click>> in the list "Internet protocols version 4 (TCP/IPv4)" select and tick "Authorities". >>Dalі put a dot next to "Remove IP address automatically" and "Remove DNS server addresses automatically".
How do you find out the details of the custom card and how to determine which type of connection is your provider.
Login at the router setup tp link tl wr741nd
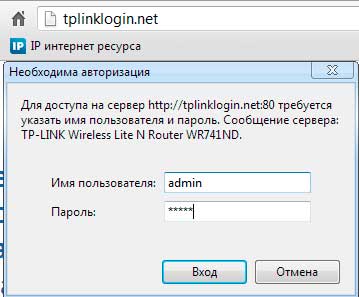
Now, after we have set up the connection of the tp link router, let's go to the new one. For whom I will hand over everything to the rajah and do not beat the lacing of the disk. It is necessary to enter whether it is one of the browsers, if you are victorious, then write “http://tplinklogin.net” or 192.168.0.1 in the address bar (given two parameters). To appear in the authorization window, enter the admin field in the field and press the "Login" button.
tp link tl wr741nd firmware
Let's talk about the firmware (otherwise it seems like a driver). The tp link company follows the problems of its routers and innovations in the market, so it constantly releases new firmware for its models. Therefore, I want to update the firmware once in a row, but more shortly, as you remembered some malfunctions in the robot tl wr741nd. Let's take a look at the report, as you want.
For the cob, let's go to the distribution of updating the firmware of the router. For which you need to go to the “System Tools” section and select the item “Updating the installed firmware”.
Also, for those who have a cost-free router from the Kyivstar company, you can hack directly for the upgrade sides “http://192.168.1.1/userRpm/SoftwareUpgradeRpm.htm” (as a message, enter the router at the address 192.168.1.1) .
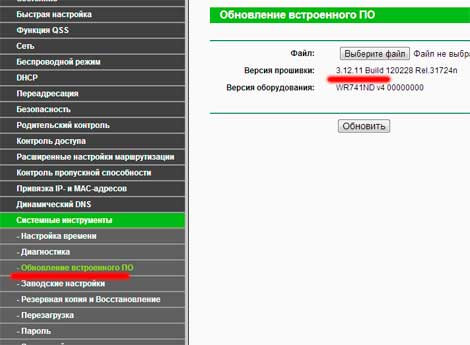
Now we can update our firmware on the side, but before that we need to download it. We know a little about the router series. For which one, the router is turned over and on the factory label under the barcode, marveling її, it will be written like this “Ver: 1.1”.

Idemo to the official Tp-link website at the jump, direct download "http://www.tp-linkru.com/support/download/". І in the "type of product" select "no-rotor attachment", "model" - "TL-WR741ND", in the "Hardware version" select your version (to look at the little ones like V1). I tisnemo "poshuk"

We choose to leave the firmware and zavantazhuemo її to your computer.

Before the speech, do not obov'yazkovo rob yourself new firmware, you can choose the version (or I'm popular, it's one and the same). Otherwise, if you are a newbie, then do not fool around with her, leave that one, like that, until you blame problems.
Internet connection
Nalashtuvannya Internet connection, singsongly, the most important part of the router. In addition, if you do everything correctly, you will be able to use the Internet. In front of you, you didn’t scoff, screenshots will be English version firmware, but I’ll write a skin albeit in the arms, I’ll write a Russian explanation. Otzhe, let's do it.
Let's go back to the side to choose the type of entry. For whom, let's go to the “Network” section (Merezha) and select the “WAN” item.

Now we can look at the skin type of z'ednannya okremo.
Nalashtovuemo Dynamic IP (Dynamic IP)
The simplest way to connect to the Internet does not require a login or a password, unfortunately (for good luck). Providers, some I know, were inspired to win this type of service, the shards of wine are the most safe. But if you have only one type of order, then the setup is simple, you just don’t change anything.
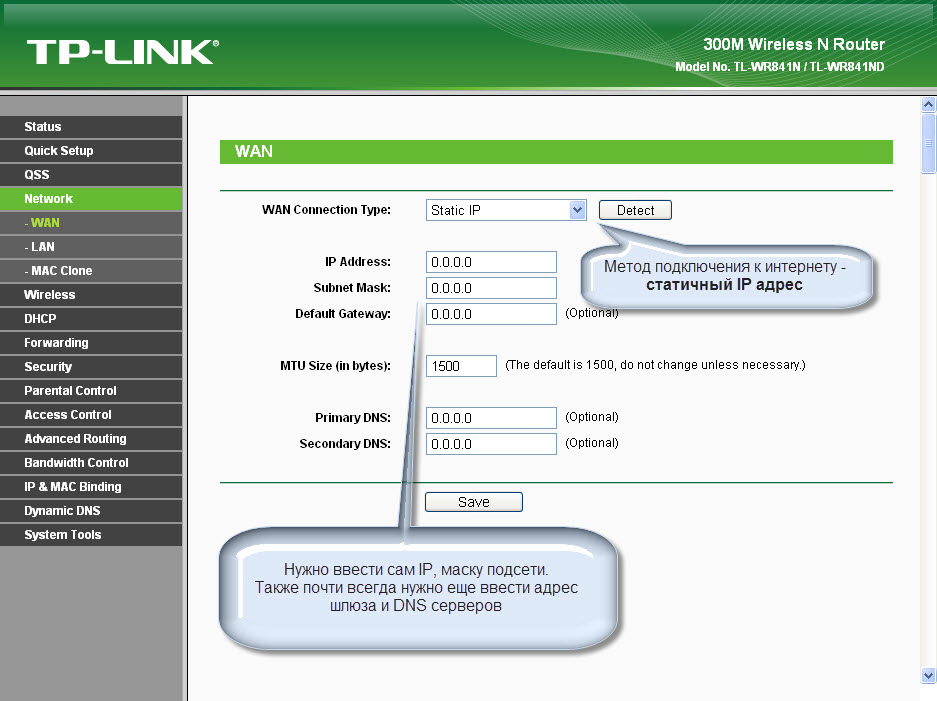
Nalashtovuemo Static IP (Static IP) Triolan
The static type of congregation in its purest form does not seem like a lot of companies. I still know only one, in Ukraine, the Triolan company (if you know if there is any provider, which has a static IP address, it’s great to write in the comments in the format: name, country, and leave your comment about the new one). Sterzhuyut, scho static IP-addresses in a clean look will speed up the robot merezhі, that does not require additional applications. For example, a dynamic distribution needs a regular reverification of the fact that IP has already been distributed, and in PPPoE it needs a regular reverification of authorization. I respect that at the same time the floorings of the nineties are broken, that these will simply be unmemorable. Well, garazd, let's wonder how we can enter a static ip.
- For the type of connection, select Static IP (Static IP).
- The ip-addresses (IP Address:), subnet mask (Subnet Mask:), the main gateway (Default Gateway:) and the DNS server (Primary DNS:, Secondary DNS:) are displayed. You can find out the details from your ISP, or if you are connected to the Internet, then you can find out from your computer. It is described in detail here.
- After entering, press the "save" button.
Custom type PPPoE connection. Rostelecom, Dom.ru, Megaline, ID-Net
One of the most popular types of Internet connection. There are a lot of providers, I have seen the main ones, such as: Russia (Rostelecom, Dom.ru), Kazakhstan (Megaline, ID-Net) (there are a lot of others, write in the comments about them and you would like to feel it). Let's get down to polishing.
- Choose the connection type PPPoE/Russia PPPoE.
- In the fields User Name (Im'ya koristuvacha), Password (Password), Confirm Password (Confirm password) you need to enter your data, the stench is to be prescribed in the contract, so you can't go to the provider's silent support and recognize it. Also, if you are hoping for a PPPoE service with a static IP address, in the Secondary Connection item, check the box for Static IP. As the very servant you hope, you can also find out from these supporters.
- After filling in all the data, we put a tick next to the text Connect Automatically (connect automatically), the fields are closed without changing.
- Everything, tisnemo on the save button.

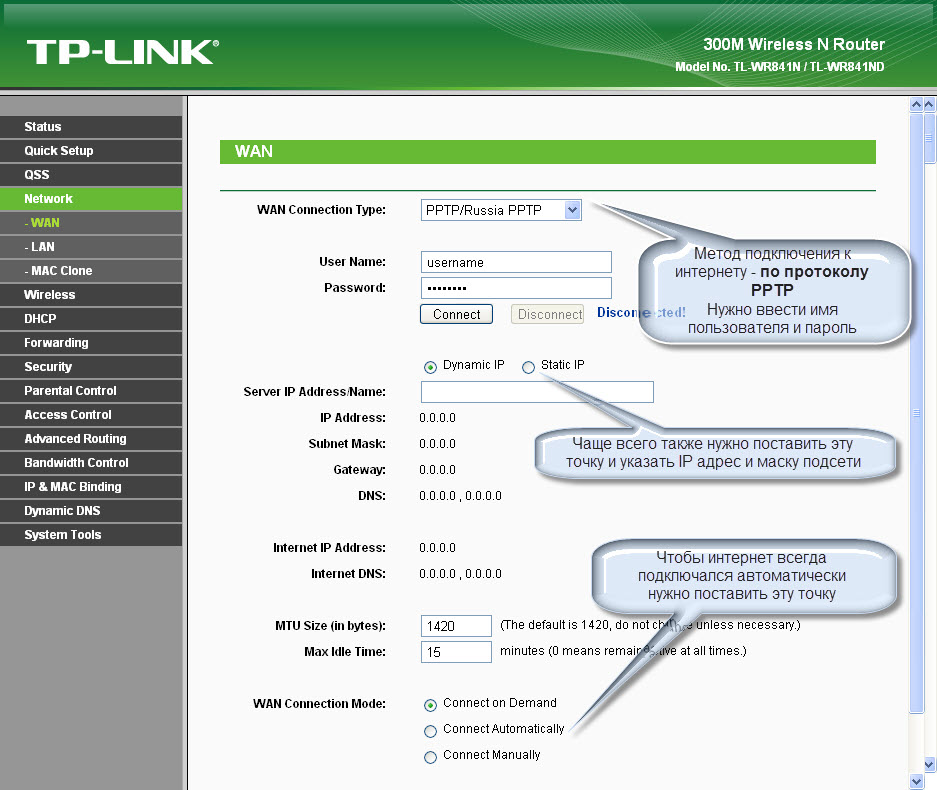
Connection type PPTP VPN server am. Leleka Togliatti, Ufanet(UfaNet)
Also dosit popular type of connection vikoristovuetsya bagatma providers. I saw the main Lelek Togliatti, Ufanet (UfaNet) (if you have a different provider, share in the comments). The main view of PPPoE is the main VPN server. I want to specify the address of the VPN server and quiet providers, which I have entered:
- Leleka Togliatti - server.avtograd.ru
- Ufanet (UfaNet) - pptp.ufanet.ru
If you have a different provider write in the comments, I'll try to know the server. It is also possible to turn around until quiet podtrymki.
Again, setting up a tp link tl wr741nd router PPTP type with VPN servers:
- WAN Connection Type - PPTP /Russia PPTP
- User Name(Im'ya koristuvacha) - your login at the contract or get to know from those supporters
- Password (Password) - the same designations in the contract, even though they are not recognized by those supporters
- We put a dash against Connect Automatically
- Press the save button.
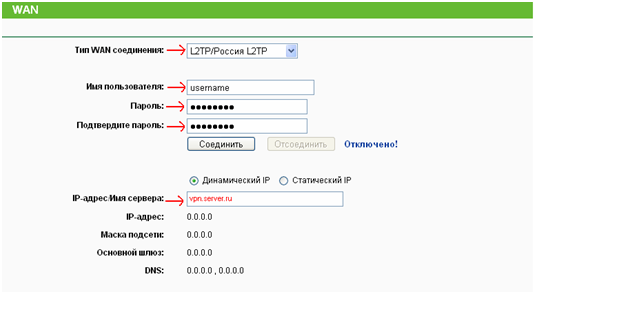
L2TP team closed. Beeline, Kyivstar
A new type of connection, L2TP is a smaller version of PPTP and PPPoE. Tsey type they took such companies as Beeline, Kyivstar for example (if you have another provider with this type of connection, write in the comments). For this type, like in PPTP, it is necessary to specify a VPN server. Let's find out what kind of vin these providers have, which I have indicated:
- Beeline (beeline) - tp.internet.beeline.ru
- Kyivstar - tp.kyivstar.ua
If you have a different provider, write in the comments, we'll try to get in touch.
Let's check on the power supply, how to fix the router tp link tl wr741nd for beeline Kyivstar and in. companies.
- WAN Connection Type - L2TP /Russia L2TP
- User Name (Im'ya koristuvacha) - your login at the contract or get to know from those supporters
- Password (Password) - the same designations for the contract, but not - to recognize from those supporters
- Choose the type of ip address of the service you hope, Dynamic IP (Dynamic IP) or Static IP (Static IP). Find out from your provider, as a static option - put a little box that is entered, as if by pressing the provider, as if it is dynamic - you do not need to enter anything.
- Server IP Address / Name (IP-addresses / name of the server) - enter the VPN server of your provider (for two, I entered the beast).
- We put a point opposite Connect Automatically
- Press the save button.
So, the same way, the process is almost identical to the PPTP setup (with a little connection type).
![]()
Setting up WiFi connection on tp link tl wr741nd router
Now you can rozpochati nalashtuvannya without a dart. For which, let's go to the "Wireless" tab ( dartless mesh) and select Wireless Settings. For this, enter it in the Wireless Network Name field (Im'ya without a dart net). Other parameters are left without change.
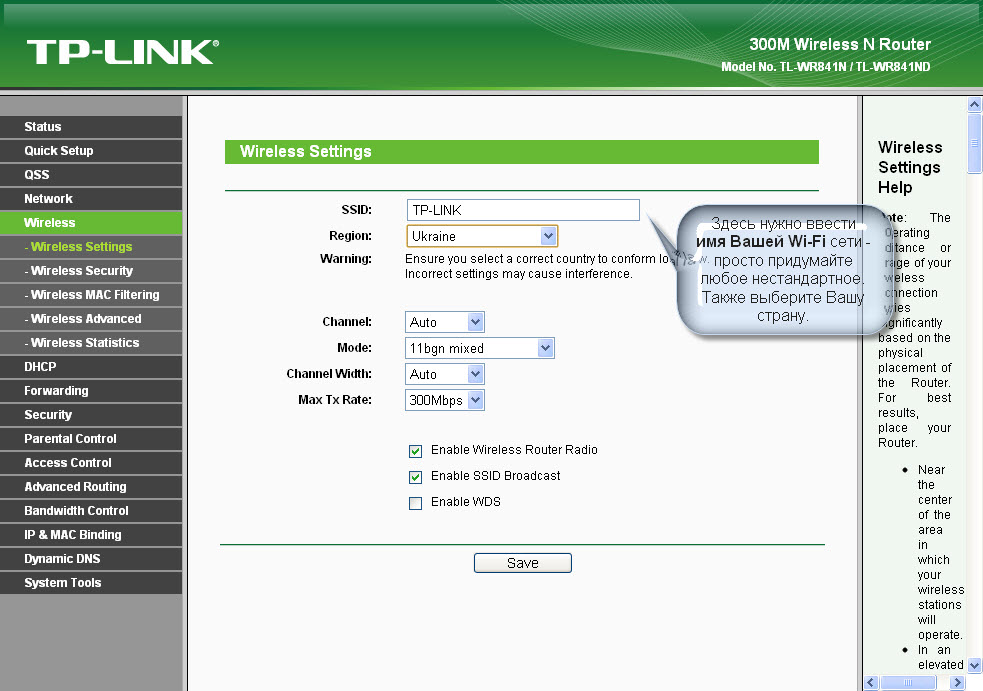
Now let's move on to the item "Wireless Security" (Security of the wireless mesh) and we'll make it secure, as you might have called it. We put a tick in front of the writing WPA / WPA2 - Personal (Recommended) (The last type of encryption). In the Version field, it is better to select WPA2-PSK, and in the Encryption field, it is redundantly Automatic. Now in the field PSK Password (PSK password) - enter a password, which you yourself will invent, wine is guilty of storing Latin letters Be at least 8 characters. Then click on the save button.

bridge
This term appeared a long time ago and means wine iptv setup on tp link tl wr741nd router. It's not necessary anymore. Zavdyaki new firmware on routers from companies Tp link iptv works both on the remote and on WiFi. If you have an old firmware, just update it, as if it were safe (I wrote more).
Change standard password on routers.
Well, the last step is to change the admin password, whichever you like. Go to the tab "System Tools" (Services), and select the item "Password" (Password). Here we need:
- Enter old data Old User Name. Enter admin, "Old Password" ( Old password) - admin.
- Let's introduce new ones, if we want, in the field: New User Name (New name), New Password (new password), Confirm New Password (Confirm new password).
- I carefully save.

Everything for what is mine report instruction completed. If I missed it, kindly ask in the comments.
Also, Raju, you can watch the video: Shvidke nalashtuvannya TP-LINK TL-WR741ND
.
Routers are spared their own firmware for various reasons. Need to add functionality, solder the USB port, or just add stability to the robotic router.
I have a router on the remaining stable firmware with 1-5 WiFi and 1-2 Ethernet slow down 1-2 times a day. It’s not scary anymore, but it’s better to re-vandage Yogo Nabridlo. I wanted stability. After long searches and reading reviews on OpenWRT. At the article, there is already a pokrokovu іnstruktsiyu without trials and pardons, which I had a chance to go through.
Croc 0
I guess, having taken up the firmware of the router, you will understand that on one of the blocks you can use access to the Internet. So, why should I really read the article, zazdalegіd zavantazhit everything need files And the next time you start before the firmware.Krok 1
First, sho varto zrobiti, tse it is necessary to put the rest of the native firmware.you can know the rest of the firmware for TL-WR741ND for the second version of the possession.
- Turn the router over and check the version of the locks with the new one, focusing on the stickers on the case.
- Download the archives with the rest of the firmware.
- Flash the router with firmware from the archive in the usual way (System Tools -> Firmware Upgrade).
Krok 2
Next, you need to select the version of the OpenWRT firmware.Follow the same file, which is appropriate for the version of your model. Do not nehtuyte tsim rule! There are two options for the file system to capture: JFFS2 and SquashFS. Judging from the observations, varto upload your choice on SquashFS-files. Word factory The name of the file means that such a file should be uploaded to your attachment over the factory (original) firmware. file with a word sysupgrade zastosuєmo les OpenWRT update, then. fills up after factory firmware.
Download factory firmware in the same way (System Tools -> Firmware Upgrade).
Krok 3 chi everything is gone
After a successful firmware, we need a working router with a web-interface. That's why you can't enter the setup through the browser anymore. More like this:Vidkrivaemo PuTTY, choose telnet protocol, addresses 192.168.1.1 port 23 , embossed "Z'ednannya".
root without a password.
Let's type the command:
passwd root
root. Further we write:
exit
Vidkrivaemo WinSCP, choose SCP protocol, addresses 192.168.1.1 port 22 , Username: root, Password which was set earlier, embossed "Login".
On all occasions, the power supply will be supported and finally with the files on your computer and on the router. We gave a friend a part of the firmware (such as sysupgrade), change it to code.bin and upload it to the router in the / tmp folder. We close the program.
Vidkrivaemo PuTTY, choose SSH protocol, addresses [email protected]
port 22
, embossed "Z'ednannya". We type the password that was set earlier for root. We enter the router and type the command for yoga firmware:
sysupgrade -n /tmp/code.bin
Check it out, while the router walks and reloads. We focus on light bulbs. Let's repeat:
Vidkrivaemo PuTTY, choose telnet protocol, addresses 192.168.1.1 port 23 , embossed "Z'ednannya".
We enter the router. On the back of your hand root without a password.
Let's type the command:
passwd root
І dvіchi write a new password for koristuvach root.
We mimic the router, we mimic the router.
At 192.168.1.1, the LuCI web interface is available to you. We go under the root with the password that was set earlier for root.
UPD. After long-term operation, a single glitch was noted. When changing MAC addresses on the WAN port, in 1-2 days it will be reset to the factory one. In another router, the diva of stability appears.
Home router TP-Link TL-WR741N is a modern and stylish point. WiFi access, that vikoristovuetsya us for the provision of high-speed Internet in Konosha Koristuvachіv merezhi OnlinePіvnіch. Transmission intensity (20 dBM) is higher than the average extension in this class (+ 5 dBi external antenna in the kit). Є IGMP Proxy subtrim, "mist" mode, 802.1Q TAG VLAN for IPTV Multicast, between the screen, Dynamic DNS , SPI, DHCP , DMZ, VPN pass through. Supported by the summіsnіst z usіma pristroyam, scho pratsyyut standards IEEE 802.11b / g / n, zahist іnformatsiї zdіysnyuєtsya for help WEP, WPA, WPA2. On board, cream Wi-Fi, €4 LAN port 100Mb/s and WAN port 100Mbps In other words, through this router, you can connect 4 computers behind an additional Ethernet cable. twisted couple» and up to 4 (bazhano) outbuildings via Wi-Fi.
#1. Web interface
The router is set up for an additional web interface. To get to the web interface, you need to:
(Neobov'yazykovo) it is possible to reset to the factory 20-second pressing of the "reset" button, so as to know the order of the LAN ports on the back of the router. The next router will automatically reboot and start up with factory settings;
Connect a computer to one of the 4 LAN ports of the router (zhovty);
Connect a cable from the Internet provider to the WAN port of the router (blue);
On the connected computer, it is necessary to set the parameters “Automatically change IP address” and “Set address to DNS servers automatically” (for Windows 7: “Start” → “Creation panel” → “Internet connection” → “Creation center with shared access” → “Change adapter parameters”, RMB after the connection type “Connection by local connection” → “Authority ”, select “Internet protocol version 4” from the list, press the “Power” button and set the appropriate value);
Through the browser, go to the address http://192.168.0.1, enter the login admin and the password admin (for locking with factory settings);
#2. Firmware update
As a rule, routers are supplied from dealers with outdated firmware, tk. software security constantly improve and from the moment the router is installed in the picker until it is installed in the coristuvach, there may be a number of exceptions fresh firmware. To that, first of all, it is necessary to update the firmware. We install the firmware version v4.20 from 01/13/13:
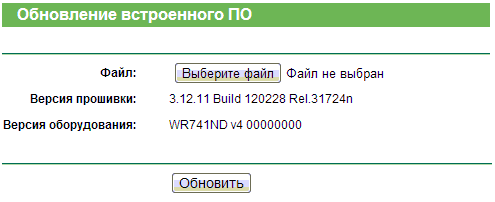
 Why is it necessary to install given firmware factory deputy:
Additional Russian WEB-interface;
Support for the "Mist" function for the IPTV service;
Added 802.1q Tag VLAN and 802.1p QoS for Triple Play addendum(Internet/VoIP/IPTV);
Fixed a bug, if the router might not correctly resend the DNS request for LAN clients;
Fixed causes unstable work for the IGMP function;
Fixed a bug when LAN clients can take an IP address from WAN;
Fixed a problem when you can't turn more old version firmware;
#3. Change password for admin
Let's go ahead and change the password for the administrator's access to the web interface:
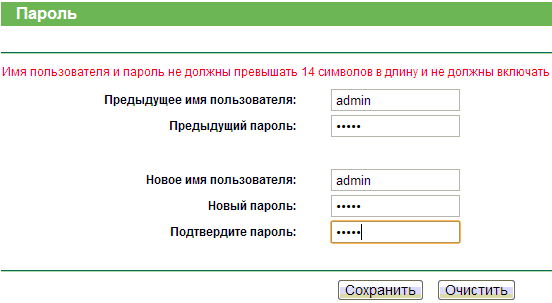
Previous name of the koristuvach: current login admin
Forward password: current password
Nove im'ya koristuvacha: zalishaєmo admin
New password: password of the client to the billing, instructions from the client's card (please don't forget the password later)
Confirm password: confirm
If the web interface is saved, it will require re-authorization, depending on the changes in the access parameters.
#4. Networking (WAN port)
Let's get down to fixing the barriers for the WAN Internet port, after that, the router will have access to the Internet. Go to "Shvidka nalashtuvannya" → "Dalі" → select "Static IP-address" → "Dalі" and drive in the nastavlennya measure, seen by the client when connected:  "Dalі" and nalashtovuєmo bezdrotov merezha.

Dartless mode: Turn off
Name of a non-rotor link: name of a link (SSID), as it depends on the hour of connection to the list of available links, for example "OnlineSever Network"