D link dir 320 routers wi fi setup. Old horse, does not spoil the furrow. Internet connection and configuration in DHCP mode, specifying the MAC address
The D-Link DIR-320 router is considered one of the most popular. It is not uncommon for a person to buy a D Link router, bring it home, and then call the Internet provider and say: “I bought it and I can't configure it”. Let's consider briefly the technical characteristics and appearance.
Appearance and characteristics
There is little to say about the characteristics, because all routers are extremely similar. The wireless standard is 802.1g / b. On a Wi-Fi router, in addition to LAN ports, there is 1 USB port. The antennas on the modem are removable. To be more precise, it has only one antenna. The device itself supports PPPoE, L2TP, PPTP connection protocols.
On the front of the device there are various indicators, lamps that allow you to monitor the state of certain characteristics:
- First comes the standard power light to show if the router is on
- Further there are indicators showing the state of the Internet, wireless network "Wi-Fi".
- Then there are 4 local port LEDs. They show if there is any connection to the router via a LAN cable, and if so, through which port.
- The last USB indicator that shows if the USB port is enabled.
There are various ports and connectors on the back of the machine where you need to insert cords and cables for proper installation:
- First comes one antenna, which allows the communication to reach further through the house or apartment.
- Then comes one USB connector, it has a green outline.
- Then there are 4 blue local ports, they are needed to connect using a LAN cable.
- Then one WAN or INTERNET connector for connecting the Internet to our modem.
- The penultimate connector is needed to connect the power supply.
- The last button is labeled "RESET". It is needed to reset the settings, with its help they reset the password. The button itself is located inside the hole, which protects it from accidental pressing, because after resetting the password, the router has to be re-configured.

Installing the router
Before configuring anything, the modem must be unpacked and installed in a convenient place for us. It is important that there is an outlet nearby, so that the Internet cable can reach there, so that there is a PC nearby.
There is nothing difficult in installation. For proper installation, you just need to connect the electricity to the router, connect the computer and the Internet via cords. An internet cable is provided by an internet company. At this stage, the configuration and installation of D Link DNS to the required location is complete.
Complete router configuration
Before starting to configure the Internet and wireless network, before configuring the D Link DIR 320 router, we need to check if the computer is correctly connected to the modem.
Checking the connection
To check the connection of a computer that runs on the Windows 7 operating system, we need to go to "Start", then to the standard computer control panel. (It's easier to do as in the instructions for the screenshots, it will help you configure the D Link DIR 320). 
Now we need to select "View network status and tasks".

After we have selected the required item, we need to click "Change adapter parameters".

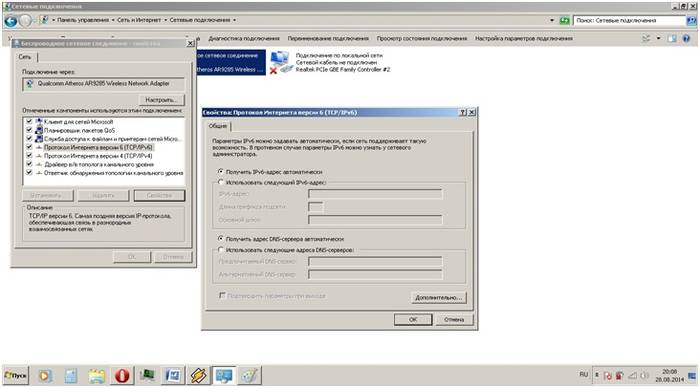
Now you need to look at the properties of "Local Area Connections".

We need to see if the correct properties of the Internet Protocol version 4 are there.

Here we put the checkboxes, if they are not there, everything is opposite the automatic setting, as in the screenshot. And click "OK".

In the event that you have Windows 10 on your PC, then follow the other instructions. "Start", and then you need to click on "Options".

We click on the sub-item "Network and Internet".

On the left in the menu, you need to click on Ethernet, then look at configuring the adapter parameters, as in the first instruction.

Now we also look at the properties of the LAN network.

We look at the properties for the fourth version.

Set automatic configurations again and click "OK".

Now we are sure that the connection is working properly, if not, then we update the software. And on the updated router, you can now perform some actions.
Internet connection setup
To perform any further actions, we need to enter the settings of the router. This happens through the browser, there we go to 192.168.0.1 or 192.168.1.1 - these are sites. This must be done on a PC that does not have an internet connection.
In the window that opened, we are asked to enter Login & Password. By standard, the username and password are identical - admin.

Now we have entered the center of all configurations, we need to change the interface language to Russian, to make it easier. In the upper right corner, where Languages, select "Russian".

PPoE
Let's consider a standard PPPoE setup. The latter is the type of connection, it must be checked with the provider. All important configuration information can be found in the contract. So, first of all, you should look there.
In the "Network" block, click on WAN. In the window that was just opened, you need to click "add". Here we do as shown in the screenshot.


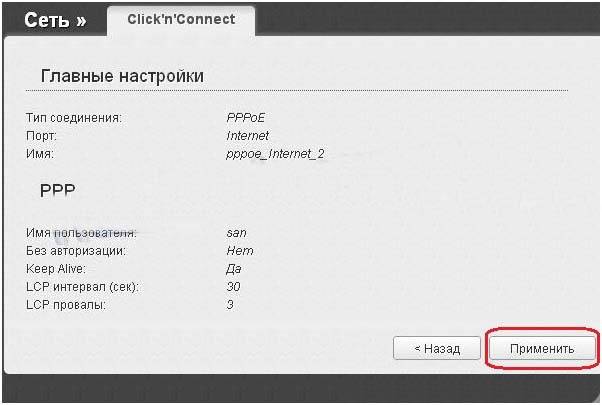
The type of connection you need to choose PPPoE, or the one that is prescribed by the Internet company in your contract.
Then we indicate the username and password, they are numbered 2 and 3,4. This data is in the contract with the Internet company.

After that we press "Apply". The Internet should now appear on your computer.
PPTP with dynamic address
First, to perform debugging, we need to follow the WAN link, which is located in the "Network" block. On the new page, click "Add".
1. The type of connection, as in the name of this sub-item, is PPTP with a dynamic address.
3. Next, we need to provide a username and password. This data must be provided by the provider.
4. It's the same with the VPN server. It must be provided by the provider.
5. We press to apply.

PPTP with static address
In order to configure the static connection, you need to add a new connection. This must be done in the WAN window, it is located in the "Network" section. We select the type of connection that we need - PPTP + static.
1. After that you need to fill in the fields in the IP item. All fields that are required to be filled in must be specified. And we can request the data from the provider, support service, or find it in paper contracts.
2. Now the settings of the VPN item. Immediately check the box opposite the automatic setting. After that we register all the selected fields. This is a username and twice a password, they must be in the contract. As well as the address of the VPN server.
3. Click apply.

Setting up a wireless network
Setting up Wi-Fi is even easier. To do this, in the Wi-Fi block, select the basic settings (if you can't find it, then first you need to click on the advanced settings at the bottom of the page).

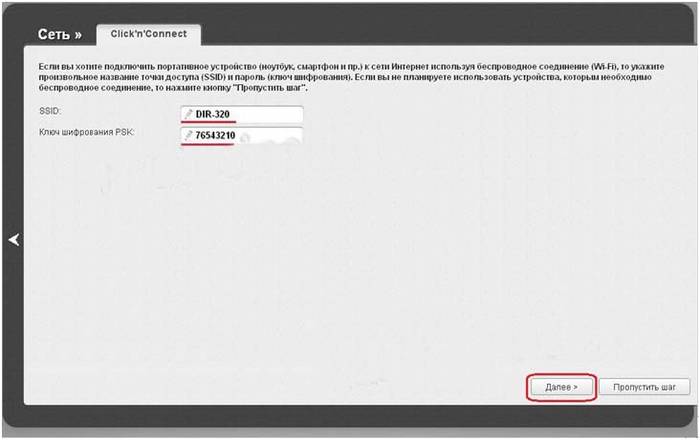
After that you need to put a tick in front of "enable wireless connection". Then we indicate the necessary data. SSID is the name of your Wi-Fi. Here we write any, only in English letters. Click "Apply".

Now you need to put a password on Wi-Fi. To password-protect wi-fi, select "Security Settings".

In the field "network authentication" select WPA2-PSK. The encryption key, which is number 2, is the WiFi password. After the new password has been entered, we need to save. To do this, click on "Save and Reload", this is at number 3.

Now all questions about how the D Link Dir 320 nru router is configured should disappear. Sometimes, before configuring the router, we need to learn how to flash the D Link Dir 320 router. But we will talk about this and how to create a network storage using the D-Link DIR router in another article.
Related Videos
Fast Internet for you!
In order to connect your computer to the Internet, the user needs to configure his router and himself. Only after that it will be possible to easily open various electronic pages of sites and download the necessary information.
Router connection
Setting up and connecting the D-LINK DIR-320 router begins with checking the functioning of important network nodes on the router itself and on the computer.
First you need to do the following:

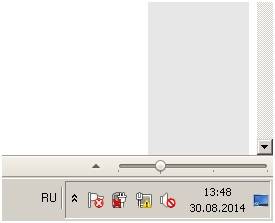
Photo: Network symbol on the taskbar
If everything is done correctly, then you can start setting up the router itself and the connection.
Login to settings via web - management
Before starting the D LINK DIR 320 configuration, you need to check the operation of network devices.
This requires the following procedure:

These steps are necessary to prepare the automatic configuration of the d-ink dir 320 wifi router and the local network.
After setting up a local connection, you need to start the disk that comes with the router. It is necessary to create a local connection to the Internet and configure the router itself. This is done in accordance with the prompts in the installation window.
Particular attention should be paid when choosing the connection technology parameter - pppoe or l2tp. The choice of the connection format is in accordance with the parameters specified in the Internet connection agreement.
The next step is configuration via the web interface. To do this, you need to type the ip-address 192.168.0.1 in your Internet browser.

Login and password are in the instructions that the system will offer to change after login.

After changing the login and password, an interface will appear on the screen, which will indicate all the connection parameters, including all possible settings for the provider's technology.

Photo: Interface with connection parameters
The standard set of the router includes a disc with the software required for the correct operation of the network device, but this does not guarantee the uninterrupted and correct functioning of the D-LINK DIR-320.
How do I configure and install the latest required drivers?
The software update for the D-LINK DIR-320 router is carried out only using the home page - 192.168.0.1. This procedure should be carried out immediately after installing the basic software from the disk, following the link "ftp://dlink.ru/pub/Router/DIR-320_NRU/Firmware/". Download and save the file to your desktop.

Photo: Firmware updates for DIR-320

Thus, the path to the file is set, on the basis of which the router software will be updated. When carrying out this operation, do not turn off and restart the computer until it is completed, otherwise a failure may occur and you will have to start the installation and configuration from the very beginning.

Photo: Software update progress
At the end of the update, the DIR-320 will reboot.
Configuring the D-LINK DIR-320 router at providers
The providers themselves often take advantage of the informational weakness of users, most of whom are simply afraid to get into the hardware and figure it out on their own. In this regard, it is always possible to call the appropriate specialist at home to carry out the appropriate work on setting up the Internet.
For example, setting up a D-LINK DIR-320 router from Rostelecom can be ordered by dialing the technical support number.The operator will listen to all your problems and offer a convenient time to call a company specialist at home.
In fact, all these steps are simple, and you can do them yourself without additional expenses.
To do this, you must adhere to the following sequence:


This Internet connection setup sequence applies to windows 7 and 8 operating systems.
Setting up for Rostelecom
To configure the D-Link DIR-320 router in the Rostelecom provider's network, the user must go to the router's home page (192.168.0.1) and perform the following actions:

Setting up for beeline
Configuring a D-LINK DIR-320 router for a Beeline provider differs from Rostelecom, because they use the connection type "l2tp".
Thus, user actions should look like this:

If everything is done correctly, then the user will be able to freely use the Internet.
Setting for Mts
Connection to the Internet from the MTS provider is made using the "pppoe" technology.
Therefore, the configuration of the D-Link dir 320 router will be as follows:
- checking the operation of a network device;
- go to the home page of the router in the Internet browser 192.168.0.1;
- install drivers;
- update drivers;
- go to the "network" tab and select the "connections" line;
- in the window that opens, select the "add" option;
- the connection type is set to "pppoe";
- put a tick in the "allow" line;
- in the line "physical interface" set the parameter "port5";
- in the lines of the username and password, we drive in the corresponding data from the contract with the provider;
- in the lines "NAT" and "firewall" put a check mark;
- save the parameters and configuration.
Video: Configuring a D-Link dir router
Setting up Megaphone
Internet from megaphone is mainly provided by 3G and. Therefore, all settings are set manually:
- go to the router page 192.18.0.1;
- select the column "Internet installation";
- in the updated window below, select the option "configure the Internet connection manually";
- in the window that opens, select the connection type "3 GUSB adapter";
- in the fields of the login, password and dial-number in accordance with the parameters issued by the provider under the agreement;
- save the parameters.
Wireless connection
Network operation via the wi-fi module of the DIR-320 router is very simple and convenient. To set up a wireless connection, just follow the prompts during the initial installation by the driver on the router. When a corresponding message appears during the installation process, you should set the recommended parameters according to the prompts.

Photo: Wi-Fi item in the main window of the web interface
The main attention should be paid to the settings of the network card on the computer to support wi-fi connection. In this case, you need to go to the control panel, and in it select the Network and Sharing Center. Next, enter the option for changing the adapter properties and check the status of the wi-fi module. If everything works, then the connection to the Internet will happen immediately and without delay.
Wi Fi connection settings in Windows 7
If the connection to the Internet does not occur automatically, and this happens only when using old versions of D-LINK DIR-320 (b1) or the windowsxp operating system, then manual configuration will be required. To do this, you need to enter the settings of the wireless adapter and manually set the ip and dns address. In this case, the ip-address will correspond to the address of the router, and the submask (dns) - 255.255.255.0.
Next, the user must create a new connection without changing the parameters. Only login and password data for connecting to the Internet are entered, and a shortcut is created on the desktop, upon opening which a direct connection occurs.
Thus, in order to fully configure your D-LINK DIR-320 router, you must:
- carefully read the instructions for the router;
- check the operation of the network card and local network settings on the computer;
- install drivers and configure the connection according to the prompts during the installation process;
- update drivers to the latest version.
Experienced users can easily cope with such a task, but for beginners it will be difficult. But if they set up their router strictly in accordance with the indicated order, then the result will not be long in coming.
In order to connect your computer to the Internet, the user needs to configure his router and himself. Only after that it will be possible to easily open various electronic pages of sites and download the necessary information.
Router connection
Setting up and connecting the D-LINK DIR-320 router begins with checking the functioning of important network nodes on the router itself and on the computer.
First you need to do the following:
- turn on the power supply on the router and connect it to the mains;
- connect the internet cable to the router;
- check the network status on the router (the ball-shaped light on the front panel should light up)
- connect the router and computer with another LAN wire;
- check the status of the connected network on the computer (icon in the lower right corner in the form of a monitor with a yellow triangle and an exclamation mark)
- go to start and select the "control panel" option;
- in the window that opens, you need to log in by the shortcut link "Network and Sharing Center" or "Network and Internet", and then - "Network and Sharing Center";

- open the "Change adapter parameters" option;
- click on the "Local Area Connection" shortcut with the right mouse buttons;
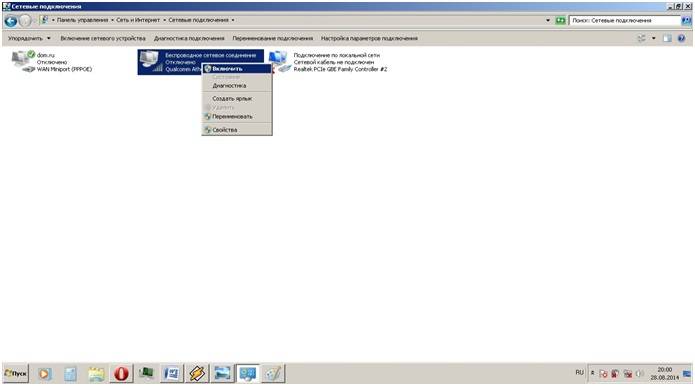
- if the "connect" option appears in the operational window, then click on it; if disconnect appears, then simply close the operational window;
- then you need to open properties in the same operational window to open a new window;
- in the new window select the line "Protocol ... 6" and click on the "properties" option and in the next window select the option for automatic settings;
- do the previous operation in the same way, but with the line "Protocol ... 4".
- in the tab on the main page, select the "network" tab;

- click on the "Wan" option;
- the wan connection setup wizard will appear in the updated window;
- when choosing the connection type parameter, select "pppoe";

- click on the "next" option;
- in the updated window, specify the name of your network (it can be arbitrary), username and password (specified in the agreement);
- then click "next" and "apply". The parameters are saved in full and displayed on the updated window;
- after which we proceed to setting up a wireless connection via the dir320 router, where the name of the wireless network and the password for entering it are indicated (specified in arbitrary, but in accordance with the instructions of the router) and save
- checking the operation of a network device;
- go to the home page of the router in the Internet browser 192.168.0.1;
- install drivers;
- update drivers;
- go to the "network" tab and select the "connections" line;
- in the window that opens, select the "add" option;
- the connection type is set to "pppoe";
- put a tick in the "allow" line;
- in the line "physical interface" set the parameter "port5";
- in the lines of the username and password, we drive in the corresponding data from the contract with the provider;
- in the lines "NAT" and "firewall" put a check mark;
- save the parameters and configuration.
- go to the router page 192.18.0.1;
- select the column "Internet installation";
- in the updated window below, select the option "configure the Internet connection manually";
- in the window that opens, select the connection type "3 GUSB adapter";
- in the fields of the login, password and dial-number in accordance with the parameters issued by the provider under the agreement;
- save the parameters.
If everything is done correctly, then you can start setting up the router itself and the connection.
Login to settings via web - management
Before starting the D LINK DIR 320 configuration, you need to check the operation of network devices.
This requires the following procedure:
These steps are necessary to prepare the automatic configuration of the d-ink dir 320 wifi router and the local network.
After setting up a local connection, you need to start the disk that comes with the router. It is necessary to create a local connection to the Internet and configure the router itself. This is done in accordance with the prompts in the installation window.
Particular attention should be paid when choosing the connection technology parameter - pppoe or l2tp. The choice of the connection format is in accordance with the parameters specified in the Internet connection agreement.
The next step is configuration via the web interface. To do this, you need to type the ip-address 192.168.0.1 in your Internet browser.

Login and password are in the instructions that the system will offer to change after login.

After changing the login and password, an interface will appear on the screen, which will indicate all the connection parameters, including all possible settings for the provider's technology.
Firmware upgrade
The standard set of the router includes a disc with the software required for the correct operation of the network device, but this does not guarantee the uninterrupted and correct functioning of the D-LINK DIR-320.
How do I configure and install the latest required drivers?
The software update for the D-LINK DIR-320 router is carried out only using the home page - 192.168.0.1. This procedure should be carried out immediately after installing the basic software from the disk, following the link "ftp://dlink.ru/pub/Router/DIR-320_NRU/Firmware/". Download and save the file to your desktop.
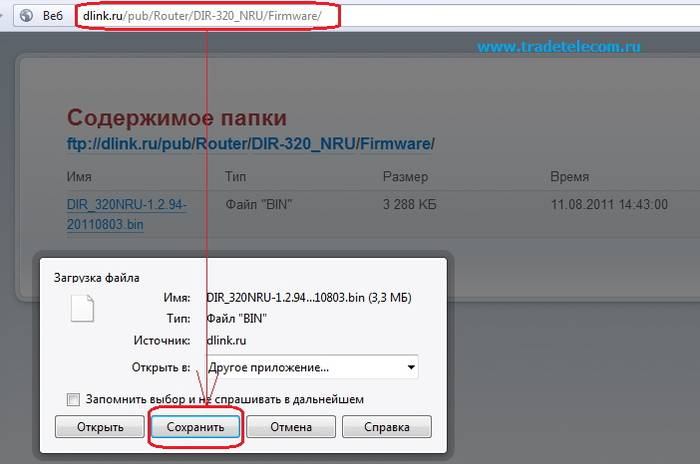
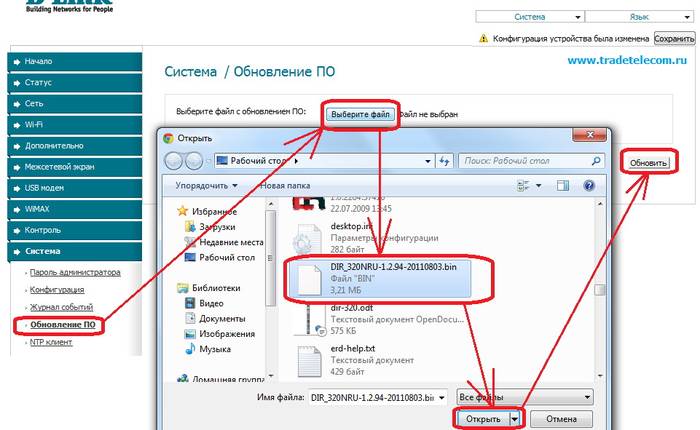
Thus, the path to the file is set, on the basis of which the router software will be updated. When carrying out this operation, do not turn off and restart the computer until it is completed, otherwise a failure may occur and you will have to start the installation and configuration from the very beginning.

At the end of the update, the DIR-320 will reboot.
Configuring the D-LINK DIR-320 router at providers
The providers themselves often take advantage of the informational weakness of users, most of whom are simply afraid to get into the hardware and figure it out on their own. In this regard, it is always possible to call the appropriate specialist at home to carry out the appropriate work on setting up the Internet.
For example, setting up a D-LINK DIR-320 router from Rostelecom can be ordered by dialing the technical support number.The operator will listen to all your problems and offer a convenient time to call a company specialist at home.
In fact, all these steps are simple, and you can do them yourself without additional expenses.
To do this, you must adhere to the following sequence:


This Internet connection setup sequence applies to windows 7 and 8 operating systems.
Setting up for Rostelecom
To configure the D-Link DIR-320 router in the Rostelecom provider's network, the user must go to the router's home page (192.168.0.1) and perform the following actions:
Setting up for beeline
Configuring a D-LINK DIR-320 router for a Beeline provider differs from Rostelecom, because they use the connection type "l2tp".
Thus, user actions should look like this:

If everything is done correctly, then the user will be able to freely use the Internet.
Setting for Mts
Connection to the Internet from the MTS provider is made using the "pppoe" technology.
Therefore, the configuration of the D-Link dir 320 router will be as follows:
Video: Configuring a D-Link dir router
Setting up Megaphone
Internet from megaphone is mainly provided by 3G and. Therefore, all settings are set manually:
Wireless connection
Network operation via the wi-fi module of the DIR-320 router is very simple and convenient. To set up a wireless connection, just follow the prompts during the initial installation by the driver on the router. When a corresponding message appears during the installation process, you should set the recommended parameters according to the prompts.

The main attention should be paid to the settings of the network card on the computer to support wi-fi connection. In this case, you need to go to the control panel, and in it select the Network and Sharing Center. Next, enter the option for changing the adapter properties and check the status of the wi-fi module. If everything works, then the connection to the Internet will happen immediately and without delay.
Wi Fi connection settings in Windows 7
If the connection to the Internet does not occur automatically, and this happens only when using old versions of D-LINK DIR-320 (b1) or the windowsxp operating system, then manual configuration will be required. To do this, you need to enter the settings of the wireless adapter and manually set the ip and dns address. In this case, the ip-address will correspond to the address of the router, and the submask (dns) - 255.255.255.0.
Next, the user must create a new connection without changing the parameters. Only login and password data for connecting to the Internet are entered, and a shortcut is created on the desktop, upon opening which a direct connection occurs.
Thus, in order to fully configure your D-LINK DIR-320 router, you must:
- carefully read the instructions for the router;
- check the operation of the network card and local network settings on the computer;
- install drivers and configure the connection according to the prompts during the installation process;
- update drivers to the latest version.
Experienced users can easily cope with such a task, but for beginners it will be difficult. But if they set up their router strictly in accordance with the indicated order, then the result will not be long in coming.
Authorization
In order to get into the web interface of the router, you need to open your Internet browser and type 192.168.0.1 in the address bar, Username - admin , Password - admin (provided that the router has factory settings and its IP has not changed).
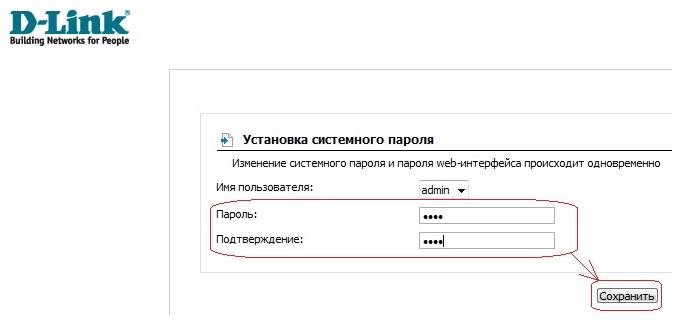
Change the factory password
Default: Login admin, password admin.
System, menu Administrator password.
In field Password (New Password) Enter a new password.
In field Confirm Password repeat new password.
After that, the router will offer to re-enter its settings.

Setting up an Internet connection
In the router interface, go to the tab Net, menu Compound (Here you can add, edit and delete connections). Click the button Add.

PPPoE connection setup
- In the box select PPPoE
- In field MAC
- Your login from the contract
- Password: Your password from the contract
- password repeat
- Authentication Algorithm: Auto
- Keep alive
- Leave the rest of the fields as default

Configuring L2TP connection
Main settings
Specify the type of connection L2TP.
Name - Do not change the name
Allow - Leave a check mark
Physical layer
Physical interface - Port5
MTU - leave unchanged
MAC - If your ISP uses MAC address binding, write down the MAC address of your network adapter. If there is no binding, the MAC field; leave unchanged.

Rest Main settings and Physical layer leave unchanged.

In the Settings field L2TP:
Connect automatically - check the box
How to set the service name - specify Url or IP
Service name - write down the address VPN servers provider
PPP Username - write down the login for Internet access issued by the provider
Password - write down the password for Internet access issued by the provider
Password confirmation - re-entering the password
Encryption - if the provider does not use MPPE encryption, leave No encryption; If encryption is in use, set MPPE AUTO or check with your ISP for the type of encryption.
Authentication Algorithm - leave AUTO
Keepalive - the connection will be always on.
MTU - change the value to 1450 or less
In field Miscellaneous check that there are check marks NATand Firewall.
If your provider provides Internet TV service, check the Enable IGMP.

Configuring PPtP (VPN) when automatically obtaining a local IP address (DHCP)
- In field Connection Type: select PPTP (PPTP and L2TP are point-to-point tunneling protocols that allow a computer to establish a secure connection to a server by creating a special tunnel on a standard, unsecured network.)
- In field MAC enter the number of your network card (you can find it out in the state of connection over the local network or through the command line "ipconfig / all")
- PPP Username: Your login from the contract
- Password: Your password from the contract
- Confirm Password: password repeat
- Service name: - IP / Server name of the provider
- Value MTU - 1372
- Authentication Algorithm: Auto
- Keep alive - put a tick for permanent connection
- We save the settings with the button and reboot the router.

NAT when automatically obtaining an IP address (DHCP)
- In field Connection Type: select IPoE
- In field MAC enter the number of your network card (you can find it out in the state of connection over the local network or through the command line "ipconfig / all")
- In step IP setting choose get IP automatically
- In step IP setting choose get DNS address automatically
- Save the settings with the button Save and reboot the router.

Setting up Wi-Fi on the router
In the router interface, go to the tab Wi-Fi , menu Basic settings.
1. SSID the name of your wireless network.

2. In the tab Wi-Fi, select the security settings.

3. In the drop-down list Network Authentication: choose WPA-PSK / WPA2-PSK mixed is the safest way to protect your wireless network.
In the encryption key field PSK You must enter any set of numbers from 8 to 63. They also need to be memorized so that you can specify them when connecting to the network. Click on the button Editto apply and save the settings.

Checking Internet Connection Status
In the router interface, go to the tab Status,menu Network Statics

Saving / restoring router settings
- Choose to save the current configuration, To save the current settings of the router The settings file will be saved to the specified location on the hard disk.
- To restore settings from a file, you must click and select Loading a previously saved configuration into a device, specify the path to the file with settings, then click the button.

D-Link DIR-320 is a router (router) that allows you to organize a wireless network for connecting to the Internet. A built-in firewall protects users across the entire WiFi network. The router is equipped with additional security (MAC filter) and encryption (WEP and WPS) features, which minimize unauthorized access to the access point.
Any wireless network needs protection from unauthorized connections. There are several ways to restrict access to the router. The easiest of them is to put a password on WiFi. To do this, you need to connect the router to your computer, configure it, and then proceed to setting a password. As an example, let's try to put a password on WiFi D-Link DIR-320.
Fast navigation through the article
Password setting
The password helps protect your wireless network from unwanted connections. To set a password, you need to connect the router to the computer (via a special cable that comes with the kit), configure it and perform the following steps:
- Go to the IP address "http://192.168.0.1" (you can use the standard Internet Explorer browser, while, depending on the router's firmware, the IP for connecting to the control panel may be different - http://192.168.1.1);
- In the field "Username" enter "admin";
- Write “admin” in the “Password” line, or leave it blank (depending on the router firmware version);
- Press the "Login" button;
- In the window that appears, on the left side, select the section "WiFi" -\u003e "General settings";
- Check the box next to Enable wireless connection;
- Go to the section "WiFi" -\u003e "Security settings";
- In the "Encryption key" field, create and enter a new password (it is best to set WPA2 encryption mode);
- Press the "Change" button;
- In the upper right corner of the page, select "System" -\u003e "Save and Restart".
In order for a password to become reliable protection, you must adhere to the basic rules for its choice:
- The password must be at least 8 characters long (letters of different sizes, numbers, symbols);
- You cannot use the names, surnames, nicknames of animals that unauthorized persons may know;
- It is not recommended to use dates of births, weddings, etc .;
- It is better not to use simple words and sets of numbers;
- It is advisable to periodically change the password.