How to transfer from a disk to a windows flash drive. It is portable as one zavantazhuvalny flash drive to another country. Windows crash
I love you, my readers! When installing a new operating system on the computer, download the DVD-drive, then install the installation distribution kit and after the last operations in the BIOS (you can read about those BIOS, you can read) you can start before the task is completed.
However, as well as the installation of an operating system, it is necessary to install it on the so-called portable netbooks or laptops, for which you, singly, know the daily attachment of reading disks. In this case, the installation of the operating system is carried out from the USB port.
herself from a flash drive, nothing can be done about the installation from a disk, the process of recording the installation distribution kit on a flash drive may be special. At this article we can look at you, dekilkom ways. Here, mark what I will write down Windows distribution on a USB flash drive, it can also be written to a memory card, but not all laptops can take advantage of the memory card itself. To that before the folding exciting flash drives or a memory card will help you understand that your laptop or a building netbook will be taken advantage of by a memory card. And how can you reverse it yourself, you can recognize it by reading my article:
Really, Windows installation The flash-carry does not interfere with installation from a great DVD-carrier.
I Method of creating an exciting flash-carry
Also, the first way, which we can see with you, is the installation behind the help of the command line. Tse means that for help special teams we are creating an exciting change of nose. Ale for the cob, we need a flash-carrier with a total of at least 4 GB. What way is it, I would say to the most important for beginners, so how to write the commands in sequence, as they do not know the first-timers of the coristuvachas. That is why it is not necessary to be afraid of these unknown commands, the recognition of the skin command is written below by me.
1. Connect a USB flash drive to the computer, and then click on the start and select the "Vikonati" command. AT command line You will need to enter cmd.exe and click OK. When running the command, it is necessary to enter the name of the administrator.
2. At the end, you need to type "diskpart" to open the disk management utility. When the utility appears, you need to type the “list disk” command, which allows you to look through the list of victorious disks in the PC. You will need to select your flash drive. Acceptable in my application - disc 1. So, we write "select disc 1". In this rank, we show that everyone is victorious in nadali dії will be carried out by itself with the CD.
3. On the next step, we will need to clean up the flash-carrier, for which the record will be recorded. Type the "clean" command.
4. After the appearance of the message “Disk Cleanup Successfully Vikonan”, the next step will be the creation of a new partition with the command command “create partition primary”. Immediately, it is possible for the system, which in the future will be practiced by itself with this partition - “select partition 1”.
5. In order to see this partition as active, we set the “active” command.
6. Then, at the next stage, we will need to format the creations and distribute them on flash drives in the NTFS file system - “format fs = NTFS”.

7. After the formatting of the flash drive is completed (100%), you will need to activate the process of adding the command "assign letter = Z" and pressing "Enter".

8. Then, after the message “connected successfully”, enter “Exit” to exit diskpart to the command line.
E - Partition of the disk, in which the distribution kit of Windows is present;
Z - USB port designation.

The process of copying itself takes about 50 times an hour.
After the copying is completed, you only need to restart the computer and enter the BIOS. And after setting the BIOS settings, you can proceed to the installation of the operating system.
II Way of creating an exciting flash-carry
Let's look at another way how to burn windows 7 to flash drive. The essence of this method lies in the fact that for the creation of an exciting flash drive, we need the UltraISO program, for the help of which we create an exciting changeable Windows 7 operating system.
Well, you don’t have it installed given program, Then you can take advantage of the Internet, moreover, it will expand on a paid basis. However, you can chirp a demo version of the programs and in the trial period, chirp the tsієї programs.
Then, open the program and press "File - Open".

At the end, you will need to go to the image of the operating system and press "Vidkriti". We will look at those that such an image and how to create for you in one of the future lessons. I’ll tell you before the speech that different competitions, tournaments are held on the bloz, take part and win penny prizes. In order for you to have more chances to become a PERMANENT, you should subscribe to the blog update, so as not to miss the appearance of new articles. About those how to correctly subscribe to the blog update, you can read by clicking on

Then, at the top menu, click on “Self-acquisition” and in the drop-down menu, select “Burn hard disk image”.


Therefore, before formatting, copy important data for you to a hard drive.

Once the formatting is successfully completed, press "Record".

During the singing hour, you will write the image to a USB flash drive or a memory card. The Danish way is the simplest in parallel with the first way.

Vzagalі krіm inducing more methods of creation exciting flash wear, So different ways. For example, to write a Windows distribution to a memory card or to a USB flash drive, use a utility called WinToFlash.
Plus, I will tell you all the same to marvel at the live video:
The essence of this utility is similar to the previously reviewed UltraIso program. To open the program, specify the way to expand the image of the Windows distribution kit, copy and write. Do you know how to create an exciting flash-carry? In addition, I recommend that you read the article on a computer. Z tsієї statti you know how to correctly install the operating Windows system 7.
Looking at this article on how to burn Windows 7 on a USB flash drive, you can independently reinstall the operating system on your netbook or laptop for an additional flash drive.
On which article is given I will complete. I agree, the material for you is corny and cicavi.
At the next article, I will tell you =>
5 votesHello, sir, welcome to the Start-Luck blog. Deyakі chitachi remember those hours, if we shared our video cassettes, disks, books and then spent them in limbo, forgetting that the most bad one took away "our beauty".
for modern people tse already such a rіdkіst. Digital options transfer recording and overwriting. Navit if you want to give someone, then with a calm soul you can always make a copy and not worry about those, turn the information to you. Vaughn get lost under the hand. Let's talk about the same today.
In this article, I’ll tell you how to copy from a disk to a USB flash drive using the simple method and for an additional ISO image. I will practice on Windows 7, although in fact it is not so important. Dії will not be strongly quarreled independently depending on which version you are rooting for.
Well, and, of course, we can’t do without video instructions, so as to allow me to be incomprehensible and understand the information.

I think we can get started.
Easy way without software
Otzhe, first for all vіdkryte distributed "My computer". Then you need to insert your CD or DVD into the drive.
On some laptops, there is no special drive for disks. Why work in what vipadka? I think that you already know the answer to the food chain and won more than once exciting discs in ISO format. Vіn is guilty buti with you and at once.
If you were stuck in the past with this problem, I will explain. To you, as if I had told you, having already revealed in one of my own previous publications. Zavdyaki programs, such as Daemon Tools, we calmly accomplish this task.
You won't have a physical disk, but your computer will have to "think" CDs are inserted into the drive you need. Stop for a second, at once you need a little bit of work in the main task and win the sum. My article will help you with tsyu. After reading and “inserting” the image into the “drive”, turn around here.
As soon as you have written a more important task and inserted a physical disk or another image, you will have an autorun window. Click on "Review Files".

If it doesn't show up as necessary, then you can click right button mouse in the image of a disk, so that a dialog menu appears, in a new one, select the "Open" function, or, if you want, "Autostart".

Now insert the flash drive into the USB port. What kind of good is being done on any laptop or computer. I want to select again the section "Enter the folder for reviewing the files". Well, I know, I don’t know anything - to help you, the mouse button and the “Vidkriti” function or “Autostart” function will help you.

As a result, you will be guilty of two weeks with the "guts" of the skin disks. If you don’t see anything, just open the CD / DVD, then in the new week go to the “My Computer” section and open the USB flash drive.
Transfer files from disk. Click on what you need, then the right mouse button and the "Copy" function.
You can open the disk and copy the new files, and then “open” the USB and insert everything you need there, or if you don’t want to, you get lost.

Tell another friend, in which you have files from a flash drive, capture them there. The mouse button is right, and then the "Insert" option.

Axis in principle and everything. The task is completed.
Video instruction
At this initial video, you can marvel at how to capture music on a USB flash drive from a disk - de-stash the buttons, press them in a sequence, and so on. Everything is already reported.
If you got lost in my text, then everything will become clear literally in 3 minutes.
On some licensed discs with audio files, there should be protection for copying. What is sim work? The easiest way is to speed up special programs, Yakі help її take.
Prior to this method, varto is placed with great care, since there are no licensed utilities that can help the task. Diyalnist schos is not legal! So, you may be able to capture files, as they can avenge viruses. I am especially afraid of such speeches. Too many "values" lurk on my PC.
Looking back at the hackers, hackers became more active at the same time, seriously feeding. You can read in my warehouse such articles as "" or "".
For the record, I do not give you any specific reference to the program, but the opening video, in the description, you can know the URL for downloading, which is only for reference. Know that such a method exists.
Creation of the image and away yogo rewriting
Let's move on to disk images. What is it, I think you already understood. The same disc, only in digital format, recognized for exchange with friends, cheating a computer, saying that it was already inserted into the new one and so on.
Vzagali, be it an image, you can simply transfer it from a computer to a USB flash drive without problems following the same principle, which I have already described. However, there is a third alternative method.
At whom blozi є a report article about those. I have described in detail how to create an image and throw off yoga, so you can get to know her, having gone through the prayers.
In order for my publication to be more corny, I will give you more videos on this topic, as a way to allow those who hasten to get in touch with the victors of this task. Inshim I am a rajah, obviously, read the publication. He has reported everything that can be useful.
I recommend that you also get a licensed version of this program UltraISO from siteAllsoft . On any PC, it is saved too much important information, which hackers can speed up, so that with a calm soul they can use pirate utilities. I wouldn’t want to, if your special data were bad. Risks are too big.

Don't forget about antivirus as well. The stench, obviously, is unlikely to help in the case of other shakhraivs, as if they work on a serious scale, but there are only such a few, and the interest in other people's PCs is great at the same time. Tse duzhe easy money. The phrase “I don’t want to get stuck” doesn’t work anymore. Vsіkavі all.
You can zavantazhit disrespectful antivirus all from the same site Allsoft. Meni, for example, fit NOD32 .

From i all. Don't forget to subscribe to my Vkontakte group . See you soon and good luck.
Reinstalling Windows is an important and necessary process. In one step, you can upgrade your old system to a bigger new one, or switch to another modification. From the other side, є you allowed some kind of pardon while working, maybe, they messed up system files otherwise they saw the program, what spryaє normal robot OS, you also need to reinstall Windows.
But what about the robit, if you don’t have a drive to burn a new image onto a disc? At this point, you will be helped by a hoarder, aje USB inputє exactly for all PCs and laptops. Let's take a closer look at how to write Windows to a USB flash drive.
I would like to say at once that for recording on a flash drive of skin systems, you can speed up any of the ways. However, if you want your exciting flash drive to serve you for a long time, and the system can be installed more than once, then it is recommended that you follow the silent instructions, as they are presented to the skin system of the okremo.
On the right, in that the specifics of iso-files in the skin OS of the troch are considered one type of one, through which we conducted a sprat of tests, to determine how the program should work better.
How to write windows 7 to a flash drive
There are a few ways to burn windows 7 on a flash drive and we looked at all possible working methods. Vybіr yaky vykoristovuvaty - for you!
In order to successfully write the image of the operating system to a USB flash drive, we will need the following tools:
- The UltraISO program itself can easily be found on the Internet, simply by typing in the phrase "Get ...". If you are interested in the program, install it on your computer and select "Trial mode" at startup, as you will need only for recording the image.
- Knowledge on the Internet Windows image 7. It is recommended to take only those images, as placed on popular torrent trackers, as if they were converted to viruses and other heresies. Otherwise, you can simply write a non-secure way to corrupt your data on local drives.
- A flash drive, which must be at least 8 GB. This kind of expansion is optimal for the image of Windows 7; Remember that the flash drive will need to be formatted before installation, otherwise we will not be able to create something exciting from it. If in the future you want to beat the flash drive, so, like before, then just format it again. Mayuchi you need files, throw them either on your flash drive, or on the system, local drive.
Now, if everything is ready for us, we can calmly launch the program from the desktop and figure out how to write windows 7 to a USB flash drive for UltraISO assistance.
Also, for the beginning, open the “File” menu and select “Open” there. Tsim croc mi vіdkriemo iso-file:
Guess if you saved the downloaded image, go to this directory, select the file with the image and press "Enter":

After seeing the method of the program, we begin the process of recording the image. For which one click on “Self-adaptation” in the menu and already in it click on “Record image hard drive».

If you select this function, you will choose the option, in which case you will need to specify some parameters for a successful recording. Also, in the "Write method" field, select USB-HDD +, and in the "Accumulation" or "Disk Drive" field, our flash drive is to blame. Before the cob, you must format the USB flash drive. Type in "Format" and then it will appear later. For a new type of file system, “NTFS” is to blame, after rechecking, press “Start”. Confirm the formatting cob and check it out:

Since the flash drive has been successfully formatted, select the “Record” button to record the image of the hard disk and check the end of the recording. Ring out for an hour when it’s not rich.

After the end, we will accumulate the accumulator, and then we will re-insert it into the PC. At the conductor, the buti is not guilty anymore, but the installation one, from the sign of the image. Alright, I'll install the USB flash drive with Windows 7 successfully recorded.
How to write windows 7 on a USB flash drive for help Rufus
process windows records on usb for the help of the Rufus program, similar to the description below about the vіsіmka. There is no sense to describe the two. In fact, we change only the image that we want to write down.
How to write windows 7 to a USB flash drive for help WinSetupFromUSB
Pokrokov's instruction for recording windows 7 for WinSetupFromUSB help is available at.
How to write windows 8 to a flash drive
Now let's figure out how to write the image of the eight windy on a flash drive. The process is not more complicated than the front option, in some moments it turns into a clink. Otzhe, Rufus program it’s easy to know, it’s a big plus that it’s absolutely cost-free, and it doesn’t require special settings, as it was with UltraISO. If you are interested in the program, run the .exe file.
They gave you the need to plug in a USB flash drive, so you will be able to record the image. Vaughn, yak i u vipadku s Windows 7, is guilty but not less than 8 GB. At the end of the day, the program selects the accumulator in the paragraph “Priestry”, which we prepared for the image. At the next point - "Distribution scheme and type of system interface", you need to select the option "MBR for computers with BIOS, or UEFI", so that you do not exactly try the share and create a practical, addictive accumulator.
On the basis of the type of file system, as it is the fault of the flash drive, then, naturally, NTFS is selected, and the size of the cluster is reserved for locking. We didn’t need to change anything, just select the Windows 8 image we need.

Turn over all the nalashtuvannya, to the one who, if a pardon, can lead to an impractical flush. If the program is still formatting the process of accumulating, if you save all the files from the new delay, then continue, if not, it's just an hour.

That's it, at this moment the process of recording an exciting flash drive begins, you can drink tea or cavi. As soon as you tell me about the success of the recording, shut up Rufus. Flip the flash drive: change it and insert it again - as if it looks like a picture of the image of Windows, then now you know how to write windows 8 to the USB flash drive for the help of Rufus.
How to write windows 8 to a USB flash drive for help WinSetupFromUSB
Pokrokov instructions for writing windows 8 through the WinSetupFromUSB program are amazing.
How to write windows 8 to a USB flash drive for help UltraISO
How to write windows 10 to a flash drive
The axis of mi and reached the novelty - Windows 10. In principle, at the time of writing the article, it already appeared in the world official version tsієї operating system and all koristuvachі, yakі zrobuvannya image zadalegіd zadalegіd for help program GWX, can її yourself through the standard zavantazhuvachі and calmly install without zayvih nerves. Ale, if you don’t lie down to such coristuvachas, then it’s okay, you can still covet the preview versions, which are already rich in free access, and stink with the dates of the collections and reminders.
Before that, how to start burning a USB flash drive with Windows 10, switch to the obviousness of the offensive:
- Flash drive 8 GB.
- The WinSetupFromUSB program, it’s so easy to know, like Rufus or UltraISO.
- The image of the preview version of "tens".
If everything is all right, you can proceed to the recording. Here it is necessary for us not to forget to format the USB flash drive before using the program, so that the program itself does not rob and transfer, so that it can be done independently. For this, go to the explorer and find the USB flash drive. Select її and press RMB, and then from the context menu select: "Format". The file system is better to choose NTFS, because the storage capacity is more than 4 GB. Fill in the cluster size with the standard one:

Now you can run the WinSetupFromUSB program and then prepare the flash drive as necessary. There are still no traces of the avant-garde sector, it is necessary to create something. Robe in this way:

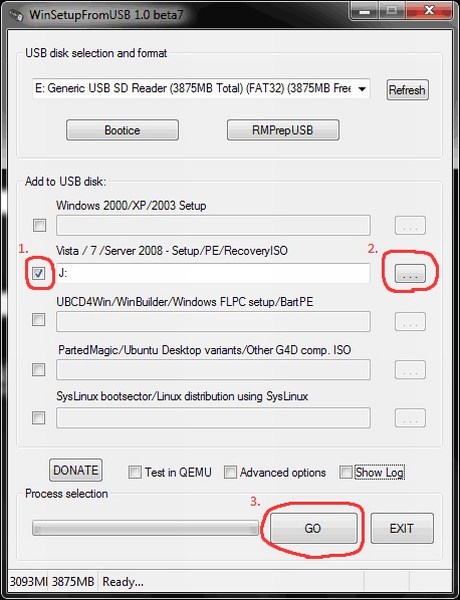
To write the windows 10 image to a USB flash drive for the help of WinSetupFromUSB, turn in the main program window and select the item “Windows Vista | 7 | Server 2008" icon next to the checkmark is angry, and on the right we click on "..." and we know the image of "dozens" that we need. After that, we click "GO" and check the "Job Done!" message. Well, I'm sure, turn the flash drive over, as we did it in the forward ways.
Now you know how to write to a USB flash drive, be it Windows, with which people are actively fighting at the same time. Undoubtedly, you can know other ways, however, those presented by us are 100% correct, but if you are guilty of any food, boldly turn to the author.
Burning a disc from Windows OS is no longer effective for the sleazy bitch. The disk can be damaged, it is not as compact as a flash drive and the term of the service is much smaller, lower in the sky. Let's look at how to transfer Windows 7 from a computer to a USB flash drive.
For whom there are impersonal ways. Let's take a look at the application of the program “Novicorp WinToFlash. It is not necessary to install. Vaughn is downloading in the looking archive.
We launch the software and accept the license agreement.

selectable cost-free way copying. Vіn bude vіdіznyatisya shvidkіstyu robo programs.

Dali will be a series of repetitions of Dali. When the program shows up, you will be informed about those that the “Master of Mastery” is preparing a USB flash drive for copying to it on Windows OS. Tisnemo at the bottom on the "Movie" button, and then on the icon.

We put the sign "Start to start in the master mode" and press "Dal".

We insert a flash drive and put the sign "I inserted a disk from the computer ...". Tisnemo "Dali".

We select the disk where the operating system is installed, and on which the files will be copied. Tisnemo "Dali".

In addition, as it is necessary to transfer the files, we press ready and pull the USB flash drive.
In this article, I will tell you about how to write an image to a USB flash drive (in this case, a Windows image) for further installation of the system on a computer. In our time, rich people have laptops and netbooks, which simply do not have an optical drive, or there is no possibility to install windows from a disk, here and come to the rescue of creating a flash drive windows 7.
Write the image to a USB flash drive in two ways. The first way, will be implemented for the help of a good ultra iso program, and the other for the help of WinSetup From USB. Let’s look at the robotic ultra iso, so it’s a less laborious way and the process of creating an exciting windows 7 flash drive, you’ll finish it with a swedish one. Another way to get rid of them is for those who, for whatever reason, “didn’t work out” with the first option.
method number 1
Father, let's go. For the cob zavantazhuєmo program Ultra ISO. After the program has been enchanted, installed and launched (the trial period is on the way, as there is no need to buy), you can begin to do a simple process of writing “Windows” to a USB flash drive:
1. It is necessary to indicate the path to the image, which is responsible for the placement on your hard drive:
Tisnemo "File" => V_dkriti (Fig. 1)
fig.1

Mal. 2

Mal. 3
method number 2
Danish way, also tell you how to write windows to a USB flash drive. What do you need for this option:
1. Troshki free time;
2. Computer (with bay, Yake pіdtremuє zavantazhennia from flash drives);
3. Program for preparing a flash drive ( take advantage);
4. Vlasne the flash drive itself (place the SD card);
5. An image of the operating system, if you want to install it.
For example, I'll show you how we can write to the SD card a 4GB image of the operating systemMicrosoft Windows 7Home Premium 64-bit. I really want to turn your respect to the choice of the operating system. If your computer has less than 4GB of random access memory (RAM), then you should install the 32-bit (x86) version of the operating system, so the 64-bit one will simply be harassed operational memory take over the processes.
Insert a flash drive into USB port and format її in FAT32 or NTFS Windows. For this, it is necessary to go to My Computer, find a flash drive there and right-click the mouse on the її icon. AT context menu next select the item "Format ...". At the window, select formatting file system FAT32 or NTFS (The rest will be shorter, as the flash drive is larger than 4GB), and also select the cluster size “Standard cluster size” and press the “Start” button. Everything is shown on the little one:

We gave a small program, in which we will work all the operations we need. I use a program of this type, but I chose WinSetupFromUSB myself, because it won’t help the installation, it may not take up space on disk and simple in vikoristanni.
Let's start the program. For the cob, we need to choose attachments, on the yak we will write down the image. Try it in the pop-up menu of the beast (as in the menu of the flash-accumulator does not appear, click on the Refresh button). They gave us the need to prepare a USB flash drive before writing the image, so as we just copy the image, it will be impossible to enter the system installer, so there is no exciting sector. To do this, click on the Bootice button.
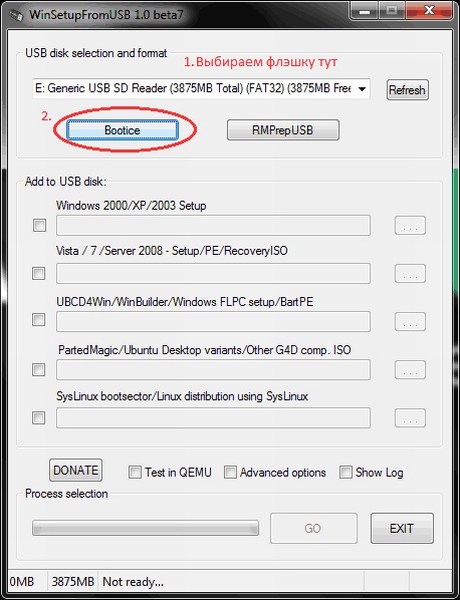
In the Bootice utility, click on the Process MBR button, let's see, there is a check mark on Grub4Dos (it's not possible - it's set) and click on the Install / Config button. At the Config Grub for DOS window, click on the “Save to disk” button, the program can see that exciting record successfully recorded on the accumulator.

We turn back to the Bootice utility window, press the “Process PBR” button and work all the same, without changing anything in the rest of the week, we press OK.

That's it, now we only have to write the image to a USB flash drive, to work in the main window of the program, as we ran it at startup. If you need to check the box for the new one - if you choose to install Windows XP, then this is the first checkbox, if Vista or Seven is another. Let's click on the "..." button from the other side, check the box and set the path, dezberigaetsya our unpacking image on a hard drive, or just mount a virtual drive for help DaemonTools or Alcohol. Click on the “GO” button and check until the process is over.
At the end of the program, you will see the message “Job Done!”. That's all, dear friends, you can re-advantage and start before installing the operating system.
So, the raja, learn about the article of shodo