The computer does not see the adb interface. What to do if the computer does not see the phone through the USB port. Phone firmware via ADB run
Everyone faces this problem at least once, but everyone: you connect a smartphone or tablet to a computer via a USB cable, but nothing happens except charging. The computer does not see the phone or identifies it as an unknown device. The situation is common, but ambiguous, and there are quite a few reasons why it occurs. Today we will figure out what causes such problems and how to deal with them.
The situation when the PC does not recognize the mobile device connected to it is caused by software and hardware failures:
- The lack of a device driver in the PC operating system.
- Driver mismatch with the device model.
- USB driver missing or malfunctioning.
- Connection with a cable that is not suitable for data transmission or is damaged.
- Defective USB socket (both on the computer and on the phone), socket group, or USB controller on the PC.
- Something malfunctioning in the computer hardware, blocking by static electricity.
- Error in the system settings of the phone.
- Blocking access to the phone by security programs running on a PC (including when the gadget is virally infected).
- The application that synchronizes the phone and the PC (if using) has crashed.
In case of software problems, the computer, as a rule, does not display the contents of the phone's memory, but the device charges normally when connected to it. If the problem has arisen due to a physical malfunction, charging most often also does not work, but there are exceptions when only the data lines do not work.
An analysis of the previous situation - what happened before the problem arose - helps to outline the range of possible causes. For instance:
- You reinstalled the operating system on the computer or removed some of the drivers (the reason is the lack of the required driver).
- The phone (tablet) was no longer detected after flashing, cleaning from viruses, uninstalling applications, optimizing and other manipulations with the OS (failure of the operating system of the mobile device).
- The device was subjected to mechanical stress (damaged USB socket) or was repaired (after replacing parts, a driver of a different version is needed or the malfunction has not been completely eliminated).
- You are using a USB cable that you have never connected your phone to a computer with (the cable is for charging only or is broken), etc.
We quickly identify the culprit
Tracking the causal relationship greatly facilitates the localization of the problem, but in about half of the cases, nothing concrete precedes it. If this is the case for you, the following steps will help you determine where the failure occurred - in the mobile device, PC or USB cable.
- Wiggle the cable in the area of \u200b\u200bthe connectors (kinks are most common in these places) and watch if the phone (tablet) is detected in the explorer or the computer device manager. Alternatively, connect the devices with another cable that is known to be working and suitable for data transmission.
- Connect your phone to another computer and another mobile device to this PC. If the phone is not found anywhere, the problem is definitely in it. The same is the case with a computer.
- If the reason is presumably in the computer, check the phone in all USB sockets, perhaps the problem is in one or more of them (for example, only in the front group).
If you conclude that the cable is the source of the problem, simply replace it. What to do in other cases, read on.
The culprit of the failure is the telephone. What to do?
If the diagnostics clearly indicate a problem with your mobile device, follow these steps in order. Check after each step to see if the problem is resolved. If not, move on to the next one.
- Reboot your device.
- Connect your phone to your computer. After connecting, slide down the shutter of the quick settings menu and make sure that the “Connect as” list does not mark “charging only”, as well as “camera” or “media device”. Select the "USB storage" option.

- Open the Android system settings (in older versions - "Options"). Go to the "Wireless networks" section. Turn on modem mode. Or vice versa, if it's on, turn it off. In some editions of Android, this parameter controls not only the modem, but also the connection of the gadget to the PC as a drive.

- Experiment with putting the device into USB debugging mode. Open the "System" and "For Developers" section in the settings. Uncheck or check the box next to USB Debugging.

- Disconnect the phone from the computer, turn off and remove the battery (of course, if it is removable) from it (phone). After 5 minutes, replace the battery, turn on the device and try to connect again.
- Uninstall applications that crashed after installing. If the connection doesn't work for a specific sync app, clear its cache. If it does not help, reinstall (both on a mobile device and on a PC) or try using an analogue.
- Scan your device with antivirus software.
- Reset the operating system of the device to factory settings.
The culprit of the failure is the computer. What to do?
- Shut down the OS, turn off the PC from the outlet (or press the key on the power supply) and hold down the power button for 15-20 seconds. This will discharge capacities and discharge static electricity that may be blocking detection of the connected device.
- If the phone is not recognized by only one group of USB ports, open the lid of the system unit and make sure that they are connected securely. By the way, normal charging of a mobile device through the port does not mean that the second device is working properly.
- Load the operating system. Open Device Manager and check if portable devices are in the list of equipment, and among them is your phone. If it is present, but marked with a black arrow in a circle (disabled), right-click on the line and select the "Enable device" command from the menu.

- If there are unknown devices in the hardware list (marked with an exclamation mark in a yellow triangle), one of them may be the phone. To make sure that this is it, disconnect the mobile device from USB. If the unknown device disappears from the list, then it is. And the reason for the failure is the lack of the necessary driver in the system. How to reinstall and where to download the driver to your phone, we will tell you a little below.
- The problem with recognizing connected devices may also be due to a boot failure, damaged or missing USB drivers. In this case, exclamation marks will be in the USB Controllers section.
- Reinstalling the drivers didn't help? Scan your computer's disks with an antivirus and then temporarily disable the security programs. By the way, the latter can block access to a mobile device as a carrier if it contains suspicious or clearly malicious software. So check your phone for viruses too.

- Uninstall the programs after which the problem was installed, or perform a system restore to the checkpoint created on the day when the problem did not exist.
- If, in addition to the phone, the computer does not recognize other devices connected via USB - a mouse, keyboard, printer, flash drives, etc. (whether they are charged or not is not indicative), the source of the failure may be any faulty component of the system unit or something then from the periphery. It is possible to determine the culprit at home by alternately disconnecting or replacing the equipment with a known good one.
How to reinstall the mobile device driver and USB on a Windows computer
iPhone
- Connect iPhone to PC.
- Open the% CommonProgramW6432% \\ Apple \\ Mobile Device Support \\ Drivers folder (in order not to type the command manually, copy it from here, paste it into the address bar of any folder and click the go button). It contains 2 files (out of four) with the .inf extension - usbaapl.inf and usbaapl64.inf.

- Open the context menu of each of these files and execute the "Install" command.
- After installation, restart your computer.
Android
Android smartphones and tablets, such as Samsung, Xiaomi, Lenovo, Meizu, HTC, etc., as a rule, do not create separate folders to store their drivers, and they are often not found on the official websites to just download and reinstall. Therefore, for a start, you should entrust the reinstallation of the drivers already present in the system to Windows itself.
How to do it:
- Open the context menu of the problem device in the device manager. Select the Update Driver option.

- In the next window, first select automatic search for updates. If Windows does not find anything suitable, check the second item - installing and searching for drivers manually.

- Then click "Select from the list available on the computer." A new window will display all the mobile device drivers that are already installed on the PC.

- To narrow your search, under "Select a driver for this device" check the box "Compatible only". Check the one that best suits your request (if there is more than one item in the list) and click "Next" to proceed to the installation.

Restart your computer for the driver to work correctly.
If reinstalling the driver already in the system did not help, you will have to look for something else in the open spaces of the network (with the risk of downloading a virus instead of the one you are looking for), so download them only from reliable and trusted sites, like w3bsit3-dns.com, and check with an antivirus before installing.
Drivers of the most common models of mobile gadgets are also collected in the "USB Drivers for Android" application, which is available for free download on Google Play.
USB drivers for Windows are usually found without problems on the websites of laptop or desktop motherboard manufacturers. Sometimes they are included in the chipset driver.
If the phone is not recognized in firmware mode
The fact that the computer and the phone do not see each other in fastboot mode is indicated by the message "Waiting for device" that appears in the firmware program. Most often, this error occurs due to the absence of a mobile device driver in the system, so the first thing to do is do what is written above - reinstall the driver or download and install it again.
If it doesn't help:
- Make sure you follow the instructions for using the firmware installer exactly and that it is running as an administrator.
- Check if USB debugging is enabled on the smartphone (if not, enable it), and the device itself is in bootloader mode. If this mode is blocked, look on the network for instructions on unlocking the bootloader specifically for your device model.
- Connect the phone with the shortest and known good cable to the rear USB socket, without using any adapters or hubs.
- Your phone may not support USB 3 (blue jack), so only connect to USB 2.0 (black jack).
- Install any released Windows updates on your computer.
If the problem persists even after doing this, try flashing the phone on a different PC. And better - with a different version of the operating system.
When the problem is a breakdown of the physical interface
It is advisable not to use faulty physical interfaces, especially on a mobile gadget (do not use current in order to avoid aggravating the breakdown), even if the phone or tablet retains the ability to charge through them. Content transfer can be organized either wirelessly (Wi-Fi, bluetooth), or through cloud services that are available on both devices. In particular, iTunes and iCloud for Apple technology, Google Drive, Yandex Drive, Dropbox, Microsoft OneDrive and many others - for everyone.
Cloud services are convenient for transferring photos, videos, music, documents and other types of files. For synchronization of contacts on Android and PC, the capabilities of Gmail are enough. And in order to control the phone directly from the computer, you can install an application like MyPhoneExplorer (consists of 2 parts - for the phone and for the PC), which supports both wired and wireless connection of devices without requiring the installation of drivers. Very comfortably.
 In short, there is always a way out and often much simpler than it seems at first glance.
ADB, or Android Debug Bridge, is a PC console application that lets you control your Android device right from your computer. It looks like this: first, the ADB toolkit and drivers for Android are installed on the computer, then the mobile device is connected to the PC via a USB cable in debug mode, and, finally, after starting ADB in the console (command line), special commands are executed that initiate certain actions with a gadget. Detailed information on how the debugging tool works is presented on the developer's official website, so we will not dwell on this, but go straight to the capabilities of ADB and how to install it on a computer.
What does ADB allow you to do?
First, let's point out why ADB is needed at all. With it you can:
- Reboot the device in different modes;
- Share files / folders with your phone;
- Install / uninstall applications;
- Install custom firmware (including TWRP Recovery);
- To produce;
- Run all sorts of scripts.
The ADB tool is usually installed in conjunction with the Fastboot console application.
Installing ADB and Fastboot from Android SDK
This method involves using the official Android Studio application development and testing tool. Go to https://developer.android.com/studio/index.html and find the title "Get just the command line tools". Below we download the SDK tools archive for Windows (before downloading we agree to the terms of use).

Unpack the archive to disk C. In our case, the files were extracted to the folder sdk-tools-windows-3859397.

We go to the directory, and then go to the directory tools / bin... Here we are interested in the file sdkmanagerwhich will help you install ADB and Fastboot on your computer.


Now you need to open the folder with sdkmanager, for which you should run the command in the console cd C: \\ sdk-tools-windows-3859397 \\ tools \\ binwhere C: \\ sdk-tools-windows-3859397 \\ tools \\ bin - path to the sdkmanager file.

If you unpacked the Android SDK not to the C drive, but to some other place, then the full address can be found using the top line of Explorer (right-click on the destination folder and click "Copy address").

So we went to tools \\ bin and now we need to execute the command sdkmanager "platform-tools"which will install the Platform-tools package containing the ADB and Fastboot files.

During installation, read the license agreement and press Y to complete the operation.

If everything went well, a directory will appear in the Android SDK root folder. platform-tools with the necessary files adb.exe and fastboot.exe.


Minimal ADB and Fastboot
The second way is even simpler. On the developer forum Xda Developers you can download the package Minimal ADB and Fastboot with all the necessary files. To do this, go to the page https://forum.xda-developers.com/showthread.php?t\u003d2317790 and, by clicking on the link, download the installation exe-file.

We launch it and follow the instructions.

We installed Minimal ADB and Fastboot to the root of the same C drive.

Basically, that's all. It remains to check the existence of files.

Checking ADB and Fastboot work
After installing applications using any of the above methods, you need to make sure that the utilities work correctly. To do this, through the command line, go to the folder with adb and fastboot files (command cd C: \\ sdk-tools-windows-3859397 \\ platform-tools or cd C: \\ Minimal ADB and Fastboot), and then execute the command adb help... It should display the version of the Android Debug Bridge installed and a list of ADB commands. If you see something like the one shown in the screenshot below, then everything is working correctly.

Now you should connect a mobile device to the PC and check if the ADB application sees it. We connect the phone (or tablet) to the computer using a USB cable, set the MTP connection mode (file exchange) in the settings and go to the section Settings - For Developers.


If there is no such item in the settings, then go to the "About phone" page and click on the line with the build number seven times.

Developer Mode will be activated and the "For Developers" section will become available. We go into it and enable the "Debugging via USB" option.

After all these manipulations with the gadget in the Windows command line, enter the command adb devices... It will display information about the connected device in approximately the same format as in the screenshot.

Thus, we tested ADB and Fastboot and made sure that the Android Debug Bridge is functioning normally, which means that now you can control your phone through your computer.
If you cannot establish communication with the device, then you need to check the presence and correctness of the installation of Android drivers. To do this, with the debug mode turned on, go to the "Device Manager" and see if there are exclamation marks in the "USB Devices" branch, the "ADB Interface" item (may be called a little differently).

If any problems are found, we try to reinstall the drivers. You can download them on the phone manufacturer's website or at https://adb.clockworkmod.com/.
We hope this article was helpful to you.
Question: ADB does not see the device
Hello. So I decided to test the application on a real device. But as in most cases, ADB does not see the device. The computer sees the device, the developer mode is turned on. In all the instructions for connecting, it says that Manage should have an Android Composite ADB Interface, I don't see it in myself. What am I doing wrong? Attaching a photo Manage
Answer: Thanks for the answer, I already figured it out. Disconnected the device, turned off debugging, and turned it back on. Then I connected the device again and everything worked
Question: Genymotion: When launching an application from AS, no virtual devices are displayed
Hello,
Android Studio does not see the Genymotion device ((The plugin is installed in Studio. Through Genymotion, the device is launched, but when the application is launched, only the built-in device appears, but I do not see the Genymotion device (In the Geny settings I set the path to the sdk folder, and so it did not help (What can be the reason?
Answer:
Message from Pablito
literally
- launch the device in gemymotion
- we look in the studio - you can see it
- start the application
I will check and unsubscribe for sure!
Question: Android SDK does not see the device
I'm trying to run a project on my Chinese tablet (Go clever insigma 800m), is it possible that this is due to the fact that the compile SDK in the project is installed 5.0 and on the tablet 4.2, but min and target sdk is installed as 4.2. Developer mode enabled, usb debugging enabled. When I eat to reduce complie sdk, a compilation error "R" -cannot resolve symbol occurs, after build \\\\ clean points to the system file with errors around topic material, Help please
Answer: Are all devices detected normally in the device manager? If not, please install Composite ADB Interface for your Android tablet
Q: Resetting device descriptor request in fastboot mode
The point is what. One day my google nexus 7 2013 wifi froze and didn't hang up. I obviously kept the shutdown button for ten seconds until he finally died. When I tried to turn it on, I was surprised to find that it froze on the splash screen, and the android itself would not load the system itself (splash screen with the inscription Google and the unlocked bootloader icon). I switched to fastboot and decided to go to the recovery menu, but that did not help either. The same problem. Hangs on the splash screen. Okay, I decided to flash just through the fastboot. But here's the trouble - windows 8.1 x64 defines the device as "Unknown device (reset device descriptor request)". Code 43. And then I grabbed my face, maybe I had a similar problem before, but it was somehow solved by itself.
I rummaged through the Internet, rearranged adb / fastboot drivers, unchecked the menu with powering usb ports, rolled the kb2967917 update, turned off the laptop so that static electricity went away. Nothing helps. What is the problem, I have no idea.
1) USB cable from lenovo p780, which has 2A / h, power supply, can this be the case?
2) Perhaps the adb / fastboot drivers are clumsy, how do you know if they are the case?
3) I connect the tablet in fastboot mode, because there is no other way. USB debugging seems to have been turned off before the incident, maybe this is the case?
I myself am very bad in this matter, so I ask you for advice.
Answer: No, the fastboot does not see it, like the computer itself.
The fact is that literally the day before yesterday I despaired, as many promised me that my memory had died, and decided to take it apart, see what happened inside.
I opened it, walked over the trains with my finger to make them sit tighter, and OH MIRACLE! he then turned on.
Apparently the loop from the memory has departed, I do not know what and how it works inside.
It is noteworthy that a couple of years ago I encountered the problem of phantom clicks when the device heats up from heavy applications. I also took it apart, poked it with my finger on the trains and the phantoms disappeared.
Question: The tablet does not see the usb drive via OTG
Lenovo A5500-H tablet. Once the tablet did not want to see the usb flash drive, although before that there were all the rules, and I decided to restart it, in the end it did not turn on. I made a hardreset and after that it turned on, but the usb drive still does not see at all. Tell me what to do?
Answer: I have not tried it on other devices, but I bought myself a USB flash drive with two inputs usb and micro usb and it also does not work.
Added after 1 minute
Added after 27 seconds
I have not tried it on other devices, but I bought myself a flash drive with two usb and micro usb inputs and it does not work either
Question: The studio does not see the phone
There is an LG L90 Dual D410 device and when connected, the studio does not see this device for debugging (It is not in the list of available devices). How to be? How to install drivers on it and where to get it?
Answer: yura91, in the sense that "how many devices support the same driver" is not a completely correct question for those who look at this question for a very long time)
Question: ADB does not see meizu m1 note
ADB does not see meizu m1 note, and it makes me very sad. The driver does not see. What to do?
on ADB devices the answer is:
List of devices attached
Here is a screen of the device manager:
What did you do:
; M79
% CompositeAdbInterface% \u003d USB_Install, USB \\ VID_2A45 & PID_0C02 & MI_01
% SingleAdbInterface% \u003d USB_Install, USB \\ VID_2A45 & PID_0C02
% CompositeAdbInterface% \u003d USB_Install, USB \\ VID_2A45 & PID_0C02 & MI_01
Answer: My Chinese also does not see 8 Windows. I am using PdaNet.
Question: There is not enough space on the device
Do not tell me why after the play market is automatically updated and I try to install the application through it, the error "There is not enough space on the device" occurs, although there seems to be enough space judging by the memory indicators in the settings. And after I delete the update of the play market, you can install the application Why is this happening ??
Answer: maybe everything that the developers of the phone came up with.
saw such models. but music or pictures from the card can you use?
Once again the same question: if you pull out the card, will Phone Storage and Internal Storage not turn off? Can you copy something on them and view the structure? or does one of them stop working when the card is pulled out?
Question: Organization of direct network communication between devices
Hello.
Subject. For example, for media communication.
Given that the addresses of mobile devices are dynamic and change every session, it is clear that an intermediate server link is needed. There are several questions:
1. Is it possible to use the server only for updating addresses (client applications connect when opening or changing a network connection and tell the server their current ip address) and further data exchange takes place directly between clients?
2. In applications such as Skype (or any other well-known product, such as whatsapp, viber, etc.) does the streaming traffic go entirely through the server or between clients? Can anyone know on what principle this is implemented?
3. Not good at socket communication, so the question is ip. If several devices are connected to the same router, then their external address is the same (in any case, various services for determining ip told me about this). How then do the servers (google firebase or the same messengers for example) find the desired device?
Probably I am not catching up with something in routing.
Thanks.
Answer: Gdjedi, source and distantion are present in the packet, then it is returned by source, and this changes from router to router and the final server does not actually know about your mac or ip or port, everything is in a chain.
I can’t tell you deeper, I’m afraid to make a mistake and confuse you.
I have about the same task, to connect 2 devices to each other, I came to the conclusion that I need a VDS, through it I will connect 2 phones / tablets, the server is an intermediary between them.
Question: The application gives an error if GPS is disabled on the device
The application determines the coordinates, then determines the city by the coordinates. But, if you disable GPS on the device, the application crashes. How to make a listing correctly so that if the GPS is turned off on the device, then the application does not crash, but just starts activity without defining the city.
Here is the listing:
|
||
By the way, without the code section below, the application does not crash, but, unfortunately, it does not detect the city either.
| Java (TM) 2 Platform Standard Edition 5.0 Code | ||
|
||
Answer: And how to register it in the listing?
Added after 15 minutes
I made such a check. When the device coordinates are determined only by GPS (without wi-fi and networks), the application receives coordinates 0.0. This is probably why it crashes. But here's how to fix it?
ADB stands for Android Debug Bridge, that is, a debug bridge for Android. The program is designed for the Android operating system and works in conjunction with a computer. It makes it possible to change files, use root rights, restore the system.
ADB run, in turn, is an application that allows the user flash your Android device. It includes ADB and Fastboot. These applications are familiar to everyone who has come across a flashing of their gadgets.
ADB, ADB run and Fastboot
Android Debug Bridge allows you to control Android using a PC. This application is installed directly on a laptop or computer, which connects to a mobile device via a USB cable in debug mode. Then after launch it is possible to execute special commands to initiate any actions with the gadget.
The utility allows perform such actions, as:
Most often, the application is installed along with the Fastboot utility. This mode allows you to reset all settings to factory settings, which is why it is sometimes called Recovery - the recovery function. In addition, using Fastboot, you can install the firmware, but in this case, only work via a PC is possible.
These two programs are better set together, allowing you to access more features.
In turn, ADB run simplifies work and automates common commands and actions commonly used by users. Although it has a console, it has a visualized view, it consists of 14 items.
This program is much simpler, it is suitable for those who find it difficult to deal with the command line, who do not know how to work with it. It already provides menus and items to choose from. She is different simple interface, great functionality, without requiring additional installations of programs.
All utilities can be downloaded, installed to operate and update a mobile device.
How to use ADB run
To understand how to use the utility, you need to be familiar with the installation and basic commands. Connection to the gadget is carried out using a computer and a USB cable or wirelessly.
To understand that the connection has taken place, you can enter adb devices. Then a message should appear: “ List of devices attached“, Indicating that the connection has occurred. Connection via wi-fi is done using adb wireless. The mobile device must be rooted.
To work, you need to enable USB debugging on the gadget. Usually this item is located in the settings. If it is not there, then you can search for it in the developer options. This menu is hidden, to enable it, you need to find the line with the build number in the Android settings, click on it several times (from 5 to 10 times). Somewhere after half of the clicks, a notification will appear that you are doing everything correctly, and then they will be provided developer rights... Then you can return to the settings, where the item "developer options" will appear. This is where debugging is enabled.
The utility has a number of positive qualities:
- Easy to install.
- Simple controls.
- Easy check for updates.
Installation
Before installing ADB, you need to download it, it can be done for free. You can download ADB on the w3bsit3-dns.com website. The official resource does not provide an opportunity to download the utility separately, but only with the entire Android SDK. The program is installed using the standard installation wizard. 
The whole process is simple and intuitive. The installer itself offers hints, guiding all actions.
After that, you need to install drivers for your mobile device, otherwise the application will not see the device. The easiest way is to use the automatic installation tool Adbdrivers. But you can also download drivers for Windows 7, 8 or 10 from the manufacturer's official website.
If there is no installer, the driver can be install manually, for this:

Overview of the ADB run interface and command
Let's consider all the menu items offered by the program, the principle of their work:
- Device attached? - is responsible for pC and smartphone connections, but be sure to enable USB debugging.

- Move - responsible for moving files from laptop to smartphone. There are both automatic and manual movement options.

- Install Android App to Device - allows you to install applications, while options for saving and moving to a memory card are possible.

- Reboot Device - various reboot modes Android:

- Fastboot - firmware, system flashing. All settings are set automatically.

- Unlock Gesture Key - unblocker pattern key, also copes with pin codes, face codes.

- Manual - allows you to write commands manually.
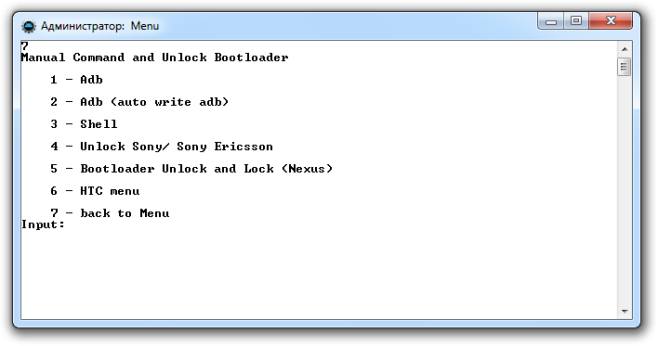
- Check Update - checking for a new version of the program.
- Intsall Bootanimation - installs and changes animation when the device is turned on.

- Memory and Partitio - introduces blocks and sections Android.

- Run Script - working with scripts.
- Backup - create a backup copy.
- Odex - odexing the firmware, taking into account various parameters.

- Screnshot / Record - screenshots, the ability to record video.

- Exit - respectively exit from the program.
Phone firmware via ADB run
The program allows you to change the firmware of the gadget. To do this, just install it, connect to a PC and use the Fastboot utility. The files to be flashed must be located in the same folder with the utility.
First you need translate device into bootloader mode using the menu. 
Then you need to unzip the previously downloaded files with the firmware. After that, you should select the item Run SCRIPT and put the firmware files in the window that opens and close it. Press Enter. The firmware has started. While the process is in progress, do not remove the cable from the phone or computer.
The program makes it possible to reflash all sections step by step or only some:
- sуstem;
- cache;
- data;
- recovery.
Using ADB
Using the utility allows you to:
- reboot the gadget using various modes;
- carry over files, folders from phone to PC or vice versa;
- work with applicationsby installing or removing them;
- work with firmware;
- carry out various scripts;
- unlock graphic key.
The utility is usually installed and used in conjunction with the Fastboot application. 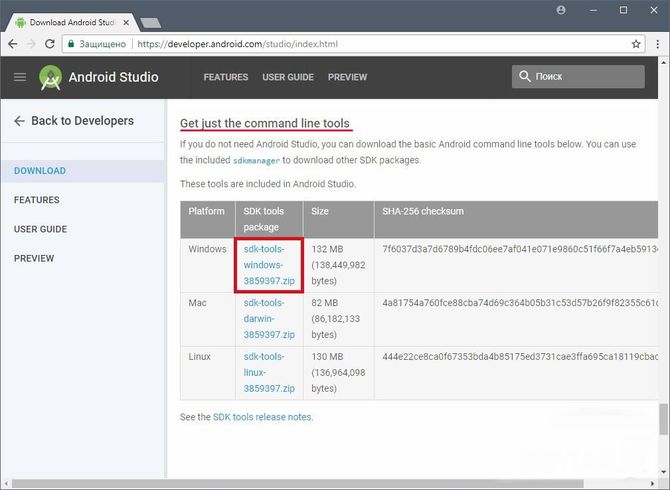
Installation
You can install the application by visiting the official website. It is necessary download archive SDK tools for Windows by agreeing to the terms of use before.
After that it is required unpack archive, go to the tools directory, select the bin folder there and refer to the sdkmanager. It will just allow to install the program. 
Further work takes place in the Windows command line. We run as administrator. After that, open the sdkmanager folder, writing a path to it C: \\ sdk-tools-windows-3859397 \\ tools \\ bin. 
During installation, read license agreement, press Y. 
If the whole process went right, the platform-tools directory with the adb.exe and fastboot.exe files will appear in the root folder. 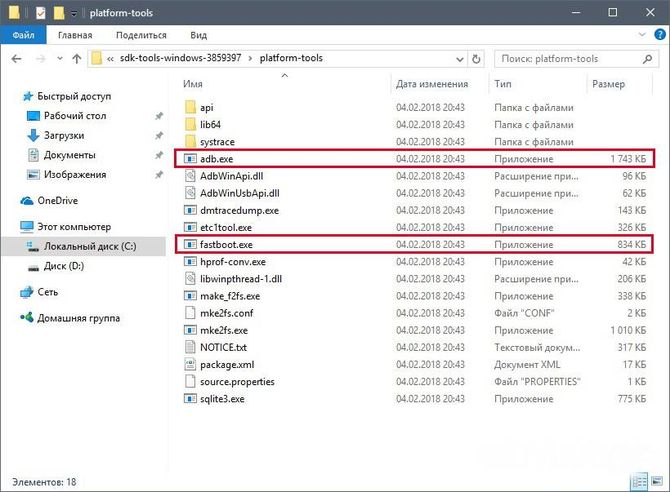
How ADB works
After installing the program, you can work with it. To make sure that everything is functioning correctly and normally, you should use the command line to open the folder with the adb and fastboot files and run the adb.help program. The result should look like the screenshot below: 
Now you need to connect the device to the PC and check if the application sees it. The connection is made using a usb cable. Should select mode MTP - file manager, and then the item "for developers". If such an item does not appear, then you should go to the section " about the phone", Click 7-10 times on the build number. After that, in the appeared item "for developers" you need to select "debugging by usb".
Then, on the command line of the system, we enter adb devices. This will allow you to see information about the device. It looks like the screenshot. 
After that, the fastboot program is checked, the fastboot reboot task is written in the console, and the input is pressed.
After checking the functioning of the task, you can safely work with the program.
ADB Teams
The utility involves working with a smartphone, performing various actions. There are only 10 main ADB commands:

It is enough to register the path to the folder from which the information is copied and to which the information is copied. 

It is also possible to access the recovery menu.

But it's worth remembering that after running this program, all data on the phone is deleted. 
- Shell - it can be used in two ways. The first is entering it into the command line, followed by typing. This will allow you to exit to terminal modewhere any Android shell commands can be executed. But you should use it carefully, as the device can be severely damaged.
The second option is single input actions. Thus, you can, for example, change the ability to access rights to some folders.

Bonus utility - Sideload. It is suitable for owners of Nexus devices, allowing to update official firmware on all devices of the company.
FAQ
What to do if ADB does not see the device
If suddenly ADB does not see the smartphone, then you need to check first debugging by usb or check for ADB drivers on your PC.
It is also worth paying attention to other reasons:
- check usb cable, its working capacity;
- check installation Android SDK, availability of its latest version;
- worth try to switch mode from MTP to camera and back;
- can try reconnecting device or restart your computer.
After all these actions, the program should work, and the device should be found. This problem often occurs with unknown Chinese brands that are not familiar to the program.
ADB or fastboot is not an internal or external command
Sometimes, when entering a number of commands in the console, you may encounter a system refusal to perform the entered action. A message appears that the command is not internal or external. This is often due to the fact that path to file is not registeredthat serves the team.
The reason for this message may be that the system does not have information about the location of the files. It is possible that the required component is not in the system, then it needs to be installed.
In order to get rid of this error, you need to point the program to the path to the files you want. Copy it to the clipboard.
- on the desktop you need to select " My computer", Click on the right mouse button, select the column" properties»;
- now we choose “ additional system parameters"And then" environment variables ";
- there you need to find " system variables»And the Path parameter, where you need to add the copied path and confirm the changes;
- then we open the console and write the desired action, after which the error disappears.
Alternatively, after all the manipulations, it costs to restart a computer.
Experienced owners of Android devices often use ADB and Fastboot programs included in the Android SDK to unlock the bootloader for their tablets and smartphones, install custom firmware, get root rights and much, much more.
However, one "fine" day, you may find that after you connected your Android device to the PC and typed the familiar command "adb devices" in the command prompt window, the list of devices connected to the computer that this program should display is empty. What to do in such cases to rectify the situation?
If this happened to you, then first of all you need to check the following:
1. Believe it is enabled in your tablet settings
2. Check that the USB cable you are using to connect to the computer is working properly and is connected correctly
3. Check if you have Android SDK installed and updated to the most recent version
4. Try switching the connection mode of your tablet or smartphone from media device (MTP) to camera (PTP) or vice versa.

You may ask - why do all this, if the device worked fine before? There can be many reasons for this situation. For example, you updated the operating system on your PC and forgot to install the Android SDK, or you haven’t updated the SDK for a long time, or you connected your tablet or smartphone not with the proprietary cable that came with it, but with a longer one purchased later in order to make it convenient to use device is charging, or - your device's USB drivers are not installed correctly.
Speaking of drivers. If you have checked all of the above, but it did not help you and the ADB program still does not see your device, try uninstalling it from the system and reinstalling it.
To do this, on a computer with a tablet or smartphone connected to it, open the device manager and find the device with "Composite ADB Interface" in the name. For example: "Android Composite ADB Interface" or "Google NexusADB Interface"

Then right-click on the device and select the "Delete" option in the menu that opens

Disconnect the tablet or smartphone from the computer, confirm the deletion by clicking on the "OK" button and after completing the process of removing the device, reconnect it and wait for Windows to reinstall it. After that, your tablet or smartphone should appear in the list of devices connected to the computer in the ADB program.