Zavantazhuvalna flash drive windows 7 what format. Creation of an exciting flash drive for installing Windows
The operating system is exactly the same computer program, Yak and all others. Axis only її znachennya richly hto underestimated. Reinstalling windows is not necessary only for prevention. It often happens that your computer is infected with a virus and the computer starts to work, it starts to be properly vantage, or there are a lot of pardons. All are clear signals before correcting system files for help reinstalling Windows OS.
What is an exciting flash drive? tse USB accumulator Or a disk that you insert into an empty computer without an operating system (otherwise, in order to reinstall it). Bios is redirecting to the start and end of the Windows installation. Naturally, you can write down the operating system on one computer, and install it on another, and so on.
As a rule, everyone installs the operating system from the disk. However, the optical drive step by step enters the past. Not only netbooks anymore, but rather laptops leave the assembly line without a CD \ DVD drive. This question intelligently generates a smut food: how to reinstall Windows, only a flash drive? The clue is obvious. Create an amazing flash drive.
Ways to create sprat. All the stinks are reminiscent of the software you have won. Let's take a look at some of the main ones: vicory-free utility WinSetupFromUSB, paid UltraISO (alternatively, you can vikoristovuvat demo or trial version), as well as without add-on software, vikoristovuyuchi command line.
In addition, having respectfully read the article, you will understand a copy of the main speeches:
- Creating an exciting flash drive is not as easy as it can be.
- Reinstalling Windows on your own is easier.
- The principle of creating an exciting flash drive in all ways is approximately the same.
To that understanding, in the future you can create an exciting flash drive on your own, vicorist and other programs.
Ready USB portable
First, you need a flash drive. Її rozmіr lie down depending on how you plan to copy the OS on it. Ale, in the best of times, it’s better to take a flash drive with a volume of three gigabytes, and more quickly, I’ll call 5-8. Now boldly insert її into USB input and open "My computer". If you have an empty flash card, you still need to format it. About every change, we guess that the formatting procedure erases all data from your flash drive. So do not forget to copy everything from it important files.
It is necessary to format in order to get lost in systemic pardons. In the dialog box, it is not enough to select the type of the file system “NTFS” for the language, but not only to speed up the formatting process, but also to allow copies of files of great size to the USB flash drive. Keep in mind the maximum file size that you can move to USB portable to be deposited in the middle of the opposite type of file system. (FAT - 2GB, FAT 32 - 4GB, and NTFS - 16TB minus 64Kb). This means that if you format the USB flash drive in the FAT system, then when you try to copy a file to it, the size of which becomes over 2 GB, the system sees a pardon and does not allow vikonati deyu.
get the image
So, to create an exciting flash drive, you will need not only the image of the program, but also yoga instead. The image is a kind of “archive”, which is to contain a bunch of folders and files. The very stench in the unpacked looks like we need it. So we need not the * .iso file itself, but yoga instead. In order to get everything that you need to remove the image, insert the disk, on which Windows itself is located on the computer, or if the image of the disk, which you have taken from the Internet, then unpack it WinRAR program or mount in a virtual drive for help special programs(DAEMONTools, UltraISO). After that, remove the entire image in an okrema folder and place it on a handy place. It is necessary to work so that the programs can work in the same way and in the same way.
Victory free program WinSetupFromUSB
This utility allows you to create an exciting flash drive for whatever Windows. Launch the program. At the window, select your flash drive.
Let's choose that item, the operating system you want to install (Windows or else).
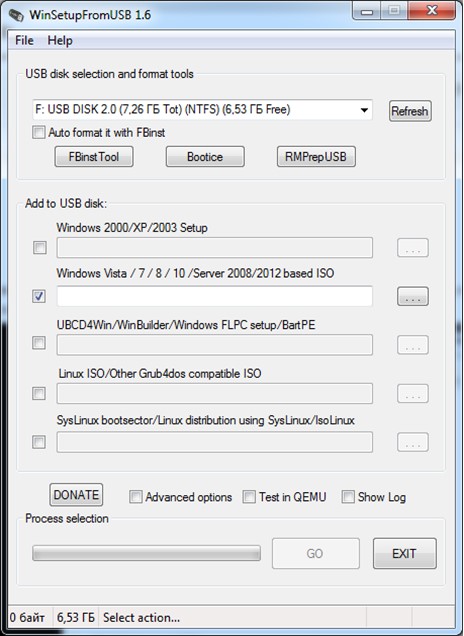
After that, tell me the way to unpack the files. If you choose to rob the system flash drive and CD disc, then indicate the path to the new one. If you vindicate the image of Windows downloads from the Internet, then unpack the image and enter the path to the folder with the required files, or to the image itself (in the background, as the version of the program you have taken advantage of). Older versions of the WinSetupFromUSB utility do not support the installation without intermediary, victorious image.
Now you have lost only the beginning of the recording process. For whom boldly emboss the Go button. Recognize the process of copying the necessary files. Tse dosit trivaliy process, do not fawn on it. After the completion of the procedure, you will become a happy flash drive driver, for help you can install Windows on any computer.
How to get a computer zavantazhuvatis from flash drives?
For that, you will need to eat in the Boot menu. It is called out on all outbuildings with different keys. Most often "F8". On other models of computers, the menu may be called for help from other hot keys "F". In order to know for sure, you will either have to try the skin of them, or surf the internet with a search. As soon as the screen lights up, you need to press the button to enter the Boot menu.
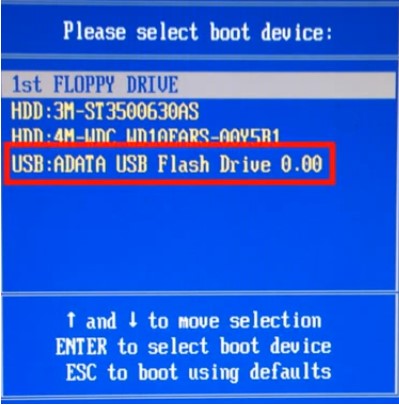
Once you see the Boot menu, select your flash drive. Naturally, for whom it is guilty buti is connected to the computer. To get rid of the scammers, open all the USB entries on the computer. Find your USB flash drive in this list (it will start with USB) and consider it as a priority USB carrier, for the benefit.
Why is it so robust that the "Boot" menu does not pop up?
If you are stuck with this problem, then you have to go into the BIOS and change the priority priorities. I want to renew my laptop or computer. As soon as the screen lights up, press the del key (it is universal for all attachments). After a couple of hvilin, you will go to the BIOS menu.
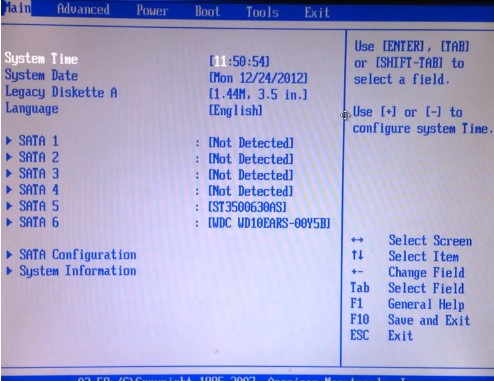
Also, it is necessary to select a USB memory stick, as a head unit for the computer. In order to do this, you will need to go to the Boot menu (which means "advanced"). Let's go to the "Boot" menu in Hard Disk Drivers.
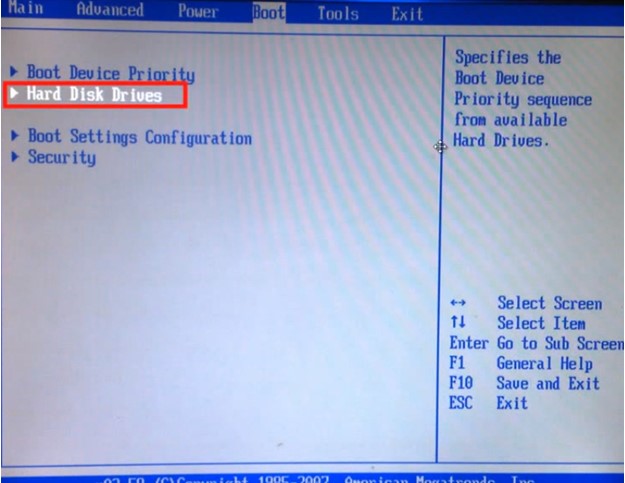
Here it is necessary to select your flash accumulator as the first one, which will be used by the computer.
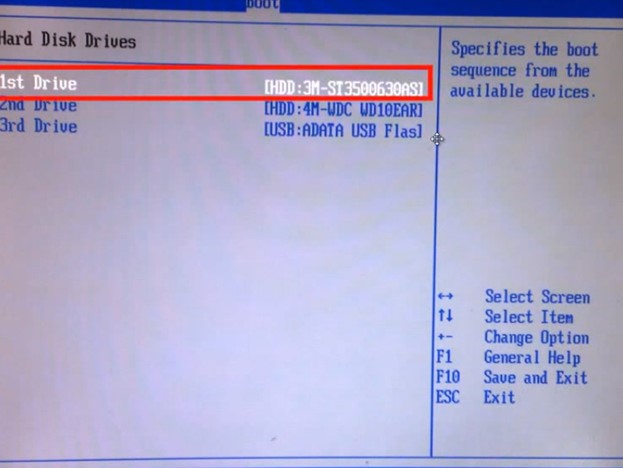
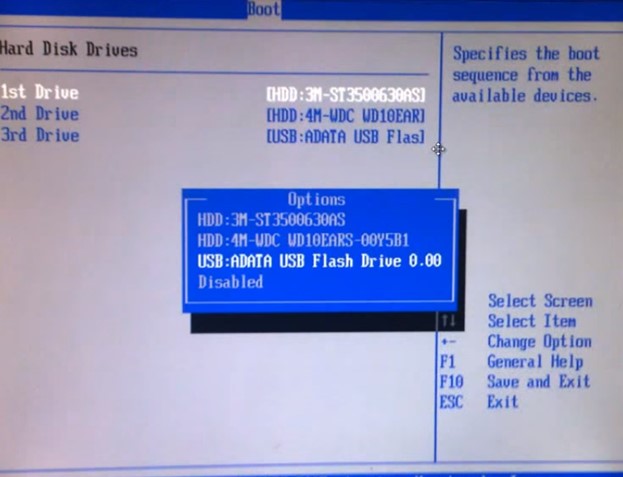
You can do it in the following way: select the very top line “1st Drive” and enter the name of your flash drive in it.
Then move back and select the first Boot Device Priority meeting.
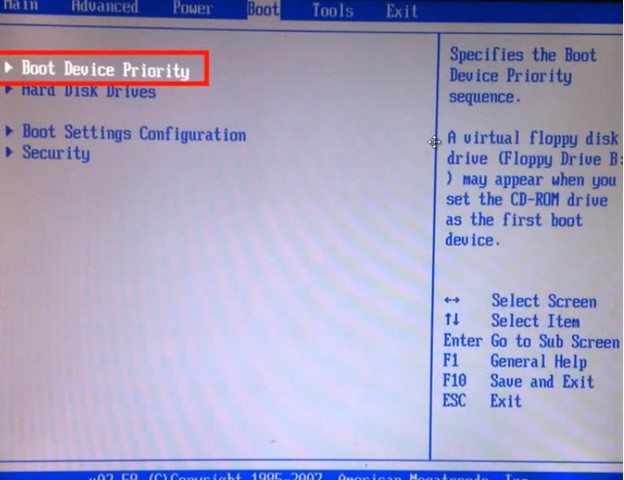
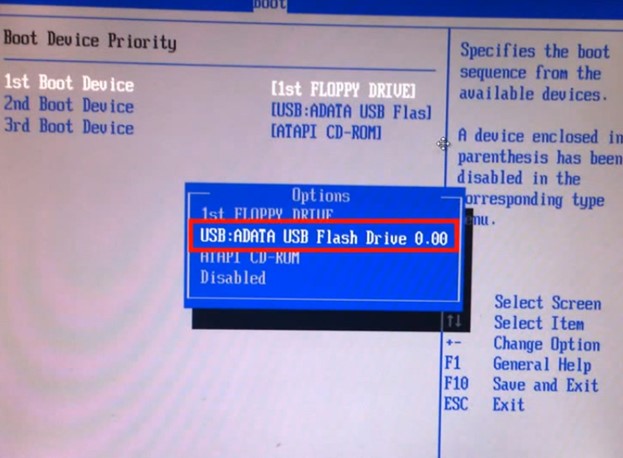
This menu will have to change the priorities of the advancement. Therefore, you need to select your flash drive.
There will be no need to change anything else. You can boldly curse Bios. Don't forget to save all the changes you made.
In addition, as soon as you wait to set up new configuration settings, the next time you restart, the computer will start up again from the flash drive. Just like that, there is nothing coherent in creating an exciting flash drive and changing the settings of the “bios”. It is not necessary to give more respect for the deeds of the moment.
vicorist UltraISO
The program itself, we need an image of the operating system, so you are going to place it on an exciting flash drive. Select the file with the .iso extension.
Let's look at the application of Windows 8 Professional, version 1.02. For this method, it is necessary to win a flash drive with a size not from 4 to 8 GB.
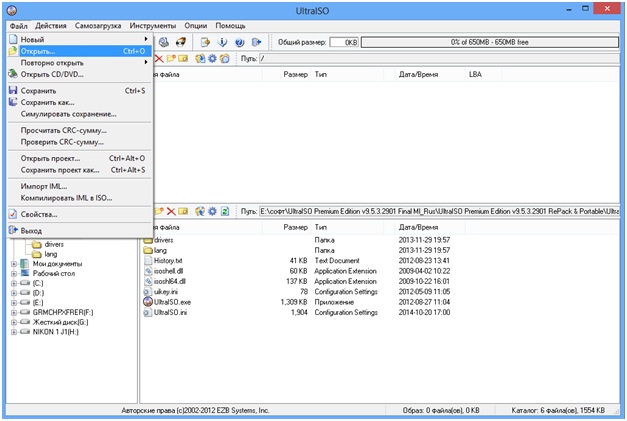
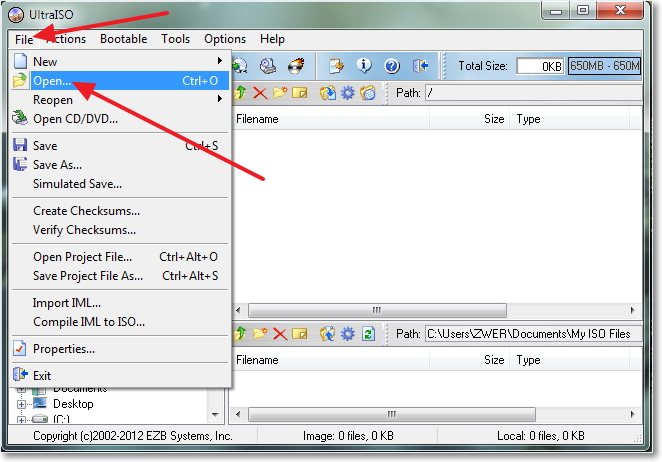
Let's start the program. If only you have downloaded, then select the “trial period” item. Let's go to the menu item "File" - "File". At the dialogue window, select the image of the operating system, so you have been tempted to press “Vidkriti” again. You will turn to the cob screen of the program. Go to the "Self-acquisition" item and in the menu, select "Burn a hard disk image".
![]()
If you missed the formatting item, then press the "format" button. Remember that there is no obov'yazkova mind for the creation of an exciting disc.
Then select the "record" button.
Recording trivatime approximately 15 hwilin. It depends on the capabilities of your computer. Once it's complete, you only have to reset your computer and start installing Windows.
Vikoristovuemo command line
First, what do you need to rob, tse viklikati command line. For whom it is sufficient to open a launch and enter "Command Row". You can also twist the hot keys "Win + R".
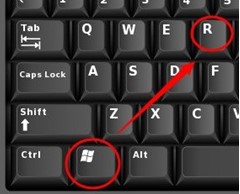
The next key is to open the small system utility "viconati", so you have to enter cmd, like a command line.
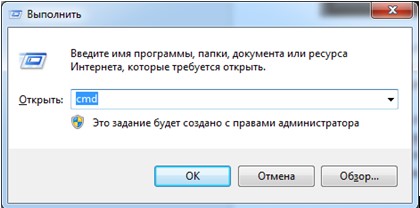
You can insert a flash drive and proceed before entering commands.
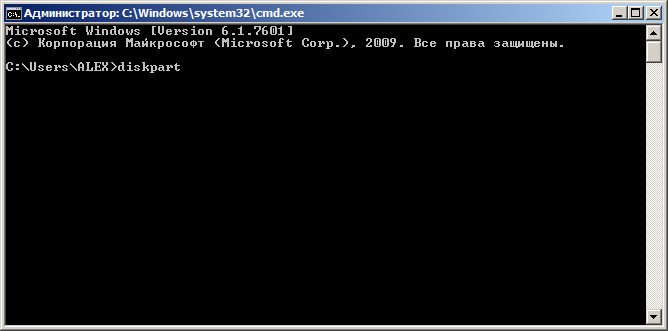
First, what you need to do is to gain access to the computer and disks management, winkroist command line. Respect! Dial only those commands, as shown in the paws.
Order dіy
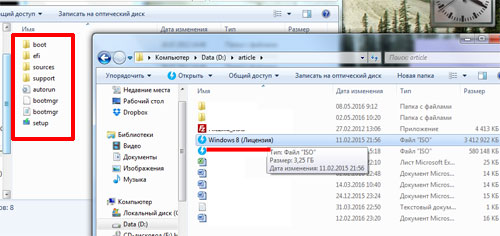
Vitaemo, you have created an exciting flash drive. The only thing you need to do is to transfer the unpacking yourself Windows files to a ready USB device. For this, copy not the image to the USB flash drive, but the files themselves without creating additional folders.
In contact with
Today, more and more laptops and PCs are being integrated into their add-on optical drive. Can you explain to us that CD and DVD-carriers have lost their relevance. We made more miniatures for memory cards and a USB flash drive. Before that, it is simply impossible to drive a drive into a thin case of an ultrabook. This trend has led to some kind of ineptitude, for example, when installing the operating system. The creation of an exciting windows 7 flash drive is simply necessary.
How to create a captivating flash drive
What is needed:
- Flash accumulator
- UltraISO program
- DVD disk image with Operating System
The storage capacity of the accumulator is not less than 4 gigabytes. The most important thing is a standard copy of Windows 7. You can save more money.
Yakscho є all nebhіdne - prichayemo to bezperednya creation.
Insert the flash drive in the right hand side into any available USB socket. Change, there is nothing useful on it, so that all information from it will be erased.
If you are recording an image from a laptop, reverse the battery charge and, if necessary, connect to charger outbuilding.
At the time of writing, the computer will fail, then it is great to turn the flash drive into a cheap piece of plastic.
Pokrokov's instruction:
1. Run the UltraISO program. You need to work in the name of the computer administrator, otherwise the program cannot start the recording process. Click with the right book. bears on the shortcut of the program and select the item "launch as administrator".
2. Once the program starts, open your file with the ISO image into it. At the upper left corner of the program, click on the file-> open button, or click on the CTRL + O key combination.
3. Select a file from the window rank of Windows 7 and press "Vіdkriti".
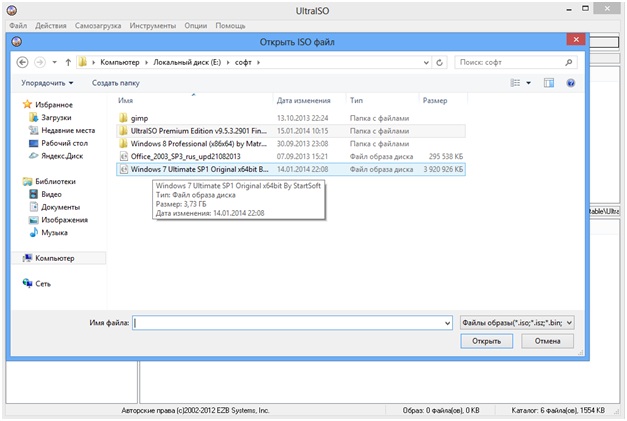
4. The image of the disk is displayed in the program and you can download all the files, from which wines are stored.
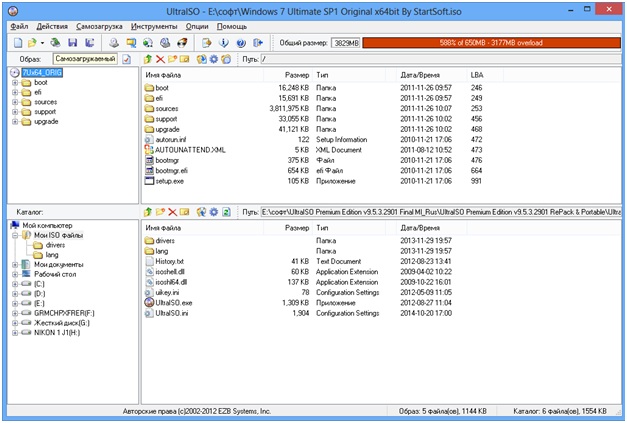
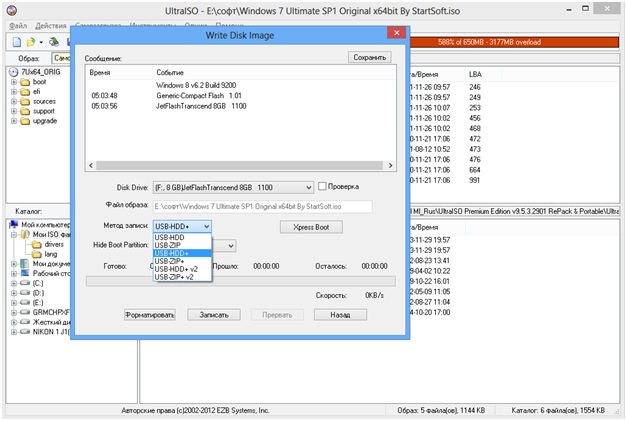
5. Then, go to the top menu of the program to the item "Self-advancement". For drop-down list, press “Record image hard drive».
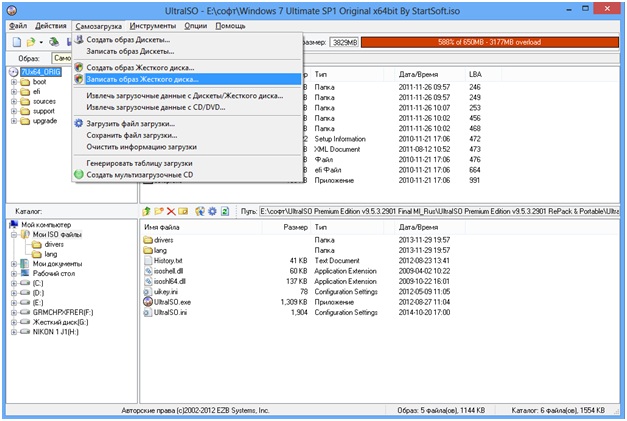
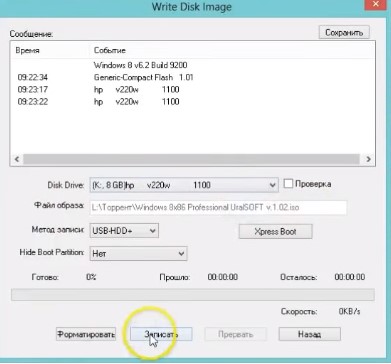
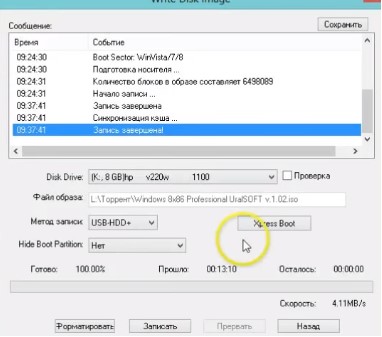
6. Check out one more window, where you will need to select the parameters of the record. It is necessary to indicate on the back, for which attachment the record will be broken down to the image. Navpak parameter "Disc Drive" in the drop-down menu, select the flash drive, which you have prepared.
![]()
7. Next to the "Record Method" parameter, select the "USB-HDD +" mode. Opposite "Hide boot partition" put "nі". Then you can boldly press the "Record" button. Other parameters are not required.
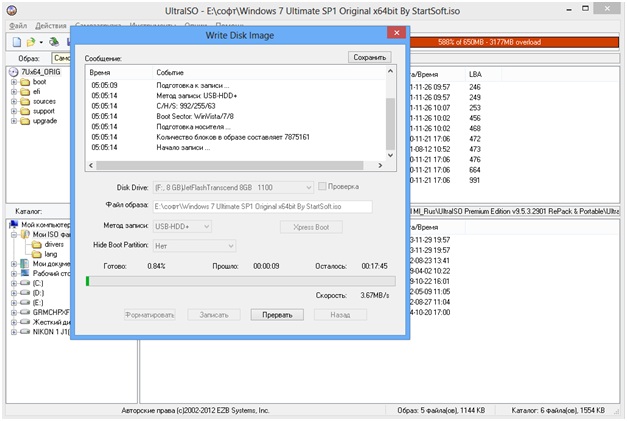
8. If possible, the process of recording the opposite method on a sniper nose will be clear. Call for a loan of 10 to 15 credits.
It is possible to reverse the process by looking at the magazine near the upper part of the window and at the smog of progress. Above it, there will be an indication of the number of records, as well as how many hours have passed and it has been lost.
Chi do not close the program and do not mimic the computer at the same time. If it happens, then you should risk zipsuvati flash storage.
9. After the completion of the entry, you will be informed in the journal about those that everything is ready and the entry was successful.
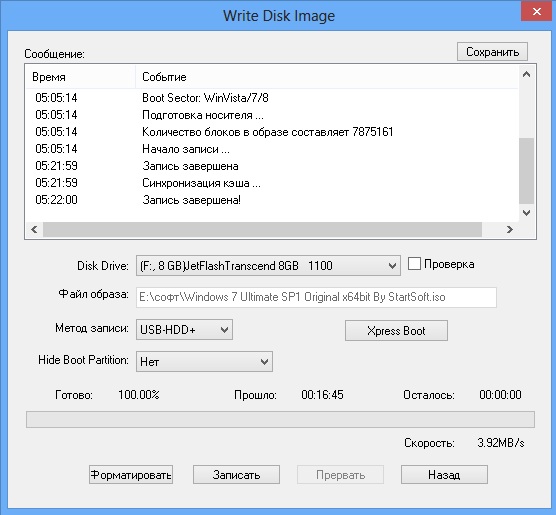
From the USB storage device, the installation of windows 7 is faster, lower sizable disk. It is explained that the speed of USB 2.0 is richer than that of an optical drive.
10. The creation of an exciting flash drive went to the end. There is no longer any need to reconsider її practice.
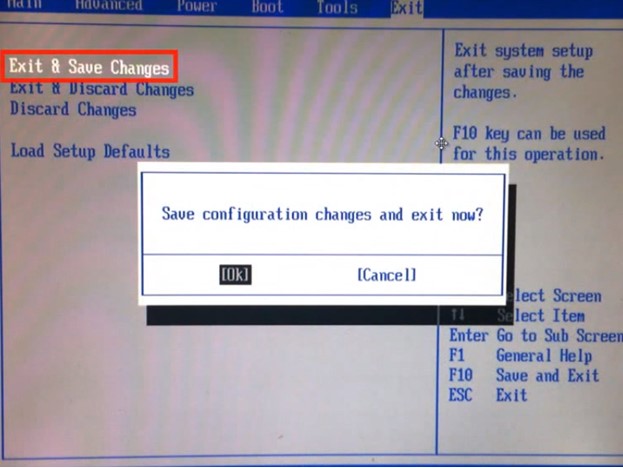
For this, insert її into the USB port of the computer or laptop, on which you want to install. Enable it and go to the BIOS. For which, trim the DEL key or F2. After the transition, the priority is reversed. Your USB flash drive is to blame for the priority priority (First Boot Device). Saved the settings by pressing the F10 key, and restarted the computer. As the installation process began, it means that you have installed everything correctly.
Buying a licensed software, the buyer buys yoga on a DVD. So, to install yoga on a PC, in which case an optical drive, you need to create an exciting flash drive. Our cover instruction I will help you in what.
All the more often to install or reinstall the operating system, you need to use a usb-storage device. The stench is not only convenient in transportation, but more functional, lower CD-disks (for example, there is no rose for a disk in a netbook).
Sometimes in the process of installing a new firmware, you can blame the pardon of the driver: “No knowledge required driver for an optical drive. In which case you should plug the flash card into another slot. ring out given problem Blame it on newer PCs equipped with 2.0 and 3.0 USB ports. Most of the new port does not support Windows 7. It can be distinguished by its blue color.
Mi rozpovimo, how to rob the system flash drive Windows 7 dekilkom ways.
What do we need to create an exciting flash drive
To create an exciting flash drive, we will need the following speeches:
- A disk from a recorded Windows 7 or її image.
- Empty flash drive, size 4 GB.
- Nalashtuvannya, scho to give the opportunity to work with a flash card in BIOS.
At the same time, the OS can be downloaded from the Internet. Koristuytes only perevіrenim sites.
format the flash drive
If there is a memory card, it is necessary to clear it again. For what next, go to the formatting. Save important files, first proceed to the next process. The formatting itself can be set as the hour of the recording zavantazhuvalny file, So i to tsgogo.
To clean the flash drive, connect the USB to the computer. Papa has my computer right button Mouse click on the icon of the required portable disk. press "Format".
When specifying parameters, choose file system NTFS. You can also change the name of the memory disk (Mitka to that). Other indications do not change.
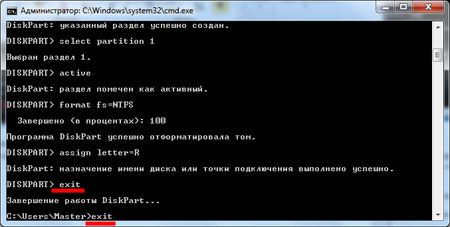
The USB flash drive can be formatted using the command line. For this, write in: format H: / FS: NTFS / Q / V: My_Fleshka and press Enter.
Select zavantazhennya in BIOS
To select a flash card, see it in BIOS. Press Delete or F2 for which next.
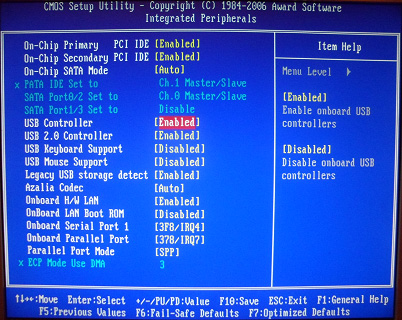
You need to know a little about the fact that the USB-controller of inclusions. The status can be checked at the Integrated Peripherals tab. Navpacki USB Controller and USB Controller 2.0 is to blame for writing Enable.
command line
Burning a Windows 7 flash drive using the command line is the most simple way, which does not transfer additional software security features. However, you need to enter a large number of tasks.
Open the command line for an additional combination of Win + R - cmd. Through Enter, enter the next task:
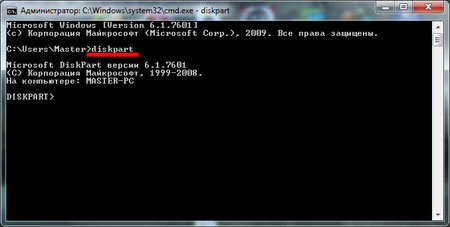
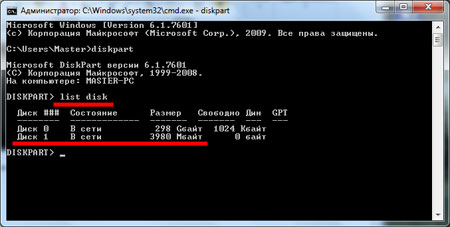
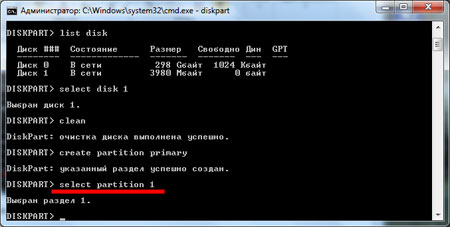
- diskpart. This command gives you the ability to control objects through the command line.
- list disk. After entering the command, you will see a list of disks. Designate one of them, which one is your flash drive. As a rule, the won is stashed after hard drives. Until then, you can recognize її for the expansion of memory.
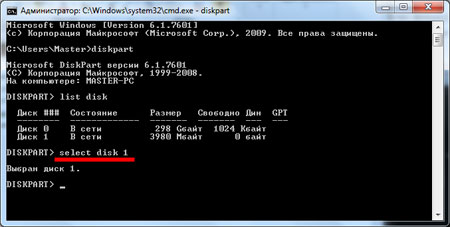
- Select disk #. Zam_st # write the number, which is the flash drive.
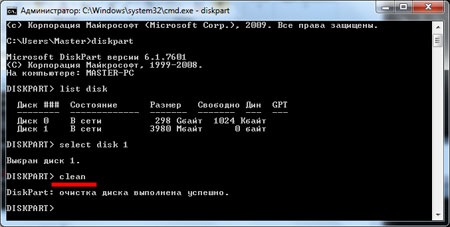
- clean. You see all the information on return.
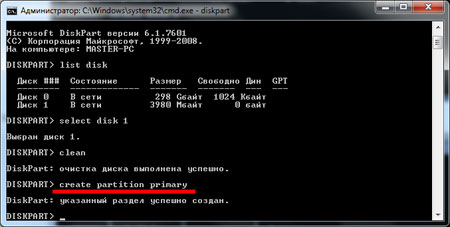
- Create partition primary. I create the first division.
- Select partition 1. Select a created partition for further work with it.
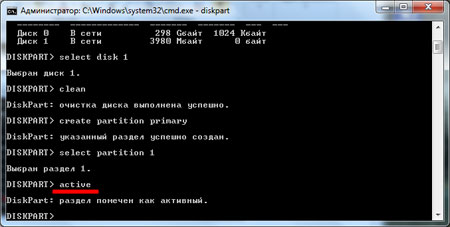
- active. Inclusion of distribution.
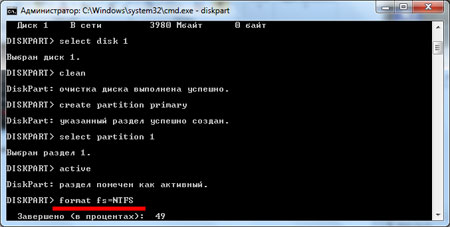
- Format fs = NTFS. This command will format the flash drive in the required system.
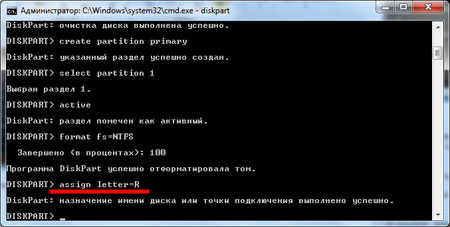
- assign. will be created new disk. If necessary, you can assign a letter to you by adding letters =N.
- exit.
- Dalі just transfer the OS files to your laptop and you can go to work.
This way of folding is less than a great number of teams. You could remember that the process of formatting a flash drive is included in the inventory description. If you have done it for a long time, just omit the points.
Please note that the files you are transferring to a USB flash drive should be decompressed. The program will not work, so you just transfer the .iso file.
UltraISO
The utility is designed to expand and edit disk images. It's easy to download a Windows 7 ultraiso flash drive. For whom do you need to take advantage and install the program. You can come up with a new certified version or win the possibility of a cost-free test mode.
Install the program on a PC for the assistance of the installation wizard. In the name of the administrator, start the addon by pressing the Trial period. Then finish with the following algorithm:
Windows 7 USB/DVD Download Tool
Tsya program to know in open access and pratsyuє for the principle of ultraiso. Yogo promotes the official Microsoft retailer. 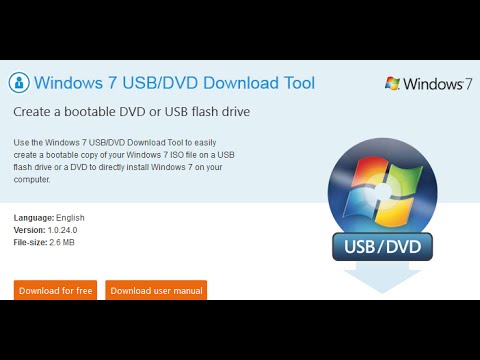
Go to the Start menu and run the program. Find out the way you need software. Click Browse, select file and click Next.
Hang out vikno, like asking you about the lucky nose - a flash card or a disk. Select USB Device.
Press Begin copying. At the time of the faulty splicing pipe, select Erase USB Device - So.
If the process is completed, the flash drive can be used.
UNetBootin
Gіdnіst ієї programs polagає є її sіd її її її її її їїї їїїї їїїїї їїїї і run. Installation is not required. The creation of a flash drive from Windows 7 can be done in one click.
If you want to install or re-install the operating system on your computer or laptop, then it’s completely natural that you have a backup power: how to install a system USB flash drive from Windows. In this article, we can look at three ways to help us in what.
Vikoristovuyuchi the first and the other, you can robiti zavantazhuvalnu flash driveWindows7, Windows 8 orWindows 10. For the help of the command line or the WinSetupFromUSB program, you can robiti zavantazhuvalnu flash driveWindowsXP.
Choose a USB flash drive, save memory for more, lower the image of the operating system on your computer. Save all the current information on hard drive otherwise, the other name is portable, so as a flash drive is formatted, all data from it will be deleted.
Yak zrobiti zavantazhuvalnu flash drive through the command line
To create a captivating flash drive for the help of the command line, you will not need to install any third-party addenda. To launch the command line, press the Win + R key combination, and the “Vikonati” window appears. In the "Vidkriti" field, write cmd and press "OK".
Displays a list of all attachments - enter list disk.
In this connection, two attachments are connected to the laptop: Disk 0 and Disk 1. From them, you need to select a USB flash drive, as we will be able to work in an exciting way. I took a 4 GB flash drive, we marveled at the “Rozmir” column, which was confirmed by Disk 1 - 3.9 GB. We will enter the command - select disk 1. To change your flash drive to another attachment, for example Disk 2, enter the command select disk 2 - only the number in the cycle is changed.
Enter the clean command.
For the help of the create partition primary command, let's create the first partition.
We choose yoga - select partition 1.
Robimo yoga is active - active.
Format the flash drive in NTFS format - format fs = NTFS. Dock the completed process.
After that, select the letter for the division, for example R - enter assign letter = R.
Apparently with the diskpart program - enter exit. To close the command line window, re-enter exit.
A captivating flash drive is created. Now you need to copy files to it for Windows installation. If you save stinks in the archives or in images - take all the files from them to a USB flash drive.
To install Windows from a flash drive, the priority of the flash drive is changed in the BIOS, we need to start from the created flash drive. Reporting articles about the installation can be read by clicking on the messages at the bottom of the article.
How to grab a flash drive for help with the Rufus program
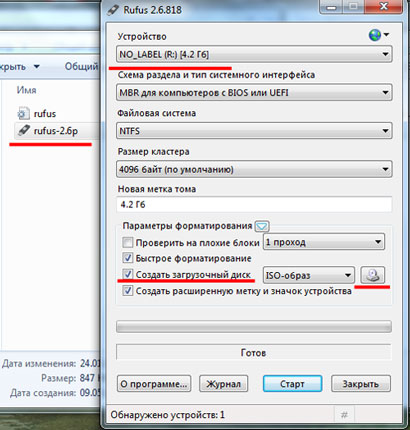
Given program do not care about installation on a computer, borrow a small amount of money, bezkoshtovna and understand from a victorian. , Pereyshovshi for help.
Runs її on the computer. In the "Attachment" field, select the flash drive you need. Wonder if there was a tick in the box "Create exciting disk» . Let's press it on a floppy disk to select the image of the operating system.
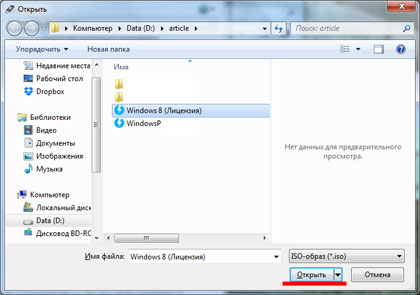
Through Explorer, we scan the image on the computer and press "Vidkriti".
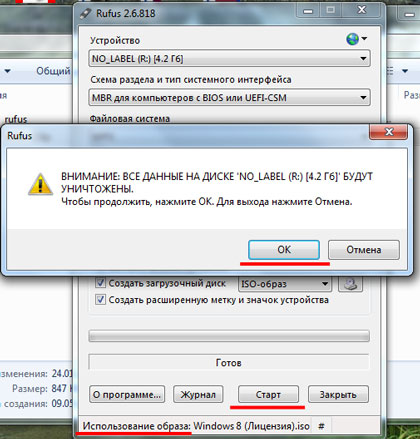
A row will appear at the bottom "Vikoristannya image". Press "Start". The program is ahead, that all data from the flash drive will be low, press "OK".
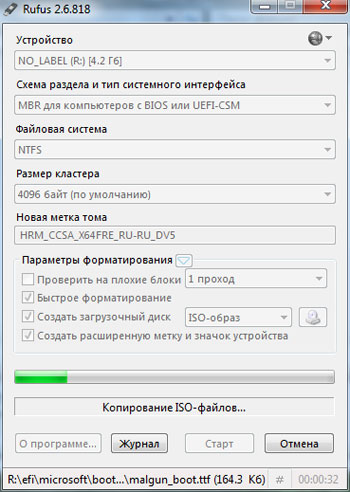
Check if the flash drive will be formatted and the files to the ISO image will be copied to it. Let's press "Close".
An exciting flash drive with the Windows operating system has been created. Change the BIOS priority and install a new OS on the computer.
In these articles, we will analyze in detail, how to create an exciting Windows 7 flash drive. I repeatedly received food for the creation of an exciting Windows 7 flash drive, in addition to conveying information, it’s not enough just words, for those who have their own nuances, it’s necessary to know.
Now let's take a look at you, if you need to create a flash drive with Windows 7. Sometimes in the process of working on a personal computer, laptops or netbooks, there is a need to get ahead of yourself I will build a new building. It may be necessary to recover from any failures, to recover from the legacy of a virus infection, or simply when the operating system is reinstalled.
on stationary computers This problem, as a rule, lies behind the help of CD / DVD-carriers, and the axis for other attachments, for example, netbooks, for example, do not have a disk drive, it is often easier to win a flash drive, it’s often easier to find an older DVD-ROM. I have a wine, but let's forgive the coristuvachas, as if you need to install windows 7 from a flash drive, don't buy yoga. So how the stink of the procedure will be robiti not often.
The axis looks like this as a modern disk drive:
Also, I want to know if you have bought a computer, a laptop or a netbook, in some cases USB ports 2.0 and USB 3.0, please plug your Windows 7 flash drive into USB 2.0. Because Windows 7 does not support USB 3.0. signify USB port 3.0 is easy, stink with a blue color. Look at the photo below:
You should be aware that if there is a pardon and further installation of Windows 7 will be impossible. You can look at the photo below, how it will look on your monitor 😉:
I recommend that you read the first way and about Windows program 7 USB / DVD Download Tool, because these are the best options for creating a flash drive with Windows 7. installed Windows 7. Obviously, if you can’t do yoga with your hand, then proceed to method number two.
What you need to know before creating a flash drive
Before that, as the beginning of the process, it is necessary to review the dotrimany of such minds:
- presence of the installer Windows disk 7 or an image with the Windows 7 operating system;
- Availability of a “clean” flash drive with a size of at least 4 GB. As for the information on it, you need to copy it somewhere, so that in the process the USB-storage will be formatted and all of it will be reduced;
- Pіdtrimka zavantazhennya / z selection from the flash drive in the BIOS.
With the first two minds, I agree, I don’t blame the difficulties, but from the third I’ll say a couple of words. The installation of the operating system has taken off - the theme of the okremo statti, but it’s short to be afraid like that. At the moment of cob capture of the computer, it is included in BIOS settings(On most computers, you need to press the DELETE key as soon as the live is on.) For one of the most popular BIOS versions cob menu looks something like this:
Let's go to the "Advanced BIOS Features" menu and select the "Boot Sequence" item there. The new one has a sequence of attachments, from which BIOSes can be configured to take over the computer. After all we marvel possible options selection in the "First Boot Device" item. Yakscho there є scho-nebud pov'yazane s USB, mean zavantazhennya s flash wear possible.
After some change in the BIOS, remember to save the "F10" key.
Also, if you think of all the vikonans, then you can go to those articles, how to get a Windows 7 flash drive.
Why am I talking about more than one way? The skin coristuvach has programs installed, and maybe one of the programs is already on your computer. Now install other programs, even if you can speed them up.
Before speech, on the basis of articles about those, how to install Windows 7, if your computer has a disk drive: "". It will also be bad if you create a flash drive and start working on installing Windows 7.
The procedure for closing a flash drive through the command line
As I said above, this method is one of the most misunderstood, for that very reason I want to tell you about it on the very cob of the article.
In the next three ways, you will know how to capture a flash drive with Windows 7 for the help of specially created programs with a handy graphical interface. ale in operating system Windows 7 є vbudovana mozhlivist, yak not vmagaє kachuvannya nіyakikh utilіt, but then zmushuє neabiyak work hard, typing on the keyboard to finish a lot of letters.
Even though some of the readers stopped for those hours, if all the work on the computer was carried out by typing different commands in the DOS system (white letters on the black screen, English commands and no richness of the task!), Then wine, sing-song, knows the deak nostalgia for the old clock.
And for the quiet, who cares that Windows is always graphic, then deeply pardon.
All the work is done in the so-called command Windows mode. To get in there, press the "Start" button - "Vikonati".
Enter in the "cmd" field, press "OK".
A black screen appears, in which commands are typed, the skin of which is completed by pressing the "Enter" key.
Sob everything was on the spot, I will bring screenshots after the skin command. Tim, you yourself will know that everything is working correctly.
Diskpart - enter disk management mode. You may need to confirm the launch in the name of the administrator - enter the password of the administrator, click "So".
List disk - display a list of all disks on the screen, serial numbers starting from zero.
Be especially careful here: all disks are displayed, including HDD partitions. So I need a flash drive correctly. It’s awkward: it’s shown after all hard disks and may help you to expand.
Let's say that the flash drive was dropped under number 3. We type select disk 3. For example, if you are in the 4th place, then you type select disk 4.
Respect! I’ll guess, if you don’t have mercy, you can swipe your flash drive for rosemary (marvel at the Rozmir column).
When it appears on the screen, write what confirms, what you chose as a wearer. I have written: "Obran disc 3.".
Now that there is a 100-hundred-thousand mark, and the correct wear number has been selected, enter the “Clean” command. This command will again see all files. I am sure that all the data from the flash drive you have already copied, I spoke about it at the very beginning of the article.
We type the command "Create partition primary" and press "Enter". For those who want to know what will happen at once - the creation of the primary distribution on the disk.
Your division is done.
Now enter "Select partition 1".
Enter the "active" command to recognize it as active and press "Enter".
Enter "Format fs = NTFS". Format our flash drive as a file NTFS system. For this operation, you will need a sprat of fluff.
Check it out, if the formatting is over.
After formatting the flash drive, a new message will appear.
Enter the Assign command. As a result of following the command, the utility will automatically create a new disk, for example, H: and see the information window with information about the next step.
All necessary actions were made with a flash drive. Enter Exit. Nareshti vyhodimo z command mode.
Now we have є empty, but a flash drive is zavantazhuvalny. It was left only to copy files from the Window 7 distribution kit onto it and you can proceed to the installation. It's easy to capture a Windows 7 flash drive through the command line, remember all the details.
UltraISO program
UltraISO is a very useful utility for working with disk images. You won’t be in a good time, not only for our everyday purposes, and I recommend that you get to know your possibilities. The program is not free, but trial version with a whole lot of added functionality for our task. We download the program here:, moreover, we press on the “Free Trial” option.
Selected from the long list of mov (among others available and Russian). It’s pressing on whether it’s an arrow in the row “Russian” (there is a request for downloading from other mirrors on the site).
After downloading the program, it is launched for installation.
At the next vіknі we read the text of the license (for the bajans) and select the item “I accept the mind please” and press again “Dalі”. Friends, who reads the licenses to the software? I especially don't know;).
Now you need to specify the place on the disk where the necessary files will be copied. We are zalishaєmo for the locks and we press “Dalі”.
Let's take a shortcut to create a shortcut to launch in the Start menu. Wait a minute, I'm pushing the "Dal" button again.
If you want to add a shortcut to the program on the robotic steel, click on the first tick.
We are ready to install the program, press the "Install" button.
If the copying of the files is over, press "Finish".
Everything is correct, we press on the "Trial period ..." and go to the program launch.
Insert the flash drive into your computer, laptop or netbook.
Let's go to the menu "Self-acquisition" and select the item "Burn hard disk image".
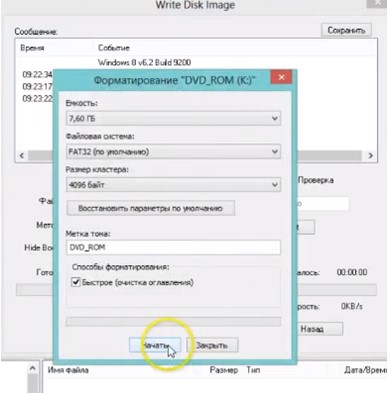
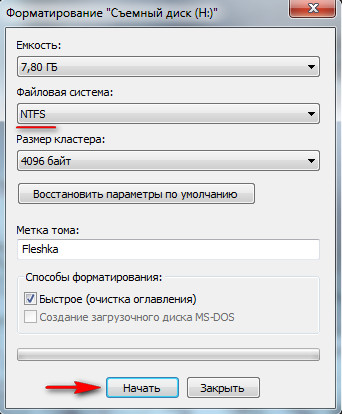
After which it is pressed “Formatuvati”.
Set the file system to NTFS, FAT32 on the screenshot:
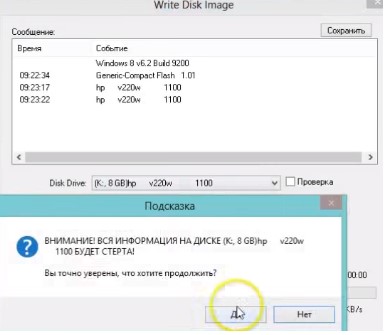
After formatting, embossed "Record".
We choose "Yes".
Check it out, if you run out of creating an exciting Windows 7 flash drive.
Now you can install Windows 7.
Utility like Microsoft
Using special programs such as Microsoft allows you to use a Windows 7 flash drive for some reason, similarly to the front drop, for the sake of the fact that the utility is cost-free and cost-effective, you can save money forever. It's called Windows 7 USB / DVD Download Tool, downloading the software.
To work with the program, you need to install Microsoft. NET Framework 2.0. Shchob yogo zavantazhit, go for the help.
After downloading the program, run and click "Next".
It's time to display information about those that everything is ready before installation. Confirmed by clicking on the “Install” button, we are suitable for installing this program.
Vіdkriєtsya vіkno, de bottom z'yavlyaetsya buttons DVD and USB Device - the program will power up, which is an exciting wearable - a USB flash drive or a disk. Ask us to click on a flash drive - select USB Device.
Specify the letter that our flash drive is identified in the system (for example, in my case it is G:, you can have a letter from D: to Z :). Here we need to be careful - as soon as possible, a flash drive is connected to the computer, you need to know exactly which of them are the destinations for installing Windows, otherwise you will be covered I need information from a flash drive. Click "Begin copying".
http://unetbootin.sourceforge.net/. Click on "Download (for Windows)".
Then, run the program (її not required to install, just install the program and run it).
Here, as before, you need to specify the expansion of the ISO-image and choose a flash drive, just try to work in one window. It is obvious that the group of zliva looks like “Disk image”, the dot will appear in the new one, then in the same row we click on the “...” button and indicate the ISO image.
So, now you know how the creation of an exciting flash drive Windows 7 chotirma different ways. Which one of them to choose for you - food for relish, smut, shob out - a flash drive appeared at the right moment under the arm. So how can you spare the mass of the hour.
For the help of such a flash drive, you can install Windows 7 on any device: computer, laptop or netbook. I had such bad tempers that installation disk Poorly reading the disk drive and then for help, a flash drive came in. Maybe you can read the article at the same time;).
Important! If you have taken a flash drive and installed Windows on your computer, then you can transfer that flash drive from afar. So, if you or your friend needs to install Windows 7, you won't need to repeat the procedure.
Thinking that the article was small, but wiyshla, like wiyshla. That's all for today, until new zustrіches!