Briefly upgraded routers with DD-WRT firmware.
Have tsіy statti mi razglyadno installed that the report was not completed Linksys WRT54gL router for work with a provider in VPN (PPTP) mode, as well as in DHCP client mode. The installation of Linksys WRT54gL will be carried out on the application of the provider BIG Telecom-Khimki (himki.net), but given instruction as a whole, you can use the vikoristan for analogy with other providers. Select Wi-Fi a router for writing this kind of kerіvnitstva buv is not a hit - Linksys WRT54gL is brought to the middle price category, and even deserved popularity among t.ch. Zavdyaki to the retailers of alternative firmware. For such projects, like DD-WRT or Open WRT, the hero of our current article, having registered with many Linux lovers, like home router. Due to the exchange of the functionality of the official firmware for our WRT54gL, we, within the framework of this survey, will look at the installation of this router firmware DD-WRT. Head rank tse viklikano tієyu furnishing, scho in official firmware there is no full support for working as a PPTP client (no routing to local resources for an active PPTP session). WRT54gL with the revision of the hardware stuffing (v 1.1) is used for customizing vicorists. It is also respectful that this instruction is for setting up more routers with DD-WRT firmware, and not only for the Linksys WRT54gL model.
So, let's be aware that you wanted to buy a Linksys Wi-Fi router, you took it out of your box and now lie in front of you in an unpacked look. Marvel at the new respect - on the front panel of the router you can see a number of indicators, which in the process of robots signal about the characteristic fringes of the bottom, and on the rear panel you will find 4 LAN port(interface) and 1 wan port for connecting the cable to the postman. This means you can connect directly to the Linksys WRT54gL. You can connect via cable to some computers. If you don’t want to forget about the possibility of connecting to your home, there are more spices of wireless attachments - Wi-Fi installation, for which the router can have 2 antennas dartless sting with support for the 802.11g standard.
Connecting a computer to a Linksys WRT54gL router
Before installing the Linksys WRT54gL, you will need to make a good connection to your computer. For this Wi, plug the router's live adapter into a power outlet, connect the WAN provider cable to the router's interface, and one of the LAN ports with a blue patch cord in the kit connects directly to the computer's network card. If it is necessary to change the TCP/IP setup lace pattern on the automatic value change (DHCP client) on the side of the Linksys router behind the LAN interface. You can do it like this:
Connecting a router in Windows XP: Start - Control Panel - Merezhevі connections - Connecting by local lines- Authorities - Internet Protocol (TCP/IP) – further div. small 1
Router connection in Windows 7 (seven): merezhy connection- Local connection - Authority - Internet protocol version 4 - remote div. small 2

For the default WRT54gL, the value of the IP address is in the range 192.168.1.0/24, so in another hour your home personal computer is responsible for taking the necessary address on the kshtalt: 192.168.1.33 or 192.168.1.34. It is possible to change the IP-address from the router by turning the connection on the local network (div. fig. 3)

Write DHCP assignments to confirm that the Linksys WRT54gL router has successfully seen the internal IP address over the LAN interface. If nothing appears, then there are no problems with the DHCP client robot on your computer. Most of the time it can be called by the firewall robot (firewalls), but there are other reasons ... In this case, we can make it possible to register the necessary IP addresses in the computer manually. For whom it will be sufficient to indicate the current IP parameters on your computer:
- IP - 192.168.1.101
- Pdmerezhi mask - 255.255.255.0
- Default gateway - 192.168.1.1
- DNS - 192.168.1.1
Linksys WRT54gL router setup with DD-WRT firmware
We will be able to tune the Linksys WRT54gL through a web interface, which allows you to fine-tune all the main parameters of our wifi router. To enter the Linksys WRT54gL web interface, you need to use any computer browser (Opera, Internet Explorer, Mozilla) go for the address: http://192.168.1.1 (the address of the Linksys WRT54GL router can be locked). Please enter the authorization page on the computer screen (div. small 4)
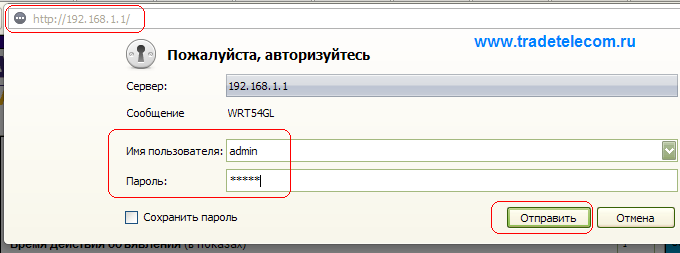
To log in to the WRT54gL web interface, you need to enter the Personal Name and Password, and then click on Add. Zamovchuvannyam Im'ya Koristuvach - admin, Password - admin. After successful authorization, you will be prompted to enter the dialog box (div. small. 5):

You have gone to the web interface of the WRT54gL router, de pristriy vіdrazu proponuє vikonati nalashtuvannya z'ednannya with the Internet. We will not be able to update the date on the original "firmware" through її lack of functionality, we will correct it in the menu for updating the firmware of our router.
Firmware update for Linksys WRT54GL router
Since it has already been marked already, we will specially replace the firmware (internal software security) of our WRT54GL for the version of the DD-WRT project. For which we need to get the firmware into our computer, for which Linksys is being adjusted. You can download the firmware to your computer later or download it with another computer. You can download the latest firmware version for Linksys WRT54gL on the official website of the DD-WRT project.
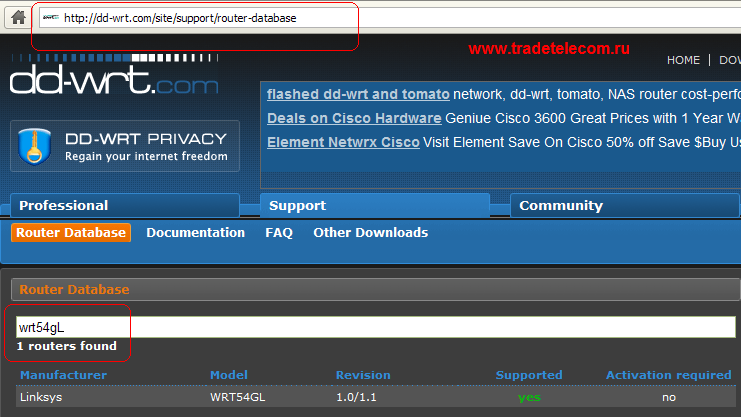
How can you dance from fig. 6, for our Linksys WRT54gL v1.1 router on the official website of the DD-WRT project there is a valid firmware.
Click for your router model and then choose - what firmware version to get us. We use the mini_generic version, so it can be loaded without any problems at the flash router via the web interface, with all the necessary functionality for our tasks. (Div. Fig. 7)

Therefore, we will install the firmware to your computer for distant diy. Zavantazhuemo, obviously, on the wrong computer, on what you Narazi install a router, and for whatever else, which may at the moment have access to the Internet.
You can upgrade the Linksys WRT54GL firmware via the web interface under Administration – Firmware upgrade (div. small 8)
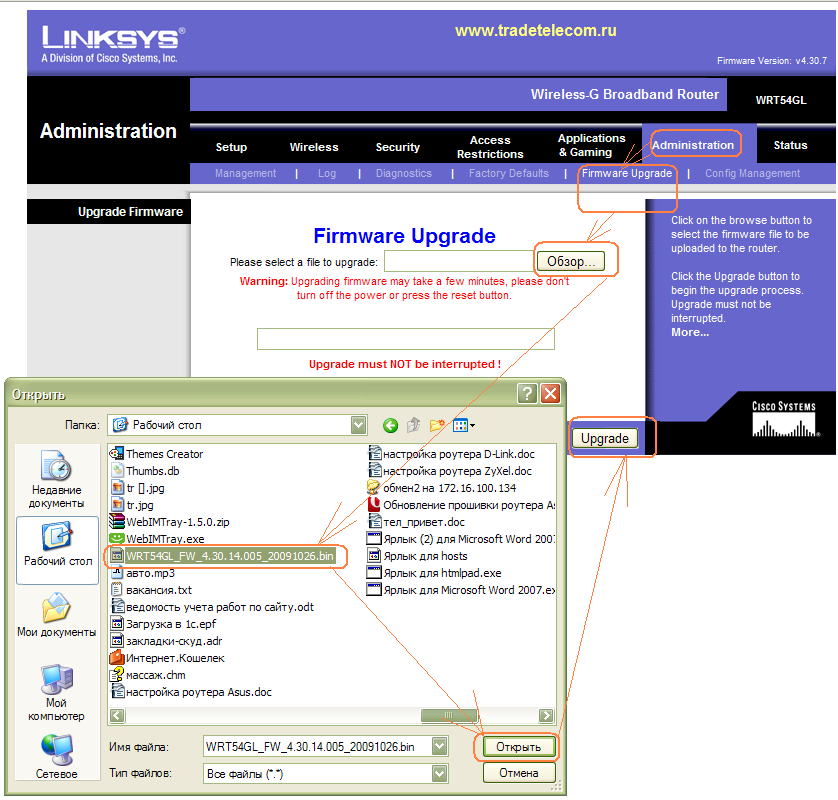
To upgrade the firmware, click on the button Look around ... and go to the browser to the file with the firmware (in the file extension.bin), indicate it and click on the Upgrade button.
Why the router can be seen on the screen ahead of time (div. Fig. 9):
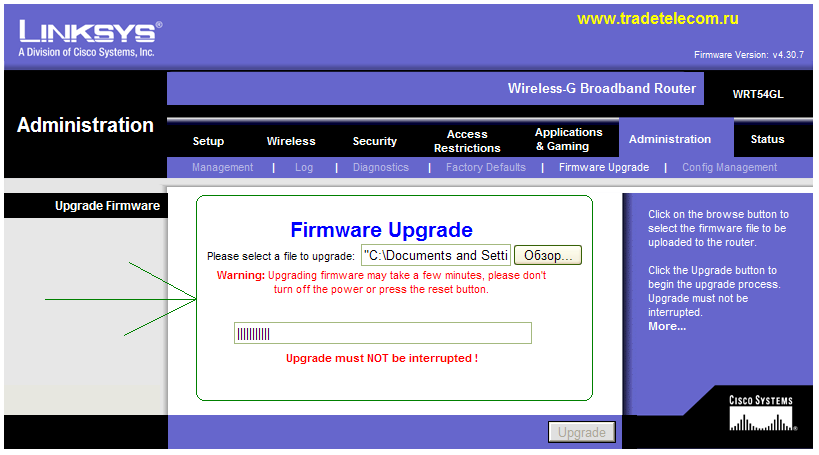
Your router will tell you about the installation new version firmware (DD-WRT) and ask for an hour to give you peace.
Respect!!! Updating the upcoming 4-th whilin in any time, do not change the life of the router and do not interrupt the flashing process, be it any other actions!
After uploading the firmware to the flash router, a notification will appear on the screen (div. small. 10)
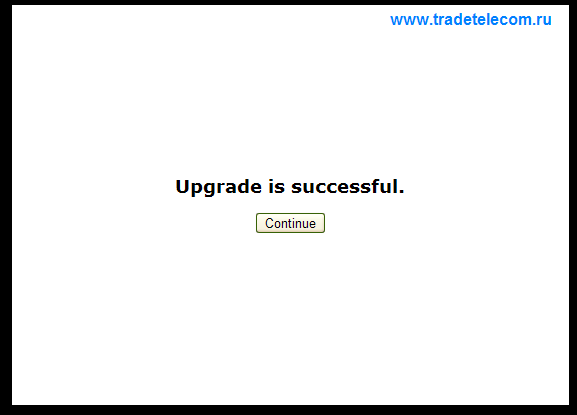
Do you know WRT54gL about the success of the installation new firmware. After uploading a new "flash" we recommend to upload outside the skid router parameters! It is possible to work for help by pressing on the Reset button (dropping off the button), which is embedded in back panel buildings. As soon as the reset is completed and the router restarts, you are safely allowed to access the web interface, you can accept our privacy, the software update procedure was successful! If your WRT54gL does not work, then, better for everything, you will have to return to the service center.
When the hour has come to reconsider, the firmware you uploaded has taken its rightful place in the router. For whom it is enough to get to your Linksys router via the web interface, the changes will be marked with an “unforgettable eye” (div. Fig. 11)

WRT54GL firmware update completed. However, in the name of TRADE Telecom, it is still recommended to periodically check the availability of new firmware versions on the website of the DD-WRT project. Sometimes (not often, albeit trapleyaetsya) in the current versions of the firmware you know the quirks that create security threats, which are used by the retailer in the new versions of the firmware. For some types of firmware updates, there is a shift in the workflow for different firmware protocols (for example, PPTP or L2TP). True, varto means that firmware updates are being carried out, as they bring more problems, lower cost, but in this time, nothing matters previous version firmware.
Configuring Internet access for the WRT54gL router with DD-WRT firmware
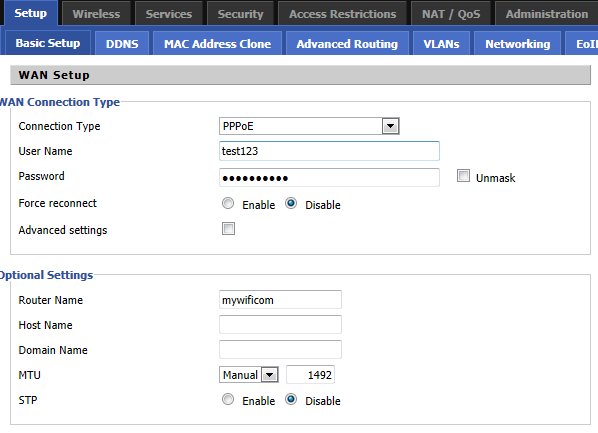
The time has come to launch the connection to the Internet at the Linksys WRT54gL router with DD-WRT firmware. In our opinion, we can look at the implementation of the 2nd popular protocols among Russian providers - DHCP and PPTP VPN. Behind these protocols are different segments of the BIG Telecom provider. At the time of your provider, we recommend that you first check with the technical support for information about the type of connection! It’s not a fact that everything will turn out like this for you ...
For the beginning, we can fix the Linksys WRT54gL in DHCP mode
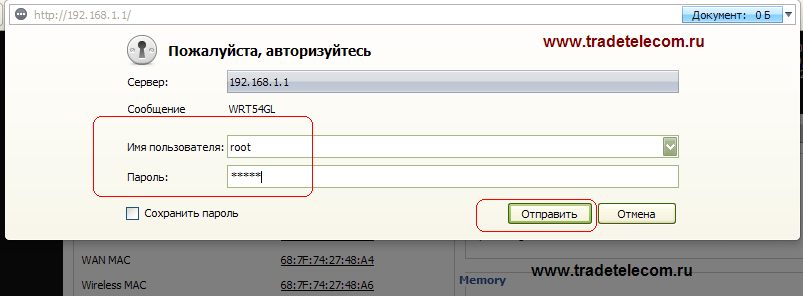
You can start setting up a connection with an Internet provider in Setup (div. small. 11). After that, your router will ask you to log in (enter your login and password). Fuck, after changing the firmware on DDWRT (DD-WRT) at the Linksys WRT54GL router, it is changed after the lock, and the password is deleted by ourselves! To log in to a router with DD-WRT firmware, type in the username - root and password - admin (div. Fig. 12)
When setting up a router with DD-VTR in DHCP mode (automatically removing the IP address from the provider), you are not to blame for any particular difficulties. Setting up a connection in DHCP mode is initiated in Setup – Basic Setup (div. small 13)

For this, in the Wan Connection Type field at the Connection Type item, you must select the type of connection Automatic configuration - DHCP.
The STP option for different business providers should be moved to the Disable position.
In the Network Setup field for setting up the router in DHCP mode, you can change the range of the router's IP address for the internal router. It may be worthwhile, as the range of the address of the local network of your provider is matched with the internal range of your home network.
You can change the MAC address if necessary ( physical addresses Ownership) of your router at the special Setup menu - MAC Address Clone (div. Fig. 14)

It may be even more distant, if the provider implements the binding of the MAC address to the client's IP address at the enterprise. Bo leather framing attachment send your unique MAC address, this option allows you to uniquely dzvіnkіv provider at the time of change of ownership. To change the MAC address, you need to switch the MAC Clone option to the Enable position. For promotions at the Clone WAN MAC field will appear "near" MAC address your router. The MAC address can also be recognized on stickers, printed on the bottom of the router (six digital-letter pairs). You can enter the MAC address in the router that is identical to the MAC address of your computer, on which you worked before installing the WRT54gL. Below in the menu, there is a Get Current PC MAC Address button, for the help of which the router itself will take the value of the MAC address of the computer's boundary card, for which you need to install the router. To allow you the need to recognize and type in the value of the MAC address of the computer manually. In addition, for the additional Clone WAN MAC option, you can specify whether the MAC address for your Linksys router (between allowed values). If you want to select a router with a "non-standard" MAC address, then use one of the suggested options. If you want to register the correct MAC address of the router, then you can call your provider and provide the correct value of the physical address.
If you don't have enough, press the Save button to save money, and then click the Apply Settings button to save it.
You can change the status of the vicons on the status menu: p. Status - WAN (div. fig. 15)

Here, at the Configuration Type field, you can find information about those that the router successfully connected to the WAN interface from the provider's DHCP server and entered a new IP address. In fact, you can already use the Internet from a computer that you have connected to the LAN interface of the router. And just like that, you have paid for access to the Internet :)
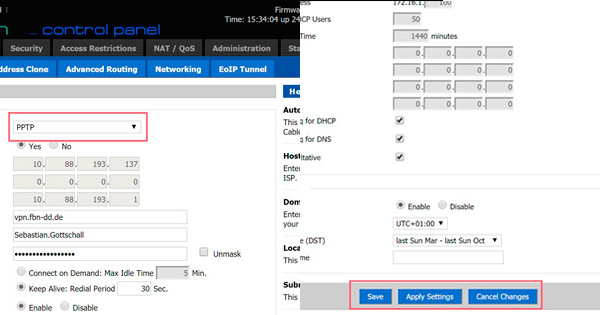
Linksys WRT54gL router is now enabled for PPTP VPN connection mode
Configuring a router with DD WRT firmware in PPTP VPN mode means a significantly larger number of manipulations, lower configuring in DHCP mode. And it starts out already known to us Setup - Basic Setup (div. Fig. 16)
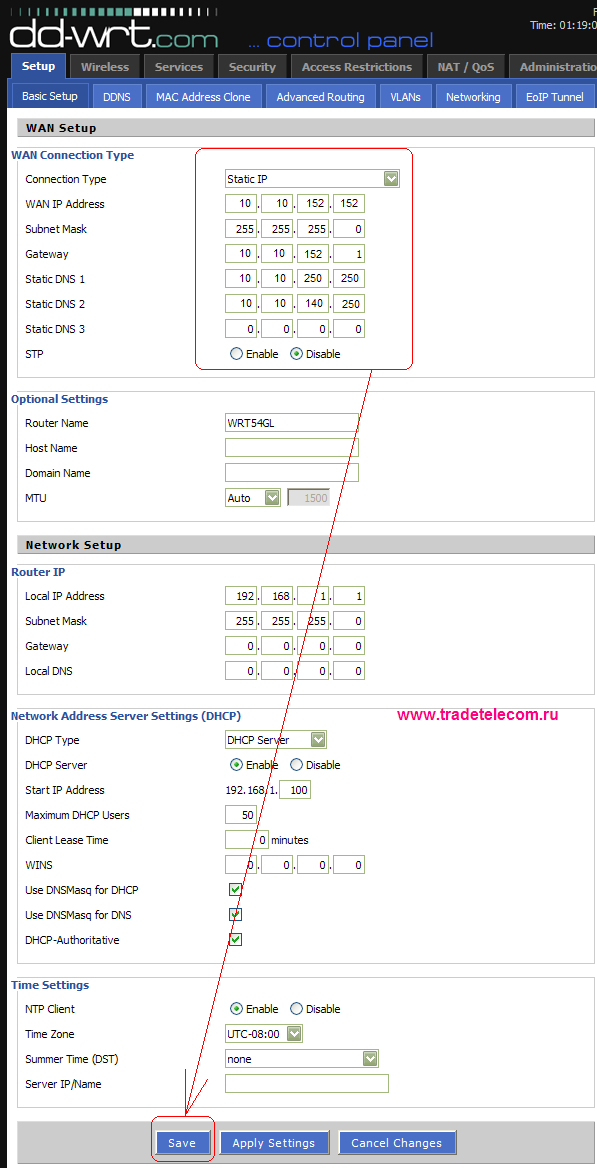
For this, in the Wan Connection Type field, at the Connection Type item, you must select the Static IP connection type (this is the same, not PPTP, the VPN client shards are only available in a different region three times later).
In the WAN IP Address field, you will need to specify the IP address that the provider sees for you under the contract (div. your contract or go to the technical support).
In the Subnet Mask field, specify the value of the subnet mask, as selected by the provider (div. your agreement).
For the Gateway field, you need to specify the address of the main gateway in the provider's network (div. your agreement)
For the Static DNS 1 field, you must specify the address of the domain name server (div. your agreement with the provider).
For the Static DNS field 2 follow the address alternative server domain names (div. your agreement with the provider).
For savings, you don't have to press the Save button.
Entering the parameters will be enough to connect with the provider in the Static IP mode, and VPN setup linking our Linksys WRT54GL with the server of the Internet provider we can find in the menu Services - VPN (div. fig. 17)

The PPTP Client Options option must be set to the Enable position to enable the VPN client router.
For the Server IP or DNS Name field, you must specify the address VPN servers Your provider (div. your contract). The value can be entered both for the domain and for the IP address. You will also add a string to the server address with the --nobuffer key to reduce the load on the processor of your Linksys WRT54GL. The results can go to kshtalt: vpn.bigtelecom.ru --nobuffer
The goal is to increase the speed of the WRT54gL router for the average person for an hour of work with VPN services from 250 KB / s to 1 MB / s.
The MPPE Encryption option determines the presence of encryption in VPN tunnels to the provider's server. If you send us providers that do not win encryption when Starting a VPN more koristuvachiv will be enough to say here: nodeflate
For the User Name field, it is necessary to specify a login to connect to the provider's VPN server (this value can be determined from your contract with the provider, and for the BIG Telecom-Khimki provider, the login is entered with the number of the contract).
For the Password field (password), enter the password for connecting with the provider's VPN server (special agreement, for BIG Telecom, the password is entered with the password for entering the special account on the statistics server).
The Linksys WRT54GL PPTP VPN client setup is completed by pressing the Save button.
If, if necessary, you can perform manipulations with the WRT54gL MAC address, see the report in fig. 14 and in the comments until new.
Setting up routing (routing) for Linksys WRT54GL with DDWRT firmware
The next step when setting up the Linksys WRt54gL router in PPTP VPN mode is setting up routing. This procedure is necessary for one-hour access to the local resources of the provider within the hour of the established VPN connection. If you don't need to chirp with local resources, then you can skip this step of setting up the router. For those who choose to go far away with such local services, like FTP or DC ++, you can set up routing (routing). For routers with DD-WRT firmware, you can change it in Setup Advanced Routing (div. Fig. 18)
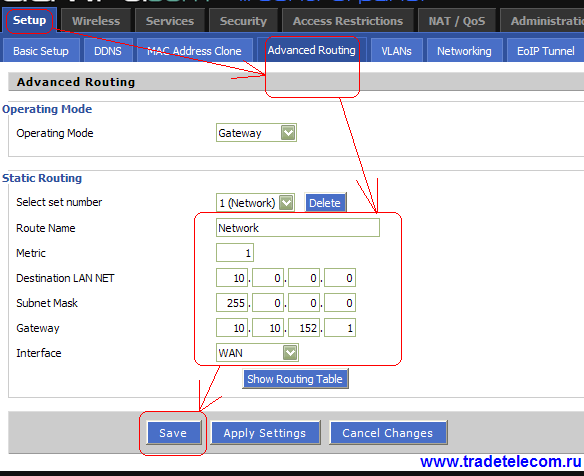
This menu is a table for entering static routes. Static routes (call routes), which are necessary for your particular destination, you can check with technical support your provider. To create a routing rule, you need to select a row (serial number) for the rule in the Select set number field.
For the Route Name field, specify the name made rule. Here you can show whether it's significant.
You must specify a priority for the Metric field which rule matched with others (for locking with more vipades, you can set the value 1).
In the Destination LAN NET field, enter the IP address assigned to this static route, in the Subnet Mask field, enter the destination mask for a specific route, and in the Gateway field, enter the address of your local gateway (the rest can be recognized from your contract with your ISP).
In the Interface field, when creating a local route WRT54GL with DDWRT firmware, select the WAN option.
After entering the required data, press the Save button to save this route on the Linksys router.
Similarly, you can create routes for other addresses that you need to add to the local zone (div. small 19).

Axis so you can enter information to your router according to the skin static route, which should be activated according to the recommendations of the Internet provider.
By clicking on the Show Routing Table button, your WRT54GL will show the streaming parameters of the routing table, where you can see all active routes.
After creating all the necessary rules for setting up routing in the Linksys WRT54GL, you can finish it. Click on Apply Settings to set the router parameters. Fuck that the router with the DD-WRT firmware does not open the VPN session, but in some sort of fluctuations, it’s cool after your re-advancement!
Setting up a connection between a VPN router and an ISP will end at some stage. You can convert її success for help ping commands on your computer or for the help of the tracert command. For whom do you press the keys

Setting up IPTV and multicast on the router with DDWRT firmware
IPTV is the most popular service for the rest of the hour digital television, which is hoped by the Internet provider without interruption. There are 2 options for using IPTV services through a router with DD-WRT firmware: for additional TV set-top boxes (set-top-box or STB) and directly on the computer via special program(VLC, IPTV Player, PC player etc.). Below, we will look at the installation of IPTV for all two types, and you will need to reconsider that your provider provides digital television service (IPTV) to its subscribers.
For the first time, we have a Linksys WRT54gL router for connecting IPTV set-top boxes without intermediary to one of the LAN ports of the router. Through the WRT54gL console, you can connect one of the LAN ports in the WAN mode to the WAN, which ensures the full passage of Multicast traffic through the router, without zavantazhuyuchi central processor outbuildings. As a result at connected IPTV set-top boxes without intermediary up to one of the LAN ports of the router, IPTV set-top box takes the IP address not from the router, but from the provider's server.
You can tune the port of the Linksys router through a telnet session. For whom in Windows systems it is possible to step: press the keys
Also, typed from the console: telnet 192.168.1.1
Behind the power supply of the router, enter the name of the koristuvach (login) and the password (password) (div. Fig. 21)

nvram set vlan0ports="1 2 3 5*"
nvram set vlan1ports="0 4 5"
As a result, on the Linksys WRT54GL v 1.1, the LAN4 port is located in one VLAN (wilan) from the WAN. We will help you to lose your connection IPTV set-top box to the LAN4 port of the Linksys router, and everything can work :)
Now we have a Linksys WRT54gL router with DD-WRT firmware to review IPTV on a computer
For whom it is necessary to enable the transit of Multicast traffic through the firewall of our router. Ale, I want to get ahead, so that looking at IPTV through a Danish router will be more possible over cable, over Wi-Fi the picture will be tinkering, spitting and smacking.
Also, we’ve set up the firewall of our router in Security - Firewall (div. Fig. 22)

For the Filter Multicast option, uncheck the box so that the firewall of the router does not detect IPTV traffic. After that, click Save to save the setting of the router. As a result of all these manipulations of IPTV on a router with DD-WRT firmware, digital television can be ordered from specialized software on a computer (VLC, IPTV Player, PC player, etc.).
On which setup of the Linksys WRT54gL router for work with IPTV, you can finish it.
Setting up Wi-Fi connection in Linksys WRT54GL with DD-WRT firmware
Linksys WRT54GL Wireless Router Supports the Standard wireless WiFi(Wi-Fi) connection - IEE 802.11g, which guarantees the possibility of working with more current wireless hands-free. Setting up WiFi networks for routers with DDWRT firmware is available for Wireless - Basic Settings (div. fig. 23)
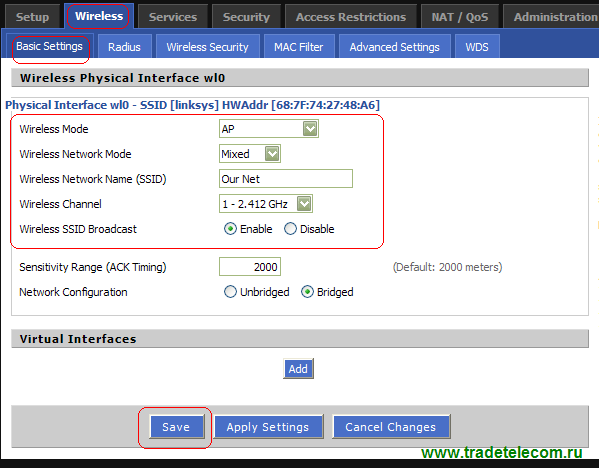
Chomu's menu has been customized without a dart our router has the following important points:
Wireless Mode - robotic mode dromeless interface at our router (we can use it in AP mode - access points).
Wireless Network Mode – adjusts to different Wi-Fi standards. What do you have wireless wifi Since there are no plans to change to the outdated 802.11b standard, it is recommended to abandon the c 802.11g option.
Wireless Network Name (SSID) - the name of the future network WiFi at home or in the office. Here you can make your own meaning, as if it were especially like you. I’ll call you under the name of You bachit the bezdrotov network with your Wi-Fi clients.
Wireless Channel - choose a channel for a wireless Wi-Fi call. It is not recommended for mothers on the right with channel number 6, but most of the Wi-Fi standard is available on this channel itself. Ideally, it is recommended to use your own vibrators on channels 1 or 12, in order to minimize the noise interference with the dartless susid lines.
The Wireless SSID Broadcast item activates the wire identifier extension, which allows "batching" the wireless wire on client outbuildings with an operating room Windows system. Turning on the SSID allows you to hide your Wi-Fi network in the event of unacknowledged wires on your behalf. However, if you ever happen to be on a computer with Windows, you would like to connect to dartless mesh even before that, how do you hide it through the menu of the router. in tsyumu dropdown Windows Automatically create a profile for a non-rotor tether and connect to it, navigate like a tether then use the SSID extension. You can, of course, manually create a profile for z'ednannya z'ednannya z'ednannya without SSID using the operating system, but also the theme of the mobile phone.
Why do you press the Save button to save your money.
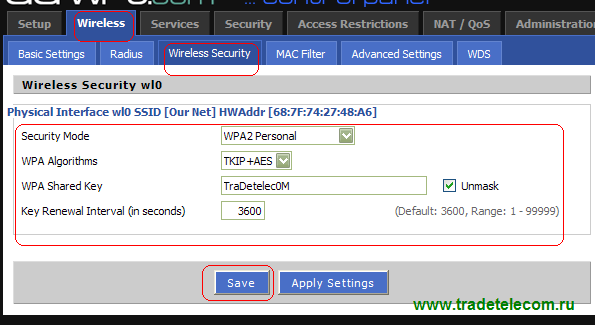
In the Security Mode field, select the type of encryption for your wireless security. Due to the improvement of the WEP protocol, we recommend that you enable WPA/WPA2 encryption on your Wi-Fi network. That's why you should choose your choice on the WPA2 Personal option. But if not all Wi-Fi possessions can work with this type of encryption, then if you have problems with accessing wireless clients to the router, you can "degrade" the encryption to the WPA Personal level.
In the WPA Algorithms field, we assign an encryption algorithm in a non-rotor way: AES is a more secure option, lower is TKIP, but not all non-rotor clients can work with it without problems. The TKIP+AES option is more universal in terms of the summability of the client's possessions, so for the "better calm" you can get rid of yoga.
In the WPA Shared Key field, you must specify the encryption key (password) for the wireless network. Vіn maє buti dozhinoy not less than 8 characters. In the name of TRADE Telecom, it is recommended to use great/great letters, numbers and special characters in passwords. This minimizes the possibility of picking a password up to a dartless barrier. And vzagalі reasonable dozhina WPA password for home without a dart system - 8-12 characters.
Key Renewal Interval (in seconds) – key renewal interval. For zamovchuvannyam you can lose the meaning.
After filling in the options of this menu, then press the Save button to save the encryption of the wireless network on your router.

TX Power option jetless signal Linksys WRT54GL router. For lock-in cost 71 MW, sanitary norms allow for living quarters the power consumption of the troch is more than 100 mW, and the maximum Linksys WRT54GL with DD-WRT firmware allows setting the value of 250 mW. "Delay" the intensity of vibration up to 100-150 mW may appear brown in the premises with thick walls, or if it is necessary to cover the kilka on top of the bud with a dart-free tie. The axis is only in order after the router after the first repair in the "yanuti kviti" and self-employment of the necessary items (zhart).
In addition, in this menu, the Radio Sheduling item (activated in the Enable position) allows you to set the time schedule for the operation of the radio module for your wireless router. For the help of the scale of the hour, you can choose that year, if you win Wi-Fi Merezhi you do not need a router (the stench is known as a chervonim). This option allows you to turn on the radio frequency, for example, at night time, which may appear brown if the router is in the bedroom or in the bathroom.
After activating the necessary options, you don't have to click the Save button to save changes to the configuration of the Linksys router with DD-WRT firmware.
On tsoma WiFi setup in Linksys WRT54gL with DDWRT firmware, you can enter the finished one. Turn on your laptop or PC and try to connect to your computer without a dart WiFi network, vikoristovuyuchi appointments before the password for Wi-Fi. For the help of your own security, you can now organize a security guard for the apartment for the help of IP cameras. If you like it, if you need some video warning, then for this information you can turn to our favorites. Video warning of the territory of the office with Links WRT54gL more lower real.
Setting up port forwarding (port forwarding) on routers with DD-WRT firmware
Port forwarding (Port Forwarding) on the Linksys WRT54gL router is necessary, as you plan to vicorize programs and add-ons in your home, to prevent unsolicited access to them from the side of the local network provider or the outside Internet. For example, the transfer of ports from the router and the need for wiping at different access from the Internet to web camera at your home or at vikoristanni file sharing services type torrent chi DC++. The principle of port forwarding is based on the attacker: You independently inform your router, which type of unpowered traffic to the router calls to redirect through NAT to the IP address of the home network.
Let's take a look at the port forwarding (Port Forwarding) for Linksys WRt54gL on Utorrent and DC applications
You can configure port forwarding for the WRT54GL in the Nat / QoS - Port Forwarding section (div. Fig. 26)

In this menu, you can create port forwarding rules for the same type of traffic.
As an example, we can set up port forwarding on the Linksys WRt54gL router with DD-WRT firmware for the DC++ file sharing program (Fig. 27)

If you have DC++ enabled, you will need to activate the Firewall login mode with manual port redirection. At the time of file sharing in the middle of the provider's local network, in the field Start / WAN IP, enter the internal IP address, as you see the provider for the contract. If you are transferring a robot with a DC++ client to the outside Internet, then in the Outside / WAN IP field you will need to enter your seen IP address (for more detailed information contact your ISP).
In the field Ports: TCP and UDP You need to enter the values of the ports for which you plan to work with the DC client. We recommend that you choose the port values, which are easy to remember and stench is not taken over by the system.
After that, let's turn in the menu for setting port forwarding of our Linksys WRT54gL router (div. Fig. 26), then in the Forwards field, we will need to fill in the necessary values for the first rule.
Here, in the Application field, I’ll name our first rule for port transfer. Radically create names for the recognition of the rules, so that they were given a simpler “refresh your mind”.
In the Port from field, specify the value of the port from which router should forward traffic from the internal home merezha behind a Linksys router. Which port is responsible for matching the port on your DC client (div. small 27).
In the Protocol field, you can specify the protocols that the router will need to forward traffic. The DC++ program collects TCP and UDP data packets for its work (div. Fig. 27), so choose the Both option, which includes both TCP and UDP packets.
In the IP Address field, you must specify the value of the internal IP address of the computer in your local network, to which router you need to redirect traffic. You can recognize the internal IP address in the connection station by the local measure (div. small 3). This value can match exactly the same IP address values in your router's forwarding rule!
Then, in the Port to field, specify the value of the port, which we need to redirect external traffic to DC ++ at the internal gateway behind the router (the value can be changed from the external port in the client's DC).
Indicated by a tick in the Enable item to activate the rule.
If you don't want to press the Save button to save the forwarding rules in the WRT54GL settings.
Now we can see the creation of the Linksys WRT54gL router with the DDWRT firmware of the rule for transferring ports for Utorrent (div. Fig. 28)

In the field for entering the value of the input port for the torrent client, specify the port that we would like to redirect to our Linksys WRT54gL router.
Then we turn to the menu for setting port forwarding of the router, after which we create a rule for forwarding incoming connections for Utorrent. To add a new rule, press the Add button and fill in the row under the already existing rule. When the forwarding rules are created, it is safe that the computer from the torrent client at home may have an internal IP address: 192.168.1.33. Forwarding traffic on port 22222, which is indicated in the created redirection rule. (Div. Fig. 26). In such a simple way, you can fix the axis of Port Forwarding in Linksys WRt54gL with DD-WRT firmware.
It is also significant that for the correct operation of Utorrent you will need to connect your provider to the service of a seen (outdoor) IP address, it will not be enough to set up port forwarding (Port Forwarding)! Otherwise, let's take a third of the power, and let's remind the torrent client that the port is closed. In addition, you can find out about our reasons for setting up Utorrent for optimal work through a router.
Since your Linksys router is set to work as a PPTP client, there is one more fold when passing ports from the outside Internet. Through a special view of the interface for the PPTP session, transfer ports as needed from the console (div. Fig. 29).

So, for example, to connect TCP port 22222 to the Internet from the router’s internal directory to IP: 192.168.1.33, you will need to enter the following in the Command Shell field:
iptables -t nat -I PREROUTING -p tcp --dport 22222 -j DNAT --to 192.168.1.33:22222
iptables -I FORWARD -p tcp -d 192.168.1.33 --dport 22222 -j ACCEPT
If you don't have enough, press the Save Startup button.
Axis, maybe, and everything that needs to be installed Linksis WRT54gL, as you may need for an hour of home operation of this router. If you have tightened the entire manual for setting up a router with DD-WRT until the very end, then you can take our vaping!
If you have been honored with our instructions for setting up a router with DD-WRT firmware, then you will be the best, if you can send me a request for this material from your blog or on the forums of the local provider. Do you want to improve the position of the third party in the search view after the fact that the request will be insured poke system Yandex chi Google.
In addition, on our website you can find out more reports on how to independently configure an access point and WiFi router:
- Merezhevі and multimedia capabilities of alternative firmware for Asus routers like Padavan (with DLNA and Transmission enabled)
- Connecting the YOTA modem to the Mikrotik router
- Self-configuring Wi-Fi router Mikrotik In addition, our online store of computer components encourages you to buy more actively. fair price. Our viddil system integration also installed intercoms in Moscow and Pdmoskov'ї. You can fix the installation of the intercom V with our manager.
Let's proceed to the preparation of the connection of the outer building.

In order to revise, chi mounted hard drive go for the address http://192.168.1.1/USB.asp and marvel at Disk Info. How to row Status: Mounted on /mnt” mean all approx.
Installing add-on packages and software
Now we are preparing the router before installing additional optware packages, for which it is necessary to advance:
WinSCP can't be closed, we can turn it over with PuTTY and we can see next commands:
ls/jffs/lib chmod a+x/jffs/lib/*
cd/tmp wget< a href= "http://downloads.openwrt.org/backfire/10.03.1-rc4/ar71xx/packages/opkg_576-1_ar71xx.ipkipkg"> http: //downloads.openwrt.org/backfire/10.03.1-rc4/ar71xx/packages/opkg_576-1_ar71xx.ipk ipkg install /tmp/opkg_576-1_ar71xx.ipk
In WinSCP, we go to the / etc directory, create a file, when we select Files - New - File in the menu (or press Shift + F4). Introduced opkg.conf and copy there:
src/gz snapshots< a href= "http://downloads.openwrt.org/backfire/10.03.1-rc4/ar71xx/packages/dest"> http: //downloads.openwrt.org/backfire/10.03.1-rc4/ar71xx/packages/dest root /opt dest ram/tmp lists_dir ext/tmp/var/opkg-lists
In the Commands field, insert:
sleep 2 if [ - f / mnt / optware. enable]; the mount - o bind / mnt / etc / etc mount - o bind / mnt / root / tmp / root mount - o bind / mnt / opt / opt else exit fi if [ - d / opt / usr ] ; then export LD_LIBRARY_PATH= export PATH= else exit fi
Tisnemo "Save Startup"
Reboot command, for which PuTTY will disable the Reboot command.
We start PuTTY again and win the command:
export LD_LIBRARY_PATH= "/opt/lib:/opt/usr/lib:/lib:/usr/lib" export PATH= "/opt/bin:/opt/usr/bin:/opt/sbin:/opt/usr/sbin:/bin:/sbin:/usr/sbin:/usr/bin" opkg update
We put the next packages. (Copy commands in PuTTY):
opkg install libc opkg install libgcc opkg install uclibcxx opkg install libncurses opkg install busybox
I restart WinSCP. We go into the /mnt/root directory and edit the .profile file, since there is no such file, then we create it. We insert the next one:
export LD_LIBRARY_PATH= "/opt/lib:/opt/usr/lib:/lib:/usr/lib:/opt/usr/local/lib" export PATH= "/sbin:/opt/bin:/opt/usr/bin:/opt/sbin:/opt/usr/sbin:/bin:/usr/bin:/usr/sbin:/opt/usr/local/bin" export PS1= "\[\033\[email protected]\h \[\033\W $ \[\033" export TERMINFO="/opt/usr/share/terminfo"
The file is saved and reloaded with the Reboot command.
After reloading in PuTTY, the following command is disabled:
Router configuration for the installation of packages is completed. You can install packages.
We win the command:
for installation file manager Midnight Commander on the router.
IPTV over HTTP for wifi review
If your ISP provides IPTV broadcasting services, then Multicast communication will be heavily occupied by the channel for revisiting iptv chaser wifi it is necessary to convert udp traffic to http, with which you can perform the following actions:
Editable Startup
We give the command:
cd/tmp wget< a href= >http: chmod + x udpxy / tmp / udpxy - a router_ip_address - p 4760 - m Your_name_IP - B 1Mb - M 30
ip_addresses of the router - as you did not change, then the addresses are 192.168.1.1
Your_name_Ip - Post IP address, as expected by the provider.
The result of the new Start script is due to something like this:
cd/tmp wget< a href= "http://files.0day.triolan.net.ua/triolan.ua/dd-wrt/atheros/udpxy"> http: //files.0day.triolan.net.ua/triolan.ua/dd-wrt/atheros/udpxy chmod +x udpxy /tmp/udpxy - a 192.168.1.1 - p 4760 - m 178.151.85.67 - B 1Mb - M 30 sleep 2 if [ -f/mnt/optware. enable]; the mount - o bind / mnt / etc / etc mount - o bind / mnt / root / tmp / root mount - o bind / mnt / opt / opt else exit fi if [ - d / opt / usr ] ; then export LD_LIBRARY_PATH= "/opt/lib:/opt/usr/lib:/lib:/usr/lib" export PATH= "/opt/bin:/opt/usr/bin:/opt/sbin:/opt/usr/sbin:/bin:/sbin:/usr/sbin:/usr/bin" else exit fi
After the configuration is pressed "Save Startup"
Now, in order to review the stream in IPTV Player, you need to fix the median interface:
192. 168. 1. 1: 4760
You can enjoy the look iptv over wifi, without galvanization, at high brightness.
Customized Transmission
Transmission - for help, you can download absolutely any files, to a USB flash drive or a hard disk, like a connection to your router, if your computer is switched off.
In order to install transmission on the router with dd-wrt firmware, you need to run the command:
opkg install transmission web
For cob lashing, required start transmission for a few seconds, for which we need the command:
transmission daemon
Check for close to twenty seconds and win the command:
killall transmission daemon
Now run WinSCP and go to the /mnt/root/.config/transmission-daemon directory and edit the settings.json file (this file is created daily).
You can see the whole place and insert the next text, first edit the parameters: rpc-username and rpc-password.
( "alt-speed-down" : 50 , "alt-speed-enabled" : false , "alt-speed-time-begin" : 540 , "alt-speed-time-day" : 127 , "alt-speed- time time-enabled" : false , "alt-speed-time-end" : 1020 , "alt-speed-up" : 50 , "bind-address-ipv4" : "0.0.0.0" , "bind-address-ipv6 " : "::" , "blocklist-enabled" : true , "blocklist-url" : "http://www.example.com/blocklist", "cache-size-mb" : 2 , "dht-enabled" : true , "download-dir" : "/mnt/share/torrents" , "download-limit" : 100 , "download-limit-enabled" : 1 , "encryption" : 2 , "idle-seeding-limit" : 30 , "idle-seeding-limit-enabled" : false , "incomplete-dir" : "/mnt/share/incomplite" , "incomplete-dir- enabled" : false , "lazy-bitfield-enabled" : true , "lpd-enabled" : false , "max-peers-global" : 35 , "message-level" : 2 , "open-file-limit" : 32 , "peer-limit-global" : 240 , "peer-limit-per-torrent" : 60 , "peer-port" : 25000 , "peer-port-random-high" : 65535 , "peer-port-random- low" : 49152 , "peer-port-random-on-start" : false , "peer-socket-tos" : 0 , "pex-enabled" : true , "port-forwarding-enabled" : true , "preallocation" : 1 , "ratio-limit" : 2 , "ratio-limit-enabled" : false , "rename-partial-files" : true , "rpc-authentication-required" : true , "rpc-bind-address" : " 0.0.0.0" , "rpc-enabled" : true , "rpc-password" : "guess a password", "rpc-port" : 9091 , "rpc-username" : "come up with a login", "rpc-whitelist" : "" , "rpc-whitelist-enabled" : false , "script-torrent-done-enabled" : false , "script-torrent-done-filename": "" , "speed-limit-down" : 100 , "speed-limit-down-enabled" : false , "speed-limit-up" : 100 , "speed-limit-up-enabled" : false , "start -added-torrents" : true , "trash-original-torrent-files": false , "umask" : 18 , "upload-limit" : 200 , "upload-limit-enabled" : 1 , "upload-slots-per-torrent" : 14 )
Save the file. Create directories through WinSCP.
DD-WRT alternative firmware yak is available for most modern routers in Rostelecom. Її main feature - fine tuning all options of the router and the possibility of connecting additional software modules.
How and How to Install DD-WRT on Rostelecom Routers?
dd-wrt additional parameters, Among them, there is a support for IPTV from Rostelecom, the installation of superbuds for connecting external HDDs and flash memory, as well as the possibility of using a router as a zavantazhuvach torrents. This functionality is alternative operating system goiter is related to its own kernel, as it is assigned to Linux. Zavdyaki tsіy arkhіtekturі software security can access to the terminal, you can in manual mode enter all required parameters.
In order to install the firmware on your own network, you need to download it from the official website of the retailer.
De zavanazhit firmware?
The required software version can be found at dd-wrt.com. In order to get the firmware you need:
- go to the Downloads section at the top horizontal menu;
- enter the router model in the poshuk field;
- choose the correct firmware;
- zavantazhit PZ u zruchnu folder.
Important: When choosing firmware, pay attention to the remaining characters in the name of your router. The stinks mean the chosen version. In case of installation of an unreliable firmware, there is a great risk to spend the construction period without the possibility of renewal.
For help getting to know the robot in the system before installing it on the router, you can go to dd-wrt.com/demo. Here is the possibility of a menu, as well as the possibility of firmware.
Installation process
Once the software is installed on your computer, you can proceed to install it. For whom do you need:
- go to the web interface of the router;
- open the update tab;
- download DD-WRT firmware;
- press the update confirmation button.
If so, it will be necessary to bud a sprat of fluff. The installation hour may vary depending on the latency of the processor and the speed of the memory chip entry of the router. If everything was correct, then access to the web interface fencing be behind the IP address 192.168.1.1.
DD-WRT: bolstering the Internet to Rostelecom
Adjustment of connection parameters will not become a problem for people, even if they once spoke about similar tasks original firmware router. Tim is no less, before її the cob it is necessary to know the documentation of the provider, demonstrating the data of the WAN connection.
In order to add parameters to the DD-WRT firmware and set up the Internet, Rostelecom needs:
- go to the Setup item;
- open the Basic Setup tab;
- choose the type of connection;
- enter provider parameters.
 Having pressed the push button, the cable connection to the Internet will be connected.
Setting up Wi-Fi connection
Zvichayno, leather vlasnik dromeless router can't enter the setting will be completed without activation Wi-Fi connection.
To increase distribution to the Internet, it is necessary to go to the Wireless menu item. Here the Basic Settings tab will be available, where you can change the mode Robotic Wi-Fi module, as well as other modifications that are not available on the original firmware.
To set the security parameters of the access point, you need to go to the Wireless Security menu and select the type of encryption for the signal.

DD-WRT: upgraded IPTV to Rostelecom
Now, if the Internet connection is enabled on that moon via Wi-Fi, you can proceed to setting up IPTV to Rostelecom. For whom it is necessary to speed up the PUTTY program or create a telnet session via CMD. Another option will need to be acknowledged command row Windows, and then enter that confirmation "telnet 192.168.1.1" (as the IP address of the router was not changed).

Having registered the commands shown on the screenshot, you will not have to reconsider, because the Filter Multicast option is not activated in the configured web interface. You can find out at the Security tab.

Setting up DD-WRT for the provider Rostelecom does not have any cardinal powers regarding the introduction of parameters for the company's router. Prote zmina deyakih parametrіv cause the need to work with the terminal. Therefore, it is recommended to install it only in vipads, if it is primed with the need to remove additional functionality.
Manually setting up a router with DD-WRT software for working with a website
Before setting up the router, turn it around, which supports your router software security like MyWiFi, which is so, then Danish way you do not need.
It is possible to recognize the list of possessions that are supported, it is possible for a given
After the installation of the DD-WRT firmware, the hot-spot for the project is installed on the site in the coming rank.
1. Password setting for access to the router
It is necessary to go to the side of the router for the address: http://192.168.1.1.
If you want to enter first, it is necessary to set it and enter the password for access to the annex, choosing them according to your own judgment, for example:
- username: Ivan_home
- password: kvartira209.
2. Improved access to the Internet
Coming soon, you need to go to the tab "Setup/Basic settings".
In retail WAN Setup fix the Internet connection in this way, whichever your provider is supposed to.
In retail “Network Address Server Settings (DHCP)” install the following settings:
DHCP Type - DHCP Server;
DHCP Server - Enable;
Start IP Address - 192.168.1.2;
Maximum DHCP Users - 253;
Client Lease Time - 1440;
The Static DNS 1,2,3 field is left empty
Set the proportions in the fields:
Use DNSMasq for DHCP;
Use DNSMasq for DNS;
DHCP-Authoritative.
Time Settings NTP Client - it is necessary to set and set your time zone.

Important: If the version (build) of the firmware dd-wrt is higher than 15778, it is necessary to remove the entitlement from the advancing fields:
Use DNSMasq for DHCP;
Use DNSMasq for DNS;
DHCP-Authoritative.
How to access the Internet PPoE-Z'ednannya, then for yoga correct work it is necessary to go to the tab “Administration → Commands” i in the field "commands" copy the following code:
/usr/sbin/iptables -t mangle -A POSTROUTING -p tcp --tcp-flags SYN,RST SYN -m tcpmss --mss 1421:65535 -j TCPMSS --clamp-mss-to-pmtu
And then press the button Save Firewall.

3. Setting up WiFi-merezh
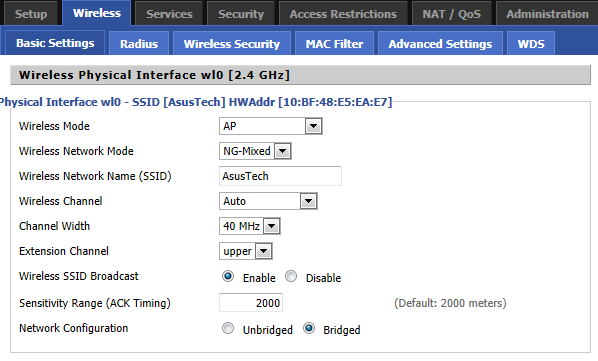
To set up the main and guest access point, go to the tab "Wireless→Basic settings".
It is necessary to set up the main (closed) access point, as it is necessary to access the Internet. In retail "Physical Interface" set the following parameters:
Wireless Mode=AP
Wireless Network Mode = NG-Mixed
Channel Width = 40 Mhz
Wireless Channel = auto
in the field Wireless Network Name (SSID) - enter the name of your widi network
Wireless SSID Broadcast = enable
In the disable mode, you can connect to the main access point without knowing the name of the network.
The coming rock at the branch "Virtual Interface" Add an interface for guest coronation.
Need to press a button "add", and in the interface, insert the ensign in the field “Advanced Settings”.
Set the next parameters of the measure:
Wireless Mode-AP
Wireless Network Name (SSID) - set the name of the guest network, through which your guests will be allowed access to the Internet, for example, "site-pointname" de pointname - name your point in special office site site
Wireless SSID Broadcast-enable
AP Isolation - enable (for sharing access to a local network)
Network Configuration - Unbridged
IP Address and Subnet Mask - it is not necessary to fill in, the router itself will automatically see ip. In another case, you may have to manually create a place for the center point.
Other parameters should be left without change. It is necessary to save the changes with the button "Apply settings".

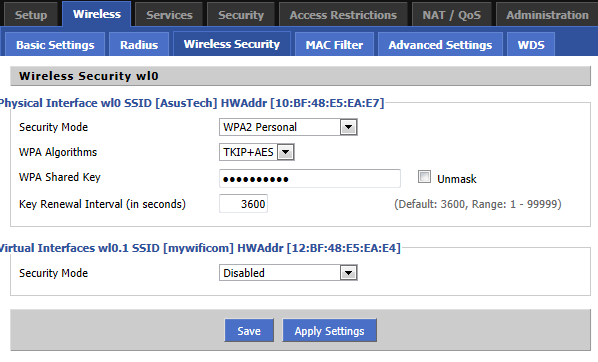
Coming soon, you need to go to the tab "Wireless Security" and enter the password for access to the main WiFi-merezhі.
In retail "Physical Interface" select:
- encryption WPA2 personal(You can choose which type of encryption suits you better, but WEP is not recommended)
- WPA Algorithms - TKIP + AES
- WPA Shared Key - access key to the main WiFi-merezhі
- Key Renewal Interval (in seconds) - 3600
The guest WiFi-merezh (at the Virtual Interfaces branch) is denied for free access without a password. It is necessary to save the changes with the button "Apply settings".
4. Setting up a guest hotspot (HotSpot)
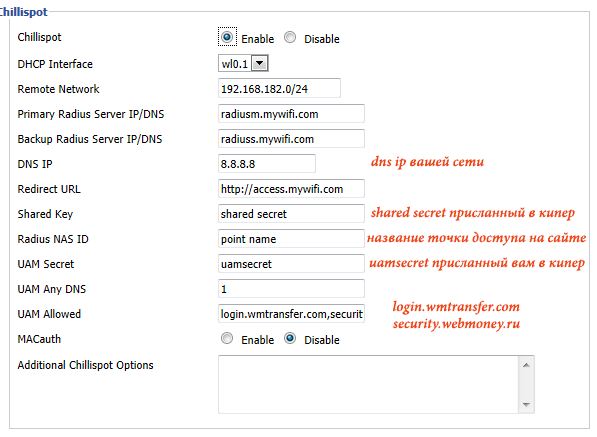
The next step is to set up a guest access point (Chillispot).
You need to go to the tab “Services → Hotspot”, opposite the Chillispot row - vibrati jumper "Enable"

І set the following parameters:
Separate Wifi as LAN Bridge - Enable
DHCP Interface - choose the name of the virtual interface (for different routers, the names can be different: ra1, wl0.1 or ath0.1)
Remote Network: 192.168.182.0/24 (this parameter does not need to be changed)
Primary Radius Server IP/DNS - radiusm.site (authorization server addresses)
Backup Radius Server IP/DNS - radiuss.site (backup authorization server)
DNS IP - (DNS ip of your company)
Redirect URL - http://access.site
Shared Key - the key to access your point to the Radius server
Radius NAS ID - pointname (name of your access point, so you created a point on the site http://www.site)
UAM Secret - the password you took from WM Keeper when registering an access point on the site site
UAM Any DNS - 1
UAM Allowed - 212.118.48.0/24.212.158.173.0/24.91.227.52.0/24.91.227.53.0/24.91.200.28.0/24.91.200.30.0/2.2. ,webmoney.com.mx,security.webmoney.ru
MACauth-Disable
To identify your hotspot as “online” you need to:
- Go to tab Administration → Management
- Insert value:
and copy the following code:
* */12 * * * root /usr/bin/wget http://www..sh && chmod 755 /tmp/getstate.sh && /tmp/getstate.sh
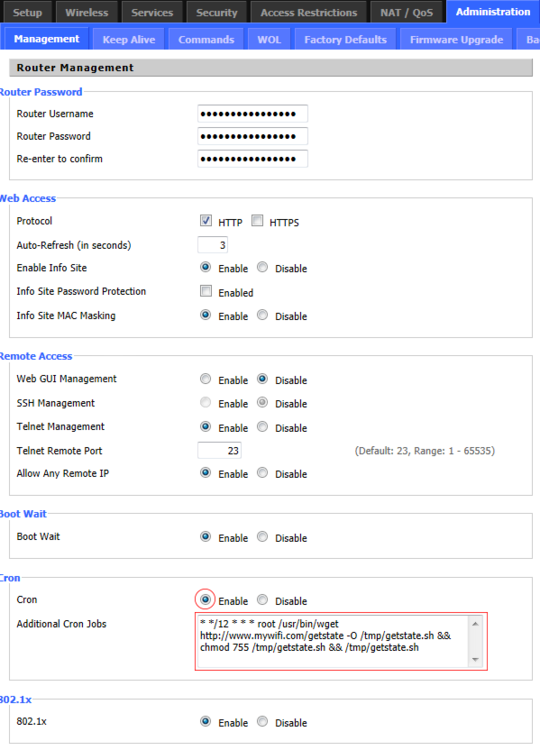
- It is necessary to save the changes with the button "Apply settings".
After changing the settings of the parameters in the router, it is recommended to reconfigure the hardware, tobto. turn off the border for 30 seconds, and then turn it off again.
The polishing process has been completed.
To check the practicality of your hot spot, you need to connect to the guest access point and go to the browser on the side (for example google.com), - after the end of the month, the side of the site is considered.
Deyakі apply nalashtuvan dd-wrt. Zmist:
5#
6# Orienting organization lace work in the middle of DD-WRT/OPEN-WRT
In the world of updating the material, points will be added.
1# Connecting a printer and installing it as soon as possible in Windows 7.
For the cob, go to the interface and turn on the print server support:
Select "Apply Settings". Connect the printer to the router and continue to install it already in the system. Submitted printer does not appear in dd-wrt settings. Windows 7 displays "Start Menu - Add Printers". The “Install Printer” button will be available, otherwise right button on an empty space and in the menu, select the similar item "Add a printer". As a result, the printer installation wizard is launched:
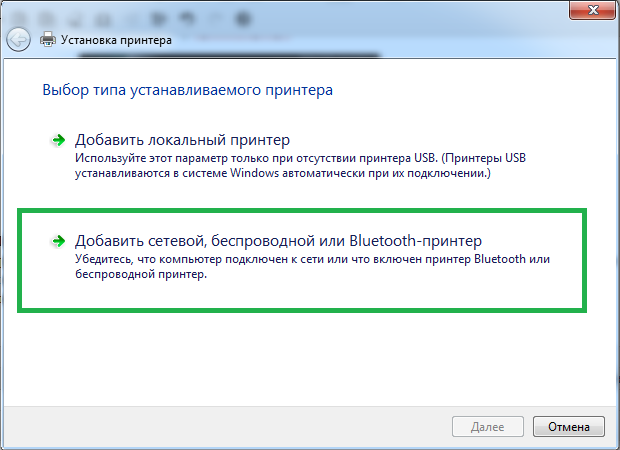
We select the item “Add a wireless, wireless or Bluetooth printer”. After the onslaught, the printer's noise is fixed. You can not check for the completion of the process, but click on "The printer is needed from the list of daily".

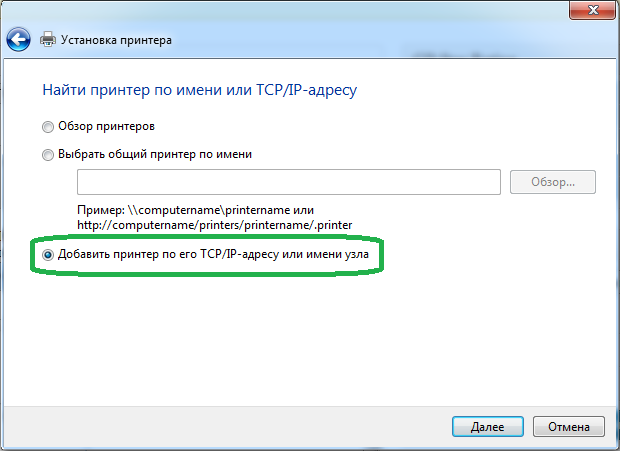
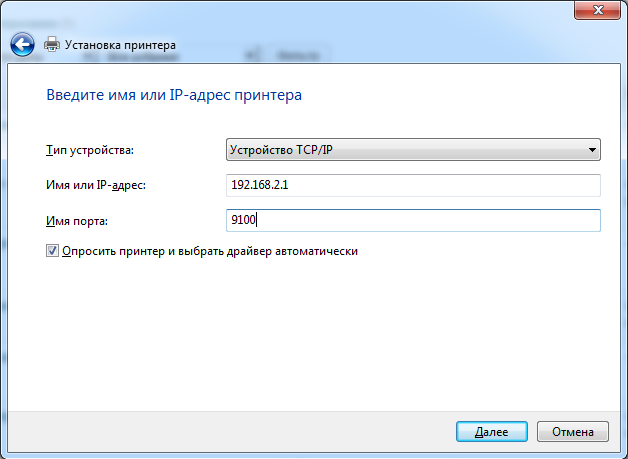
It is possible to add the type “Attachment TCP / IP”, the address of the router and port 9100. Nalashtuvali > Dali.
Again, an unsuccessful search for more vipadkivs, as the system can’t get drivers for your printer))
![]()
We choose the type of attachment "Obshlive" and press "Parameters".

We review the earlier introduced by us fencing and the type of protocol is selected "RAW". Tisnemo "OK" > "Dali". I know Windows is trying to know. After completion, we will see the standard driver installation window. Select your printer from the list, or specify the folder where the driver should be located, or installation disk. If it is entered correctly, the printer you need will appear in the list.

I have an HP printer, and I'm working on it =) I'm calling "Dali". It will install printer drivers, power some more simple power: printer name, give access to the printer to local printers, lock the printer. Why is everything! Reset printer and can be in the lists of available printers.
2# Access to FTP to connected disk.
The ProFTPD item is activated, in the “User Password List” field, specify the names of the correct ones and passwords, which will provide access to ftp. If you do not enter the password, the access will be only to the mother of the root password with a password to the Web interface of the router.
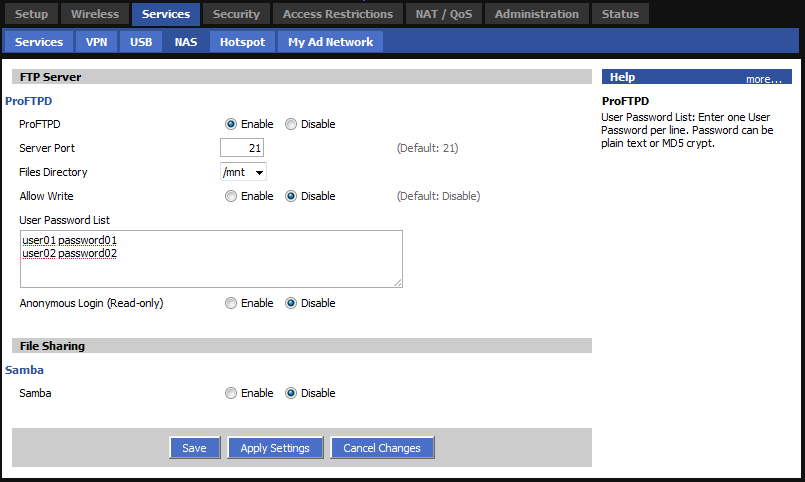
The password can be set for the hard drive or for the md5 cipher. Save/stop and deny access to all connected disks via ftp.
3# Access to FTP from the Internet.
After setting up the router, as described in the previous paragraph, you can open access to connect to the Internet. Knowing the address of the router, you will be able to get access to the necessary data, which is stored on the connected disk, at any time for the presence of the Internet. Handy! Chi wrong?!
At the "Administration" tab - "Commands", in the "Commands" field enter the command:
iptables -I INPUT 1 -p tcp --dport 21 -j logaccept
iptables -I INPUT 1 -p tcp --dport 21 -j logaccept
and press "Save Firewall". The result may look like this:
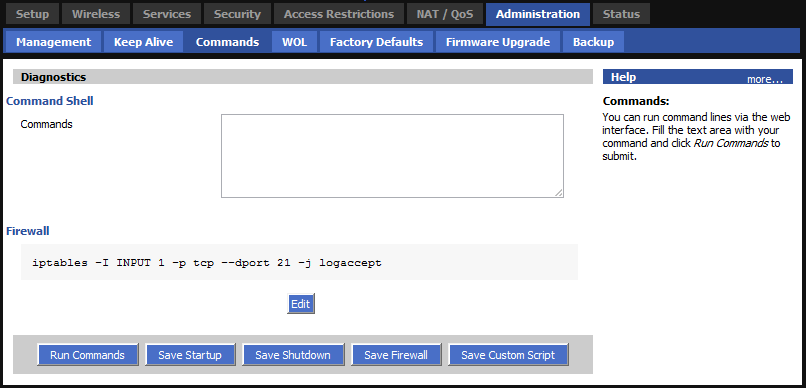
This rule is to be saved when the router is re-configured and nothing is needed again.
4# Home folders for FTP correspondents
Task: skin koristuvach ftp is guilty of consuming that folder, yaku mi say.
So do not work through the web interface, you need to connect to the router for the help of telnet or ssh. mustache configuration files the ProFTPD daemon to lie in the directory:
/tmp/proftpd/etc/
/tmp/proftpd/etc/
Open the password file:
vi /tmp/proftpd /etc/password
vi /tmp/proftpd/etc/password
user01:$ 1 $fRF21Ju8 $n / hIbUS/ QT.6ejqlF3/ qE1:0 :0 :Ftp User,:/ tmp/ root:/ bin/ sh user02:$ 1 $fRF21Ju8 $/ gW4GC1CvVZ6b5AW ,:/ tmp/ root: /bin/sh
user01:$1$fRF21Ju8$n/hIbUS/QT.6ejqlF3/qE1:0:0:Ftp User,:/tmp/root:/bin/sh user02:$1$fRF21Ju8$/gW4GC1CvVZ6b5AWTBkq71:0:0 /tmp/root: /bin/sh
Change the home folder (/tmp/root) to the one where you can use it.