How to enable redirection on android. Forwarding Megafon: detailed service settings. How to disable forwarding.
The call forwarding service allows you to stay connected even when the phone is turned off or out of network coverage - in this case, the call is forwarded by the network to another number specified in the settings.
Forwarding is most relevant for business people, when losing contact with a client can be worth serious money. This service is provided by all telecom operators in Russia and enjoys a certain demand. Also, you can leave a voice message to the subscriber within the framework of the MTS Autoresponder service, which we described earlier.
After completing this data, click Finish. Keep in mind that with this option mail will be stored on your hosting, taking up disk space. When all this data is complete, click Finish. A warning will appear, which you must also accept by selecting the “I understand the risks” check.
Secure Email Settings
A screen will appear, indicating that the account email already configured and you can send and receive. If you want to configure the use of secure connections for your email, this is the information you need to fill out. After setting, click "Finish".
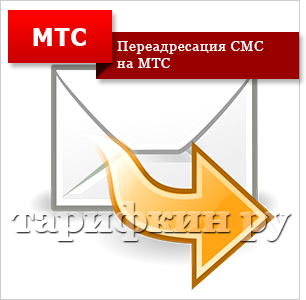
As for our review, it will be devoted to redirection in the MTS network.
Forwarding to MTS (as well as in other cellular networks) represented by four varieties:
- Call Forwarding (subscriber is talking to someone);
- Call forwarding by no answer (the subscriber does not pick up the phone);
- Call forwarding to unavailability (subscriber in the subway or outside the city)
- Unconditional forwarding.
How it works? Everything is very simple - if one of the conditions works, then the calls are redirected to the specified number. Accordingly, on the number on which call forwarding is activated, the forwarded call is charged in accordance with the tariff. The same applies to unconditional call forwarding, when all calls are transferred to another number without any conditions.
Enable distance sensor
If you open it for the first time, you will be given an assistant to configure it. Click Add Email Account. Email Address: The email address you want to set up. This is an email account that will be displayed for people to be able to reply to mail.
Remember this password: activate this option. Display Name in Sent Messages: This section displays the name you want to see as recipients. Check the option "Manually configure server settings." After completing all this data, click the Next button.
Any other phone in the world can act as another number, including the voice mail number (difficulties may arise when setting up call forwarding to numbers from the 8-800 segment).
Using conditional call forwarding in national and international roaming will entail a double charging of calls - both for incoming and outgoing calls at the same time.
You must complete the following fields. Authentication method: you must specify “Text without encryption”. Login username: your full name account Email. Information about the server output tray. You can also specify. Secure connection required: this option should be disabled.
Settings for secure mail
Authentication is required: we must enable it. A screen will appear, indicating that your email account is already set up and you can send and receive. Username: the user associated with the email account, that is, the full address.
Configure redirects is most often done through the “Call Settings” menu (may have a different name) in the mobile phone - here you need to select the appropriate type of call forwarding and fill in the phone number (it is obligatory through +7). If necessary, the subscriber can select several types of call forwarding at once, by setting different numbers. This is also where the service is disabled.
Password: the password corresponding to this user. When you complete this step, you will get the following window. To add an account, click the button in the lower left corner of the window. After clicking here the wizard will guide you through the process of setting up your account.
On the first screen, you must fill in all the fields. Your Name: The name that will be displayed as the sender of your email. Password: The key that corresponds to the email account. The username will be the email account you are setting up.
How else to redirect to MTS? For example, it can be installed using the “Personal Account” of the MTS and with the help of USSD commands. And if everything is clear with the first method, then you need to talk about the teams in detail.
The network has several commands:
- ** 21 * telephone_number # - this is how unconditional forwarding is activated. It is disabled by the command 21 #;
- ** 67 * telephone_number # - activation of call forwarding by busy. This type is disabled by USSD command 67 #;
- ** 62 * telephone_number # - setting forwarding on unavailability. USSD-command 62 # is sent to disable;
- ** 61 * telephone_number * interval # - set forwarding on no answer. Disconnection is performed by USSD-command 61 # (the interval is set from 5 to 30 seconds in increments of 5 seconds. By default, the interval is 5 or 15 seconds, which depends on the SIM-card features);
- 002 # - removal of all types of call forwarding.
To control the redirection, you can use the help desk services, but in this case the installation cost will be 30 rubles. By the way, forwarding the already forwarded call will not work - the outgoing call for the calling subscriber is interrupted.
This new section should be configured in the same way as an incoming mail server. In this case, the username is also the email account you are setting up. In the next step, a summary of how the email account is configured will be displayed.
Click "Create", and the account will already be created in your manager. Now you need to configure the authentication settings on the server to start using your email account. Once in this section, we will verify the correctness of the displayed data.
 If forwarding voice calls on MTS is a basic service cellular network, SMS forwarding is available as part of the SMS Pro option. The option is activated by sending the text “ON” or “Reg” (without quotes) to service number 232, and sMS Pro portal is used to manage it.available at http://www.smspro.mts.ru/.
After this data has been verified, click the Advanced button to access the authentication settings of your account on the server. Now go back to "Account Information", and at the bottom, where the "Outgoing Mail Server" appears, you will see that there is a drop-down menu. When you click on it, the following window will appear.
How to disable redirection
At the top of the screen you will see the different outgoing mail servers that you have configured, and below are the configuration options. Select the mail server that you configure at the top, and then click the Advanced button. After entering this data, click "OK".
The login and password from the Personal Account are used as the login and password for access to the portal.
Having visited the portal pages, subscribers will be able to set forwarding or Auto Answer by SMS, use the functions of receiving and sending SMS, as well as view the contents of the archive. It also provides the functions of working with contacts.
Remember password: must be marked. Secure password authentication should be disabled. You also need to enable authentication for the outgoing server. This a new version greatly simplifies the configuration process, making it easier to create accounts, because it automatically detects many of the configurations necessary for its use.
The first thing to do is open the program. If you do not have an account, the following screen will open, as in the previous case. Keep in mind that what you enter in the "Name" will be the name that the recipients of your letters will see when writing them. In the "Email Address" field you will need to enter an email account to configure, and in the "Password" - the corresponding password.
The subscription fee for this option is 1.5 rubles a day., sending SMS - at the tariffs of subscribers.
 It is possible to connect call forwarding to the MTS (if it has been disconnected for some reason) using the Personal Account, or using USSD command 114
.
It is possible to connect call forwarding to the MTS (if it has been disconnected for some reason) using the Personal Account, or using USSD command 114
.
After clicking "Login" you will be asked to configure more detailed information. In both "Incoming Mail Server" and "Outgoing Mail Server" you will need to enter the name of your mail server. By default, there will always be mail. Next is your domain name.
After you log in to the servers, close the "Username" field with your email account, in any case, the program itself will automatically determine the format of the user, without entering anything. In this case, you can simply select the Mail application, which, after all, is the one that will use the postal service. This is done, you have finished setting up your email account, so after clicking “Done” you will be able to use it as usual.
In addition, an SMS command is provided to activate the service — you need to send an SMS with the text 2111 to 111. There is no subscription fee and no connection fee.
 To disable forwarding, you should use Personal account or contact MTS support service.
Perhaps after setting up your account, you will be warned that you cannot verify the security certificate. You can confirm this exception because it simply notifies you that you are not using your own name to use the certificate, but this will not affect the use of your email or your security.
The next screen displays the fields that appear and the option “Manually set up an account” is checked. In the service for selection, you must select the option "E-mail on the Internet" and click "Next" again. In the next window, you must fill in all the fields.
But the easiest way to disable all types of call forwarding, using the command 002 #, and forget about the availability of this service, especially since the subscription fee for it is not provided.
More information on how to disable all paid services on MTS, you can find on our website.
Android is full of useful bells and whistles and they are constantly updated with new ones, giving you the opportunity to more efficiently use our gadgets.
Barring incoming calls
Please note that with this option mail will be stored on your hosting, taking up disk space. Password: the password corresponding to the user. Remember the password: you must select the option Recover password. Upon completion of all this data, click the “Advanced Configurations” button.
It is very important to access the next tab "Output Server" and configure it as shown below. A screen will appear, indicating that the account has already been set up and that you can send and receive. We will see a window through which we can start the configuration process by clicking “Add”.
If you want to receive notifications during a call, you will need to activate the “call waiting” option.
This setting is available on phones regardless of the version. operating system, for example, android 5.1 or 6.0.1 and user interface.
You will hear some signals in the speaker, you can switch to another call and talk to someone else.
We perform the steps that fill in the requested information. As needed, we cover all other areas. In the next step, we will look at the fields. To do this, click the email tab and select an account. A new window will open with account settings. Click “Servers” at the top and check the “My server requires authentication” option.
After that, click "Apply", and now we can close the account configuration window, since the postal service will be ready for use. Inside the application, we will request the first data. Your name: the name you want to send to the sender of the letters you send.
Thus, you will be able not to disconnect the initial call and answer a new one without closing either of the two.
If you answer another call while talking on the phone, the first party will hear a voice message or a song, depending on the network operator.
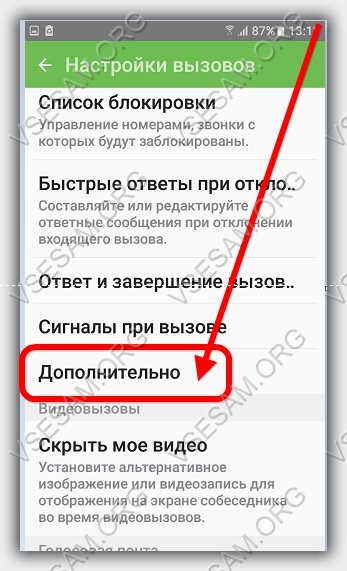
How to enable call waiting on your Android phone
Sign in to the telephony app, and then turn them on. To do this, top left click "Options" and go to the settings.Now go to the tab "Advanced".
After specifying the necessary information, click "Manual configuration" to configure the other parameters manually. In the next step, we will need to select an account type. The following steps do not change, despite the specified account type. We cover the data you request with relevant information in each case.
Login configuration. Now you will be shown a screen that allows you to configure the inbound mail server, where we look at the necessary information. Output configuration The next screen is for setting up outgoing mail, the data to be covered will be.
Here, in the “Call Waiting” section, move the slider to the right position.

This means that you will receive alerts on other incoming calls during a call.
In the next step, simply select account synchronization options. Example. Checking new messages in 10 minutes is a valid interval. Notification of new messages and sound when sending a message can be activated.
Click “Next” again, this time in the upper right corner. Guide. The next step is to select the type of protocol to retrieve mail. Configure the inbound server: you will be given a screen to configure the inbound mail server where you will need to fill in the necessary information.
That's not all. Go back and go to another tab - “Signals when you call.

Here, in front of the line "Notify During the call ... ", also move the slider to the right.

How to disable incoming calls?
Set up an outgoing server: you will be presented with a screen for setting up an outgoing mail server where you will need to fill in the necessary information. Check the “Required Access” setting. Password: Email account password. Now click "Next" and wait until the account is configured.
Choose the frequency with which you want your smartphone to check for new emails and click “Next”. Finally, you can specify the name you want to display when sending emails. That's all! To begin setting up our account, go to the “Adjustments” icon located in the Dock.
Important points in setting up call waiting on Android
Please note that the names may differ slightly from mine, depending on the version of android and user interface.
In this case, I used a Samsung Galaxy phone with Android 6. In addition, check that the call on hold option is active.
Name: the name that will be displayed as the sender of your email. Email - the email address you want to set up. Description: The text you want to identify in your application. Outgoing mail server
After you set up your email account, two warnings appear that the server's identity cannot be verified. Later we will change it in outgoing mail. After this step, we turn to the section, which indicates that we want to synchronize.
Usually there are only "mail" and "notes". After creating the account, we will go to the list of mail accounts we have created. Click on the one we just created and a summary will appear. Clicking on "Account" leads us to the list of outgoing servers that we have configured.
This feature has no other settings, it can be turned on or off.
In the telephony menu there are other settings with which you can play, but with caution.
This is a call forwarding - see do not mess up. There you have the choice of when and which number will be redirected to another.
You can also enable call blocking, show or hide your phone number and other parameters. All these settings are available in the menu of the Phone application. Successes.
How to make call forwarding to android
You must enable authentication for the outgoing server. In the settings window, select the email accounts section on the left. Just click “Add” on the right. Once this is done, an account creation wizard will appear. If you are opening for the first time mail clientThe first thing you will see is this master.
We will request the following information. These fields are required. Full Name: The name that will be displayed as the sender of your email. The following fields are optional. If the auto-configuration feature appears, we will cancel it to continue the manual procedure.