What is the mode of shooting hdr. HDR shooting mode - what it is and how it is used. When to use HDR mode
Improving camera capabilities and HDR support is one of the promised changes in iOS 4.1. HDR mode (High Dynamic Range in English - high dynamic range) is an increase in the dynamic range of a picture taken by a digital camera.
What is the HDR mode
Imagine the following situation. Early morning or evening in a room with natural light. You can perfectly see all the details of the room and the surrounding landscape outside the window. But when you try to take a photo, you get either a detailed interior and a window that is too bright, or a dark room and a fairly well-crafted street landscape. The new camera mode will avoid this and get the result corresponding to reality.
Panoramic tag images
Via standard application for photos you also take panoramic shots. But you can not add headlines or comments. But as soon as the holiday ends, short notes remind where and when the photo was taken. There are convenient applications that do not just create 360-degree images. With these applications you can tag digital photos at the same time.
The benefits of using the HDR feature in the phone
In addition, you edit additional information such as name, description, and tags. This way, you can tag each image in seconds and easily find snapshots later. The application only takes pictures in a vertical position. The indicator indicates the correct position. The smartphone moves either to the left or to the right. Unfortunately, the application is not possible to shoot a panorama from the bottom up, or vice versa.
Now your iPhone will take three frames at a time and combine the images in the final image. Using the mode makes it possible to balance the tonality of the surrounding objects, with the result that the image more fully reflects the real picture and just looks better. Let's try to figure out in which cases the use of the effect allows you to get a better picture.
Sometimes distorted objects appear on digital images. This effect is called convex distortion. In photography, this effect is widespread and often occurs with wide-angle lenses. Such lenses are used by manufacturers for smartphones.
In the picture it looks like a straight line has a bulge in the middle. This is especially true for vertical lines. However, there are applications that correct this prospective error. Perspective correction has a simple operation. You open the app, select an image and slide your finger across the grid.
When can I use the HDR graphic effect?
Always use this mode in the following cases:
- in landscape photography (it helps to smooth the contrast between the bright bright sky and the dark earth);
- in portrait photography with bright daylight or strong artificial light (removes the effect of the whitened face);
- when lighting is not enough (dark room and light from the window).
- When not to use the mode:
- during the shooting of moving objects (considering that the final image is made up of three intermediate images, the image may be blurred);
- if you want to get a high-contrast picture (many images look better with strong contrast of details, and the use of the mode smoothes it significantly);
- if you want to make a rich and bright photo (using the mode makes the image paler).
To enable HDR in the iPhone, simply click on the appropriate icon located at the top of the screen in shooting mode. Now you can make a frame as usual. The phone will need a little more time to process and save the image.
When can HDR mode come in handy
The application then corrects the perspective errors until all lines are straight. To fix perspectives, the application works with spaces. Therefore, it is advisable to leave a little more space for the image with many lines on one side in order to have the full motive in the picture later.
Great shots in low light
Applications automatically select the appropriate exposure time and aperture. With some applications you set the shutter speed to short. This will take very little light. For best results, use a camera stand. This avoids blurring.
Practice shows that the graphic effect is especially useful during the shooting of landscapes. An ordinary camera often spoils the sky, making it white and completely without imparting a rich blue tint. The mode allows you to avoid this and make a very high-quality frame.
AT free application There are three shooting modes: Standard for normal lighting conditions, Low light for low light and more low speed shutter and light tray. In the last mode, you experiment with the lighting settings, as shown in the screenshot below.
Easy to use application also has useful features editing, such as the front camera. This option reduces the resolution to one or two megapixels. The difference between a photo and a professional photo is the right composition.
Make compositions with pictures look bad, because the photographer puts the object in focus or someone bursts the image. Solution: you shorten the image. You change the focus of the image, delete an unnecessary object, or place another in a more advantageous position.
Finally, it should be noted that it is necessary to use any artificial modes and filters with caution. If you want to be sure that the resulting image will not be corrupted, do a repeated frame without hDR applications. In the future, the resulting snapshot can be edited using special program. In addition, after a while this approach will show whether you need the use of artificial modes or not.
How does the HDR mode in the smartphone
The photos correspond to the human eye, which has many advantages compared with the “usual” camera technology. It helps to display light and dark areas well. Especially in the fall in bright and vibrant colors there are many bright and dark tones. Large differences in brightness are difficult to capture for a regular camera.
In general, three photographs are created. One photograph with exposure, as is usually done when measuring a camera, is exposed to overexposure and exposure, which is underexposed. These cameras also occupy three frames, but they are already counted together inside the camera. A fixed aperture of three or more frames serves to maintain the depth of field for all three photographs. You also need to set the focus in advance and switch to manual, rather than autofocus, so that it does not change in all three photos.
HDRI (High Dynamic Range Imaging) or simply HDR (High Dynamic Range - high dynamic range) is such a technology for working with images and video, whose brightness range exceeds the capabilities of standard technologies.
Imagine that you decided to take a picture of the building on the camera of your phone. You are trying to remove the building, but it turns out that it goes too dark against a bright sky. Accordingly, it is very difficult to distinguish any details, while the human eye, when looking at the building, sees all these details and perfectly distinguishes them.
Sometimes the effect has a very impressive effect on the viewer. The result is a combination of the advantages of all three exposures: good depth and light. This is very useful because in three frames the camera usually makes three different white balance. Unlike motion blur, it appears that the sheet was in three places in the image, but slightly transparent. Clouds, people and cars are moving too.
B. is not suitable for sports photos. It sounds so easy! You make a congruent expositional series of three shots. It was not so difficult, is it? Naja - it's not that easy! There are many potential trap traps. However, it is in the essence of things!
If you set the exposure on the building itself, highlighting a particular area, we will see the building in all its glory, but the sky will turn into a spot, “smearing” the picture. It turns out that we need to combine the two specified images into one, so that both the sky and the building are normally combined in the image. This is where HDR technology will help us, which actually combines several different images with different exposures, allowing you to get a high-quality photo.
What is HDR shooting?

Results are better at the worst time - but never perfect. The main disadvantage is that the process of tone mapping in the camera is automatic and cannot be influenced by it! Thus, post-processing capabilities are severely limited! Aperture affects the depth of field.
Set the white balance manually

Not only the aperture should be the same in all the images in bracketing, but also in the white balance. Although most cameras do not change the white balance in bracketing, one thing is for sure, with the white balance adjusted manually. This step can be saved, but with a manually adjusted white balance.
Most modern smartphones support the use of HDR-technology, so, in theory, the need for a third-party application disappears. But this is not always true, since in some cases the work of the HDR mode leaves much to be desired and it will help third-party application, with which you can get a much better image. In addition, they often have additional settings, including changing brightness, contrast, etc. Similar applications in Google play Market and App Store a great many, which of them better copes with their duties, it's up to you to download and try.

But on the safe side, you are still on a tripod. In low light exposure time will be logically longer, and in any case will need a tripod. If you do not have a tripod, you can of course also park the camera on a hard surface. Of course, this works just as well, but brings limitations in terms of image design, since the camera cannot be leveled with a ball head or three-sided tilt.
Please note that using HDR mode is not recommended while moving: several exposures of the same scene are used for the image and if this scene changes suddenly, imagine what photo is waiting for you ...
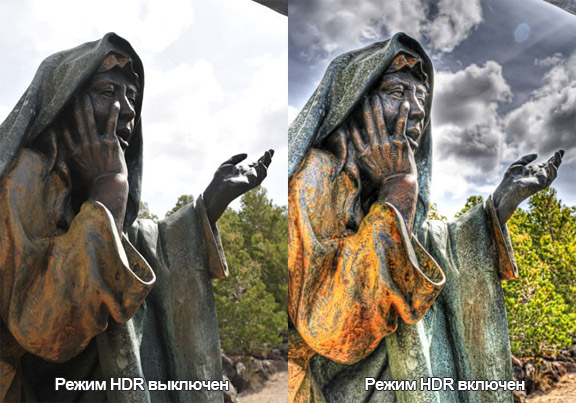
Examples of pictures in normal mode and HDR mode (on the right - hDR mode):

Use self-timer or remote trigger
But, in any case, a tripod is a must! To avoid blur when you press the shutter button, you must use the remote control. This is not necessarily required, because the self-timer of your camera works just as well! Some modern cameras have remote control via an application for smartphones.
Don't overdo the sound mapping.
In the process of drawing tones, the existing image noise is further enhanced. The same applies to the display of tones. To control the result of the image, you can use various controls and settings. Beginners, as a rule, fully control the controls.


HDR - the key to success?
Not! In any case, not always, because often the use of HDR mode adversely affects the image quality. For example, it is not recommended to photograph monophonic objects. In any case, use different modes, try to make as much as possible. more photosto understand where and when to use HDR mode.
What looks fascinating at first is often not so great at second sight! Excessive display of tones also intensifies or creates typical errors, such as color shading and image noise. Please do not misunderstand me! However, I like these photos only if they are also made nice and clean.
Just turning the sliders to the limit while displaying tones does not automatically lead to a very good result. Post-processing - does it sound cool? Well, in fact it is English, and it is nothing more than processing. In addition to image editing, which affects the whole picture, as well as targeted adjustment of individual areas, can lead to fascinating results.