Hdr photos. What is a photo in HDR. Working with HDR mode in digital cameras
Responding to your numerous requests, in this issue we will acquaint you in more detail with one of the most interesting technologies for creating and processing images - HDRi (High Dynamic Range image). This concept came into use not so long ago, translated from English, it means "high dynamic range of the image."
So. To obtain the file, we need at least three frames with different exposure levels, in which there is maximum information, both in the light and in the shadows. To do this, there is either automatic bracketing, or manual (shooting successively several frames with different exposures), or RAW format, from which you can make the necessary number of source frames with a maximum exposure of 2–2.5 steps. We will not consider each of the methods for obtaining initial frames separately, since this does not affect the final result. I want to say only that the RAW format is preferable, and much more, since it does not require the subsequent alignment of frames and the fight against moving elements in the image, which, with standard bracketing, will necessarily “scatter”. On top of that, it contains 12-bit information. In principle, all digital cameras are filmed in this “raw” format, it is simply not available from digital cameras, unlike DSLRs. And if you make bracketing in RAW format, then there will be even more information.
Then click "Settings". If the current status is off, press the button and turn it on. In terms of photos, dynamic range is the difference between the lightest and darkest elements in an image. The camera software for smartphones then combines these images into a single photo that supports details from the darkest and brightest regions.
When you or other things move
Lighting is one of the most important aspects of good photography, but outdoors sunlight can cause too much contrast. 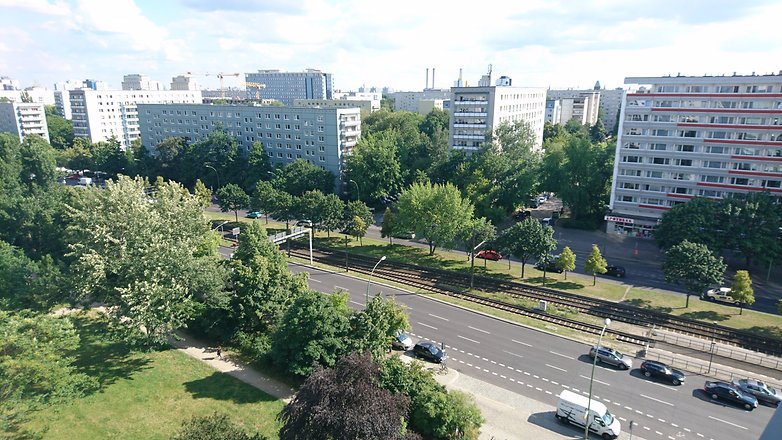
Stay away and try to photograph still objects. Some photos look better, with strong contrast between light and dark areas. If this is not what you want from the final image, do not do it.
For clarity, create a picture that is laid out at the beginning of the article. The shooting was done in RAW format. Used software: RAW converter CaptureOne, program for creating HDR-image PhotomatixPro, and Photoshop.
With the converter CaptureOne (although you can use any other, this is a matter of taste) I made five converted files with the exposure (-2.0) - (-1.5) - (-1.0) - (-0.5) from the original snapshot - (0). Here we will make a small lyrical digression. Why five “development”, and why only “in minus”? The bottom line is this: the more contrasting the frame, the greater the range of the plug for detailed study of light and shadows, and the greater the number of frames. It is not necessary to do a symmetrical expander. In this case, the original picture clearly shows that everything is fine with the shadows, there are no failures, but the sky is pretty much overexposed, and in fact it is the sky that we want to make more interesting in order to give the picture a completely different mood. Sometimes you need to do it only plus or minus, and often not symmetrical. It all depends on the initial material and the result that you want to get. The number of files can also be any, but not less than three (although you shouldn’t get too carried away with this and do more than 10). Otherwise, if you have unprocessed elements on the image, then in their place you will get black or (most often) white spots.
Be careful not to miss the color saturation. 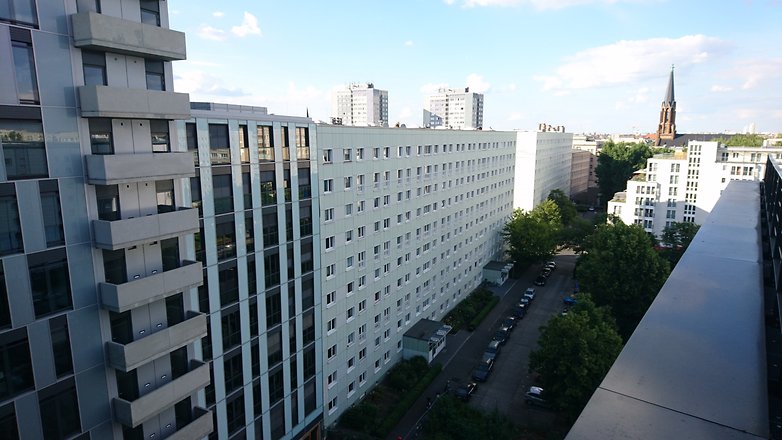

Sometimes this means that the application for the camera of your phone is used in manual mode and not in automatic mode. This is quick, easy and will give you a better idea of what can be achieved with this setting. Remember to keep a steady hand when you do this.
When do you think it is best to use it? But not many understand what it means or what it actually does, let alone try to use it. This is a technique in the field of photography to capture a larger dynamic range of brightness, between the lightest and darkest area of the scene or the object photographed.
It should be noted that many digital cameras allow you to make up to 5 frames of bracketing, which is quite useful for such work. The main thing is to choose the right exposure meter and type of metering with such a composition. The more contrasting the frame, the wider the fork should be, especially if it is not RAW format.
Now it's time to start the program. PhotomatixPro. So, File - Open, select the folder with our source files and click OK. It should be noted that the program works perfectly with both eight- and sixteen-bit source files of all formats, so when converting from RAW, it is preferable to do 16-bit TIFF for maximum information preservation. After all our files are open, we need to choose the option of what we will do with them. Here I will only briefly dwell on some of the features of the program, since it allows you to do more than just create HDR files. But due to the limitation of the volume of the article about absolutely all the charms of this program, I will not be able to tell - so you have a wonderful opportunity to familiarize yourself with its interesting nuances. I will touch only on some aspects and settings that you may need in the first place.
People often associate this technique with how human eyes work. You can easily compare this comparison by looking at the landscape, where there is a very big difference between the lightest and the darkest area of the scene. For example, in bright daylight, where there are shadows suspended under trees or buildings. If you allow your eyes to adjust for a couple of seconds, you should clearly see not only the clouds in the sky, but also the details under these shadows.
"Dark" side "Light" side. If we use 2 images, they could be selected under the open sky, and the other - with excessive exposure. This process is often simplified using the Auto-bracket function, in which the camera will automatically take at least 3 shots in sequence, one under, one normal and one on top of the exposed one. You can also apply further editing on this final image using the same software or others that people usually do.
Menu item Combine that is, a combination.

These commands are designed to create the resulting (combined) files of the standard (source) format without creating an HDRi. Average - a summary file based on open source. Highlights & Shadows - 2 images: alignment of shadows and light in only two images. Highlights & Shadows - Auto: automatic alignment of shadows and light. Highlights & Shadows - Adjust: custom alignment. Highlights & Shadows - Intensive: only for 8-bit images.
But after using it for a while, you will realize that this is not always the best idea. It is also very well suited for taking photographs in a room where only ambient lights are available and shadows are visible. The only exception to this would be when the moving object is not the most important part of the scene, and the movement itself actually adds the artistic value of the photo. An example for this would be photographing a busy street with people and vehicles passing as one of the elements of the urban scene.
The process of composing tones will basically go through “every pixel” in the image and adjust its contrast and reassign its color according to what value the surrounding pixels have. The result can be, as you know, beautiful - sometimes almost "from this world."
The menu that we need and is interesting in the first place is HDRi.

Before creating a picture, only two items are active in it.
GenerateHDR - creation (generation) of HDRi.
TooneMapping - tonal compression (compression of the dynamic range of the image according to its customizable algorithms to bring it to the standard 8-or 16-bit format for later use). It should be noted that here you can make tone mapping and without creating an intermediate HDR file. The results will be almost the same, but only "almost." The fact is that when applying tone mapping without creating an HDRi, the color information will be noticeably lost, and in the area of deep shadows and light, it can be almost lost. That is, dark trees may turn black, and a pale blue sky just gray. If you plan to create a monochrome final file, then this can be neglected, but in this case it is not appropriate. Again when creating HDR-file you can clearly see that you have chosen the right exposition, otherwise failures can occur, which I mentioned above and it will be difficult for you to understand the reason for not very successful processing in TooneMapping. So, in any case, especially at the beginning of your work, always create HDR. You can not save it, but use it only as a visual indicator of the correctness of bracketing. Push Ctrl+ G, in the drop-down menu will appear open files (the operation of selecting files can be done in this menu, bypassing the preliminary opening). After clicking OK in the next menu you are given a choice of curves to create HDR. The best result is obtained using standard curves (by default), although you can experiment with them. Finally, tick the menu AlignLDRimagesbeforegeneratingHDRImage (align images before creating HDRi) if you use conventional bracketing.
Some others may use only one photo, or two or three, from your photo album. All of them would use some post-processing technique and most definitely used tonal imaging on the resulting image. Although the quality and level of control you receive from the overall process varies from application to application.
This application has a rather complex control that we can use to influence the overall process and provide additional editing tools. Unfortunately, you can no longer get this application, as the developer refused it.
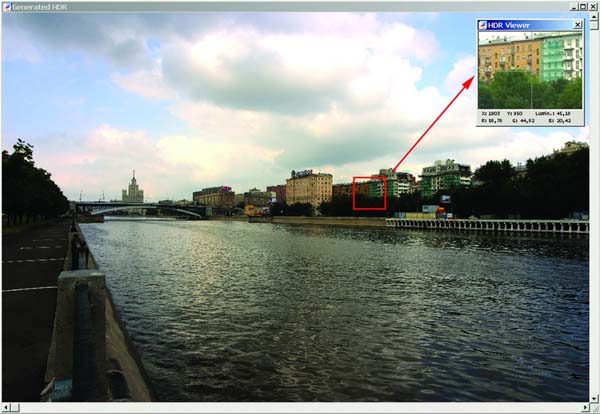
After a while, he will give you this (or very similar) picture. It does not look very attractive, but I have already said that the monitor is unable to correctly and completely display our HDR file for the reasons already described. However, in the program Photomatix There is an interesting tool - a dynamic magnifier ( HDRViewer). By moving the mouse cursor over the screen in the magnifying glass window, you can examine in detail the real information with quantitative indicators of the coordinates, brightness and each of the color channels, which is located in the lower part of the magnifying glass window. Thus, going through the whole picture, especially in problem areas, you can make sure that all the shadows and the whole world are well developed. If this is not the case, try changing the RAW developer expo or slightly playing with the selection of generation curves. If this does not help (in the case of real bracketing), then you can try to slightly edit the source files manually. The fact is that sometimes you still have to resort to manual correction of the source files - until you learn to select the object of shooting right away for subsequent processing with HDR technology.
Cameras are great tools, but they have several drawbacks. Unlike the human eye, the camera cannot adjust shadows and highlights in the same scene. In a high-contrast scene, shadows leave details in the dark, while overexposed bright areas emit into white drops.
Dynamic range is a term used to denote the difference between the darkest and lightest areas of an image. Scenes with a large difference between these light and dark values leave the shadows too dark and too light. A photographer has to make a choice: shoot in the middle and get both dark shadows and light highlights, set bright highlights, but leave most of the image too dark or set shadows, but leave most of the image too light.
Now begins the most interesting and creative moment of work, on which the whole end result depends - this is tonal compression!
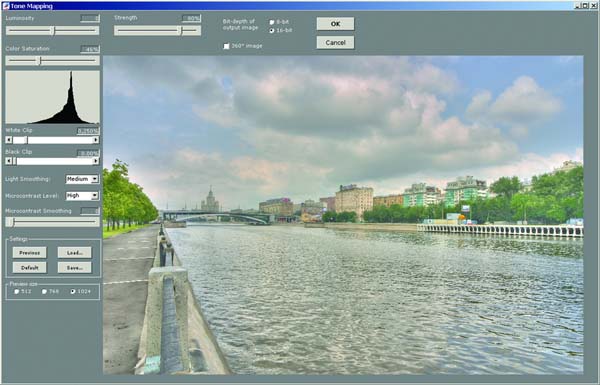
Here we will have to stop in more detail, since this operation determines 80 percent of the entire final result. Now all the engines are set to the default position. The significance of each for the picture is enormous, and it is very difficult to say at once what needs to be and how to move for such and such a result, since they are all interconnected. Let's start with the main and most "strong" effects.
The human eye can adjust to these differences in light and dark, but the camera cannot. This means that the scene that took your breath personally was not so good on one photo. The problem with high dynamic range copes with this problem. When photographers take photos with a high dynamic range, they do not just take one photo. They use the so-called bracketing or make the same shot at different exposures. As a rule, at least three photographs are involved, although often more.
One image demonstrates for dark areas, another for medium tones and a third for highlighting. These images are then combined together, creating an image with a higher dynamic range than the camera could capture in one image.
Strength - stretching (strength of stretching the range between adjacent pixels). If the value is 0, we get a simple result file. A value of 100 is the maximum.
Luminosity - illumination (taken values from −10 to +10) - the effect on the overall picture is very large, so it presents you with a huge field for the experiment. It affects the brightness and contrast of the entire image.
Select a scene and set up a tripod.
High dynamic shooting doesn’t mean you need the latest, most best camerabut these things come in handy. If the camera moves between frames, they will not line up after processing. First choose what you want to shoot. When you decide to shoot, mount the camera on a tripod so that there is no movement between shots.
Determine the number of shots
Determine how many frames will work for your scene. Scenes with the greatest contrast will require more shots, but keep in mind that the more shots you combine, the more you probably get it over the treated appearance. Ideally, you should take at least three shots, each of which is set to highlight, midtones and shadows. Then, if your camera has auto exposure bracketing, turn it on and tell the camera how many photos you want to copy.
Colorsaturation - color saturation (probably the most “quiet” and predictable slider). Enhances saturation. I recommend almost always moving it to 60–80 percent, since the compression operation leads to some loss of color (especially if you spend it without creating an HDR file). Do this at the very end of the treatment.
You can also shoot in manual mode and keep the aperture in line and change the shutter speed between photos. Choose the aperture that works for your scene — remember that narrow apertures keep the scene sharp. You also want your indicator to be evaluated, and make sure your white balance gets the desired mode.
You want your focus to remain unchanged between each shot. Using manual focus is a good idea, as it is useful for landscapes anyway. If you are not comfortable in manual focusing, you can use autofocus, you just need to lock the focus so that it does not change at all in your image sequence. To do this, you can focus, then turn the switch on the lens to manual, without adjusting the focus ring.
Whiteclip andBlackclip - clipping the light and dark areas of the histogram. Has the greatest impact Blackcliptherefore, it is somewhat more cautious and gentle with him. Enhance overall image contrast. Try not to cut the shadows unnecessarily in order to avoid strong failures. This will be well seen in the histogram. Strongly connected with the engine Luminositywhich significantly changes the position and shape of the histogram.
Now you are ready to take a picture. Use the remote control or the self-timer function on the camera if you do not have the remote control. Thus, you do not introduce unnecessary camera shake when touching the camera. If you are working with a camera that does not have the bracketing function, you need to be in manual mode and adjust the shutter speed between each shot. Just how much you set up between shots depends on how many photos you have selected, and your object — you need at least one image set for the shadows, and one for highlighting, with several gaps.
LightSmoothing - smoothing lights. May take 4 values. High - Medium - Low - VeryLow. Most applicable High and Medium (high and medium). Low and VeryLow (low and very low) can be used if there are only large and very large objects in the picture, otherwise their effect on small objects leads to “blurring” and loss of volume.
As soon as you have all your images in square bracketsit's time to get them together. The exact process you use depends on your choice of software. There has been a huge change in how people are photographed. Digital photos come with a code snippet that identifies which camera took each shot. Last year, the site showed that the most popular camera is not a camera at all. This camera setting tries to solve one of the flaws in the phone's photos.
Working with HDR mode in digital cameras
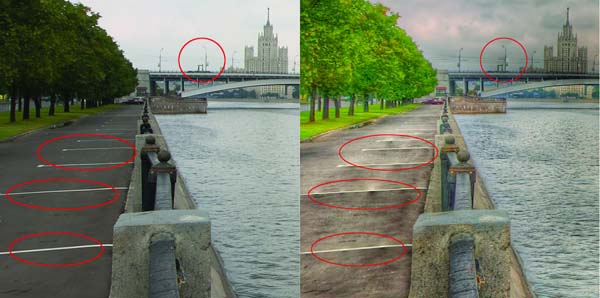
Several phones offer exposure settings. This leads to problems when dealing with harsh light and heavy shadow. Take a look at the images above. The brick path looks great, but the camera has lost a lot of detail in bright and dark areas. Flowers are lost in the shade.
MicrocontrastLevel - microcontrast level. Accepts the same values as LightSmoothing. Most applicable High and Medium. Smooth engine added to fixed values MicrocontrastSmoothing - smoothing microcontrast. It smoothly determines the impact force.
As a rule, to determine the impact force of a particular parameter, it is required to set it to the extreme values to determine the boundaries, and then smoothly achieve the desired result.
A professional can repair this image using editing. Each image uses a different level of exposure. One shot is set for dark areas, such as the flowers in the image above. One captures bright spots such as the sky.
After he clicks all three photos, the phone tries to determine the best aspects of each photo and stitch them into one image. Although the final product is rarely perfect, it is often much better than the original - without additional work. In some cases, this can really worsen the situation. Here are a few pointers if you are just starting out.
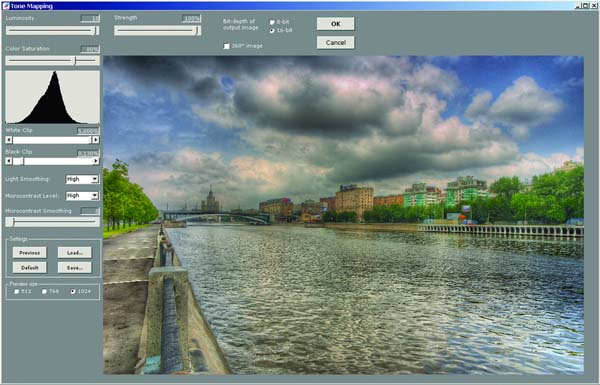
If you give a short tip, try to keep teams Whiteclipand Blackclip the histogram within the framework of reasonable, not cutting off the shadow very strongly, since the resulting file will have a little more contrast than you see - this is some feature of the program. You just have to select the file's width (I prefer 16 bits for further processing) and click OK.
After 10-20 seconds you get the result. Save it and go to Photoshop.
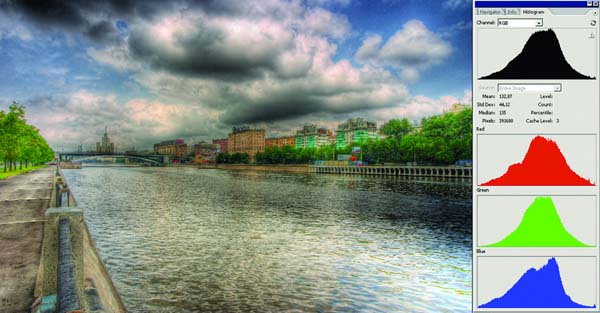
As you can see, the histogram of the image is almost perfect and does not require correction. However, let us now turn to the problems that have appeared in the image with which we will have to fight.
The first - these are noises. As I said, they have increased significantly, and especially in the shadows. Therefore, the first recommendation arises: always remove the minimum sensitivity. Even ISO 400 on a digital camera is already too much, because the picture can be significantly damaged. This is especially true for maximum levels of engine impact. Luminosityand Strength. With noise we fight our favorite filter. NeatImage.
The second - aberrations. Increase the same fragment of the original and the resulting image on the edge of the frame.
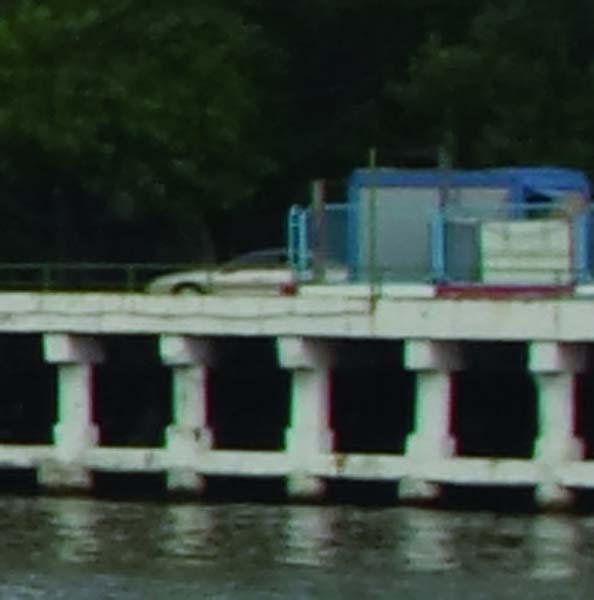
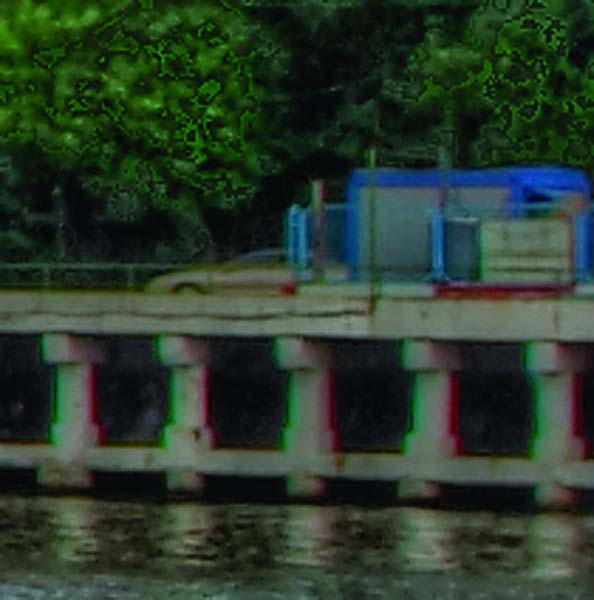
On the first, initial image, chromatic aberration is not very noticeable, although the shooting was done with a wide-angle lens. SigmaAF 15-30 . But in the final picture, she just climbs into the eyes. Tonal compression enhances all such defects. It is difficult to fight these, especially on digital cameras, because their optics are much weaker than those of sLR camerasespecially at the edges of the frame. I’m not talking about dealing with them in the editor, quite significantly (albeit with some loss of clarity) this unpleasant effect can be weakened by applying a filter LensesCorrection. Just take this into account when shooting and, if possible, line up the composition so that you can frame 30 percent, because the effect is especially visible at the edges of the frame.
Third - local contrast.
For tone mapping, save all your settings with the command Save in the bottom corner of the panel. If you find similar problem areas, then try to reduce the contrast or clarity of the source files at these points as much as possible. If you look at the pictures, you will see that they need to be reduced very slightly. Although this is a time-consuming operation but by writing it in ActionsYou can easily apply it to all frames. Then reopen them in Photomatix and loading the installation command Load, you exactly repeat the previous processing, but with a completely different result. And there remains the last option - manual "cleaning".
There are very few. Slightly muffle the color of greens and the brightness of the water. To do this, open our original image with a correction equal to (0), copy it to the clipboard and overlay it as a separate layer on our image, changing the blending mode to Darken (blackout). The transparency of the layer will make 30% and reduce the layers.
On this, perhaps, that's all. It should be noted that HDR is very fond of texture. These are stone, buildings, water, sky, earth, etc. The pictures are striking in their clarity of details. You already understand how and how this is achieved. You can work the sky like in any other editor, and it’s not at all necessary to create such a surreal picture. The main thing - without the "fanaticism" and with a sense of proportion.
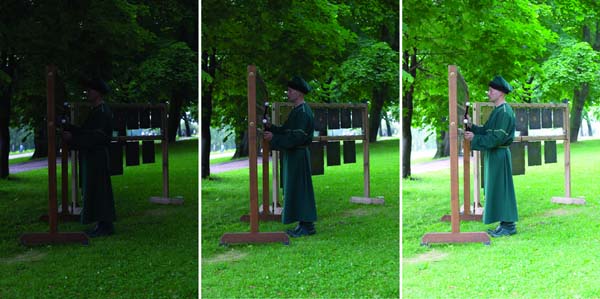
Now on another example, create an HDRi using Photoshop. In this case, we will make the main character of man.

For this work, I needed only three “development” of one RAW with fork parameters (-1.0) - (0) - (1.5). I deliberately do not consider conventional bracketing, since everything is much simpler with it and austerely.
Open up Photoshop - File-Automate-Merge to HDR ...
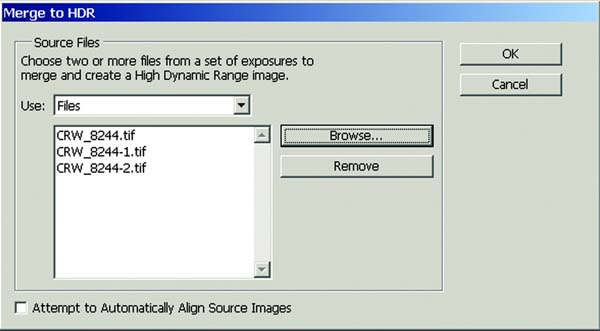
On the opened tab, select the files we need. If we use not the RAW format development, but real bracketing, then it is necessary to put a "tick" in the lower left window AttmpttoAutomaticallyAlignSourceImages - “automatically align image sources”. This is necessary to align the frames, especially if the shooting was carried out "with hands", without a tripod.
Click OK and ...
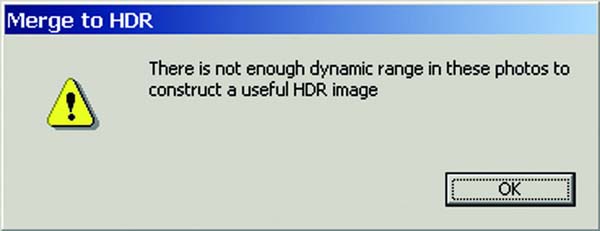
“There is not enough dynamic range in these photos to create HDR images»...
In this case, we are faced with the first important drawback of creating images in Photoshop. Obviously, this is due to the insufficient development of software, in which the concept HDR just appeared in version CS2 . The fact is that Photoshop (like other programs) works with Exif frame information in which all the necessary exposure data are recorded, etc. In this case, since the frames are made from the same source image, then Photoshop “The roof goes” and we get what we get. But it does not matter, you just need to deceive him and make it very simple. It is necessary to de-personalize the original images by removing from them Exif information. To do this, open the source files and for each file we make a sequence of operations (select all - copy - create a new image - paste - save) or more simply: Ctrl+ A-Ctrl+ C-Ctrl+ N- Ctrl+ V-Ctrl+ SBy giving each new file its own name. Now, running the creation HDR as described above, we get a completely different result!
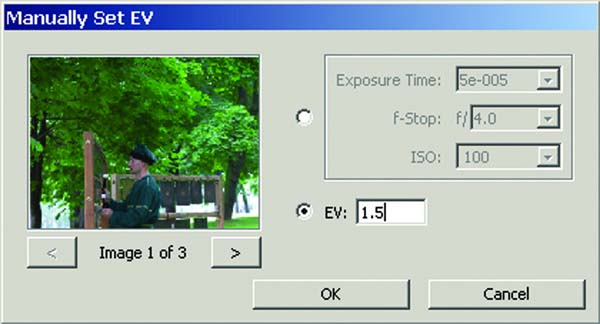
In this menu, we need to specify an exporter value for each of the three frames (or manually enter the shooting parameters, which is less convenient). Remember that I did a developer RAW with the expander (-1,0) - (0) - (+1,5). Enter these values for each image and click OK. In the case of HDR images from real bracketing these tricks will not be needed and everything will go much faster. Perhaps this is the only drawback RAWbut only when working with Photoshop.

Here we will stop a little more. In the tab, we see the resulting frame obtained by mixing the three source frames. Very often, especially when using real bracketing, the resulting frame on the monitor will immediately look very bright. To view it move the white point slider. It is necessary only for previewing the file and does not affect the final result. It's not yet HDR. Now we need to choose what we want from this: 8, 16 or 32-bit file. Sometimes it is enough to get just a 16-or 8-bit file in which all the shadows and lights are worked out, which is practically unattainable in a regular frame. But since we are talking about HDRthen we will do a 32-bit file by selecting in the top tab 32 bit/ Channel. Again, click OK and wait for some time required to create the file.
So, the file is created. Outwardly, it looks like the previous picture, but it is only outwardly. In fact, you see some kind of resultant image that can be displayed on the screen. You cannot print or view it in any of the graphical browsers. 95% of all tools available in Photoshop. To start, save it in the proposed format to disk.
Here is the time to make a second digression about the features Photoshop. The fact is that further work with the file is very limited by the means that the editor has. There is no built-in flexible custom tone compression necessary to create a real file, namely the HDR image that is most interesting to us. We can only convert this file to the usual 8-or 16-bit with subsequent processing. True, during the transformation itself we can do something with it, although very little. Let's try. So, Image - Mode - 8 bit/WITHhannel.

Option number 1. Ability to adjust exposure and gamma. The choice is not very large and the result is not very interesting from an artistic point of view, although it is quite acceptable as an option of expanding the dynamic range of the image, if the goals of creating something unusual are not pursued. The purpose of the engines is clear from their names and do not require a separate explanation.
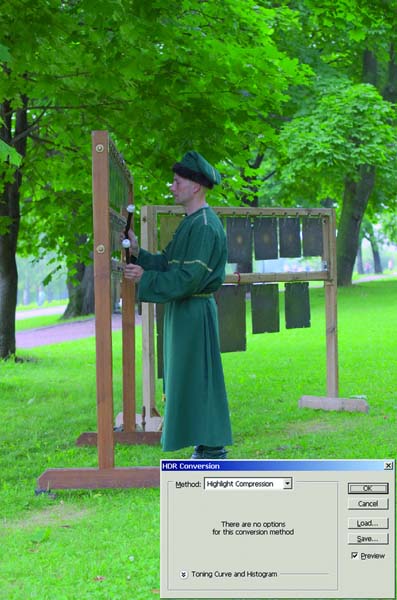
Option number 2. Compression of light tones. Result management is not possible, as can be seen from the message, since adjustments are not available. You have to rely only on the default settings. The result is not very interesting, although in some cases it can take place.
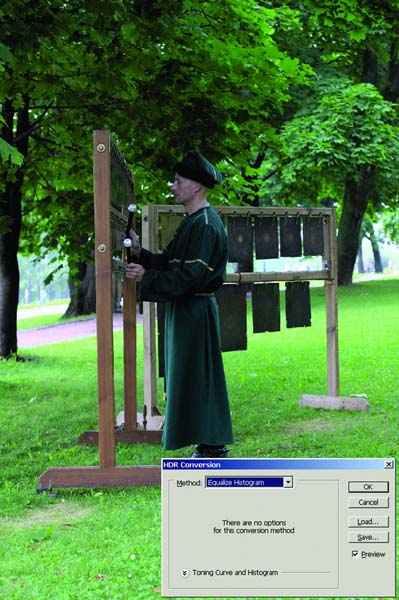
Option number 3. Equalizer histogram. Unfortunately, here the adjustment is also not available. The result is similar to enhancing the contrast.
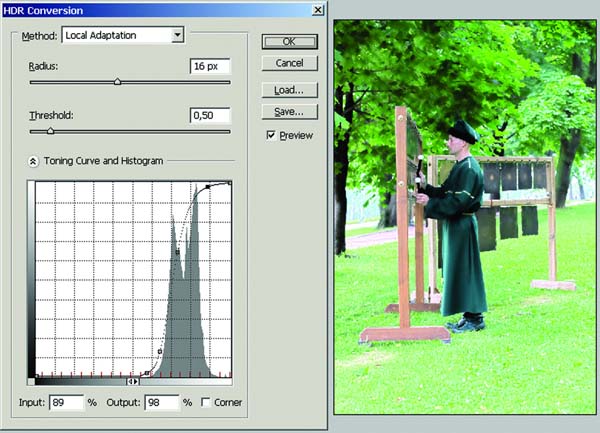
Option number 4. Local adaptation. The most interesting, but also the most time-consuming method of obtaining the final result. All adjustments and manual correction of the resulting frame by points on the original histogram are available. For a simplified result, simply repeat the envelope line of the histogram with control points, and then experiment with them to get the desired result. Very tedious and difficult to get a normal result. In general, all these four tools are similar in their properties to the tab. Combine programs Photomatix, only work worse. Specific recommendations here are hard to give. Each result is very individual and depends on the requirements of the author and on his degree of "fanaticism."
As for the built-in elements of creating HDR images, then on this Photoshop exhausts itself. I’m not talking about post-processing options — here the editor’s possibilities are endless, but that’s another song. I hope that in the near future, the authors of the editor will eliminate these gaps in softwarebecause technology HDRi increasingly popular.
Everything would be really bad if there was no separate plugin for Photoshop entitled TooneMapping, released by MultimediaPhoto SARL, for which a special thank you to her. Let's run it and see what happens.
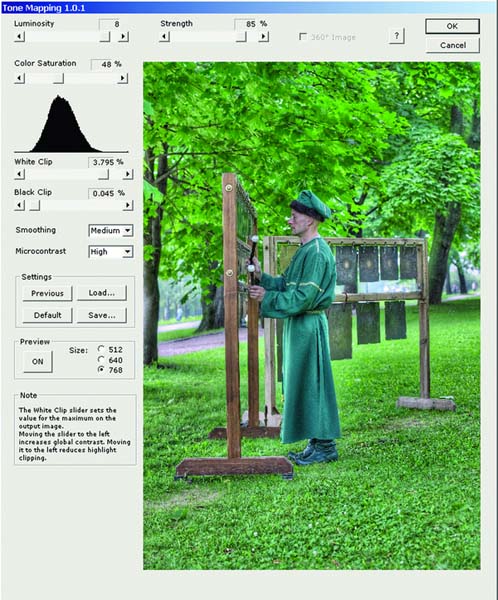
I will not describe the filter interface, since it is almost exactly the same, although not without a spoon of tar. The fact is that the parameters Smoothing and Microcontrast installed by default and cannot be changed to others. It is evident that everything is still somewhat “damp”, but this is a matter of time. Stand our engines and click OK.
As I said earlier, after compression, the picture is much more contrast than on the preview of the filter.
For further processing, we apply a filter correction layer. Hue/ Saturation in mode Colorize (“Toning”) and set its transparency to 70–75%. Since the toning is done in a separate layer, its parameters (color) can always be changed by going to this layer. It remains only to crop the picture, and this work can be considered complete.
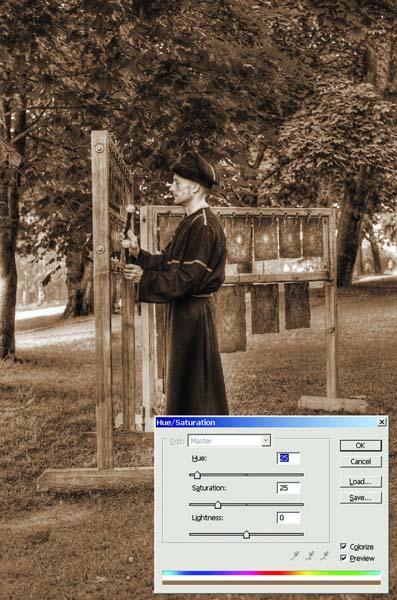
It turns out that the HDRi technology is quite applicable to people, although to a much lesser extent. Having tried to work with different pictures, you yourself will understand where and when this technology gives a clear advantage, and where it can spoil everything. And do not forget about the sense of proportion - this is very important.
Surely you have heard that modern smartphones support mode hDR shooting. This article will give you to understand what is its essence.
HDR technology was not invented yesterday. However, its appearance could not have happened in the era of film cameras. And still the HDR mode could not be present in the first digital cameras and smartphones - they simply would not have enough power to process images at the desired speed. It is now such devices allow you to make a couple of frames in a split second. So, let's already understand what HDR is in the camera of a smartphone.
Any digital camera, including a built-in phone, has a limited dynamic range. This means that if there are very bright areas in the frame, problems with dark objects start. For example, you are photographing a building while in its shadow. Most likely, this will lead to one of two options for the resulting image:
- Clouds in the sky will be clearly visible, but the details of the building itself will be almost indistinguishable;
- The house will be detailed, but at the same time the sky will turn into a white gruel - in some cases it hides the roof of the building in its colors.
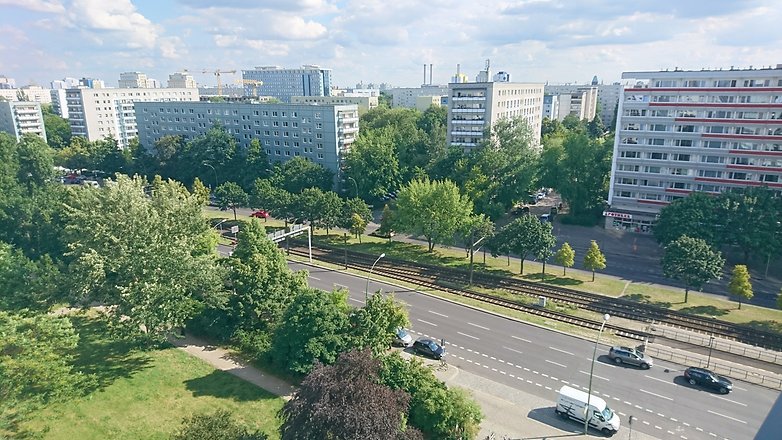
In such cases, the HDR function saves. This mode allows, roughly speaking, to make two frames with different exposures, then combining them into one. As a result, the image will not be very dark areas, as well as too bright. Detailing will increase significantly - absolutely all objects will be distinguishable. But do not use this mode on an ongoing basis. The fact is that HDR-photos often look somewhat unnatural. It is worth activating the mode if the camera of the device does not cope with its task. For example, you shoot against the light of the sun or in the shade of a building - then you can use HDR.

Pay attention to the area in the shadow: it turned out bright, and the details are clearly visible
It is noticed that owners of budget smartphones use HDR mode much more often than owners of top-end devices. The fact is that expensive devices are equipped with a higher quality camera with a wide dynamic range.
How it works?
When activating HDR, be prepared for the fact that the camera will take several pictures at once - two or even three. Therefore, it is not necessary to photograph moving objects in this mode; they may split in two, turning into peculiar ghosts, or become blurred. Pictures will be taken with different exposure and exposure. Specific values of exposure depend on the aperture optics, the size of the matrix and many other parameters. That is why high-grade cameras cope with this task much faster.
Further, the resulting frames are merged into one. The more powerful the processor is installed in the camera or smartphone, the less time it will take this process. Although you should not forget about the resolution of the matrix. Of course, 24-megapixel images are more difficult to process than frames with a resolution of 8 megapixels. In any case, even on budget devices you will see the result in a couple of seconds.

Another example of an HDR image
When creating photos, autofocus concentrates on areas with different brightness, contrast, and distance from the camera. When superimposing frames on each other, the system analyzes their quality, selecting areas with the greatest clarity. Also, the final image will consist of areas with better saturation and less noise.
High Dynamic Range technology in different smartphones can be implemented in completely different ways. Somewhere pictures just overlap each other, and then slightly "zamylyvayutsya." And on more powerful and new devices the above described process takes place.
How to shoot in HDR mode?
Now practically all Camera applications with which modern smartphones are equipped have the corresponding function. This means that it is not necessary to install any additional ones. The HDR icon may be in the mode selection menu. And in many cases, it can be found right on the main “Camera” screen, next to the flash activation. However, you are required to touch this icon.

It's simple
Next you take a picture of a familiar touch on the shutter button. But if a regular photo is created in a split second, then in the case of hDR mode you will have to wait some time. Try to keep your smartphone still for one or two seconds. It is important! Otherwise, you will succeed.
Some third-party applications provide HDR mode settings. That is, you can choose how much the exposure will change when you create multiple frames. In the pre-installed programs “Camera” there is usually no such setting.

The difference between a normal photo and HDR is obvious.
That's it, the HDR photo is ready! Nothing complicated!
Disadvantages of hdr
Let's briefly summarize. The main advantage of the HDR mode, you should be clear: all areas of the frame made in it will be equally detailed and bright. And what are the disadvantages of such a regime?
- Taking multiple shots is time consuming.- and the worse the camera built into the smartphone is, the more chances to get an image with blurry objects at the output.
- Unnatural lighting- the reality on the final photo will be far from what you saw with your own eyes.
- You can miss the moment- image processing in HDR mode takes at least a couple of seconds. Burst shooting is thus excluded.
Now you understand what the beauty of HDR-shooting, as well as its main drawbacks. We hope that you have learned something new for yourself. Be sure to share your opinion in the comments, whether you use the HDR function, and whether it is well implemented in your smartphone.