Which satellite is better to adjust the plate tricolor. Setting up satellite equipment to receive broadcast tricolor tv
The satellite TV operator "Tricolor TV" is the leading and has several million subscribers. Setting up the receiver of the Tricolor TV provider is subject to an independent work, which we will consider.
Analog TV with confident steps goes into the distant past, which is replaced by satellite broadcasting. The channel package of the operator Tricolor has already gained mass use and reverence, and in general, is well received by the consumer.
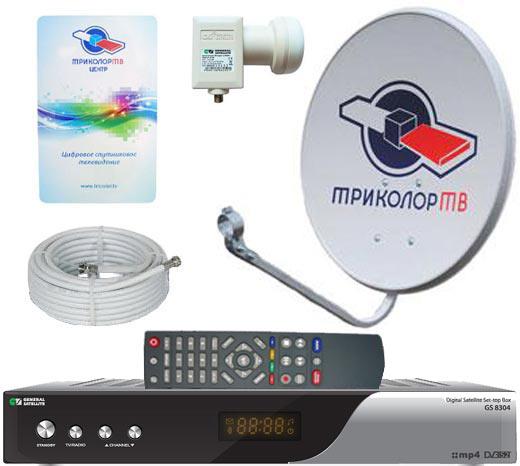
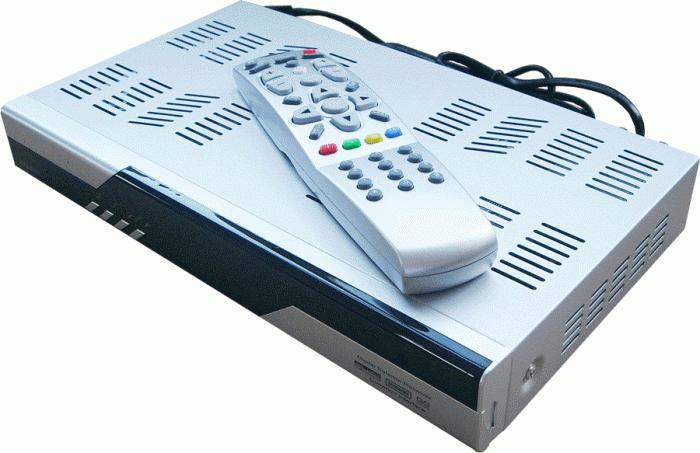
To use the services of the provider is to purchase a standard set of equipment. The list of standard satellite equipment consists of the following components:
- Satellite antenna;
- Receiver;
- Converter;
- The required length of coaxial cable.
It will not be difficult to purchase this equipment from any certified dealer, as well as in retail sales in retail chains. In addition to acquiring the necessary kit, you should know how to install the antenna and catch the satellite signal on this antenna. It is possible to connect the antenna yourself, as well as choose the right direction of its installation, and learn how to set up the TV and the antenna to receive the signal.
Devices for receiving digital satellite signal Tricolor TV
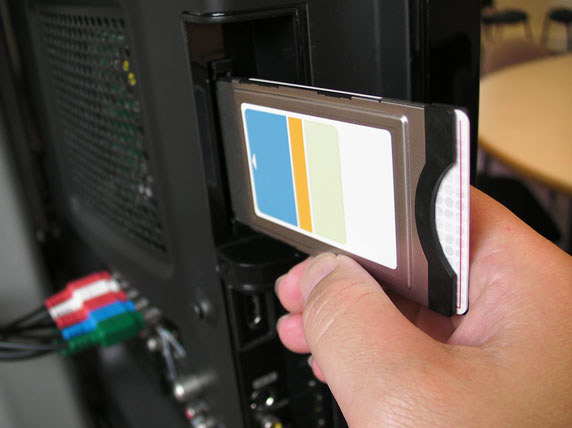
It is known that Tricolor TV binds its own access cards to specific devices. Not many subscribers have the opportunity to pick up the devices that came to taste, because everything, the company recommended using not only certain receivers, but also CAM modules.
- GS-8306S
- GS-8307
- GS-8305
- GS-8306
- GS-8305
- HD-9303 and other devices.
In order to receive support from the operator Tricolor TV, full registration must be completed and a service acceptance contract signed. Cardsharing service provides typical services with more affordable prices, but registration is also required. At the same time, registration on the portal and receiving the service takes place in a matter of minutes, also with the support of operators who are always online.
Yet in this publication it is worthwhile to dwell on the consideration of a specific example of setting up the broadcast of satellite TV operator Tricolor. By the way, TV operator Tricolor is permissible to watch without a receiver. 
In fact, every modern TV can be equipped with a tuner that supports DVB-S2, but this is all about receiving free base channels. So to talk about decoding is unnecessary.
Activating satellite broadcasting: setting up equipment
Before the receiver is connected to the TV and the receiver is tuned, it is worthwhile to properly install the antenna itself. Next, connect the receiver to the converter using a cable, and then connect the equipment to the TV. Of course, the receiver connects to the network and starts.
Below is an instruction on how to tune the receiver Tricolor. Instructions will be given on a specific example of a GS-8307 receiver. Connecting the device to the TV should be done using the SCART or HDMI output. It is worth noting that the picture from this unit is displayed exclusively through one output. That is, if in the device settings the connection is made via SCART, and the TV is connected with an HDMI cable, the screen will display the absence of a signal.
Information about the used connector is displayed on the scoreboard of the device. Switching the output is permissible to produce:
- A button on the receiver’s remote control: “ix. Sign. "
- Or in its menu in the item "Configure AV output-video inputs."
Setting up the tricolor operator's receiver TV: instructions for manipulations
In order to activate the receiver, it is included and inserted into it the operator’s card. When connecting the card sharing service, the device should be registered on the sharing portal.
Often, when the device is sold, the Tricolor TV channels are scanned, but if it didn’t happen, or a receiver that was already in use is used, then the “Installation Wizard” is launched the first time it is turned on. It is worth going through the three steps of the provider settings:
- Select region of location;
- Operator selection;
- Scan TV channels.
Step one is concluded in the choice of the operator, which is done using the remote control with the up / down and left / right buttons. In this section, the language used is chosen.
When selecting the main region, all operator channels are automatically scanned.
The process is not complicated and takes a minimum of time.
Firmware for satellite receivers operator Tricolor TV
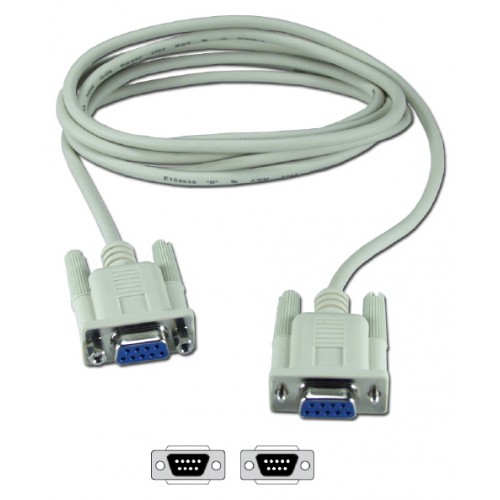
In order to flash the receiver, you need the following list of additional devices:
- RS232 - null modem cable;
- Personal Computer;
- GS Burner - a program designed to copy and download software and databases of GS devices: https://yadi.sk/d/z3wgU_GFf8a3U;
- Firmware for a specific model of the receiver.
Each presented firmware is provided inside the file with auxiliary instructions for a specific specified Tricolor TV receiver:
- https://yadi.sk/d/mk1WpWd1fA9dA - firmware for Tricolor TV receivers: DRE-5001, DRS-5000, DRS-5003, GS-7300;
- https://yadi.sk/d/vMTpBa4OfAA4S - firmware for HD9305B;
- https://yadi.sk/d/zmAe_lA4fAACc - software for the DRS-8300 device;
- https://yadi.sk/d/e98fMw-sfAAJY - firmware for the Tricolor TV device: GS8300 M \\ N;
- https://yadi.sk/d/yTEqQZ3kfAATT - software for the GS8302 satellite receiver.
With confident leaps and bounds, he is leaving the past, and IPTV and satellite broadcasting systems are replacing him. All of them are in great demand among the population, as they provide excellent image quality, allow not to depend on natural and weather factors (weather has little effect on the signal), and also provide hundreds and thousands of additional services and subscriptions.
Of course, our consumers first of all pay attention not only to the quality of the services provided, but also to their cost. It is desirable that the latter was as low as possible. The excellent price-performance ratio of services sold in the field of digital satellite television is characterized by the domestic company Tricolor TV. Surely many of your friends or acquaintances are connected to their network.
The equipment and channel packages of Tricolor are very cheap, and therefore most of the potential subscribers can afford it. However, our users would not be so if they had not made any attempts to somehow save. Today we will consider setting up the Tricolor receiver, which under normal conditions is carried out by specialists.
There is nothing particularly difficult in this, and therefore you will certainly manage.
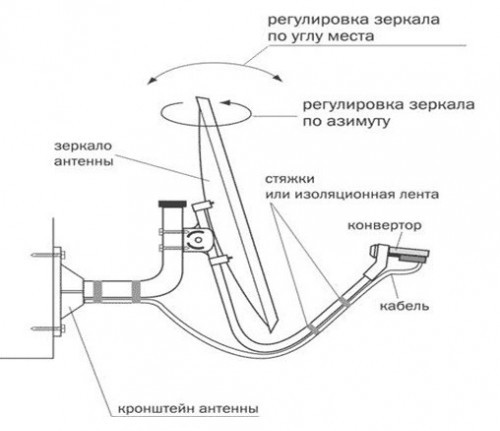
Satellite Dish Assembly
Referring to the attached instructions, assemble the antenna as accurately as possible. At the selected point (preferably on an elevation) rigidly fasten the base. On the loggia or balcony, the device is attached only to the outside of the wall, using the roof can be installed on the top floors. If you live in the private sector, do not mount the antenna under trees or massive buildings that may have a negative effect on signal reception.
How to install?
Once you have assembled the antenna, it should be fixed on a suitable base, turning in the direction of approximately 4-5 hours, then reject the device four to five degrees down. Once again, make sure that in the chosen direction, at least for fifty meters, there are no massive objects that can have a negative impact on the positioning accuracy.
The probability of this is not so high, but sometimes even window glass can significantly degrade reception quality. In this case, you can not tune the receiver "Tricolor" for good reason.
On the bracket, the antenna is fixed so that it can only rotate under the influence of a certain force. Under the mounting device, you can install a simple clamp. If you do this, simply loosen the fastening bolts as much as possible: the antenna will be very convenient to turn, relying on the above-mentioned fixture.
Some misconceptions
Often you can hear that the antenna with the receiver should be connected only with a copper cable, as it conducts the signal better. It should be immediately noted that this kind of delusion has remained since the days of analog television, when the type of cable did in fact have a significant impact on signal quality.
The fact is that digital information is transmitted from the satellite. absolutely no matter what quality cable it will transmit. If everything is really bad, you simply will not see any pictures on the screen. No bands, "snow" and other things, as it was in the days of analog TV towers, will not be.
How to prepare the cable?
For the signal to pass, you need to properly prepare the cable. It is often possible to observe when users extremely carelessly clean contacts, pulling out half of the metal braid, and then they are surprised at the absence of any reaction from the equipment. How to avoid it?
- Starting from the edge, gently we cleaned 15 mm. It is very important to try not to damage the shielding layer.
- We cover the sheath, again trying not to break it.
- Next on the cable you need to screw the F-connector
Important!
However, there is one exception. If you use a good double-shielded copper cord and a powerful central core, the antenna can be located a hundred meters from the TV. This is especially important if you have on your hands receivers "Tricolor TV" Full HD, which are very demanding on the speed of data transmission.
In the case when you bought a Chinese product, where the thinnest threads of an incomprehensible metal are used as a braid, and iron, which is slightly covered with a layer of copper, acts as a core, you will have to additionally purchase a good amplifier. If this is not done, then no adjustment of the Tricolor receiver will help.
It is also often thought that in order to ensure a good signal level, the antenna must be raised as high as possible. This opinion also remained from the time of improvised receiving devices made of wire, which in fact showed the best result if they were fixed on the roof of the house itself.
Lifting to unattainable heights you do not guarantee a good reception at all. Just the opposite: if it is located closer to the ground, the terrain folds can act as a prism, improving the directionality of the signal.
Getting Started
Before you tune your Tricolor receiver, you need to perform some manipulations with the antenna itself. First connect the receiver to the converter with a cable, after which it can be configured.
Consider the procedure by which you can connect to the satellite "Bonum 1". To do this, you need to enter the data of the transponder into the device, with the help of which you are going to find a satellite.
The data are as follows:
- The frequency is 12226.
- The polarization parameters are horizontal.
- The flow rate is 27,500.
Basic receiver settings
So how to tune the receiver "Tricolor TV"? First go to the menu by pressing the corresponding button on your model of the remote control. We go to the item "Installing the antenna" or "Search transponder", then enter in the appropriate fields the data that we have provided above. If you do not know where and which menu item is located, simply read through the instructions for your equipment.
 It is very important to know exactly what type of converter you have in the settings. Select the option "Single". In the settings of the local oscillator enter the number 10750.
Watch TV without a receiver
Is it possible to watch "Tricolor" without a receiver? Oddly enough, but it is possible. The fact is that modern TVs often have tuners that support DVB-S2. They will receive a signal from the satellite. But! Only to accept, about decoding speech does not go.
Most likely, you can watch “Tricolor” without a receiver on such a TV, if we are talking about basic free channels. However, even this is very doubtful.
Configure satellite signal levels
Further adjustment should be based on the “Signal level” (Scan) item. Almost all modern models of tuners display two positions. Pay attention to the “Level” scale, as it displays the parameters of the inverter at the input. Accordingly, the “Quality” parameter displays the level of the useful signal (frequency, speed and FEC). In the first case, the full signal is displayed, including ethereal noise, “white noise” and other “husk”, which affects the quality of reception negatively.
Prior to connecting the converter, the signal level on the first scale will be zero (most often). Many models of tuners have only one scale. If a mixed signal is displayed, it is gray. In the case when the equipment is tuned to the satellite, the color will change to green or yellow. This is the basic setup of the Tricolor TV receiver.
We start the search for a satellite
 First we are looking for a satellite by the "junk" signal. The higher the desired object, the indicators become more noticeable. To find what you are looking for, you should scan the sector in which it is hypothetically located. Note that a tall tree, shed or other obstacles can increase the signal level on the first scale. Of course, it’s worth being guided only at that moment when the “Quality” scale starts to react or the color of the graph in the first column changes (which we talked about above).
Thin Search
A more accurate search, as you can guess, is conducted by level on the second scale. Important! If you have some other firmware of the Tricolor receiver, or it belongs to some other model range, all the menu items we have mentioned may be located in different places, and the levels on the scales may be horizontal or vertical. Be sure to check if the “LNB power” option is active, otherwise the equipment will show a complete absence of signal. Scanning must begin from the same position in which the antenna was installed.
In order to achieve the best result, in the process of searching it should be rotated by 10-15 degrees in different directions.
Note that the antenna should be rotated as slowly as possible, since the digital signal is processed by the receiver with a decent delay. Look at the level of the second scale: when you catch the desired frequency, it will color. In this case, with the utmost care and caution, twist the plate until the reception level is maximum. Once again we warn that the receiver for the "Tricolor" (HD-quality) is demanding of this parameter, so pay close attention to this.
If you failed to catch the satellite right away, try to move the antenna up or down the mast to which it is attached. It is possible that you will have to make several visits at once. Of course, the most vivid proof of the success of the setting will be a picture on the TV screen. 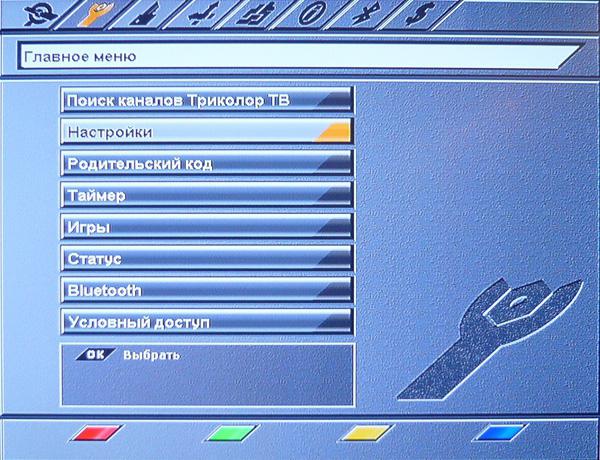
As soon as you reach the maximum reception level, you must carefully tighten the nuts. You need to twist them very carefully, as the slightest antenna shift up or down, as well as scrolling along the axis, can cause a sharp deterioration in the signal level from the satellite.
Here's how to connect the receiver "Tricolor."
Note!
Many amateurs who tried to put the antenna "by eye", nothing good came of this idea. So you should be very careful with the setting. In addition to the above, we offer you a couple of other useful tips. First, in no case be in a hurry: you should literally rotate the antenna literally millimeter, constantly monitoring all indicators.
For setting it is preferable to choose only a clear and sunny day. Since the plate "Tricolor TV" can be found even in the most remote village in the forest, look at where the converters are directed to the neighboring equipment.
![]()
You can do more cleverly: on a sunny day, look where the shadow of the converter is focused. As practice shows, such a simple method allows to reduce the setup time to 10-15 minutes. But people sometimes tinker around for days, unsuccessfully trying to aim at the satellite! Unfortunately, you can pay attention to the shadow of the converter only in autumn and winter, when the sun is low. Representatives of the "Tricolor" say that when setting up, it is necessary to focus on the southern direction.
Well, setting up the receiver "Tricolor" is completed! Enjoy your views!
The cost of departure is 1500 rubles.
This operator is a leader in high-definition television in Russia. And the number of subscribers has already exceeded 10 million.
Such figures tell us that the requests for tuning the antenna are several times higher than those of other operators.
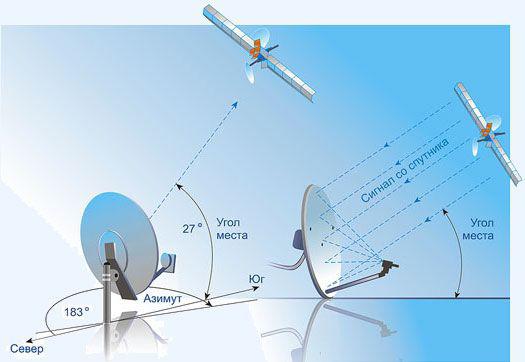
A few rules for proper orientation of the dish on the ground:
- The plate should be on the south side of the wall.
- Fixing to the wall must be firmly fixed.
- Tricolor antenna tuning is carried out only by a specialized device.
- Installation must be carried out by specialists.
- There should be no interference on the signal path in the form of trees and buildings. Figure 1
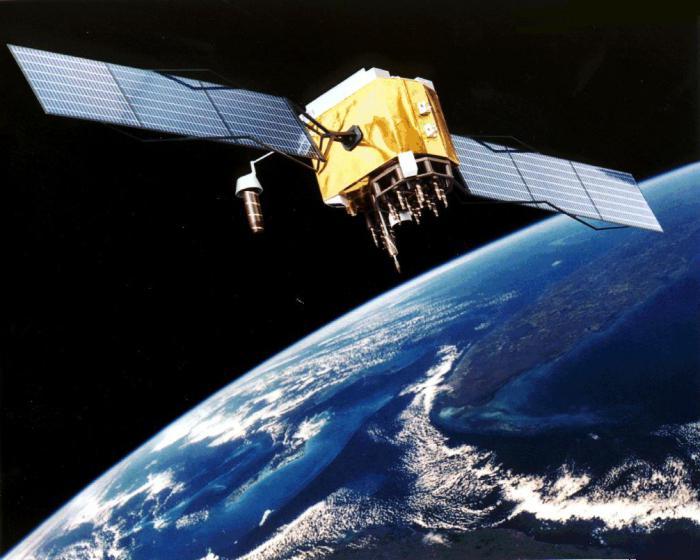
The signal is transmitted from the Eutelsat W4 / 36E satellite. To receive the signal, 55 cm of Supral antenna is sufficient.
Pic.1
As can be seen in Figure 1, the satellite is in the South. Accordingly, all antennas should look to the South.
Trees, dense foliage, pillars, gutters, all this causes a distortion in the reception of the signal. Foliage practically does not transmit satellite signal.
Tricolor setting stages
For a start, you need a spanner for 12-13 mm, to loosen or tighten the nuts. Now be patient, turn on the TV, receiver, install it on the receiver of our operator, and then look at the “Signal Strength” and “Signal Quality” scales.
They may be empty. If the “Signal Strength” scale shows some%, then you are already on the right track for tuning. It is necessary to continue to slowly move the antenna horizontally until the scale starts to increase.
Just remember that setting the satellite dish Tricolor is a subtle event and each subsequent movement with a plate should be carried out by 2 mm and with a delay of 2-3 seconds. This is necessary in order for the receiver to manage to process the signal and output it to the screen.
If you have reached the maximum indicators of the “signal strength” scale in horizontal rotation, then now you need to start moving vertically, in order to accurately point the antenna at the satellite. And as soon as the signal is captured, information about it will immediately appear on the screen in the form of a “signal quality” scale.
Adjust it to the maximum value, since the quality of the transmitted content depends on it. The minimum acceptable level is 50-56%. If below, then you need to look for reasons in the other.
Namely:
obstruction in front of the antenna itself
tall building or house
defective converter (there were such cases)
coaxial cable of poor quality or there is somewhere interruption of the central core
If you have not managed to set up the equipment yourself, then the Tricolor Setup Wizard is ready to help you. Check out the day of treatment. The cost of 1500 rubles! We will do all the work efficiently and quickly.
With the time of operation and the impact on the antenna of various kinds of climatic conditions, they knock the position of the antenna, and over time (3-4 years), the signal becomes weak and in a small cloudy weather, the image on the TV starts to “crumble” or suddenly the message “No Signal ”, (Fig.2), which means the loss of broadcasting at 100%. This is the first sign of equipment malfunction.
Fig.2 The inscription “No signal” on the screen of your TV

Often not working and the year the signal is broken. This all indicates a fault in both the antenna itself and possibly in the equipment.
A bad signal is a sure way to the failure of a module, which in turn will entail costly repairs. Therefore, if you detect such problems, immediately call the wizard for setting up the equipment.
The company Tricolor TV, in addition to broadcasting satellite television, offers services for connecting and setting up equipment. But you can do it yourself, which is not at all difficult by following the instructions below. In this case, you will save on the call group of specialists.
A good signal depends largely on the correctness of the chosen place for the installation of the antenna. The main requirement is the absence of high-rise buildings and trees near, which can impede the passage of a signal. If you live on the lower floors of a skyscraper, and a nearby building is located a few meters from the windows, it will be rational to place the antenna on the roof. Do not place the device in your apartment or on the balcony. The next step is to assemble the antenna design according to the instructions. Fasten the bracket to the wall surface using the most suitable hardware. This can be anchor bolts, screws, screws or studs. The receiving device is mounted in the holder with the connector down so that in the future it does not get moisture. The cable is connected to it and it is necessarily tightened with ties along the arc on which the “receiver” is mounted. Depending on the region and model, it is necessary to adjust the "plate", turning it at an angle.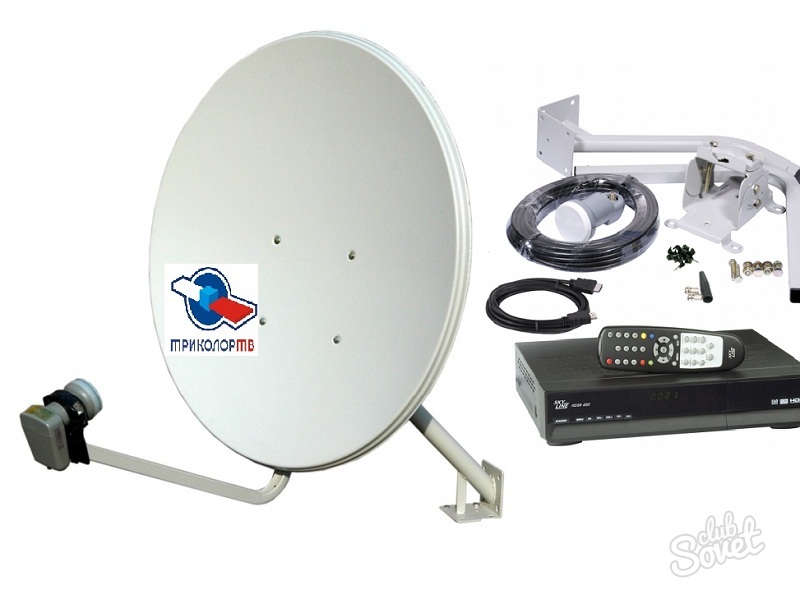


When finished setting, do not forget to tighten the fasteners and be sure to save the settings before exiting the menu. The signal level may deteriorate due to rain, snow or strong wind. Do not forget to clean the antenna from snow and dirt.
On the example of GS-9305
Connect the satellite receiver only after complying with all the necessary connections!
1. Insert the HD Tricolor smart card into the slot of the card reader located on the front panel of the satellite receiver. The smart card chip should be on top, and the direction of the pointer (arrow) next to the chip should correspond to the direction of installation of the smart card in the card reader slot. (5)
2. Connect the GS 9305 to the power supply. 3. To turn on the receiver, turn the POWER power switch, which is located on the back of the Tricolor TV satellite receiver, to the “l” position. 4. If the indicator of the “STANDBY” key lights up in a greenish color, then the receiver is in the operating mode and there is no need to press the “STANDBY” key. 5. If the indicator of the “STANDBY” key is highlighted in red, in this case, you must press the “STANDBY” key on the receiver's remote control or on the front panel of the receiver in order for the receiver to enter the operating mode. 6. Turn off the receiver in the reverse order.
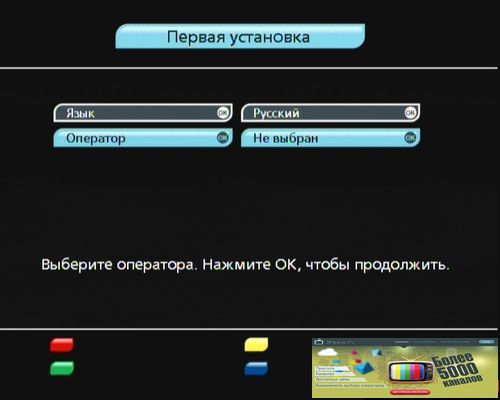
The first switching on of the receiver, accompanied by the launch of the installation wizard. It is designed in such a way as to simplify the initial setup of the receiver as much as possible, without effort to scan the television and radio channels of interest to you. To set up the receiver, use the remote control. Most of the default settings are optimized for the most common and common cases of receiver settings, then in most cases you only need to confirm these settings by pressing the “OK” button on the receiver's remote control.
The Setup Wizard also starts after the receiver is reset to Factory Defaults. It is possible to terminate the “Installation Wizard” at each stage by pressing the “EXIT” key on the remote receiver of the satellite receiver or by selecting the “Finish setup” option. You can also restore the original settings by selecting "Restore".
Step 1.At the 1st step, you must select local settings. Move the cursor up / down with the receiver's remote control keys to the line of the desired option. Switch options with the up / down keys or press the “OK” key to select the desired option from the drop-down list.
To select a setting in the drop-down list, use the up / down buttons, to confirm, press the "OK" key.
Menu language - in case you want to change the language in which the menu will be displayed, select the menu language. The subsequent steps of the Installation Wizard will be displayed in the selected language.
Audio language 1 - the language selected in this line will be used by the receiver automatically as the voice language of the program.
Audio language 2 - is used as the audio language if the language designated in the item “Audio language 1” is not in the list of audio languages available on the original channel or radio station.
The soundtrack channel installed by the machine may not match the saved settings if the language you specified is not transmitted by the provider in the stream, that is, there is no such language among the audio languages available on the original body or radio channel.
Time zone - in this section you can set the difference between your time zone and UTC (time on the Greenwich meridian).
Operator - specify the operator of satellite television. For the European part, Tricolor TV center is selected. The receiver will automatically enter the settings of the satellite dish of the specified provider, which makes it possible to automatically scan the Tricolor TV channels.
Step 2. At this stage of the Installation Wizard, you need to specify the options appropriate for connecting the receiver to your TV. To select the settings, move the cursor with the up / down keys to the line of the desired option. Switch between installation types using the left / right keys or press the “OK” button to select the desired option from the drop-down list.
To select an option in the drop-down list, use the up / down buttons, confirm the selection by pressing the “OK” key.
Audio channels - possible types of audio channel: "Stereo", "Mono". "Mono" sound will be played in monaural mode, even if the program includes stereo sound.
The soundtrack of a television channel or radio station is displayed in stereo only if the specified TV or radio channel has a stereo soundtrack, and “Stereo” is selected at this point.
Screen format possible types of screen format: 16 by 9, 4 by 3. Format 16 by 9 - the picture is reproduced in a wide format, with an aspect ratio of 16: 9.
In this case, the picture of a standard format on a widescreen TV will stretch to full screen with distorted aspect ratios. 4 to 3 format - the picture has a standard format with a 4: 3 aspect ratio. A widescreen picture on a regular TV will be displayed in Envelope mode: the image will be with black areas in the upper and lower parts, but its aspect ratio will be 16: 9.
Image format Image format options can be as follows: “As is”, “Envelope”, “Pan-Scan”, “Combined”. “As is” - the picture captures the entire screen, in this case, the distortion of the aspect ratio occurs, in the case of a mismatch between the formats of the picture and the television receiver.
“Envelope” - the aspect ratio of the picture does not change, however, black areas are added on the screen (for 4: 3 pictures - in the left and right sides, for 16: 9 pictures - in the top and bottom). “Pan-Scan” - the picture is cropped on the left and on the right (for a 16: 9 image) or above and below (for a 4: 3 image) while maintaining the aspect ratio.
In the “Combined” format, distortions occur that are typical of the Envelope and Pan-Scan modes, but are halved. The HD mode indicates the resolution with which the video image will be output to the HDMI interface.
In order to open the list of available parameters, press the “OK” key, in the opened list, use the up / down keys to select the resolution that will be optimally displayed on your TV (for the selection of resolution, follow the operating instructions of your television receiver) and press the key "OK". A window will appear on the screen to confirm the action (or reject it).
Use the left / right keys to select “Yes” and press “OK”. In case within 11 seconds. No user reaction followed (or “No” is selected, or “EXIT” key is pressed), then the confirmation window disappears, the receiver leaves the old screen resolution. S / PDIF audio output format on the digital audio interface.
“Stereo” plays stereo sound, “As is” sound is played in the format set by your provider. To return to the previous step of the Installation Wizard, select [\u003e] and press the OK key.
Step 3. here the antenna system settings are selected. The default settings are selected to receive TV Tricolor channels.
You can change these settings by entering your own. To select "Custom settings", move the cursor up / down with the receiver's remote control to the item "Install antenna" and use the left / right buttons to select the desired option. In the same way, the selection of "Custom Settings" can be performed using the drop-down list.
In the user settings of the satellite antenna, it is necessary to determine the proper settings, such as: LNB power, LNB setting, lower frequency, upper frequency, Tone, DiSEqC 1.0 input, DiSEqC 1.1 input.
In the lower part of the screen there are 2 graphical scales of the satellite signal value with the corresponding numerical representation in relative percentages.
Left scale "Signal strength" - these values provide an opportunity to assess the strength of the received signal. The right scale “Signal quality” is precisely on this scale that it is necessary to navigate when setting up the Tricolor satellite dish.
The data of these scales can be used to clearly adjust the satellite dish. To return to the previous item of the Installation Wizard, select [\u003e] and press the “OK” key.
Step 4. At this point you can see the strength and quality of the satellite signal received from a specific transponder.
Move the cursor up / down with the buttons of the receiver's receiver to the “Transponder” line. Select the transponder frequency with the left / right buttons or press the “OK” key to select it from the drop-down list. Select in the drop-down list using the up / down buttons, to confirm, press the "OK" key.
The scales below show data on the strength and quality of the received satellite signal. To return to the previous item of the Installation Wizard, select and press the OK button.
Step 5. Choose the necessary region, when scanning channels Tricolor TV accurate choice of region will help scan not only federal, but also channels and radio stations suitable for your region.
Move the cursor with the receiver’s remote control keys to the item “Select region”. Select a region using the left / right buttons or press the “OK” key to select from the drop-down list.
Select in the drop-down list, use the up / down keys, to confirm, press the "OK" key. In case you doubt the choice, set the option “Basic”. In this case, only federal television and radio channels will be scanned. To return to the previous item of the Installation Wizard, select [\u003e] and press the “OK” key.
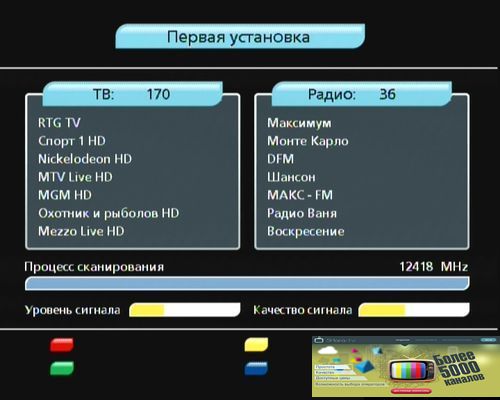
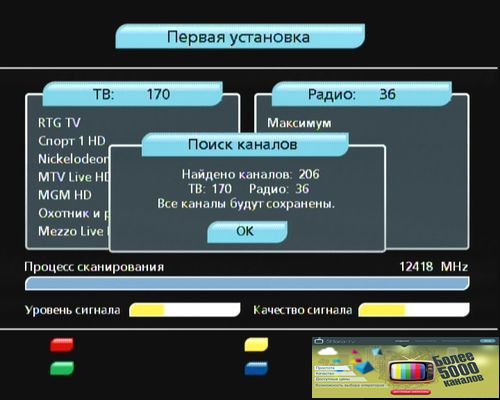
Step 6.at this stage, the receiver scans TV channels and Tricolor TV radio stations. All TV and radio channels found are displayed in 2 columns: “TV” and “Radio”.
After searching for the TV and radio channels, a corresponding message will appear on the TV screen. To finish the search and save the TV and radio channels, press the "OK" key.
The found channels and radio stations will be stored in the memory of the satellite receiver, after which the receiver will switch to the viewing (listening) mode of the 1st of the list of found channels.