Wizard windows printer installation. Rules for connecting the printer to the computer
The printer is an indispensable assistant in the office or at home, especially if you are a student. Even schoolchildren successfully print a large number of essays and reports on it. But, having acquired this device, many users face the problem of interaction between the computer and the device for printing. In this article we will look at possible ways to connect and configure the printer for printing, as well as the problems that arise.
Manufacturers of inkjet and laser printers have not yet been able to develop the same algorithm for connecting a printing device to a computer. Since PC operating systems are subject to change all the time, the ways to connect peripherals may differ slightly with each update.
To connect the printer to a computer with Windows 7, you will need to perform the following steps.
- Connect the device to the mains using a special cable.
- Connect the machine to the computer using a USB cable. Usually it comes bundled with the unit, but if it is not there, then the cord can be bought in an electronics store. There are different connectors at different ends of the cable. The connector shown on the left should be connected to a laptop or PC, and the one on the right should be connected to the printer.
With the installation disk
After connecting all the cables, you need to install a program (driver) that will control the operation of the device. Usually, if you install a jet or a laser under Windows 7 - 8, then the drivers will be installed automatically if they are in the system. In the case when the OS does not find the driver, you will need to install it from the disk that should be included with the printer.
Insert the disk into the optical drive of the PC, after which the automatic installation of the program will begin. Everything is simple here - follow the installer’s instructions until the process is complete. A situation may arise when installation wizard will not start when placing the disk in the drive. In this case, go to “My Computer”, select the disk located in the optical drive from the list, and after its contents open, you should find the file called “Setup” and click on it. After that, the driver installation will begin.
If there is no driver disk
The equipment can be connected without the installation disk. If you do not have software for the printer, you can download from the internet. To do this, it is enough to know the model of the device (you can peep from the back of the case). Knowing the model, type it in a search engine, and download the driver on the PC. In the folder with the downloaded data may be the installation file “Setup”, which you need to click to start. If this file does not exist, do the following:
- connect the printer to the computer (via USB cable);
- go to “Control Panel” - “Device Manager”;
- in the list of equipment that the OS has identified, one unknown device will be visible, opposite which there will be an exclamation mark;
- right-click unknown hardware and select “Update Driver”;
- you will see a window in which you are offered to choose a driver from the Internet or to find it on this computer - click the last one;
- a window will open where you can select the folder with the drivers downloaded from the Internet and click “next”;
- as a result, the software installation will be installed.
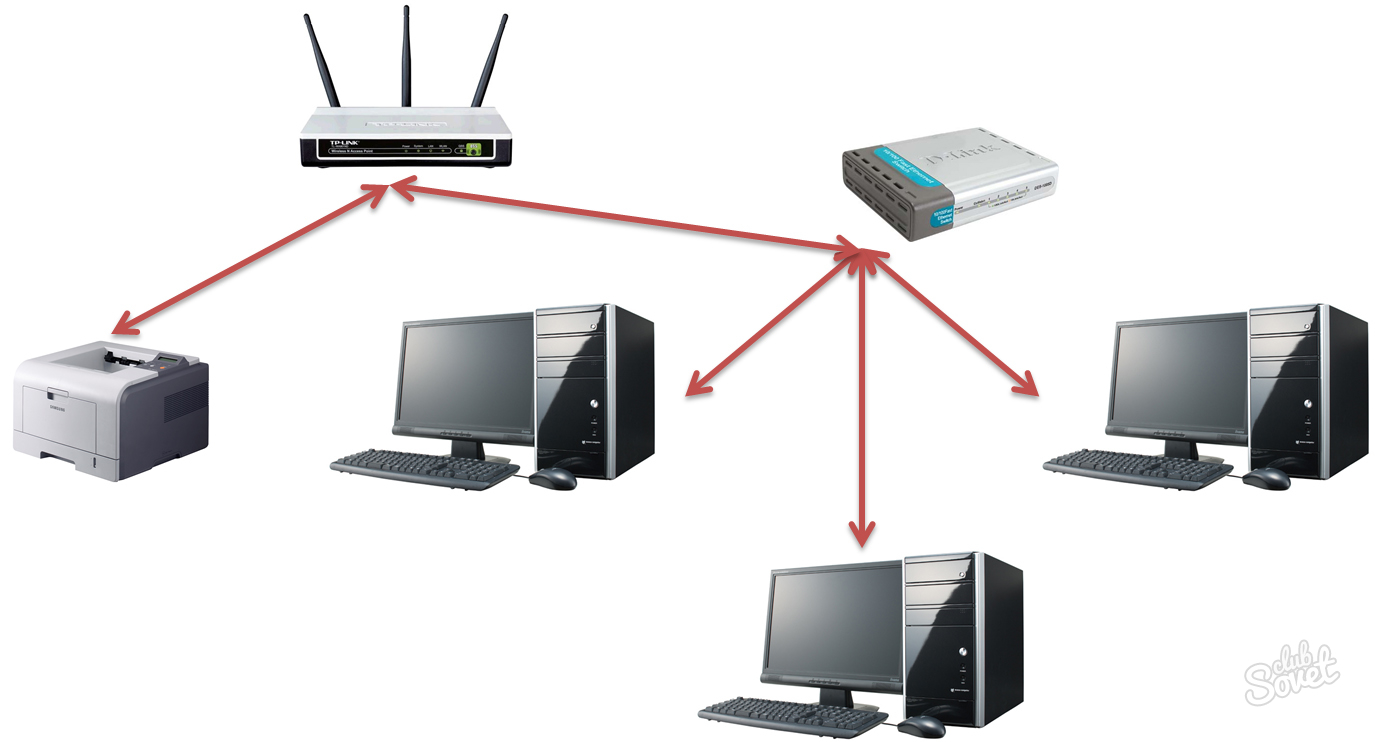
If you have already familiarized yourself with the local connection of equipment for printing, then it is easy to set up printing over the network.
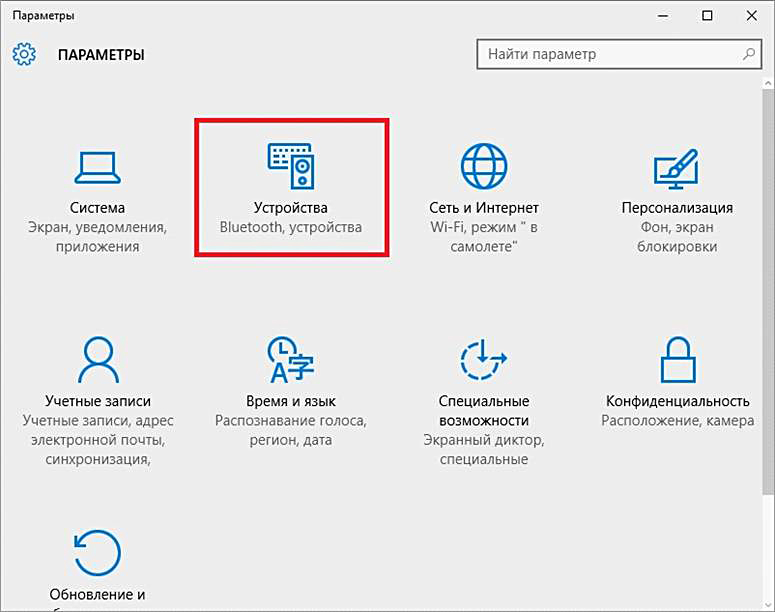
Installing the printer in the Windows 10 OS follows the same algorithm and is intuitive, even if the names of the items are slightly different.
Connect via Wi-Fi and Bluetooth
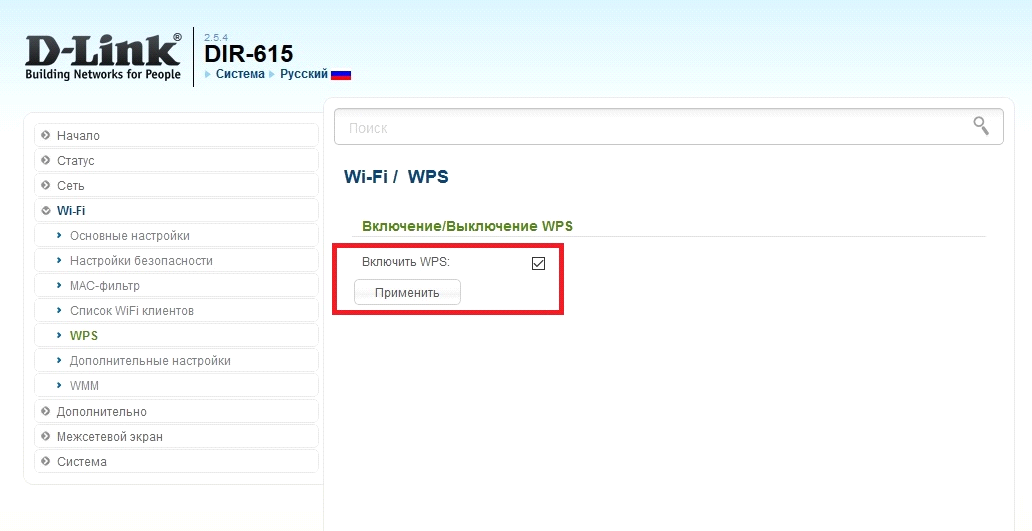
There are models of multifunction printers, strujniki and lazerniki that support connection using wireless technologies. For example, you can take the jet Canon PIXMA G3400, which feature is the ability to connect it via Wi-Fi. It should take into account a small nuance: this unit connects to a Wi-Fi router using WPS technology. Therefore, it is necessary to buy a router with WPS support, and this feature should be enabled on it. The following figure shows how to enable WPS on a D-Link DIR-615 router.
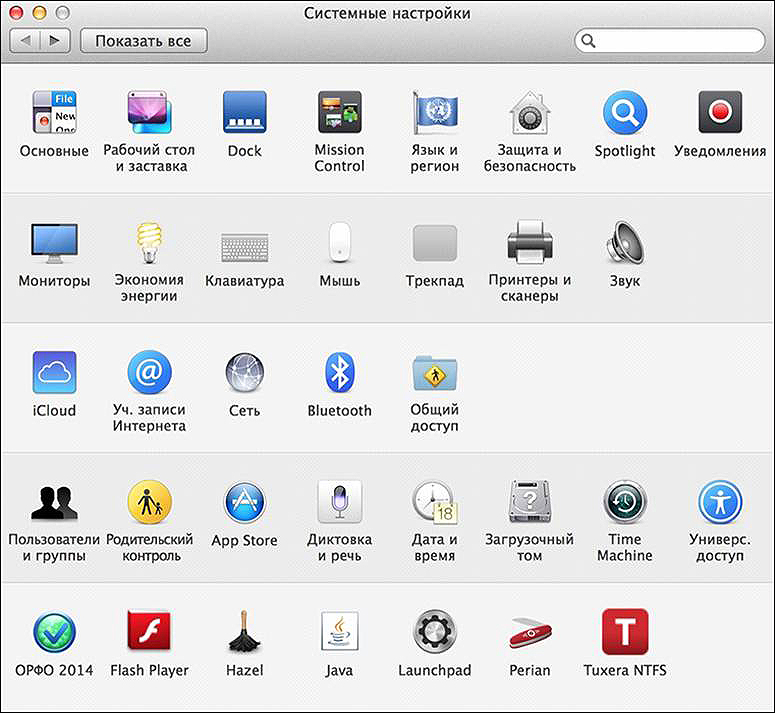
Connect a printer to a MacBook with Mac OS
In addition to the usual Windows, there is a fairly common operating system Mac OS, which is used in computers manufactured by Apple. Since the interface of both operating systems is very different, you will need to follow these steps to connect the printer to your MacBook.
Do not forget about drivers. The system may ask you to connect to the Internet to download the necessary software, or it will offer to insert a driver disk.
Network Device Connections to MacBook
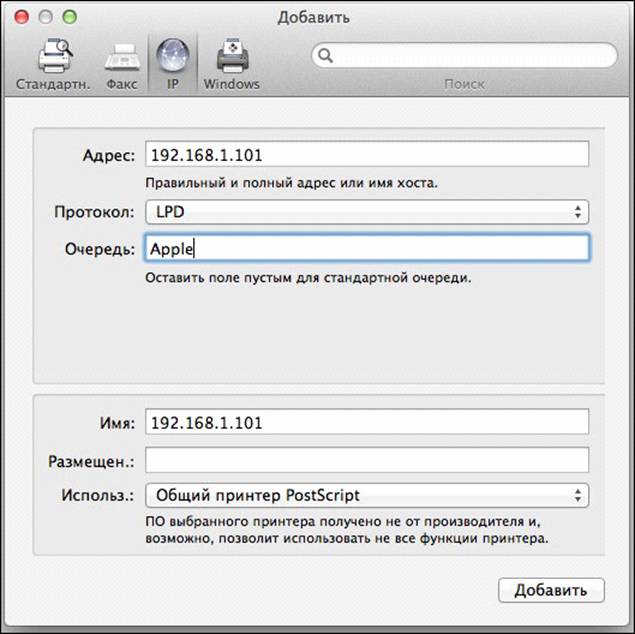
Printing equipment can also be connected to your MacBook as a network. It requires to know which IP address assigned to it in your network. Go to the printer settings and select the “Print network settings” option, where the IP will be registered.
The procedure for connecting network equipment is as follows.
Connecting a MacBook printer over Wi-Fi or Bluetooth
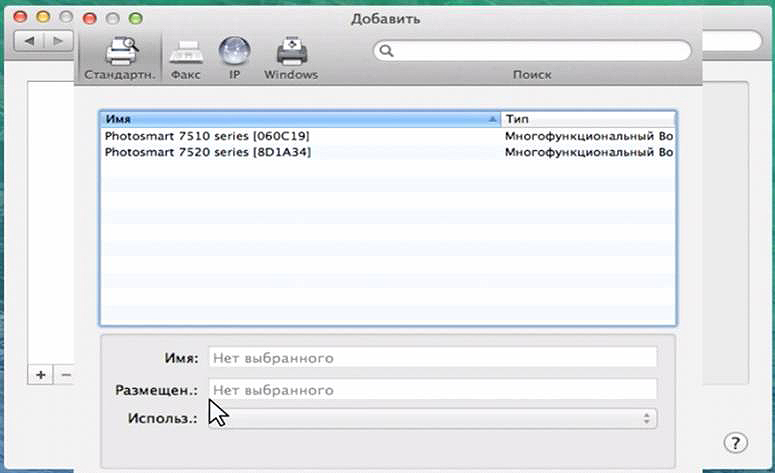
To connect the device to a MacBook by Wi-FiWhen you are logged in to “Printers and Scanners,” click on “+” to add hardware. From the list, select the equipment you need. It is important that its type be “Bonjour Multifunctional”.
After selecting a device, if it supports airprint technology, in the “Use” row, select “AirPrint” and click “Add”.
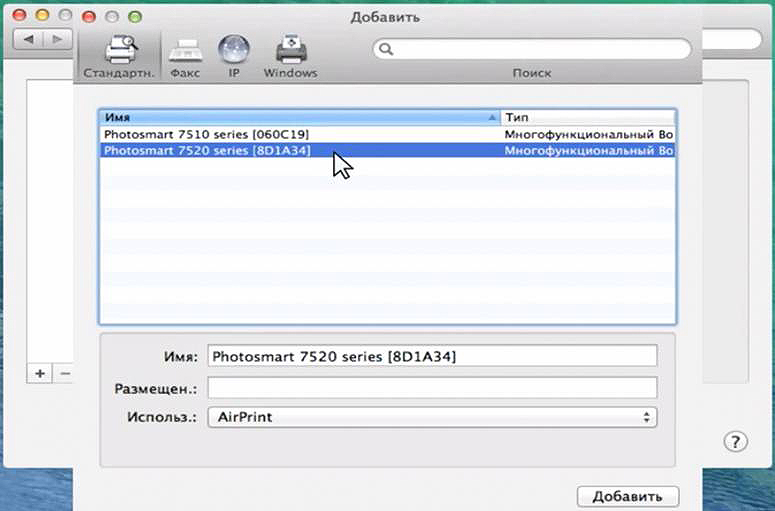
After that, the search will start and pairing will occur between the computer and the device you have selected.
It is also recommended to update the software from the App store.
To connect the device via bluetooth, click on its icon at the top of the screen and turn on the “Turn Bluetooth On” receiver.
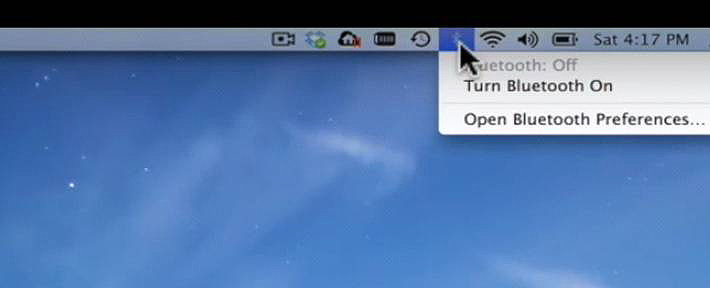
Make sure the printing machine is turned on in Bluetooth mode. In the window that opens, after searching for Bluetooth devices, the found ones will be displayed. Select the desired one and perform the pairing by clicking “Create a pair”. When prompted to connect, click “Accept”.
What to do if the printer does not connect
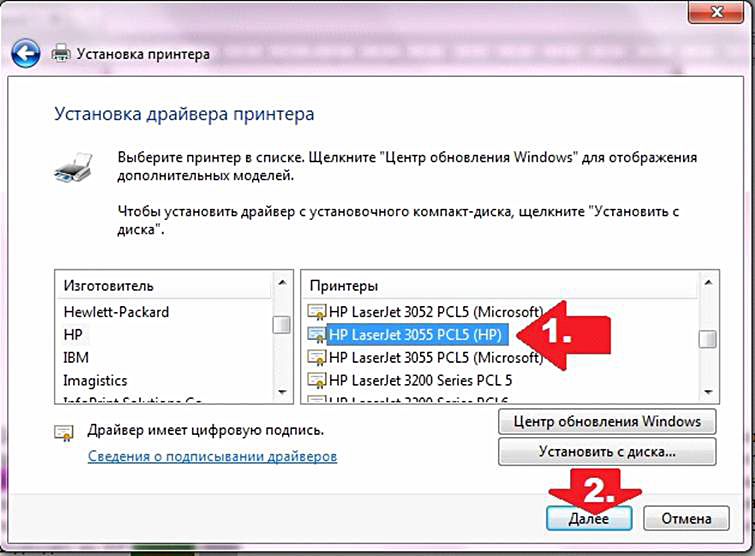
There are cases when the OS does not see the MFP or other equipment for printing, and it does not connect. For example, if you take HP LaserJet 1010 lazer with such a problem, you will have to install it manually.
What to do when there is no official software for the HP LaserJet 1010 in Windows, or you do not have an internet connection? You can temporarily get out of the situation by choosing a laser maker from the same manufacturer from the list provided by the system. In this case, this is the HP LaserJet 3055 PCL5.
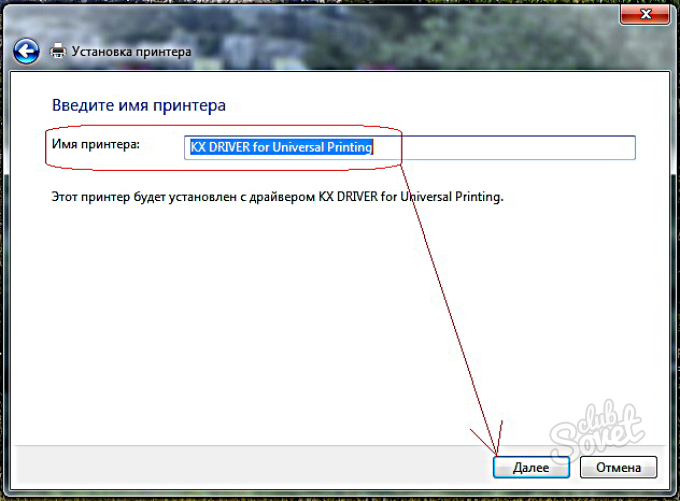
In the next window, give the name of the equipment to be installed, and then also click on “Next”.
Now you need to specify machine access parameters. Click “No sharing ...” if you are not going to connect the machine to the network, or “Allow sharing ...” to be able to print from other PCs. After clicking on the “Next” button, the installation of the peripherals is complete.
Setting up an inkjet (laser) for printing
To set up the machine, go to “Devices and Printers”, right-click on the necessary equipment and select “Printer Properties”. To test the machine, click on “Test Print”.

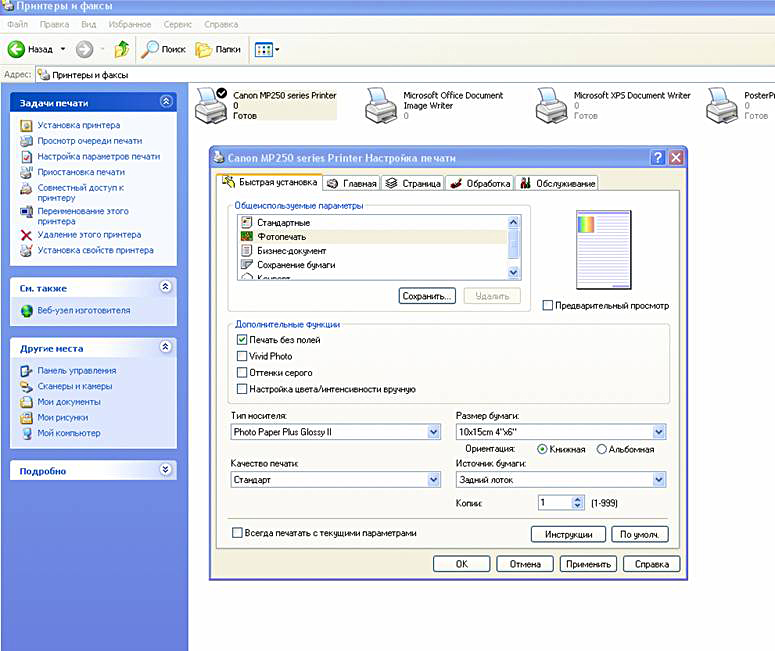
By pressing the “Print Settings” button, you can select the paper size and determine the page orientation as well as the print quality.
How to turn on the default printer
Sometimes it happens that the computer is connected multiple printing devices. But if you use one of them most often, it is very inconvenient to constantly choose it from the list. The problem is solved in a rather simple way: you need to add the desired jetting (lazernik) to the default devices:
- open the control panel:
- open the section “Printers and Faxes”;
- double-click on the necessary equipment and put a tick next to the line “Use by default”.
For convenience, make a shortcut to the “Printers and Faxes” folder and place it on your desktop or pin it on the home screen in Windows 10.
Print queue management allows the user to control all documents in her list. Thanks to this service, it is possible at any time to re-allocate and send the document for printing. It can also be placed in the “Favorites”, so that next time it does not send it to print.

There are 3 types of queues for printing:
- general - all PC users can perform any tasks;
- direct - you can print a document from the designated equipment;
- secure - printing a document will not be possible without authorization.
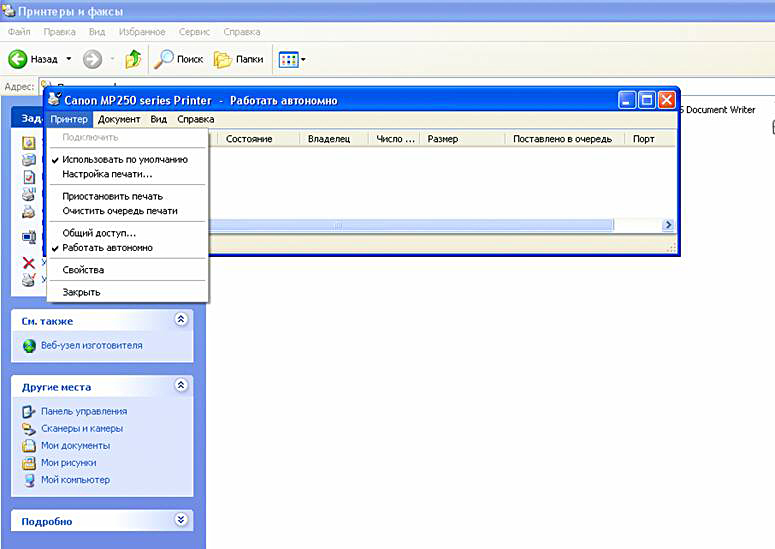
In the event of a malfunction, the ink jet (laser) can refuse to print documents from the queue, or it will print the same document without going to the next one. In this case the queue can be clearedby double-clicking on the icon of the desired machine in the control panel. Next, click on the “Printer” menu and select the “Clear Print Queue” line.

Color printing setup
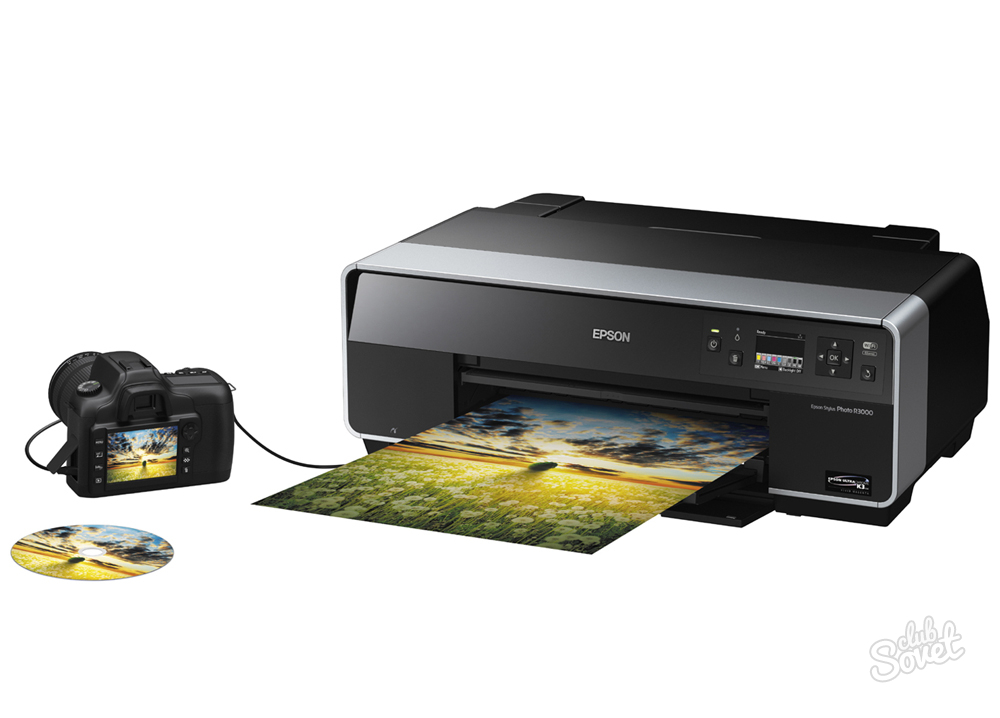
Adjusting the color profile is a very important step for high-quality color reproduction during printing. You could see, for example, in the device settings for printing, the choice of either glossy paper or matte. For each type of photo paper there is a color profile in the form of a special file containing specific commands for the inkjet.
Color profiles for used ink or paper can be downloaded from the Internet and installed on a computer.
You can also customize color printing. manually, by trial and error, creating your profile for the best quality color reproduction. To do this, use the jet driver. For example, setting up a Canon jet driver will look like this.
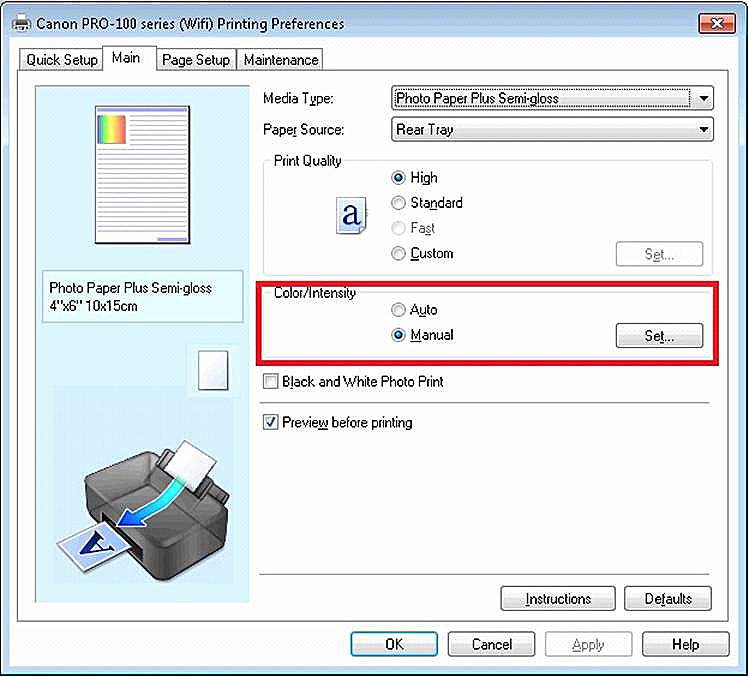
Now printing will be made taking into account color balance adjustments, and images will look more qualitative and realistic. The windows of the printer driver of different manufacturers may differ by a set of commands and the location of the buttons. But in general, the algorithm for adjusting the color balance is similar, and performing it will not cause any special difficulties.
Anyone who has had to deal with a printer knows for sure: in order for the device to start working, you need an installation disk. But situations when there is no such disk arise quite often - it can get lost on its own or lose information. You could buy a printing device from your hands, so that the much-needed iridescent circle remained with the former owner, if it survived at all. What to do? This article will answer the question of how to install a printer.
The first steps
How to install a Canon, Lexmark or any other printer? Regardless of whether you have a driver disk or not, you first need to connect the printing device to the computer. This is nothing complicated:
- Place the printer in the space provided for it.
- Plug it in - almost all models are connected using the usual cable itself, exactly the same as the system monitor or monitor.
- Connect the printer to the computer using a USB cable.
Important! The printer can not be turned on through an uninterrupted device - it needs the usual voltage, which is in the city power network, otherwise - it will not work or it will discharge the battery at once.
Connect to computer
Puzzled by the problem of how to install the printer on a computer, make sure that both devices are properly connected. The options may be different, but the most popular is via the USB port. Before you connect the printer to a laptop without an installation disk or even having one, pay attention to whether you have such a cable.
It usually comes bundled with a computer, but you can buy it separately at any computer store. But you need to pay attention to the cable version:
- USB 1.0;
- USB 2.0;
- USB 3.0.
Important! USB 1.0 is almost never released, but they are still on sale, not to mention the fact that many of the old computer geeks have kept them on the farm. For a modern printer, this is not suitable, they are connected only via USB 2.0 or USB 3.0.
To determine which cable is needed, look at the connector on the computer. He might be:
- blue long, with right angles;
- white, gray or black square with beveled corners.
The blue rectangle is USB 3.0. all others are USB 2.0. So you need a cable. Inspect it - the connectors are different in shape:
- Flat, which is also called “type A”, insert into the computer socket.
- Square or rectangular is inserted into the printer slot.
Where to get drivers?
How to install the printer on a laptop when there is no installation disk or the drive is not provided at all? In the same way as on a computer, if the installation data is lost. You need drivers, that is, additional software, without which the printer can be taken to the museum - it will not work.
Important! There are, of course, devices that the system automatically recognizes. But hope that it is you so lucky, it is hardly worth it.
By itself, installing a printer is a simple matter, the most important thing is to stop being afraid. Even if you do it for the first time, you can complete this procedure in half an hour. There are two ways to do this if you download the driver package from the Internet:
- use the features of Windows Update;
- on your own if you know the identification code or model.
The version with Windows Update is good if the printer is not particularly clever. You will receive the basic package, and the printer will be able to print or print and scan. If you need any other functions, choose the second option, because you can find and install the latest version of the software.
Important! Sometimes you have to rearrange the drivers if the printer does not work correctly. One of the causes of failures is a previously installed inappropriate driver.
Windows Update
The Windows operating system has all the necessary software for the most common devices, that is, for printers too. To run them, proceed according to the following algorithm:
- Connect the printer to the computer.
- Wait a few minutes.
- The printer should connect itself.
If the device does not work, take the next step.
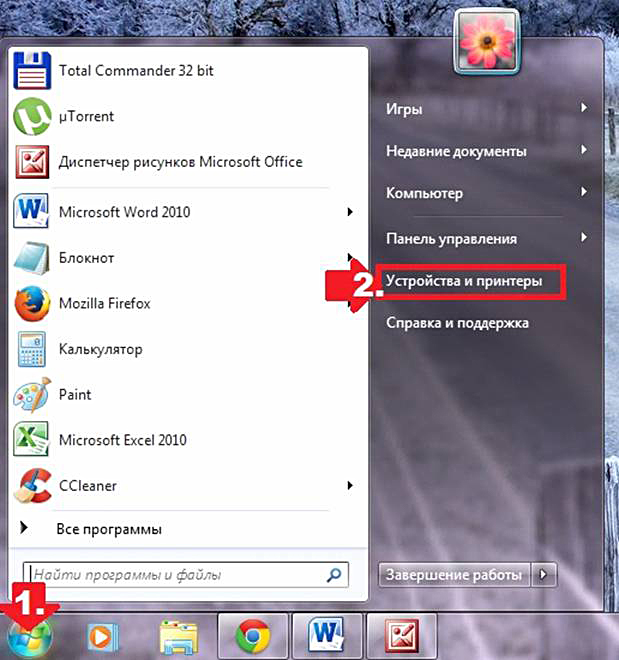
- Click the “Start” button.
- Open the “Control Panel” tab.
- Find the line “Equipment and Sound”.
- Open the “Devices and Printers” tab.
- Among the device icons, find a computer or laptop.
- A context menu appears in which you need to find the “Windows Update” line.
- In the window that opens, click the “Check for Updates” button.
- After that, the system will automatically check for updates for all peripherals.
- Wait for the updates to load.
- Reboot the machine.
- Check if the printer is working.
Important! If the printer does not work even after updating, check the USB ports.
Manual installation
If you are interested in how to install a Samsung printer or any other, but automatically or with the help of OS capabilities, it could not be started, you will have to act in a more sophisticated way:
- First, disconnect the printer from the computer. Click the “Start” button.
- Find the “Control Panel” tab.
- Find the “Devices and Printers” tab (in some versions - “View devices and printers”).
- Locate the “Add Printer” line on the top panel (in some versions, “Add Printer”).
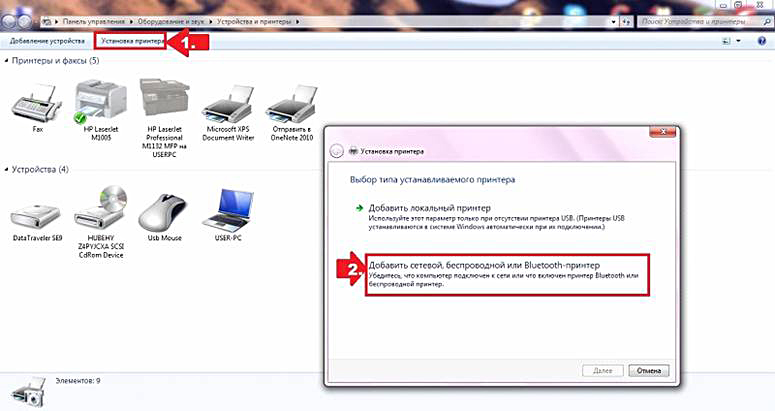
- Before you will be the printer installation wizard, which will offer several options, including “Add a local printer” - this offer should be selected.
- In versions of Windows 8 or Windows 10, you need to click “There is no necessary printer”, and then select the option “Add a local or network printer”.
- Set the parameters and click the “Next” button.
- When the installation wizard prompts you to select a port, put the default one, that is LPT1, and click the “Next” button.
- You will see the “Windows Update” button, click on it and wait for the drivers to update.
- You will see a list of the most popular models of printers.
- Find the company on the left side of the list, and the model on the right.
- Go to the next stage of installation.
- Give a name to the device (you can leave the default) and click the “Next” button again.
- Wait for the installation to complete.
- You will see the “Use of general settings” window - select “No sharing” and click “Next” or “Finish”.
- Then you need to delete what you just installed, that is, click on the printer icon with the mouse and right-click.
- A context menu will appear in front of you - select the “Delete device” line, the driver package will remain.
- Reconnect the printer to the computer.
- Wait for the machine to recognize the connected device.
Data from official sites
If you are thinking about how to install an HP MFP or any other multifunction device, as well as a simple printer, do not neglect the official manufacturers websites. You need to know:
- firm;
- model.
All this information is in the documentation for the printer, and on the device itself.
- Open a browser.
- Go to the page of any search engine.
- In the search bar, type "printer", model, drivers, download.
- Look at the first page of links - usually the one that leads to the developer’s website is at the top of the list, but not always. Therefore, make sure that you get to where you need, and do not download any virus to your computer instead of the much-needed software.
- The address should not be too complicated - usually there is the name of the company and the extension (most often com).
- Find the model you need in the list and download the software.
Why is it better to use official sites?
Official websites are created to host software for customers who for some reason have lost their bootable discs. This method has its advantages:
- it is safe - drivers have no malicious code and have a digital signature;
- the site has the latest software versions.
Important! The only drawback is that on official websites it is not always possible to find software for old models taken out of production and ancient operating systems.
Find the page you need:
- drivers and other files;
- software;
- downloads;
- drivers.
- Enter your device model in the search box and find the file you need.
- If the corresponding window appears, enter information about the operating system.
- Click the “Download” button.
Important! On some sites, the printer model is automatically determined - there is a corresponding button.
Files to choose from
On some official sites, the user is given the opportunity to independently choose a driver package. You can offer a version:
- basic;
- extended.
The first gives the opportunity to access the main functions, the second - to additional. After the file is downloaded, run it. The installation wizard will open, and you just need to follow the instructions.
How to find ID?
Knowing the identification code can make life easier if you need to reinstall the software:
- Go to the “My Computer” section.
- Find “Device Manager”, click.
- Before you open a window - find your device.
- Place the mouse on the desired line, right-click and open the “Properties” tab.
- In the dialog box that opens, find the “Details” tab.
- In the line “Properties” find the item “Equipment ID”.
- Copy the code that appears in the window below (the first is selected from several values).
In this article we told you about all the ways that you could install and connect a printer of any manufacturer, any model without the help of a specialist. Hopefully, all the information was clear to you, and you successfully coped with the task.
The main output of information from a PC is through a printer, which is usually installed by professional copy equipment technicians. This does not mean that the average user is not able to do everything himself. The main thing is to have an idea about installing this device.
Checking the integrity of the printer, as well as the availability of the necessary package of instructions and a set of cables are important elements to help further the use of copying equipment. The model of the copier, as well as the brand of the manufacturer, must be “known by sight”. This information is required to install the printer.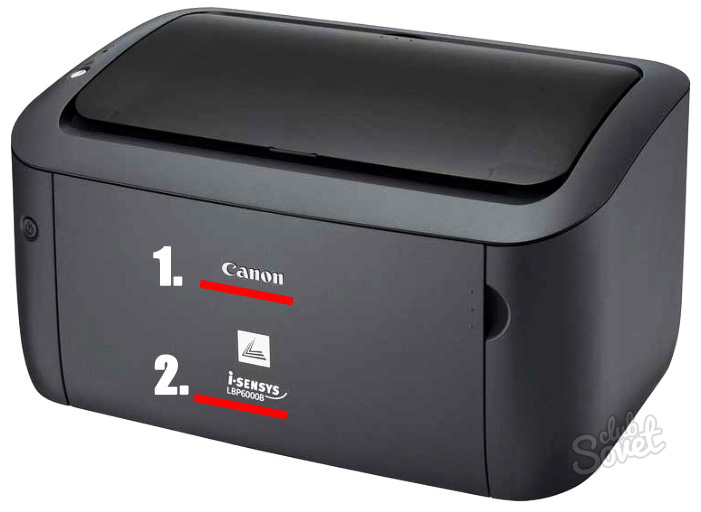

New copier and updated system - are the key to successful installation of the printer on your PC. If a new printer has problems with printing, this is often due to the drivers or the breakdown of the printer itself, you will have to use the help of the wizard.
This is a difficult situation, when we buy a printer from a friend, at a sale of second-hand things, or we were simply presented with a printer at the office where we work, and the installation disk has already been lost. This can also happen when we format a computer, but we no longer have the installation CD. All these situations can lead to the fact that we do not have the necessary drivers for installing printers.
Although, this problem is completely solvable, if you follow the instructions proposed in this article.
"If you have any questions or problems with the printing equipment, contact us through a comment on this publication and we will be happy to answer."
The procedure for installing the printer in the absence of the installation CD or drivers:
Step number 1
Connect the printer to the computer via a USB cable. Through this cable, the printer receives data for the printing process. It looks something like the image below:
"In case you do not have this wire, there is no cause for concern, since its cost is not high and you can buy it at any computer store."
Step number 2
First turn on the computer and after it completes the boot process, turn on the printer. This must be done in such a way that the computer is already in normal operation when new equipment is connected, so that the PC can detect the new device.
Step number 3
Now on the computer, click the "Start" button, then select " Settings".
Step number 4
Then select "Printers and Faxes" or "Printing Devices".Step number 5
Now after clicking on the button, as shown in the previous image, it remains only to click on the option "Add Printer". |
| Select "Add Printer" |
Note: Add a printer in Windows7 is in the upper left corner, as shown in the image below.
In WindowsXP, this option is also in the upper left corner, but in the "
Step number 6
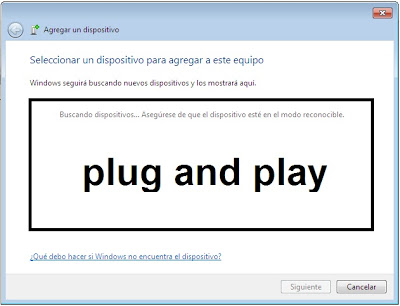
The printer setup wizard starts. Click the Next button to allow the computer to discover the new printer thanks to the Plug and Play system.
 |
Note:
The system "Plug and Play" in Windows7 is automated. As soon as we click on the “Add Printer” option, it will detect the printer automatically. Below we leave you a picture of how the printer is selected when you try to install it on Windows7.
"This system will automatically detect printers that are connected and available for installation. In this case, the computer will automatically start installing the printer. If this does not happen, you will have to select a printer from the list."
You can use the Help or Windows Help application if the device is not recognized.
Step number 7
If the printer is not recognized by the computer, you will have to select the port through which the printer is connected. As mentioned earlier, the printer connects to the computer via a USB cable. Choose the same type of connection. It remains only to choose a printer. If the printer is not new, then it is most likely to occur when it is installed on Windows7 or WindowsXP. First, in the window that appears, select the brand of the printer, then the model with the appropriate series.
Step number 8
If the procedure performed in step 7 does not work, then you should download the driver from the manufacturer's website. When the driver is downloaded, install it by unpacking the driver file.
"Keep in mind that even with this information, installing the driver without an installation CD or without a driver may not go as expected. Therefore, we are always ready to help. Just leave a comment to this article and we will answer as much as possible faster. "
The article will tell on the example of Windows 7. For Windows 8 / 8.1 / 10 - the same.
Installation
1. Disconnect the printing device from the computer.
2. Insert the disc into the drive.
It may start autorun. It must be immediately disabled for all devices for greater security.
5. The initial window may (and most likely will) differ. But the essence remains. Click "Install".
6. We are warned that, possibly during the installation process, additional windows will appear in which it is necessary to allow the execution of all programs. ".
7. Accept the license agreement =.
9. Connect the device and turn it on.
If at the moment it is not desirable to do this (for example, you brought the printer from the frost and you need it to stand for an hour),.
10. Software installed. Click "Finish".
If you, like me, did not connect the device immediately, then launch the shortcut on the desktop and connect it.
I hope I managed to tell you as much as possible about the installation of the printer and you realized that the most difficult thing was to wait for the process to complete. There are more videos, look, please. There will be questions - ask in the comments. Let's try to figure it out together.