How to put one-sided printing by default. How to make duplex printing
Often, when working with a printer, you need to print newsletters, booklets, cards, which are two-sided and you need to use both sides of the paper.
Some printers accompany the duplex printing process. step by step instructions how to turn the pages manually and print the text from the back side. Other devices support automatic duplex printing. And there are printers that do not support this feature at all.
Before setting up and performing duplex printing, check the following:
This setting is suitable for HP printers with paper loaded in the front and back trays.
We load enough paper into the input tray of the printer to complete the job, without exceeding the maximum capacity of the printer.
Open the document on your computer. Press the CTRL and P keys at the same time to open the system dialog box.
In the drop-down menu, select the printer.
Go to the tab "Functions" or, if this tab is not available, go to the tab "Layout" or "Final processing".
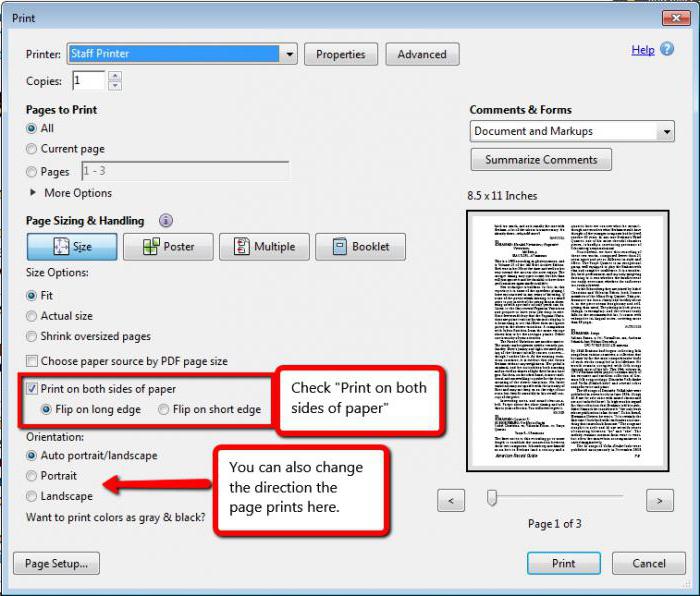
Select "Print on both sides" or "Two-sided printing."
In the menu or the item “Print on both sides” or “Duplex printing”, select the necessary parameter for binding or page flipping.
When selecting "Binding Side" creates printouts in the style of a booklet with the same orientation of the text on each page.
When selecting "Binding from above", printouts are created in the style of a tablet with text of opposite orientation on each page.
Press the OK and "Print" buttons.
If the printer automatically prints on the other side of the page, the operation will be performed without user intervention.
If the printer prints only on one side, do not remove the stack until all pages exit.
Remove the pages from the output tray and knock the stack on a flat surface. 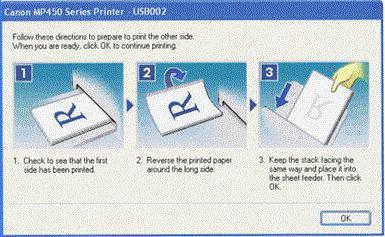
Load the pages into the printer again.
For most rear-loaded printers, you need to flip the pages so that the blank side of the page goes up and the bottom short edge loads first.
For most front-loading printers, you need to load the stack with the bottom edge of the printer and the blank side down for booklets or the top edge into the printer for tablets.
On the computer, click Continue.
Prints the other side of the page until the job is completed.
Duplex printing on a Canon printer
Please note that this function on the printer is possible only in cases where:
Before we start, do not forget to load paper into the printer, and then proceed as follows:
- tear off the necessary document;
- press simultaneously CTRL and P;
- enter the item "Properties";
- in the "Advanced Features" section, select "Two-sided printing".
- click OK and "Print".
Another choice for duplex printing is to select the “Print on both sides” item and one of the two display options when entering the dialog box.
Duplex printing on the WorkCentre
For this model of printer, you can configure both manually and automatically. This is done as follows:
- go to the "File" and click on the item "Print";
- select the printer in the list and click the "Properties" button;
- in the “Duplex printing” window of the “Paper / output” tab select the option of page binding options;
- choose the type and size of paper;
- in the "Print Options" window, click OK, and to start printing, click the "Print" button.
Please note, launching the manual mode, the "Manual duplex setting" window will appear. Do not close this window until the action is completed. After closing it can not be opened again.
Sometimes automatic duplexing is required. To set this feature by default, change the printer settings: 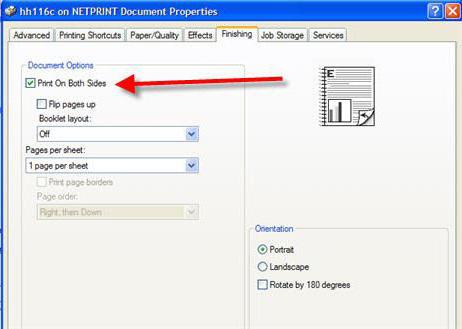
- in the "Start" menu, select "Devices and Printers";
- right click mouse click on the printer icon;
- select the item "Printer Properties";
- on the “General” tab, select the “Settings” item;
- in the “Layout” tab, select “Two-sided printing” and the necessary parameters for page turning;
- press the button "Apply" and OK;
- close the window "Devices and Printers".
If it is necessary to print a text document on both sides of the paper, the procedure depends on the features of the printer used in this operation. The device of some of them allows two-sided printing without any user intervention, others stop the process at a certain stage and offer to re-print the printed sheets in the tray, and others do not. Below is a sequence of actions in duplex printing on the example word processor Microsoft Word.
Sponsored by placing P & G articles on "How to make duplex printing" How to write a review of work programs How to transfer photos from camera to computer How to scan photos to computer
Instruction
Find out if your printer supports automatic printing on both sides of the paper. To do this, open the word processor menu by clicking the round Office button in the upper right corner of the window, go to the "Print" section and select the "Print" item. In this way, a dialog opens to send the document to the printer. It can also be launched by pressing ctrl + p. In the dialog box, click the "Properties" button. The content of the window that opens after that is entirely determined by the device driver, and therefore will vary different models printers. Look for installations that include duplex printing. They can be formulated in a different way - for example, “printing on both sides of a sheet” or “printing with a turn”. If there is such a setting, activate it and start outputting the document to the printer, and if not, go to the second step.
Close the printer driver window and in the send dialog box, check the check box next to the duplex print. After that, click "OK" and the document will be placed in the print queue specified in the "Name" field of the printer. When all pages placed on one side of the sheets are printed, Word will stop the process and display a message prompting you to turn the stack over and put it back into the printer’s input tray.
There is an alternative, albeit less convenient way to duplex printing. It consists in sending only odd-numbered pages to the printer, then turning over the printed sheets, placing them again in the input tray and sending only even-numbered pages to print. However, with this method of printing, it may be necessary not only to turn a stack of pages, but also to change the order in which they are followed, which is not very convenient with a sufficiently large number of sheets. The option to select printing only odd or even pages is located in the same print dialog box - in the "Enable" drop-down list in the lower left corner of the window.
How simpleOther related news:
MS Word is designed to work with electronic documents. In addition to all other features this application allows you to print documents in different formats and with different scale. All these settings can be selected in the print window. You will need a computer; - Printer; -
Printing documents in Microsoft Word is configured mainly for A4 paper. Therefore, when printing brochures or multi-page documents in A5 format, it is better to use additional applications. You will need - Microsoft Word. Sponsored by placing P & G articles on "How to print in
Two-side print - a task that requires a different approach, depending on the type of printer and the file format that you need to print. If you work with a new printer, or rarely dealt with office equipment, you will need some time to figure out how to
When you create a file, be it text Document or a photo, sooner or later there is a need to print it. Exist different ways send a document to print. Sponsored by placing P & G articles on "How to print a document" Instruction 1 If you are operating
Once you bought a printer, not assuming that you may need to print large volumes, now you have to watch with dismay how slowly and slowly the printer produces printed pages. But you don’t have to put up with it, because you can work on printing speed, make
If you are interested in duplex printing, get support for this type of printing with your printer. Duplex printing is an economical solution for paper consumption. Also, this technology allows you to create brochures of their own making. Duplex printing will be of great help.
A mistakenly printed document with a large number of pages can create trouble in the form of a used cartridge or wasted sheets. To cope with the problem, you should know several options for stopping the printer. P & G Articles Sponsor
Duplex printing is one of the most commonly used enhancements for office devices. And because such a malfunction important function in the most crucial moment can be a very unpleasant problem. But instead of quickly running to the service center, you should first check the possibility of eliminating the fault immediately on the spot.
Possible causes of failure
- Wrong connection.
Your printer may not print duplex printing due to improper connection. In such a case, you should reconnect the device to reset the print settings, and cancel the tasks in the job queue line. After that, the problem can be solved by itself.
- Lack of necessary drivers.
In this case, help reinstalling the drivers for the printer. This is the most common problem and its solution does not require much time. You simply take the installation CD that came with the device, or download the necessary drivers from the official website and then install them on your PC. After that, the fault will be eliminated.
- Driver mismatch with your OS.
This problem is solved almost the same as the previous one. The only thing you will need to check is that the downloaded drivers match your operating system. In particular, for the 7th edition of Windows, you need to pay attention to its bit depth - 32 or 64. And choose the driver that is suitable specifically for your OS.
- Duplex does not work when sending a document to print with Word.
This refers to when duplex printing is working from all text editors except Word. That is, Excel, from a browser and even from a notebook, printing occurs as needed, but not from the main editor of the Office suite. The problem is quite rare.
- The parameter is not set in the corresponding driver.
That is, the printer works adequately in all cases except for duplex printing. One of the most common faults.
- Out of ink.
Banal, but no less common problem. It may be worth checking the ink levels in the cartridges to continue.
- The printer prints only one page when sending to duplex.
Instead of a normally completed job, you get "half" of the work and the printer gives an error.
Ways to solve these problems
Most duplex problems are caused by improperly working drivers. To do this, you just need to reinstall them with the requirements of your operating system. This is especially true of old models of printers that have been developed for other operating systems. In this case, the disk in the bundle is unlikely to help, and therefore it is worthwhile to refer to the manufacturer's website, where the driver databases for products are regularly updated. First of all, you should pay attention to the specific name of your printer model, which office software package you use and what OS you have installed. If you downloaded the driver with all of these requirements, then the fault should be solved.
In a situation where printing does not occur only when sending documents from Word, you just need to reinstall the editor itself with stripping all traces previous installation. If the drivers are installed correctly, and printing still does not occur, then it may be worth noting the need for such a checkmark in the drivers themselves and saving the changes. Last problem more complex procedure and requires some technical skills, and therefore it is worth contacting the service center for its correction.
1. Click Start, select Settings, then Printers or Printers and Faxes.
Click Start, Control Panel, and double-click Printers.
2. Right-click the printer icon, then click Properties, General tab, or Printing Preferences.
3. Make the necessary changes and then click OK.
Change settings (Mac OS X)
Change settings
1. On the File menu, click Page Settings.
2. Set the options you want (for example, paper size) and then click OK.
3. On the File menu, click Print to open the printer driver.
4. Set the required options (for example, paper type) and click OK or Print.
Two-sided printing
Printing on both sides of the paper can be done manually or automatically using the duplexer.
The printer driver does not support manual duplexing. For duplex printing, you must install an HP automatic duplexer.
Specify duplex printing options in the program or in the printer driver.
Do not use duplex transparencies, envelopes, photo paper, glossy media, or paper that is less than 60 g / m2 or more than 105 g / m2 for duplex printing. Jams may occur when using these media.
Some media require a certain orientation when printing on both sides, such as letterhead paper, watermarked paper and perforated paper. When printing on windows computers The device first prints on the first side of the media. Load media print side down.
With automatic two-sided printing, after printing on one side of the media is complete, the device pauses the media while the ink dries. After the ink dries, the media is fed back into the printer to print the second side. After printing is completed, the media enters the output tray. Do not remove the media until printing is complete. You can print on both sides of a sheet of supported non-standard size media. To do this, you need to turn the media manually and re-submit it to the device. For printing you can buy in Moscow for your printer.
Duplex printing
You can manually duplex printing. To do this, you must first print only odd pages, then turn the sheets and print only even pages.
Automatic duplex printing (Windows)
3. Open a document, choose Print from the File menu, then select a print profile.
4. Make the necessary changes to the remaining parameters, and then click OK.
5. Print the document.
Automatic printing on both sides of the pages (Mac OS X)
1. Download the appropriate media.
2. Verify that the duplex unit is installed correctly.
3. Verify that the correct printer and page size are used in the Page Setup window.
4. On the File menu, click Print.
5. In the list, select Copies and Pages.
6. Select the Double-Sided Printing tab and check the box to print on both sides of the page.
7. Select Layout and then click the appropriate icon to select the binding position.
8. Make the necessary changes to the remaining options, and then click Print.
Print webpage
You can print a web page from a web browser on the device.
When using a web browser Internet Explorer 6.0 (or newer), you can use the HP Advanced Web Page Printing feature, which provides simple and predictable printing of just the right information from web pages in a convenient way for you. HP's Advanced Web Printing feature is available on the Internet Explorer toolbar.
Print webpage
1. Make sure paper is loaded in the main input tray.
2. On the File menu of the web browser, select Print.
For best results, select HP Advanced Web Printing from the File menu. When selected, a check mark appears.
The Print dialog box appears.
3. Make sure the device is selected as a printer.
4. If the web browser supports the corresponding function, select the elements of the web page that you want to print.
For example, in Internet Explorer, click the Settings tab to select As displayed on screen, Only the selected frame, and Print all related documents.
5. To print a web page, click Print or OK.
To correctly print web pages, you may need to set the landscape orientation.
Cancel print job
You can cancel a print job in one of the following ways.
Device control panel Click X (Cancel button). This will delete the job, which in this moment processed by the device. Jobs that are in the print queue are not deleted. Windows Double-click the printer icon in the lower right corner of the screen. Select a print job and press the Delete key on the keyboard.
Mac OS X. Open System Preferences, select Printer and Fax, select printer, then click Open Print Queue. Select a print job and click Delete.