A program for creating a Windows 7 flash drive. WinToFlash - installing Windows from a flash drive to a computer
The program for installing Windows 7 from a flash drive eliminates the need to install a CD drive.
You will also need to prepare the distribution kit in advance and install the BIOS settings.
politely: Select the program for installing the trace as carefully as possible - you can accidentally introduce a virus or Trojan. Follow the same procedure for the Windows distribution. If possible, you can quickly access the licensed version. Otherwise, scan all files with an antivirus.
UltraISO program
The UltraISO program must be installed. It doesn’t matter whether there are any folding machines, for which you need to launch vikonuvany file And press the far button for the entire hour.
politely: During installation, the program does not have to ask for a phone number; other data is provided free of charge.
If something like this happens, then remove it immediately. Apparently, the utility is infected with a virus.
The creation of a valuable flash drive is required in the coming order:
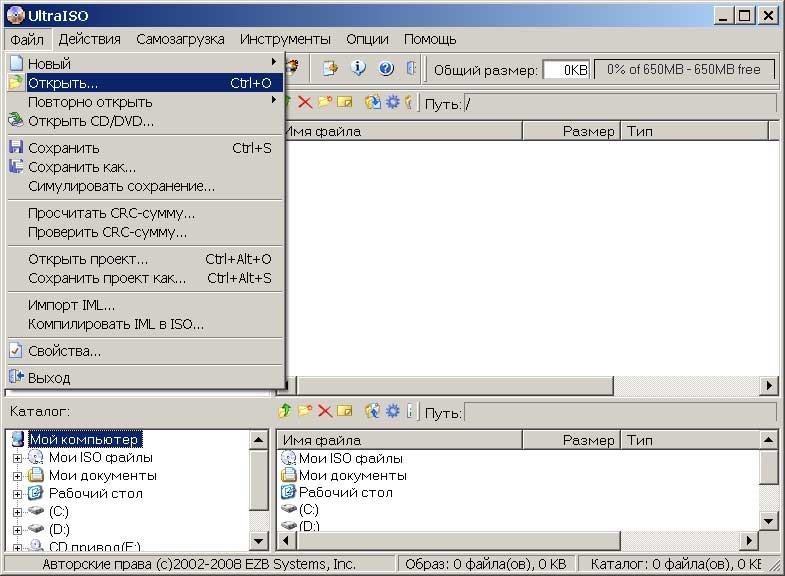
- After launching the program, a window will open in which you need to click on “trial period” (Fig. No. 1);
- Once the program opens the main operating window, you need to click on context not menu“Open” - select the next step to prepare for installation Windows distribution;
- Then the flash drive is inserted into the USB port;
- Click on the menu under “self-image” - select “burn hard disk image”;
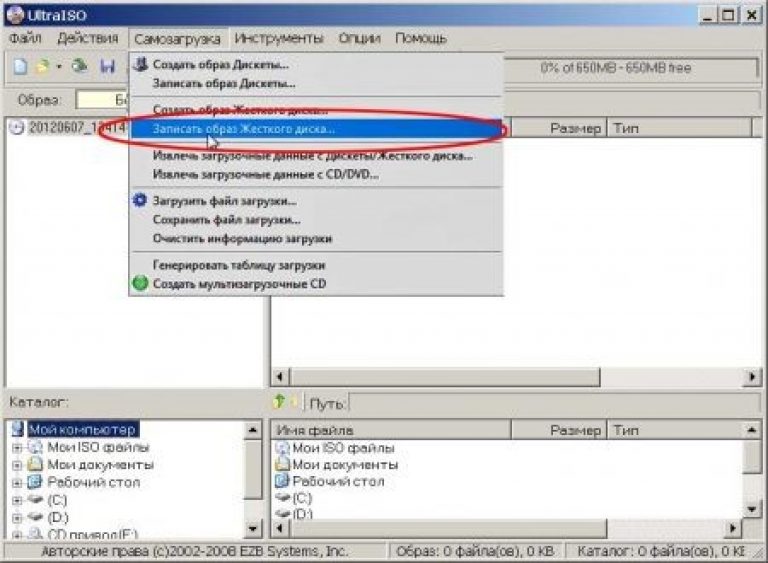
- After installing the trace, click on “Format”;
- After completing the formatting of the flash drive, you need to click on “write” (Fig. No. 4);

Porada: It is necessary to use the wiki to install the utility third-party vibrator- you can speed up in standard ways OS.
You can quickly use the official add-on for creating a private flash drive.
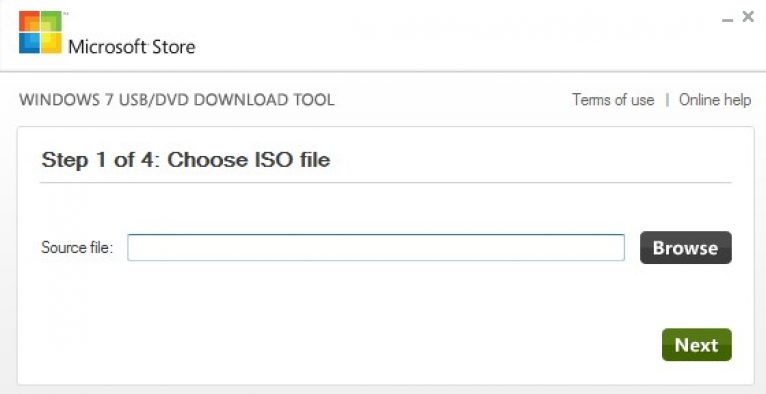
To create a new device, I need a new distribution kit - in ISO format. The operation itself looks like an upcoming procedure:
- launch is in progress;
- Click on “Browse” to open the distribution file;
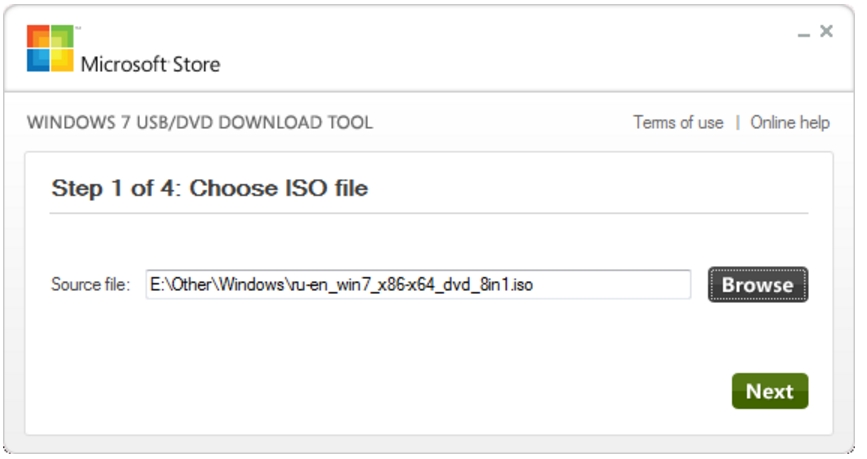
- Specify “USB device”;
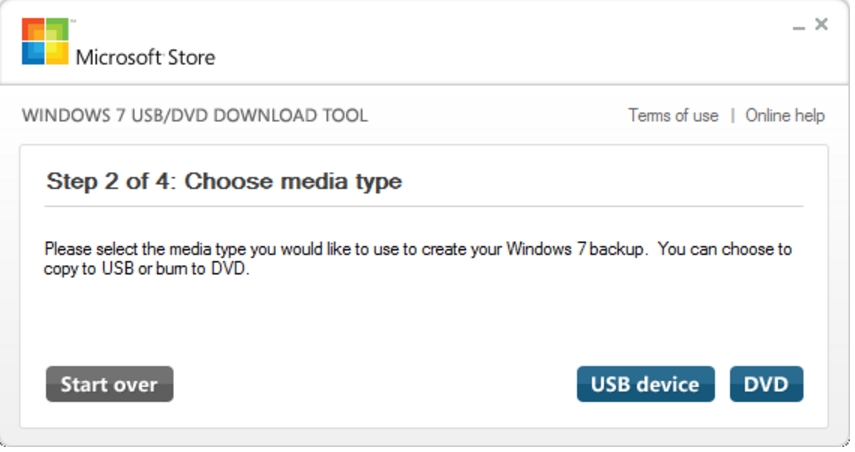
- To record to a USB disk, you need to insert the nose at the back;
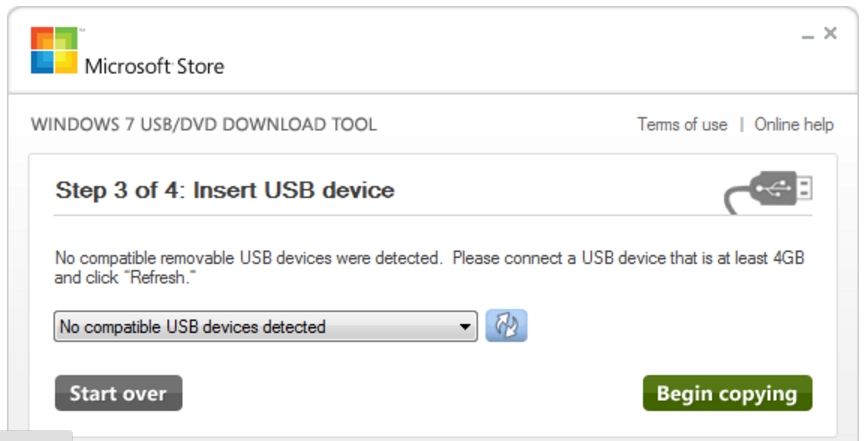
- Press “Start over”.
After this, you need to check out 5-15 coins until the creation of the original flash drive is completed.
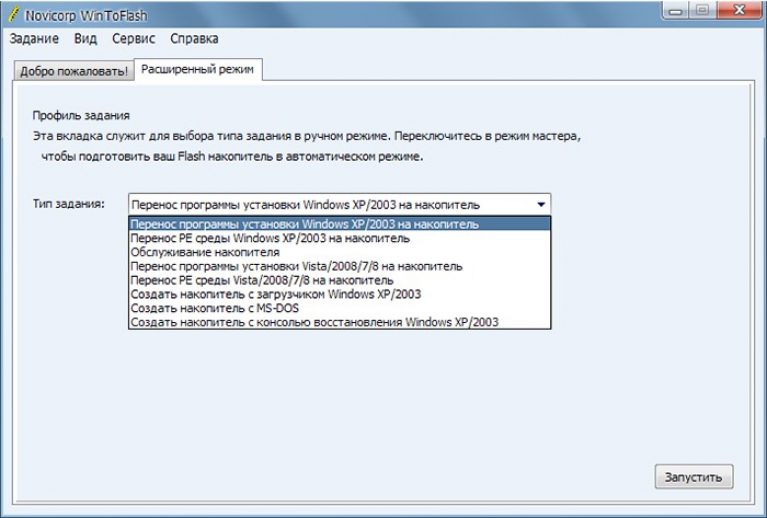
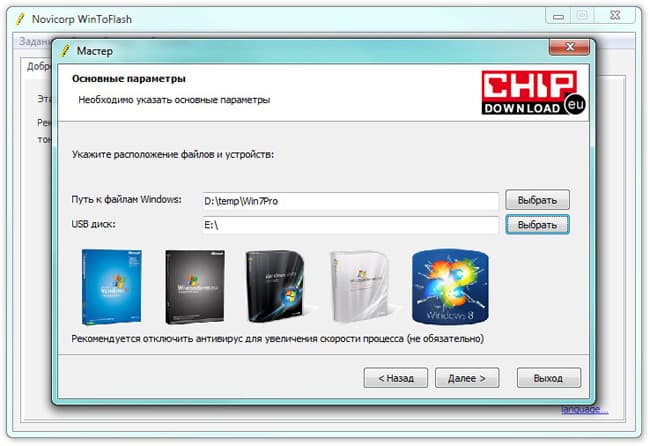
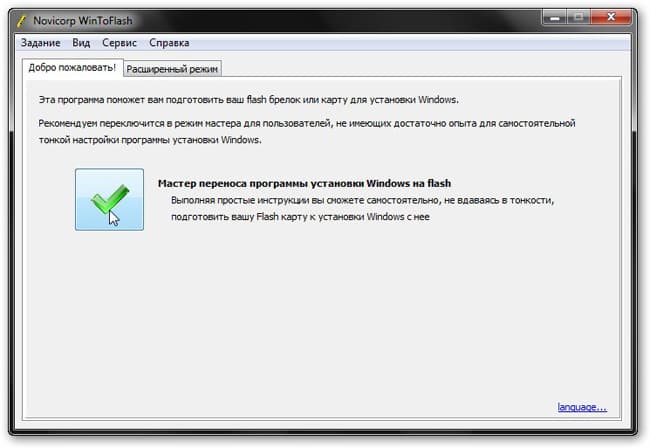
WinToFlash program
It is necessary to cancel all two things:
- run the installed utility;
- select the submenu - “transfer Windows installation programs to storage device”;
- embossedly launch (Fig. No. 6).
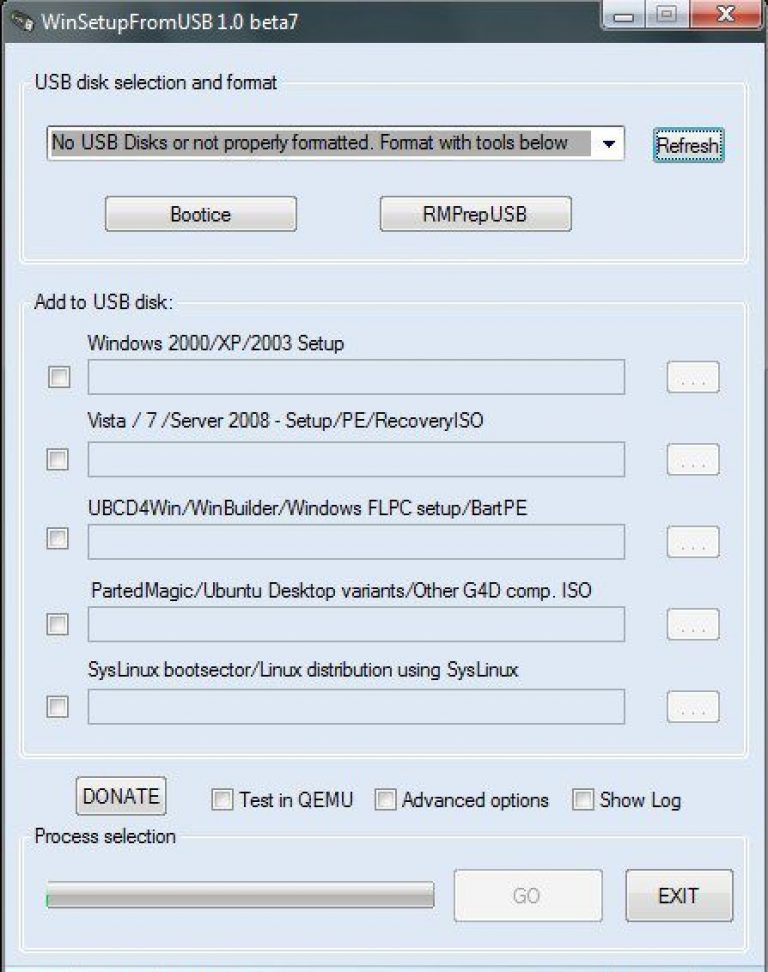
WinSetupFromUSB program
A manual utility for setting up this file is WinSetupFromUSB. If necessary ISO imageі USB storage device. After launching, you need to do the following:
- format the memory;
- run MasterBootRecord (MBR) in Bootice (Fig. No. 7);

- write down everything you need using WinSetupFromUSB (Fig. No. 8).
Setting up Bios
To successfully install Windows 7, consider how to properly configure the BIOS. If you are able to become familiar with the kerivnitstvo, it can be safely accessed on the official website of the cerivnik.
Bios settings may have their own characteristics or specificities. It is completely individual for the skin model - from one source.
To go into settings, be sure to press the Delete key at the beginning stage of setting up your PC. As a result, a window with a tabular menu will appear (Fig. No. 9).
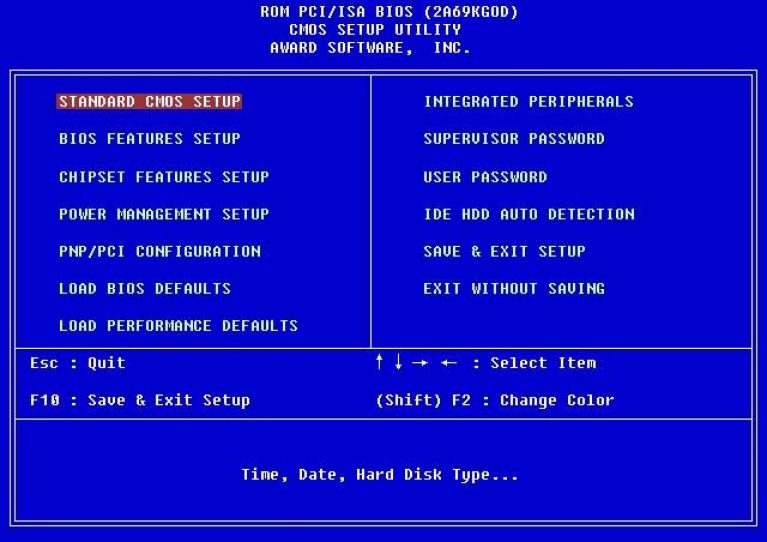
After successfully enabling Bios, you need to know the option that indicates the order of installation of devices different types. All Bios have different names for this menu. This is where all the complexity lies.
But, as a rule, all such items include the word boot in their name.
Settings are implemented in the following way:
- Open the menu for selecting priority (Boot);
- Select USB-HDD.
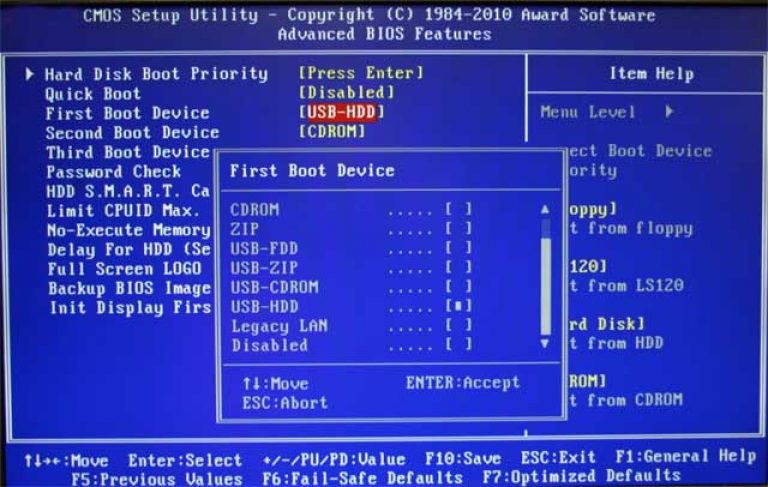
politely: Be sure to insert the USB storage device into the socket - only after you enter the range of devices from which you can start.
Installation of the operating system
You will be able to download all programs without any costs from the Internet. Ale varto from now on, get to know all the benefits - up to the amount of free space on your hard drive, RAM and other characteristics.
When everything preparation robots completed - you can start before installing Windows. This operation is carried out as follows:
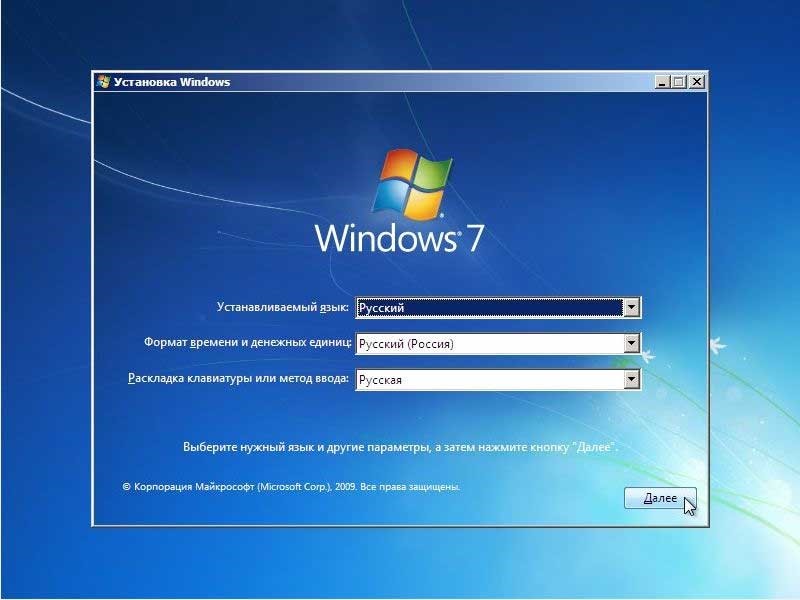
- After setting up the Bios and installing the storage device in the port, you need to re-enable, press on any key (Fig. No. 10);

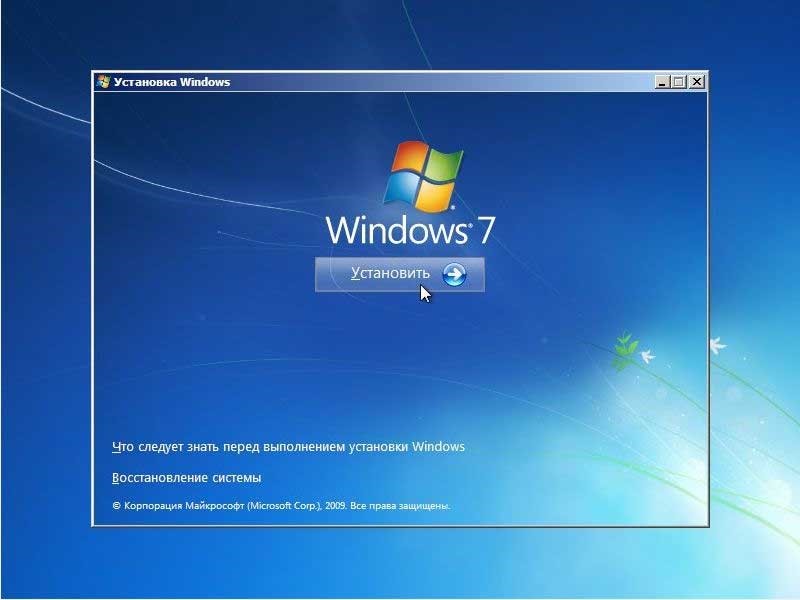
- The OS installation window will open - you need to click on “distance” (Fig. No. 11);
- then a window will open - you need to click on the “install” button (Fig. No. 12);
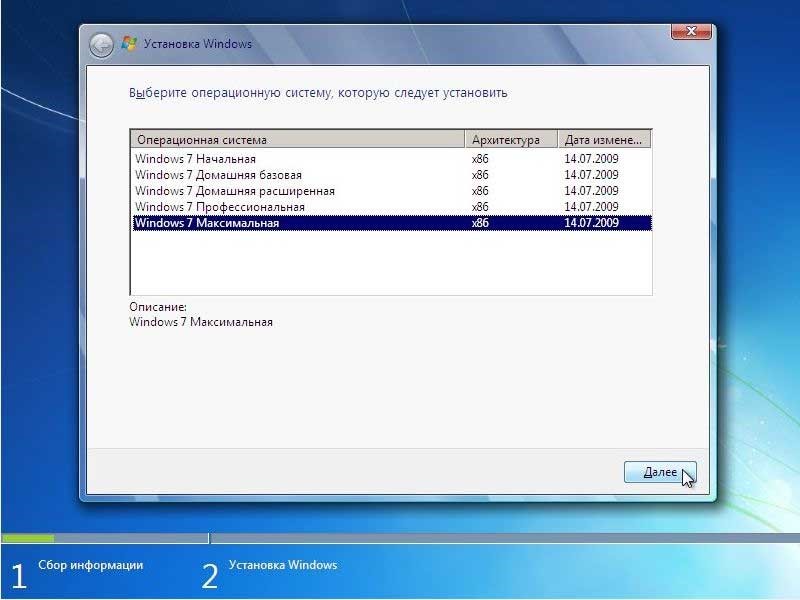
- You need to select the installed version operating system- almost all pirated distributions allow you to earn this (Fig. No. 13);
- the system asks you to read the license agreement, check the box next to “I accept the license” and press “further”;
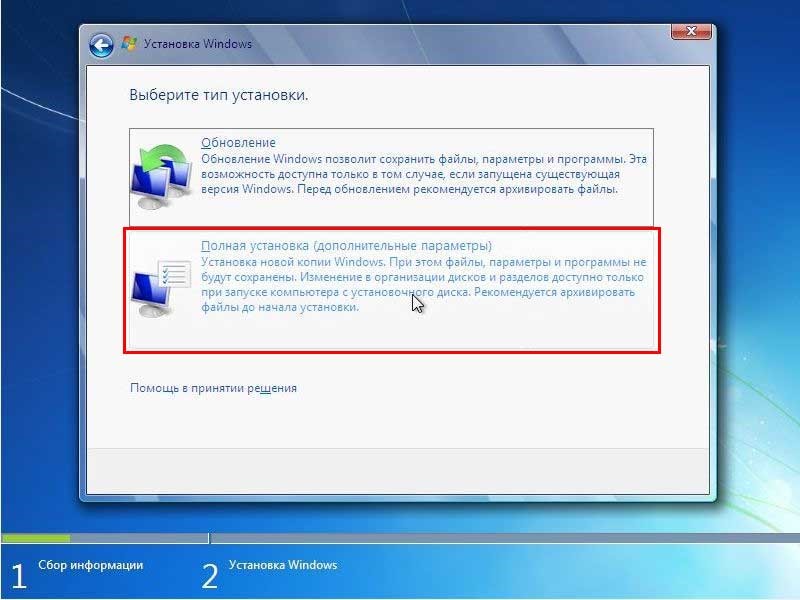
- selectable in the upcoming window " full installation"(Fig. No. 14);
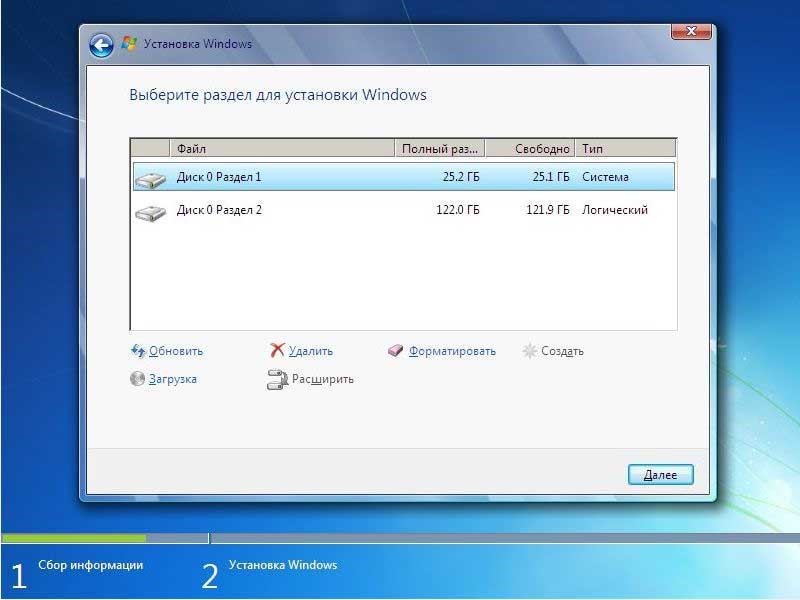
- we select the partition of the disk where to carry out the installation - it is important to remember that all information on the new one will be erased (you can use backup programs on the Internet) (Fig. No. 15);
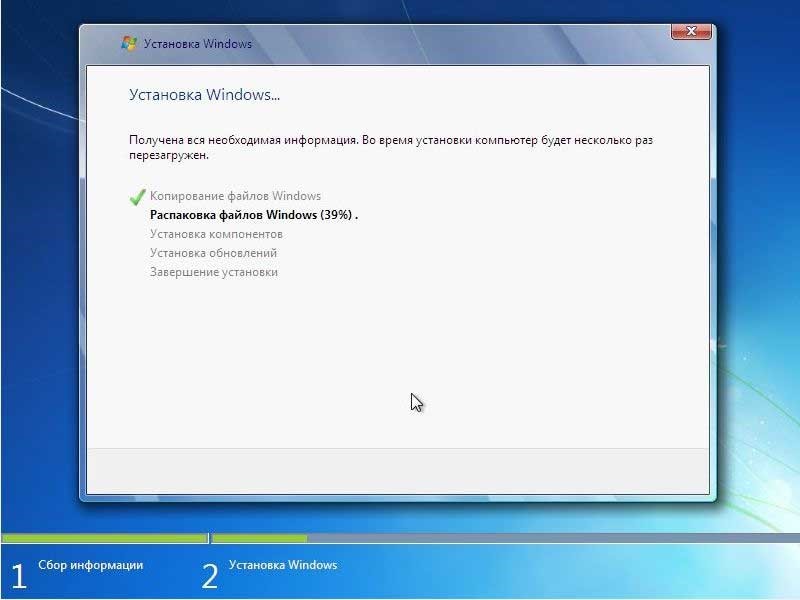
- The installation is completed in a completely automatic mode (Fig. No. 16);
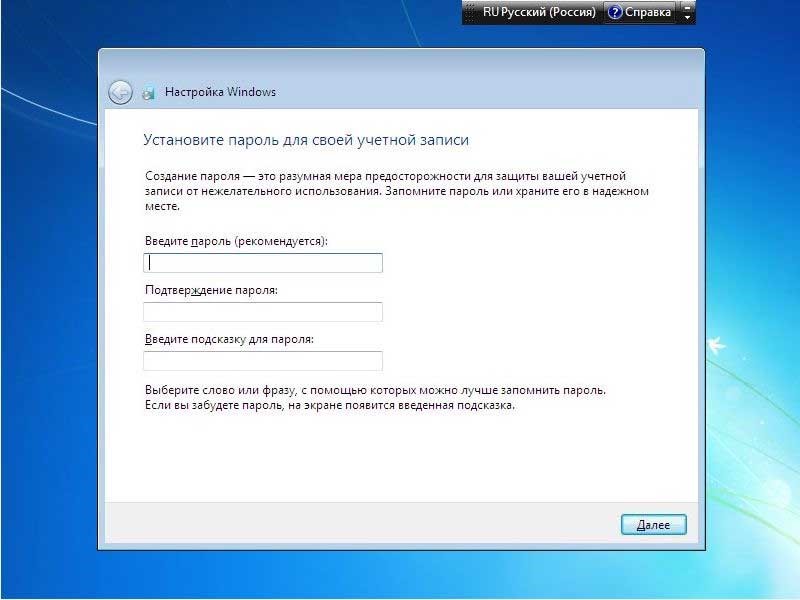
- enter the password for regional registration(Fig. No. 17);
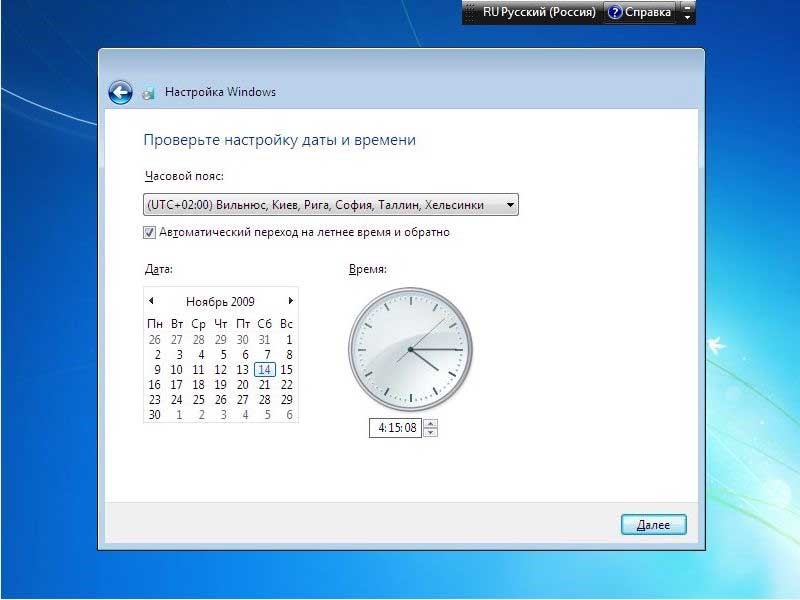
- The date/hour setting is adjusted (Fig. No. 18);
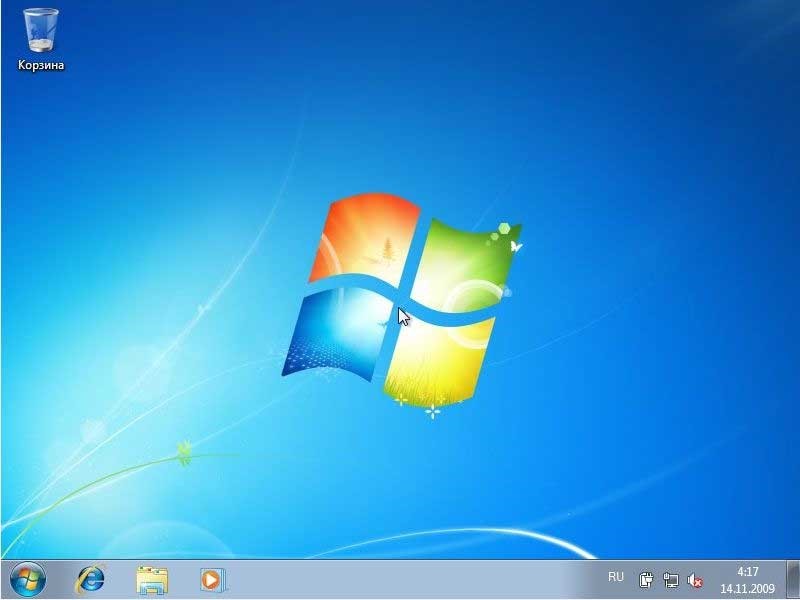
- After completion of the first stage, preparations will begin until the first launch (the participation of the pilot is not required).
Please download antivirus and other software add-ons from here. This is how the folding parts sometimes fail when adjusting the gauge settings.
Porada: After completing all necessary operations, it is necessary to return all settings changes to the original setting - otherwise, when the skin is turned on, the transfer from USB will occur.
If there is proof of use of the following utilities for creating a USB backup device, you can familiarize yourself with this procedure on the Internet:
Creating a fancy flash drive in UltraISO
You can create a flash drive with an image of the Windows operating system using the additional UltraISO program. This is such a cool flash drive, it can replace the installation drive. DVD disc, We will write it down to a new level of the operating system.
We will work on the application of the operating system Windows 7і special programs for the creation of a significant fancy nose(Tobto flash drive or externally harsh disk).
The whole process is divided into 2 parts:
Let's start with everything in order.
There are some helpless programs that you can create fancy disk. We focus on one of the simplest and most straightforward -. These programs require an installation image of Windows in . iso(You can get it from your installation Windows disk or download).
After installation and launching the program, you will now see:
At what stage it is necessary to introduce the expansion program Windows image and press Next.
Third step - select specific outbuilding. We can guess that the disk to be recorded must be at least 4 gigabytes in size.
After whom we press the button Begin copying And check while the program is creating the backup disk.
The offensive priority is set to priority in the BIOS of your computer. At this stage, be very careful and if you don’t know how to change the BIOS settings, you can quickly get to the bottom of your diet. The sequence of actions is as follows: in the BIOS you need to go to the section BOOT and there in the parameter BOOT SEQUENCE put it under number one USB Generic Disk. Another priority is to set the hard drive where you are going to install Windows. After this, you need to save the settings and after restarting the computer, install them permanently.
2.Windows installation
At the first stage, we need to select the language to be installed, the hour format and the keyboard layout. There is a Russian price for speaking everywhere and we will not hold it in vain.
In the coming time, it is necessary to wait for the benefit intended for the mercenary, put a tick and emboss " far".
Selecting the type of installation transfers 2 options, we install from scratch the one we select " reinstallation".
The newborn is even more respectful, so let us give him a little more respect. As you see on the above screenshot, the installer prompts you to select a section hard drive to install the system. In our version we install Windows on virtual machine Therefore, the situation of a “naked” or unbroken hard drive will be modeled. This situation occurs when you install the system on new computer, In which the disk has not yet been marked. If you do not have a new computer, then at this stage there will be a list of logical drives, Available on your computer. In this case it is necessary to select installation to disk C:\. And we’ll look at how to create a disk layout from scratch.
For the beginning, select the unmarked place available to us and press the "" button.
After which we have the following additional options:
We still don’t have any logical layout, so we select the item “ create".
After this, the system prompts us to select how many megabytes we want to create a logical drive for. Our version has only 25 gigabytes. virtual disk, That's why we vikoristovuem all of them. What if you have a real hard drive with a capacity of 500 gigabytes, for example? Administrators do not recommend operating it with one logical drive and we come to our conclusions. In this case, it’s better than anything to see part of the disk space under system disk, And decide to use a disk to save files and other information. At this stage, the power supply often fails. How much space do you supply to the system disk? We recommend no less than 60-100 gigabytes, and if you plan to install it on disk Z:\ important games, you can get 200.
For now, we set the maximum size and press the button " zastosuvati".
After that you will add it to the list of available logical drives. There will be the disks you created, plus a small 100 megabyte system disk, which is necessary for installing Windows. Do not be foolish if the system is installed and will be invisible. At this stage you need to select the disk on which you will install the system and press " far".
After this, the Windows installation process will begin, which will take 10 to 60 minutes, depending on the complexity of your computer. Over the course of time, the computer will restart a few times, and in the meantime you can do other things.
After the system has been reinstalled, ask you to create a koristuvach.
If the first user to create an account is the administrator, he must set a password for his account.
A new addition for the creation of exciting outsiders USB carriers- WinToFlash. Danish product for surgical robot applications Windows systems. As a rule, packages with OS installation data are placed on disk by the installer. However, practice shows that this option for saving information does not conflict with high reliability and the necessary level of reliability (especially for the cashier).
The disc can be extremely damaged, it often shows cracks and stains, and even more budget tablets And PCs are released without optical drives, which is why it is still becoming increasingly popular to record a Windows OS image on a flash drive or another type of USB storage device such as WinToFlash software supported by Russian language. Desktop option for laptop, Which does not fit the CD / DVD drive.
How to install windows 7, 8, 10 from flash drives on your computer?
Apparently, one of the most popular specialized products these days are programs that allow you to rewrite the installation of the operating system on a new storage device. One of the most popular programs is.WintoFlash can be downloaded freely in Russian for any version of Windows OS.
This program is intended for robots with such Windows operating systems as 7, 8, 8.1, XP, Vista. It’s easy to get started with this program, just by properly breaking down the interface and following a basic procedure. The program has two basic operating modes - the Master mode and the Advanced mode.
The first type is a good choice for an inexperienced operator, since the program will briefly inform you about the procedure and prompt you to select the required parameters. Following the instructions, transferring the OS settings to a flash drive takes a lot of work. Master mode WintoFlash Russian language uses for more detailed settings OS, and the main task is to be installed in the work by programmers, but after all, it is not particularly difficult to navigate these settings.
Another great program, which, of course, has its advantage - it has a smart and simple interface, with a variety of flexible menus, and a whole range of functions for quickly achieving the task at hand. The program is portable (portable version)і does not push installations directly into the directory, thereby not containing any system entries Windows registry. According to the instructions of correspondents and facists, the program is a standalone product aimed at achieving a specific task: transferring Windows to USB drives.
Basic capabilities of the WinToFlash program:
- rewriting installation programs of Windows xp, 7, 8, 10 onto a USB flash drive to install the OS on a computer or laptop (from the front required disk for installation in BIOS);
- The prevailing diet is based on how to create Vandalized flash drive windows xp (7, 8, 8.1, 10);
- rewriting new disks or other operating media;
- Full support for disc image format (ISO and others);
- formatting of the external storage device assigned to the FS;
- fine tuning OS options for optimal performance;
- checking the current accumulator for the presence of errors after completion of work and a number of other functions.
| Screenshot: | TECHNICAL INFORMATION: |
 |