Powershell updating system files. SFC and DISM: Checking and updating system files in Windows. What to do on the Internet to update the collection of components
- The files for launching the PowerShell shell can be found here:
- 64bit PowerShell if you have a 64-bit system or 32bit PowerShell if you have a 32-bit system:
- C:\Windows\System32\WindowsPowerShell\v1.0
- 32bit PowerShell on a 64-bit system is in the folder:
- C:\Windows\syswow64\Windowspowershell\v1.0
- You can add a shortcut to your desktop and run it as an administrator. How can you marvel at the picture below by pressing it on it, making it even bigger:
- We've deleted the Store in Windows 10, no matter what, I'll tell you two ways to turn the store back. The first method is the simplest; you don’t even need to work, but just import the file and run it on the machine and you need to turn the store. Another method, as the first one did not work, would be more complex, otherwise I will describe everything briefly. Let's move on to the first easiest way to rotate the magazine. We are preserving the file:
- Run files with extensions ps1 on wiki, and not openly as expected, please help the article:
- The enchantment file is launched on Wikonanny by pressing right button bears and in context menu Select run as administrator. We check for the completion of the operation and go to the latest store. You can find out by searching for store.
- This option is complicated, but still effective. Launch Powershell as administrator. You can find and launch powershell by typing in the start menu, then search, powershell or power then selecting from the powershell list:
- In PowerShell, type the command:
- then press enter.
- Select the list in which you look for the section: Microsoft.WindowsStore and in which section you find in the right column: PackageFamilyName. Next, copy the name of the previous store to the next row in the PackageFamilyName row. The picture shows the name of the store. Paste the code into powershell:
- The code says that you need to insert the name of the previously copied file from the powershell store. Press Enter and search for help again, where you type the familiar word store. Shop in the city, as you found it after a quick search!
- You can turn on the store and launch it in group policies by clicking on the following rule. Group Policy You can run it with the command, but not with the command, but with the name of the file in the window: gpedit.msc Below you will learn the entire process of connecting to the store in Windows 8.1, but this method is in no way different depending on the version of Windows in either the store:
- This option is more humane and you can turn back in the future simply by turning it off, in the same way as you turned it off just in case. By enabling rules in group policies.
- Launch PowerShell, there are plenty of methods to get more done. Lkz started asking us to know the name of your store. Enter the command before PowerShell
- Get-AppxPackage >D:\app.txt
- After we pressed Enter, we follow the path indicated and we find a text file called app.txt Open it in notepad and search for your store, it looked like this:
- We know the row:
- PackageFullName: winstore_1.0.0.0_neutral_neutral_cw5n1h2txyewy
- In the picture I have shown it with an arrow. Next, copy the name of your store after double-clicking from the text file and write the command in PowerShell:
- Remove-AppxPackage –package
- Next, we add the name to your store, taken from the text file:
- winstore_1.0.0.0_neutral_neutral_cw5n1h2txyewy
- We press Enter and check that the entry has been completed. In this way you can see whether it is installed in Windows add-on. Raju’s text file may not be deleted in the future. If you want to install back, you will not find the store name in the newly created text file, which is one of the reasons to save the text file.
Where are the files to launch PowerShell?
Turn the Windows Store to the right place!
entice
Another option for updating the store:
Vidality or Viknuti store for Windows 10 or 8.1
Shop with group policies.
Visit the store for more PowerShell help
Turning to the Component Store technology in Windows 8, let's look at the upgrade scenarios. It’s worth noting that, starting with Windows Vista, Microsoft abandoned the concept of component based servicing. This new component structure was able to create a more stable system for installing/removing updates, patches and SP update packages. This system is the basis of the architecture of Windows 8. Convergence files Windows components on the disk located in catalosis \ Windows\ WinSxS that power can significantly grow in size over time (a report about those why the size of this catalog grows over time and how to change the size WinSxS folders read at).
However, in some cases, the conduit of components can become damaged, which can lead to problems during installation. Windows update and other Microsoft software. To renew the tendon of components in the anterior Windows versions(Windows Vista, Windows 7, Windows Server 2008 /R2) Microsoft broke down special utility — CheckSUR or System Update Readiness Tool (KB947821). This utility is large in size (over 350 MB), and is regularly updated as new Windows updates are released. This means that you will soon have to download the latest version CheckSUR.
Porada. In one of our previous articles, we already looked at the CheckSUR application for searching for and updating defective components: .
Why bother? given utility? System Update Readiness Tool checks the integrity of the following resources:
- Files in directories:
- %SYSTEMROOT%\Servicing\Packages
- %SYSTEMROOT%\WinSxS\Manifests
- Instead of registry entries:
- %SYSTEMROOT%\WinSxS\Manifests
- HKEY_LOCAL_MACHINE\Schema
- HKEY_LOCAL_MACHINE\Components
- HKEY_LOCAL_MACHINE\Software\Microsoft\Windows\CurrentVersion\Component Based Servicing
If the CheckSUR utility detects errors or inconsistencies, it will try to update them.
Problems with components may arise from various problems during the installation of Windows updates. Below is a list of typical error codes that this utility is required to use.
List of WindowsUpdate fixes that cause damage to a bunch of components
| Code | Error | Description |
| 0×80070002 | ERROR_FILE_NOT_FOUND | The system is impossible to view the file specified. |
| 0x8007000D | ERROR_INVALID_DATA | The data is invalid. |
| 0x800F081F | CBS_E_SOURCE_MISSING | Source for package or file not found. |
| 0×80073712 | ERROR_SXS_COMPONENT_STORE_CORRUPT | The store component is in an inconsistent state. |
| 0x800736CC | ERROR_SXS_FILE_HASH_MISMATCH | A component's file does not match the verification information present in the component manifest. |
| 0x800705B9 | ERROR_XML_PARSE_ERROR | There is no need for XML data. |
| 0×80070246 | ERROR_ILLEGAL_CHARACTER | An invalid character. |
| 0x8007370D | ERROR_SXS_IDENTITY_PARSE_ERROR | An identity string is malformed. |
| 0x8007370B | ERROR_SXS_INVALID_IDENTITY_ATTRIBUTE_NAME | I'm ascribed in identity is not within valid range. |
| 0x8007370A | ERROR_SXS_INVALID_IDENTITY_ATTRIBUTE_VALUE | The value of the attribute in identity is not changed. |
| 0×80070057 | ERROR_INVALID_PARAMETER | Parameter isincorrect. |
| 0x800B0100 | TRUST_E_NOSIGNATURE | No signature was present in the subject. |
| 0×80092003 | CRYPT_E_FILE_ERROR | An error occurred while Windows Update reads or writes to a file. |
| 0x800B0101 | CERT_E_EXPIRED | The required evaluation does not appear in its validity period when sent to the flow system of the date, or the time of creation in the named file. |
| 0x8007371B | ERROR_SXS_TRANSACTION_CLOSURE_INCOMPLETE | One or more required members of the transaction do not exist. |
| 0×80070490 | ERROR_NOT_FOUND | Windows can't find the search for new updates. |
Windows 8 and Windows Server 2012 have functionality similar to the CheckSUR utility, which is already installed on the system and is called InboxCorruptionRepair(Components have been updated). Updating components can be performed in two modes: backgroundі manual. Background updates are automatically launched every time there is an issue when you try to install Windows Update. Windows will automatically prompt you to correct faulty components and reinstall them. Windows package Update. In that situation automatic update If you cannot correct the problem yourself, the administrator can correct the problems manually, restoring the workflow of the component cluster. You can use the additional DISM image maintenance utility (command Dism/Online/Cleanup-Image) or s I'll help you Powershell(cmdlet Repair-WindowsImage).
To check the component convergence mode, open the command row with advanced privileges and select:
Dism / Online / Cleanup-Image / CheckHealth
For the sake of.
- DISM on the largest account Windows utilities Sensitive to the case of characters.
- The Dism/Cleanup-Image command saves logs in the directories C:\Windows\Logs\CBS\CBS.log and C:\Windows\Logs\DISM\dism.log
Similar Powershell command:
Repair-WindowsImage -Online -CheckHealth
Checking CheckHealth takes a lot of time. As you know, the current status of the image component node is Healthy, then. no need for renewal.
In the event that problems or fixes are detected, then run the procedure for updating the system with the command:
Dism.exe /Online /Cleanup-Image /Restorehealth
Similar Powershell command:
Repair-WindowsImage -Online -RestoreHealth
Whose butt is updated? system files was successful:
The rest of the wyconnies were successful. The component store corruption repaired.

If the system itself could not update the components in the system, you may need a distribution kit (installation disk) of Windows 8. Insert Danish disc at privіd or . For example, the drive with the distribution kit is assigned the letter E. We can retrieve the list of available versions of Windows 8 on the drive using the PoSH command:
Get-WindowsImage -ImagePath E:\sources\install.wim

In this application, it is likely that the disk has only one image (Windows 8 Pro) with index 1 (Index: 1).
Now comes the command to run the updated system with updates of corrupted components from the original Windows image 8:
Repair-WindowsImage -Online -RestoreHealth -Source G:\sources\install.wim:1
After completing the update, reconfigure the components that are in the processing station (status: Healthy)
Advance (not too late stage) – checking the integrity of system files using the following command:
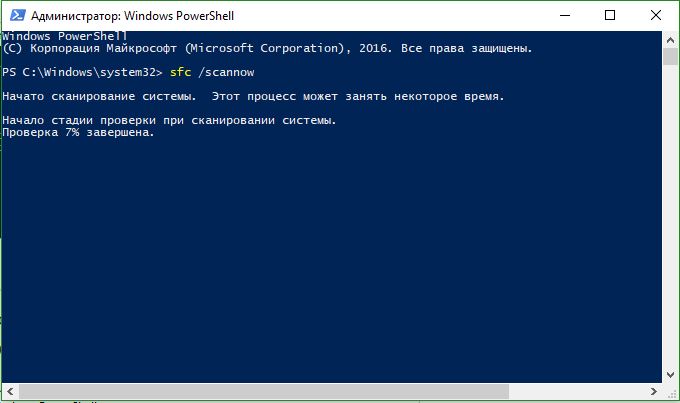
Sfc /scannow
Porada. If you have encountered problems installing the Windows update before updating the component cluster, restart Windows service Update and reset the local cache. To do this, enter the following commands in the command line:
Net stop wuauserv net stop bits net stop cryptsvc ren %systemroot%\SoftwareDistribution oldSD ren %systemroot%\System32\catroot2 oldCat2 net start cryptsvc net start bits net start wuauserv
The Windows operating system is similar in many ways to a living organism, which means that the least damage can occur, and the removal of one or several files can lead to the appearance of serious problems. The cause of the problem may be viruses, software failures, power failure, problems with editing system libraries, etc.
As a result, the user may encounter various problems when launching programs, due to the inability to install them, problems with system adjustments and show blue “screens of death”. Therefore, when diagnosing problems, first of all, it is recommended to check the integrity of the system Windows files 7/10. on Narazi There are two main methods for checking and updating system files - in addition to standard utilities SFCі DISM, which can be launched through the command line or the PowerShell console.
The other tool is more pressing and may become stuck if the SFC fails to return from the settings, or its launch will end in failure. It is also suitable for these purposes third party programs, and further duplicate the functionality of SFC and DISM, providing more manual access to them using an additional graphical interface. In critical situations, if neither SFC nor DISM help, the update of the system or other components will stagnate with the help of a previously created backup copy.
Vikoristannya SFC
SFC utility or otherwise System Files Checker For all versions of Windows starting from 2000, it is used to check and update system files. SFC can accept a number of arguments, but in this case we only need one. Checking and updating system files in Windows 7/10 can be done in this way. Launch the command line or PowerShell console as administrator and enter the following command:
sfc /scannow
The verification procedure will take about an hour. Once the fixes have been found, the utility will promptly remove the corrupted files during the computer restart process. If you write SFC that you cannot update files, please re-convert if you have enabled the EFS and Bitlocker encryption functions, please safe mode, and then repeat the scanning procedure.
To ensure maximum access to the file system, the procedure for updating corrupted Windows system files can be configured in a suitable environment. There are a number of ways you can bring innovation into the heart of the world, but it is probably the most universal. Entertain your computer installation disk Windows, and when the Installation Master window appears on the screen, press Shift+F10. Since the average disc letter is getting worse, you need to check the letter system section. We can use the following commands:
diskpart
list volume

On MBR disks, the system partition, which is for everything, is marked with the letter D, and the “System Reserved” partition is marked with the letter C. Knowing the letters of the volume tags, use the exit command to close Diskpart and check:
sfc /scannow /offbootdir=C:/ /offwindir=D:/

After completion Windows scan re-engagement with the primary regime.
DISM utility
How to verify the integrity of system files in Windows 7/10, since there is no other way to describe it, or when you run commands you see different errors? In this case you can try to press it until you get stronger - utility DISM. We launch the command row with administrator rights and enter the following command:
dism.exe /online /cleanup-image /scanhealth
The utility informs that the component assembly supports updating, which is updated with the following command:
dism.exe /online /cleanup-image /restorehealth

If errors appear during the execution of commands, try updating the components of another PowerShell running with privileges by entering the Repair-WindowsImage -Online -RestoreHealth command when the computer is connected to the Internet.
After completing these procedures, you can check sfc /scannow and see that the errors are not repeated. If so, make sure that you have enabled the “Windows Modules Installer” service, and then you can start working on it in advance.

Updating bad files in manual mode
This method It becomes a problem when it is impossible to update corrupted SFC files, but for this purpose you may at any time need the same operating system installed on another computer or virtual machine It's a backup copy. To determine which files need updating, select the command line:
findstr /c: %windir%/logs/cbs/cbs.log >D:/sfc.log

Information about corrupted files will be saved in a log file, in our version sfc.log to disk D. Instead of adding more volume to the file, look for blocks with the keyword Cannot repair (could not be updated) with the relevant date and hour of scanning.

The screenshot shows that SFC was unable to update the Asseccbility.dll file. Whose vine may have instructions on the way to the wrong file. Copy the original file from another computer and manually replace the corrections. At this stage you often run into problems, where the file may appear or be corrupted system processes for koristuvach not matime na nogo pravo.
To revoke rights and replace such files, you can use standard console utilities Takeown with parameter /fі icacls with parameter /grant administrators:f, but there is a much simpler and more universal method - to speed up being a “living disk” with the memory file manager For example, Dr.Web LiveDisk. Once the computer gets busy, it’s even simpler to just copy the original files into a manual folder on your hard drive.
Vidredaguvati fancy image An ISO of the same Dr.Web LiveDisk can be obtained from the UltraISO program by creating a new folder and copying the Windows files to a new one.
Now let's look at how to update Windows 7/10 files using such a disk. Once you are ready, find your folder with files (for Dr.Web LiveDisk, serve as the installation point /cdrom), copy the original files to the clipboard, go to the target directory of the folder win and replace them with them.


If the original files are located on Windows disk, look for them at the uninstalled win, at the one in whom you placed them. This method is manual because it removes all restrictions file system Windows allows you to deny exclusive access to it.
Vikoristan of third-party add-ons
Rozrobka special programs There is no sense in how to corrupt and delete system files, since all the necessary functionality is available in the system itself. However, there are tools that will simplify access to standard features using a manual graphical interface. Thus, for example, Microsoft DaRT – fancy disk, which is a set of administration features, which also includes a module for scanning and updating Windows system files. The procedure for such verification is shown in the screenshots below.


To launch SFC manually, use the same program Windows Repair And only those administrated under Microsoft DaRT will start from the working system.
In Windows Repair, to start the repair, you need to go to the Pre-Repair Steps section, click on the Step 4 (Optional) tab and press the Check button.


In Glary Utilities, go to the “Modules” tab, select “Service” in the evil menu and click “Update system files”. In both modes the standard will be launched console utility SFC.

Other ways
As far as power supply is concerned, as soon as I delete the system files, everything is clear here. As far as the size of the disc allows, make regular backup copies system partition or, remember, do not turn on system protection, so that you may be able to roll back to the front.


And the only thing left is what I would like to gain respect for. If you have purchased and installed a data collection, be prepared for the fact that SFC will soon find out that it has corrupted files. The reason is quite simple - people often modify their images, replacing, for example, the original icons in libraries and others. So before that, how to carry out the renovation original files, think about what you really need, since there are no problems with the robotic system.
Of course, if something is going wrong with your computer or laptop, there are a number of troubleshooting tools you can use to try to fix the problem. Windows 10/8/7 has a number of built-in commands that can be used to check and update corrupted system files that can cause problems when changing. One of the ways to troubleshoot problems associated with Windows is to check the system and update system files. This can help with all types of problems, such as the political system, blue screen death, food failures and system failures.
Let's take a look at how to start checking system files in Windows for help command row CMDі PowerShell, such commands as sfc /scannow to the instrument DISM. I would like to point out that for updating the Anniversary Update of Windows 10, it is better to use the Vikory method using PowerShell itself.
Checking and updating system files via CMD
System File Checker scans your computer for any damage or changes to system files that might otherwise be damaged. normal robot your PC. It will replace the file with the correct version to ensure uninterrupted work. In addition to the command line, you can try to scan and update the system files of recent ones operating systems yak Windows 10/8/7 / Vista. Let's select two teams sfc /scannow and DISM CMD for further assistance.
1.
- Open the Command Row (CMD) as Administrator. Click "search" and simply write "cmd" or " command line", then click on it with the right mouse button and launch under the admin name.
- Specify the command sfc /scannow then wait for the process to be completed.

Note: After scanning your system, you will see one of three results:
- There will be no damage to system files.
- System files will be deleted and Windows will update them automatically.
- Windows has detected errors, but we cannot continue to act on them.
If option 3 shows that the error has been detected and the system cannot update, then try the procedure again. Raja switched on encryption and at the time of verification of the stink. Nothing came of it? We collapse lower.

2. (DISM)
Since it does not work in safe mode, there is only one the remaining method Check for errors in system files and correct them. Vikorist's Deployment tool Image and Service Management (DISM). The team works Windows systems 8/8.1/10. Open back and attack the command:
The process can take a frustrating hour due to freezing of the meter scale. After finishing the work, restart your computer and start back sfc /scannow Let's get over it, there's no mercy, and there's no mercy.

Checking and updating system files viaPowerShell
We'll use Windows PowerShell to show you how to use Windows PowerShell and how to use Windows PowerShell. DISM to scan and correct corrupted system files in Windows 10. This method will be more effective for updating Anniversary windows 10, lower command row.
1. Use the System File Checker (SFC) tool
- Launch PowerShell as the administrator's name. Click "search" and type windows powershell, then right-click mouse and select admin name.
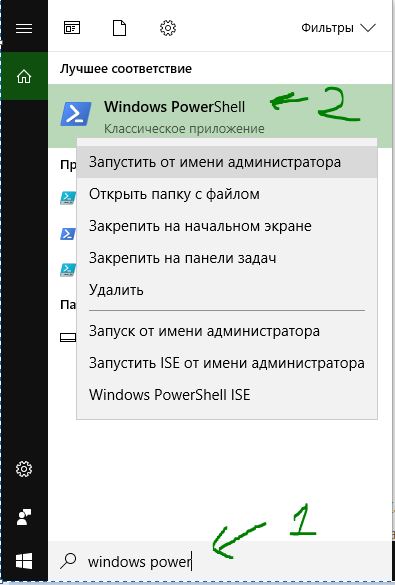
- Enter the command in the PowerShell window sfc/scannow. If the scan reveals problems, Windows will try to fix them. If Windows can't fix them, it will get ahead of you and require further investigation and action. Skip to the bottom if there is a compromise.
2. Deployment Image and Service Management tool wiki (DISM)
A DISM scan will detect corruption in system files, and Windows will try to fix them and report back on progress at the end. If Windows is unable to find the files needed to update corrupted system files, you will also be provided with information about those that work on the Microsoft website and troubleshooting options. Enter the command below in the PowerShell window.
DISM/ONLINE/CLEANUP-IMAGE/RESTOREHEALTH
If DISM has corrected everything or does not show errors, restart your laptop or computer and run it to check back sfc/scannow.

If you often install security software otherwise you'll stagnate Tweaks, it would be disgusting to do such hand-offs in front of everyone system update checkpoint
. Windows 10 This is especially problematic, because in the tenth version, the edit points are created earlier, lower previous versions. You can create an update point manually using applet ceramic panels System -> System protector, also for these purposes you can quickly access the console PowerShell
.
Another way is to create a song that allows you to create refresh points in the process of downloading various scripts, in addition, users can enter a similar command PowerShell at the shortcut, for additional points you can close the mouse with one click.
The axis is so timid.
Having changed, what The system update function behind additional control points is disabled.
Unlock the console PowerShell As an administrator, enter the following command into it:
Checkpoint-Computer -Description "My update point" -RestorePointType "APPLICATION_INSTALL"


Argument -Description specifies a text description of the control point, -RestorePointType- Її type. You can take the following values:
MODIFY_SETTINGS- Change your mind.
DEVICE_DRIVER_INSTALL- Installation of the driver.
APPLICATION_INSTALL- Installation of programs (Vikorists get dirty)
.
APPLICATION_UNINSTALL- Vidalennya programs.
CANCELLED_OPERATION- Skasuvannya dii.
Which of the keys will be chosen is not of particular significance. Please note that in this way you can create no more than one control point per target.

To understand this, open the command regedit registry editor, light up HKLM\Software\Microsoft\Windows NT\CurrentVersion\SystemRestore , create a new one in the remaining section 32 -bit parameter to type DWORD from ім'ям SystemRestorePointCreationFrequency And set the number of lines to set the interval between the new update points.
There is a number behind the motivation of vikoryists 1440 V tenth system calculation, which indicates one addition. After you freeze your TV, you can create update points in PowerShell From the frequency you need.