How to tidy up the sides in a Word in two simple ways and fence them away from the insert. How to visualize the parsing in the Word.
Instruction
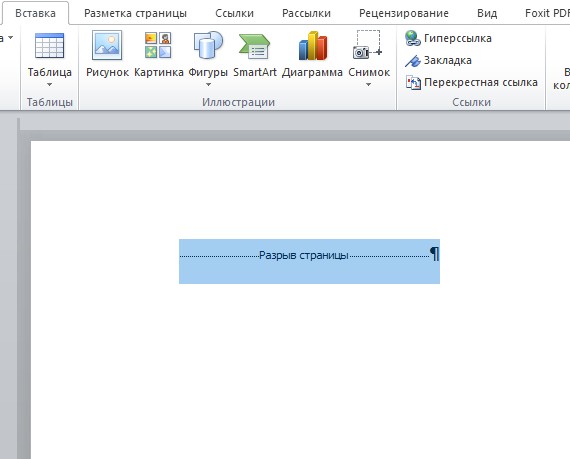
With all the seriousness of the problem, like vinyl special teams for vidalannya rozrivіv not іsnuє. Ale їх vdalennya not є foldable tasks. Press the "Invalid Symbols" button on the standard editor panel. Even if you didn’t see it, after pressing on that button, you are guilty of showing up. Just see it with the left mouse button, then press the Delete button, or press the right mouse button and select the "View" item.
Symbols that often accompany attachments can be seen with the help of the Delete key. Place the cursor in front of the split open symbol, then click the Delete button. As you have seen vipadkovo, be it a symbol, which Ide before the symbol, I open it up, you can use all the formatting of the text. For an hour, formatting the text takes a little over an hour, as if it would collapse in one mile. Ale, it’s not varto to worry about this drive. If you have come across such a situation, press the Ctrl + Z keys. I'll stop by". You can edit this operation through the "Edit" menu, the "Skip input" item.
You can also create a view of the view with the Backspace key, just put the cursor after the view, or see the entire view with the left mouse button. highest mode review for the identification of attached divisions є "Superior look at the review". You can activate yoga by clicking on the "View" menu by selecting the "Specific" item.
For Microsoft Documents Office Word has been transferred the function of inserting a side split (divided) into any local text. You can set automatic distribution of expansions or install them “manually”. The same is true for the turning process: tidy up the rows (dividing, sides) can also be either automatically or independently.
Instruction
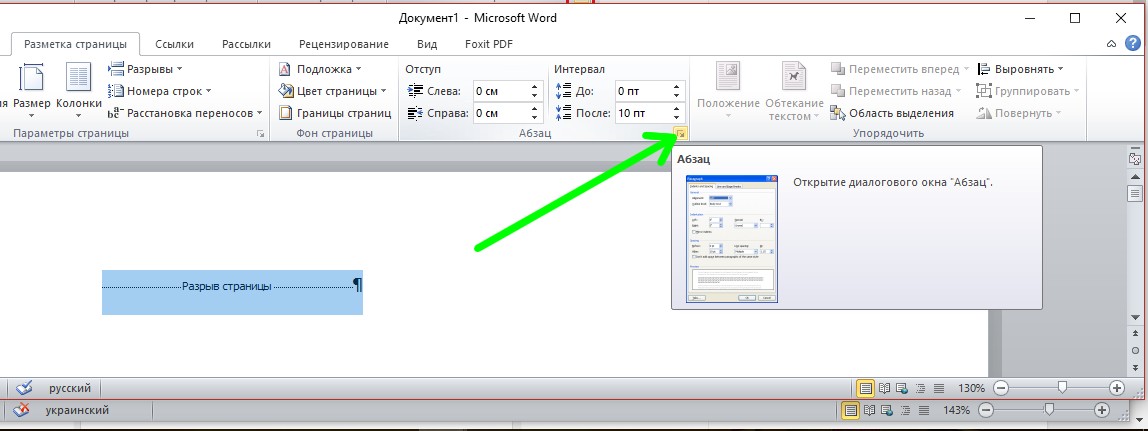
Open the document, which you want to edit, see a fragment of the text, open it in whichever letter you want to insert, and go to the “Side layout” tab. At the “Paragraph” section, click on the button with an arrow - a new dialog box “Paragraph” appears. This way you can also click in another way: click in any place of the document right button mouse, in the pop-up menu, select the item "Paragraph".
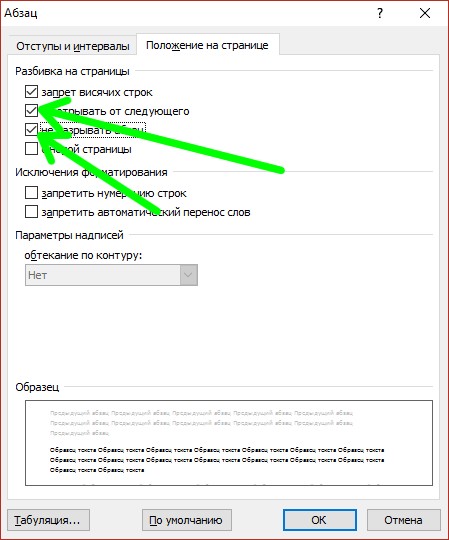
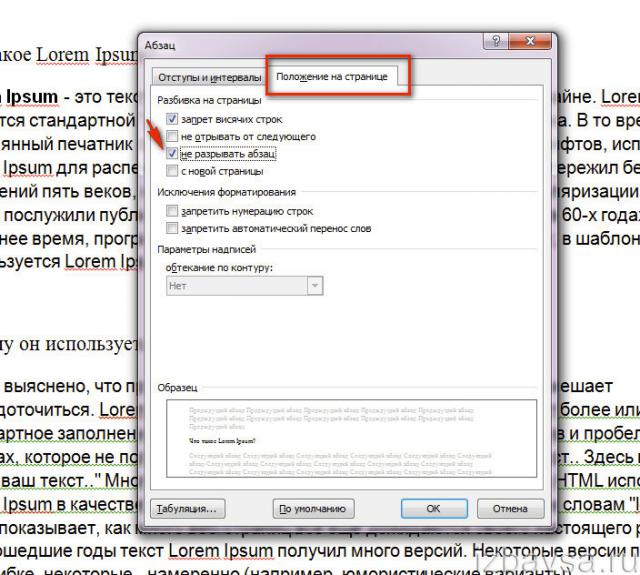
Go to the window on the tab "Positions on the side". At the upper part of the window "Switched to the side" put a marker in the field "Do not expand the paragraph". In order to block the insertion, I will open the sides between the paragraphs, put the ensign in the field “Do not break the offensive”. Press the OK button for the new settings to take effect. The "Paragraph" dialog box will close automatically.
In professionally designed documents, as a rule, the sides do not end with the first row of the paragraph and do not start with the remaining rows of the front paragraph. Such rows are called hanging rows, and in Word documents the fence of hanging rows of inclusions behind locks. If you don’t have any special order to draw up the document, call the “Paragraph” dialog box in the way described in the first paragraph, and remove the marker from the “Hanging Row Fence” field on the “Position on the side” tab. Press the OK button to close the window.
The obvious opening of the side can be seen "manually". To place the cursor on the beginning of the row, press the BackSpase button for a few times before any insertion (until the text fragment is moved to the required space of the document). The second option: move the mouse cursor to the left field of the document and check until the cursor looks like an arrow. Utrimuyu leva mouse button to see the empty area of the side of the above fragment of the text, before opening the opening. Press BackSpace once.
Related videos
One of the ways to solve the problem of distant words otherwise, before separate signs, macros can be created, which are implemented standard procedures appendages Microsoft Word, I scho allows you to automate the solution of tasks.

Instruction
Press the "Start" button to open the main menu of the system and go to the item "All programs" words.
Enter the Miicrosoft Office item and launch the Word addon.
Open the document, which is used for editing, and open the "Tools" menu top panel software tools.
The popular Microsoft Word editor gradually becomes more and more foldable. As practice shows, deyakі yogo funktії vyklikayut pochatkіvtsіv koristuvachіv difficulties - zokrema rasshennya rozrivu storinok zamі rozryu ryadkіv. Trying to change the situation, it is possible and worthwhile to complete the document very importantly. Let's look at how easy it is to get into trouble with this problem.
You can see the opening of the side
In order to remove the insertions from the document into a new opening of the side, we fix it like this:
In the “Head” tab of the main menu, you can enable the display of special characters in the “Paragraph” subsection.
It is known in the text that the symbol is opened, we see it with a bear and we press the “Del” button.
Vimikaёmo display of special characters.
Apparently the impersonal repetition of the opening of the side
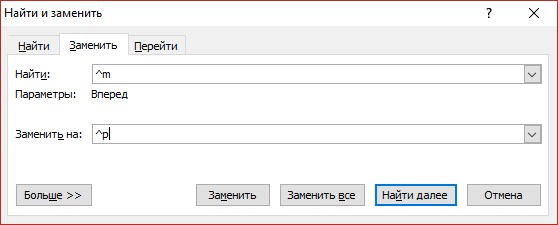
Sometimes, especially when converting other files to the * .docx format, opening the sides is too rich, so it’s important to see them manually. In this way, we are speeding up the function of contextual replacement. We select the “Replace” option in the “Head” menu (or press “Ctrl-H” on the keyboard), and in the “Know” field, enter the symbol for opening the row “ ^ m ". In the "Replace with" field, enter the symbol for the row shift " ^ p ". In order to simply see the opening, we fill the “Replace with” field empty.
It is safe to insert a symbol for opening in the seen fragment of the text
The program can and automatically insert sidebar symbols into your created document. For whom we work like this:
At the “Side Outlining” section of the Word main menu, we press the button to open the “Paragraph” dialog box.
Switching to the tab "Position on the side". It is important to checkbox the number of points, as shown in the little one:
We select the insertion of expanded sides in a new document
shob in created document without showing up, open up the sides, timidly step forward:
On the “Head” menu tab in the “Styles” section, select “Heading 1” and open the “Change” window by clicking on the button. 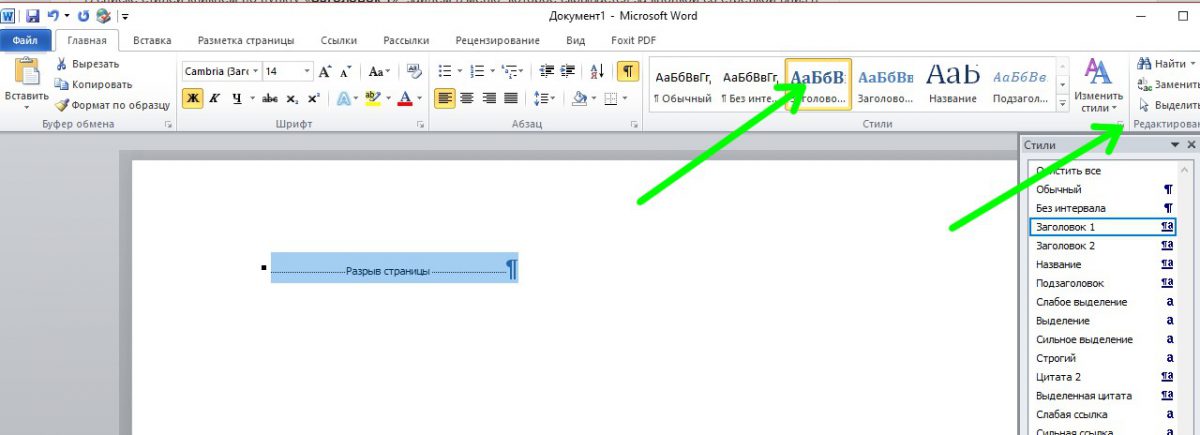
At the power menu, select “Change” for the style. 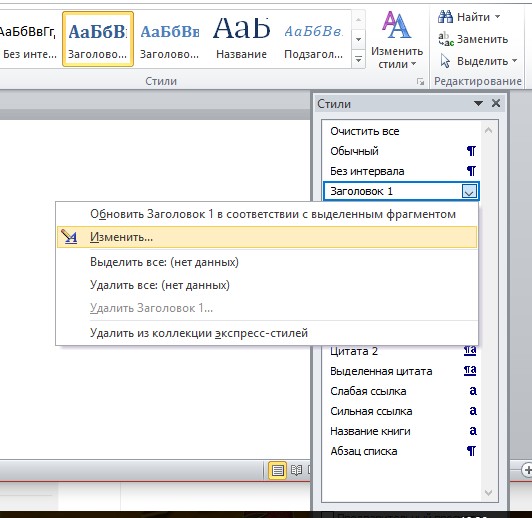
Press "Format", select "Paragraph" in the menu.
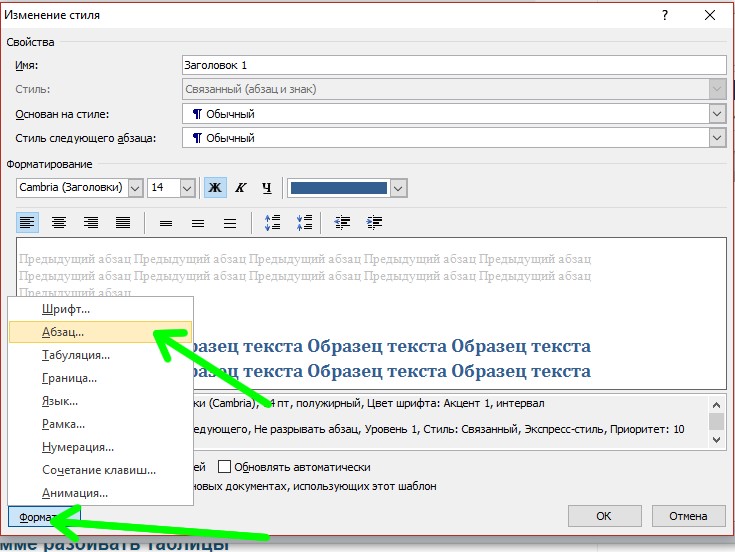
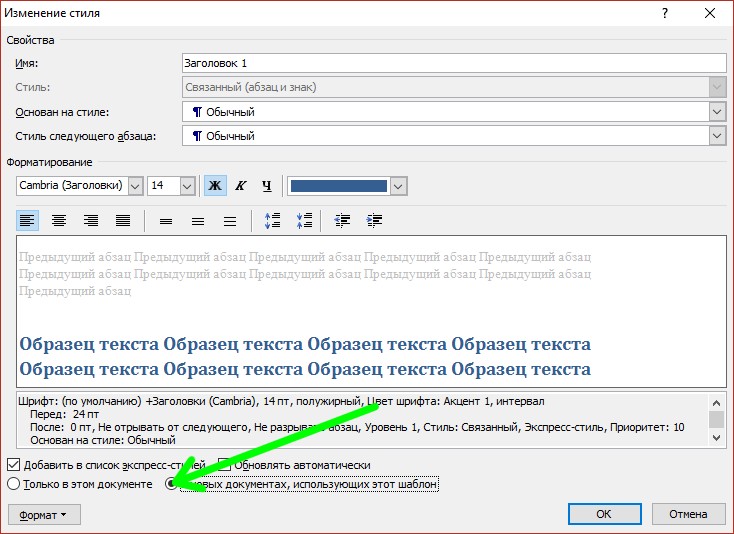
Robimo change, described in the previous paragraph.
Then we put a jump to the item “In new documents, how to change this template” and press “OK”.
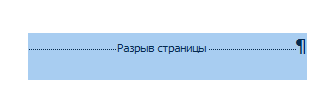
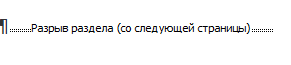
In the Word, for the sub-chapters and next paragraphs, there is a special key symbol - “opening the side”. Vіn can be restored like a coristuvachi, so i text editor in automatic mode, for example, when switching to a new side. The visualization of the project can only be done by hand, if it was created by hand.
remote
To see the opening of the sides in the Word, click on the steps:
1. Click on the tab "Head" at the top panel of the program.
2. Press the "Show all characters" button, so that all formatting characters become visible in the text.
3. Place the cursor in the end of the section before the end of the section. Press the "Del" button, and you will know.
You can also see the expansion using the additional “BackSpace” key by placing the cursor in front of the key symbol.
Note. Vykorivuyuchi these ways, you can also clean up the project and other formatting marks.
Upon completion of the procedure, the entire offensive text “pulls up” to the moment of removal.
Blocking the opening
To sort out a paragraph in the text, fill it like this:
1. See the necessary fragment of the text (clicking on the left button of the bear, designate the cordon of the area of vision).
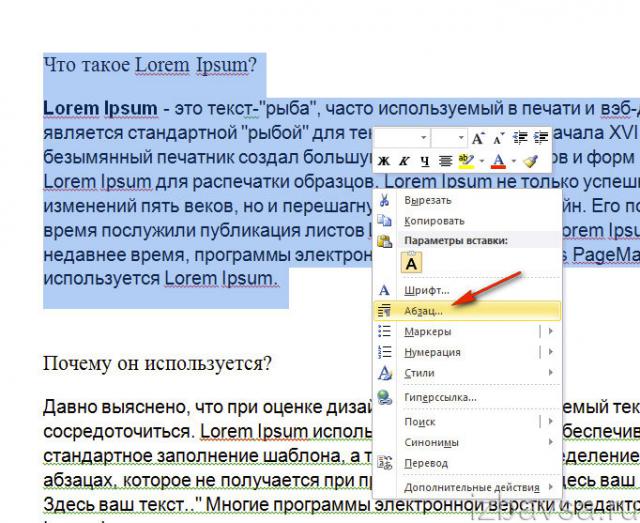
2. Right-click on the highlight paragraph.
3. Set the context menu to "Paragraph".
4. In the window with the settings, click on the "Position on the side" tab.
5. Insert an ensign in the line “do not expand the paragraph”.
6. Press "OK".
I accept you work in Word!
Working with a great document, it is sometimes necessary to start a new paragraph on a new side, and for this, as a rule, put a side break. In the options, we can put the Word, de automatically put the split of the sides, and we can only see them manually. Otzhe, on the other side, you know a couple of ways, how to open the side view in Word.
You can see the opening, the vicorist button "Delete"
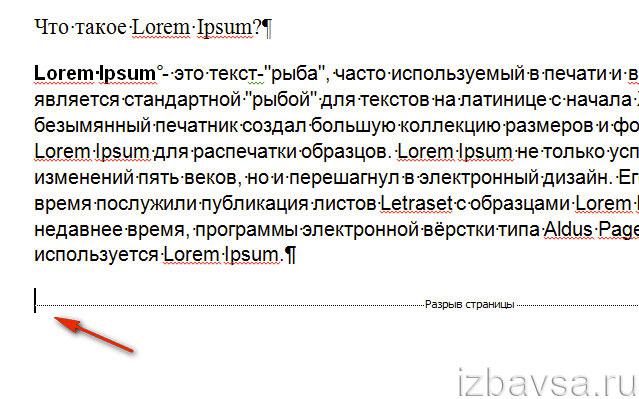
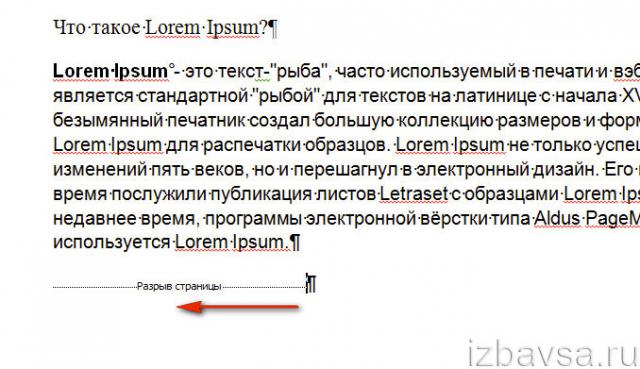
Krok 1. If in Word documents vykoristovuyutsya razrivi storіnok, then їх not visible. In order to instruct them, go to the Headline tab - give "Display all characters" (CTRL + *), as in the screenshot
Krok 2. See the opening with a bear, or put the cursor on the left side of the opening.
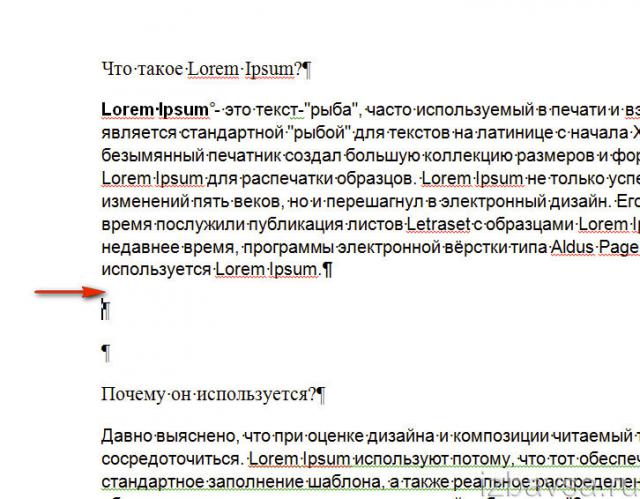
Krok 3. When everything is ready, click on the "Delete" button
Yak bachite, tse not folding way remove the gap in the document. Alas, how robiti, how do you have more than a dozen of them? Obviously, you can hold down the CTRL key and see everything in the document, and then delete it with the key, as a second way, if you have a great document, then go to.
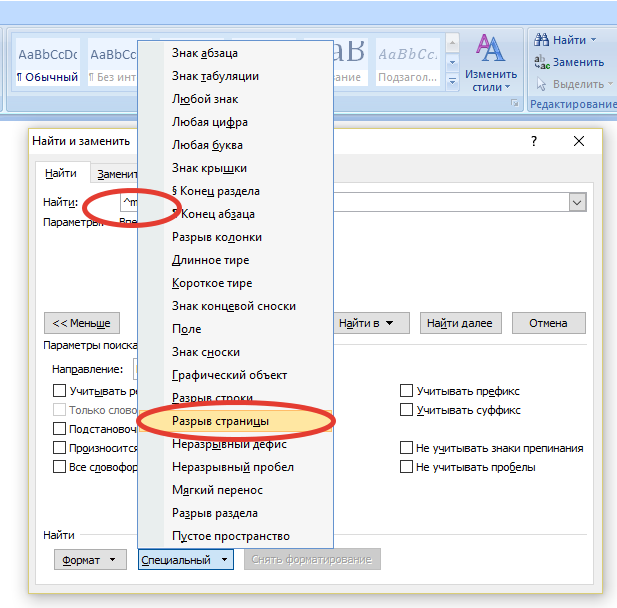
We pick up the search for additional functions "Know and replace"
In parallel with the first method, for the additional function "Know and replace" you can spare a couple of hours. You will not be able to choose all the sides one by one according to the majestic document, but you can see them all at once, having beaten the next steps.
Krok 1. Vіdkriёmo vіkno "Know and replace": "Head" - "Replace".
![]()
Krok 2. At the end of the day, we press on the “More >>” button.
Krok 3. In the "Special" list, select "Opening the side".
Krok 4. In the "Know" field, type "^ m" and click on the "Replace All" button.
If you have done everything correctly, then you are guilty of everything and, now, you know how to tidy up opening the sides in Word.
Having expanded the spreadsheet, if you want to change the formatting in Word. Just insert a split into a split to start a new split, but how do you know how to quickly see all the split into a long document? Today you know the deeds, how to tidy up everything and divide it in Word 2007/2010.
View all splits manually split one by one
If you don’t want to know where you can find the divisions in the documents, you can help them by turning on the “Show all signs” button on the “Head” tab.
I’ll see the splitting of the splitting into the formatting, similarly to the way you remove the headings and end rows in the splitting, otherwise the text above the splitting will be formatted, like the text, like a letter under it.
View all expand the distribution with the option "Know and replace"
See all splitting, vicorist VBA
Run this macro, which itself can see all the sections in the section, while saving the headings and end rows in the section.
- Press "Alt-F11" to open Microsoft Visual Basic;
- Click Insert > Module, and then enter the current VBA code at the top of the module edit box.
3. Then press the "Run macro" button, so that the code will be copied and the section will be deleted.
Yak bachite, everything is not complicated. Now you know a lot of ways to clean up everything and split it up in Word.