How to translate from a3 to a4 word. Two simple options to print a picture on several A4 sheets
By default, the MS Word document is set to A4 page size, which is quite logical. It is this format that is most often used in paperwork; it is in it that most documents, abstracts, scientific and other works are created and printed. However, sometimes it becomes necessary to change the generally accepted standard to a greater or lesser side.
Three things never work: voice chat, printers and projectors. Why, in an era when you seemingly do magic with technology, do these basic pieces of hardware often fail us? This is ridiculous, but when you really begin to understand printers and their behavioral traits, you will find all sorts of reasons why they often do not work. And one of them, of course, can stand at the door of paper formats.
In fact, those of you from North America will be familiar with a completely different set of paper formats for the rest of the world. As you can see in the picture above, these two paper sizes actually have different sizes. If you create a new sheet of paper with two pages of the same size, they will have the same aspect ratio.
In MS Word, there is the possibility of changing the page format, and this can be done either manually or using a pre-made template by selecting it from the set. The problem is that finding a section in which these settings can be changed is not so easy. In order to clarify everything, below we will describe how to make A3 format instead of A4 in Word. Actually, in the same way, it will be possible to set any other format (size) for the page.
But the difficulties do not stop there. Where this is really stupid, we need our printers to communicate with cross-culture. If someone from New York sends the document to Berlin or vice versa, it is unlikely that it will be printed correctly. This is not only a constant source of confusion when you ping files around the world, it can also cause difficulties in setting up your printer. Thus, all documents were printed with a very large border on one side. If it's a mess with your head, you're not alone.
The problem is that the printer is only semi-intelligent. But as it turns out, the printer is not smart enough, and his knowledge of what kind of paper he has is based on the setting on the printer, and not on any sensor. For people, this is super frustrating — printouts don't look like they should, and there is no obvious way to find out why. And if you had chosen a printer, you would have been forgiven for not thinking about manually setting paper sizes. There is even a standard way to do this - sometimes it must be installed in the driver, and sometimes on the printer itself.
1. Open text Document, page format in which you want to change.

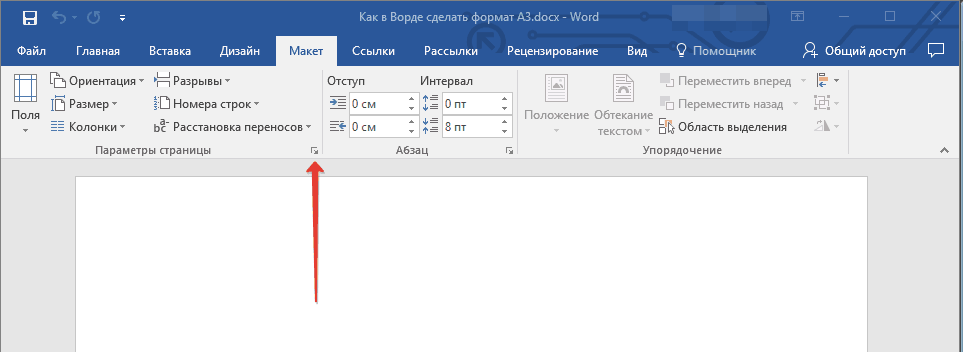
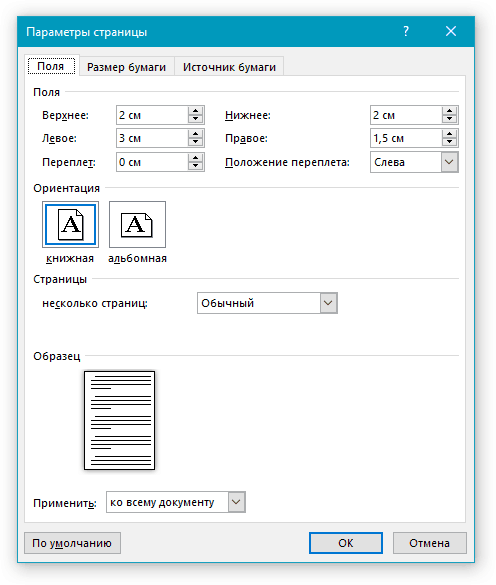
2. Go to tab "Layout" and open the group dialog "Page settings". To do this, click on the small arrow that is in the lower right corner of the group.
And even if you configure it correctly, installing a driver update may result in you deleting carefully selected settings. That is why we are actively working on how to improve the work of the printer with people and learn how we can make printers smarter about how they are configured. But at the same time, if your printouts look a bit "wrong", why not check the paper size settings on your printer?
Stay tuned for new updates! Temporary resizing can only be resized for printing, or you can save the resizing in a document. This option is easily accessible in the print setup dialog box. When the paper size changes, your document is automatically scaled to fit the selected paper size. The computer screen displays the new size and position of the text and other elements of the document.
Note:In Word 2007-2010, the tools needed to change the page format are in the tab "Page layout" in section " Extra options".
When you do this, the size of the document on the screen will change to the legal size, and the text will go to the new size. It shows how the content of the document flows in a new size and how it will look when printed. You have the option to keep a constant resizing of the document or keep the original size.
This paper size is the standard size for documents used throughout the world. Users can select text and images to print on this paper size, making adjustments to the program in which they made the documents. You can customize printers to fit this page size. Open the document or image file to be printed. Choose File, then Open in the program toolbar menu.
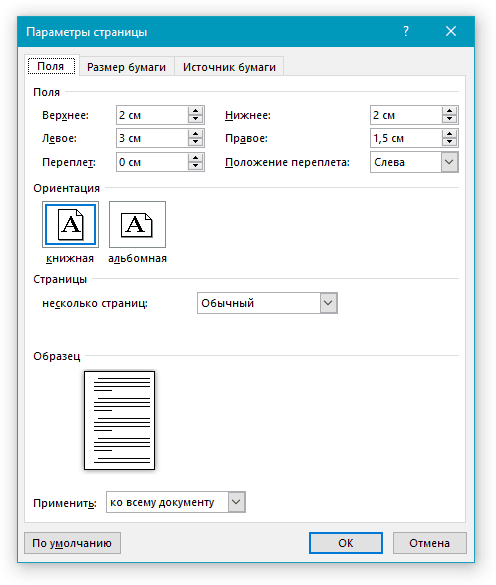
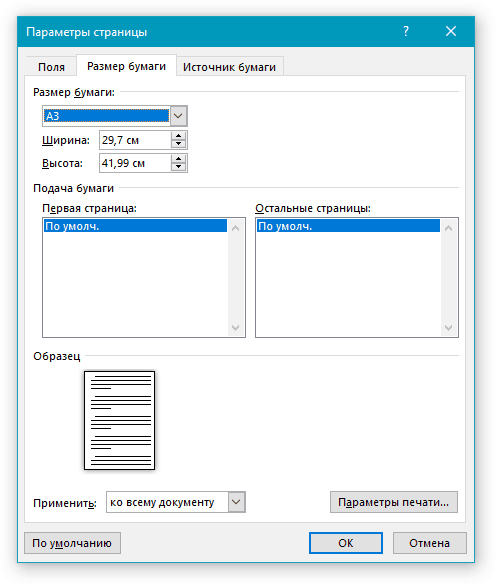
3. In the window that opens, go to the tab “Paper Size”where in the section “Paper Size” select the required format from the dropdown menu.
4. Click "OK"to close the window "Page settings".
Adjust printer settings to print a document on A4 paper. Return to the File menu, then select Page Setup or Printer Settings from the menu list. Go to the “Page Layout” section in the next window and select “Fit to Page” to match the text to the page size.
Move the slider to the top or bottom of the printer's paper feed area to adjust it on A4 paper. This will allow the paper to properly stand in the printer and ensure correct printing without jamming in the rollers. feeder after adjustment. Print the document or image on paper by selecting “File”, then “Print” in the program toolbar menu.
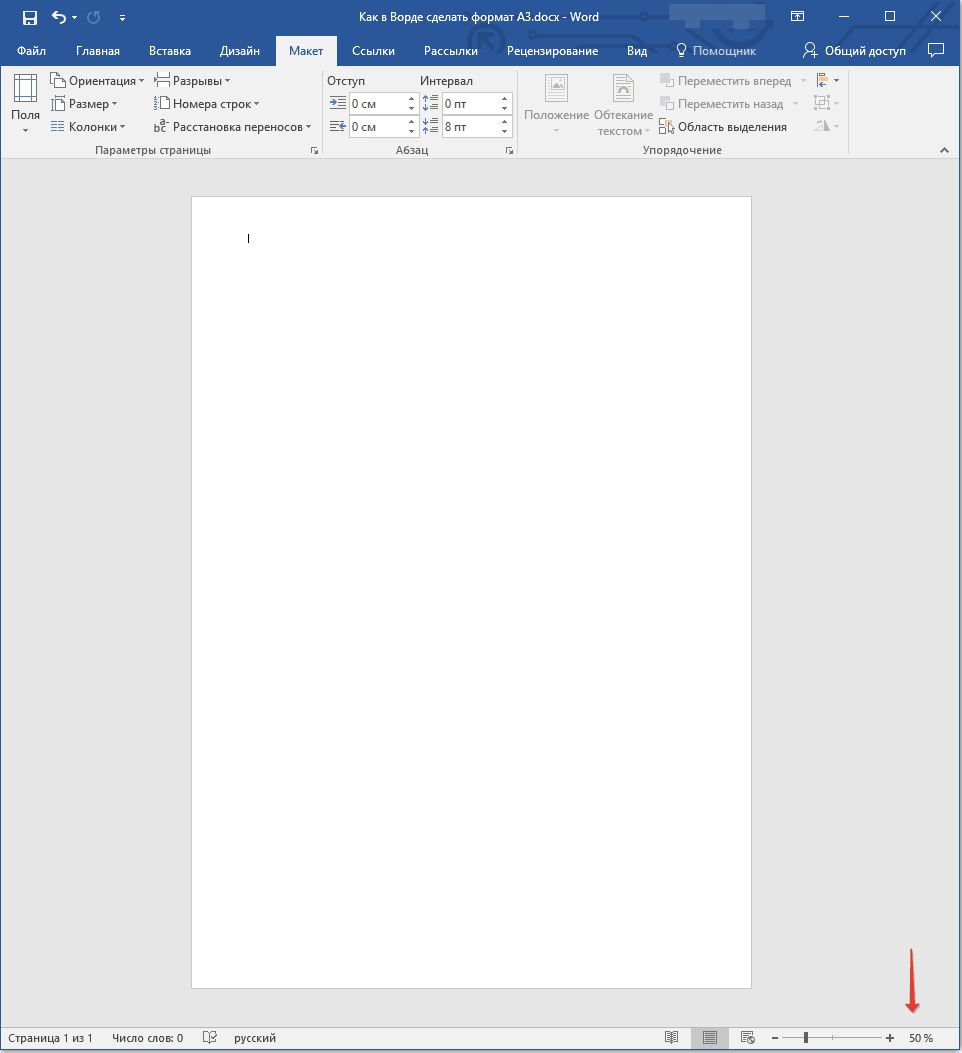
5. The page format will change to your choice. In our case, this is A3, and the page on the screenshot is shown at a scale of 50% relative to the window size of the program itself, since otherwise it simply does not fit.
Manual page format change
In some versions, page formats other than A4 are not available by default, at least until a compatible printer is connected to the system. However, the page size corresponding to a particular format can always be set manually. All you need to do is to know the exact value of the GOST. The latter can be easily learned through search engines, but we decided to simplify your task.
Do you create posters for personal or business use? Note. This will not work for your poster, so you need to change it. In addition, most posters use portrait orientation, but the default slide size is landscape.
From the Slides for Favorite drop-down list, select the size of paper you will use to print the poster. If you see a dialog box asking you to choose a scaling method, you can choose one of them, because your poster does not have content yet.
- The Slide Size dialog box appears.
- In the "Orientation" section, select "Portrait" for the slides, as you see here.
So, the page formats and their exact dimensions in centimeters (width x height):
A0 - 84.1х118.9
A1 - 59.4х84.1
A2 - 42x59.4
A3 - 29.7х42
A4 - 21x29.7
A5 - 14.8x21
And now about how and where to indicate them in the Word:
1. Open the dialog box "Page settings" in the tab "Layout" (or section "Extra options" in the tab "Page layout"if you use old version programs).
You now have a tabula race, a blank sheet. While we are talking about the layout, it's a good idea to sketch out the plan of your poster in advance, using ordinary pencil and paper. When you find something you like, creating a poster will be much easier. Border is not needed, so skip this section if you do not want it.
To add a border, you can use a simple rectangle with a double border.
A distinctive feature of the poster is a large headline at the top. You want to attract the attention of people while they walk. For maximum flexibility, use text fields. Text fields are often not a good idea for a business presentation, but you have to think differently when you create a poster. To insert a text field and create a large title, follow these steps:
2. Go to tab “Paper Size”.
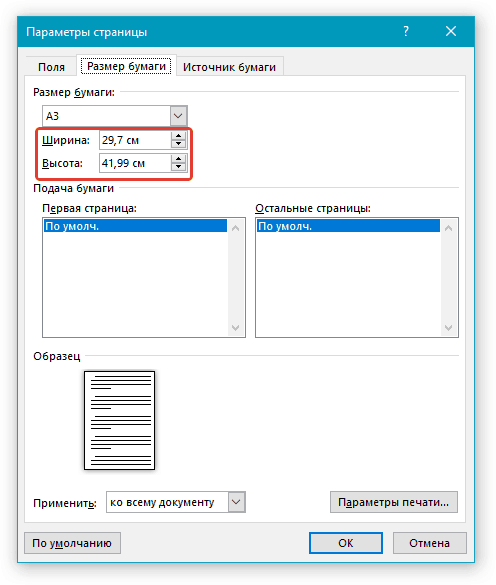
3. Enter the required width and height of the page in the appropriate fields and then click "OK".
Do not worry that the text field does not pay attention to the height when dragging; it will be adjusted when adding text. You will probably make adjustments, so you don’t need to do it again. With the selected text highlighted, select a bright font color in the Font Color drop-down list. Other common options are to make the text bold and center it.
- Start typing text.
- When you're done, drag the text to select it.
- You can see this change when you hover over different sizes.
Greetings to you, readers of my blog. With you in touch, Timur Mustaev. I decided to print a picture consisting of several A4 sheets. And of course I took advantage of the Corel DRAW program in my arsenal, for trimming into several parts, of course, you could use Photoshop, and then print to a printer. But, here I was wondering what methods you can still do this.
Make the text field large: to fit as much text in a line with the largest possible font, you can make the text field larger. A text field can overlap a border because its own border is invisible. Wrap the text where you want: too often you get 1 word on the third line. Or the words are wrapped in a place that looks awkward or even makes the meaning obscure. To add flair, insert text at an angle and use white text on a solid background. Here are the steps.
On the mini toolbar, select a font color that matches the fill color well. Insert a text field and enter text. . You can add a shadow to the text field with a fill to make it look as if it is on top of the rest of the posters.
I started to turn the whole Internet, and it turns out that everything is so simple that everyone can do it without having powerful graphic programs. Today I will share with you how to print a picture on several A4 sheets, and believe me, you can easily do it yourself.
The first thing that is recommended everywhere is image breakdown using the printer property. Yes, the option is good and quite understandable. But the fact is that not everywhere is this function in the properties of the printer. therefore this way we will not consider.
Below is an example of the top of the poster after these steps. It's time to add text that contains more detailed information. Adjust the size by dragging the corner or side handles, but remember that you can make adjustments later. It is difficult to know the correct size until you enter and mark all text. You may have to change the font size. Remember that a poster needs a large print so that people can read it on the bulletin board, but not necessarily as large as you would use for the presentation that you are showing on the screen for a large audience. For a simple list of items, try the “List” category. . Then ungroup it a second time.
For all the way, I will use the same photo.
Paint
And so, the first method in my arsenal is using Paint. Yes, this is the default program in Windows. And so, where to start.
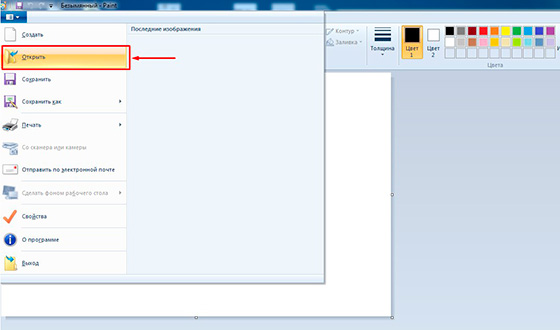
Open the Paint. File — Open
So, if you have created separate objects, such as the 3 windows below, tap 2 of them the way you want them, and then move them to the first place. You will see weak lines showing when the third object is at the same distance as the first two. Here you can see equidistant markers.
Here is a poster up to this point. If possible, find real photographs; they better photos clip. For example, did you last photograph an event? Can you take some photos of people at work? To find photos, follow these steps.
- The "Insert Pictures" dialog box appears.
- In one of the categories, search for the desired image.
- My post ,.
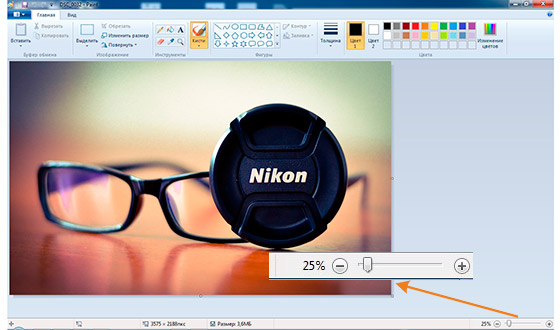
In the menu that opens, choose where your photo is located. We open it. If the photo is of high resolution, then in the editor it will open at 100%. In order to reduce the size, move the slider to the left to get a normal visual size.
Add tear-off strips at the bottom of the poster
Some posters have tear-off strips at the bottom, so people can take a phone number or address with them email. Tear-off strips are typical of personal posters offering something for sale or rent. To add tear-off strips, follow these steps.
You will move and resize, so the exact location does not matter. Enter the content that is required for the tear-off strip. This text may be 12 or 14 points higher. With the text field selected, hover over the green direction indicator and drag it so that the text is sideways. Resize the text field to fit the text and move it along the leftmost page. You will now duplicate the vertical dashed line and text field. Use the arrow keys to move them up and to the right, where the second bar will be. Continue until you have all the tear strips. Make the necessary distance and placement adjustments.
- Start by drawing a horizontal line about 2 inches from the bottom of the poster.
- Go to the Home tab and select the Line icon.
- Select one of the dashed line options as you see on the right.
- Insert a text box next to the slide.
Then open, File – Print – Page settings
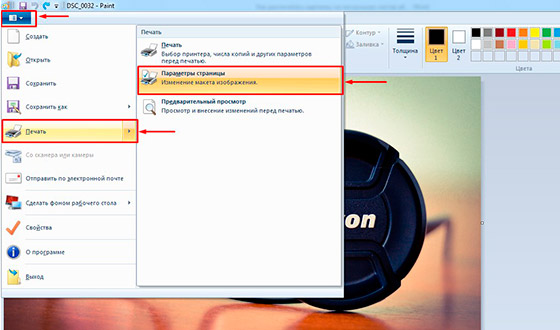
In the menu that appears, set the settings:
- Paper. The size - A4, Giving - Avtovybor.
- Orientation. It is better to put Album. If you want to Book, then please, the picture will not spoil it.
- Fields (mm). Everything can be left unchanged.
- Centering. We put both ticks, Horizontally and Vertically.
- Scale. Here we will stop in more detail. If you want to print a picture, in the original size that it is, then set 100% in the field To install. If you decide that 100% is not enough for you, feel free to bet 200% or more. But remember the main thing: the more you zoom in, the quality of the photo will be worse, as it stretches.
![]()
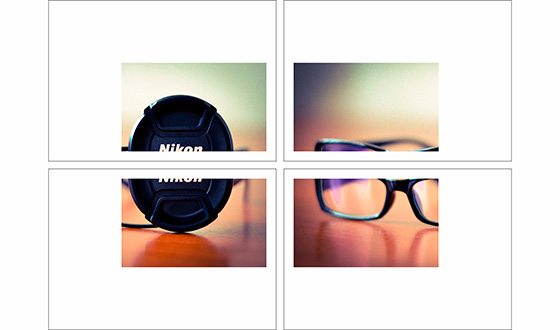
In my case, the original photo was divided into only 4 parts of A4 format, at 100%, for me it seemed a little and set 200%, we see what happened.
Rasterbator.net online service
Everything is simple here. it online service to split and prepare files for printing. At the end you get ready PDF file with broken photos on A4 sizes. The service is free. There is one "BUT" service in English. I think it will not be difficult for you, especially since I will try to describe all the steps in more detail.
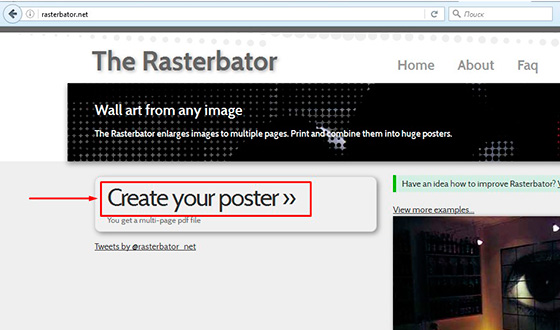
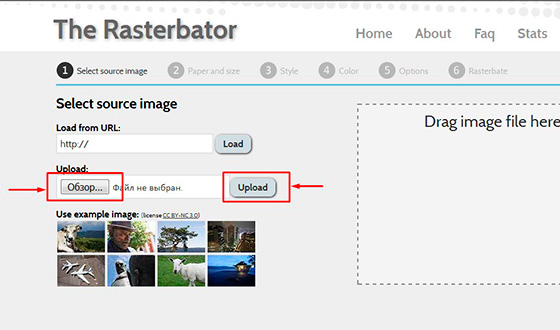
What do we do first? Open the service. In the window that appears, click the left mouse button on Create your poster.
The next step is to choose a photo, which we will divide into parts. In my case, I will use the same photo as in the previous example. And so, I press the button Overview and specify the photo. After click on Upload and wait for the photo to load.
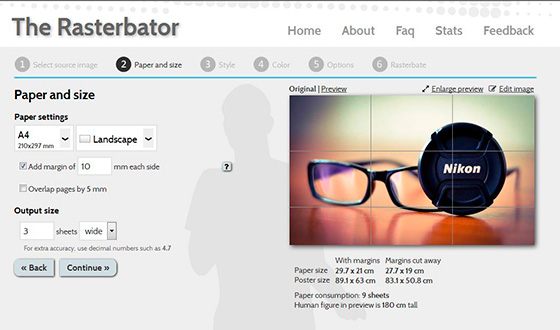
- Paper stings (Paper setting). Here we are interested in the size of A4 paper. And album ( Landscape) location. You can choose the book ( Portrait) option by clicking on the arrow.
- Put a tick Add margin of 10 mm each side. What does this tell us? It's simple, it is indented when printing 10 mm on each side.
- Tick Overlap page by 5 mm do not set.
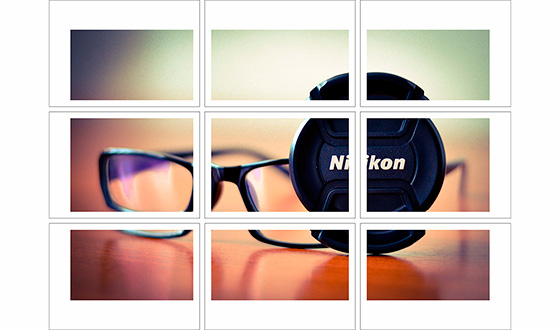
- Output size. It means how many parts the photo will be divided into. In this case, I put 3, it means the breakdown will be 3 × 3, that is, consists of 9 parts.
There is also additional information in the lower right corner. Where indicated, Paper size (Paper size), The size of the finished picture (Poster size), how many sheets will consist of a picture (Paper consumption) and a human figure 180 cm high in the viewer (Human figure in preview is 180 cm tall). What does it mean? See, the silhouette of a man in the middle. This silhouette is 180 cm tall.
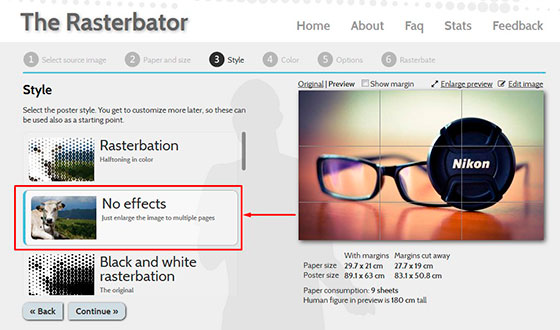
Next step, color ( Color). We set the following settings:
- Raster color set Multicolor
- Background color we expose White
To see how the poster will look framed in a white border 10 mm, which we set at the beginning, tick Show margin.
We press Continue.

In the final step Options is waiting for us, a few settings. So:
- Output choose Enlarge.
- Otherput a tick Crop marksThese are additional marks on the photo that are convenient for cutting after printing. If you do not want to cut off the white border, then do not put a tick. Page position, the order of printing pages. It does not matter, I do not put a tick.
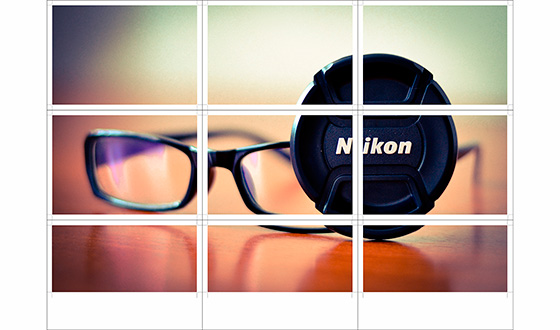
Push Rasterbate 9 pages!
After that, the separation process will start and give you a ready PDF file for saving. If a auto save did not appear, click on click here.

As a result, we received a finished poster, in PDF format for printing, with the title Raasterbation.
On this note, I will say goodbye to you. I hope you found this article helpful. Subscribe to my blog, comment, share with friends.
All the best to you, Timur Mustaev.