How to print a large diagram or poster. Three ways to print multiple photos on one page.
Hello dear readers!
We often need photos for scrap works. smallerthan 10x15. Now I will tell and show you how to place two or more pictures in 10x15 cm format. I do this in several ways in Photoshop. MK is very detailed, designed more for those who are still poorly oriented or have never even worked in this program =) I have to say right away that I have PhotoshopCS 5.1 (Russified). So I will write all the commands in Russian, and if you have a program in English, then I think it will be clear where to go by the screenshots.
First, open the photos you want. It is possible one by one, but I have several at once, it is more convenient for me. On the menu File - Open. Choose a photo from desired folder (if several - then we clamp Ctrl ).
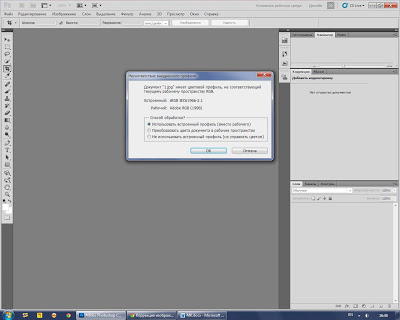
If such windows pop up - click OK.))
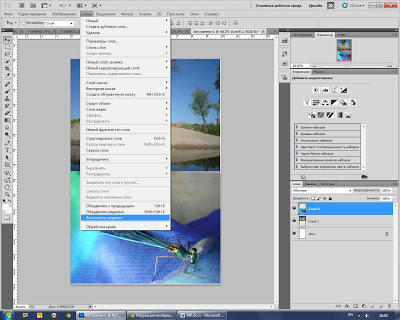
Method number 1 (the easiest).
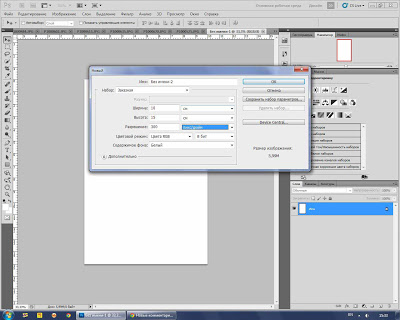
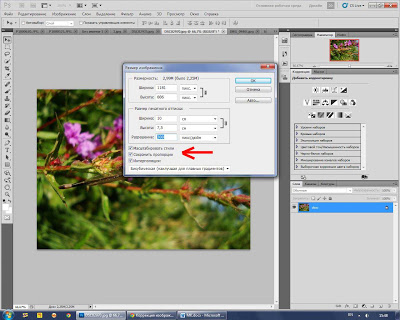
Create a new document. Choose from the menu File - Create. Suppose we need to place two horizontal photos. In the parameters you need to set Width - 10and Height - 15. Check that the units are - cm. Resolution set - 300 ppi. Everything, we press OK.
Now we need to move one of our open images onto this blank sheet;) Click on the tab with a photo, hover the cursor (there must be an arrow icon - this is tool "move"), hold down the left mouse button and drag up (where all the tabs are) to a new document that has already been created.
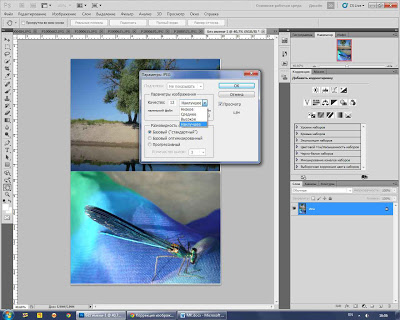
That's how it should look when you move. “Something is wrong!” - you will think.))) And now we need to complete the “focus” - reduce the photo to the size we need!
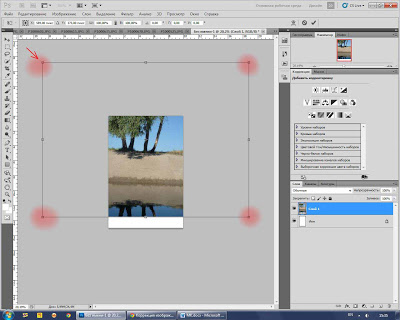
Push the magic shortcut Ctrl + T (note: all the letters on the English keyboard layout, if someone does not know :) This frame appears - this is the outline of our image. And it remains to “grab” for any of the upper corners (red in the photo), while holding down the left mouse button and the Shift (to maintain proportions) and pull, reducing the size to fit. Have achieved the desired - click Enter!
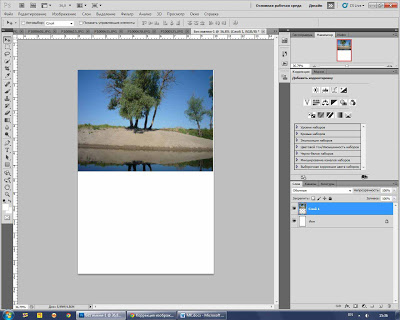
That's what should work. If a small gap remains - nothing terrible, there is less than a millimeter.
Then we transfer another photo in a way we already know, and also reduce it.


Now we need to combine all that we conjured up =) Layers - Flatten. Save to the right place ( File - Save As ...), choosing the desired quality (for printing - 12 is the bestfor publications in networks it is possible and less).
In a similar way, you can place 4 images in 10x15 format.
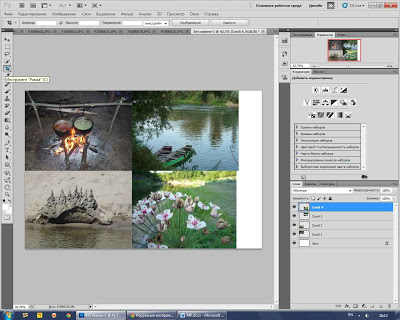

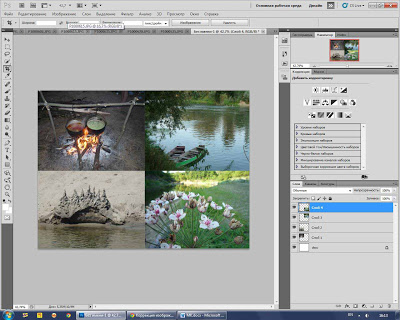
We also reduce layers and save.
But there is another method of placing 2 photos! It is more suitable for high-quality photos.
Method number 2 (more difficult ... though, how to look;)
Suppose we again need to place 2 photos horizontally. Open the desired photo. Turn the photo. On the menu: Image - Image rotation - 90 degrees ...

Then choose Image - Image size. In field Width set 10 cm, Height will appear automatically - 7.5 cm. Resolution 300 ppi. And check to see the checkboxes on the options below.
Then choose in the menu Image - Canvas Size. We set the necessary sizes. Width - 10 cm, Height - 15 cm. AT location put the upper middle square.

Sometimes there is a need to print a diagram or poster on a large format. Well, if it is A3 format. You can use an A3 format printer or a copier with a magnification. And if it is A2, A1, or “non-format” in general?
When I was a student, I printed large format drawings and posters using the Visio software. We must pay tribute, the program regularly performed its functions until it was bought by Microsoft. I continued to use it, despite the cumbersome, until I knew a great alternative - Splan.
Splan makes it easy and convenient to draw diagrams and all sorts of plans without any problems. If you remember, I also drew a plan in Visio, and even uploaded files for general downloading, for example - in the article about.
I also used Vizio to prepare illustrations for a blog - for example, for articles and.
So, I usually printed large posters in parts on several A4 formats using Visio. But since I switched to Splan (about a year ago), it has become much faster, easier and more convenient to print large circuits. And the usual A4 format is also simple and predictable.
Examples of using Splan in my blog can be viewed and downloaded, for example, in the article approximation and pro. I agree, not the best samples. computer graphicsbut it is done in a couple of minutes.
And large posters can be taken from the article on Safety Posters, and.
How to print large format in Splan
By large format, I mean all formats larger than standard A4. These are А3 (А4х2), А2 (А3х2), А1 (А2х2), А0 (А1х2).
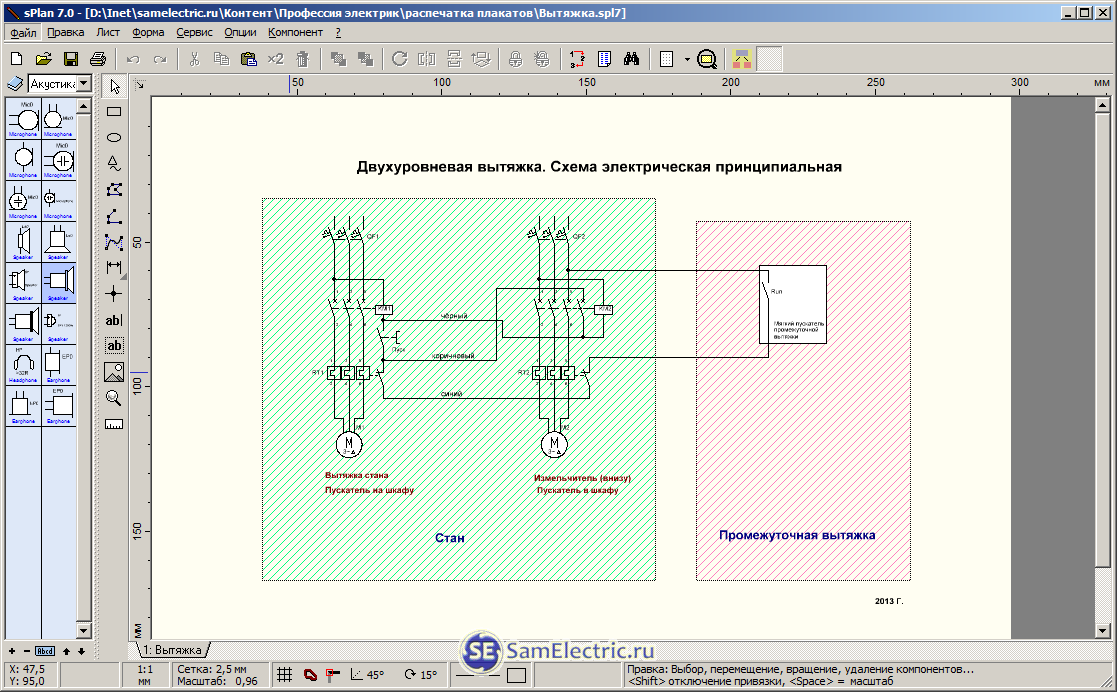
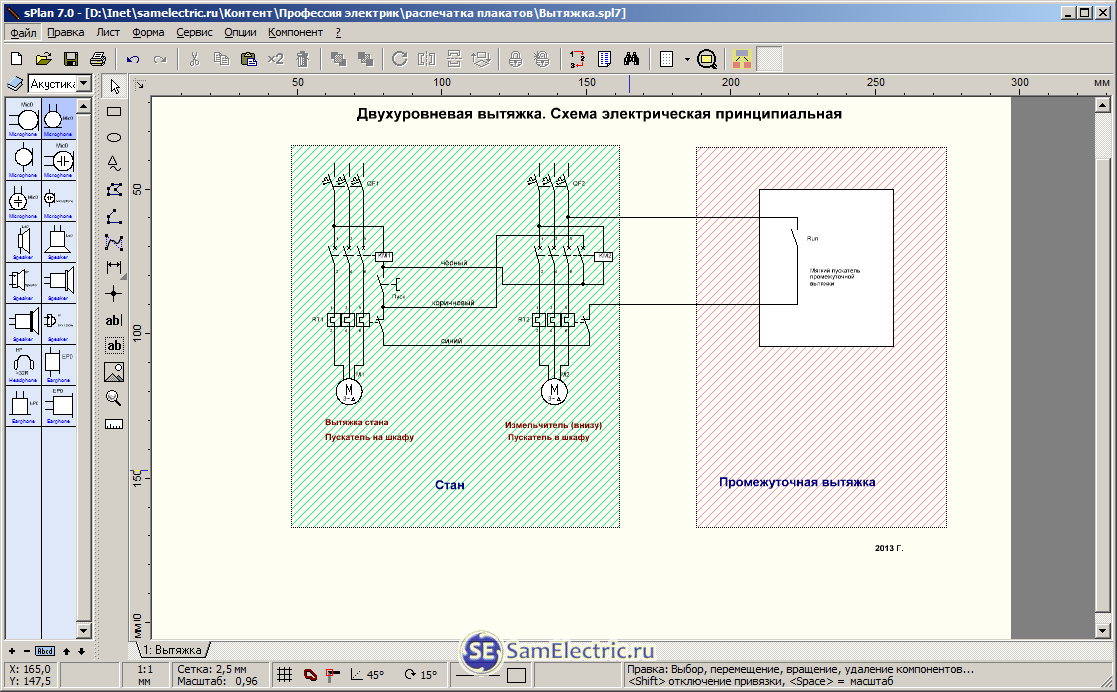
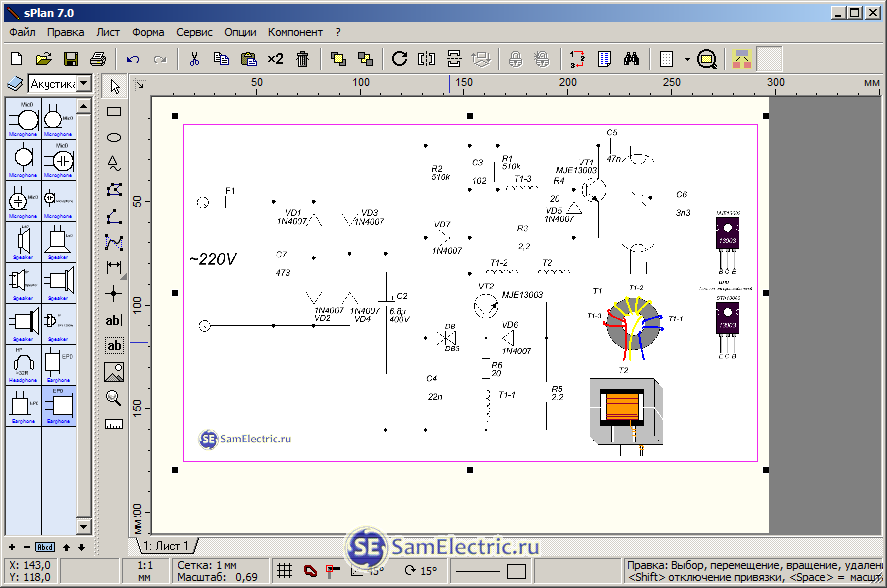
I will give an example of how I now print large-format schemes in the performance of my engineering duties. I can’t lay out real schemes for the purpose of confidentiality, but I found such a schema for example, which is given in the title of the article.
The circuit really works.
Open the scheme in Splan7.0:
Check in the properties of the format of our sheet. This is not necessary, the basic settings will be in the print window.
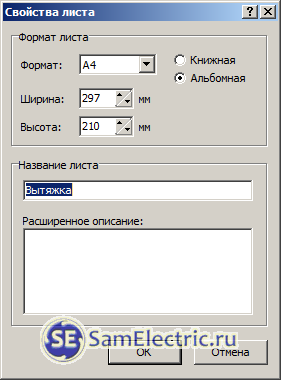
If the scheme does not fit in width or height, you can change the values in this window. Then the format will change from A4 to “Own”. And then when printing to fit the whole scheme on one or several A4. About it further.
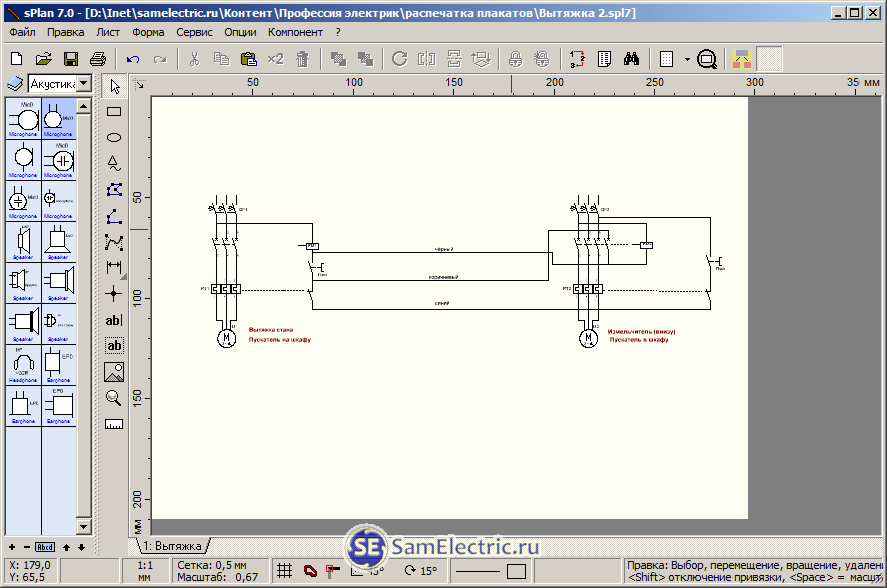
Just in case, what our scheme will look like if we set the format of A2 sheet:
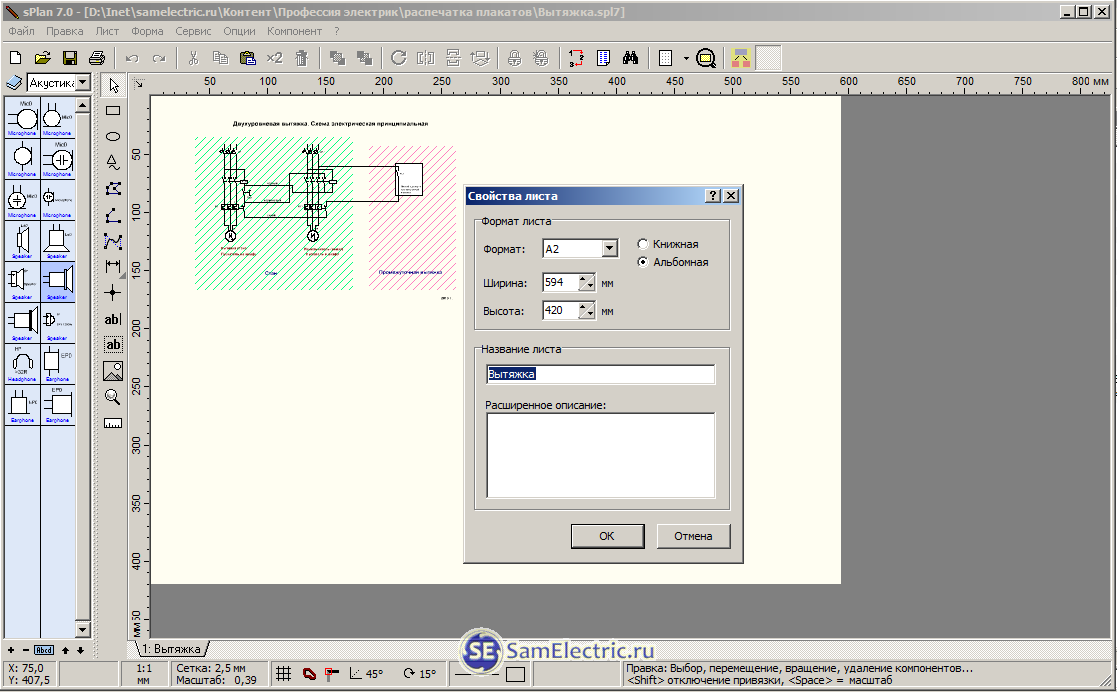
The drawing area increases, but again, we change the print settings later.
If we now stretch the scheme with “graphical” methods, then later it will be possible to print this sheet to a larger number of sheets, and accordingly, to a larger final size.
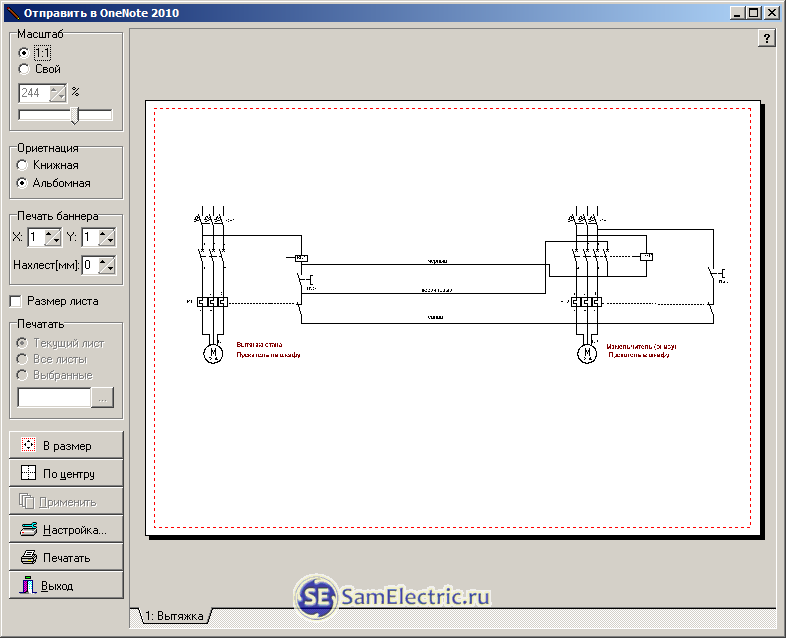
Let's go back to A4, and open the print window. Real printer on this computer not installed, but essentially it does not change.

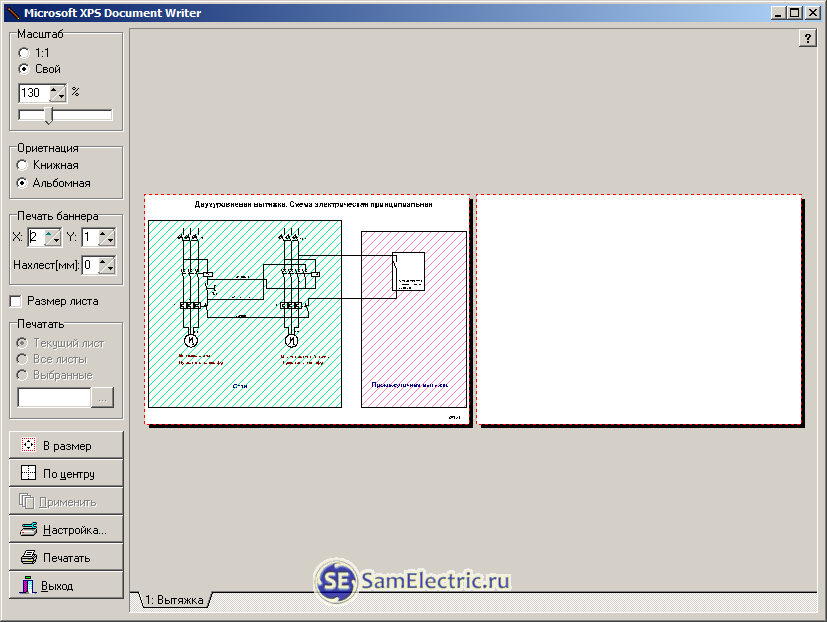
Pay attention to the field Scale. If you leave 1: 1, then the scheme may be either too small, or climb out of the sheet. In this case, lucky - almost what we need.
Push button In size, the scheme occupies the entire usable space, only the fields remain. There is no way to get rid of the margins, this is a physical limitation of the printer.
Maybe it will be interesting:

Field Scale changed, now it is automatically established 130%.
The fields are too small, you can set the scale slightly less, for example 125%. The maximum increase is up to 400%. If this is not enough, it is necessary to increase the original size by “graphical” methods, and put the format is not A4, but more. I am writing about this about the 2nd figure, where I put A2 format for testing.
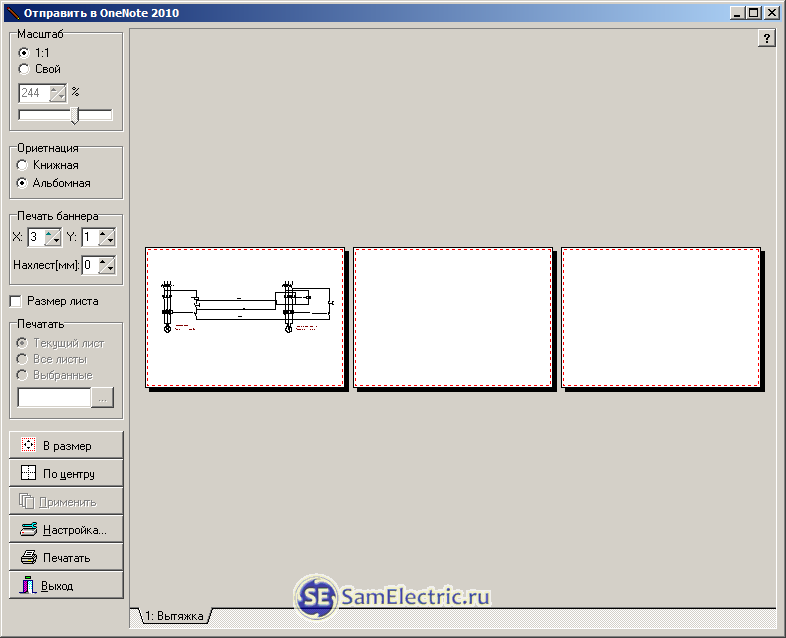
Now we act in the field Banner printing. Set X = 2 - the number of A4 sheets horizontally, and Y = 1 - vertically.
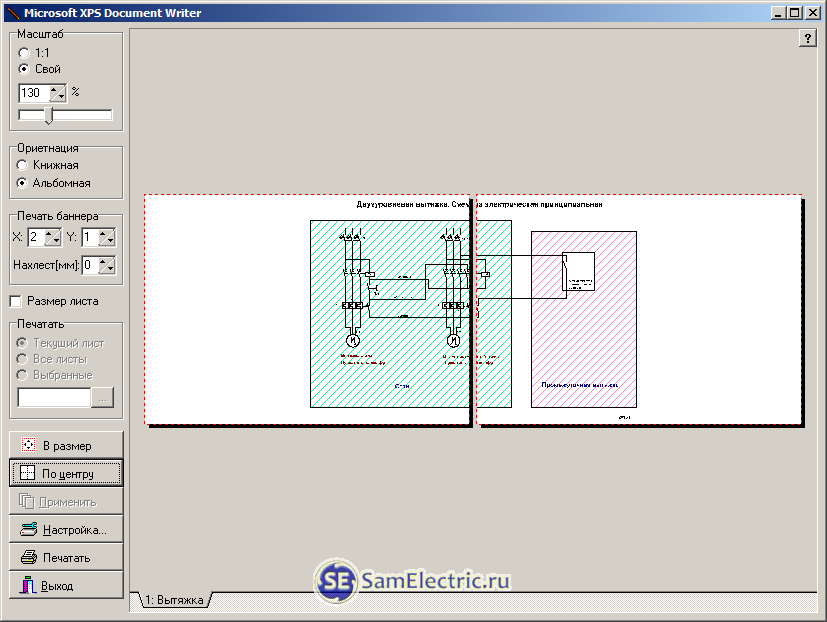
We put the format 4x4, this is A2. Push Centered in size:
Now you can easily grab the scheme with the mouse, drag it around the sheets, and change the scale by turning the mouse wheel, or by changing the percentages in the field Own Scale. At Visio, one can only dream of such comforts.
We manually shift the scheme so that it is in the center of our poster, or click Centered. Everything can be printed.
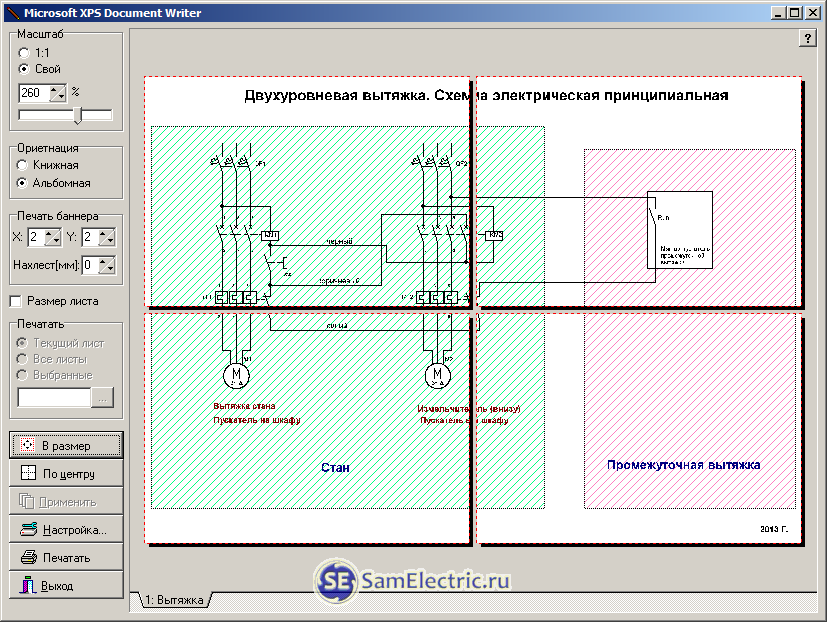
But what turns out does not always suit me. The fact is that later, when gluing together several A4 sheets in a large format, unsuccessful places are obtained at the joints, when many lines are “cut” along the junction. Worst of all, when it is not a line, but any curves.
Below, I placed the scheme not in the center, but slightly to the left, so that only two horizontal lines would be cut. If placed automatically, Centered, then a large vertical section will cut the power supply circuit of the second engine, and that is ugly. And it will be much more difficult to glue together.

But still, it does not suit me.
We must strive for the ideal, but remember that it is unattainable. Need to be able to complete things, otherwise you can lick things up to infinity.
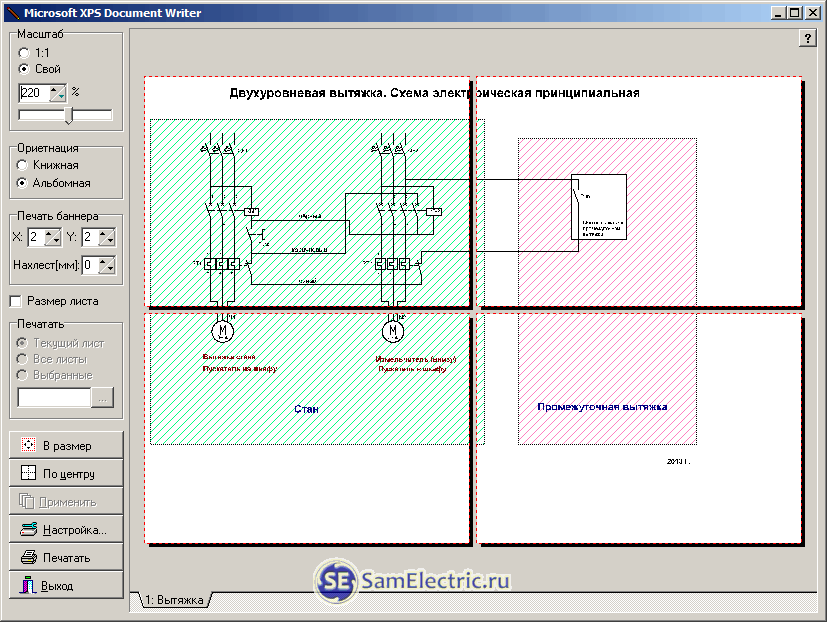
The fact is that the circuit is skewed (shifted) to the left, on the right sheet there is actually one switch. In addition, the word "electric" is ugly cut. Therefore, we turn to the editing mode, and adjust the scheme so that it fits nicely on the large format, taking into account the cuts.
This is what we get in the print window:

See the difference from picture 10? If you do not see, try to print, and then glue the option in Figure 10, and in Figure 12. What is it like? What does it look like? And if this is a diploma defense, any trifle is important, and in the commission is such a meticulous person like me?
Of course, norm control will not miss such a scheme, but the article is not about that.
By the way, the hatching could also be removed.
Now printed sheets need to be cut from one edge and glued together with glue. Or cut so as to glue it together with adhesive tape. Good luck and patience!
Tips for easy pasting large formats. The size of the fields can be set in the printer settings ( Setting up ...), you can also experiment with Overlaid. Glue better together.
Printing a non-format size of several A4 sheets
Recently, I had to print a scheme that I scanned and glued into Photoshop. The scheme was, like a long tablecloth, of 8 or 10 A4 pages portrait orientation. I want to show how Splan easily copes with this task.
To do this, we redo the previous scheme like this:
In the print window, the scheme will be as follows:
On 3 sheets A4:
We increase and optimize the location. Use only the mouse, drag and twist the wheel.

Everything, we print and neatly glue.
Printing large pictures on multiple sheets
How is the picture different from the previous schemes? The scheme made in Splan is a vector format, it can be stretched as much as you like without loss of quality. But the picture with an increase of more than 100% - is divided into pixels. Therefore, when printing a picture or a large-format photo, you must initially take care of its size in pixels.
Suppose that we need to print a large image, such as a photo, on a large format. Splan understands only graphic files of the * .bmp and * .jpg formats. But this is quite enough; to convert graphic formats is not a problem.
The * .jpg format is used for photographs, that is, for real-life images. But if you have graphics - a plan, scheme, drawing, in which there are few shades and half-tones - then it is better to use the format * .gif. The best middle ground is * .png format. A format that doesn't care what the picture is * .bmp, it does not process anything at all, but the file size is the largest.
In this case, I will use * .bmp, since this is a scheme. I did not go far behind the scheme, I took a scheme from about energy-saving lamps.

This is 100%. I already wrote that it is necessary to initially have a large image size. Here - 100% barely fits on a quarter of A4. With the increase of the image will spread to the pixels. But maybe it is not scary if it is not considered close.
Stretch:
Part of the scheme is “lost”, but in this moment in viewing there is a scale of 69% (in the status bar below), if you put more than 100%, it will be normal.
And this is how the scheme will look like when printing it on a 5x4 A4 format:

It would be possible to increase the scale of more than 400%, but the program does not allow it. And in order to increase it, it is necessary to build it up at the stage of Figure 18. Or, in the page properties, choose not A4, but A3. I wrote about it above.
How to print multiple images on a single A4 sheet
Indeed, sometimes there is an inverse problem - on A4 sheet print out pictures (diagrams, etc.) of two, three, etc. files.
That is, reduce them so that they fit on page A4.
This can also be done in Splan, but there it is necessary to manually reduce and arrange each picture, which is not always convenient. Although you can.
To print several pictures on A4 paper, I use the ACDSee program.
I used to use it for viewing graphics, now I switched to a much more convenient, functional and free - Fast Stone Image Viewer.
So, select the files in ACDSee, we need to print. Push Print (Ctrl + P).
In the window that appears, select the option Index-print.
She used to be called Thumbnail printingor something like that.
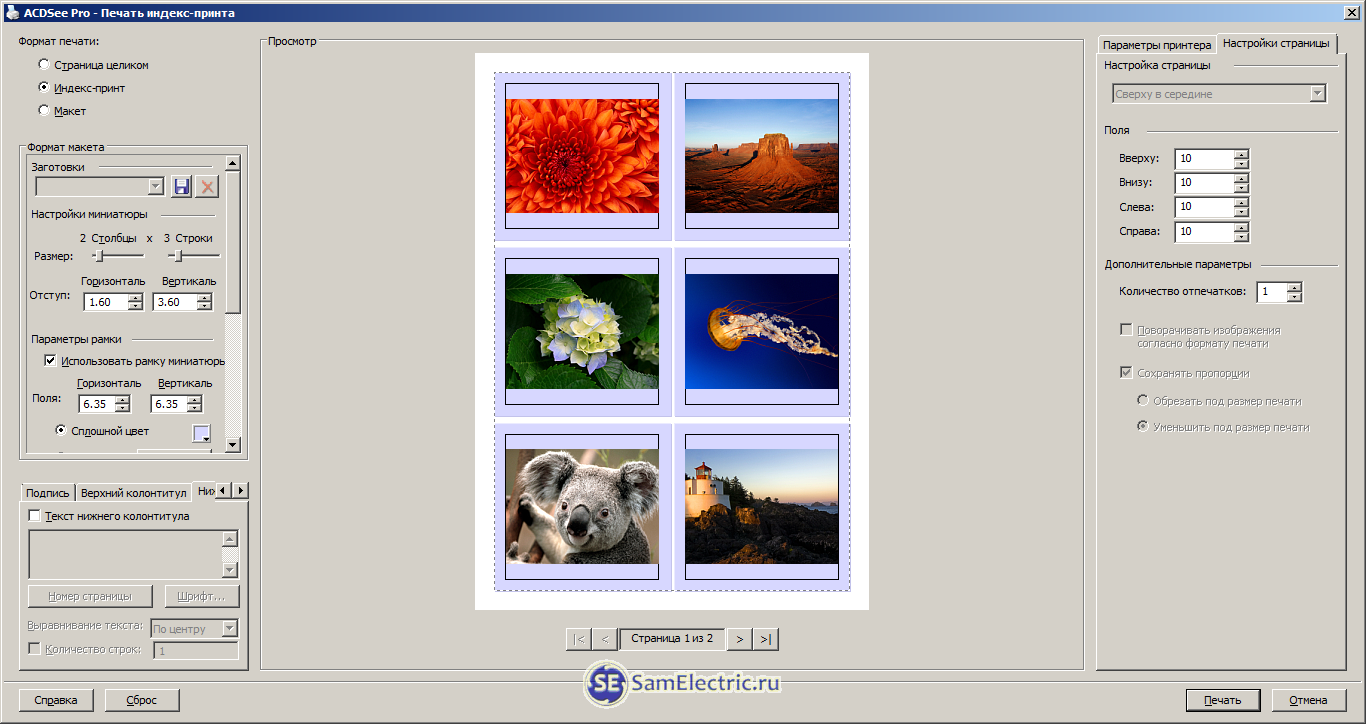
Print miniatures - a few pictures on A4 sheet
Now, in the Thumbnail Settings field, select the number of columns and rows in which our miniatures are located.
Adjust the distance between pictures (indent), frame, and other parameters in the Layout Format field. We set the fields in the page settings (on the right), and you can print!
Download files
As usual, I post files on the topic of the article. And as usual, everything is downloaded freely.
/ Examples for an article on SamElectric. Files for the article, rar, 68.12 kB, downloaded: 527 times. /
/ The program is unprofessional, but very convenient in quick and simple drawing of schemes. The archive contains Russian help, component libraries, installation file, viewer, description file. Does not require an activation key, works immediately after installation., Rar, 3.55 MB, downloaded: 7051 times. /
If you want to make a collage or print a photo for memory with a few pictures of friends, family. Nevertheless, the collage looks better on one page if you print several photos immediately on one sheet of paper. Few people know how to print multiple photos on one page. If you also do not know, do not worry.
It is not so difficult to reduce the size of photos to fit them on one page, to set the correct color scheme so that the collage looks attractive. In continuation, we leave you a list of three methods that will help you to print a collage easily.
For more information on printing, there are other methods, such as using a processor. Microsoft Wordviewing images or using the cloud. You can do this from the website that we describe below.
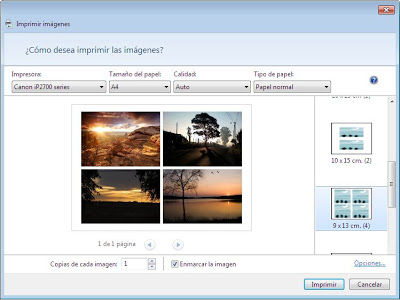
The first way to print multiple photos on one page is using programs for viewing windows images that is very simple. First, find all the photos you want to print, and place them in one folder, preferably on your desktop. see image below ...
When you select photos, the option for working with images is activated in the folder at the top of the window. In this case, you will see that you can print the images, and click the Print button.
A window will open in which you will see the images we have selected and some other parameters. You can change the print settings if you want. In the right part of the window that opens, select the fifth option from top to bottom.
In this case, we see four images on one page. You can choose other available options: you can insert up to 35 images into one page. Click Continue and the printer immediately prints a page with four photos on one page. See image below
 |
Another easy way to print images is with Microsoft Office PowerPoint. This program is widely used for word processing on Windows computers. It costs about $ 200 on average, although in fact almost everyone buys it for free.
The fact is that this program belongs to well-known Microsoft Office programs from Windows. In combination with other programs, this is Microsoft’s best selling product after Windows and most often used among office workers, after a similar free version Open Office.
Printing multiple images on one page with this program is quite simple. If you made a slide, it will be easy to put several images together and print them. Just open the program (depending on the version of the operating system opens in different ways). We will try to give a general explanation of the process.
After opening the program in the upper left part of the window click on the button Insert. AT different versions This option is in the FILE menu, Insert Photo. I am now using the 2007 version. Click as above, select the photo along the route where the photo is located. Insert images into a word processor, it is possible that they appear slightly distorted. Give them the right size and position with the mouse.
After the collage is ready, you need to print the resulting page. Go to the File menu in the upper right corner and click Print. Then a print window will appear in which you can select print properties. see drawing ...
Information:
Visit vKontakte group . Professional humor and useful information. Regular publications on 1C and other interesting topics.
I'll show you now universal way to print posters on a regular A4 printer. The method of printing large posters described here is perfect not only for Microsoft Word, but also for any program from which to print. Print a poster from A4 sheets is very simple!
By the way, along with this page about printing posters from Word, an article about printing letters in A4 size is also very popular on the site. So I recommend to solve two problems at once.
I also note that if you do not have a printer at home, but you still want to print a poster, you will be helped to print to a file.
The result of printing a poster from A4 sheets using Word
Many have a regular printer, but as a rule, large-format plotters are available only in specialized firms dealing with printing. The cost of such equipment compared to a conventional A4 printer is quite large, so it makes no sense to keep it at home. Let's use a regular printer to print a large poster from A4 sheets.
The photo shows the result on A4 sheets. The printer is normal. Do not pay attention to the typo in the picture - I just don’t want to correct it :) Now I will show how all this is done using the example of printing a poster with a picture from MS Word.
Note: printer settings for different printers are different, but the principles remain the same! In addition, here I will show the poster print on the example of a picture, but the same applies to text just typed in Word.
The example given in this article is far from the only one.
If you want to learn how to work well in Word, then you should definitely watch video tutorials that show other ways to solve this and other problems in the most effective way.
We start printing a poster from A4 sheets
First of all, you need to prepare a regular Word document. I inserted a picture into it, but it was possible to print the text. Go to the menu "File / Print". I use Word from the Ribbon type menu.

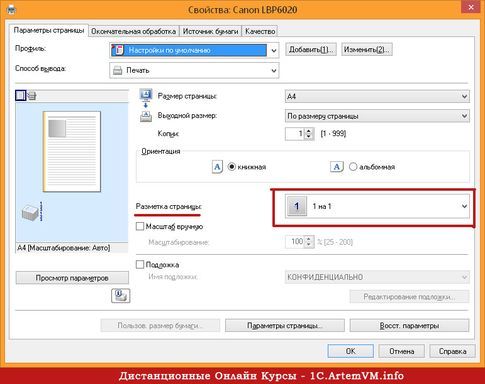
First of all, select the desired printer - the one on which you will print a poster. This is important because to convert a regular document into a poster from A4 sheets, we will use the appropriate function of the printer. You should not be afraid, since the function of printing posters is almost (!) In any printer. Open properties your his printer and see something like the window shown below. Of course, you may be a little different.
The meaning of the method of printing posters from A4 sheets shown by me is based precisely on the use of printer propertiesand not Word itself or another program. The fact is that in this case the printer driver itself will divide the document into parts and increase them, which saves you from having to do it manually. Of all the ways to print posters at home, this one is the easiest.
To print your document as a poster from A4 sheets, you need to find the item responsible for this feature in the printer properties. I give an example for my printer.
![]()
After selecting the size of the poster you need, you only need to save the settings, and then click the print button in Word. The size of the poster is indicated in A4 sheets on the principle X * Y. In the given example, this is a poster of 3 * 3 sheets of A4. You can see the print result in the very first picture.
There was an important part of the article, but without JavaScript it is not visible!
Feature of printing posters from A4 sheets
If you print text that scales easily, then, in principle, you can print a poster consisting of any number of A4 sheets that allows you to select your printer.
If you are printing a picture, then its original size should be quite large. Otherwise, you risk getting a poster of poor quality.
After printing a poster, you will need to take scissors and trim the printed fields to connect the parts of the poster (A4 sheets) into one. Do not attempt to print without borders! As I wrote earlier in one of the previous articles, when printing without borders you can lose part of the document - it simply will not be printed.
Video Tutorial for printing a Word document as a poster from separate A4 sheets
The most simple printout option is shown. large poster using the built-in driver capabilities. The presence of such a function directly depends on the printer used!

Let's sum up
One of the main principles that guide my training courses is that the main thing is to understand the essence and not just to learn something! If you can not do something in one way, then there is always another! In this case, instead of looking for how to print a poster in Word from A4 sheets, I suggest simply using the universal poster printing function built into the printer. It is much more efficient and allows you to print large posters on ordinary A4 sheets from virtually any program.