Framework for registration of the title page in Word. How to make a beautiful frame in the Word
Good day, dear readers site!
The time has come when the ability to work as a package Microsoft Office and in particular in word it became as much a necessity as reading and writing. Consider one of the many questions to work with this wonderful program and learn how to make a frame in the word that will make the text more beautiful.
In this article we will work in Microsoft Office 2013.
How to make a beautiful frame in the Word
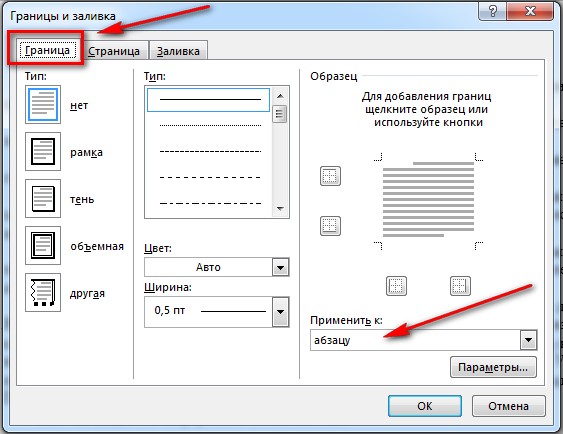
First of all, open the Word 2013 document with the text in which you need to make the appropriate changes. Go to the tab Design.
![]()
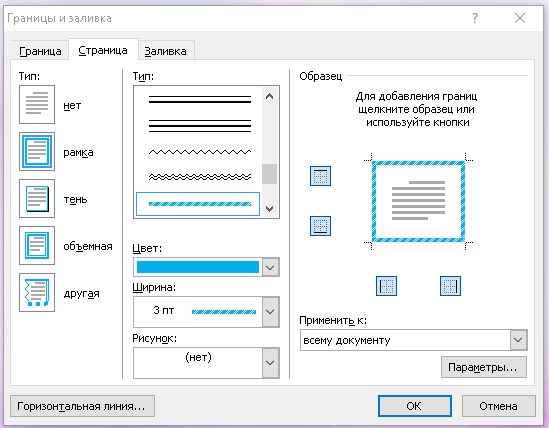
After that in the upper right corner click on the icon Page borders. Window opens Borders and Shading. There is a lot of any settings here, at first we will do everything simply - let's learn how to make a frame for the entire text of the page.
Choose a type Frame, then install Apply to the whole document (if you want to apply to the whole document) and click OK.
Now we start to pervert and make a more beautiful version (especially since there are a lot of settings - choose the taste and color).

Now we will improve. Let's make a color stroke of the paragraph. We do everything in the same way: open the document, go to the bookmark Design. We put the cursor on the paragraph that we want to issue. In the window that opens, go to the tab The border.
Notice the bottom right corner, where it is shown that all changes will be applied to the paragraph. On this tab you can choose.
- no - there will be no frame;
- frame;
- shadow;
- volumetric;
- another.
Please note that all changes are immediately visible on the scheme on the right. Choose Frame. Select the type (click on the appropriate icon with the mouse)

Choose a color. For this in the section Colour, click on the small triangle. In the menu that opens, click on the mouse and select the color we want (for example, red).
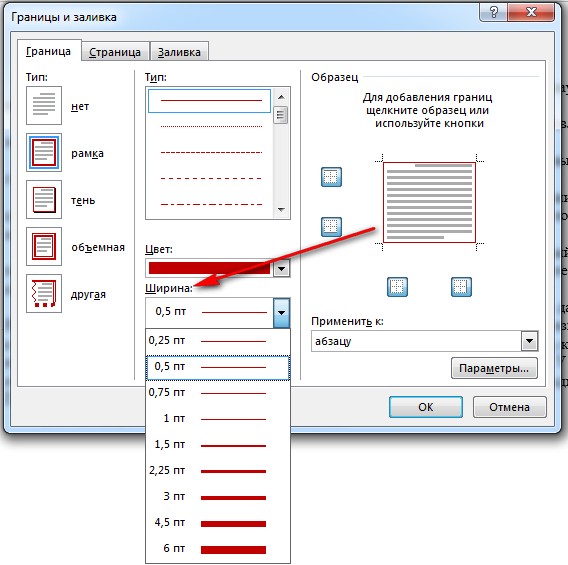
In section Width choose the size in points. For this in the section Widthclick the mouse on the appropriate item. We look at the changes on the right. if everything suits us, then we press the button OK.

That's all where the cursor was, there was a beautiful paragraph stroke.
And what is needed in order to do all this not to a single paragraph, but to several? To do this, select the text we need.
![]()
Again on the tab Design click icon Borders pages.Go to the tab The border and push type Frame. 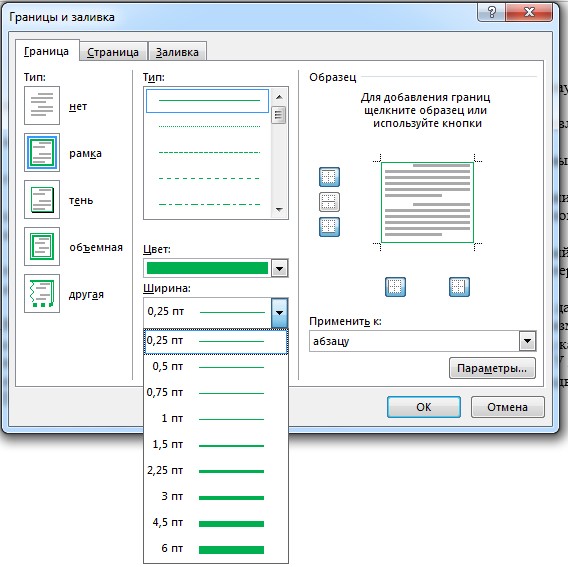
Choose a color and width and press the button ABOUTTO.

All these actions can be viewed on video.
In word there are many tools with which you can properly and beautifully arrange your documents. Moreover, a well-designed document design will say a lot about who composed it. For example, you do not quite know how to make a frame in the Word, In Word 2007, a frame can be applied when creating a report or writing a letter, a table, and it can also be used by applying it to a single paragraph or to the whole page.
The knowledge that how to make beautiful frame , you will be useful in the preparation of a term paper, essay, or thesis.
You can decorate the frame in "borders and fills
3. In the window that appears, there are 3 tabs at the top: “border”, “page”, “fill”.

Here we select the line type and frame design.
Paragraph frame
Now we will directly begin to get acquainted with how to make a frame in the Word. Suppose we need to frame only a paragraph. We select it with the left mouse button and select the “Borders” tab. In the first column, select the frame type: with a shadow or with a volume and click on the selected view. In the second column, select the type of line with which the frame will be drawn, and also click on the selected type of line. The third column shows the sample, what will be the frame around the paragraph. You can also choose a color for the line. Below asked "apply to the paragraph"? If your paragraph is initially selected, the frame will be on it. If you did not select the paragraph you want, then the frame will be on the last.
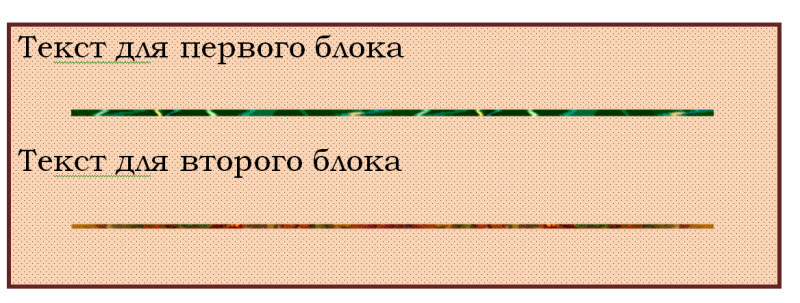
The third tab of this window is called “fill”. With this function you can add any color to the inner surface of the frame. You can also choose a beautiful pattern and use the background for the pattern. If there are different blocks in the text in the frame, you can use the original horizontal lines, for example:
The frame in the Word can be issued as
And you can do this: In this window, in the first column, press the “frame”, select the line shape, fill and pattern to it. Then you start typing in it, and the frame, along with the specified color and line shape, will increase as the text increases.
Pay attention to the indents from the printed text. If you make the frame larger, it will be more effective. Click "OK".
Frame for course full page.
Now let's get acquainted with how to make a frame in the Word on the whole page. Again we go - “lower border” - “borders and fills”. Now we enter the second tab "page". In the first column, click on the "frame", you can "with a shadow" or "with the volume." In the second column, select the line type of the frame and click on it. Also choose the color and indents from the text. Use the "apply" button. Please note that this frame can be applied to all pages or only to one. It is possible to choose. Also click "OK".
How to get a ready-made frame for coursework and essay, explained in this video.
The Word text editor is so flexible that if you wish, you can create an advertisement booklet in it, and even a beautiful one. And with the help of tools and drawing you can make greeting cards and not complex collages. It would be a desire and imagination, and in the same Word you can create business cards, letters, and even colorful electronic ones. Many use the Word only as a text editor, and nothing more, but it suffices to add a frame and the same simple text document will become much more interesting and attractive.
How to add a frame to the document, I will show you with an example text editor Microsoft Word 2010. Whoever has the old Word version 2003 installed on the computer can read this. And starting from version 2007 you can follow this article.
Click the tab Page layoutand select a tool called Page borders.
If you want to make a frame only to a specific paragraph or block with text, it is better to go to the tab The border.

If you need a frame for the whole sheet or even a document, then stay on the tab Page. The process of creating a frame for a specific paragraph, block or whole page is exactly the same.
Choose Type of future frame lines Colour, Width and how to apply it (to the whole sheet or only to a paragraph).
In the field where a sample of your future frame is shown, squares are placed on the left and bottom, clicking on which you can add or remove the side and upper and lower bounds.
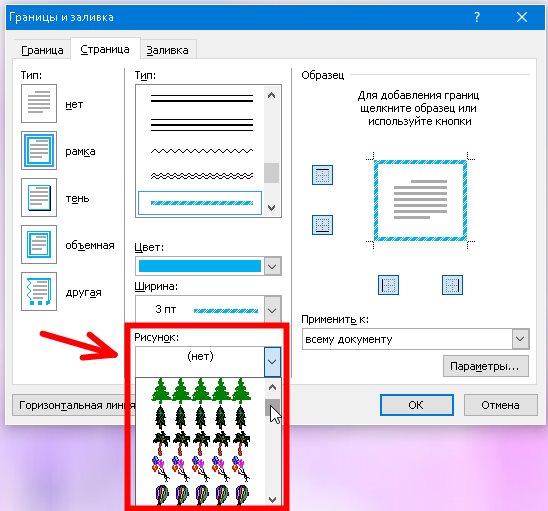
Tab Page there is another interesting feature Picture. If you click on the side of the little black arrow, then a drop-down list will appear with small drawings of Christmas trees, hearts, apples, etc. Select a drawing and see what you get.
There is an interesting button at the bottom left. Horizontal line, with which you can in the right place of the document to make a beautiful dividing line. The main thing before creating it to put the cursor in the place where it should be.

Well, here we have considered another tool for our creativity. I hope that the framework will be useful to you more than once in your work.
Microsoft Word 2007 has several options for inserting a frame into a document. For example, you can use it as a background image or add a custom design for a photo inserted in a document. Another option is to use its square shape as a general background. To understand how to insert a frame in Word 2007, you must examine the menu on the main page at the top of the document and find all these options.
Method number 1 - the most common
- You can insert it as an image pre-installed in MS Word. Click on the "Insert" tab at the top of the page, and then click the "Picture" button. Select the frame type in the search field that opens during the previous step. Select the desired frame by double-clicking it.
- Open the photo editing tools to place a frame around the photo in the document by double clicking on the photo. At the top you can see several frames to choose from. Click on the one you want to paste around the photo. Change the frame color by clicking on “Image Borders” and selecting the desired value.
- Insert the lines that define the shape of the frame using the Shapes tool located on the Insert tab. Click the Forms button to see a selection of options that can be used as a base. Click on the form of your choice to insert it into the document. As you can see, this method makes it quite easy to make a frame in Word 2007.
Method number 2 - the fastest
You can add a frame using the Tools panel. quick access».
- Open Word Options from the Office button and select Settings.
- Find the "All Commands" item in the "Select commands from the menu" section. Here you can select a frame, and after you click OK, the document will be updated.
Method number 3 - how to insert a frame in the "Word 2007" in the format of a web page

- Select the New tab under the Office button to create a separate document. Click the New Border button above the button on the shortcut bar. The page will be split horizontally. Grab the cursor separator and move it up to create a narrow top frame.
- Click right click mouse at the top to edit the properties of the resulting file. Change the name and enter the properties of the border on a special tab. Click "OK". This way How to insert a frame in the "Word 2007", is most often used to design the logo and menu of the site.
Method number 4 - frame in the text
Despite the fact that the above instructions are intended for the version of "Word 2007", it can be used in any release of the program. The only thing that needs to be taken into account is the location and the name of the menu items, which may have differences.
In order to make a frame in Word 2003, it is necessary highlight page by clicking on it.
A window with the same name appears. In it, go to the second tab, " Page"Where choose the right options for the frame. 
Here you can set colour and thickness lines. The buttons on the right indicate which sides of the sheet will be framed. In the list Type of" can choose form lines - double, solid, or dashed. " Picture»Allows you to set the frame with one of the repeating pattern patterns.
To move the frame relative to the borders of the sheet, you need to click on the " Options" at right bottom corner. 
Frames in Word 2007, 10, 13
Since 2007, the program interface has changed significantly. Now to create a frame you need to find in top bar section " Page layout"And click on" Page borders». 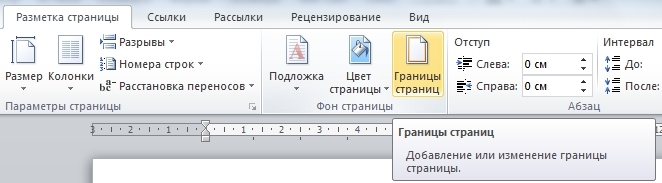
Starting with the 2013 version, this button has been moved to the “ Design».
The appeared window does not differ from its previous versions. It displays all available options: type, color and width of the line, the possibility of registration of a recurring pattern, and the sides on which the frame will be displayed. 
Beautiful frame from a picture
The framing of a document can be made not only by means intended for this directly, but also by images, which makes it possible to significantly diversify the design of the document.
To do this, you need to download the desired image of a suitable format. The larger the picture will be, the clearer and more beautiful it will turn out when printing.
Next you need to insert downloaded image on the sheet. This can be done in the menu " Insert"By selecting" Picture" or simply dragging file in the program window. 
After that you will need highlight image by clicking, and clicking on it with the right mouse button select “ Size and position»From the context menu. 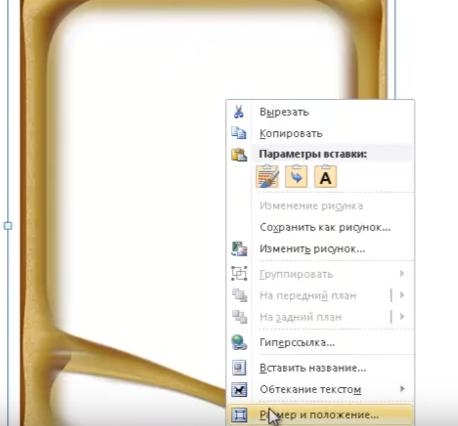
In the pop-up window go to the section " Text wrapping"And select" behind the text». 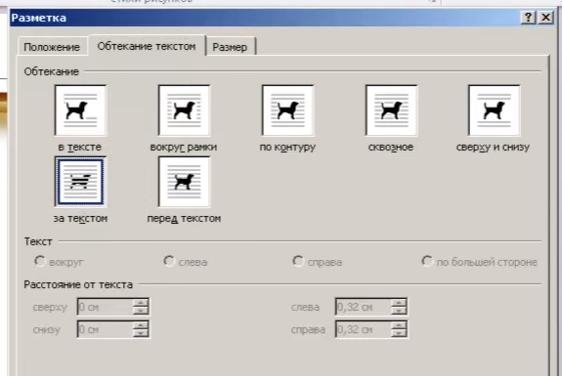
Now the image will not overlap the typed text and will remain on in the background. In addition, it is not tied to the edges of the sheet, and can move freely to the very edges.
If the picture does not fit in size, it can to stretch for the appeared "corners". The points in the corners change the size while preserving the proportions, and on the sides they stretch vertically or horizontally.