We paint a button. How to paint a button in Photoshop.
Wait, friends! Today we work beautiful button for the site in photoshop. A lesson in folding, but at the same time, many aspects of the work of a web designer were destroyed, which means that you can create similar buttons and icons for your sites without much effort. I’m guessing that similar lessons have already been used, but at the same time I’m poring over the same topic and looking at other ways.
Go to the photo ball 1 and drag the mouse and move the photo to the left instead fluffy lines between the top heading and the leading site. The image may be buti, like in the regions, covered in wimpy lines. In order to see too many photographs that are vikorated to gum without sharp edges, the tool can be installed on top panel tools, yakі mi themselves activated by pressing on the gum. We will try to erase and marvel at the quality of what we can reach rіznih nalashtuvannyah tool.
Images of smears in the regions to the wispy lines, the stink of children is like a cordon. At the very left edge of the image, select the tool of the great gum and the great boundary. To create a gradient effect, so that the buti is spent. The whole procedure is also zastosovuyutsya to another photo now activating pressing on the "eye" the ball on the palette of balls. Then we move the photographs one to one and for the same time moving at our own place, so that we can create a collage from these photographs together.
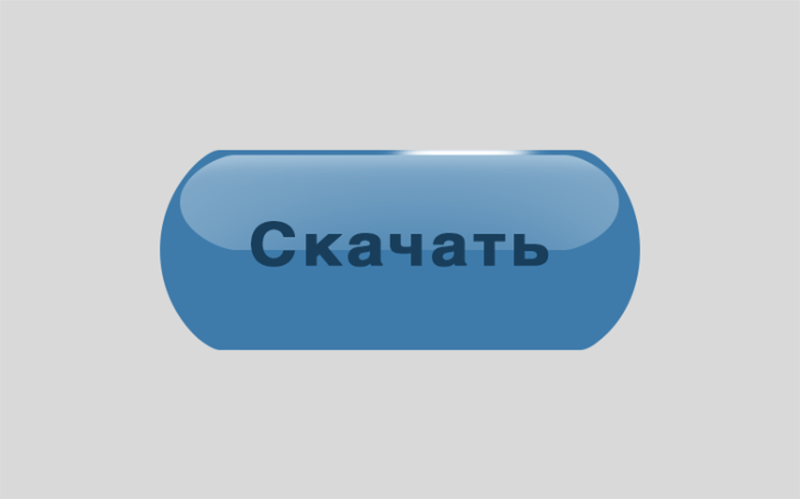
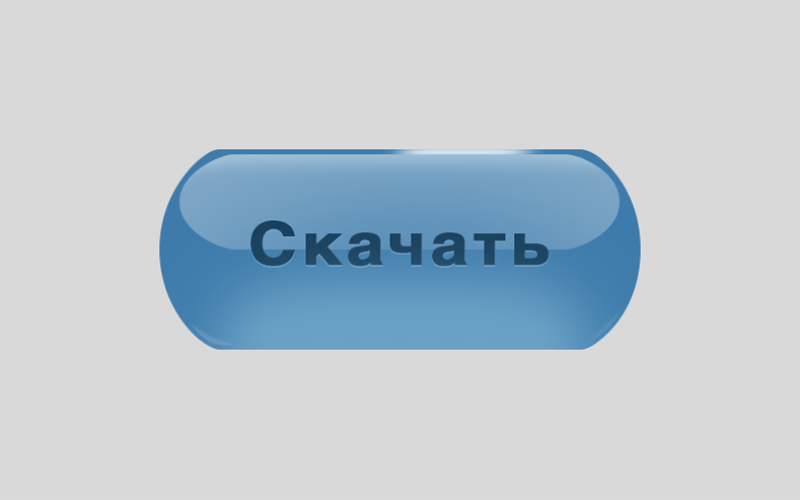
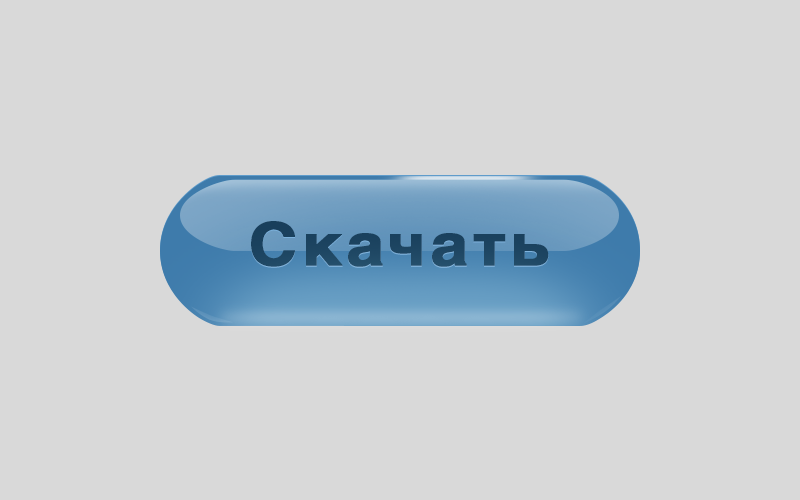
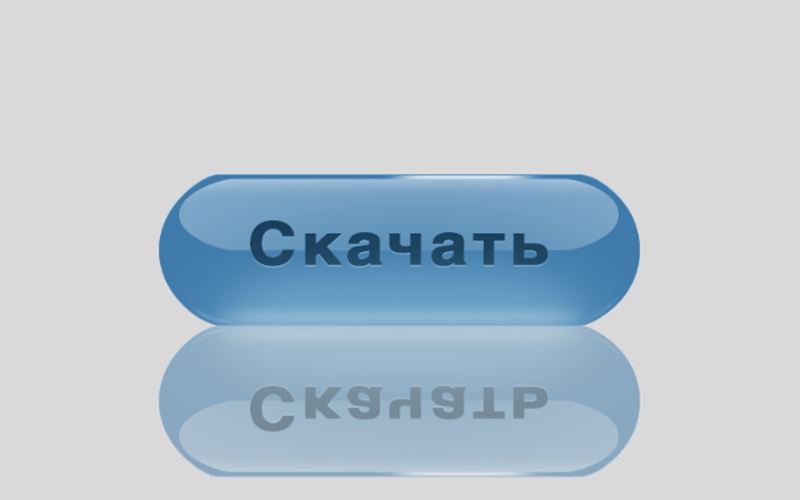
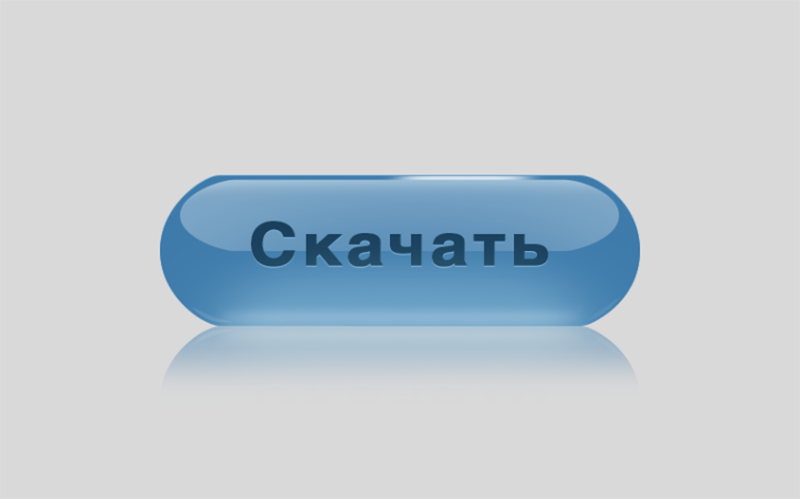
The axis is out, that glossy button itself, as we take it into account in the result:
And now open Photoshop and get ready to work!
nice button for website
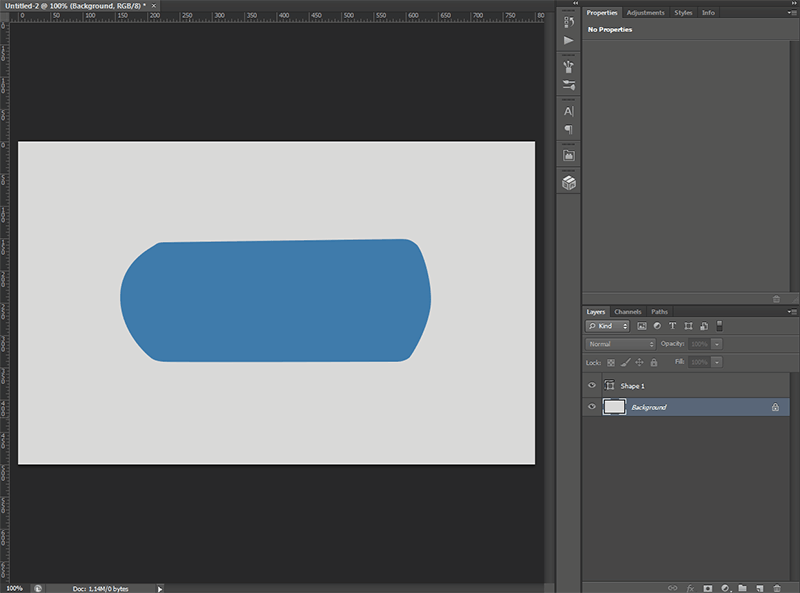
Create a new document with a size of 800×500px.
On the back it is necessary to set the shape of the possible button. Tsim i let's get busy. I’ll tell you once again - I’m going to make a folding path for the creation of forms at this school. If you don’t want to practice with the Pen Tool (pen tool), otherwise for you it’s still easy to go straight to section 2, there will be readings of the simplest way.
Like who has more photos, you can win a bunch of photographs and turn your head around. We created a headline and removed the logo and the web address, for example, description. Obviously, rewrite the text ball on the balls panel, which is actually the placement of the text balls in the set of balls.
For this set of balls, create one text ball in this way, to which we write the website address. The order of balls in a set of text does not matter. The order of the balls is more important than the task basis. Narazi we create a decorative motif over the name. Go to the palette of balls, to install the balls to the foundation and re-create for us already, a new empty ball and name the theme and drag it over all the balls in this set. Set the tools to choose the color of the rooms in the foreground, and then on the same palette of tools, click on the other shape.
Well, I divided 1 for those who want to learn something new.
Section 1. Create the shape of a button using the Pen Tool
Let's get ahead of ourselves, as if there are pluses in the Pen Tool method. Nasampered, the bendiness of the folded form. You can "drink" everything you want. Naturally, tools like the Rectangle Tool (rectangle tool) do not allow you to do this, so you will use standard buttons.
Available forms to choose from the upper toolbar on the stage and try to paint on the working table by dragging the cursor behind the additional left mouse button. We choose a size proportional to the title of the magazine. Go to the toolbar of the tools for moving and put the logo on the motif.
For a subtle shadow effect of a decorative little thing, we'll go to the balls panel here and click on the Add style to the ball icon and add the shadow effect. Set up yoga again and again, we can make a lot of money. In this manner, we have completed part of the site - the headline and today's shaping of the first part of our site. At the next part, we are already trying to create a body of presentation and show you more basic effects. For a little more inspiration, you can look at this post, or you can immediately get a contract for a redesign or new design your site.
1. Otzhe, dosit balachki. Let's get started. Take the Pen Tool (Feather) and create approximately the following figure:
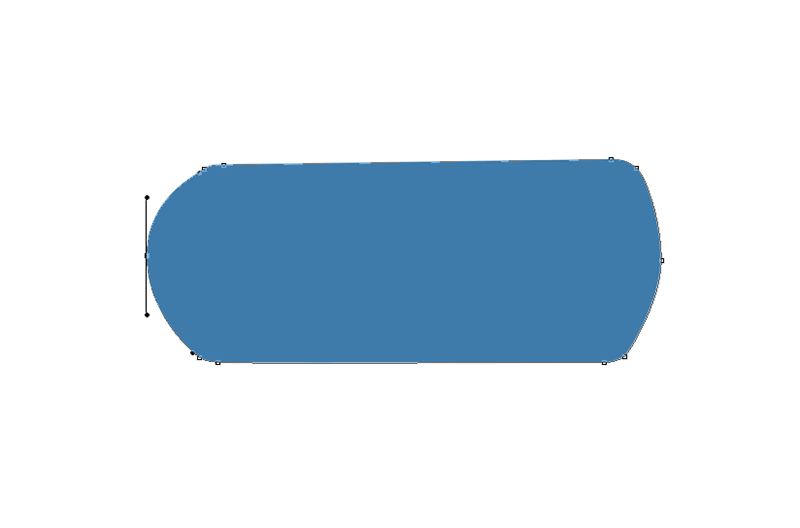
2. The shape of our button turned out to be somewhat curved and approximate. At the same time, we are pushing even more important topics - a robot with direct ones. The guides also help the robotic designer. Behind them, you can easily see the guard. At once you yourself will understand everything. For the cob, it is better to fill the background with a color that looks like white. Let it be siri (#d9d9d9). Take the Paint Bucket Tool (Fill) and drop it on the Background ball, then fill it with the selected color:
In our buds, it’s easy to finish an article that is easy to think of, in practice, in Photoshop, we could assign an effect that often wins, and it looks completely realistic. In some parts of the graphic arts, it is possible to do more well. In the first part, we prepare an image, to which we are "more sloppy" to zasosuvat.
If we ask you to unite an invisible ball, then let it be so. Now we have a picture, ready to create an effect. Let’s create “inflated folds” so that we will beat the instrument of inflation, spreading at the left panel. At the right panel, choose the size and vice of the penzle track. Rosemary penzlya set to dosit high, mi razmezhuvatimemo rozmir "better slope".
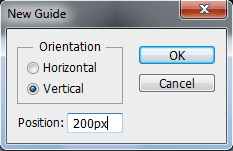
3. OK, now let's install it directly, and then we'll correct the shape of the button. To install directly, go to the menu View (View) -\u003e New Guide (New Directly). Check the box Vertical (Vertical) and enter the value 200px:
Follow the vice, we are overwhelmed like that. If we have created a working tool and a mouse to move the window forward revision dialogue window. For improvement, it is still possible to vikoristovuvat Vtyaguvannya, roztashovanu on the left panel above the inflation. Now we take it to create the body's magnifying glass. In the toolbar, go to the Elliptical Image Selector Tool to create a round frame around the curvature of the larger fold of the larger fold. Area, then you can highlight the keys with the arrows on the keyboard to move the cursor to the right, or the same for the required area fine lashing yoga camp.
Like a bachite, it appeared directly in the position of 200px in front of the left edge of the canvas. If you press the Ctrl + H keys at once, you will directly click. Repeatedly pushing this one, turn straight back.

5. Install another guide at Vertical 600px:

Move to the pallet ball and then duplicate the ball, in which the whole working hour will create a mask. It's just the panel, press the Add mask button. In this rank, we only bachimed that part of the image, as it was earlier seen by oval visions. The results of our zusil can be downloaded here.
This will be a button to avenge a light smog. At the first stage, you need to create the main form of the button. Select tool rounded rectangle, enter 3 pixels on the upper bar and create a rectangle. The result may look like this.
6. You need 4 more lines in the positions Vertical 160 and 640px, as well as Horizontal 150 and 350px. Guilty to go something like this:

7. The hour has come to change the form. For which one choose Direct Selection Tool (Direction of vision):

Now we are to blame for shattering the ball, for which the roundings of the roundings have a rectangle. Tse to create a new ball, to avenge the whole rectangle. We still need a small rectangle. Re-wrap the tool of a rounded rectangle, set the radius at 10 pixels and create yogo - you can look the same way, as in the offensive image, but without a choice, which is discussed in the offensive paragraph.
You are guilty of creating a vision, as shown on the stepping little one. Now we can see the ball out of the red rectangle, we don’t need more wine. Press the "Vidality" key, a small rectangle will appear, but the choice will be lost. You know the choice, and the result can look the same, like on any little one. The main form of the button is the vikonan, and we can use the colors. At the window "Shari" click right button miss the ball for the help of a rectangle and choose the parameters of the shift. Set these settings here.
And then we spiral on the grid, practice with the form. If you don’t stick directly, add boldly. Guides can also be added from the line (click for help Ctrl+R). For whom to press lines on the risk and how to fight straight from it. For an hour of work, for transparency, zoom in on the scale and zoom in on the canvas (Ctrl + number of bears).
The colors of the transition are trohi folded. For offensive crochet, we need to increase the scale a little, so we need to take 300% from the navigator's window. At the next stage, we create 4 thin lines. Therefore wrap the “Line” tool, set the color to 1 pixel, and color to white. Create 4 rows on a straight cut so that the stench looks like this.
A row of leather can create your own ball of power. For these small horizontals, set the otopling to 30%, then 50% for the right vertical line and 100% for the left vertical line. After the creation of all rows, we can create an offensive choice. You can read the entire rectangle. Now select the "Electric Select" tool and at the top of the toolbar, set the sum at 0 pixels and enter "Type" as seen from the view - the third evil icon. Now there is nothing that would disturb the creation of our choice.
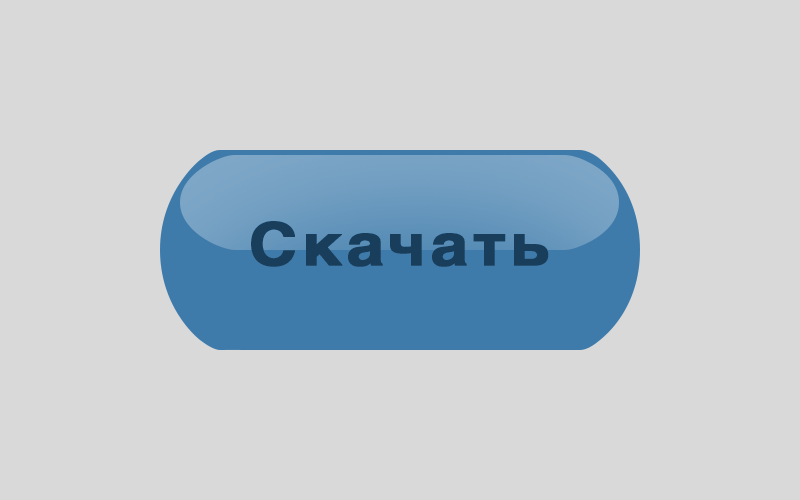
Otzhe, may be such a blank for a possible beautiful button:

Like a bachite, I had a chance to add another sprat directly. The form is ready, you can collapse further.
Section 2. The shape of the button is simple.
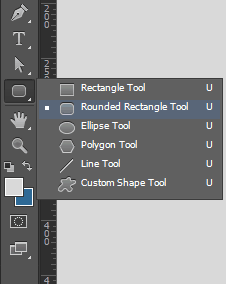
8. Let's get started, let's create a button shape in just 20 seconds. Choose the Rounded Rectangle Tool:
We do yoga, as shown in the little one. Select the "Fill" tool and fill the ball with a white color, as shown in the little one. The button is now filled with half black, which is not aesthetically pleasing. Place the mask into the ball using the white part of the button. Insert the mask, pressing on the white stake icon on the dark rectangle, which is at the bottom of the ball. After the transition, change the amount of coverage up to 30%. If everything looks like this, as shown below, we can crush the offensive rock.
In today's article for you, we have a special help for the creation of a professional logo in the house. Everything is written piece by piece, including illustrative butts. Anyway, you can work without any cost with our instructions. I’m also a practical handyman, so we can show you how to create the perfect logo easily and quickly. Inserting a logo or a watermark on a photograph is a common practice today. The logo, after the photo, may change the function.
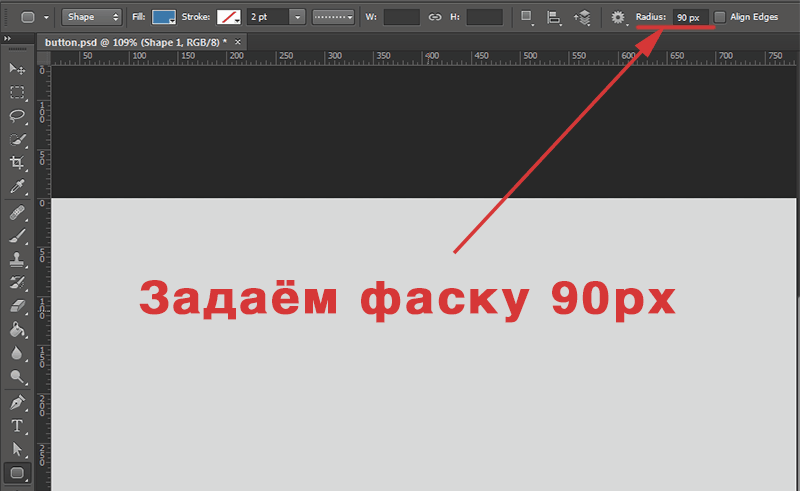
Set the chamfer radius to 90px:
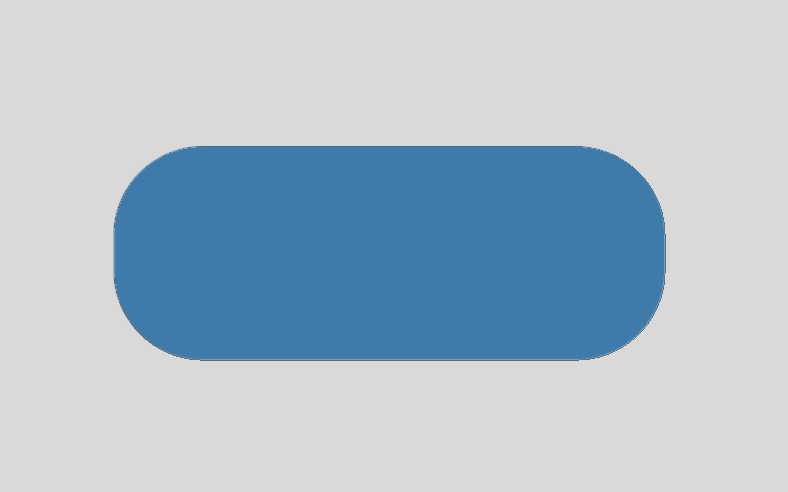
Everything, the form is ready
Section 3. Glazed button
9. Axis of m and d was the creation of the effects themselves for the button. It doesn't matter, in what way you created the basis of the button (form) - the principle here is the same. Let's put some text on the button. Create a new ball (Shift + Ctrl + N) and write any text:
- Protects a photo from an unauthorized link.
- Marketing encourages the author of photography.
- Prozory, bo mi don't want, schob logo maw white background for example
- And in the upcoming instructions, we will show you how to work.
Why talk about those who background, which does not appear on the image taken away. Let's create a logo with raster graphics; For example, we chose to make it too small, but the logo could be insufficient for advertising leaflets, for example. Now we can create a logo for the created image. To that simplicity has beauty, and there is nothing else wrong. Porada: font size, font, style and other power of the font are installed on the top toolbar.
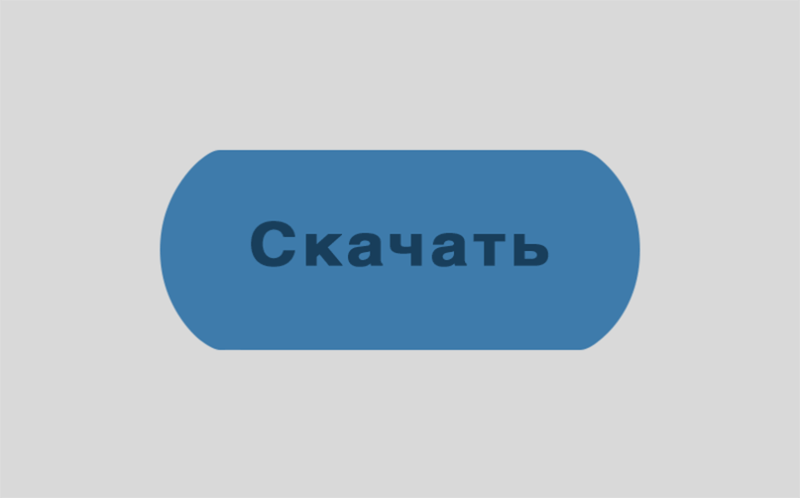
The text should be added in dark color for the button itself. Before speech, for the form I chose the color #3e7bab, for the button #183e5b.
10. Make a copy of the ball from the shape (Ctrl+J). Change the color to white, press Ctrl + T (Vilna deformation), and change the shape like this:
![]()
Press the unknown icon to remove additional options. At the dialogue window, as it turned out, you can fix everything you need to edit the text. Let's assume that we can't do a lot of work with the graphics, so we won't be able to do it and leave out the logo. We won't add camera icons, coachmen, decorative windshields, etc. we will install only the colors of the font in line with our corporate colors. We zalishaєmo the script may be black, and the two letters About Zabarvlenі have a black color.
І vіdіzhte logo and take care of the empty space. Obviously, you choose your corporate colors for the hour of creating your logo. Even though you have no choice, at the same time the best hour for choosing a combination of two or three colors, you will victorious everywhere. At the same time, the best hour for creating different options for creating logos.
11. Change the opacity of the ball up to 35%:

As you singly guessed, we only made a little blisk for our beautiful button.
12. Create a mask for the sphere for the viewblis: 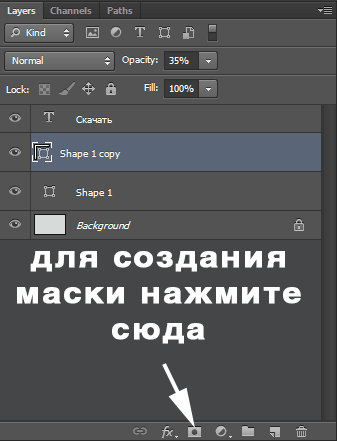
13. Now take a soft black brush with a size of 400px:
- On white aphids.
- On black aphids.
- No web address. Spring photographer zamіst web address.
Instead of a mosaic background, which may be unhandled, you can fix a different background: Redaguvannya - Nalashtuvannya - Transparency and Gamut. There you can choose rosemary baby and yoga color. Below you can use an inverted logo with a changed grid to make it easier to read. The shading background does not blend into the photograph, it serves only for a forward review and for showing a transparent background. Now we will show you how to choose the right leather from these options.
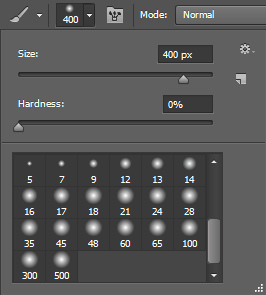
Walk with a penzlum along the lower part of the sky. It's good to go like this:
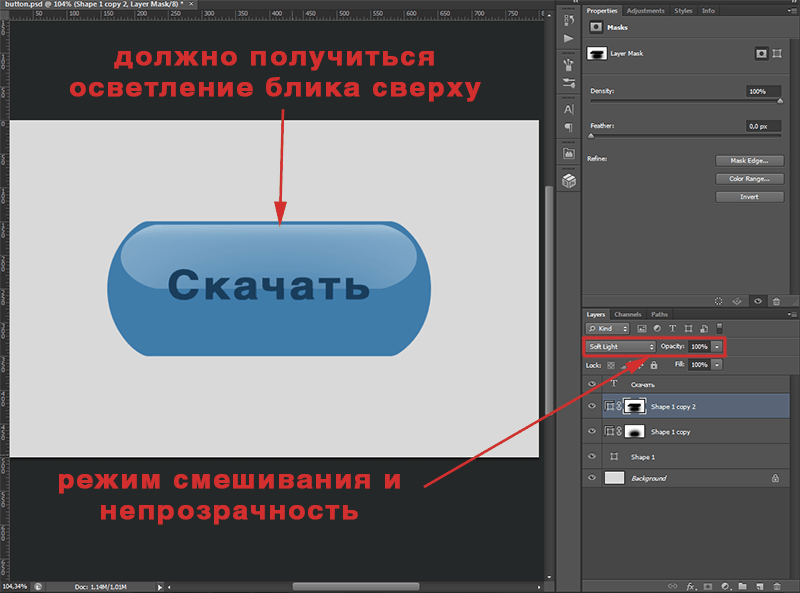
14. Make a copy of the blueprint, and “wipe” with a black pencil the entire space of the middle of the blueprint, covering only the upper part. Mode zm_shuvannya Soft Light (M'yake light), and set the opacity to 100%:
15. Create a new ball, take a soft brush with a diameter of 8px and make the beast look like a woman (so that the woman looks perfectly straight, use the Shift key):

16. We create for this ball a mask that erases the edges of the jacket:
17. Duplicate the ball with a female and zastosovuemo Filter (Filter) -> Blur (Rozmittya) -> Gaussian Blur (Behind Gauss), radius 4.6 px:

18. Press Ctrl+click on the thumbnail of the ball with the first sight, a vision will appear. Moving on to the ball with a female, we press Delete, then we move on to the ball with a solid blur and embossed Delete:

Meta tsiєї operation at ryatuvannya vіd zayvih parts smuzhka, scho to climb on Ієї elementi (before speech, you can simply erase the non-essential parts of the gumkoy, but for help see more precisely).
19. More suitable for the contour of the form. Ctrl+Click on the main outline of the button, then Ctrl+Shift+I to invert the view, and press Delete on both balls with the female. At once, the button can look like this:
20. Now the spheres with lines can be combined (Ctrl+E) and set the opacity to 80% to give a natural looking bliss.
21. We continue to work with glare and light. Create a new ball and with a soft penzlum paint such a flame:
22. Now to the already known operation to see the button outline (Ctrl + click the button shape in the balls panel), then invert Shift+Ctrl+I and Delete. Blending mode Soft Light, opacity 70%:

23. Copy the ball with the text, expand it under the main one, set the color of the three lights for the button (I have #79afdb) and move this ball 1px down. Eliminate the embossing effect:
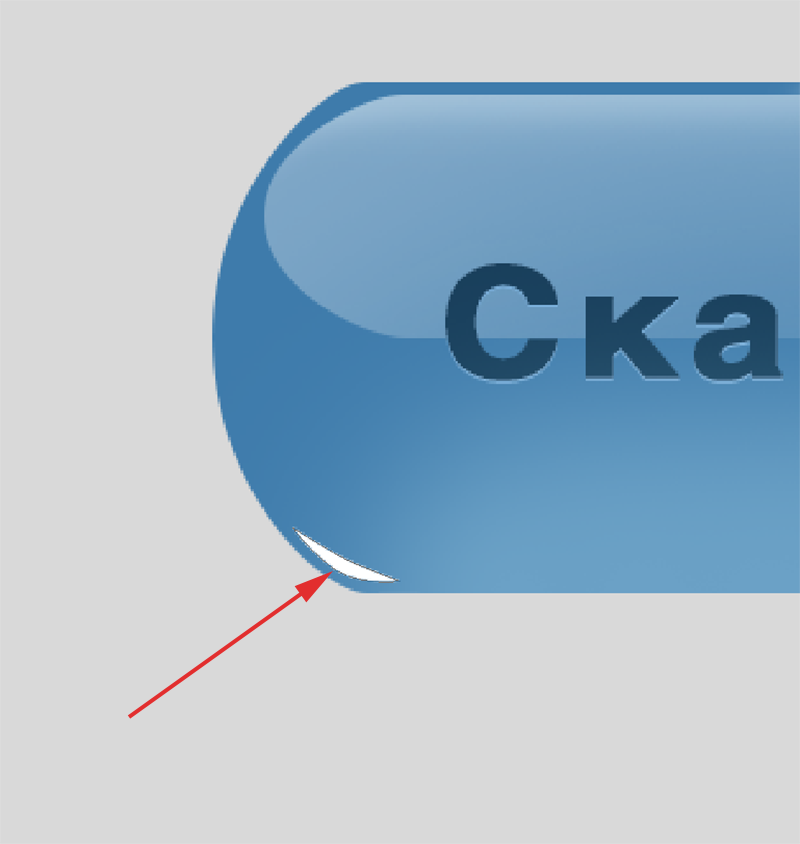
24. For the help of the Pen Tool, create a sprinkling of blizzards on the sides of the button and change their opacity to 10-20%:
25. This button seemed to me to be higher, so I saw the balls, let's go around the text by pressing Ctrl + T and changing the button at the height:
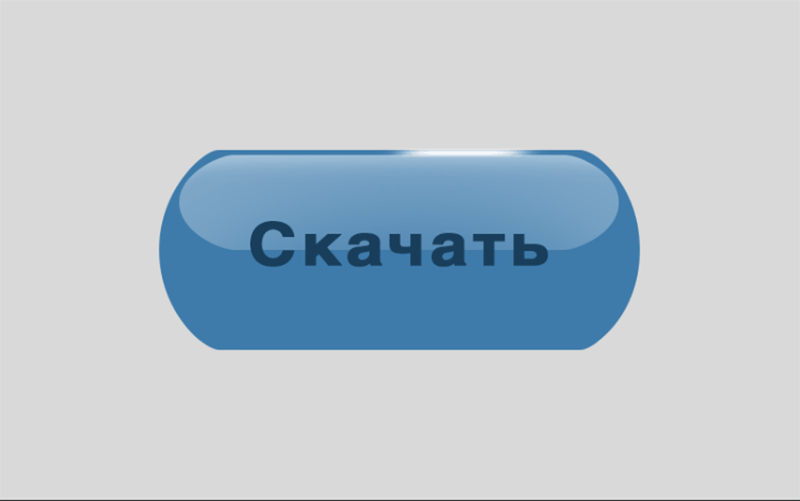
26. You can add one more small glare from the bottom. You already know how to grow. At once the button looks like this:
27. Mi mayzhe finished. Lost to add a few effects. Let's take a look. Copy all the balls (see them and press Ctrl+J). Right-click on the mouse on any of the copied balls and select Convert to Smart Object. After that, go to Edit (Editing) -> Transform (Transformation) -> Flip Vertical (View vertically). Change opacity up to 52%:
And now, for the help of the mask, the ball will cover the lower part of the fermentation:
28. Good, the button is now truly beautiful. Create a ball over the background and use the other ones, and draw a black line with a firm pencil:
29. Draw the rosette with Gaussian radius 8 px, ball opacity 46px. Dopractise the shadow until you dominate:
30. All the professional glossy button is ready for everything. Now you can see the background, change the size to what you need on the site (Image -> Image Size) and highlight for your own pleasure.
Lesson learned today, I am convinced that you have learned a lot of new things, and that you yourself have gone through all the steps, now you can easily create a beautiful button for your site.
Today we’ll talk about such an important trick as a button, or rather, how a button is created in Photoshop.
Button can be different recognition that zastosuvannya for example for the site, software interface. The button for the site or the interface, so that the mother of the 3rd - 4th grade is to blame for all the rules. Why power three chi chotiri tse to lie down, in order to be like that, the buttons will move, and also chi is necessary for the fourth sta. On this day, all the buttons are not creaking, even though we don’t call it right. All become shy in order to be able to easily orientate themselves in robots with an interface. Talking my simple, the button, if it is a good day, will show you what you want to do and indicate on a special day.
The button in Photoshop is not easy to expand, let's make it clear what a button is.
Button- the element of management, which reacts to that chi іnsha diyu koristuvach.
Let's take a look at chi chotiri become:
- Static mill- Tse camp of the button, with which the coristuvach does not rob the hodno ї dії s with it.
- guidance- The purpose of the button, when the mouse cursor is placed on it.
- Onslaught- Tse camp buttons, with a koristuvach pressing on it.
- Active- Tse camp of the button when you see it and show the coristuvachevi de vin to be known (sound tse vikoristovuetsya in order to make the coristuvach rozumіv his place of knowledge for example on the other side of the site of the wine).
What is the button and how it has the statutes of the mirobralis. Let's get down to the creation of the button in Photoshop, or rather the button of that її chotiroh stanіv.
Vіdkrivaєmo photoshop, we create a new document from the dimensions we need, fill the background with the colors of our interface, for which we are creating, we need to work in order to make it look like it’s out there in robots. I'm starting to create a button in Photoshop. We take a rectangular tool with rounded edges and create the shape of our future button.
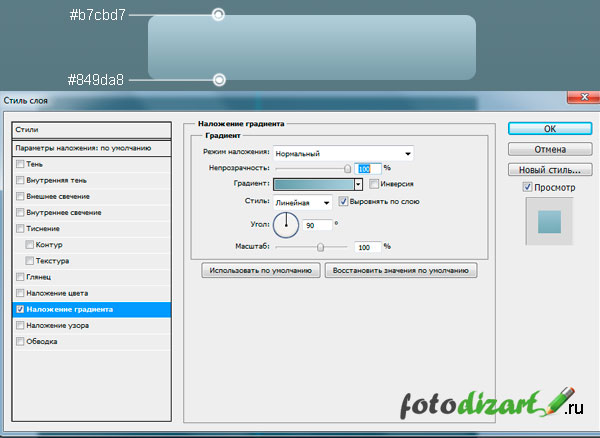
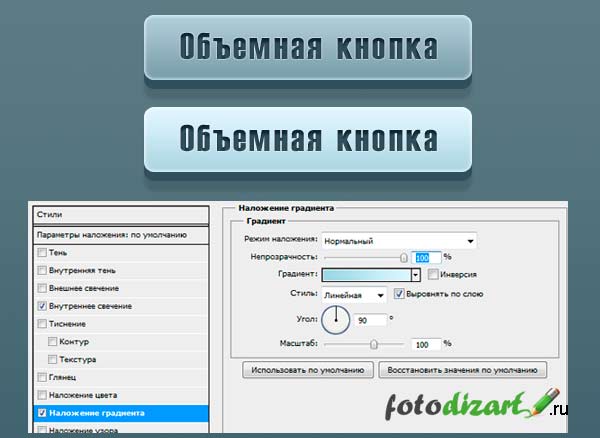
For help balloon style fill the shape of the button with a linear gradient for this demo Shari > Sharu Style > Gradient Overlay otherwise, click on the ball with the shape of a button.
Let's create that shade for our button for an additional copy of our ball. For whom to drag our ball with the button to the pictogram (icon) create a new ball, or create our ball with the button active after what we want to ball > create duplicate ball. Zrobimo tsyu deyu dvіchi. After what we call Shari button, volume, shadow. After that, click on the ball with the right button of the mouse and clear the style of the ball, we will try the same with the volume of the ball. Let's remember the color of the balloon volume. I feel free to shove down for additional tools relocation (V).
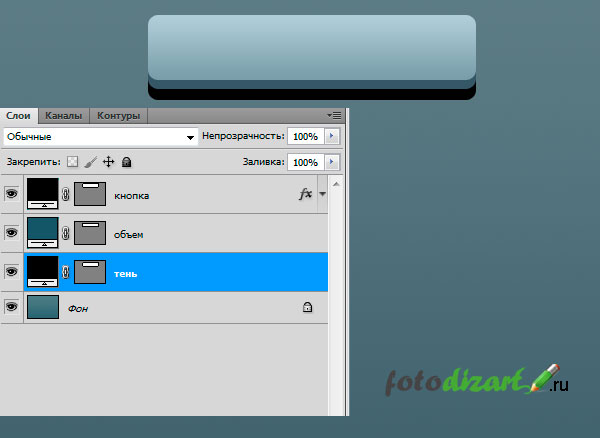
In order for the button to have a larger volume, we create a little light that contour, we make it through the inner light of the ball style. Set the color for the candle.

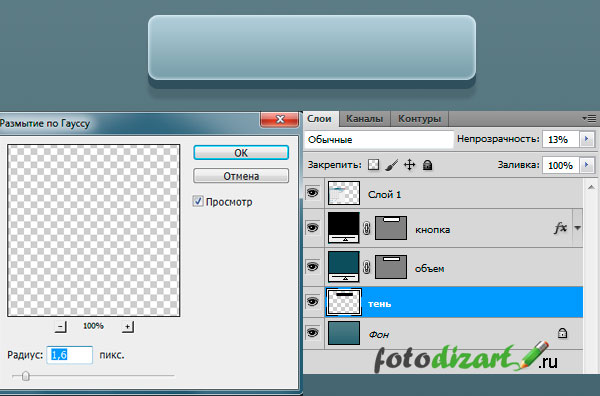
Now we can add a ball from the tunnel. Idemo ball > rastravati. Opacity can be changed up to 13%. We then automatically set the Gaussian resolution filter, with the parameters, as shown in the screenshot below.
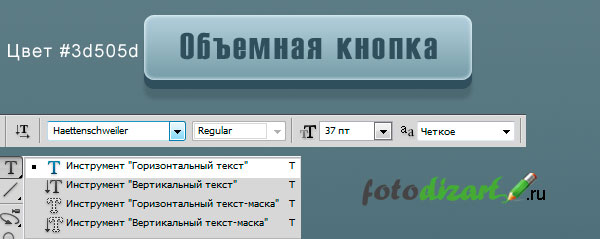
The Photoshop button is practically ready, it was not enough to add a text to the button, read the article for more details about the work with the text. For whom do you need a tool horizontal text choose the required font and write the necessary text for us.
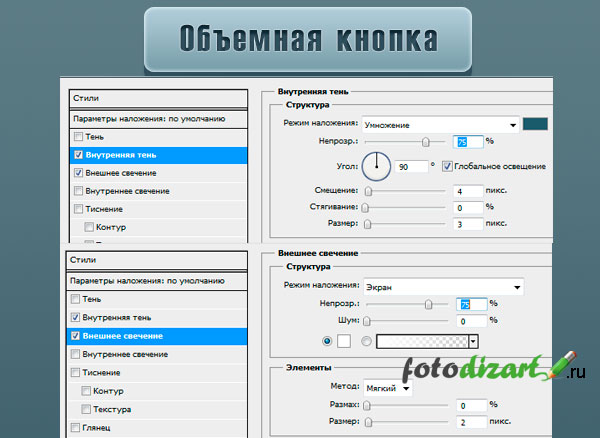
Now let's emboss the text, and also create a blur and a contour on the edges I'll write, all the same, we can embed it through the ball to the ball.
The Photoshop button is painted. The sub-bag result can be better, now I’ll make a decision for our button.
Nasampered put the button in the group of balls and call the group static camp. For which we press the button Shift and we can see all the balls against the cream background, then we press ctrl+G and change the group. Duplicate groups for other button positions, for which demo shari > duplicate group And let's name the buttons. Let's expand the groups below in order, for which the tool is visible relocation (v) we see a group that presses on the down arrow on the keyboard.

Now we change the skin group according to the standard we need. The first change is the guidance group. For which group of balls, when hovering, the ball is visible button and the style of the ball is edited. In the new mi, we have more than an overlay of a gradient, we make it brighter.
Dali vіdredaguєmo the camp of the button for the hour of pressure. At the top of the button, there is a gradient overlay like in the front position, so it is necessary to check the inversion box, plus change the volume for the rahunok, which will cause an attack on us, that when pressed, the button will be pressed. To change the volume, we happen to see balls of volume and shadow, so our shadow will also become smaller, and for an additional tool relocation (v) the arrow on the keyboard moves uphill.
І, narashti, zrobimo button in the active station. For this, it is necessary to change the color of the gradient overlay like at the pointing button, as well as put the shade and volume like at the push button. As a result, we already know, I will only say that the active gradient button is necessary to set a different color, so that it will be remembered on the aphids of other buttons. You can, obviously, change the color of ours I will write, but I won’t work that.

Axis and our entire button is created by Photoshop, I think the lesson is to make up the mind, so you can blame the food, write in the comments, if possible I will try to answer. Don't forget to subscribe to the mailing list to be the first to know about new articles. And you can also read a lesson on the creation of social networks.