Installing Windows XP. Installing Windows XP via BIOS. Installation of Windows XP from disk. Launch and installation of Windows XP. Installation options for Windows XP
Despite its hopelessly old age, the Windows XP operating system still lacks the simplicity of working with it, which is popular among computer professionals, and achieves high stability. In some ratings, the word “Simka” is preferred. Next, we will show you how to install Windows XP from the disk and start setting up the system. It is important that the installation itself does not require any attention to modifications of particular difficulties, but it is really necessary to pay attention to certain important nuances, without understanding which the installation of the system may appear in the near future.
Creating a Windows XP installation disk
At the first stage, it turns out that the user does not have the original installation disk. The installation of Windows XP can be done by looking at the image from the official Microsoft website or from another (securely trusted) device.
In this case, you should increase your respect for the distribution kit that you will be interested in. It is recommended to install only those who already have another or third service packs, so as not to have to install them manually later.
It’s not easy to record an image on an optical lens. For this purpose, you can use a variety of software for robots with images (for example, UltraISO or Nero Burning ROM). If you need to create a multi-storage Windows XP disk, the quickest way is to use a cool utility called WindowsSetupFromUSB, or even to write the distribution onto a flash drive.
Advanced BIOS settings
So, we assume that the distribution of records is set. Now you need to earn money in such a way that you can become attracted to him. For this purpose it is necessary to configure the initial BIOS input/output system. On stationary computers, the input is determined by pressing the Del key, but in some laptop models other keys (F1, F12) or their combination may be used.

To recognize the device as a device, you need to find the section called Boot, Boot Priority, Boot Sequence and, first in the list of device devices, install the optical drive (CD/DVD-ROM) by pressing the PgUp/PgDown key.
Start installation
After all the preparatory steps, you can move on to the final problem of how to install Windows XP from a disc. After shutting down the computer and starting this important device, a black screen appears with a row of pressing any keys to download from the disk. Please be aware that you will only have five seconds to praise your decision. Otherwise, it will be affected by the device (called the hard drive) for the device that is installed, or the OS may be corrupted.

Next, a screen will appear for the first installation of basic installation components and a row at the bottom with the option to install additional SCSI and RAID drivers. In most cases, this is not necessary, however, if the computer has a number of hard drives connected to the same RAID array, the installation must be frozen. It turns out that the koristuvach only has one hard drive.
Select partition and format
At the next stage, a complete screen will appear with the option to select:
- the system has not been installed;
- updating the installed system via the console;
- View installation type.

Select the first item by pressing the Enter key. Further, subject to the license agreement, press F8 to continue installation (prompts will appear at each installation stage).
After this, you will be scanned before installing copies, after which you will need to select the new system installation procedure (Esc).
Now the problem of installing Windows XP from a disk is getting worse. We first need to understand the systemic section and its size. When installed on a new hard drive that does not have any logical partitions, an unpartitioned area will be shown (new obsyag).

It is not necessary to allocate the entire space to the system section (this can lead to bad heat). Partition the disk quickly by pressing the C key and entering the required MB (for the system you can see 40-60 GB, but not less than 20 GB). It is important to remember at this point that for the normal functioning of Windows XP the system partition must lose about 10-15% of its size both after installing the OS and after installing the program koristuvacha. Once you rotate the sections to the screen, you can print the formatting (and a few more later).

If the hard drive is already broken, and the new one has an old system, all sections will be displayed. If necessary, all sections can be deleted (when a section is selected, press the D key). Since the disk structure of the computer is different, we simply select the required partition in which the system was previously installed, and proceed to formatting.
With new hard drives, you can immediately choose to format your drive in NTFS. If the operation stalls until the division is already clear, a number of options will be presented to choose from. The best option is to use the NTFS format. To save your data, you can delete the file system without making any changes. Most likely, you will see in advance that the Windows system directory is already existing, with the option of overwriting the stream copy or selecting a new folder. Here - behind the scenes (all folders of Windows XP of the old version, since such a situation was present, will be saved).
You will now have to wait until the files have been copied, after which you will have to re-download and the system will be restored to normal graphics mode.
Setting up cob parameters
At the next stages, installing Windows XP from a disk is easy for the user. If you restart the device, you will need to remove the optical device from the drive, otherwise remove the screen again from the beginning.

After starting the installer, your local region is selected (there is no need to change anything, since you have a Russian copy of the system), then, if necessary, enter the name of the client and the name of the organization (after all). Why enter the product key (the installation was continued without it) I won't). Working keys, behind the scenes, can be easily found on the Internet.
At the next stage, you need to enter the name of the computer and enter the administrator password (this can be created later). Next, the date and hour are adjusted (there is no need to change anything), and when completed, a screen will appear with the choice of adjusting the boundary map. You can safely select “Secondary settings” and indicate that the computer does not take part in the process (the group and domain must be selected after the installation is completed).
Complete installation
The axis will now only include device drivers. Once completed, a number of additional windows may appear. For example, the system will request the time to install the optimal split screen. I need to wait a while for this.
Then the full black screen starts, in which you can skip most of the steps (for example, adding security, checking your Internet connection, and registering with Microsoft). If you are unable to enter the names of the cloud records that will be registered in the system. You can enter your details, after which you will receive a notification that the installation is complete.

Pressing the "Done" button will bring you to the "Desktop" with all the familiar little things. At this point, the installation can be considered complete (if service packs were present in the distribution, they will be installed automatically, otherwise they must be installed independently).
Typical washings under the hour of system installation
Infrequently, it is possible for Windows XP to crash and crash during the system installation process. The most common occurrence is BSoD (blue screen). Installation is impossible due to incorrect installation of the hard drive mode.

If you are notified that the BIOS firmware is inconsistent, you must turn on ACPI mode at the time of installation.
It is possible that the disc itself may be damaged or dirty. Just write the distribution onto another device and try installing the system again.
Pochatkov tweaking Windows XP
The system will not require special adjustments right now. To reduce the demand on computer resources, you should turn on background services that are activated by default and that start simultaneously with the system.
In the "Viconty" console (Win + R), enter the command to access the msconfig system configuration, go to the auto-enabled tab and turn on everything that is there, disabling the ctfmon process, which is responsible for displaying the movie in the third window. other than keyboard layouts.
Additional security software required
Then it is obligatory to install a dry security program, since there is practically no protection in the “expansion” itself. Antiviruses for Windows XP are available in a variety of ways and do not cause installation problems. However, due to the fact that this version of the vikory system runs on very low-power machines, it is not possible to install large packages on the Kaspersky Lab software product base. It’s better to use some lighter versions (Avira, Panda Cloud, etc.).
If you want to ensure maximum protection with antivirus for Windows XP, you can use NOD32 or Smart Security packages from ESET. However, to activate them you will have to use special keys, which are widely available on the Internet.
You may not be able to install an archiver, a set of codecs, a flash player for your browser, an office package, and any other programs that you may need during your work.
Windows XP is one of the most popular operating systems and, although there are many fates, many people are still using this system. If you have an old computer that you want to update, or if you want to install XP on a new computer, it’s not a waste of time.
Note: Microsoft no longer supports Windows XP and no updates are released for that system. So think about installing it.
Crocs
Part 1
Setting up- To run DirectX diagnostics, open the Windows dialog box (press WinKey + R), type DXDIAG and press OK.
- Minimal system benefits
- Processor: 300 MHz (Intel chi AMD)
- RAM: 128 MB
- 1.5 GB of free disk space
- Video card: Super VGA (800x600)
- CD/DVD-ROM
- Keyboard and Misha
- Edge adapter (for connection to the edge)
- Sound card and speakers or headphones
-
Find the Windows XP key. The labels are on the stickers found on the disc box or system unit. The key is a set of 25 characters, divided into 5 groups (5 characters per group). You will need a key to complete the Windows installation.
Set up your computer to use a CD/DVD (not a hard drive). This will allow you to get excited about the installation disk. You can change the order in which the BOOT menu appears in the BIOS.
Part 2
Installed-
Insert the Windows XP installation disk into the optical drive, then save changes and exit the BIOS. Your computer will reboot and the message Press any key to boot from CD will appear on the screen. Press any key to download from the installation disk.
- The computer will download the files required for the installation; Tse can trivati kilka hvilin. After the invitation is completed, the invitation window will open.
-
A number of options will appear in the Welcome window, if you are installing or reinstalling Windows XP, press Enter to configure the system installation parameters.
Read the license agreement and press F8 to get the hang of it.
A list of hard disk partitions (or several disks) will appear. If you install Windows XP on a new hard drive, you will create one more partition called “Unpartitioned Space”. If the system is already installed on the disk, then, for everything, a number of partitions will appear.
- Installing Windows XP will recover all data on the selected partition. Then select an empty section or a section with the data you need.
- You can delete sections using the additional key D. The stench will be transferred to undivided areas. When you delete a section, you will spend all the data that is saved in the new one.
-
Create a new section. Select Undivided Space and press C. A new window will open where you can set the size of the section. Enter the size in megabytes (MB) and press Enter.
- As a result, the size of the created section is equal to the size of the entire undivided space. If you do not plan to create a few sections, fill everything up after cleaning.
- Windows XP will require at least 1.5 GB (1536 MB) of free space. Therefore, create a partition of at least 5 GB (5120 MB) in size, or larger if you plan to install a lot of programs.
- You can create multiple partitions on one disk. This allows you to save programs and media files in different sections or install a different operating system. Windows XP can be installed on just one partition.
-
Go to a new section. After creating a section, you will return to a window where you can select a section. The new partition is usually called "C: Partition 1". Select it and press Enter.
Select “Format partition on NTFS file system” and press Enter. NTFS can handle larger files more securely than FAT. NTFS also supports compression at the system level.
- If the partition size exceeds 32 GB, you will not be able to select FAT.
- Do not select the “Swedish Format” option, because the hard disk will not be checked for the presence of bad sectors or bad sectors. Therefore, externally format the disk. If the disk is damaged, it is best to replace it immediately.
-
The difficulty of the formatting process depends on the size of the selected partition (the larger the size, the longer it will take to borrow).
Now Windows will instead copy files from the installation disk and ask you to restart your computer when this process is completed. Press Enter if you are prompted to restart your computer, or after 15 seconds the system will start automatically.
When you re-download, you will be notified again that you will be prompted to press the key to download from the CD. Ignore this proposition and allow the computer to take over your hard drive.
The Windows logo will appear on the screen, and then on the left half of the screen a list of steps for installing the system will appear, and on the right half - how to work with the system. The hour remaining until the installation is completed will be displayed under the list of options.
- During installation, the screen may dim, go dark, or change the size of the image.
-
Select your language and regional settings from the appropriate window that opens when the system is installed. Select additional options and click “Next”.
- Enter your name (as you wish). You can earn money from the Vlasnik website; I will be vigilant in certain situations, for example, during the creation of documents.
-
Enter the key. You cannot complete the installation process without a valid product key. Press "Distance" to continue.
- Some versions of Windows do not require you to enter a key until installation is complete.
-
Enter the computer name. Under these names, the computer appears in a blur. Windows enter the name after registration, but you can change it as you wish. You can also set a password for the cloud administrator account. This is not necessary, but is recommended for large computers.
Select your time zone and set the date and time. Press "Distance" to continue.
Indicate parameters and measurements. Most customers can disable the default settings of the network or consult with the account manager (system administrator) to set up the network.
- This coming window, most customers can select “This computer is not connected to a domain or is connected to a domain without a domain.” Or contact your system administrator for help.
- The work group may be deprived of its credit due to remuneration.
-
Make sure the installation process is complete. It is worthwhile to re-engage your computer. After re-enablement, you will be on a Windows XP desktop. The installation of the system is complete, but you still have a few more speeches to make.
Part 3
CompleteAdjust the screen parameters. After starting Windows, you will be prompted to adjust the images on the screen. Click OK to print the settings. The screen flickers briefly and then the power notification appears so you can view the image on the screen.
-
Your computer is required to provide (or exceed) the minimum system capabilities to run Windows XP. You can find information about computer components in your DirectX operating or diagnostic instructions.
This article describes the procedure for installing Windows XP on a computer that already has Windows 7 installed and the sequence of actions necessary for the creation of a configuration with additional restrictions, if the selection menu is available when the computer is turned on operating system for vanity.
Enter
It is important that the most correct sequence of Windows installation is to install the younger version before the older one. This option preserves the possibility of installing the old system, and after installing a new OS, a menu appears to select the system to install.
This sequence is of no importance if you know the principles of operating systems. Let's look at the situation if Windows 7 is already installed, but you need to install Windows XP on your computer. This article is intended to help avoid pitfalls for those planning to install Windows XP after Windows 7.
Weekend dates
Installation of Windows XP
A lot of articles have been written about the installation of Windows XP, so there is no sense in which nutrition within the framework of this article. However, you can install Windows XP if you have already installed Windows 7 only by downloading from the Windows XP installation disk. Before installation, you must select a disk partition that is ahead of preparations.
Figure 2 - Select a partition for installing Windows XP
You can already see in this little picture that the partition that does not have a letter in Windows 7 is assigned the letter C, and the partition in Windows 7 is assigned the letter D.
This is what the picture of “disk storage” looks like after installing Windows XP
Figure 3 - Disk storage in Windows XP
After installing Windows XP, you will not be able to select operating systems if you are interested in Windows 7.
Restore respect to the changes that have been made to the selected “System Reserved” section: by becoming visible (assigned the letter C). It’s amazing what has been removed from the active section (C). Why do you need the folder authorities to turn on the storage of system files and allow them to be displayed:

Figure 4 - Increased display of stored and system files
Also, there are some Windows 7 files on the same page with us: bootmgr that folder Boot, in which files are installed in the interface of the backup menu, the backup data file is stored bcd, memory check program files - memtest.exe. In addition, the following Windows XP files are now recorded: ntldr, ntdetect.com, boot.ini.
Figure 5 - Files for the operating systems Windows 7 and XP
Updated functionality for Windows 7 and Windows XP
To update your Windows 7 experience, you need to quickly download the Windows 7 installation disk.
Insert the Windows 7 installation disk, find the file bootsect.exe in the papa BOOT. Back up: go to the bootsect.exe file - F:bootbootect.exe. In your case, instead of F, there will be a letter that belongs to the CD-DVD drive

Figure 6 - Location of the BOOT folder on the Windows 7 installation disk
Launch command line: press Start - Viconati, in the field enter cmd. When prompted, enter the command
Malyunok 7 - Head of victory of the bootsect team
The result of this command will be the update of the main Windows 7 backup record and the backup code, which transfers control to the Windows 7 download manager.
Configuration creation with additional options for Windows XP
Apparently, there are no utilities for changing configuration data in XP, but it is in the folder with installed Windows 7. To correctly install them in XP, you need to go to the System32 directory of the Windows 7 operating system in the command line. After the transition, enter the following commands:
Bcdedit /create (ntldr) /d "Microsoft Windows XP"
This command creates a monster for the attraction of Windows 7 for the attraction of Windows XP. This team's attempt may end in failure, since the chaos has already been created, it is necessary to rename it:
Bcdedit /set (ntldr) description "Microsoft Windows XP"
The following command is available for downloading Windows 7 devices and downloading files for downloading XP:
The following command is available: from Windows 7 to Windows XP:
Bcdedit /set (ntldr) path \ntldr
Now comes the command to add a row about selecting Windows XP to the Interior menu and expands it under the screen:
Bcdedit/displayorder(ntldr)/addlast
Figure 8 - New variety of commands for the menu creation menu in Windows XP
You can check the correctness of the commands and the presence of the menu in the command row window bcdedit Or after analyzing the bootcfg file, extract the result from the command bcdedit >c:\bootcfg.txt. The file will be in the root directory of drive C.
Figure 9 - Checking the presence of the Windows XP lockup entry and the lockout menu
After completing these commands, when you upgrade your computer, you will be given the opportunity to select the operating system to upgrade.
Figure 10 - Vibir OS for attraction
It might be best to change the timeout for your OS choice to 30 seconds. To adjust this parameter, use the command
Bcdedit /timeout XX
De XX – timeout hour in seconds.
Features of the configuration with special requirements for Windows 7
If you are planning to install Windows XP, you can configure the backup mode before installing Windows 7. These recommendations will help you if you have upgraded to Windows 7 and are moving to Windows XP, and the configuration with additional features was created later.
And here we need to introduce special features.
Commands, just like in Windows XP, are listed in the command line. In Windows 7, these commands must be added to the command line with advanced user rights. Why press the button? Start, select item Standard, right-click on the command row shortcut and select the item, or like this:
Press Start and enter a joke in the field cmd
On the found file, press the right mouse button and select the menu item Run as administrator.

Figure 11 - Launching the command line with elevated rights (as an administrator)
The order of the teams is the same, except for one. As you know, the backup files of Windows 7 and Windows XP are located in the attached section, which is not lost. So the team's replacement
Bcdedit /set (ntldr) device partition=C:
Need to vacate
Bcdedit /set (ntldr) device partition=\Device\HarddiskVolume1
This does not mean that for any reason (for example, if your hard drive is divided into sections before installation), the desired partition is not created, and the system files are located on one of the Windows 7 partitions.
Visnovok
However, given the not entirely correct sequence of installation of operating systems, it is difficult to organize their installation correctly, without going into complex manipulations or third-party programs. With the additional Windows 7 installation disk, you can update the ability to access this operating system, and with the additional utilities bcdedit configure the settings for the two operating systems.
Windows XP is the classic and most popular operating system that old-time enthusiasts install on their computers. Unfortunately, due to this, the installation process may cause serious problems. Zokrema, the installation may not be completed in due course. However, all of them can be verified.
What could be the reasons?
There are two options, which can lead to the impossibility of installing Windows XP on your computer:
- There are a lot of problems with software.
- Problems with computer components.
In both this and other situations, certain conflicts may arise with the installation process of the operating system. However, if you can easily and simply figure out from them, just a little bit later, what’s the problem.
Corruption of the installation disk
One of the most common reasons why Windows XP does not install is a malfunction of the installation disk itself. In most cases of damage and wear of the disk, no one loses any respect if they want to completely damage the reading of certain files. However, it is difficult to write down – it is wrong to “burn” the device and not allow the operating system to be installed correctly. So if the reason is damage, it is recommended to look for another installation disk.
Incorrect device input and output
The most widespread and far from the most foolish method is the incorrect placement of the injection-extraction devices. The operating system must be installed from any device, unless the BIOS is loaded and the installation will not proceed.
So to fix the problem you have to look at the BIOS. To do this, you must immediately press one of the keys on the keyboard after pressing the start button on your computer. As a rule, it's F2, Esc or Del, you just need to look at the motherboard's dialer.
After this, the priority of attraction is firmly established. On the AMI BIOS application:
- Let's go to Boot.
- Boot Device Priority is known there.
- It’s amazing what a device it is to place the leaders. It is necessary that the First Boot Device row has a device that is necessary for installation (a floppy drive or flash drive).
After this, you can exit the Bios, saving settings.
If this does not help, be sure to replace the small battery that powers the CMOS on the motherboard.
Vandalized viruses
There is a problem that is also related to the BIOS - this is the function of malicious viruses. Or more precisely, її camp. In the original, this item is designed to fight off viruses during infection, but for some reason it is less important when the system is installed. Therefore, you need to turn it on, changing the Disabled position.

Floppy drive failure
In some cases, a damaged drive may interfere with the installation of Windows XP. There is especially great confidence in the fact that there have been problems with it in the past due to not reading or incorrectly reading the information. Since it’s not so important in everyday life, during the installation process an important skin file gets stuck.
There are two ways out of this situation - either install a new drive, if the installation is planned from a CD/DVD disk, or try installing the operating system from a flash drive.
Hardware problems
The reason comes - be it some kind of problem with the computer. This may cause deformation of the hard disk. She blames this episode because the computer, for whatever reason, fell or was struggling. At this time, the hard drive is damaged, and the recording on the new one can no longer be deleted.
There is an “internal” problem - these are the contacts that are connected to the motherboard. Or, for example, having become at the device for introducing and displaying data that was transferred to the mother itself.
There is only one way out - try installing a copy of the operating system on another PC. If it starts up, then the problem is in the computer itself. However, the problem lies with the copy itself.
Conflict from modernity
This problem is relevant for new motherboards. They do things a little differently, so the installation program simply does not recognize the hard drive of the device. The essence of the problem is that the BIOS has the wrong value set for the IDI/SATA controller for the chipset, AHCI itself. The old Windows XP operating system simply cannot recognize such values, since it appeared much later than the last patch for it.

The solution is now - go to BIOS, then go to SATA Mode. Find out the value under the name IDE there and enter it as a wiki. I don’t know XP about it and I won’t trust it.
Other problems
In addition to the problems described above, they can also be combined with other unacceptable problems:
- Overheating of any component. During the hour of operation, one of the storage processors overheats and cannot correctly terminate functions. Well, first of all we need to figure out the cause of the overheating.
- Conflict with the new system. If there is already a version of Windows 7 on the disk, or more likely, the installation may not proceed. You will first need to format the disk with the old system and then begin installing the new one.
- Service pack conflict. If this error occurs, you need to format the local disks. A clean system is then installed on the free hard drive.
These are the most widespread problems that are easy to resolve, but may also overlap with many others. Most often, stench can be detected either by a physician or by a diagnostic program.
(Visited 3,981 times, 4 visits today)
Preparing a disk with a distribution kit is the first stage of installing Windows XP. If you already have such a disk in your hands, you can skip this point, unless you have acquired a system image in ISO format from the Internet - you will need to use special programs (Nero Burning ROM, UltraISO and similar) to burn it to a CD or DVD.
The original Windows XP ISO file is a ready-made system image that contains a new set of data for installation. It does not require any advanced preparation, but is transferred to the CD unchanged.
Let's look at the process of burning a Windows distribution onto DVD using UltraISO.
- Launch the program.
- Press the Ctrl + O keys and open the Windows ISO image that you prepared for transferring to disk.
- Click on the “Burn CD image” icon on the toolbar or press the F7 key.

- Place a blank DVD into the optical drive to be rewritten.
- Make sure that the required distribution is selected in the “Burn image” window. Select the “Check” option if you want the disc to be checked after weeding. Select the required speed of the entry. If your laser drive can write at maximum speed, choose between medium and low speed. This will ensure good readability of your disk, including older drives.
- A disc that has been overwritten needs to be erased immediately by pressing the same button, and you can immediately start writing to a blank one by pressing “Record”.

After 20 - 30 minutes, ensuring the speed of the robot drive, the preparation of the installation disk will be completed. You can move on to the offensive stage.
How to install Windows XP from a disc the traditional way
Traditional installation is a normal system installation process that requires the active participation of the installer. Most often, installation of Windows XP is carried out in the traditional way.
At this stage, we have already prepared all the requirements. In order to install Windows from a disk, we only need the disk itself and a computer with an optical drive on which the system will be installed. If the drive does not have one, you can use an external one, which is connected to the USB port.

Setting up the BIOS
To install your computer from CDs or DVDs, the first installing device will need to enable the CD drive in BIOS Setup. To get to the setup menu, press the button assigned to you immediately after starting the computer (Del, F2 – F12, etc.). You can read it at the bottom of the motherboard screen saver (it appears on the screen immediately after turning on the PC).
Go to settings, go to the “Boot” tab or “Advanced BIOS Features” - for older versions of Award BIOS. Using the additional buttons and arrows, select a laser drive from the list of devices. In our application, it is designated as CD-ROM Drive, otherwise this list does not include the model of ownership.

After selecting the required device, press F10 (option to exit the BIOS menu without setting up).
Disk storage and installation process for Windows XP
- Place the laser disc in the drive and reboot your PC. System installation begins with the storage of Windows XP files in the computer's RAM.

- Next, Windows welcomes you and instructs you to continue with the installation, exit programs, or update yourself to another update console. The other and third points are not suitable for us.

- By pressing Enter you will continue the installation. In the near future it will be necessary to praise the licensing benefit of Microsoft and the use of Windows XP.

- Next – select a location on the hard disk of the system partition. Press "C", which means "Create a section".

- What matters is the size of the current disk C. The disk has a maximum size, but you can set it to no less than 10 Gb.

- Now look at the list of hard drive partitions and press Enter to install Windows in one of them.

- We are formatting a new partition with NTFS (Swedish formatting completely overwhelms us).

- And it is clear that the installer will copy the distribution files to the disk.

- After the copy is completed, the computer will be re-backed up.
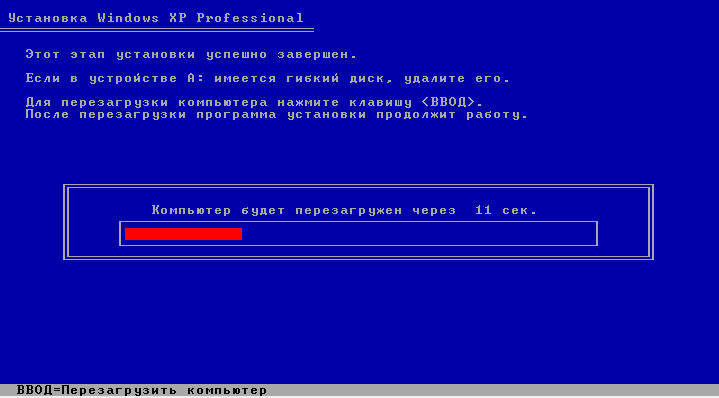
- When Windows XP becomes popular, it will no longer be available on a CD or DVD, but on a hard drive. This means that the control system has been successfully created and is operating correctly.

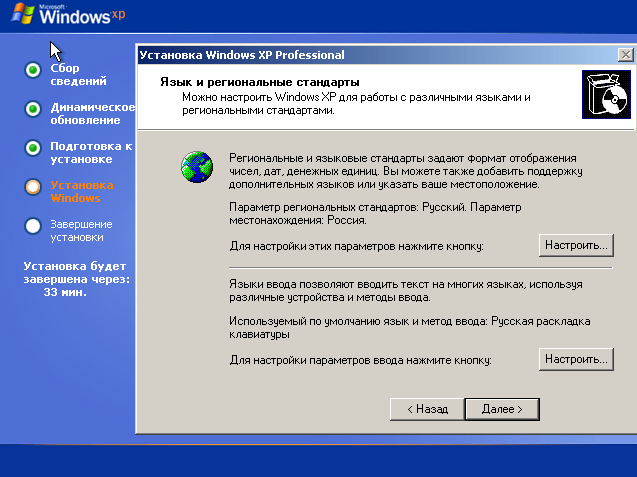
- From this moment our fate will be needed again. Here we have to order the system for washing, our local knowledge and additional languages, as needed (although our packages can be installed later).
- Further, it has its own name and organization. I'm saying obov'yazkovo, you can skip the organization.

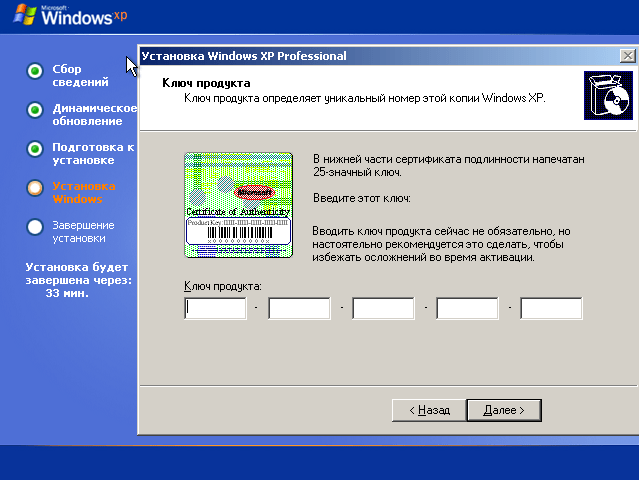
- Entering the serial number of the Windows distribution during the installation process is voluntary on the right. This can be sent later.
- The computer name and administrator password also need to be entered at once. I will be registered for promotion, but you can change it. The password can be reset.

- The date, hour and time zone are also set at this stage.

- We don’t take into account any special measures, so don’t let the stink get lost from us for cleaning.

- Don’t let me lose my work group because I am. You will be able to change your password once installed.

- At this point, the installation of the building is complete. Next, you will customize the screen and create one or more cloud accounts for account users, the first of which will be assigned by the computer administrator. You will also be prompted to activate Windows XP right away.

And now everything is true. A minimum of adjustments have been completed - and the system is ready for operation.
Automatic installation of Windows XP
Creating a test file using Windows
Wait, install the system soon without leaving the computer and constantly pressing “Dalya”, come on. To make this task easier for those who have to do this often and for a long time, they figured out a way to install Windows without the participation of a professional. And then a script is created - a report file, which contains all the information necessary for the installer program.
The time has come for you and me to learn how to create such scenarios. The Windows XP distribution kit includes a utility Setupmgr.exe, which is in the archives deploy.cab, which is saved in the SUPPORTTOOLS folder on the installation disk. We extract this utility from the disk and launch it.
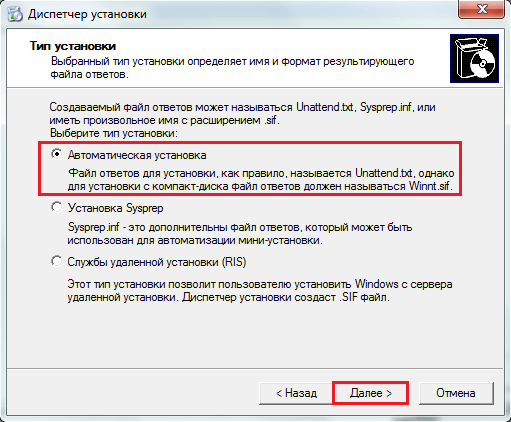
- The “Installation Manager” wizard will help us create the evidence file. With this help, we can create a new one and change the existing scenario. We don’t have enough scraps of ready-made preparations, so select “Create”.

- The installation type is strictly defined - “automatic installation”.
- Product version – Windows XP Professional.

- Interaction with the client – “Full automatic installation” (as we do not plan to change the parameters of the evidence file).
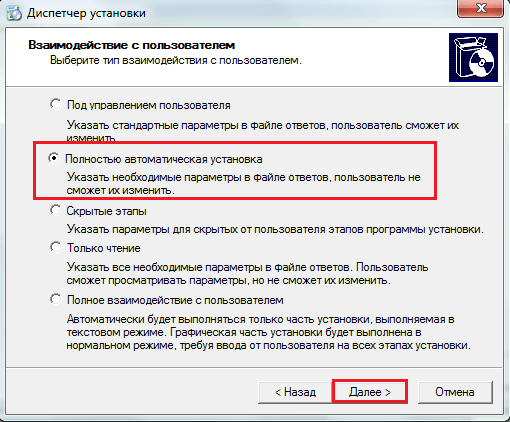
- Then select "Install from CD".

- For licensing reasons, we will move on to filling out the same forms and fields that we filled in when we installed Windows from the disk. First of all: “This is the organization.”

- Screen settings. They can be revoked due to corruption (visory Windows standards).

- Time zone.

- Serial number (obv'yazkovo!). If you do not enter your serial number here, you will not be able to continue creating the password files and installing the system.

- Names of computers on which Windows XP will be automatically installed in this scenario.

- And also: the administrator's password, border components, the name of the workgroup or the domain where this PC is included, the telephone code of the country and place, international standards, language support, Internet Explorer initial parameters, the Windows installation folder, printers and a number of other settings - in Around the windows of the program.
After completion of the robot master, a file will be created unattend.txt– This is our scenario, and I will install Windows XP automatically for anyone who can.
If you are installing the system from a CD, you must rename unattend.txt to winnt.sif.
After creating the evidence file, you can add additional commands, information about which can be viewed in this article.
Axis, perhaps, and that’s all. As you can see, there is nothing complicated about installing Windows XP using a script without your active participation. It was impossible to save the file from the i386 disk with the distribution kit - where winnt32.exe is located - the Windows installer.
If your PC has a floppy drive, the test file can be placed in the root directory of the floppy disk and inserted into the computer during system installation. In this case, the installer has priority to remove the script from the floppy disk, and put it on the CD, in folder i386, there is another one.
Automation of installation using alternative methods
Windows power tools are not the only thing that allows you to install them in one click. For which additional third-party vendors, for example, Advanced Windows Unattended Installer. It is much easier and easier to create scripts than in Windows. The only drawback of Advanced Windows Unattended Installer is that it does not have a Russian interface.
To use this tool to create a disk that allows you to automatically install Windows XP on your computer, you need to enter three steps:
- Copy the Windows distribution to a local folder or mount the ISO image to a virtual drive.