Druk to the doc file. PRN format: how to open such files
Today in the computer world there is such a great number of extensions that it is necessary to search for the identification of file types, that the rich coristuvachiv simply have a head wrapped in an ide. One of these is the PRN format. Chim vіdkriti yogo, at once i will be looked at (there are more options, not so rich).
What can a file with PRN extensions look like: basic options
For the cob, it is significant that this format in its cob look is universal for rich systems, shards, even though someone already mentioned the word print (druk) in the shortest possible time. Such files may be present in both Windows and Mac OS X.
However, only one side of the coin. In fact, this expansion can also be expanded from some office files created for additional non-standard packages. You can also assign the PRN extension. What do you see the same objects, we can look at the trohi later. For the time being, let's stick to the main, basic version.
PRN extension: what do you see in the standard view?
Otzhe, as it was already said more, before us, we are given for other documents. To look at the file of this type itself, the vin is a set of commands for a specific printer installed in the system, which driver is used in the add-on when setting a document for another. In principle, as a language about “apple” systems, food about those that open a PRN file, it’s easy to do it. You can simply drag it to the printer icon on the desktop, after which the process will be activated for another.

On Windows systems, these files are also compressed. Most of the time, the stench appears at the moment when the correspondent sets the name of the signet in the file with the wiki of the MS Office Document Imagine program, as it is included in the standard set of the package.
It is even more important to look at the PRN format, lower the window, become more aware of the various graphical look-ahead utilities for ACD See, ACD System Canvas, Free Raw Print.

However, you can do it in a much simpler way, vikoristovuyuchi for vodkrittya given format package Adobe Acrobat. In this case, the program will work as a graphic add-on with elements of recognition of the forward revision in place of the file before launching it on another.
PRN file: what do you mean?
But still not all. On the right, in that the PRN format can be used differently among files created for the support of the Lotus 1-3 office package. In this case, instead of being just a formatting text, it is a spreadsheet that was exported to a text file, for example, to exchange data between addenda.
What do you say yoga? Naturally, a decision is asked about zastosuvannya "native" spreadsheet processor. But don’t spend an hour on this installation (it’s not enough for anyone to win), it’s easier to open the file with any Excel editor you know. Such data are displayed without problems.
visnovok
Like Bachimo, the PRN format itself seems to be richly known, regardless of those who are coristuvachi and did not know before that, which program itself was similarly expanded. Well, what about the method of writing, for the cob you can try to develop a document, as if it were the object itself, we can recognize it for the printer. In a different way, it is recommended to vicorate either a reviewer, or Acrobat, or Excel. Zagalom, in any case, there is a solution.
The widest is the printer format itself. On the right, the fact that the Lotus package is practically nothing today, and the use of files on this basis is very rare. Vtіm, navit for a friend, you can edit all the same Adobe Acrobat, so be it, driving in two birds with one stone (and revisit, і druk, for the mind, that the koristuvache file is not necessary to edit). In general, as it has already been understood, no one is to blame for the problems with such a format of blame.
Vikoristovuvaty ROP method for displaying transparent raster
Set this flag in order to use the ROP method (raster pixel overlay) for processing transparent pixels raster images. Since the method of ROP assignments is mainly for displaying on the screen, then not all printers / plotters can do this. For the sake of our hearts, we will hand over a sprat of trial vouchers. This method does not apply to other vector balls. Tsey ensign is not appointed for the zamovchuvannyam.
Drukuvati raster in True Color, if possible
Set this ensign, so that you can edit the screen and surfaces in full-color 24-bit formats, as well as possible (change the printer, if the printer can print more lower in 256 prints). Throw off this ensign, because you don’t win a color printer. Tsei lieutenant of the installations for zamovchuvannyam.
8. After completing the selection, click on it, turning to the "Druk" dialog, press the button O K - the program is more drukuvati.
For the sake of efficient hatch scaling
Persh nizh drukuvati, vyznachte - the printer driver of which type is transferred to vikoristovuvaty. Rich PCL6 printer drivers and HPGL deacons support hatch scaling and allow control over this parameter. The difference between what you see on the screen and on the screen, may be the result of the fact that hatch scaling is enabled. We can turn on hatch scaling, which is set by the printer driver, and turn on ours. We have now perfected our method, with the help of which it is easier to achieve good viability of yoga in the morning. You can turn on hatch scaling by setting the ensign scaling and shading at the window of the dialogue "Parameters of view". Turn off our scaling and turn on the scaling mode of the printer driver and check the results. Our tests show that the application of our method allows us to achieve the best lightness of the wine on the screen, moreover - the richness of the color of the wine.
When using the PostScript drivers, which can be drawn 2 or 3 times a month, we got stuck because the Microsoft drivers do not support hatch scaling. Therefore, our method may not help you. Microsoft for the sake of installing 1 rіven movi PostScript i tsim zim zamezhennya. We have shown that we can prove the faults of this rule. For example, in Windows 2000 and Windows NT, the current HP Laser Jet and Color Laser Jet PostScript printer drivers allow us to correctly adjust our hatch scaling.
Druk to file
To change the settings and reconsider, so that another pass without pardons, instruct the card into a file:
1. Select F File> P hand - the dialogue "Druk" will appear. If necessary, increase the power of the printer.
2. set an ensign P sleeves in photo.
3. Press OK - the "File friend" dialog will appear.
Addendum Edition: MapInfo Professional 7.5 User Manual
4. In the field Name of the file for viewing, enter the name of the file that you want to create, and press O K. wick extension PRN file- tse dopomozhe rozpіnat tsey file like a file to a friend.
The .prn files will replace the data bytes themselves, as if they would be direct to the printer instructions, they would not send them to the file. If you don't have access to that printer (or to an identical ...
How can the file be saved as a file for a friend with the .prn extension, how can you work with it? I can neither unpack these files nor look at them. For example, as if we were displaying a file, if we do not open it on the printer, this file is saved with the .prn extension.
Mustafa Fawaz
The .prn files will replace the data bytes themselves, as if they would be direct to the printer instructions, they would not send them to the file. Since you don't have access to that printer (or to an identical add-on), you can't practically do anything with the .prn file. However, if you have access to the printer in your order, you have the ability to distribute the file from the window command line. The axis command is responsible for successfully transferring the file filename.prn to the printer: COPY / B filename.prn / B PRN. If the team will not be beaten, try one more try, replacing the PRN symbols with LPT1. Vtіm, here it is necessary to indicate that some printers, recognized for work in the Windows environment, do not accept this command. Yakshcho at vikno poke system Google and enter the words free raw print utility, a list of free raw print utilities will appear on the screen, which are used to transfer .prn files to Windows printers.
It is possible, if you want to use a generic (purely text-only) printer (Generic / Text-Only printer). Click on Start button(Start) and select the item Printers and faxes in the menu. Click on the Add a printer button on the Printer Tasks panel. Follow the "Maister" instructions for installing a new printer (Add Printer Wizard). Behind the "master" request, select the item Local printer attached to this computer (Local printer connected to the computer), and do not forget to turn on the function automatic recognition printer, for which it is necessary to throw off the ensign. If the “master” prompts you to select the port that you will use, select the FILE: (Print to File) item. Then, in the Edit field, select Generic, and in the Printer model field, select Generic / Text Only. Upon completion of the work with the "master" you take new printer, Which can be selected in the standard Print dialog box. Try to enter the data from your program on your printer, and then flip the result, opening the file, in the Notepad editor. Deyakі programs, especially older ones, provide visnovki purely textual materials, such as decals are even more brown.
installationprinters
You will find information about the installation of local printers (local printer), global printers (printers, shared on the network), as well as Internet printers (Interne! Printers). Local printer, direct connections to one of your computer's ports. Global printer - the same printer, for which a server provides a separate access to a network. (To the printer installed on the computer of the workgroup, it can also be accessed from other computers of the workgroup. help Internet-z'ednannya.
installation local printer
Windows XP Professional beeps to display a new local printer when it is connected to the computer. When a new Windows printer XP checks for the driver, automatically starts and displays the merger, in order to confirm that the printer is installed and available. If you do not know the correct driver, then Windows XP launches the Found New Hardware Wizard (Master of the new installation), in which you can independently specify the location of the required driver. If Windows XP is unable to display the printer, select Start / Control Panel / Printers and other Hardware / Add a Printer to launch the Add Printer Wizard.
During the printer installation process, you will be prompted for the next options.
On the Local or Network Printer side, select the Local Printer Attached to This Computer option.
On the Select a Printer Port side, select either the default port from the Use the Following Port list, or the Create a New Port option, which will open the Type of Port list . If your computer has a single parallel port, then, obviously, it's LPT1.
Give the printer a name. Meister will propagate the name of the printer, based on the yoga model, but you can set whether or not the name is different. If you plan to have more access to this printer, then the printer name is not guilty of overriding 31 characters.
If your computer already has another printer installed, you can choose which one will be the lock-in printer.
The printer can be zrobiti zagalnym for spilny vikoristanny with іnshimi koristuvachami merezhі.
Note. To launch the Add Printer Wizard, double-click Add Printer in the Select Printer group, as it appears in the Print dialog boxes.
installation tether printer
The procedure for installing a network printer may vary depending on whether your computer is part of a domain or a work group. If you have a bad temper, you need to vikonate your feet.
1. Run the Add Printer Wizard by selecting Start / Control Panel / Printers and other Hardware / Add a Printer.
2. On the Local or Network Printer side, select the A Network Printer or a Printer Attached to Another Computer option.
Installing a merging printer in the middle domain
To install a tethered printer in the middle of a domain, click on the next step.
1.On the Specify a Printer side, select the Find a Printer option.
3. On the Printers (Printers), Features (Possibility) and Advanced (Dodatkovo) tabs, enter information about printers that you need to know. For example, you can search for printers in the song area by selecting the Location field on the Printers tab. Otherwise, you can choose color printers by placing a flag at the Can Print Color window. You can also leave all the fields blank so that you can search all printers, as you are allowed
bachiti.
4.Press the Find Now button. The list at the bottom of the Find Printers window will search for the list of found printers.
5.Select the printer you want to connect to next, and press OK.
6. How many printers you have, you can choose which one of them to use as a printer for locking. Let's close the master.
Porada. If you know the current path of the lace printer, then you can install the printer more quickly, for the additional entry of the path and the printer name in the Run (Vikonati) dialog box. Windows XP install the printer automatically and display the black box for this printer.
Installing a tether printer in the middle of a workgroup
To install the printer in working group, watch the next steps.
1. On the Specify a Printer side, select the Find Printers option to set the connection printer to the printer and active.
■ Check the Connect to a Printer option to show you the names of the printer and computer, up to and including the connections. Enter name and direction.
■ Check the Connect to a Printer on the Internet or on a Home or Office Network option. home measure or in the intradimension), if you know the URL of the original printer (div. offensive distribution).
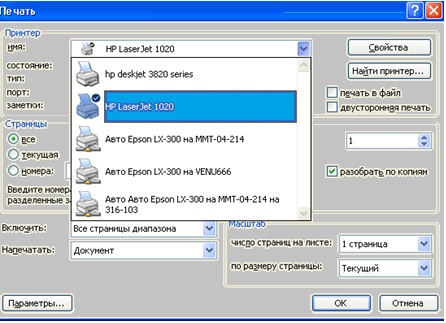
2. After selecting the Find Printers option, the wizard will display the Find Printers side (div. Fig. 1).
3. Select a printer.
4. If there are other printers installed on your computer, then choose which one to use as a lock-in printer. instruct I'll try a side and close the master.
Mal. 1. Choose hot printer on the side Browse for Printer Add Printer Wizard
AT operating system Windows XP can access printers via the Internet. For example, if your company has up to 3 printer permissions access via the Internet, then practitioners in other offices, or at a higher cost, can send documents to the head office. Since the installation of simultaneous access to the printer via the Internet becomes a threat to the security of your company, then printers are subject to strict control and mother of opportunity. You can also install a printer for access via the Internet at home.
There are two ways to install an Internet printer. The more formal way is used by the vicons of the offensive.
1.On the Specify a Printer side, select the Connect to a Printer on the Internet or on a Home or Office Network option. For the text window, enter the URL of the printer.
2.Enter your username and password for the printer.
3. Install the printer driver, if the master asks for it. You can also install an Internet printer in the next step.
Victory web browser to connect with home side server, which printer to control, which one you want to install. Enter the URL http://server/Printers, where server is the IP address or server name.
2. On the Printers side, press the message on the printer.
3. On the Printer Actions side, press the Connect button. You may need to install the printer driver again.
Setting up a printer for a friend to a file
Friend to file allows you to create a file, which you or anyone else can wick for a friend without the need to wick an addendum to read that document. This opportunity may be in good fortune, so you will need to send ready-made files to other people. For example, you may need to send a file to a friend in the distant office, and you can debug it at once. You can change the file to a file from any printer by seeing the Prim to File option in the Print dialog window, which is displayed more when you select the Print command. However, if you often write to a file, you can set up the printer by typing a friend into a file permanently, so you do not forget to set the ensign at the Print to File window.
To set up a printer for writing to a file, create printers using an additional natural procedure. In the Properties dialog window for the selected printer, on the Ports tab, select the FILE item in the list of ports.
To show that the printer is attached to a friend in a file, Windows XP displays the icon of the printer with a disk.
Setting a text printer for a friend to a file
If you need to save a text printout with programs, and if your auditory addendum can only use the Print command, then in some way you need to create a text printer and save it in a file. To add such a printer, click on your feet.
1. Run the Add Printer Wizard.
2. On the Local or Network Printer side, select the Local Printer Attached to This Computer option. Clear the window of interest Automatically Detect and Install My Plug and Play Printer ( automatic appointment and installing a Plug and Play printer).
3. On the Select a Printer Port side, in the Use the Following Port list, select FILE: ne4aTb to file.
4. Install Printer Software on the side software security printer) in the Manufacturer list, select Generic, and in the Printers list, select Generic / Text Only.
When you write to a file using such a printer, Windows XP will create a text file, which you can use with a text editor.
printer remote
To delete the printer, select it and enter the Delete command (Visibility) - for example, press DEL or press the message for the Visibility of this printer in the list of Tasks for a friend. Windows XP Professional displays a window to confirm the removal of the printer. If you remove the printer, Windows XP Professional saves the driver for removal so that you can install the printer again.
Printer and server management
Friend server is a program that controls a friend on your computer.
The Properties dialog box of the printer has a large number of options for its settings. If the printer is installed locally, or if you are an administrator, then you can adjust all or more of these options. If you have a merged printer, whichever administers something else, then you may not have access to these options. However, you can select two buttons on the General tab of the Properties dialog box: Print Test Page and Printing Preferences. To display the Properties dialog box for the printer, select it from the Printers and Faxes box, then click on the Set Printer Properties option to appear in the Printer Tasks list. You can also enter the Properties command from the File menu or context menu for the printer.
Note. Options, about yakі pіdе mov in tоmо distribution, є typical options for laser printer. If you have an inkjet or other printer, then for the new one you can use add-on options, which will sound on the add-on tabs of the printer's Properties dialog box.
Printer change for locking
Windows XP embedding printer. If you install another printer, Windows XP will ask you to install it by locking the printer. Using the Add Printer Wizard program, you can change the printer for locking by selecting the printer you want to print for locking and entering the Set As Default Printer command from the File menu or from the context menu. Perhaps you will be able to change the printer by locking it in the middle of the domain.
Overcharge the test side
To override the test page, click on the Print Test Page button on the General tab of the Properties dialog box. Possibly, in the middle of the domain you can charge a trial side.
Printer change
To set other options, display the Printing Preferences dialog box. You can work with one of the methods below.
1. In the Printer Tasks list, on the Printers and Faxes side, click on the Select Printing Preferences button.
2. In the File menu or in the context menu on the Printer and Fax side, enter the Printing Preferences command.
3. On the General tab of the printer's Properties dialog box, click on the Printing Preferences button.
4. In the process of another, click on the button Preferences (Parameters) in the dialog window Print (druk), as for more addenda, it is at the same time as the Print command (druk).
Select dialog box Printing Preferences (Setting a friend) to change options for choosing paper orientation, inserting the order of sides, the number of document sides of a document for a friend on a leather archway paper, paper quality, etc. (If you are administrating the printer, you can choose to set up locking for these options by pressing the Printing Defaults button on the Advanced tab of the Properties dialog box and the Printing Defaults dialog box). the ability to change the parameters of each other in the middle of the domain, but it’s less likely that you will be allowed to change the number described in the upcoming divisions.
Enter printer name, locationi comment
The General tab of the Properties dialog window contains the fields for assigning the printer name, information about the location, and a comment that the administrator wants to assign to this printer. As you administrate the printer, you can make changes to the fields, but in the middle of the domain it is not possible.
The General tab also contains information about the printer model and its ability (including the speed of a friend, the color and color of a friend).
Enabling support for two-way exchange of danimi
This option can be set exclusively to local printers - and only those of them, as a way to support two-way data exchange. Bilateral exchange of data allows the printer to be informed about such matters, as if the toner is stained or the paper is jammed.
Creation, enhancement and modification of printer ports
Sometimes you can blame the need to set up, adjust or remove printer ports. For this, select the Ports tab of the printer's Properties dialog box.
With more options, you won't have to add a port to administrate your printers. Attachments, for which it is necessary to fix the port, ring out the installation algorithms that allow you to create and adjust the port automatically. Most of the time you may need to add a TCP / IP port, which allows you to connect with others for an additional outbuilding connected to the fence. To select the Add Port button, in the Printer Ports dialog box, select Standard TCP / IP Port and click the New Port button. Windows XP run the Add Standard TCP / IP Printer Port Wizard (Master of adding a standard TCP / IP printer port), which will help you enter an IP address, add a friend and create a new port. Meister to reconsider the connection to the port and see the information about the yogo practicality.
Porada. You may also need to create a port to redirect a task to a friend for a time-out-of-hours printer. For this, in the Printer Ports dialog box, select Local Port, press the New Port button, in the Enter a Port Name dialog box, enter the UNC name of the printer, for example, \\acmeheavyO71\laserjet. Sending a friend to a non-working printer will be redirected to the printer you specified. when removed Windows port XP Display a dialog box for confirmation. To configure the port, select it from the list of ports and click the Configure Port button. Availability of setting options to deposit per port type.
Creation of dekіlkoh copies of the printer
Having made a few copies of the printer, you can select each other for the help of the printer with different sets of options richer and smarter, lower manually choosing different configuration options for each other for the skin setting for the other. For example, you can make a copy of the printer for a high-density color or a copy for a low-density black and white. Or you can create printers with different access hours and different priorities.
To create another printer, install the printer using the Add Printer Wizard, as you did earlier. On the Use Existing Driver side, select the Keep Existing Driver option. On the Name Your Printer side, give it a name, as well as the name of the first printer. Add a comment that indicates why this printer is installed.
Time limit for printer access
The hour of access to the printer can be changed for the additional option Available From (Available from) on the tab Advanced (Dodatkovo) of the dialog window Properties (Power), specifying the beginning and end hours for the open fields.
signetdocument
To overwrite a document, enter the Print command (Druk) for the additional selection of File / Print (File / Druk) or pressing the CTRL + P keys (the standard shortcut for the Druk command) or the equivalent pressing of the keys. An addendum, for which the other vibrates, to display the dialogue box Print (Druk) (for a little 2 indications, the butt of such a window). Select a printer, enter the required parameters and click the Print button.
A lot of add-ons can also be done with the Print button on the toolbar. For the help of the button, you can start another without displaying the Print dialog window (Druk).
You can also initiate others directly from Windows Explorer by dragging the document to the printer icon (for example, from Printers and Faxes or on your desktop). Actual documents can be arranged by pressing right button mouse їх icon і by selecting the command Druk from the context menu or (in Windows Explorer) From the File menu. Under the hour of spooling, scanning the document in a different way, or otherwise, Windows XP Professional displays the printer icon in the display area. When hovering a mouse over a new indicator, you can see information about those, how many documents are in the window. Dvichi press on this badge, so that you can see what you show to the other.
Friend in modeoffline
If you're using a local printer instead of a tiled printer, you can take it offline. To use a local printer in offline mode, enter the Use Printer Offline command from the File menu or the context menu on the Printers and Faxes side. To switch to online mode, enter the Use Printer Online command from the File menu or the context menu.
Managing other tasksand hell to each other
Before that, as a task to a friend, sent by you to the printer, if you are instructed, you can cherubate him in your friend’s friend (as you have on those є vіdpovіdnі novnovazhennya). Dvіchі klatsnіt on cherzі druku for the printer.
From the menu Document (Document) vykna through druk or the context menu for zavdannya druk you can vykonat next steps.
■ Appreciate and recall the leader of a friend.
■ Restart a friend-on-the-cob task.
■ Ask for a friend.
■ Change the authority of the task (for example, you can change the priority
zavdannya druk or zastosuvati before the new distribution).
For a local printer, you can easily manage tasks via a friend. For a lace printer, the administrator of the domain, better for everything, having saved you the management of the zavdannya druku, but with whom you are sing-songly allowed to sack the zavdannya, and, ymovirno, pripinyat and vindicate the zavdannya. As a printer administrator, you can assign and refer to each other, check all the tasks on the Printer and Fax side for additional command entry from the File menu or from the context menu.