Installing Canon printers. Canon i-SENSYS MF4410 printer installation and setup
As you have become the master of the richly functional attachment of the Canon i SENSYS MF4410, we can warmly welcome you, shards, and now you have the opportunity not only to make other documents, but also to successfully scan and photocopy them. Unfortunately, in the midst of such a miraculous occasion, one can blame and confuse, and another trivale can provoke a rose.
Installed and installed Canon printer i-SENSYS MF4410 includes driver installation.
The problem is blamed if the Canon i SENSYS MF4410 has a problem connecting the MFP, due to the installed drivers. In order to protect such unimportant nasledkami, cherish the help of a koristuvach, who will work with a picker at once with an outbuilding, and also win over the honors of professionals. So, for the sake of revenge, you can take revenge on your peculiarities, which allow you to “outwit” attachments, and also to learn how to practice at any vapadka, vykonuyuchi like all watered down.
How to install the MFP
The Canon MF4410 MFP has a lot of shortcomings in its rich functionality, as well as in the swedish mode. Such a building printer provides the delivery of twenty three rounds for one piece of paper. When you navit the first arcush, it is friend after 9 seconds after the first request.
Also, the rich-functional attachment opposes its compactness, understandable interface, opposing rare-crystal monitor. Such an MFP successfully competes with other printers that work and scan, while being able to save energy while working. In practice, you should consider all the advantages of the printer, and then install the attachments correctly.
Installing drivers
At the beginning, you need to install the driver that will ensure the normal functioning of your Canon i SENSYS MF4410 printer. It is recommended that you keep the size of the packaging in which your device is sold. Often the maker accompanies the Canon MF4410 MFP with a disk written on a new driver. If you made a search, but the results are zero, you didn’t know the fragments of a disk with drivers, then reorient your search fuse to the Internet.
At per row In any browser, write down the model of your printer, indicate your need to know the driver. After the completion of the search, you will be asked for different sites. Take a quick look, there is nothing in the middle of the official website of the Canon picker. You can be trusted without fear.
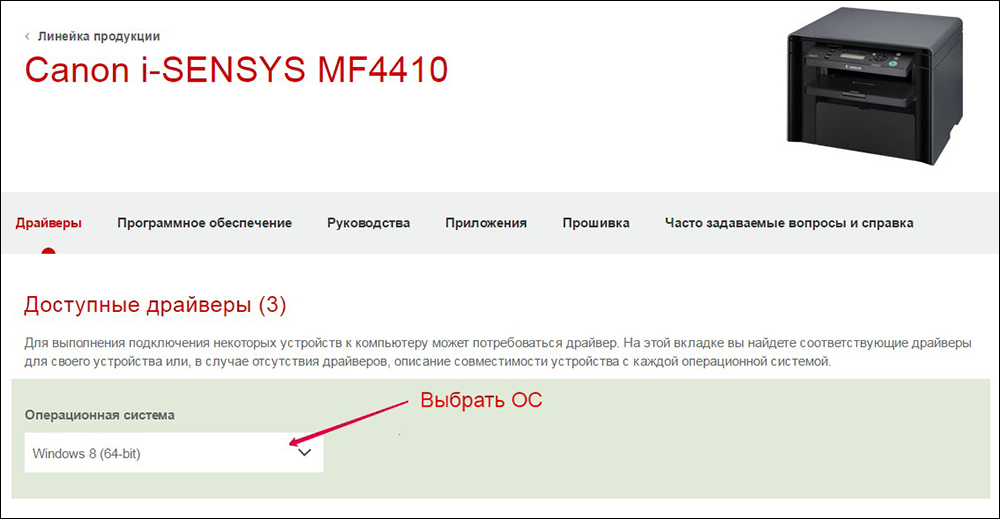
Well, there is no other option, how to go to third-party sites, even before downloading, you need to download the client's prompts, change your mind, that this site does not spread all viruses, obviously, it will not cause problems for your computer.
As you can see, the search can be accompanied by a 3-minute hour, the fragments of the driver downloaded by you may not go through those that are oriented to your own operating system, or the same, like yours, but for the help of other bits. Once you are interested in a viable driver, you can boldly proceed to the next stage of your actions.
Installing the Canon MF4410 printer with driver installation is the same as for other attachments. View the printer from the computer, see the folder, de vie saved the driver. Find the file there under the name Setup, click on it to activate the installation master.
The entire installation will start in automatic mode. You will need more than once to get involved in the whole process, vykonuyuchi povazhannya, like hanging out the master and talking about the information that is blamed on the screen.
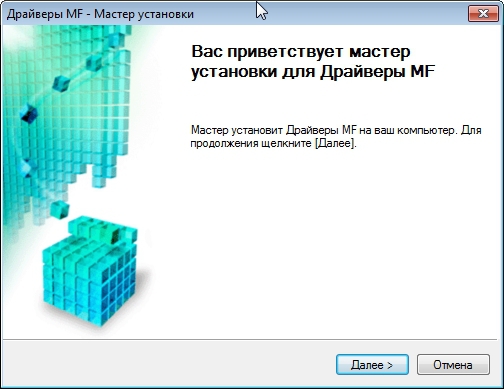
The master himself will tell you if you need to connect the BFP to the computer. Wait for me to finish the installation process. As soon as you correctly zavantage the driver and went through the installation process without pardon, you will be able to immediately switch to the normal functioning of the printer, obviously, charge the first test side.
Problems with the scanner
Some people can fix problems by trying to scan. Zdіysnyuchi less than others or robljachi xeroxies of documents, the magistrates of the MFP can no longer be pleased with the result. However, the first attempt to launch the scanner and the capture of the scanned image can cause failure. Obviously, whether it’s a rozcharuvannya causing a little confusion, and then we’ll grow up, which is still the reason for the failure.
The scanner's masters do not allow the thought to forget about such a function, I will add it, with which I can win just like a printer and a copier. It's right, if you use the Canon MF4410 MFP, how to scan, vicorist such an attachment, our recommendations will help you.
Let me remind you that launching the scanner in the usual way for you will be successful, and as soon as the process is completed, the screen will often show a pardon Cannot scan because of the following. Insanely, in whatever way you can take the image, you can’t see it, then, you happen to re-scan the document.

Meister can tell you if the MFP is connected incorrectly to the computer. Obviously, about every change, take a look at the place where I’m going to build a PC, in order to incapacitate the filthy contact, but in most cases, such a pardon is blamed for other reasons.
We encourage you to speed up with some tricks that allow you to rightly bypass such technical barriers. If so, the foldable adjustment of the Canon MF4410 scanner is not transmitted seriously.
on old building MFP recognize the COPY / SAN button, click on it. When the display of your MFP shows up, it will tell you what type of scanning you need:
- computer;
- remote scanner.
PORADA. You need to choose another parameter yourself, after which a letter appears on the display, which will give you a little bit of kidney. Now you can continue scanning documents using the method that is most suitable for you.
It's a pity that you happen to be so cunning to speed up the scan, as only one blames the need to speed up the MFP for scanning documents. As a reminder, you have made a change only for a stretch of no more than five minutes.
Father, for what you blame is small technical problems With the Canon MF4410 MFP, don't panic, everything can be fixed. Consider the recommendations, which are not accompanied by folds, and “take” your richly functional addition to suit you.
Hello, newcomers to the Linux operating system!
Today we will connect Canon printers to our (or your) computer. From the very beginning, I will allow myself to talk about the installation process and explain why connecting the Canon brand printer itself is very difficult. On the right, in that these printers are “soft”, so without a computer, that software can’t manage wines. Without a computer, it's just a matter of typing in those microcircuits, and in order to get them right, you need software security. The software security is developed by the printer manufacturer Canon, and, behind the covert (and, perhaps, voice) homeownership with the Microsoft Corporation, the software security is developed by itself for the products of the company created by the corporation. Movlyav, bazhaєte drukuvat on the printers of our company - buy Microsoft Windows!" Ale, crocodile with a planet with wide crocodile operations Linux system And the lawful efforts of the corrupt operating system (as well as the antitrust laws of the United States) have forced Canon to work to support our system for you. Pdtrimka, honestly seeming, useless, ale gifted horse in the teeth, do not be surprised, and we turn on our printer. software security, what є.
As an example of vikoristovuvatimu AltLinux Shkіlniy, I'll take a Canon LBP-2900 printer (well, I don't have anything else), screenshots are only there, where you can't do without them, the main work is at the terminal. I guess What's on Syrian background there will be commands that are typed in the terminal, You can simply copy it from your browser window and paste it at your terminal window.
Oh, let's get started!
Canon driver installation.
Connect the printer to the computer and vmikaєmo yoga. Open terminal and type command
dmesg | grep printer
as a result of this, we are more likely to prove it, I’ll go up to it:
usblp0: USB Bidirectional printer dev 3 if 0 alt 0 proto 2 vid 0x04A9 pid 0x2676
then continue further. Become root
su
the system will ask us for a password, we will type it and after successful authorization we will go to the home directory:
cd ~
I’m guessing that it’s not a good idea to launch programs from third-party retailers from folders with Russian names.
To download the Canon LBP-2900 printer driver file to your computer, from our server, type the following command:
wget http://site/files/canon1.tar.gz
or directly in the browser it is pressed and taken to the home directory.
Obviously, you can find the same file on the official website of the Canon company (so you have an exotic printer that will be printed in short cut), and in our file, download a lot of different Canon printer drivers.
Let's continue. Unpacking the archives we have taken:
tar xvfz canon1.tar.gz
otherwise it's on pressure right button teddy bears on file i's vanity context menu we select the item “Unpack here”. Go to the folder with drivers for 32-bit systems, choose rpm packages:
cd ~/CAPT_Printer_Driver_for_Linux_V220_uk_EN/32-bit_Driver/RPM
In the folder /Src є cndrvcups-capt-2.20-1.tar.gz archives, in the new ppd folder, the file CNCUPSLBP2900CAPTK.ppd is located and it is possible to go to the RPM folder. Now you can check the disk, from which you installed the system, insert it into the CD-ROM and check, the wine docks appear in the system. If the vin is specified, we start the installation of the driver and the daemon friend Canon. Without some demon, Canon printers won't be buggy
apt-get install cndrvcups-capt-2.20-1.i386.rpm cndrvcups-common-2.20-1.i386.rpm
after that, as the terminal displays “done”, the daemon controlling the CUPS signet is called:
service cup stop
or in the "System Management Center - Services" click CUPS, press the "Upload" button. Verify what has been created need folders
ls /var
And we marveled at the Visnovka, chi є folders ccpd and captmon. Like mute - we create
mkdir /var/ccpd
mkdir /var/captmon
Like folders, we check that a channel has been created for linking the system with a printer
ls /var/ccpd
at the seen terminal, it says fifo0. If there is no way for the channel - we create
mkfifo /var/ccpd/fifo0
to which channel full access
chmod 777 /var/ccpd/fifo0
ta robimo vlasnik channel root-a
chown root:root /var/ccpd/fifo0
Assign the attributes of the /usr/share/cups/model folder
chmod -R a+rX /usr/share/cups/model
Run CUPS either through "System Management Center - Services", or
service cups start
Register printer with spooler friend
/usr/sbin/lpadmin -p LBP2900 -m CNCUPSLBP2900CAPTK.ppd -v ccp:/var/ccpd/fifo0 -E
Now "let's see" the spooler, what can be done with our printer
/usr/sbin/ccpdadmin -p LBP2900 -o /dev/usblp0
can go to kshtalt
Starting the Canon daemon
service ccpd start
Let's write a simple script for automatic start daemon to a friend at system startup. For whom we marvel, yak rest file at /etc/rc.d/rc5.d
ls /etc/rc.d/rc5.d
and create a file with a number one larger (I have the remaining file showing S60)
gedit /etc/rc.d/rc5.d/S61start_ccpd
Have a look text editor we insert step rows
# !/bin/bash
service ccpd start
Robimo script vikonuvanim
chmod a+x /etc/rc.d/rc5.d/S61ccpd_start
that rebooted the computer. It was no longer possible to rewrite the installation, changing the test side to another. One respect: if the computer is credited, the printer is also to blame for the credit. However, if you forgot about it, you just need to run the Canon daemon from the terminal
service ccpd start
To install other models of Canon printers, download the driver for your printer from the manufacturer's website and copy the ppd file for your printer to the RPM folder.
I also want to remind you: first of all, try the “Add printer” button in the CUPS Control Center (re-energize my password, type in root that password), as much as possible, that your printer is supported and without being such tricks!
From i all! You have installed a Canon printer in the AltLinux operating system!
It is not uncommon for the short-sighted-pochatkіvtsy to decide that to fix and install the printer with the required parameters, recognized for the other - on the right, it is too foldable and confused, they are wondering that only highly qualified programmers can be selected.
But really, Kenon printers can be adjusted easily.
The installation process in the main hour may take no more than 15 minutes, and after that the windows are merged, they will be even more intuitive.
We can connect to a computer, and then we will connect to a printer. For which you need to connect the printer cable to the computer or note-book, and immediately connect them to the printer.
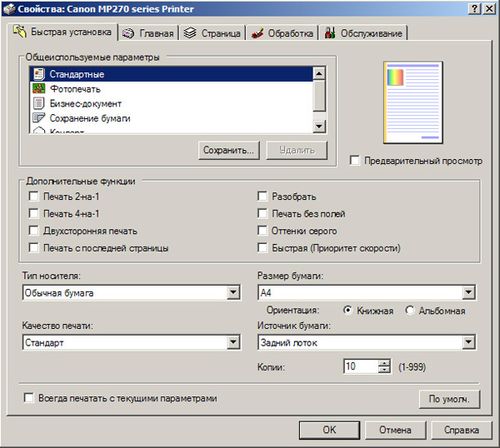
The first thing to do is to overcharge documents, it is recommended to adjust all the required parameters on the printer (including clarity, economy of ink, color and all other). For this process, go to the Control Panel, then at the "Add Printers" select a label with the name "Printers / Faxes". Vіdkryєtsya vikno, de will be shown all the attachments installed on the computer. Then we will need to choose the required printer, adjust it and adjust there all the necessary parameters for other documents or photographs.
Canon printer setup

More information about the coristuvachi begins to confirm the fact that the building printer is bigger, lower text. Age view correct nalashtuvan to lay down more richly for a friend, save money. Moreover, some printers can use their arsenal wirelessly connected via WiFi (Canon Pixma printer line). Ale varto start in order: 
Good time for each other required document Useful methods for directing yoga directly to the printer. Shvidka - seeing a label on the panel of the document task, robbing the distribution of the entire document in a single copy. The primary friend can be reached by pressing the Ctrl+P keys or in the File - Friend menu. In this menu, you can change the setting of the Canon printer. In addition, you can choose the horizontal orientation of the side - for homemade other good photos and memorable moments, another document from both sides, which can be done manually and allows you to save on paper, stained ink - another for the songfulness of lightness, etc. of the specified parameter .
Canon Printer Fitting
For a more professional friend, you can adjust the clarity of your Canon printer. For the cob of varto, it is made up of paper paper, which is victorious: glossy or matte paper. In addition, you can clean up the fields, add shades of grey, experiment with images on different sizes of paper.
Brightness is created for blanks or manually at the depositor “Colour/Intensity Adjustment Manually”. Next, select the required parameter. But the result you can inadvertently sing less on paper, to that varto spend a lot of free time for deak in order to signify the necessary adjustments. In addition, you can re-address old photographs, which can be repaired from time to time. For which you need to set up a scanner, and on Canon printers, date new life dear signs.
Virobnik, who has been on the market since 1933 and may have had over 200,000 jobs, simply can’t afford to be left out of the job, even though Canon has been the flagship of the gallery and other photographs. Constantly blush іsnuyuchi models they are created new. Also, there is an official site with a report description of models, the presence of drivers for them and technical support.
Install a Canon Pixma printer connected via WiFi with a loan of no more than the amount of credit that is given report description. Okrim іnshoy pointed report instruction out of sync dartless connection attach via WiFi to the computer. It is also possible to induce malfunctions and paths of their adoption. Therefore, you don’t dare to take on this clumsy robot on your own and add your own information about how to adjust the parameters of your printer’s friend, read this instruction and you have all the language!
Canon pixma printer installation
1. Dochekatisya povantazhennya operating system;
2. Connect the USB cable;
3. Go to the Internet and see the official side of your printer's selection (ours is Canon);
4. At the request, you need to type the exact number or letter code, which means the printer model;
5. Then select the type and size of your operating system from the list and install the driver for download;
6. If the necessary file is copied to your computer again, you need to start it;
7. After the installation is completed, the system will prompt you to reset it - wait a minute, if not - reset the computer manually;
8. After restarting the computer and starting all services, it is necessary to go to the section “Additions and printers” - this section is listed on the panel when the computer is turned on;
9. Find out your color or black-and-white printer and, through the right mouse button click, select the “Write for the lock” tab.


The master's bezkoshtovny way for the repair of the BFP for a year from the moment the engagement was taken off.
Permit us to spare a sprinkling of ink, but at the same time, the quality of the friend will be lost. Canon printers learn to use original cartridges to give the best quality that can be expected in inkjet printers.
Qi cartridges are mainly high-quality FINE technology, so it’s not varto turbuvatisya about those who should look at each other or be inconspicuous.
It doesn’t matter to get the printer set up for a friend in blackness, it doesn’t matter, it’s possible to get it done with basic computers and printers. You will need to consult the instructions below, as they are also available in the Printer Operation Guide.
In this post, it is possible to imagine two color methods for setting up a friend on a black swede. One of them - if it is necessary to blame one by one, for example, it is necessary to inflict close to 20 sides, all in the place of black color and it is not necessary an important document. Another way to install the configuration is to install the black color on the whole other, which is vibrating from this printer.
To inflict only okremi documents like a shvidka black right in front of the signet:
Krok No. 1
For which we will need to tweak a text processor: Microsoft office or Open Office on Linux OS. These are the two most victorious processors.
Krok №2
Under each document, our operating system will display a dialog window with printer settings. Tobto another can be amended, yakі allow us to change the quality of the other and other options.
Krok №3
If this option is displayed, press the Set to friend button. Sound like this for sure.
Krok №4
In this case, we choose that each other will be carried out on Canon printers, and the other one - Shvidka black. Press the OK button.
 |
Krok №5
Z urakhuvannya usikh tsikh nalashtuvan, the document was sent to each other in blackness without saving nalashtuvan for future zavdan druk.
Printer settings for Windows XP
The printer is to blame buti ukmkneniy and pratsyuvati on the same tightness, without pardons of cartridges and documents from others.
Press Windows or Windows for configuration.
Go to the Care Panel.
Go to the Printer and Fax menu.
If you are convinced that this is a printer that needs to be adjusted, right-click on the mouse and select the POWER option.
If you can see it, at the top right corner, select the Add-on adjustment tab.
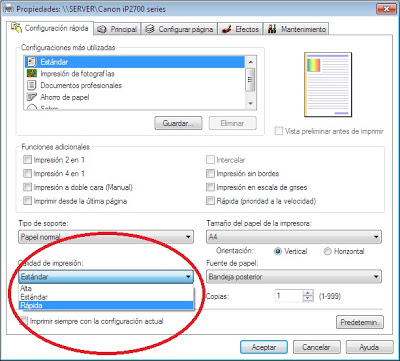
Select next to the row Yakіst druk - Shvidke black (this option can be displayed in the field of coloring with color).
Come on, press the Stop button.
Printer settings for Windows 7
Press the START button at the bottom left corner of the working table.
At the right side of the menu, select the Add printers option, click on it and it will appear in the list of available printers.
click with the right mouse button and select the AUTHORITY option to the other, the other option to the beast down.
Find out the same parameters as in Windows XP in the printer parameters.
Printer settings for Windows 8
The retail price is in the transition to the parameters of the other. Operating systems are changed by the interface. Windows 8 gives you the ability to work only in black color with Canon printers, which does not depend on the operating system, but on the printer model. Click the hover button below to go to the Printers and Attachments menu in your operating system.
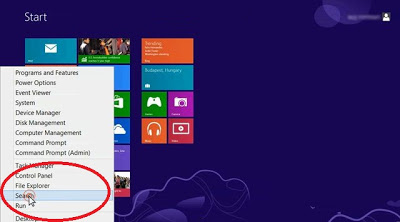
Come in and look for a nashtuvan from the working table.
To go there more quickly, right-click on the mouse in the lower left corner of the working table. Vіdkryutsya kіlka variantіv, choose Poshuk. div. image below...
 |
Go to build and choose add a friend
Please click on the link to select Settings. There are no more available results for options, which can be adjusted. At the prompt, enter Attachments and printers, at the right side of the window, select Attachments and printers, click on the buttons for these options. Div. little ones...
Attach printers - this folder itself, like in others operating systems. There you will find all printers available for customization. Similarly, select Options to the other, but the other option is down and adjust the printer, as in the previous operating systems.