How the local printer is zrobiti merezhnym. How to be a printer zrobiti merezhim
How to connect a printer to a router?
Master's note:
At the process of creating an office space, you should add printers or MFPs to it. Іsnuє kіlka ways to create such a connection. Some of them may turn out to be very handless.
Required: mesh cable.
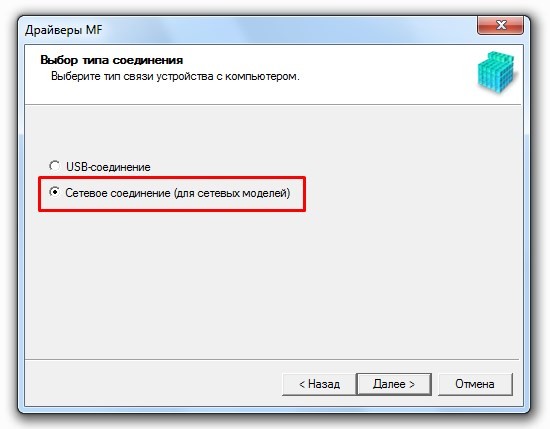
In a situation, if for a meeting of an office or home measure If you win the router, then it is more logical to connect the printer itself to the new one. Tsey method maє kіlka wins. Come border port printer to the LAN socket of the router. For whom hurry up tie cable which you need to prepare ahead of time.
Let's choose the next computer to help you configure the router. Don't forget that the printer is to blame for only one add-on, which LAN port. Tse means that it is not necessary to connect to the printer through the mesh hub. Open an internet browser and enter the IP address of the router. Also, enter your password. The next time you enter the menu for the settings of the fenced property.
If the connection to the Internet is already set up, turn it over, and the NAT function is activated in the set up local networks. If you are not eligible for the DHCP function, dodatkovі nalashtuvannya you don't need to. Otherwise, open the routing table (Route Table) of your border property.
Select the LAN port to which the printer is connected, set the IP address to a new static value. Also, if it is not possible to work in the settings of the router, it is necessary to connect the printer to the computer or to the laptop.
Now you need to install software security, to give you the opportunity to win fine lashing printer robot mode. After running the utility, set a static IP address for which owner. It is faster to speed up this IP, which is considered by the rest of the segment as the address of other framing outbuildings.
To complete the operation, you must physically turn on the printer from the computer. Run the "Start" menu => "Add printers" => "Installing a printer". Then the next step is to select the option “Add local printer". Specify the type of port and press the "Next" button. Then, install the correct driver and connect the printer to the computer.
How to allow all coristuvachas to work from one printer.
It is clear from the fact that modern printers, MFPs and other devices can be connected to a PC. The most popular and the most wide-ranging LPT (if you want this port to be included in the mod), USB, Ethernet ports. Apparently, setting up a printer on a personal computer will depend on which port you choose. You must spoil your pluses and minuses. Well, for example, if you send a friend via usb, you can say, "instantaneous", then for a friend through a mesh, you may need another hour, even if the documents are fought for your size and until the stink is transferred through the mesh to the printer, the friend won't start... before that, if the printer is connected via usb, if the server PC (the PC on which the printer is installed) breaks down, the printer will not be available to anyone.
Otzhe, let's do it. Let's take a look at two examples of setting up attachments on Windows 7.
USB connection
Perhaps the printer is installed on your computer and connected with a USB cable, how can it be so that others could work on it?
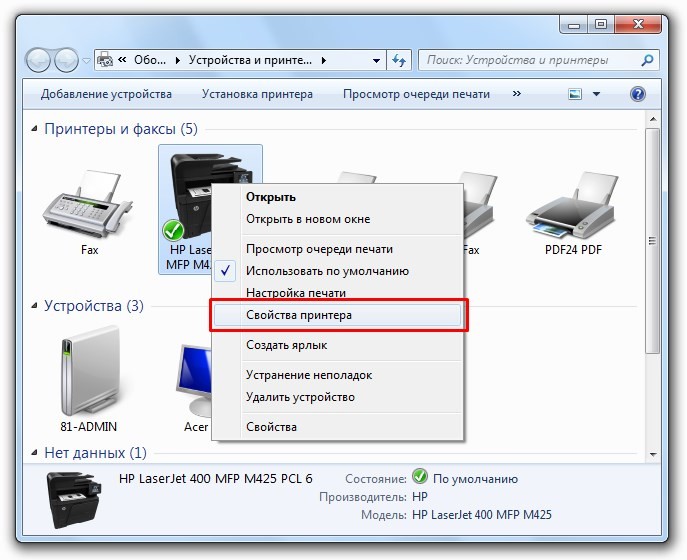
We need to go to " Start" - "Attachments and printers":
Everything will be seen in the window installed printers, fax, monitors, scanners, MFPs, etc.:

Ale, we need to choose a printer, until which next we need to give sleep access. Klatsaemo right button Go for the printer you need (I have an HP LaserJet 400 MFP M425 PCL 6). At the splicing window, it is necessary to click on the item " Printer power":

Cho mi here bachimo, tse inactive item. Full access to your printer". It is necessary to check this box. Similar manipulations will now allow us to know the printer at the ip address or the DNS name of the computer. But don't hurry to attack " OK", next check the box next to the name" Contribute to Active Directory(If you have a domain machine, you can ask the printer's password, but you can check it out below in the article):
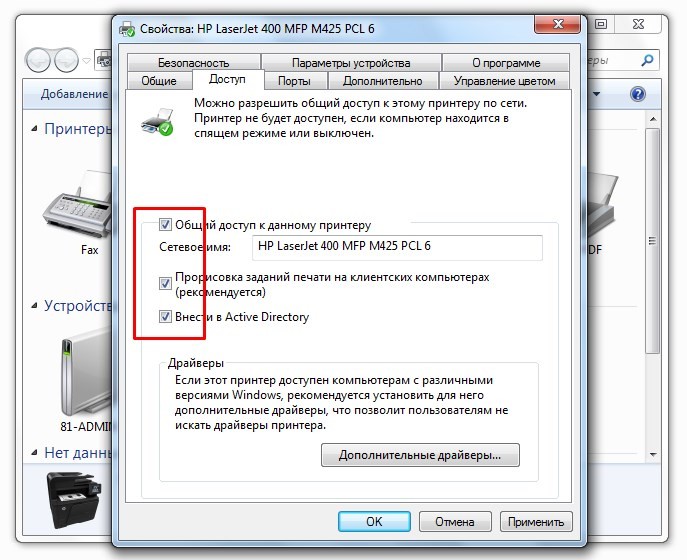
First click on the button " OK", zrobimo finally completed. Click on the button" Additional drivers...":

At the vikni " Additional drivers it is necessary to mark all the checkboxes (be aware that drivers for x86, x64, etc. are installed). Allow to install drivers to the printer as needed, not only for 32-bit PCs, but also for 64-bit PCs:

Mustache! Now you can push OK"Whoever has that in front of me. Nalashtuvannya z access completed. Now let's see how to connect to our printer from another PC. For whom it is necessary to go to the window on another PC Attachments and printers"that click for the help" Printer installation":

We have two more points: " Add local printer"і":
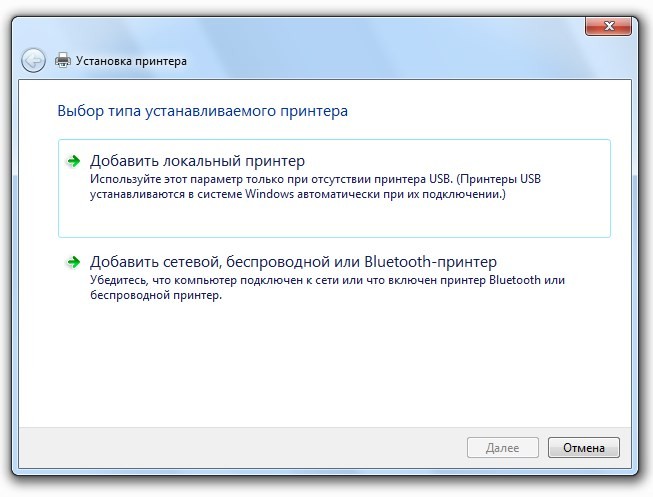
To connect the printer by IP address, select the first item, to connect the printer via Active Directory, select another item. Let's first select the first item, click on the new one and go to " Select printer port":
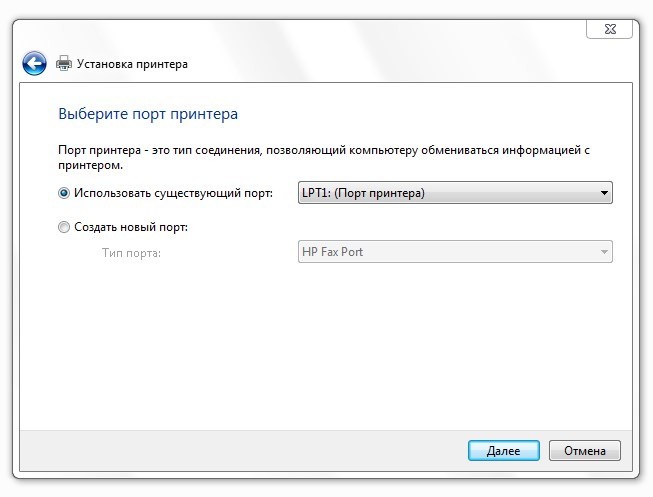
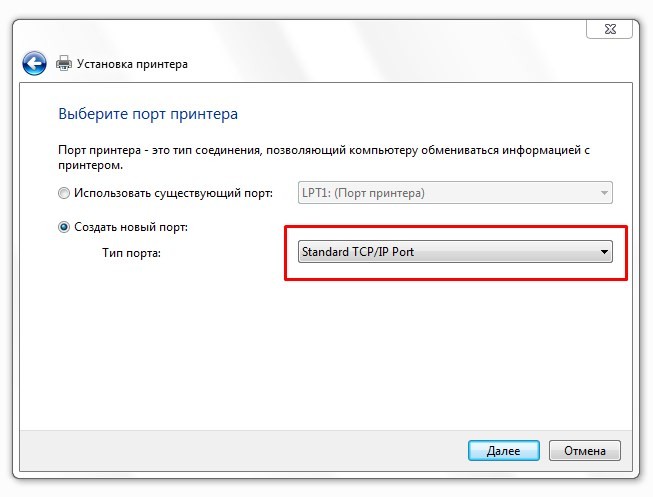
Choose " Create a new port", in" port type"choose" Standard TCP/IP Port"abo" local port"and pressing" Dali":
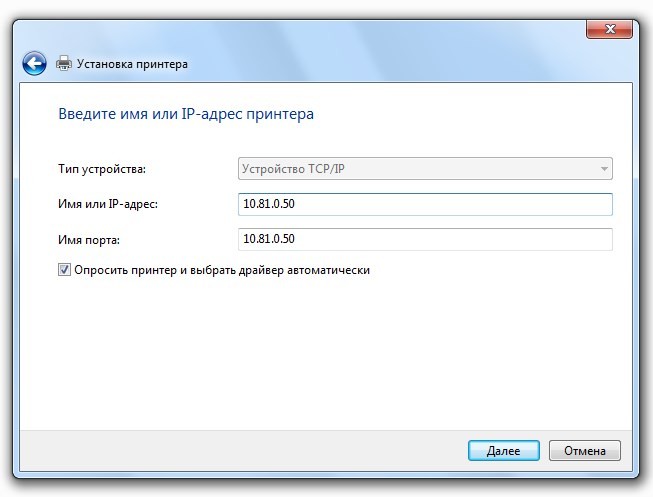
At the menu Enter a name for the printer's IP address"need to specify the IP address of the computer on which the printer is installed (my version is 10.81.0.50)," Dali Once the installation is completed, you can re-open it.
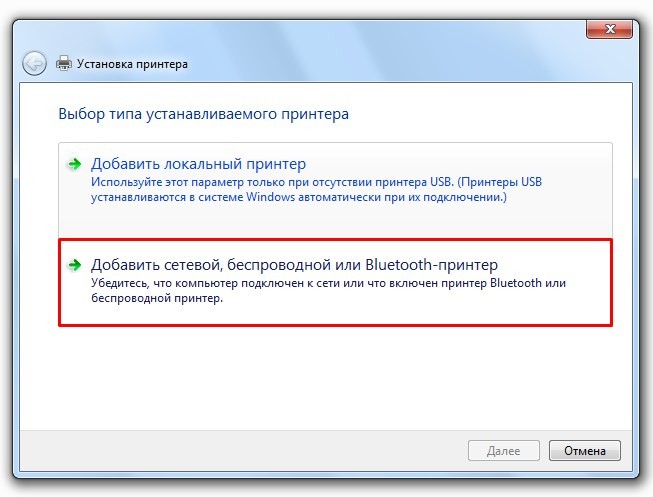
Now let's turn to that point and take a look at adding a printer via Active Directory. Select item " Add a wired, drotoless or Bluetooth printer":
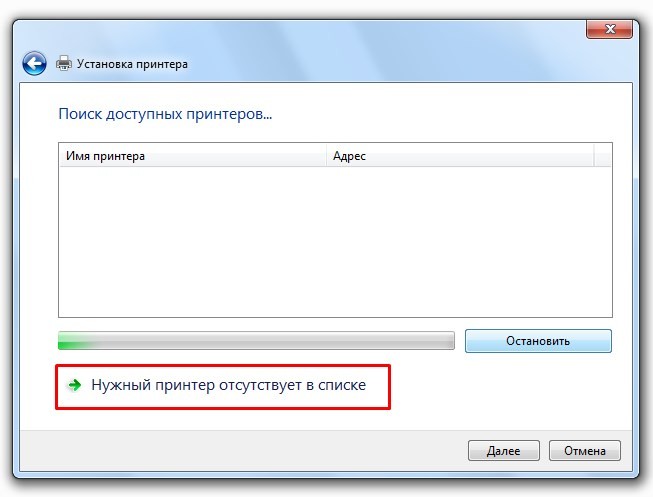
At the menu Search for available printers."without looking for a joke, I'm on the verge of an onslaught" Required printer in the list":
My bachimo menu has three installation options, you can choose any of them. At the first point you can know the printer through Active Directory, at the other point you can know by entering the computer name or knowing the computer through the link, at the third point you can enter the ip-address. We choose the first point, we press " Dali"and otrimuemo vikno" Poshuk: Printers":

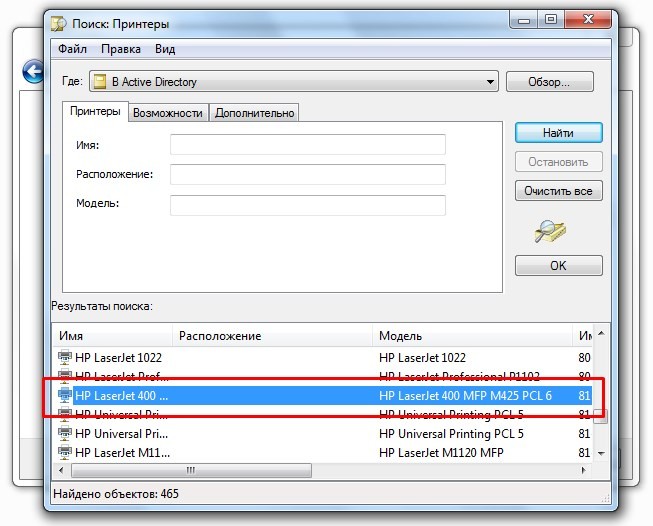
Here you will see a list of available printers domain name, and you can also filter them for the parameters. On the screenshot you can see that I have chosen my printer, which I have shared earlier, just click on the new one to start the installation, once it is completed, you can turn on the printer.
Ethernet connection
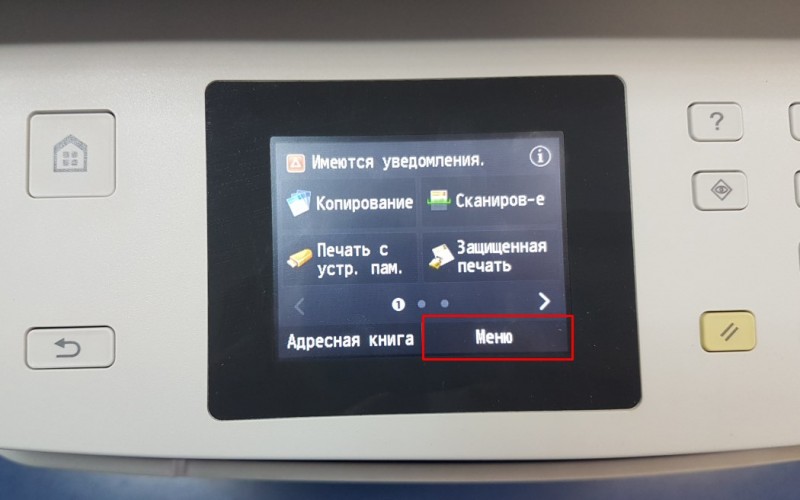
I will show an example of such a connection on a printer, an MFP Canon i-Sensys 411dw. In other varieties, those other models will be identical. First connect directly to the printer through the mesh, it is necessary to change the IP address on the printer itself! This is important, otherwise we simply do not know the printer at the printer.
On the touch screen of the printer, it is pressed Menu":
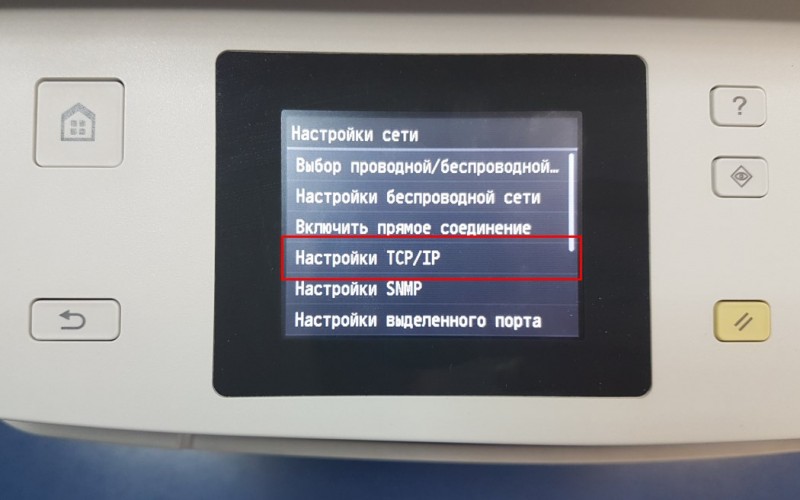
Choose " Laying out the mesh":

Choose " TCP/IP settings":
Choose " IPv4 settings":

Choose " Setting up an IP address":

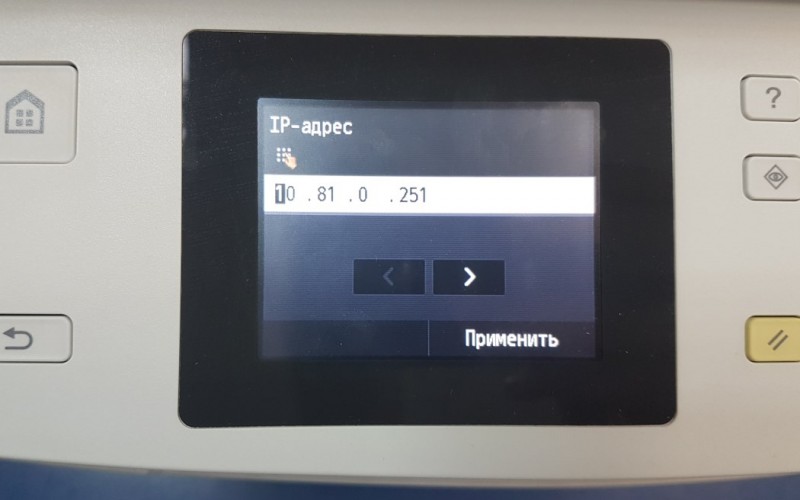
In this menu, you can automatically adjust the settings, but if it shows the error, the printer cannot find the DHCP server, it seems to be shorter, the IP addresses of the printer are automatically incorrectly assigned, it’s easier to enter them manually. Choose " Take off by hand":
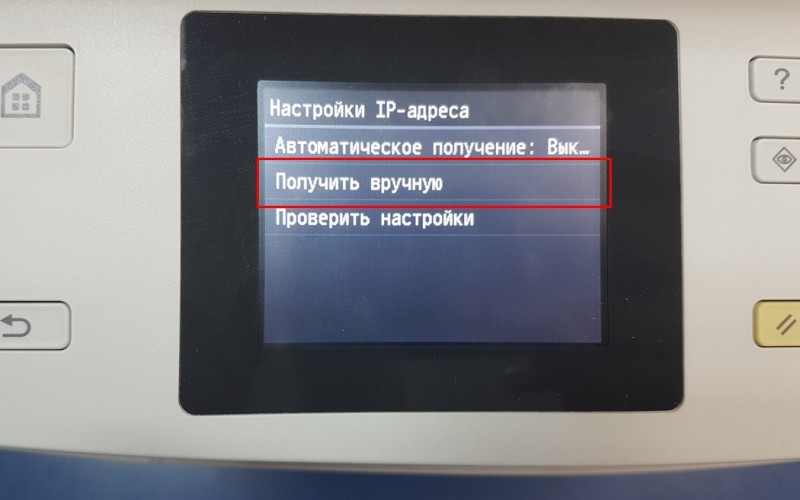
Enter the IP-address, p_dmerezhі mask. All of these parameters should be stored in your area, on the photo of the address it is shown as an example. If the address is entered, that mask is under attack " Zastosuvati and we can crash to our computer to connect the printer.
After setting up the printer, it is necessary to get the driver from the official site, in my case the driver was taken. MF410MFDriverV2160W64RU". Unpack and run:
We now know the printer, because the automatic search did not help, enter the IP address of the printer and press " Dali":

Why is everything! The printer will be installed and you can print documents. I am happy to help you with setting up your printer! Success!
It seems that children at school need a color printer and a scanner. She herself wanted to remember the black-and-white laser, which is being torn apart, in 1996 to the release date. The selection criteria were: color, laser technology (interrupt between printing can reach months), automatic document feeder for the scanner and copier, automatic two-way Wi-Fi, to put the screen in a distant corner. For these characteristics, a giant for 25+ kilorubles was chosen, which turned out to be unreasonable. I raptom on the robot saw a couple of gift cards from one known rye shop, and it came to my mind that I needed to buy it. It's a pity, in this assortment there were less than three laser MFPs with a color scheme, but I could not match the other two. Two months later, the assortment did not expand in any way, but instead, shrunk to two positions throughout Moscow, and I decided to take those that were not on display.The lucky one was the HP Laserjet Pro 100 Color MFP M175a without auto-rotate sides and connected only via USB. Before the speech, I appeared not so great, as I looked at it, and not so gamirny, as I write in the reviews.
manager
How automatic bilateral friend It's impossible to add to the printer, it's really possible to get it right from the computer.Simple, but not a better way - connect yoga to a router that distributes the Internet near the apartment and, maybe, maybe USB port. This way can be on the way, so, first, the MFP will be guilty of being within a three-meter range from the router, in another way, the router will only allow a friend, and not the same scan (on factory firmware).
Another way is to buy some box for $35… …and see if you can work with what you need and will be able to sum up Ubuntu on the client side. The representative of the virobnik willingly demonstrates the ignorance of the miraculous Chinese English. I do not become successful.
The third way, even more adventitious, allows you to connect via USB to one computer, on another computer so, no more connections to another, via USB local measure, hoch іnternet.
Soft
The implementation of the original sprat, but I’ll immediately select the one that is included in the Linux kernel, so that you can spare yourself any possible license fees, fees, impossibility to build that other dependency. It's called usbip.Zalizo
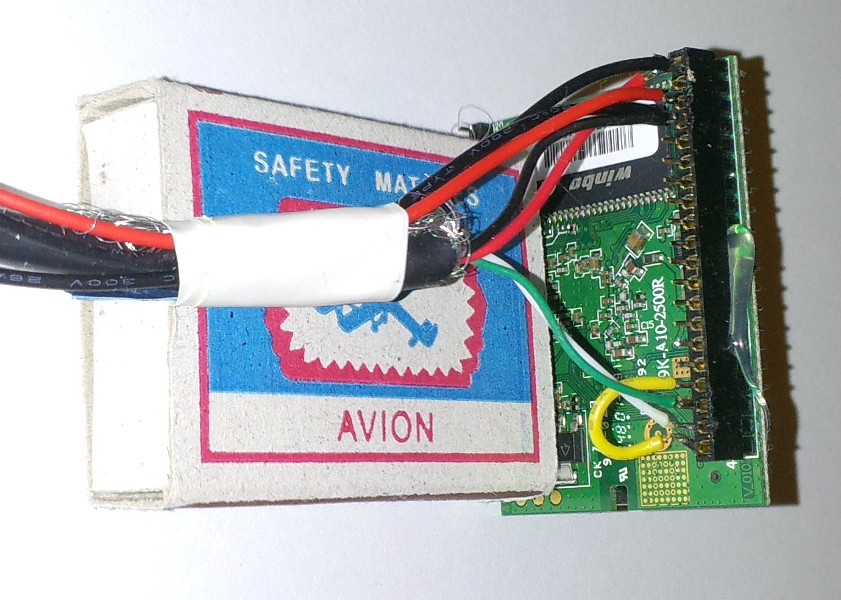
It was possible to know the old D-Link in the shell, put it on the new OpenWRT, but it would be cumbersome and with a small part of good hands, so it was possible to joke around a little, all-powerful and inexpensive.Carambola
Rozmirom iz sirnikovoy box, can be on board Wi-Fi, USB-host, 320 MHz MIPS-processor, running no more than 1.5W, OS OpenWRT, cost 22 euros.Raspberry Pi
rozmir 86x56, Wi-Fi to be connected to the external port and plugged into USB, 700 MHz processor, rich on the board of the one that is not available, 3.5W minimum (700mA at 5V), Linux OS on vibrate, cost 35 US dollars. size 120x120, 1 GHz ARM processor, rich peripherals, Linux OS, power 4.2W (350mA at 12V), cost 55 euro. maybe, save 5W, cost from 64 to 78 euros.As a result, according to the criteria of expansion-energy-saving-variety with the improvement of the sufficiency of functions, the first option was selected - Carambola.
process
It was planned to connect only USB, but it was not necessary to use the expansion board and the case, replacing the module itself.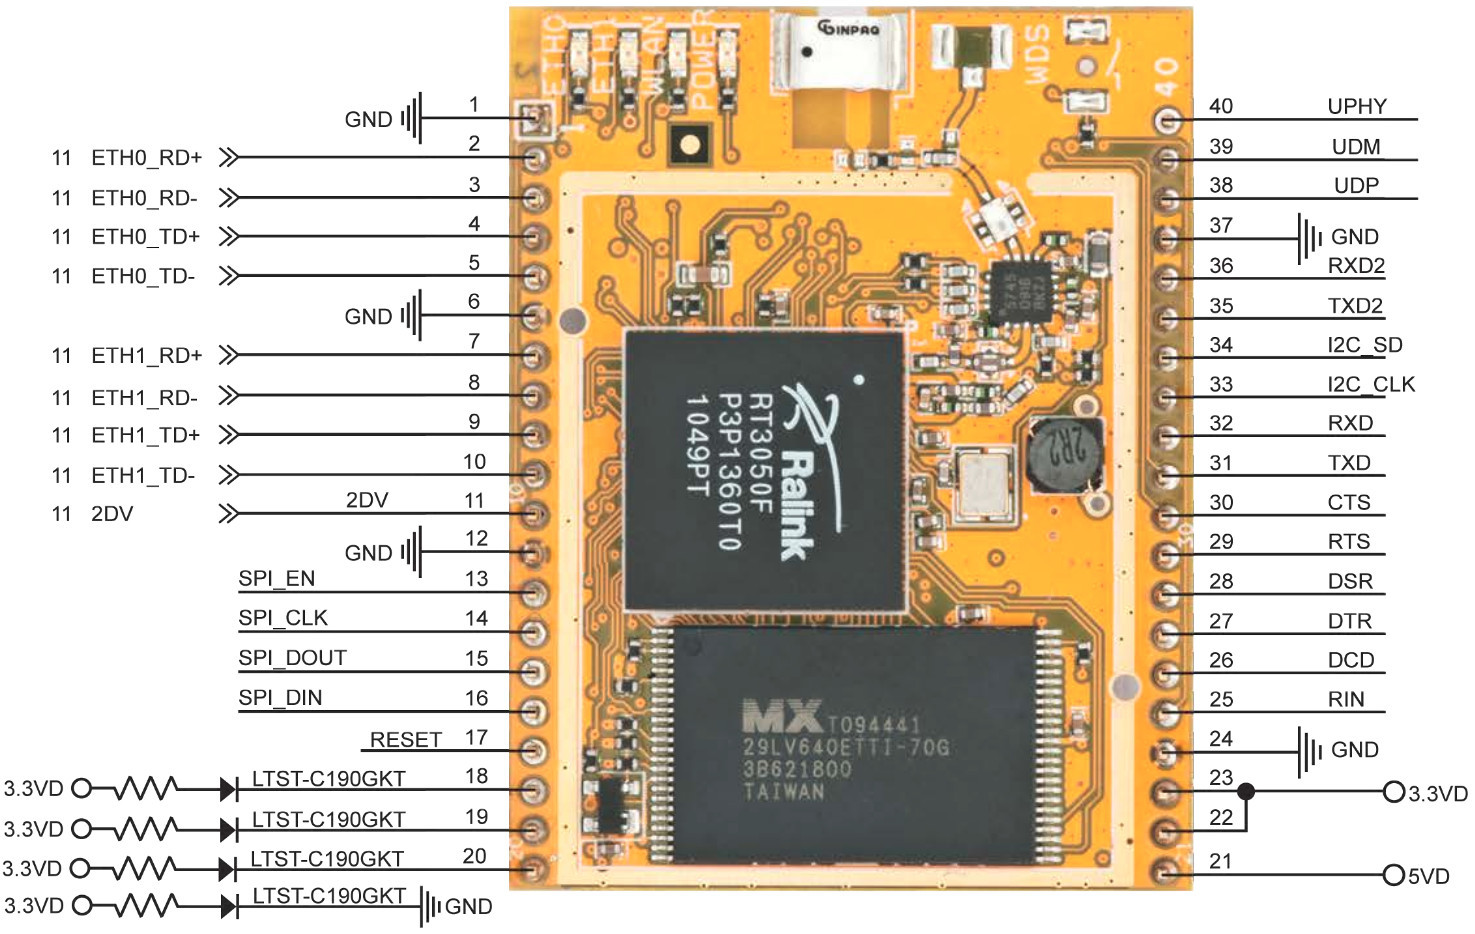
The console appears on TXD2-RXD2, 115,000 8N1.
For USB work, the host mode on pin 21 requires a 5V supply (the module itself works less than 3.3V), and pin 40 is connected to GND. White wire (D+) up to pin 39, green wire (D-) - up to 38.
Virobnik told me what lines of data USB cable you can connect to the module without intermediary, the Internet showed that in this case it is better not to use the hot plug, so that you can connect-plug in the USB-attachment when the module is unplugged. I don't have to go - I'm going to plug in the MFP once and for all.
OpenWRT is one of the old Bleeding Edge installations, I'll update it to a stable 12.09 Attitude Adjustment via the web interface.
Then OpenWRT installed the usbip package, which brought in the necessary kernel modules and utilities. Forgot to add a kіlka ryadkіv in autozavantazhennya:
/usr/sbin/usbipd -D /usr/sbin/usbip bind --busid=1-1 "1-1" I took the list of connected USB devices from the OpenWRT console: usbip list -l
On the client side of Ubuntu 13.10. Kernel modules in the system are present, for them automatic acquisition need to add x (usbip_core, vhci_hcd) to /etc/modules
Userspace-utilities, vtim, daily. Do not install them from the repositories, there is version 0.1.7-3, you will not work with version 1.1.1 on OpenWRT. You can do it like this: sudo apt-get install linux-sources tar -jxf /usr/src/linux-source-3.11.0/linux-source-3.11.0.tar.bz2 cd drivers/staging/usbip/userspace/ . /autogen.sh ./configure make sudo make install Now I have enough vikonati to connect the MFP sudo usbip attach --remote=192.168.2.16 --busid=1-1
Nedoliki
The main shortcoming is that the connection of the usbip-server and the usbip-client is one-to-one, so that if one client connects its own USB-attachment to the server, then you can’t connect it yourself, until it won’t included first. For such a vipadku, you can strain and write the usbip management side at the OpenWRT web interface, but don’t threaten me yet, the MFP can only be used in one working place.It can also be a little short that theoretically the speed of the link over Wi-Fi is less, lower over the USB cable, but in my private data mode, when scanning, it’s more convenient to go over the cable, but it’s sing-song my local problems.
Plan for future
At the same time, I need to revive the module for an additional DC-transformer 12V to 5V and 3.3V:Vіn bulky and he himself occupied the bi okrem sіrnikovu box. Youmu to change here in China DC-transformer 5V to 3.3V, the axis is as follows:

Let's call the little ones and put them in one sirnikova box with Carambola (without pins). Kharchuvatisya all tse will be in the form of an old telephone charger.
Mezha mriy - place this box in the middle of the MFP case, there is a small place there, and you should know there in the middle of the 5V socket, or, take it, there is another place for converting AC 220V. But on the other hand, I’m less likely to finish the term of warranty repairs.
Rozrobka that testuvannya:
(Colours of postings in the meal are full)
Result
Two days later, after the topic was written, it was quick as a matter of course (for a couple of days, the replacement of the most important chotiriokh-p'yati) arrived from China, and now the project is completed: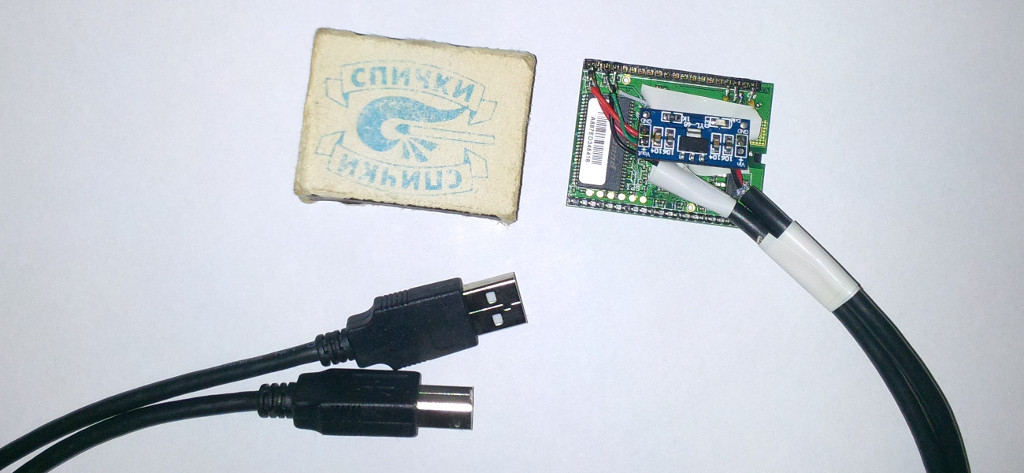
Adding to the OpenWRT web interface for connecting a USB device: