Pochatkov configuration of the CISCO router. Post-configured Cisco routers
Hello everyone today, I want to tell you how to set up a ciscoil router or organize a network for a small office. Let's talk about the identity of the 3rd level switch and router, and analyze the scheme for organizing a small office and a middle one, with different Cisco routers. I think this is a topic and it is often discussed.
Cisco router vіdminnostі vіd svіd 3 rіvny
I’m guessing in the previous article we improved the cisco switch in the core capacity, which works on 3 equal OSI models, and analyzed which is more productive and cheaper, lower cisco router. So, what do you think about buying Cisco routers, all on the right in soft, how to give functionality, like this:
- ip routing
- Intermediate screen
Without any difficulty, it is easy to show how to speak in the distance of the office from the central one. This is the axis of the cunning party policy at Cisco.
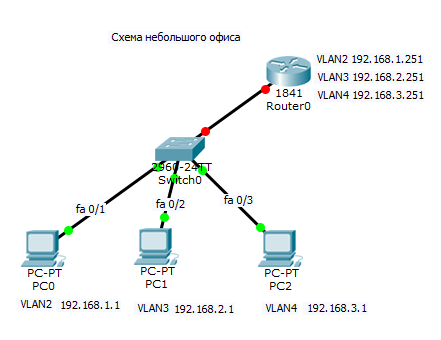
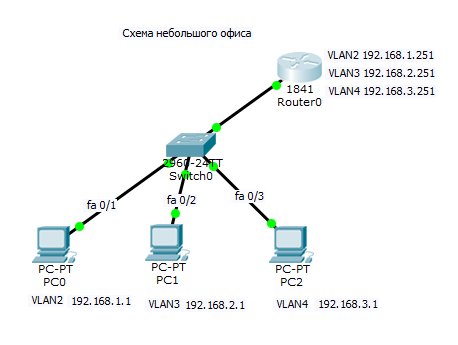
Scheme for a small office
The file scheme is as follows: 1 Router0 router model Cisco 1 841 for butt, one Cisco 2960 switch and three computers. For example, we have є 3 segments, for which we have vlan. Let me know what you have already done.
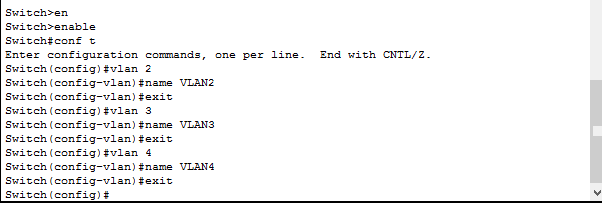
We create VLAN2, VLAN3, VLAN4. Login to your cisco 2960 and go to configuration mode /
enable
conf t
Valn 2
name VLAN2
exit
vlan 3
name VLAN3
exit
vlan 4
name VLAN4
exit
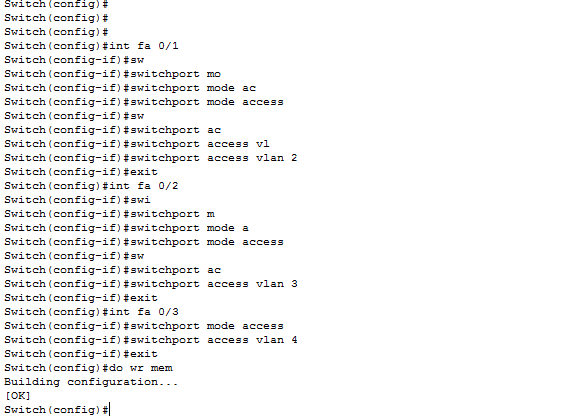
now significantly skin computer in the required vlan. PC0 is in vlan 2, PC1 is in vlan 3, PC2 is in vlan 4. The lesser ports are fa0 / 1, fa0 / 2 and fa0 / 3.
int fa 0/1
switchport mode access
switchport access vlan 2
exit
int fa 0/2
switchport mode access
switchport access vlan 3
exit
int fa 0/3
switchport mode access
switchport access vlan 4
exit
do wr mem
The next step will be to install the trunk port to our Cisco 1841 router. Enter the next commands
We choose the required interface
Set trunk mode
switchport mode trunk
allowed vlan names
switchport trunk allowed vlan 2,3,4
end
wr mem

All work on the Cisco 2960 switch is completed, let's move on to our router.
Installed cisco router one thousand eight hundred forty one
We need to set up a cisco 1841 router in order to enable routing traffic between vlan and internet gateway. For locking, all ports on the router are located in the switched-off station, including the port where to block the patch cord in cisco switch 2960, I have fa 0/0.
enable
conf t
intfa 0/0
no shutdown
You will soon show up, reminding you that the port has become active.
%LINK-5-CHANGED: Interface FastEthernet0 / 0, changed state to up
% LINEPROTO-5-UPDOWN: Line protocol on Interface FastEthernet0 / 0, changed state to up
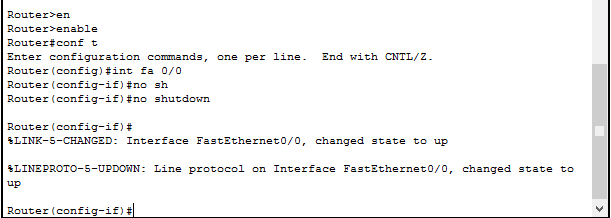
Port turning green
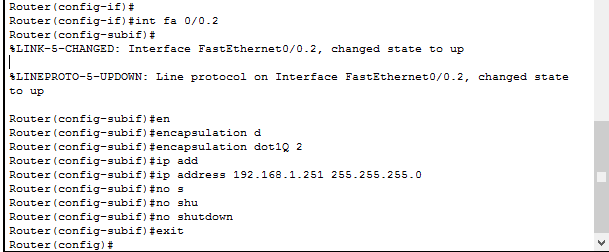
Coming soon, you will need to create a sub-interface for the number of vlan. The routers simply do not have vlan and their role is played by the subinterface, the main vlan is subinerface.
Create subinterface for vlan 2
It is possible to specify which vin is required in cases of vlan 2 packets
encapsulation dot1Q 2
nalashtovuєmo ip addresses
ip address 192.168.1.251 255.255.255.0
enable port
no shutdown
exit
and take care of the team
There is a similar subinterface for vlan 3.4
int fa 0 / 0.3
encapsulation dot1Q 3
no shutdown
exit
int fa 0 / 0.4
encapsulation dot1Q 4
no shutdown
exit
ip routing
do wr mem
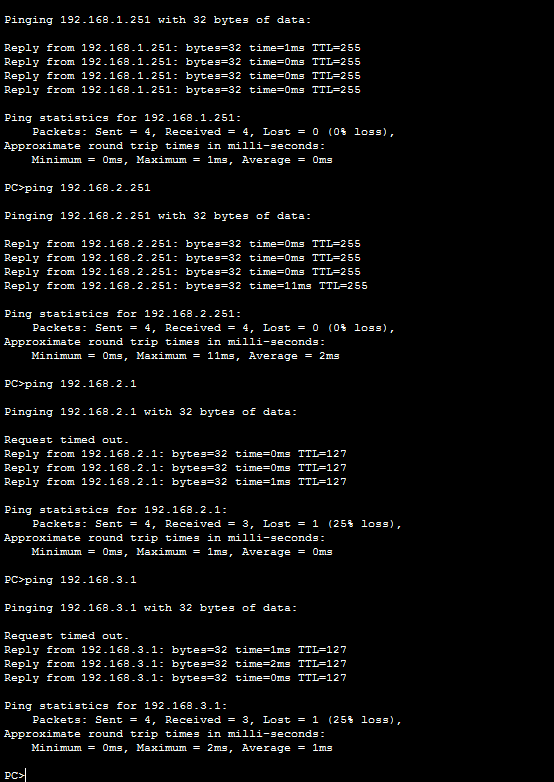
Let's try to ping PC3 and PC2 from PC0. Yak bachimo on the screenshot everything is ok.
ping 192.168.1.251
ping 192.168.2.1
ping 192.168.3.1
The axis is just the axis to organize a local network in the arc of a small file and it is easy to install the cisco router. NAT setup is detailed in another article.
Scheme for the middle office
The axis looks like a scheme of the local area of the middle office. Є cisco 2911 router, which acts as an Internet gateway. Є core merezhі switch 3 equals Cisco 3560. Vin will be routed local traffic mizh vlan merezhі. In the Cisco 3560, 3 switches of another equal Cisco 2960 are built-in, which already connect end-of-line extensions. Merezha has 3 vlan 2,3,4.

Plugging Switch1
Let's look at the settings of Switch1, server segment. Login to the global configuration mode.
enable
conf t
We create vlan 4
vlan 4
name VLAN4
exit
Zakinemo porti fa 0/1-2 in VLAN4
int range fa 0 / 1-2
switchport mode access
switchport access vlan 4
exit
do wr mem
We will set the trunk port fa 0/3, we will only disable vlan4 traffic
int fa 0/3
switchport mode trunk
switchport trunk allowed vlan 4
exit
do wr mem
Switch2 patching
All with the server segment have finished. Let's move on to the same setup on Switch2 and 3. And so Switch2 Cisco 2960.
We create vlan 2 and vlan3 ahead of us.
enable
conf t
vlan 2
name VLAN2
exit
vlan 3
name VLAN3
exit
Now it is significant that our ports are connected to computers in the need for vlan
int fa 0/1
switchport mode access
switchport access vlan 2
exit
int fa 0/2
switchport access vlan 3
exit
Enable trunk port on interface fa 0/3 no shutdown
exit
int vlan 3
ip address 192.168.2.251 255.255.255.0
no shutdown
exit
int vlan 4
ip address 192.168.3.251 255.255.255.0
no shutdown
exit
Nalashtovuemo trunk porti
int fa 0/1
switchport mode trunk
exit
int fa 0/2
switchport trunk encapsulation dot1q
switchport mode trunk
switchport trunk allowed vlan 2.3
exit
int fa 0/3
switchport trunk encapsulation dot1q
switchport mode trunk
switchport trunk allowed vlan 2.3
exit
Enable routing and save configuration
ip routing
do wr mem
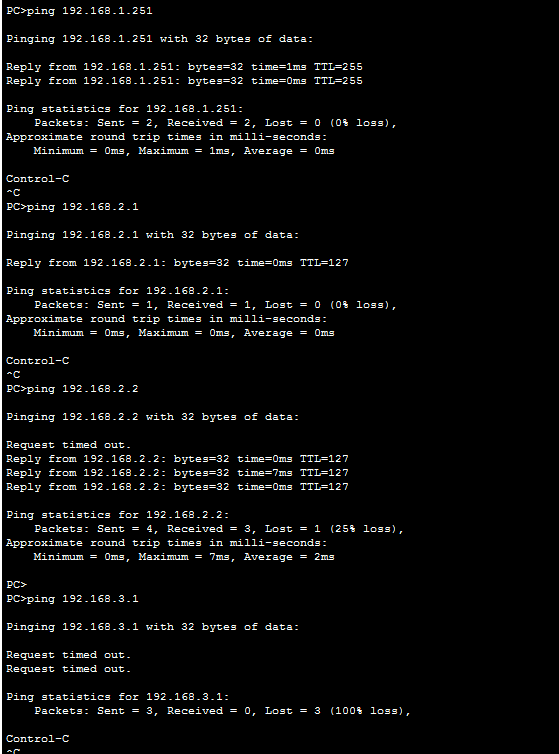
Ping will be done from PC3. Yak bachimo, servers i secondary computers divisions.
The router is also unpacked and connected to a new TELNET via a com-port cable.
To get rid of it in the Foreground of the smittya, we type:
erase startup-config
! and revantazhuєmosya
reload
Setting up authorization and access via SSH
Enable encryption of passwords
service password encryption
! vikoristovuemo new model AAA i local base koristuvachіv
aaa new-model
aaa authentication login default local
! we start a koristuvacha with maximum rights
username admin privilege 15 secret PASSWORD
! give router name
hostname<...>
ip domain-name router.domain
! generated key for SSH
crypto key generate rsa modulus 1024
! tuning SSH
ip ssh time-out 60
ip ssh authentication-retries 2
ip ssh version 2
! and yoga is allowed on the remote console
line vty 0 4
transport input telnet ssh
privilege level 15
Routing setup
Enable accelerated packet switching
ip cef
Adjusting the hour
Time zone GMT + 3
clock timezone MSK 3 0
! Updating system dates via NTP
ntp update-calendar
! It’s better to set ntp servers by IP, because if the DNS server is not available, then the settings by name will change ...
ntp server NTP.SERVER.1.IP
ntp server NTP.SERVER.2.IP
archiving configs
Including archiving of all config changes, attaching passwords in the logs
archive
log config
logging enable
hidekeys
! the history of changing the config can be admired by the command
show archive log config all
DNS setup
Enable allowed names
ip domain-lookup
! enable internal DNS server
ip dns server
! prescribe the DNS provider
ip name-server XXX.XXX.XXX.XXX
! just in case, we add a piece of public DNS servers
ip name-server 4.2.2.2
ip name-server 8.8.8.8
Improving local lines
Turn on the port of the internal switch on the router connected to Vlan1
interface Vlan1
description === LAN ===
ip address 192.168.???.1
! turn on on the interface pidrakunok packets transferred to clients - manually look over who is sending traffic
ip accounting output-packets
! you can see the statistics with the command
show ip accounting
! cleanse
clear ip accounting
Setting up a DHCP server
Include active addresses from the pool
ip dhcp excluded-address 192.168.???.1 192.168.???.99
! і nalashtovuєmo pool address
ip dhcp pool LAN
network 192.168.???.0 255.255.255.0
default router 192.168.???.1
dns-server 192.168.???.1
Setting up Internet and Firewall
nalashtovuemo filter input traffic(Everything is fenced for locking)
ip access-list extended FIREWALL
permit tcp any any eq 22
! including inspection of international traffic local mesh i Internet
ip inspect name INSPECT_OUT dns
ip inspect name INSPECT_OUT icmp
ip inspect name INSPECT_OUT ntp
ip inspect name INSPECT_OUT tcp router-traffic
ip inspect name INSPECT_OUT udp router-traffic
ip inspect name INSPECT_OUT icmp router-traffic
! nalashtovuemo port to the Internet
interface FastEthernet0 / 0
description === Internet ===
ip address ???. ???. ???. ??? 255.255.255. ???
ip virtual-reassembly
ip verify unicast reverse-path
no ip redirects // enable redirect redirects if Cisco IOS hosts forward a packet within the interface, after which the packet is discarded. Intermediate information, sent by the router in different port scans
no ip directed-broadcast // enable group IP address blocking, which ensures that the router cannot be blocked as a broadband broadcaster in service blocking attacks (DoS, Denial of Service attacks)
no ip proxy-arp // enable ARP proxy service
no ip unreachables // enable ICMP Unreachable alert generation
no ip mask-reply // enable ICMP Mask Reply generation
no cdp enable // enable CDP protocol on the interface
ip inspect INSPECT_OUT out
ip access-group FIREWALL in
! well, finally the gateway
ip route 0.0.0.0 0.0.0.0 ???. ???. ???. ???
NAT setup
On the Internet interface
interface FastEthernet0 / 0
ip nat outside
! on local interface
interface Vlan1
ip nat inside
! create a list of IP can access to NAT
ip access-list extended NAT
permit ip host 192.168. ???. ??? any
! enable NAT on the calling interface
ip nat inside source list NAT interface FastEthernet0 / 0 overload
! we give inspection of popular protocols
ip inspect name INSPECT_OUT http
ip inspect name INSPECT_OUT https
ip inspect name INSPECT_OUT ftp
Inclusion of non-essential services
no service tcp-small-servers // blocking access to a number of TCP services
no service udp-small-servers // blocking access to a number of UDP services
no service finger // fetch requests using the finger protocol
no service config
no service pad // harrow the PAD
no ip finger
no ip source-route // reject packets with an explicit route
no ip http server // enable HTTP server
no ip http secure-server // enable HTTPS server
no ip bootp server // enable BOOTP server
no cdp run // enable CDP protocol globally
After that, we learned how to expand the network in three ways (,), it is logical to proceed, and to set up the router. Let's check the basic settings of the router (which you will have to check often) and assign the IP address of the router's interface.
Let's assume that after the subdimension 192.168.0.0/24 for 3 subdimensions A, B and C (100, 50, 2 hosts each) we took the following subdimensions: A - 192.168.0.0/25, B - 192.168.0.128/26, C - 192.168.0.192/30.
The first address under A must be assigned to the fastethernet 0/0 router interface.
The first address under B must be assigned to the fastethernet 0/1 router interface.
The first address to be assigned to C needs to be assigned to the serial 0/0/0 router interface. Moreover, for one end of the cable (DCE) for the serial interface, it is necessary to assign a clock rate (set the hour for synchronizing the signal), but for the other (DTE) it does not require work.
// This is how I'll name the comments.
Zavantageti vikonane zavdannya nalashtuvannya router
Please download the file with the password for the PacketTracer emulator program, open it and look at the implementation (the password for the console login is cisco, for the privilege mode - class).
Be aware that PC1 can ping PC2 normally, but it can't ping PC3. Tse v_dbuvaєtsya through not established routing. And now we are in the upcoming crib;)
Adjusting the router to copying the configuration
- For automatic basic installation (everything else) of the router, enter the following steps:
- 1. Copy the text below to the clipboard: After doing everything, click right button according to the seen and choose "Copy".
- 2. If necessary, clean the router after all upgrades and re-vandage.
- 3. Go to the global configuration mode and select the HyperTerminal menu "Edit", and in the new one "Transfer host computer".
- 4. Obov'yazkovo change the settings for the additional show running-config command
- 5. If necessary, enable the interface with the no shutdown command in the skin interface mode
If you are faced with the possession of cisco for the first time, then it is absolutely obvious that it is necessary to understand how to deal with it, create your first coristuvach, set your name, set the hour, increase your ability remote connection and etc.
I have given this article to dedicate to a number of similar meals and, as a result, I have named it "Pochatkove Cisco routers". I want to respect that we will not go into the settings in detail, but simply go through a number of options, so that mothers need to submit on topics.
Otzhe, to read the lyrics, let's move on without a hitch to the right.
Let's put it in our hands after eating a cisco router.
Zavdannya, how we will win:
1) Get to know the interface.
2) Significantly, they are equal to access.
3) We wonder what the configuration mode is.
4) Set up such parameters as naming the virobu, name of the domain, hour.
5) Let's go into the port setup mode and add ip addresses to them.
6) Set a password for the privilege mode and create a password in the local database.
7) Set up the possibility of a remote connection via telnet
8) Set up remote connection via ssh
1. Connect to the annex for an additional console cable
Press RETURN to get started.
This is how Enter is consumed in our console:
Router>
Well, let's try to marvel at how it works. We press "?" and bachimo approximately step forward:
router>?
Exec commands:
disable Turn off privileged commands
enable Turn on privileged commands
exit Exit from the EXEC
help Description of the interactive help system
logout Exit from the EXEC
I think you already realized that we were quick to give a hint and help all the commands available to us at this stage. More than that, let's try it like this:
router>enable?
<0-15>enable level
view Set into the existing view
Cisco prompts us to show you the options for the remote writing of the command with us. The option is defiantly more expensive, but more importantly, it is available at any stage of writing a command.
Let's try a new axis like this:
Router>e?
enable exit
So we can put the sign "?" absolutely in whatever place and cisco will propagate us all the possible ways of prodovzhennya. In this case, I'm trying to figure out what the symbol "e" cisco is like, that two commands are based on given criteria and show what the commands are.
Designate Mushu that it is not obligatory to type commands as a whole, so that you can log out from cisco without having to type the exit command again. Dosit bude dial "ex". When typing commands "in full obsyaz" it is necessary to understand that the system is not guilty of choice and it is possible to identify one command matching the given criterion.
2. In total, there are 16 possible equal accesses in the system from 0 to 15. We will need only 3 for understanding
Privilege level 0 - the mode in which we changed when we connected to the router
Privilege level 1 - assignments for the koristuvach mode, which includes the koristuvalnik commands
Privilege level 15 - privileged mode, which includes all commands. If you want to use it, type the enable command, after which you can replace "Router>" and use "Router #". The sign "#" is clear and means that we are in privileged mode.
Otzhe otrimuemo
Router>- emergency mode
Router > enable- we type a command to switch to privileged mode
Router #- privileged mode
3. At point 2 we drank in a privileged mode. Now, if we want to viroblyat on the router, whether it be nalashtuvannya, we will need to switch to the configuration mode. For what speed is it with the configure terminal command, otherwise you can type quickly conf t
Router # conf t
Router (config) #- configuration mode, where you can make the necessary settings
4. Now you can try a row of stitches. I am guilty of saying that I will add direct necessary to the fixed name, I don’t know the domain for an hour. Albeit not the rest of the article, as you read, it is possible that the setting of these parameters will still be in good shape at the temple.
What would I do to fix it, I’ll add it quickly with the hostname command
Router (config) #hostname TEST
TEST(config) #- new I'll add TEST, so we can perfectly bachiti
To configure the domain name, speed it up with the ip domain-name command
TEST (config) #ip domain-name test.ru- now ours domain name test.ru
Adjusting the hour is a trifle more complicated, to that which is adding up to adjusting the time zone and no middle hour. To set the time zone, we speed it up with the clock timezone command.
TEST (config) # clock timezone MSK +4- I change in Moscow, so the time zone is +4
In order to change the trivality of the period, it is necessary to enter the configuration mode and speed up with the clock set command, so that the "hour is set" is to be translated verbatim.
TEST (config) #exit- visible from the configuration mode
You can change our settings with the help of the show command.
TEST # show clock
16:03:28.183 MSK Thu Feb 21 2013- the result of our nalashtuvan
So, to see all the configurations, you can speed it up with the show run command
TEST # show run
Visnovok the result of the given command to finish the volume and I will not post yoga. I will only say that the result is to collect information about all the parameters that are on the router.
5. Let's take a look at the port settings on the router and set the ip addresses.
port in lace possession cisco is called interface. To display a list of available interfaces, you can use the show interfaces command. However, you will finish the visnovka volume. For a more compact view, you can speed up with the show ip int brief command
TEST # show ip int bri
Interface IP Address OK? Method Status Protocol
Embedded-Service-Engine0 / 0 unassigned YES NVRAM administratively down down
GigabitEthernet0 / 0 unassigned YES NVRAM down down
GigabitEthernet0 / 1 unassigned YES NVRAM down down
Now we can check the list of available physical ports. The assumptions are that the GigabitEthernet0 / 0 port connects to the subdimension 192.168.0.0 with the subdimension mask 255.255.255.0, and the GigabitEthernet0 / 1 port connects to the subdimension 192.168.1.0 with the subdimension mask 255.255.255.0. Apparently, we wrote the tasks on GigabitEthernet0 / 0 ip address 192.168.0.1, and on GigabitEthernet0 / 1 ip address 192.168.1.1. Everything is needed so that the computers of the first tier could go to the computers of the other tiers and navpaki. We can proceed to the configuration.
TEST # conf t- go to configuration mode
TEST (config) #interface gigabitethernet0/0- the interface command allows us to switch to the mode of setting the port we need on the router
TEST (config-if) #ip address 192.168.0.1 255.255.255.0- set the ip address for the subdivision 192.168.0.0
TEST (config-if) #no shutdown- enable port command on the router
TEST (config-if) #exit- apparently from the port settings
TEST (config) #int gi0 / 1- we go to nalashtuvannya another port. The name of the ports can be abbreviated as shown in this view
TEST (config-if) #ip address 192.168.1.1 255.255.255.0- set the ip address for the subdivision 192.168.1.0
TEST (config-if) #exit
All ip addresses are fixed and links between links 192.168.0.0 and 192.168.1.0 are fixed.
Let's say we had mercy and set the wrong ip address (don't let it be 192.168.0.2), or you entered the mask incorrectly, then you can change it with the help of the "no" command. For example:
TEST (config-if) #no ip address 192.168.0.2 255.255.255.0 - the command was given to change the ip address 192.168.0.2 on the interface.
The "no" command stops only up to the ip address parameter. You can check it out to check other parameters of the router.
6. We already know how to dine in a privileged mode, moreover, we were robbed without any kind of authorization. Proponuyu, to improve security, set a password for the privileged mode. You can do it for help with the enable secret command
TEST # conf t
TEST (config) #enable secret 0 cisco- now our password for privilege mode will be cisco. Mushu set that 0 means that we enter the password in plain text. Since we have the password in the encrypted view, we can choose another option. See what options you can for help enable secret?
TEST (config) #enable secret?
0 Specifies an UNENCRYPTED password will follow
4 Specifies an SHA256 ENCRYPTED secret will follow
5 Specifies an MD5 ENCRYPTED secret will follow
LINE The UNENCRYPTED (cleartext) "enable" secret
level Set exec level password
Well, we've set the password for the privileged mode. I am trying to create my own powerful coristuvacha in the system, which in the future we will vicorize for connection to the annex remotely via telnet or ssh.
For which damo axis is the following command:
TEST (config) #username user1 privilege 15 secret password1
As a result, the system will create a password with the name user1, password password1 and equal access 15 (privilege mode)
7. We have є pіdmerezhi, є koristuvach in the local data base. Now you can connect to the extension via telnet. For whom we will need to go to the line vty setup (virtual terminal line). Let's move on to the configuration and everything will become clear.
TEST # conf t- go into configuration mode
TEST (config) #line vty 0 4- we go into the installation of terminal lines. on the outbuildings You can also change the number of terminal lines. Ours has a score of 5, which is 0 to 4, which is shown in the team. The number of terminal lines to talk about the number of possible one-hour connections to the router. If one is connected, then the first free line vty will be assigned to you.
TEST (config-line) #transport input telnet- we say that you can connect to our building far away for help telnet
TEST (config-line) #login local- the command is given to speak, you can log in by vty to the vicorist local database of data coristuvachs. Obviously, we can go in under a koristuvache, which was done in paragraph 6.
Now you can connect to the annex remotely for the help of telnet, from some kind of computer from before the creation of 192.168.0.0 or 192.168.1.0
8. Handling telnet manually, but not safely, to the one who passes the login and password as soon as possible. So if someone needs to know the required package, then you can change the password. Therefore, I recommend that you connect via the ssh protocol. For whom it is necessary to overcome a number of vimog. It is necessary to specify the parameters hostname (div. Item 4), domain-name (div. Item 4), since it depends on these parameters for encryption, and it is also necessary to generate a pair of encryption keys, for the additional command:
TEST (config) #crypto key generate rsa modulus 1024- de 1024 encryption of our keys.
It is now necessary to allow ssh connections on our vty lines.
TEST (config) #line vty 0 4- we go into the installation of terminal lines
TEST (config-line) #transport input telnet ssh- we say to our outhouse that you can connect both via telnet and via ssh. You can actually enter only ssh, but you can't connect via telnet anymore.
TEST (config-line) login local- we say the router vikoristovuvaty local data base koristuvachіv. If you have already given the same command in paragraph 7, then there is no obov'yazkova.
All. Now you can connect to ours, I will add it remotely and safely for help ssh.
In the end, I will save all the settings we made with the write command. In this rank, after re-advancement, I will add all the parameters to save. Even if you don’t save money, then after the re-advancement of the attachments, we’ll “innocently” clean up nothing on the new one.
TEST#write
building configuration ...
subbag: basic stitching our router is finished. Now we know a little about cisco routers and how to work with them. I spodіvayus given article Bula Korisna to you.
See you fast news and new posts;)
Changed Date: Tuesday, 17 September 2013