Presets for Lightroom. New list
I want to show one of the options for processing studio photography in Lightroom. The dressing is even simpler - contrast, shade, orange minus. Ale looking, at my glance, dosit tsikavo!
On the photo, if you check the final retouching in Photoshop, don’t give respect to the wall and other rubbish. Download the preset and use it on the sly!
Little olive
I have long wanted to create a preset for lightroom, which allows me to imitate little olives. On the Internet, there are anonymous materials about those who, like a viconate, have made a cut in the style of a little olive in the Photoshop program. Ale, I don’t know any article about how to edit a photo in lightroom in the style of an olive baby!
A wonderful preset for processing photos in the open air
In order to take a beautiful photo of a model in the open air, you need to choose the right light. In this case, the breeding was carried out in forest and the model of the bula was planted not under direct sun, but in the shade of trees and illuminated by rose light. Scho, zagalom, gave a good result.
Plivkove b'yuti
The work with color, curves, increasing contrast and adding graininess to the effect did not allow such a photo processing to be achieved. This preset for Lightroom will help you to get your icons from the same key!
Brown retro
Є photographs, until which you can stock up on a rich variety of requisitions. This is the same vapadok, and to that it was exacerbated by the growing popularity of the brownish tone. Yak bachimo, nothing else happened! For help crooked that bastard Shadows visviting shade, and also dimming the color for help Saturation. All other customizations you can marvel at the preset.
Portrait of a veteran
To create such a dramatic portrait of a veteran, I had the opportunity to maximize the contrast. The whole was smashed for help with crooked work - the most steep plot of crooked was laid out in the light zone.
Tilt Shift effect
Let's turn to photographs with small models of real objects. Tse vіdbuvaєtsya through optical illusion. Such depths of sharpness can never be reached under the hour of shooting with a great sight with a great wide-angle lens! The axis of this we are given, that the survey was carried out close, and all the objects are miniatures!
golden shkira
This preset is the first step in processing a portrait image. From the images, what happened, what to lie down great robot at photoshop. Ale basic speech - skinton, contrastі color correction richer and smarter than Lightroom.
Imitation of swimming
In order to imitate the impressions taken on the plive camera, it is necessary to carry out an individual processing for the skin mark. There is no universal recipe!
The effect of red light
Bachu often black and white photographs with such an effect light up. In Lightroom, the fifth version, it's even easier to fight - for the additional tool "Radial Filter". The color can be chosen absolutely be it. In this application, the contrast is seen in order to enhance the effect. This vision can be reduced, changed and moved to your own judgment.
Dramatic sky
To create such an effect, take a photograph, make the exposure across the sky so that it doesn’t blow out. It doesn’t matter what the image is dark, but I wanted to - just finish it at post-processing. Freeze your preset to the finished frame, and you'll get a dramatic edge look, similar to the preset.
Variant of juice tonuvannya
To your respect, I will propagate the chergovy preset for tonuvannya znіmkіv. After the preset is set, the photo becomes contrasting and warm. Such colors reach for the help of curves. To fix the final result, I changed the exposure to pvtoni, and adjust it for myself.
Retro imitation polaroid
Make your pictures look like shots from the old pivaroid! duje cicavi effect, which is implemented by a channel-by-channel robot with curves (Curves) that color. In this preset, the black dot is strongly raised, through which the photo can be seen to be tightened with a small serpentine.
Dodaemo to the beast and the bottom of the frame black smugka
For the help of whom you can stop, you can quickly add black smugs to the bottom of the frame. Bagato who wins this effect. Vin gives the sign "cinema", a special charm. This effect is also called: porridge (in a voice in the rest of the warehouse) or curtains.
Editing of a spring photograph
Preset, which is to create a spring photograph with warmth and life. He died in the yellow in the light and purple in the shadows (there are trochs). A small black vignette has been put on, as it may be unremarkable, but all the same, it adds its own atmosphere to the frame. I'm moving the exposition to the meeting, if you have a victorist, adjust this spring preset in your own way.
Water light
Sob znіmki znіmki meshkantsіv morskih gibin, not ob'yazkovo descent under the water with scuba gear. Below is the sign of a wonderful small home aquarium. The camera set the wrong white balance in the preset. I’m ready to make the sign of viishov atmospheric with such a work.
In these times, we are experiencing a golden doby of presets, macros, actions and other quick solutions for editing photos. It's not surprising.
First, the popularity of Instagram called out to a new wave of interest before analog look image, and the new generation of hipsters should give their photos from new digital cameras, view of the hired people for a 40-year-old photothermal
Just like in music, having moved into the post-digital age, we again began to show interest in the old, "warm" analog effects (oh, the "warm lamp sound").
In a different way, more people are in power and need to make your work easier, even if you have є gigabytes of unprocessed photos, you miraculously show yourself, more time to do the processing by hand. It has the ability to light up to tons of image presets or actions to create more aesthetically pleasing look even more pleasantly.
Thirdly, Lightroom is gaining more and more popularity, and the wines have been expanded for work with presets in order to speed up the process of editing photos as much as possible.
Standard Lightroom Presets
This should be obvious, but with all the new third-party presets, it's easy to forget about those that are introduced in Lightroom for locking. So like the stench of Adobe is broken, you can be sure that you already have a high quality. Even better, like Zagalny, so black and white presets that create a perfect point for a distant editing. Remember that any preset is only a cob, even if all images are different and you can’t be a preset, which allows you to process a be-like image in one click.
Cream of that you can make own authority Preset Lightroom, which is more appropriate for both spring and commercial photographers.
Blog Juliani Coast
You can check out Im'ya Julien Coast on the Lightroom launch screen. Vaughn is good to know the programmer from Adobe, so її the presets are also vіdіznyayutsya high quality. Julian's blouse is willing and free to share these presets for Adobe Camera Raw and Lightroom.
Zokrema, won’t you fahіvtsyam at the split tone and black-and-white conversion, and, if you want to modestly describe your presets, like “the most transverse” stink effectively save an hour, and vikonnі with gusto.
Preset Heaven
It is good to organize a resource for cost-free presets, if you want to download a package of presets, a fee will be charged. When you see it in the Project 365 distribution, you can get access to a number of free presets, or pay to download everything.
The deyakі z presetіv prаtsyuvati pratsjuvati, nizhі іnshі — for deyaki koshtovnyh presets remember the trend to look trohi more beautifully and more, chim it is necessary, with a reddish or orange tone of the shkiri. Ale navit popri at the price Presets Heaven you can find a few of the available presets.

On1 Software
Tse sche one good resource with the help-free presets, but for their interest you will need to register and confirm the address email, in this order, price, as you pay for downloading presets - advertising sheets, as they will come to your Postal screenshot(Ale, you can easily subscribe to them).
If you want, the deacons from the preached presets look over it on Instagram, but all the same, it is a garnoy vіdpravnoy point for distant editing.
Iside Lightroom
This site is a place for enthusiastic enthusiasts who share with joys, tricks and presets, absolutely not looking at you, what you can buy. On Iside Lightroom, you can find a wide range of faceless presets created by both fans and photographers, as well as Lightroom gurus, for example, Martin Evening, the author of the Lightroom Bible from Adobe Press.
Presets on this site are zazvichay zavantazhuyutsya okremo, not sets.
I love Adobe Lightroom. Ale doesn't mean that I want to spend a lot of time on my wedding day. I'll take a quicker look, or I'll give Lightroom lessons, so I need to quickly process my pictures.
1. Victory Caps Lock for Autochange
If it is necessary to repair the module library(Library), my love trick is to squeeze Capslock on the keyboard.
With the addition of Caps Lock, you can change keyboard shortcuts to add metadata to the image and automatically transition to the next one.
- P, which means a sign like a vibration
- U, to take the ensign from the image or skip it more precisely
- Figures 1-5 vikoristovuyutsya for vodpovidnoї scoring at stars
- 1-6 vikorivuyutsya for color yarlik
I cannot recommend Autochange(Auto Advance) like a smart and simple trick, but even more effective. Behind him, you can quickly move by sign, trimming your fingers on the quick buttons, as shown above.
If you don't want to turn on Caps Lock, you can activate the mode through the menu Photo > Autochange(Photo > Auto Advance).
2. Edit for help smart preview
Smart Preview(Smart Preview) - all the magic. Lightroom can create smaller versions of your images in the middle of the catalog so you can continue editing if you don't.
It’s more appropriate for your laptops and grandiose photo collections on an old hard drive. When the hour is overwhelmed hard drive at home and break on the road, you can continue to edit the wind Smart Preview.
Another key feature for Smart preview: you can edit for them to help you improve your productivity. Axis as it works: smart preview files are smaller, lower RAW. From them you can work out more, lower from the originals, navit if you have access to full permission. We can edit Lightroom and edit Smart Preview.
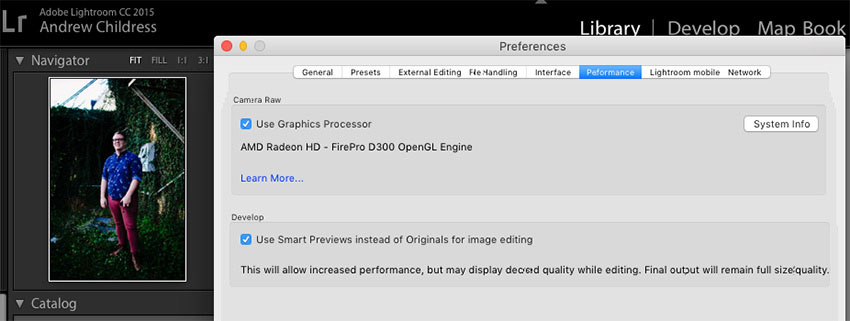
How to use Smart preview, go to window Parameters(Preferences) Lightroom and select tab Productivity(Performance). Check the box Featured Smart preview instead of originals for editing(Tick Smart Previews to activate the feature.
3. Vimknene podsvіchuvannya to help focus on the image
Sometimes I need to focus on the image, which is how I work, and not in the Lightroom interface. Himself here to come to the rescue mode Vimknene pіdsvіchuvannya (Lights Out).
To activate the mode, press L, chatting at the vikni Libraries(Library). The expanse of the image is darkened, and the wine looks bright and clear. I will press again and become black. One more pressing L turns the outward look.

Vimknee pіdsvіchuvannya miraculously works like when looking at one photograph, so when working with a net. Key function- the interface is dimmed so you can focus on the photo.
4. Bring your logo to Lightroom
Let's get some personality out new function Lightroom- Features written(Identity Plate). For help, you can add your own logo or the image at the top left corner of Adobe Lightroom.
Go to menu Lightroom > Custom Writing(Lightroom > Identity Plate Setup). From the menu that you see, choose Personal(Personalised).
There are two options for a special signature:
Check mark Text special writing(Use a styled text identity plate) Allow custom system fonts to write your own brand name.
Check mark Graphic special writing(Use a graphical identity plate) Allows you to create a transparent PNG file as a logo.

A custom signature is the ideal option if you want to flaunt Lightroom to showcase your pictures to clients. How often do you think Lightroom looks like a branded studio program.
5. Watch out for clipping!
Kliping see to the details of light and darkness. In fact, if the hour of post-production is overdone, the real estate will be re-examined, or other important details will be included.
It may also be the case for the hour of capture, as it is incorrect to display the image, but it is also recorded at the processing stage.
Such problems can be solved by pressing a key J on the keyboard, perebuvayuchi in modules Obrobka(develop). Abo to click on small tricots at the top Histograms(Histogram) by highlighting the function.
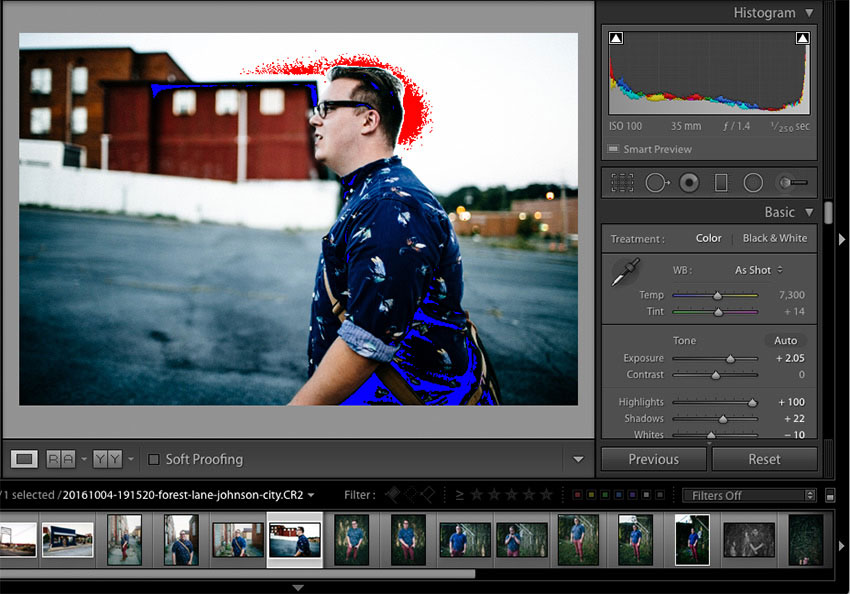
The red litter boxes show the illumination of the month, and the blue ones show the loss of details in the darkness. Drag the sliders back to their range if you want to avoid incorrect exposure.
6. Drag & Organize Presets
I love Lightroom presets. Prices for customization, which are activated in one click and vindicated for stylization or image correction. If your Lightroom catalog is the same as mine, over the years you have accumulated too many presets and it would be bad to clean them up.
Elements of the presets panel can be dragged to change their order and organize them by folders.

Needed Nova folder? Just press right button click on the preset panel and select Nova folder(New Folder). Give me your name and choose one more group where you can organize the necessary presets.
7. Increase productivity
If Lightroom is working correctly, I can suggest three ways to fix it:
- On deposit Parameters > Productivity(Preferences > Performance) uncheck the box Victory graphic processor(Use Graphics Processor).
- On deposit Options > Process files(Preferences > File Handling) cache settingsRAW files(Camera Raw Cache). Sobі I having installed 30 GB.
- Run periodically File > Optimize Directory(File > Optimize Catalog).
8. Frame creatively
You, singly, know that you can go into trim mode by pressing the key R at the module Obrobka(develop).
However, you might not know about the different fabrics, which can be stitched on top of the print at the hour of trimming.
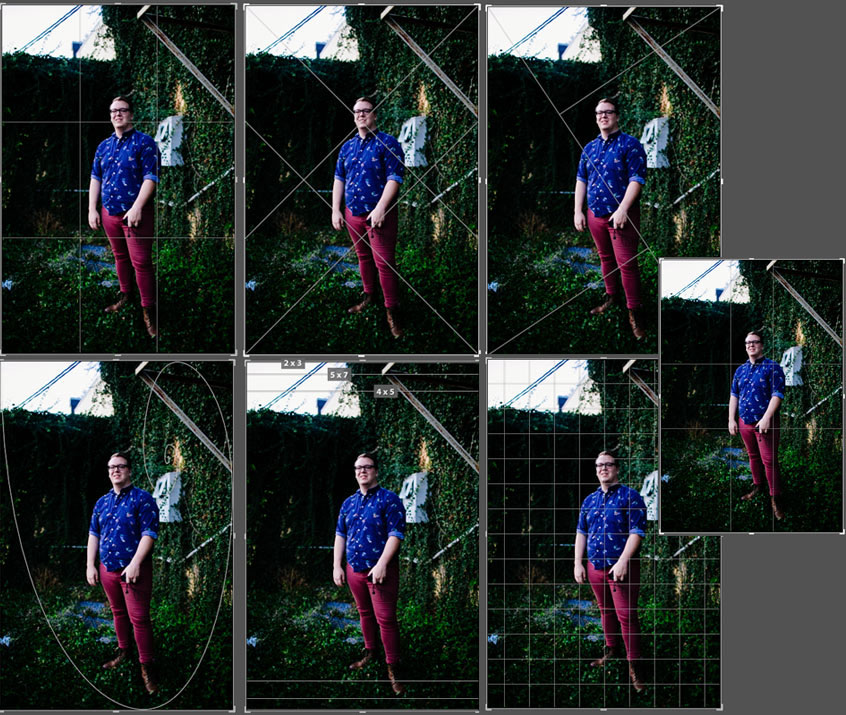
This screenshot shows the different cut grids. Try them for more creative framing.
Press the key in the trimming mode O, scrolling through different options. The stench can propagate wonderful ideas, as if it were an unusual way to cut your pictures. Try to place the key parts of the photograph on the line, in order to turn the respect.
9. Loosen presets
We already talked about the organization of presets, but what a wonderful joy, how to change their victories.
Stop, like I love, but I want to zastosovuvat weaker than them. Replace the new strength of the effect, it would be bad for the mother to be able to put yoga like a Photoshop ball and shorten the opacity.
The Fader plug-in was invented for itself. Take yoga and then go to the menu File > Plugin Manager(File > Plug-In Manager) to install.
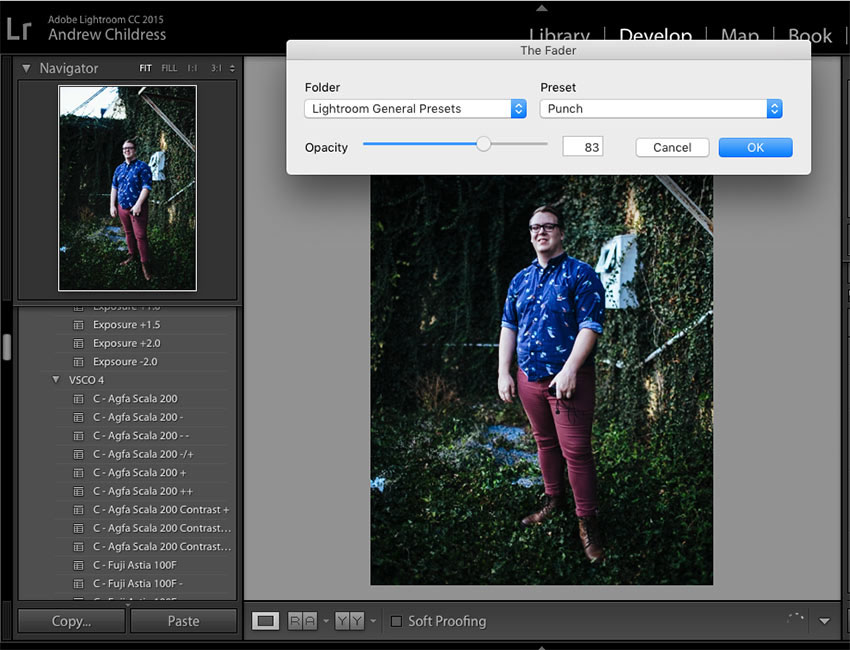
Once installed, go to the menu File > Connect add-ons >Thefader(File > Plug-in Extras > The Fader) by starting a new plugin. You can select a preset from the list and start yoga. Speed Slider opacity(Opacity), having improved the strength of the effect.
10. Attach panels automatically
I see most of the work on the critical screen of the laptop, free place- ce permanent problem. It's important to give enough space to your control panels like Lightroom does.
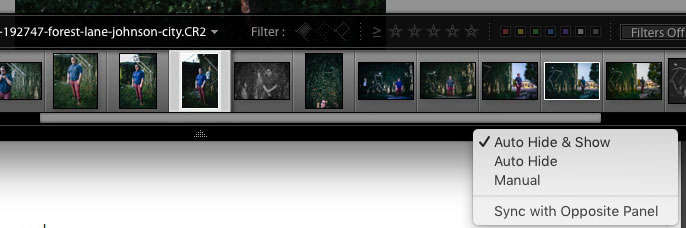
Click with the right mouse button on the rows of photos, as well as on the left and right panels, selecting Automatically attach and display(Auto Hide & Show). Tse prihovaє panels, zalishivshi more space for photographs. If you need a panel, finish it off just bring the necessary cut and get out.