Linux ubuntu 17.10 installation from a flash drive. Installing Ubuntu from a flash drive: detailed instructions. Creating an image in Windows
We welcome all those who decide to embrace the humanistic philosophy and install the Linux Ubuntu operating system on their computer. The Ubuntu operating system has its advantages in a way that has only recently been reviewed. While the installation of Windows 8 for many homeowners does not require power, the installation of Ubuntu may have some complexity and complexity. Below we will provide you with instructions for installing Ubuntu from a flash drive in pictures.
Before installing Ubuntu, we recommend that you proceed without installation by launching this operating system from a flash drive or disk. What's the matter? Since you haven’t tried it more than once, or many people haven’t worked with the remaining versions of Ubuntu, it has changed a lot, so before you change the system you need to try it out. If you like Ubuntu and want to use Windows in the new world, then we will disable it before preparing the installation.

Preparation before installing Ubuntu
The preparation process is a complex stage that consists of several procedures: capturing the installation image, recording it on the computer, and resaving data from the hard drive.You can get the latest Ubuntu images at: Ubuntu.ru/get
Experts on the site recommend that you download the image from the “Newest Release” section with the mark “Raring Ringtail”, where you will also need to select the appropriate capacity of the operating system (x32 or x64) and create a download for the image itself.
How to burn an Ubuntu image to a USB flash drive?
Almost all of our readers know how to write an image to a disk, but it’s unlikely that you can write an image of an operating system to a flash drive. It’s easy to burn an image onto a flash drive, for which you need the Universal USB Installer program, which can be installed absolutely freely on the program’s official website. Installing this program will not take much time, you just need to indicate the path where the programs will be installed, as well as familiarize yourself with and understand the licensee's understanding. Then, after launching the program, you will see the window shown below.

Now we are ready to begin the process of writing the image to the flash drive:
- croc first. To get started, you need to select the operating system you want to write to the flash drive.
- krok different. Select programs to download from Ubuntu.
- Krok third. Indicate the letter under which you need to write to the flash drive image.
- Croc quarters. Verify the correct settings and click on the “Create” button.
Resaving data
If you are planning to completely switch to Linux Ubuntu, then it is recommended to format the entire hard drive for manual work with operating system, So, as it is based on the ext4 file system, it differs from NTFS in its structure. There is more information about this in the statistics under the title:. In order to format it later, save all your data from drive D on a third-party drive (for example, on DWD drives). If you don’t want to format the partition of your hard drive with data, then you can save only the data from drive “C”.

Adjusting the settings in the BIOS
The remaining stage of preparation before installation will be setting up the storage device, in which you will need to install the flash drive as the first device for storage, and the hard drive as the secondary one. To do this, insert the flash drive into the USB port of the computer, start the PC and press the “Delete” key on the keyboard. In the BIOS menu, select the “Boot” setting. In the “1st Boot Device” field enter “USB-HDD”, and in the “2nd Boot Device” field - “Hard Drive”. Then we exit the BIOS by selecting “Save and Exit”. If all the things have been rebuilt, we will move on to the system installation process.

Installing Linux Ubuntu
Ubuntu installation It will begin from the beginning of history, in which case you will need to choose a language. Here you can try to run Ubuntu from a flash drive to test it without installation by clicking on the “Try Ubuntu” button. To install the operating system, click on the “Install Ubuntu” button, after which you will need to make some settings before installing the OS.
From now on you will need to confirm that your computer:
- There is at least 5.3GB of free disk space. You will need enough space on the partition to install Ubuntu and the correct software on your computer.
- Connection to the electrical system. When you install an operating system on a laptop, you are faced with the fact that there are no connections until it is live.
- Internet connections. In principle, connecting to the Internet when installing Ubuntu is not obligatory, but is still necessary for updating other system components.


The rest is what you need to enter:
- Your name. This is yours regional registration in the system. You can enter either your name or your nickname. Your name must be entered in Latin characters.
- Your computer name. You also need to enter bashans I have computer, to identify it in the middle.
- Enter the name of the accountant. The name of the accountant is the name of the cloud record of the super-accounter in the system (in essence, the name of the administrator), through which changes will be made to the setup of the system, and the installation of programs will be carried out.
- Set and confirm password. To access the super account account, as well as to log into the system, you need to enter a password, after which you need to repeat it in the bottom row. The password may include Latin upper and lower case characters, as well as numbers and special characters.
If you are locked out of your computer or laptop and no one else has access, we recommend that you set a dot opposite the “Log in automatically” item, so that when you turn on your computer or laptop, you will not need to enter a password, but it will start immediately work table If you want to protect yourself and protect your data from unauthorized access, then delete the dot opposite the point: “Get a password to log in.”
To keep your data safe, you can check the box next to “Encrypt my home folder”, so that all files in the client’s home folder will be encrypted. However, we do not recommend encrypting your home folder without special need, since if there is a failure in the operating system, you will not be able to renew your encrypted data. After this, click on the “Continue” button.
At this point the installation of the Linux Ubuntu operating system begins. The installer will format the hard drive, create parts necessary for the operation of the system, and make copies of OS files.

While the operating system is being installed, you will be shown a slide show that explains the new features. remaining version Ubuntu operating system.

The first slide tells you about the accessory center and about the large number of programs that you can install on your computer.

Another slide talks about the Rhythmbox music player.


After the system installation is completed, the installer will ask you to restart the computer. To do this, click on the “Re-Zavantage” button.

This is what the Ubuntu screen looks like - simple and pretty. In a few seconds the work table will appear.

The work table is folded from the panel, as it is located on the floor, and the panel Swedish access, I am known to be evil.

Immediately after installation, if your computer or laptop is connected to the Internet, you will be prompted to install the remaining updates. To install them, click on the lit icon at the bottom with the letter “A” in the middle. After installing the update, the system will be fully installed and ready for use, you will no longer need to configure it.

To configure the system, click on the gear and wrench icon. In the window, you can configure all the necessary parameters.
Now you know how to install Linux Ubuntu from a flash drive and you can do it yourself.
If you have old laptops, when you try to “speed up” the device, you may need to install Linux. It's the easiest way to create flash drives, especially if the gadget doesn't have an optical drive. However, first proceed to the right, then learn about this process in the report.
Features of installing Linux from a flash drive
Linux and Windows, when interacting with a computer, may be similar in some situations. But the internal processes of the stench vary greatly. The installation was not without its peculiarities:
- Having launched Linux from a flash drive, it is intended for basic and basic programs, you can use it without any obligation to install it on hard drive. That’s why almost all distributions of this OS are called “Live-CD / DVD”.
- Installing Linux from a flash drive or disk can be done in the same way unified system on a PC, or use another OS.
- To record the distribution, be sure to use the USB flash drives, as the device may overheat and turn off during installation.
- It is not recommended to perform the installation by connecting a flash drive via a USB hub. Especially if, in addition to the connection with the installer, other equipment is connected. This can lead to a lot of problems.
Programs for installing Linux from flash drives
There is a great list software security for recording operating system distributions onto USB storage devices. But the most universal and reliable is Unetbootin, as it works both on Windows and Linux.
How to record an image using Unetbootin:
- Engage the program as much as you can
- Run it, specifying that the destination will be a disk image.

- Press the button with three dots and enter the distribution image.

- Select the type “USB Device”.

- Enter the letter nosiya. If you have all the connections in a single instance, the program detects them automatically.

- Press "OK". The data on the nose will be lost.

Everything is ready before you start installing Linux from a flash drive on your laptop. You can close the program.

How to install Linux from a flash drive
The diversity of Linux distributions makes it impossible to recognize all types of installers. The most common types of computers include Debian builds, such as Ubuntu, Fedora, Zorin OS, ALTLinux, etc. And their installers give a complete picture of how and how you can install Linux. From flash drives, for starters, you need to get excited. You need to go to the BIOS.
Setting up the BIOS
Respect! On most laptops, you can enter the BIOS by pressing or steadily pressing the F2 key while the device is plugged in.
However, depending on the type and model, the keys and their connections may change.
- MSI laptops - Del key, F2.
- Dell - Del, F1, Insert or
- Acer - F1, F2, Delete, Ctrl + Alt + Escape.
- Packard Bell - Del, F2.
- Hewlett Packard - F2, F11, Del.
Also, some devices have a Boot Menu, where you can immediately select a device to use bypassing BIOS settings. Sound it after pressing the keys - F10, F11 or F12.
Since the Boot Menu is active, but you can’t enter the BIOS, the settings for most laptop models look like this:

Installing Linux on Fedora
Respect! Manual marking for installing the operating system creates a more amenable mind for further use.
- After downloading from the USB flash drive, you will now be able to see the item “Start Fedora-Workstation” and press “Enter”.

- show up Start page installer The “Install to Hard Drive” button starts the installation.

- Next you need to select your language and region.

- Click on the Installation Location button.

- Select the hard drive that will be used to unpack Linux.

- Set the configuration of devices to the “Your own way” mode and click “Done”.
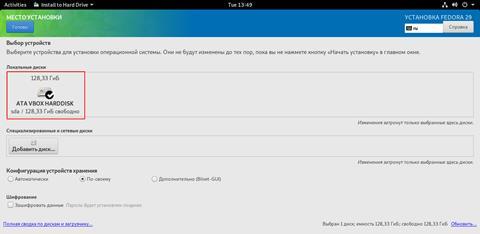
- Then change the partition scheme to “Standard partition”.

- Click on the “+” button to begin partitioning the disk.


- Click on the "Done" button.

- Then start the process by clicking on the “Start installation” button.

- The unpacking process begins.

- When you notify Fedora that the unpacking process is complete, click “Exit”.

- Then, in the control menu, restart your PC and remove the USB drive.


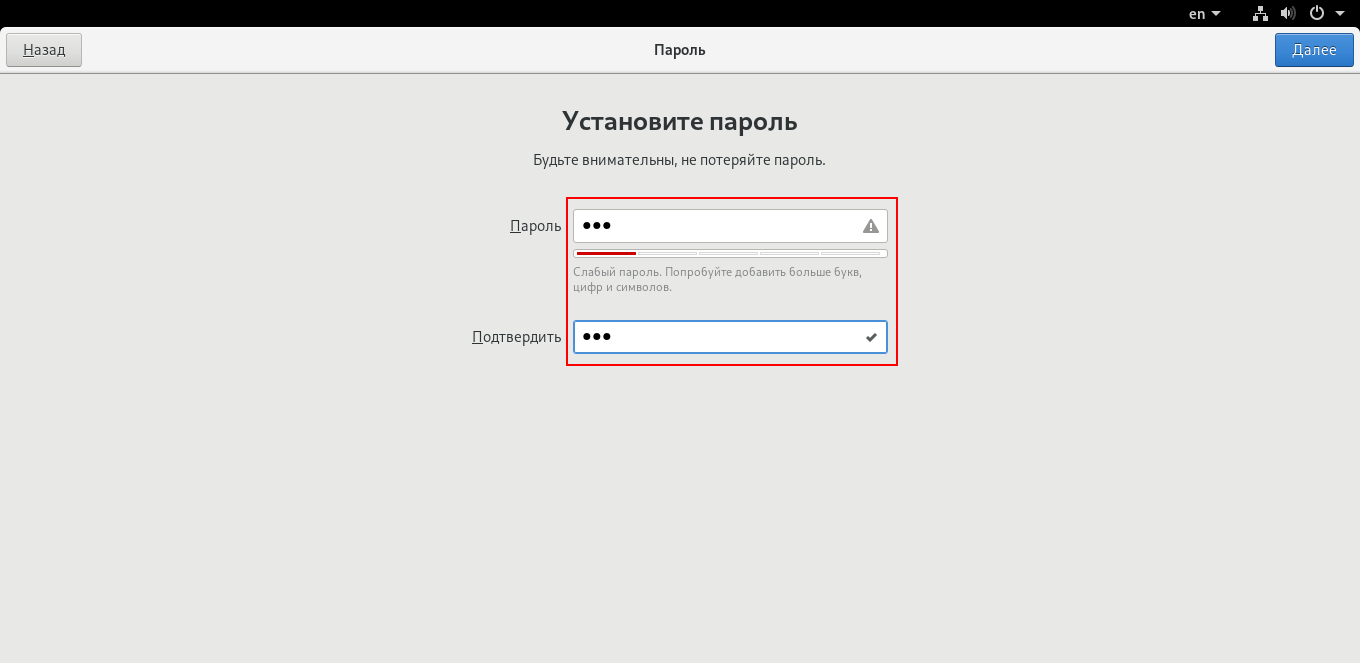
- The first start of Fedora is accompanied by a login screen, in which the remaining screen will be where you enter your username and password.

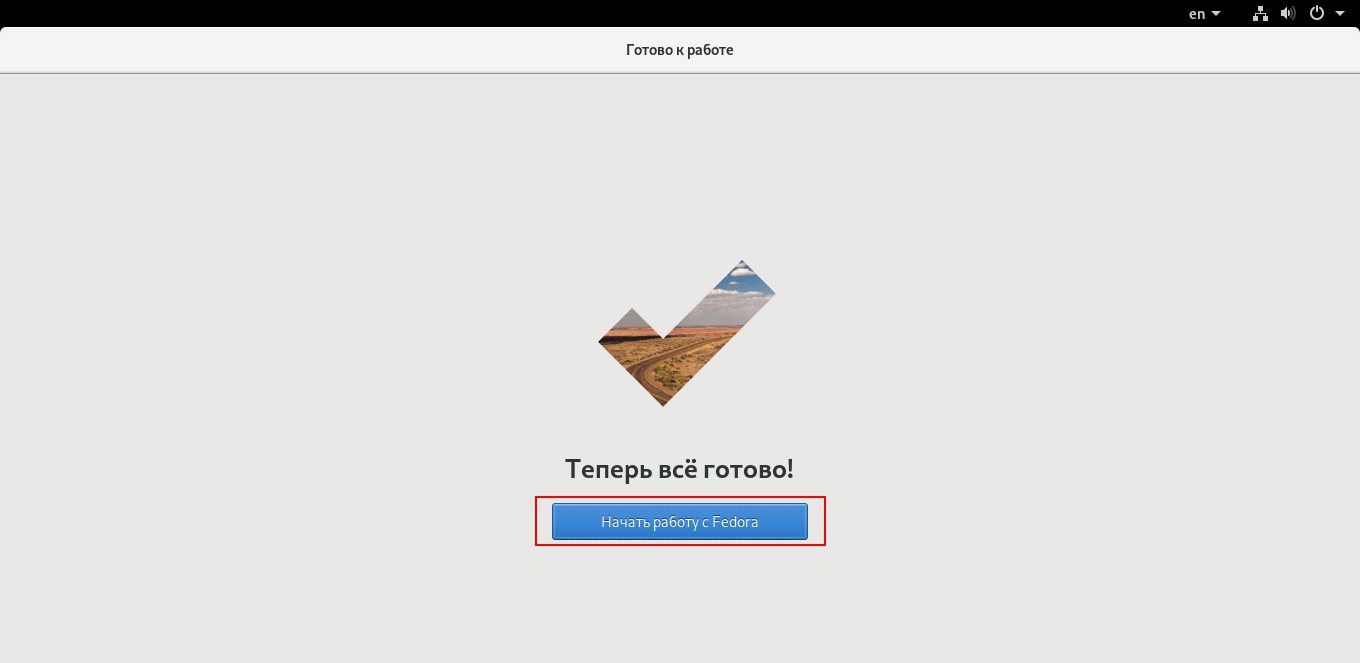
- At the end of the settings, click on the “Start to work” button, and the installation of Fedora from the flash drive is completed.
Installation from a Zorin OS flash drive is carried out through a standard installer for Debian-like installations and has minimal complexity in this process. Linux Fedora. And to yourself:


Installation from a flash drive of ALTLinux and most other operating systems on its kernel, such as Ubuntu, Elementary, Deepin and others, is done the same way, without the interface.
Because Linux cannot be installed from a flash drive: extensions
Regardless of the ease of installation, no one is immune from problems with it. Since Linux cannot be installed from a flash drive, it’s worth everything:
- The BIOS settings have crashed or were not installed correctly. Review the settings and save them again. If the situation does not change, try replacing the battery on the laptop’s motherboard, it will help you save the settings, date and time on the device.
- If there is more than one in a computer hard drive After installing the Linux OS, go to the BIOS and the first device, select the hard drive on which the distribution package was unpacked.
- The image is broken or the recording is unclear. You may need to check the MD5 sums for help, however, not all distributions support them at the same time. So the best option would be to re-download the Linux image from the official website (without parallel downloads of anything), with further recording on a USB drive without third-party running processes.
- Incorrectly marked Winchester. If the root is divided less, it is recommended to system vimogs song collection.
- Zavantazhuvach buv installations on the wrong disk.
visnovok
In recent times, Linux has ceased to be a product intended exclusively for computer help professionals. Anyway, if you are a person, after reading this article, you can independently install Linux from a flash drive.
Therefore, you decided to install Ubuntu on your computer for some reason, for example, due to the presence of empty discs or drive for reading disks, you want to buy a flash drive. Ok, I'll help you. This instruction will cover the following stages in order: creating an Ubuntu Linux installation flash drive, installing an installer from a USB flash drive in Computer BIOS or a laptop, the very process of installing an operating system on a computer as part of another or the main OS.
this pokrokova kerivnitstvo suitable for everyone current versions Ubuntu, and itself 12.04 and 12.10, 13.04 and 13.10. I think we can end with the introductory part and proceed directly to the process itself.
How to get a flash drive for installing Ubuntu
I assume that you already have ISO image with the version of Ubuntu Linux OS you need. If this is not the case, then you can easily attract your attention from the sites Ubuntu.com or Ubuntu.ru. So, no matter what, we will need it.
Run the program (this example is for the latest version 1.0, which was released on June 17, 2013 and is available by special order) and complete the next steps:
- Select the required USB storage device (ensure that all other data will be transferred from it).
- Select the item Auto format it with FBinst.
- Select Linux ISO / Other Grub4dos compatible ISO and select the path to the Ubuntu disk image.
- Open a dialogue box about how to name this item in the menu. Write something, perhaps, Ubuntu 13.04.
- Click the “Go” button, confirm that you know that all data is included USB accumulator will be deleted and the process of creating the corrupted flash drive will be completed.

We're done here. The next step is to go into the computer’s BIOS and install the software from the carefully created distribution there. Once the setup has been saved and the computer has been restored, you can proceed straight away to install Ubuntu.
Pokrokov's installation of Ubuntu on a computer in the context of another or the main operating system
In fact, installing Ubuntu on your computer (I’m not talking about setup, installing drivers, etc.) is one of the simplest tasks. Immediately after downloading from the flash drive, you will be prompted to select a language:
- Launch Ubuntu without installing it on your computer;
- Install Ubuntu.

Select “Install Ubuntu”
We choose another option, not forgetting to first select the Russian language (or any other language, whichever is more convenient for you).

From now on it will be called “Preparation before installing Ubuntu”. You will be asked to reconnect so that your computer can take up free space on your hard drive and, in addition, connect to the Internet. You're rich because you don't play at home Wi-Fi router If you use the services of your provider with L2TP, PPTP or PPPoE connections, the Internet will be connected at this stage. It's okay. This is required in order to install all updates and additions to Ubuntu from the Internet at the initial stage. You can also earn it later. Also at the bottom you will see the item “Install third-party software”. It is important to use codecs for creating MP3 and other things. The reason why this point is mentioned is that the license for this codec is not entirely “Vilna”, and in Ubuntu only a wide variety of software programs are licensed.
Next time you need to select the Ubuntu installation option:
- Command from Windows (in this case, when the computer is turned on, a menu will be displayed in which you can select what you want to use - Windows or Linux).
- Replace the OS with Ubuntu.
- Another option (self-partitioning of the hard drive, for additional information).

For the purposes of this instruction, I choose the most commonly used option - installing another Ubuntu operating system other than Windows 7.
The next window will show the partitions of your hard drive. By changing the partition between them, you can specify how many places you see for the Ubuntu partition. It is also possible to independently select the disk partition using the advanced partition editor. However, as a self-dealer, I don’t recommend going all the way (having told a couple of friends that there’s nothing complicated there, they’ve lost their money in the pouch without Windows, although it would be different).

If you click “Install now”, you will be shown warnings that new disk partitions will be created at once, as well as changing the size of old ones, which can take a very long time (depend on the level of disk occupancy, as well as its fragmentation ). Click “Continue.”
Through this (different, for different computers, but not for long) you will be prompted to select regional standards for Ubuntu - time zone and keyboard layout.
Today I will learn how to install Linux. They also signed up with the distribution kit. The middle of the work table was vibrated. I stopped downloading the image and installing a new operating system. So, having chosen ubuntu with xfce running, then a special version. It's called Xubuntu. We take it from the official website - download xubuntu. There are two options. Original and lts versions. It is important to go out to the river twice in life and in winter. And the lts version is - Long Term Support - “give long-term support.” Go out once every two rocks and lift for 5 rocks. I'm using the vikory lts version.
Once you have taken possession of the image, turn over its control bag. Yak tse robiti is written. If the control amounts are avoided, you can record it on some device from which you will install, for example, an optical disk or flash drive. You can write to disk using a specialized program, for example. And burning the image to a flash drive will help us Rufus program. Enjoy from the official website - download Rufus. Vaughn is simple in vikoristan. After that, they attracted it and launched it. required:
- In the “device”, select a flash drive to write to;
- in "Partition Scheme" - MBR for computers with BIOS or UEFI;
- in "Creation" fancy disk"Select an iso-image download explorer for help;
There is no need to make any more adjustments. Press “Start” and check for the completed recording. flash drive ready for installation.
To be precise, I recorded a video about those - How to get a flash drive:
Installing Linux Xubuntu
Let's start the installation. Set up your bios/uefi settings motherboard fascination with flash drives or optical disk. It depends on which nose you chose. Then we will feel attracted and we will have to choose. Either “Launch Xubuntu” or “Install Xubuntu”.
(For more information, click on the pictures)
In the English menu, select a language. I'll choose Russian. Click on the “Install Xubuntu” button.


Press continue and select the type of installation. This is an important point. It is necessary to determine where and how we will install Linux. I recommend clicking the “Other option” button and selecting the manual disk management method.

We have partitions and disks on a computer based on the size and type of file system

Next, select the location where to install the system. Since there is no free place, it is necessary to create seemingly unnecessary sections. You can earn money by pressing the button with the minus sign. Please be respectful and after the stagnation, you won’t renew anything!
Otje, vilne misce we have є. Now let's add the division. To do this, select the appropriate place and click on the button with a plus. The yak is shown as a baby.

On the tab - “Appliances for installing system backup”, select which disk to install on awesome post. First, we create a swap partition (analogous to a swap file in Windows). Tell me how to finish it with you RAM, The swap section is all one you can earn.
Recommendations for the size of the physical memory of the computer are multiplied by two. How much work you will do is at your own discretion. With low levels of RAM, the sub-size will not always be the same. In the Size window, indicate your size.
Set the type of the new partition to logical. Miscellaneous - The beginning of this section. Especially if you install it on an HDD hard drive. By clicking on the arrow in the “Select how:” menu, select the swap partition and click the “Ok” button.

Next, create a partition directly under the operating system. Enter size. Minimum capacity for a 8 GB system. Type put the first and the beginning of this space. Select Ext4 for file system. The mounting point is the root directory “/”.

The place that has been lost is included in the catalogs of sellers. Directory "/home"

Now is the important moment. If you want the disks to be connected automatically after the acquisition. For example, the “save” section formatted in the ntfs file system was processed simultaneously with the operating Windows system Where you save information and want the disk to automatically connect after the system is loaded. Then you will earn money soon. Select this section. enter file ntfs systemі NOT Check the box to format sections! Otherwise, the information will be wasted!
At the installation point, simply select the “media” folder and the disk name. For example: “/media/save”

Finally, you will need to specify mounting points for all sections of the swap. After that, the disks were marked. As it looks in my appearance, marvel at the screen. Click on the “Install Now” button.

We'll see in advance. Let's jump over and make sure that the divisions are divided correctly. We read it, we check it, because after this change we can’t cancel it! I press the “Continue” button.

After this change, it will be written to disk and the system installation will begin. The first will be shown the place of growth. Yakshto is automatically assigned correctly. Fill it out like that. There is no way you can enter your own.


Then enter the details of the account manager. Enter your account user name, computer name and create a password. So I recommend disabling the enabled button - “Get a password to log into the system.”

As you should external look and the functionality of the Ubuntu OS, and if you want to try installing it on your laptop or PC, then you can simply download the Desktop Edition from the Ubuntu website. Click on the “Enter” button in the menu at the top, then download and install the program according to the instructions on the site. Vickory the menu that appears to select the version you want to install. It is best to carry out the installation with the settings according to the instructions (as you don’t have any reason not to be shy). The file size is approximately 700 MB.
You can also install Ubuntu from a flash drive with 4 GB of memory for additional help USB utilities Universal Installer. Run the utility (it works directly in the window from condensed file, Whichever you liked) and scroll through what you select from the list. Then say the way until it gets out ISO file on your hard drive i, select, select correct disk, Which one needs to be installed on.
Make sure you backed up your files to flash drives before erasing them. In addition, create backup copies files on the computer on which you will install Ubuntu from a flash drive, if you plan to install it in a container of another operating system.

After all the files have been written to the USB drive, you can insert it into a different port on your computer. If automatically from a flash drive, you need to change the device order in the BIOS. You can enter this section by pressing Del, F1 or another key that displays on the screen under the hour of enchantment.
Follow the instructions on the screen when you install Ubuntu from a flash drive - it will reveal the presence of another operating system and will indicate options for how to install Ubuntu as quickly as possible. If you want to use Windows and use Ubuntu as a single operating system, it is recommended to select the “other” option and delete the Windows partition on the hard drive. You will also need a free area, which will cost you twice as much (so that installing Ubuntu from a flash drive will be complete).
If you are familiar with the disk partitioning process for Windows, you may get a little lost in Linux. Place the letters on the disks, you will see the letters HDA, CDA, etc. today hard disks Those connected via SATA or USB are called SDA, SDC, etc. The first section of the leather is numbered from 1 to 4, and the logical section of the leather is made up of 5 parts. Confirm that you have selected the correct disk and partition before making the last change. The marking is only displayed when you click on the “Install” button.

The parts needed to install Ubuntu from a flash drive are: root, home and swap partition. Root - this is the partition in which Ubuntu is immediately installed (its capacity is at least 4 GB). Next, select ext4 in the file system and set it as the point of change. The Home section is the section where your files are saved (you will have to work hard to accommodate everything you want to save). I again select ext4 as the file system type. The swap partition is responsible for twice the computer's memory capacity (so, if the RAM is 2 GB, you need to create a 4 GB partition).
At the time of installation, you will be asked to provide a number of details (including your location, language, customer name and password). Please ensure that your computer is connected to the limit (you will be prompted to select Wi-Fi measure, There are no connections). This guarantees that the remaining updates will be installed.
Once the installation of Ubuntu from the flash drive is complete, remove the disk and press Enter. Your computer will be restarted and Ubuntu will be launched. Go to the software center (the cat icon at the bottom of the screen), you can install your favorite programs, including Chrome (version for Ubuntu Google Chrome), Skype, Dropbox and others.