Yak zastosuvati preset in lightroom. Presets for Photoshop. How to add presets to Lightroom.
Software product Lightroom is a professional tool for editing digital photographs. The program extends from Photoshop to include a batch image processing function. By editing one picture, you can save the specified parameters to other pictures. Using plugins is another way to speed up production. This article tells you how to install presets in Lightroom.
What are light indicators and where to find them?
If you want to save the preset, press it onto a new one, and that’s it. At this point you can do the same. Perhaps, is this more similar to presets? What do you say? Are you reluctant to acknowledge them? Light presets, also known as advance adjustments, are one of the most valuable and valuable resources that can be found in an editing program.
How can I add a preset to my photo?
It is necessary to sort out the changes from the editors that are being saved, so that later they can be submitted to the authorities. This allows you to speed up and save a lot of time for editing. Setting up the preliminary preparation for our photography is even simpler.
Advantages of vikoristannya set nalashtuvan
Varto vrahovuvati, scho universal plugins I can't sleep. The result of the processing remains in the minds of editing, illumination, and exposure. The skin plugin will have to be adjusted to a specific photo, otherwise there will be a whole series of adjustments that will require a couple of adjustments, and this will save time. A preset is a set of parameters saved in a special file. You can create it yourself or use the plugin created by other people.
What should we bring light presets?
Great! Let's marvel at how you can earn money, piece by piece, without ruining us. 
If we have a lot of presets on the panel, we may find a few things we want to start searching for what we want, so that we can create folders so that they can be classified and processed more effectively.
How to add advance installation in a bright room?
How can I earn money? Let's marvel, piece by piece, so we don't get lost. 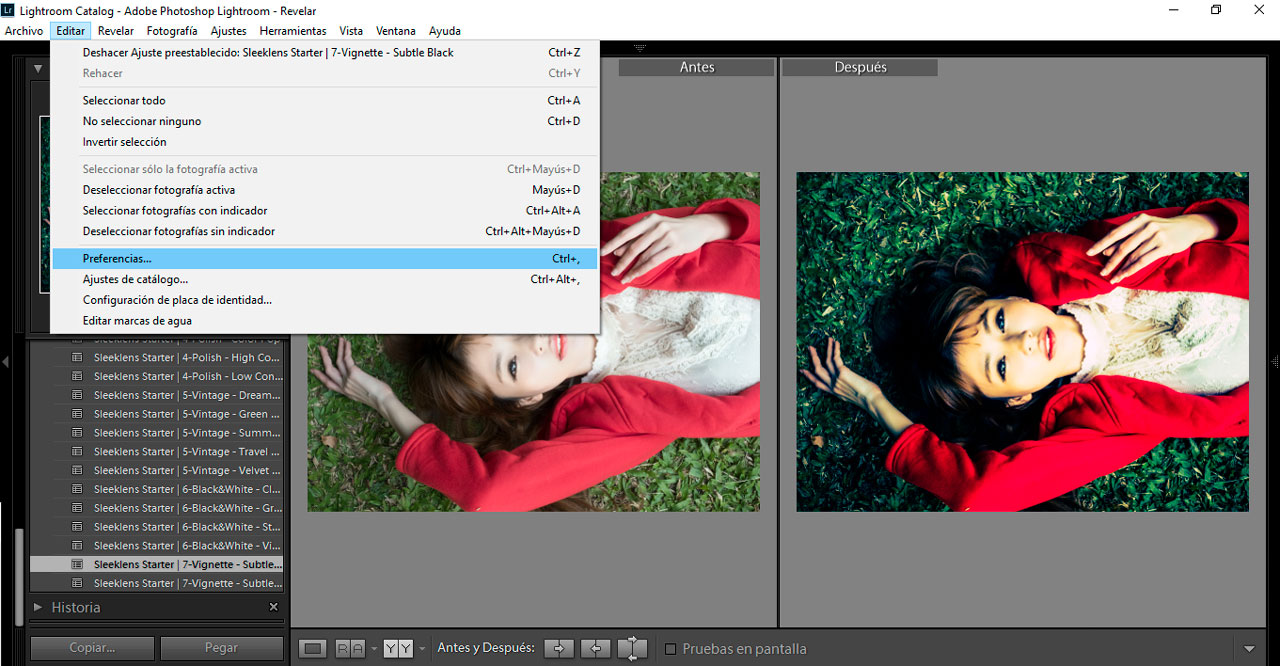
To quickly extract the most from light reinstallations
So, in order to get the most out of them, let's see what joy can be achieved in the future.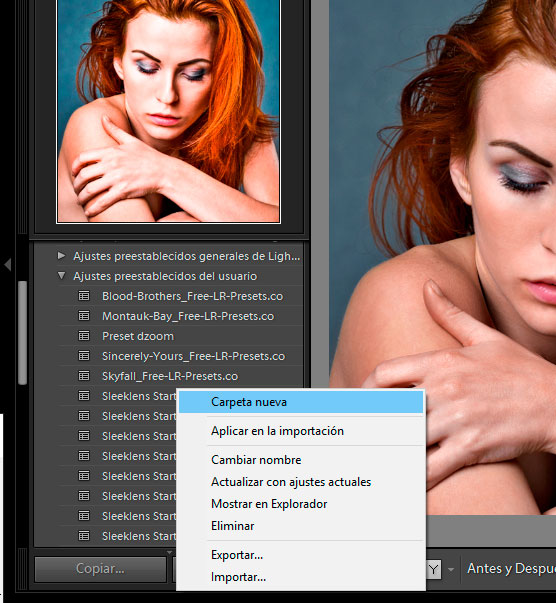
The most cost-free light scale advances
Reinstallations - extremely simple and intense functionality; We can create presets for many places on this instrument.This method allows you to quickly obtain the necessary effects. The program has built-in presets, so you won’t have to go to the settings again. The addition of third-party plugins may scam some traders.
How to install VSCO presets in Lightroom: 1 way
Set up your settings and call them to appear in these archives. Before installing encrypted files, you need to unzip them to a folder.
Why not talk about creating presets?
We can easily find them on the Internet, and there are even good deals that we can buy already at a great price, we can install them, and with one click we can be unique external look. Of course, creating presets is a lot of fun, but we can get hundreds of cost-free presets from the Internet, which can be a starting point for retouching our photos different styles and relish.
The simplest method, and the most important one, is to click on the presets panel of the development module and select the “Import” option. Oskolki, as we click right button Move one preset at a time, the parameters will be different. Therefore, in this basic method, it is recommended to create a folder “Customer Presets” and for greater control, it is recommended to create a folder so that we can import our presets from each folder.
How to install presets in Lightroom? For this purpose, run the program and go to the correction module. On the left panel you can open the “Presets” menu. Here there is a set of adjustments, a discussion of topics.
It is necessary to know the item “Koristuvach Presets”. If you have a large number of plugins saved on your computer, it is best to organize them in different folders. For which track, select the New folder row in the context menu. After creating a new folder, you need to click on the “Import” button. In the window, enter dzherelo.
How to install presets in Lightroom
Other options in this menu are not explained because they are too obvious; The option “Updates with ongoing adjustments”, which is used in methods such as statistics. In the context menu of the front image, you can add a parameter in the red field, which is a shortcut for setting what you want, so that the preset is frozen before importing.
De preseti?
As soon as we choose, a small ridge will appear as a result of the reinstallation. To enable it, you can turn to the previous installation and select one of the same options from the context menu. To know our presets, we have two options. From the context menu, to the preset. . While it is open, we can add folders or rename existing ones, copy or move presets to arrange them in the same order. In addition, we can copy presets that we have downloaded by downloading them from the Internet and pasting them into a separate folder.
Next, you need to select presets and confirm their availability to the program. For this option, you can add 1 or more plugins. 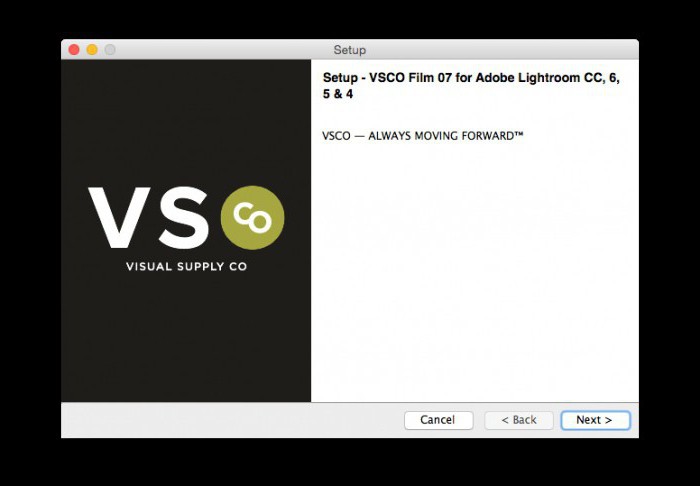
How to install presets in Lightroom: 2nd method
Koristuvach will work with the folder, where the sets will be saved and adjusted. You can move the installed plugins to another location and add your files there. How can I install presets in Lightroom using any other method? Koristuvachev needs to go to the “Edit” section and select the “Transitions” row. Then go to the “Presets” tab.
І field: save presets from catalozi?
It is very important that you understand what is happening if you rob someone. When you select a preset, it will be saved in catalogue; This means that when you create a new directory, they do not allow access to the presets that were installed in the previous directory. Much less, because the stench creates a directory for the skin project.
We encourage you to preset
Not only can they do this, but they are to blame for being copied as they support their photographs, presets and valuable editing hours that we cannot afford to waste.In some situations, the “Ctrl+,” buttons are used. Here you need to set the order to the “Save presets in catalog” item. This will eliminate the need for you to search for files in all sections hard drive. To figure out where to install presets (Lightroom), you need to click on the “Go to folder” option. A directory containing files will open.
Update them by re-opening so that the appropriate version of the process is selected. . Once you have completed the registration process, you will go to the side where you can access the additional presets. This will open a window similar to the one shown below.
Cob of vikoristan presets
This opens the flow, as shown below. If you haven’t installed any presets, you will only see the “Koristuvacha” folder. If you have already installed other presets in the past, you will find them here. To access them, go to the development module, and you will find them on the left side.
Here you can expand the develop folder. It saves plugins for the correction processing module. There is a user presets folder here. You will need to manually move new setup sets here. After re-installing programs, the menu will appear adding presets. 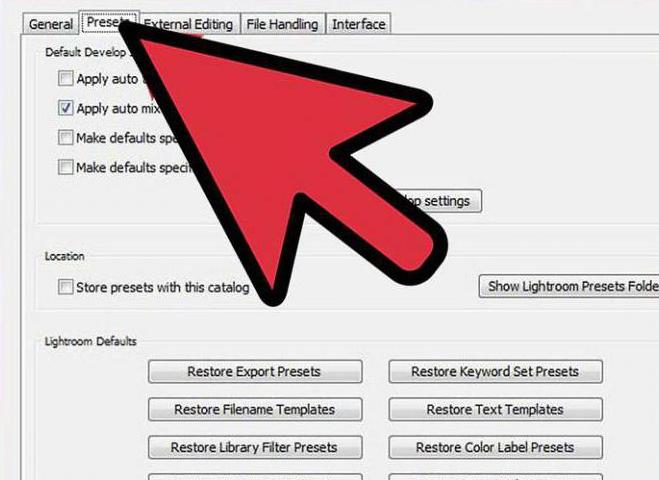
How to save your time
Another method is to import a large number of plugins. If you do not have access to the presets, you can add your own set of parameters. For this you need to go to the correction section. Then you need to go to the “Preset Options” tab and click on the “+” icon.
You know what you preset – the very same Swedish way Do you want to limit the style to the effect to a great number of photographs? Presets are an invisible part of any photographer’s workflow. Unfortunately, many people still don’t know what such a problem is and how it can bring harm to their projects.
What are presets and presets? You create, save settings like presets and add them later in your photos with just one click. If so, your learning will be simpler if you create your preset. Kroc Activate the software module.
You will need to indicate your name and settings in the window. Then click on the “Create” button. The preset is to appear on the secret list. Then you need to click on the new one and start processing the photo.
After completing the process, you need to right-click the optical mouse button on the plugin and select the “Update settings” row. To save the file on your PC, select the “Export” item in the context menu and specify the required folder.
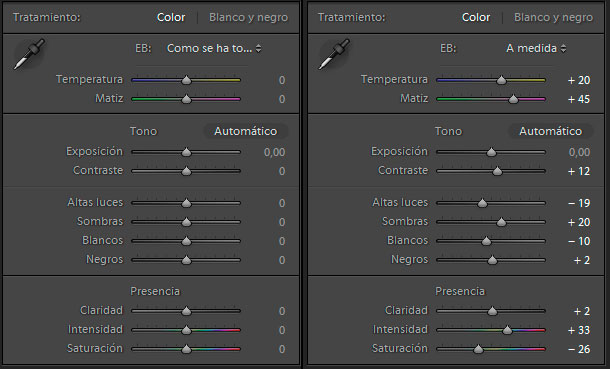
Krok Creation establish Odkrovennya. To create the preset, respectfully start viconati deyake redaguvannya. Work with the sweet tone of your wet skin. Create effects that show off your photographic personality. Stick to this beautiful black and white. Once you are satisfied with the results of your settings, it is time to save and create a preset.
For which click the icon. Understand the skin function of this dialog box. Item Here you can name your preset to help in identifying the changes that were made. Item It is good practice to save your reinstallation from the singing father, as it helps you easily organize and find.
What and where is saved in Lightroom? Originals, presets, previews... michael_perlov wrote in February 7th, 2011
Most Lightroom applications do not store settings, presets, original photos and information about their processing.
This article is about the removal of different files, such as Lightroom, about their meaning and about those that need to be saved when transferring the catalog to a new computer.
You can indicate how the adjustments were made when the previous adjustment was created. Croc You need to select an image from the beginning if you want to freeze before washing. Croc Next, select the preset you want to put on it by pressing it on it. Note. Often the number of created presets tempts the user to forget about the meta.
Do you remember how easy it is to create a new preset, step by step? Croc Open the tab for promotional items. Press the mouse in front of the right button. Please note that you will open a floating window with some information. Select file to import. We all know that the word “hour” is an object of luxury.
First of all, we’ll look at the originals of the photographs, which are incredibly important. Yakshcho Vi did not make up the Kudi, poison the photographers at izport in LR, I can’t know now, just rub the button Mishі (Ctrl+Klik on Mac) on the photographer, pusk, I viber in the contextual menu it is "Show in explorer" ("" "" "" "" Show in Finder"" on Mac):
Another way is to find the entire folder of images. For that, in the Folders area in the left panel (Libraries module), also click on the folder names, then click, to click context not menu. There will be a similar point:
An important element of success is the editing of hundreds of images, maintaining brightness standards and proper data. How can you save these rules in a short hour? The answer lies in what you learned from this article: Creation of presets.
Lots of photographers still spend expensive money on making adjustments to too many images. The right way to achieve the shortest workflow is to create a preset that reflects your need. Vikorist them for your professional career and earn additional funds to enjoy your homeland. Did you deserve what you learned before?
In the folder with the originals you can find files with the extension .XMP:
In these files, LR records all additional metadata (ratings, keywords, adjustment of processing without history), associated with the image, which is in the RAW format of the camera's pickup. For Nikon - NEF, Canon - CR2. If the original is saved in JPG, TIFF or DNG format, then the metadata is saved right in the middle of the file and the .XMP will not be transferred from it.
Click here and find out more! Using different styles can optimize processes and save time when you need to get an accurate look at the image. Style may include sprat various adjustments, including adjustments, lens correction, keystone distance, basic functions and metadata information. Select “Used styles” or “Customer styles” and see the current appearance of the image while viewing the flow list. Select the style that you need to set before the image.
- You can create a beautiful style on the “Customization Tool” tab.
- Select images from your browser.
- Select the “Styles” icon on top panel tools.
- In the section "Work spaces".
What should I give this metadata? Possibility to transfer the same frame to another LR directory or other program (actually not Adobe Camera RAW), saving the rest of the settings, keywords, ratings and color tags. But in order for the metadata to be registered with the publisher, they need to be saved. For whom can you see required files in Lightroom press the key Ctrl-S, or set the settings to automatically save them from the Edit->Catalog Settings menu (Lightroom->Catalog Settings on Mac):
You can work on the style by altering the original photo and the changed photo. Once the style is saved on your computer, it can be imported and easily modified by other vendors. Resetting is a group of parameters that can be applied to one instrument. For example, you can create a preset that matches keywords across a variety of metadata categories. The style can be adjusted to any number of presets or ungrouped parameters. . The settings for the installation are de-packed.
In certain situations, you can arrange the presets in a crooked manner. If you have a number of metadata presets, you may not want to combine them with the “collections” metadata presets. Є shortcuts, so that in one click you can condense a collection of images to a photo. In this way, you can go to the rough picture, just from the camera, finished image At first glance.
Vikoristovuvati auto saving I do not raja. First of all, this is an enhanced program; in another way, there is a greater emphasis on hard drive with photographs, and thirdly, this is not necessary. Having read to the end, you will understand why.
Let's step on the importance of the file to the Lightroom catalog. One file saves information about all imported photographs and their storage on disk. Collections, virtual copies, keywords and other metadata, customized processing and, most importantly, processing history are also stored there. Essentially, Lightroom does not function without a catalog, since you opened the program, which means you opened the catalog (the first time this catalog is created automatically).
For example, you might have a preset that basically adjusts contrast, sharpness, clarity, and saturation for all your shots. Or you may have a “folding” one, for example a preset, to transform black and white portraits or give a specific tone to the photo.
It’s good that a lot of photographers share presets on the Internet that they do today. Preparing and installing these presets will not only save you the hassle of working, but also spare you an hour to create the presets. A number of sites have been released that offer presets only for payment, and other transactions are available for all free collections.
If you don’t know where your catalog is (which is even worse), just go to the Edit->Catalog Settings menu (Lightroom->Catalog Settings on Mac). There you will go to the directory and go to this folder button:
From the Pope's catalog you will find a number of important speeches:
First of all, this file is in a directory with extensions.lrcat (underlined in blue). You need to save and reserve as surely as photographs or anything else. You won't need XMP.
In another way, here is a preview of your photos, on Windows - this is a folder with the name directory i.lrdata at the end, on Mac - just a file (underlined in purple). What does preview mean? On the right, when I look at a photo from a library, Lightroom does not open the originals, but instead creates a specially modified version of the image until all processing adjustments are completed. This axis is called the first one.
The stench is created automatically in the world when I look at the catalogue. This folder can be safely deleted but not backed up, otherwise it will be automatically recreated. Please tell me what you need to do to help the robot in the library module!
Thirdly, this dad may have all your presets (under the chervonym). Read about how to set up presets and what else in this article.
Look, fourthly, there may be a special file here (underlined in green) with extensions.lock. This file does not allow opening one directory of the client and is automatically deleted when the LR is closed. If it crashes and the program crashes, the file may be lost, and when you start it you will uncheck the "Lightroom catalog 'Catalogue X'" option.
Just delete the file and everything will be fine!
Cream preview for the library module, Lightroom also saves special files for quick processing. Right now, when a new photo is opened in the Develop module, reprocessing is carried out and the removed workpiece is stored in the cache. If the preparation is already in the cache, it will take less than an hour. As soon as the place is over, then the oldest part is removed, and its place is carefully created.
You can check the cache size and adjust its size in the Edit->Preferences menu (Lightroom->Preferences on Mac) on the File Handling tab:
The cache size is selected individually. If you often work with a large number of photos in Develop mode, you can build up a larger cache. If you expect the footage to be separated by a dozen frames, then download a standard gigabyte. Find out that the size of the workpiece is approximately the same as the size of the original photograph.
Be careful to keep the cache on your hard drive so there is plenty of Have a good time, otherwise Lightroom will work even better! Ideally, the cache should be expanded between the system and the swap file on another physical device.
Another important element of Lightroom is the camera profiles and optical lens correction profiles that appear in remaining version program The program comes with several profiles, which can be found in different folders on different systems:
- Mac OS X:/Library/Application Support/Adobe/CameraRaw/CameraProfiles
- On Windows 2000 / XP:C:\Documents and Settings\All Users\Application Support\Adobe\CameraRaw\CameraProfiles
- On Windows Vista/ 7:C:\ProgramData\Adobe\CameraRaw\CameraP rofiles
Profiles for correction are entrusted to your father LensProfiles:
In addition to the standard ones, you can add your own profiles, for example, in this article I wrote about new profiles for Nikon D700, D3 and D300 cameras, which are many times better than the standard ones. To install them, you need to copy the profile files to your preferred folders.
Before speaking, this is the profile of Vikorist and Adobe Camera RAW!
This record is automatically added to the site LCourses.ru.
Original.