3 what does it mean to see a paragraph. You can see a paragraph or a fragment of text in a Word document. View of the additional keyboard
When you use Word, you can get a lot of subtle nuances, for example, how to see a paragraph in a Word document.
Nutrition, as it seems simple, in reality is a number of decisions, different from each other, both in reality and behind the meanings.
Even if you respond to the requested trace, understand that when you see the paragraph, correspondents often hesitate in respect of the current speech:
- transferring a new row;
- seeing my dear friend;
- view of the additional keyboard;
- setting paragraph spacing;
- vision of the paragraph symbol itself;
We will try to confirm the skin nutrition in detail. And even with the powerful forces of the stench, it’s easy to get rid of the stench and it’s not their fault. Well, practice shows that theory can do better than theory. And there are special attacks, if you need some advice!
Transferring a new row
This is the simplest thing you can do with Word. As if the version were not vikorized, the language will always go about one thing. About pressing the “Enter” button on the keyboard. After this, a new paragraph is inserted.
This action calls for the transfer of the row and many who choose it mechanically. Word itself does not break up the text into paragraphs, but simply transfers words and text elements to new rows.
Seeing a Helping Misha
The procedure is threefold folded, lower in front. You can also see them as paragraphs, or as elements of the text.
For example, take the word seriously. And then work with them like operations.
In order to see part of the text in the target you need:
- Place the cursor on the cob of the river.
- Press the left mouse button.
- Without releasing the LMB, pull the mouse until the cursor lands on the edge of the desired fragment.
In this case, the part that is seen is prepared in this way. The gray text in the background is about your vision. Now you can cancel all the necessary operations, as long as the fragment is visible.
Before speaking, this is the only way to see your target. You can combine the views with the method described below. A remark about this will be placed in the text. So the following paragraph has already been seen. 
Dodatkovo: Versions of Office starting from 2007 have their own trick for making paragraphs visible. Instead of using the cursor, you can simply press the mouse three times over the drop-down area between the paragraphs. This also gives the best result.
It’s true, you need to practice in order to work without mercy. The hands that started to press the button often violate the interval between the presses of the button.
View of the additional keyboard
Windows users are glad to know that all mouse operations can be performed using an additional keyboard. How can you immediately see the paragraph with this help?
Meals will be enough for you. The rich man is thrown into a stupor. Hands begin to instinctively press “Ctrl+A” (which sees all the text in the document). And if you press Shift and click on the arrows, then only one row is visible.
And this kind of dribble was conveyed by Microsoft developers. The decision has been around for a long time. Approximately with the version of Word 2010 a new feature was added:
- We place the cursor on the beginning of the paragraph.
- Press “Ctrl+Shift” and press the down arrow.
- Ready.
The way to finish it is simple. One thing, after pressing so many buttons, not everyone can exit the first time. It’s just a little simpler, you need to apply 3 pressures of LMB correctly.
For the sake of justice: The function itself is not explained in the official document. If you place the cursor at the end of the paragraph, you can reach the final result. Then, pressing “Ctrl + Shift + up arrow” will see the paragraph in front of the cursor.
You can also combine methods. Simply place the cursor at the beginning or end of the paragraph and press the Shift button. Then, when you press again at any point in the document, you will see a fragment that appears between the two clicks. Shift is released after seeing the video.
This function is especially handy if you need to delete or change part of a document. It allows you to see not only paragraphs, but also parts of the speech.
Setting paragraph spacing
An option that is often confused with the seen paragraph. The idea is to set the entry to the first word in the required fragment of text. In the images this entrance appears more prominently. The first proposition is moved to the right, below the entire text. How can you earn money yourself?
Note: The instructions are written for the Office 2013 application. A similar method works for versions 2007 and higher. For older versions, you will need to search for additional menu items.
Sequence of actions:
- On the “Head” tab, click on the arrow in the “Paragraph” section.
- In Vikna we know very well the item “First row”.
- Select “Input” or “Input” and set the size as required.
View of the paragraph symbol
So, the transfer of a row in Word contains a powerful symbol. It's easier to deal with it, it seems. If there is a need to insert the entire character itself, then use a special insert. 
Otherwise, you can simply add transfer to a new row when copying. To display this symbol, you need to enable the “Display non-directed symbols” option.
There is a paragraph at the top of the section. When pressed, spaces and other characters are displayed. You can see the sign of a paragraph in any number of ways.
Vlasna, that’s all there is to seeing a paragraph in Word. It’s easy to understand the problem, but you still have to blame it for its own nuances. It is most often difficult for Koristuvache to understand that the very intention is to work and as it is correctly called. Therefore, other elements related to the paragraph were considered.
The article is about how to create a row of reds in Word or, as simple as it seems, a paragraph, to write a lot of, especially poorly understood, components of this software product. The first thing that comes to mind is to press the clearing several times until the entrance seems to be “eye-opening”. This decision is completely incorrect, so we know less about those who use a text editor from Microsoft to create a paragraph entry, looking in detail at all the possible and acceptable options.
First of all, let’s begin with those who are aware that the instructions described below will apply to all versions of the office program. Following our recommendations, you can create a red line in Word 2003, 2007, 2010, 2013, 2016, as well as in the most recent Microsoft Office 365 and 2019 packages. To be clear visually, give the little ones other names, but in everything is approximately the same and will be understandable to the skin.
Important note: In business there is a standard for entering from the red row - this indicator becomes 1.27 cm.
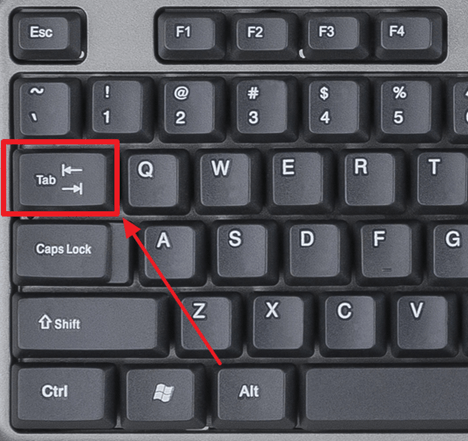
Method 1: Tabulation
Having turned on pressing the space bar several times as an alternative option for creating a paragraph, we can safely use another key on the keyboard. "Tab". For the sake of this, we need it first, let’s face it, when it comes to working with programs on the Word platform.

Place the cursor on the beginning of that fragment of text, which may be written from the line of hearts, and simply press the key "Tab". As a result, an entrance will appear in the first row. Shcrac, є є in the country's method of short -lived, I Polyaga, in the one, the paragraph widest is not zgіniky with the standards, but zgіdly with the Microsoft Office Word settings, yaki can be the right yak, so incorrect, especially yaksho for a specific comp. You are not less interested in the product.

In order to avoid possible compromises in the created row of hearts by means of tabulation, it is necessary to correctly determine the parameters of this function, which we wrote about in the article.
Method 2: “Paragraph” parameters
As we have already said above, those in what order the key is "Tab" when pressed, it can be indicated in the tabulation parameters, but in the context of our current situation, it is possible and necessary to look at it as a different method.

Method 3: Line
Word has a tool called a ruler. Vikorist is used for marking up text documents, their verification and more. With this, you can also place a row of reds. This tool can be activated, and to activate it, go to the menu panel under the tab "View" and put a tick next to the relevant item "Line".

The same line will appear at the top and bottom of the sheet. If the runners (tricuts) are placed on it, you can change the layout of the side, including setting the required stand for the heart row. To do this, just place the cursor in front of the required fragment of text and drag the top bar of the horizontal ruler. Above is the normal version of the approach, below is a more extensive demonstration of the operating principle of this tool.

As a result of the correct and precise setting of the line, the paragraph will be ready and look the way you need it. You can learn more about the characteristics of the work and the area of use of this tool by following the instructions below.
Method 4: Creation of a powerful style
Finally, we decided to deprive ourselves of the most effective solution, since we can not only create paragraphs, but also easily and speed up the process of working with documents from the editor of Microsoft Word, which automates this process. To complete the task set before us in this manner, we only need to exert ourselves a little once and spend quite a bit of time, and then we will not have to think about how to complete the necessary formatting and design of the text. Next, we will create your own style, which you can turn on through the parameters of the red row. From now on, you will be able to bring any text you have written literally in one click of the bear to the desired appearance.
I'm flying. This article is devoted to the principles of work in the text processor Microsoft Office Word. There is a lot of nutrition available to those who use this software. In this article, I will look at one of these foods and give a testimony.
Today you learn about all the ways to see fragments of text or an entire paragraph. To get started, you will need to open Microsoft Word. Find out by clicking on the program shortcut, or simply open any document with .doc or .docx extensions:
In the image shown, I have opened a file that already has text. You can now print out a description of the vision methods. Microsoft Word uses a whole range of tools to help you see a piece of text. Let's divide our methods into categories:
Universal methods
1. Misha for help
Place the cursor where the part for the view begins and without releasing the mouse button, move the text cursor to the very end of the view area:


Also, please note that you can start seeing in two directions: from the beginning of the viewing area to the end, and from the end to the beginning. When the text is visible, the background of the visible area itself is colored blue. With different programs, you can change different colors according to the hour of viewing.
2. Misha + Shift button
To implement this method, you will need to click on the place where the fragment you see begins, or some other fragment. Then you need to press down the key Shift, it is located in the lower left corner of the keyboard:

Now, do not release the key Shift, press the text at the end of the fragment:

3. Misha + Shift + Arrows
This method is similar to the first one, but you also need to use the arrow keys: ← ↓ →. To start, press the required fragment of text onto the surface. Then press the key Shift Use the arrow keys and arrow keys to move the cursor and view the text:

Tools for seeing other elements of the text
1. Vision of one word
To see more than one word, you need to move your cursor over the required word:


2. Visible part of the row left-handed with the cursor
To speed up this method, move the cursor to the text next to your target or the arrow on the required word or part of the word. The fragment shown is displayed at the beginning of the row and up to the point where the cursor stands:
Now press the keys Shift + Home. The result of the victory of this team will be immediate.
When typing text on a computer, writers often try to write a paragraph in Word. Ask them not to mark the paragraph itself, but the paragraph before it.
If you are faced with this problem, then this article is obliged to help you. Here you can learn how to create an access before a paragraph in Word 2003, 2007, 2010, 2013 and 2016.
How to create a paragraph in Word 2007, 2010, 2013 and 2016
In order to create a paragraph in Word, you first need to press down the ruler. For whom go to the “View” tab and check the box next to the “Line” item».
This line can be turned on by clicking on the button located in the upper right corner of the sheet (a little more for horizontal scrolling).
If the line is marked, it is important to read it carefully. On the line there are three pompadours that look like trikutniki. Two evil ones and one on the right. With the help of these steps, you can create indentations between the text and the edge of the arch, as well as paragraphs. To do this, create a paragraph you need to see all the text behind the mouse and move the top left button to the right hand.
The following paragraph of the text will be reinforced at the edge of the arch with an additional layer.

If you need to create an input for only one paragraph of text, you can not see the text, but simply place the cursor on the required paragraph and create an input by moving the button.
How to create a paragraph in Word 2003
In a similar way, you can create a paragraph in the text editor Word 2003. To get started, you will need to turn on the ruler display. Try for additional menu “View - Line”.

How to create a paragraph using an additional keyboard
Also note that you can create a paragraph using an additional keyboard. For whom You need to place the cursor on the top of the text block and press the TAB key on your keyboard.
This method of creating a paragraph is also simple because you work not only in Word, but also in many other programs for editing text.
A paragraph is a section of the text, which is expressed by its monotony. Starts with access(Row of Hearts). In the Word office package, it is added to other paragraphs by pressing the key Enter. You can create it beautifully and effectively.
Zokrema, for Word 2010 you can get it dekilcoma ways. Here's the next track see paragraph. You can earn money three times click in the area of this category or forgive visions From the left mouse key squeezed.
Next, click the right button and select the item Paragraph.
The same action could be performed by clicking after seeing the little arrow on the right side of the panel Paragraph on deposit Layout of the page(or Golovna) on Toolbars.
There is no one here tweaking, what is allowed to work in any way. 
Here you can learn Virus(Left, right, center and width). Zrobiti access from the left and right sides. In the First row entry field, you can select either entry or entry. 
The washing is the same as the standard one 1.25 cm, you can do yoga right away change.
You can make a row of reds without any window, just by pressing the button Tab, placing the cursor behind the relevant part of the text. The first row should be cut to the same 1.25 cm. If you need to change this value, then turn to the window parameters press the button below Tabulation.
In the field For the rest change the values to those that control you. 
Another red parameter. Here you can select the value of the entry in front of the next paragraph. It’s also changing here Inter-row values.
The standard row spacing for official documents is one and a half. You can change it here at your discretion.
Down by the field Zrazok, you can check which changes will be made before confirmation.
To adjust the new paragraph settings for the entire document before opening the Adjustment window see trace the entire document. The best way to earn money key combination Ctrl+A.
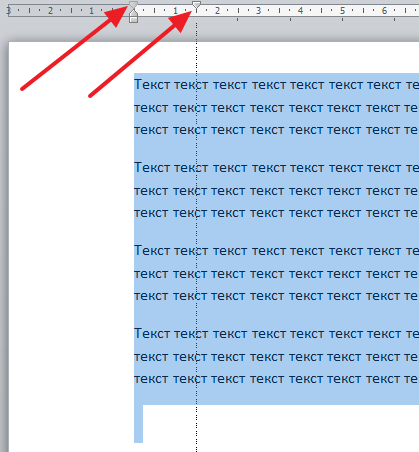
Another way to transfer the first row - for help rulers. If you don't see it, you need to go to the tab Viglyad and put a tick on the item ruler in the section Show.
Once you have seen a paragraph or entire document, pull the top knit of the ruler to the desired position. However, the method of manually pulling the slider, in our opinion, is the least difficult. 
Nizhny trikutnik overtightens the entire visible part of the document.
All descriptions are current and for the latest versions of Word 2013 and 2016.
Zrobiti row of reds in Word 2007
Similar actions can be performed in the 2007 version. 
Please follow the instructions described in Word 2010. 
The ruler sticks to the tab View.
Row of Hearts in Word 2003
The 2003 version of Word is already out of date. Please note that changing the parameters of the inputs is simpler, as there are no numerous tabs, all located on one panel.