How to make Windows 7 without a disk. Installing Windows to a computer without a disk and flash drive. How to install windows without a flash drive and disk: the main stages of work
In this article, you will learn how to reinstall Windows 7 on yourself. The material is designed for users who will install Windows on a computer or a laptop for the first time. It would be scary that it did not sound, reinstall Windows is very simple. In the time of Windows 95 and 98, a inexperienced person, the procedure for reinstalling the operating system could be introduced by a mystical rite. The person who was invited to do this - necessarily gone by a programmer, and was considered a guru in the computer region.
For their part, such a guru, feeding the price, in every way fought their clients with terrible computer terms and stories about viruses and burnt computers. In this manual, you will make sure that this is not at all and that installing or reinstalling Windows on your laptop or computer is very simple and available for almost any person who can use the computer mouse.
I will do a not greater reservation. This article will tell you how to install Windows 7 yourself using a DVD disk. If there is no DVD drive in your computer or laptop, then you will need to install Windows from a USB flash drive or from a memory card, I will tell about this in another lesson.
Before you begin to reinstall Windows, read the entire article to the end, and if you have a printer, print it.
Reinstalling Windows 7 consists of several stages:
- Preparing a computer to installing Windows 7;
- Preparation of the installation disk with Windows 7;
- Configuring a computer BIOS to boot from a DVD disk;
- Installing Windows 7;
Now go through all the steps in detail.
1. Preparation for installing Windows 7
Before reinstalling Windows, you need to carry out small preparation.
First you need to copy all valuable information from the C disk. Of course, you know, but still I will tell you where to look. Places where on the disk "C:" can be your useful information not so much, usually this is the desktop and "My Documents". It is still worth looking into the root of the disk "C:" Sometimes people in a hurry or just for not knowing, save files there. Copy all the files you need to another disk (for example, "D:"), DVD disc or flash drive.
For the future, keep in mind that it is best to store information not on the same section of the disk on which the system is installed, and, of course, create backup copies.
If you just purchased a computer or confident that there is no valuable information in it, you can naturally not bother
Another point that should be foreseen before installing Windows, it is drivers for a network card. If after installation it turns out that in your WINDOVS distribution, there were no drivers for your network card, or they are not correctly installed for any reason, then you will find yourself without drivers and without the Internet. Therefore, in advance, download the latest drivers at least for a network card.
2. Preparing the installation disk with Windows 7
Those who already have an installation disk with Windows 7, you can skip this item. If you have no such disk, you need to write it or purchase it. Those who want to download windows on the Internet, look for clean MSDN assembly.
By this you will protect yourself from possible errors in the installed system.
Installation discs with Windows 7 on the Internet, as a rule, distributed in the form of disk images in the ".iso" format. Where to download to speak will not be because It is not entirely legal to promote their spread. I can advise before downloading the image, read comments on the release, problem disks are usually quickly detected as a heap of angry reviews.
At this stage, it is worth identifying which version of Windows 7 to install on your computer, 32-bit or 64-bit. I won't go into details, since this topic can be written separate item. I will only say that a 64-bit system can work, with all the amount of RAM, when as a 32-bit maximum uses, only about 3.25 GB. At the same time, the 64-bit system due to the 64-bit addresses to the addresses requires more memory when working. This increases the memory capacity occupied by applications.
Also, in favor of the 64-bit system, it is worth considering that when using 64-bit applications there will be a fairly good increase in their performance.
Conclusion: 64-bit system must be used if the amount of operational memory in your computer is 4 or more gigabytes, which in principle for a modern computer is already becoming the norm.
After the image of the downloads need to be recorded on the DVD disk, and you can start setting.
3. Setting up a computer BIOS to boot from a DVD disk
To install Windows, just insert a DVD disk into the drive, you need to still make a computer when you turn on starting to load from this disk. This is done in the BIOS. BIOS is almost in any computer or laptop, it stores all important settings, one of these settings is the order of loading devices. This setting is at the moment and interests.
In order to get into the BIOS, you must immediately press the keyboard key when the computer is turned on. Usually, when booting on the screen it is written, what exactly needs to be pressing to get into the BIOS menu. Most often it is a DELETE, ESC key, or F2. About what you entered you find out when you see the BIOS menu.
Most often there are options:


If the attempt was unsuccessful, then overload the computer and try again. Below are tables with possible entry options in the BIOS.
| Manufacturer BIOS. | Keys |
| Alr Advanced Logic Research, Inc. | F2, Ctrl + Alt + ESC |
| AMD (Advanced Micro Devices, Inc.) BIOS | F1 |
| AMI (American Megatrends, Inc.) BIOS | Del. |
| Award Bios. | Ctrl + Alt + Esc, Del |
| DTK (Datatech Enterprises Co.) BIOS | ESC |
| Phoenix Bios. | Ctrl + Alt + ESC, Ctrl + Alt + S, Ctrl + Alt + Ins |
| PC manufacturer | Keys |
| Acer. | F1, F2, CTRL + ALT + ESC |
| Ast. | Ctrl + Alt + Esc, Ctrl + Alt + Del |
| COMPAQ. | F10 |
| Compusa. | Del. |
| Cybermax. | ESC |
| Dell 400. | F3, F1. |
| Dell Dimension. | F2, Del. |
| Dell Inspiron. | F2. |
| Dell Latitude | Fn + F1. |
| Dell Latitude | F2. |
| Dell Optiplex | Del, F2. |
| Dell Precision | F2. |
| emachine. | Del. |
| Gateway. | F1, F2. |
| HP. | F1, F2. |
| IBM. | F1 |
| IBM E-Pro Laptop | F2. |
| IBM PS / 2 | Ctrl + Alt + Ins then Ctrl + Alt + Del |
| IBM Thinkpad. | from Windows: Programs\u003e ThinkPad CFG |
| Intel Tangent. | Del. |
| Micron. | F1, F2, OR DEL |
| Packard Bell. | F1, F2, DEL |
| Sony Vaio. | F2, F3. |
| Tiger. | Del. |
| Toshiba. | ESC, F1 |
After you went to the BIOS, you need to find the option responsible for the procedure for loading devices. As a rule, these settings need to be signed in the menu, in the title of which the word BOOT is present, of course there are other options, but as they say - "who is looking for, will always find."
To facilitate the search, I will give a few examples, as it looks alive:


The selection of the device loaded first usually takes place using the arrow keys on the keyboard, but there are other ways to navigate the BIOS menu, so if it does not work out, you can see the help that is usually in the BIOS in sight.
Choose your CD / DVD drive as the first boot device and leave the BIOS while saving all changes. To do this, use the Save and Exit Setup item. There will be a reboot of the computer and we, thus, got close to the next step, for which everything was actually stood.
4 Installing Windows 7
If the disc is recorded correctly and in the BIOS settings are set up, right, we will see such an inscription Press Any Key to Boot from CD or DVD, which means press any key to download from CD or DVD.
It looks like this:

Press any key
If you did not appear such an inscription, then it is possible from the above written you did wrong. In this case, check the BIOS again, whether the download setup from the DVD is preserved if everything is installed in the BIOS correctly, then most likely your disk is not bootable and you will have to look for another installation disk or download another image of Windows 7.
In this place I will make a small reservation. You may be climbing the Windows 7 installation disk, on which, in addition to the windows itself, more additional utilities are recorded, in which case you need to select the desired item in the menu of your disk. It should also be noted that in some disks, most of the operations described below will be automatically, without your participation. You should not worry about this, all these settings can be changed if desired after the installation of Windows is completed.

To start installation, click "Set"

Before you get a choice which version of Windows install. You need to choose the one from which you have a key. If you have a laptop, then often a key sticker and an indication of the version of Windows is glued onto the bottom. The key itself will be required at the end of the installation. In principle, it can not be introduced immediately, but within 30 days.

Agree with the license condition and click "Next"

Choose a complete installation.

Choose a section in which Windows 7 will be installed and click "Customize Disk"

In this place, an inexperienced person may have questions, so consider it in more detail.
Setting the hard disk
Often on your computer's hard disk except sections that you know (such as C: D: E: etc.) there may be another or more hidden partitions. This is especially true of laptops that were sold with the already installed operating system. The manufacturer makes such sections in order to have the ability to restore the system and bring the laptop to its factory settings.
Also often occurs a hidden section of the size of 100MB, it creates Windows 7 itself. This section is used to implement the BitLocker function, this function is designed to encrypt the system partition. So in this section there is a program that, when loading, will decline the encrypted system partition. From this section, if you wish, you can get rid of the hard disk of your computer in advance to installing Windows 7. This is best to use special programs, such as Acronis Disc Director.
Let's return to the installation.
Click "Disc Setting" and "Format"

The installer will warn you that all the data from this section will be deleted, but it is not scary to us, because we prepared for this and made a backup copy in advance with the entire information we need, so we boldly agree by clicking the "OK" button.

After the formatting, click "Next"

We are waiting until the installation

After installation, you will be prompted to enter the username and computer.


We enter the key, it can be glued to a laptop from below, or as a sticker on the system unit.

Install the security mode

Set the date time and time zone

If the computer has a network connection and in the system there is a driver for your network card, Windows will prompt you to choose the type of connection

On this installation of Windows 7 is completed, and you can go to the installation of the drivers and the programs you need.

Finally, do not forget to return the BIOS settings that we changed in paragraph 3. Our leadership. You must set your hard disk in the BIOS by the first boot device, otherwise, with each start, the computer will try to start loading with DVD.
(209 votes)
How without disk? This topic is currently relevant. Especially since she appeared not so long ago new development OS. Now in more detail! Windows 7, or just "seven," is one of the last OS from Microsoft, and along with the more successful of them. At least, many experts think so.
What does the installation from the boot drive implies?
7 without disk? The standard setting model of any operating system is derived from the hard medium. And besides the disk, the drive can be used as it. The option with the installation from the flash drive is quite reliable. As in the case of a disk, the master system is installed at a lower level of the computer software hierarchy. In other words, "from under the old system." In addition, this method of downloading a new "Operation" allows you to format the hard disk on which the previous system was placed. This will protect the OS from old programs that may be malicious, as well as from the "closed" parts of files invisible at first glance, but remain in the system and interfering with its normal operation. Such "scraps" of unnecessary documents make it difficult to speed the system. The appearance of failures in work. You should consider how to reinstall Windows 7 without a disk and without a flash drive.
If there is no flash drive, no disk
The standard installation method is not always possible. For example, if there is no disc, but there is an OS file on the computer or laptop itself. What to do in such a situation? How to reinstall Windows 7 without a disk and flash drives to a computer? The system file can be represented as an image, archive or just installer. To install the system from the image, you should run a special program. It is necessary for reading / write exactly this kind of formats. For example, Daemon Tools. Running the image in the program by mounting it, select the installation file. If the OS is in the form of an archive, it is not necessary to unpack it. How to reinstall Windows 7 without a disk and flash drives to a computer in such a situation? Click the archive and select the installer file in it has the resolution ".exe". This file is located mostly closer to the end of the list of archive content. It will not be distinguished by the launch of the installer and if the operating system simply lies in any folder.
What should I remember?

If the installation of the working system is performed for the first time, some rules should be taken into account. They need to know if you need to answer the question of how to reinstall Windows 7. Without a disk it will be done or with it - does not play an important role.
First, the installation of the new OS can occur due to the infection of the computer with viruses. This is a useless process if it is not accompanied by formatting. The fact is that infected files with this type of installation of the main working medium do not disappear anywhere. They are saved in the previously installed system. Subsequently, they simply move to a new shell.
Secondly, the best, and most importantly, the most secure method of installation will still use a hard medium. Reinstall Windows 7 without a disk in such a situation is easy. It is enough to have a bootable flash drive. If it is not, it is created with the help of simple actions. Especially for this there is a program that recording images to the carrier. For example, Ultra ISO. Accordingly, if the files are not in the disk image format, it should be created. Usually for this use the same Daemon Tools.
How to reinstall Windows 7 without a disk on a laptop or computer? It should be remembered that when installing a new system, you should always use only verified files. The fact is that with modern progress, handicraft assemblies are found everywhere. Downloading Windows 7 from the Internet, no one can say with confidence that the malicious software is not "stitched".
First actions

How to reinstall Windows 7 without a disk on a laptop or computer? Consider how it is to do the easiest way. We find the folder with the operating system, run after that the installation window will be opened. It will display the ability to configure the following parameters:
- selecting the system language (this is the language of the displayed names of folders, files, disks, and so on);
- keyboard layout (input language);
- time format (country, time zone).
For our country, naturally, everywhere you should choose the option with the Russian language.
After pressing the "Next" button, a window opens with the Install key. By clicking on the installation, go to accept it, putting a tick next to the appropriate inscription.
The most popular types of systems
The installer may contain several system options. The most commonly used:
- home - for an inexperienced user;
- standard - for those who confidently work with a computer;
- professional - for an experienced person; It offers ample opportunities, the necessary modules and large access to files;
- maximum - provides full access to the entire operating system functionality.
If you wondered how to reinstall Windows 7 without a disk and flash drives on a laptop or computer, then it should be understood that this is an incomplete list of possible systems.
Don't forget about the bit

All programs of this type are characterized by their discharge, that is, 32-bit (x86) and 64-bit (x64). This parameter is specified after the name of the system. For example, Windows 7 is the maximum x86.
The selection of the discharge of the installed system should be done, guided by the power of computer resources. If a laptop or PC is relatively weak, it is recommended to install the X86 OS (32-bit version). Installing Windows 7 X64 is best in the event that the size of the RAM exceeds 4GB. The thing is that the 32-bit version is simply unable to "see" such a volume.
What to do when formatting is necessary?
Let's go back to how to reinstall Windows 7 without a disk. The next OS installer window will offer the option full of your computer and update. It is necessary to make a choice in favor of the full installation. Otherwise, only an update of the previously existing operating system will occur.
After selecting the preliminary parameters, a window appears with the possibility of selecting a hard disk. With this method, it will not be possible to format it. This is due to the fact that the launch of the installer produced from the operating system. If you need to format the disk, which is desirable when installing the OS, then this moment you can get around. It happens as follows. Until the installation of the new "seven" take any other partition of the disk and clean it from the files (move it, if necessary, and simply do not touch them if not needed). After that format the section. You should not change the letter of the disk in this situation. Responding to a question how to reinstall Windows 7 without a disk and flash drives to a laptop or computer, it should be borne in mind that when the new system is loaded, the letters of the disks will change automatically. Formatted section should be selected to install the system.
If cleaning is not needed

If there is no need for formatting, you can simply select a disk to install a new system and continue. In such a situation, the old system will remain in the Windows OLD folder. It will be located on the disk "C". From it can also be started and working. But it is not recommended to do this, since two identical operating systems on one disk can "conflict". This, in turn, entail fails to fail. Old OS can be removed or moved to another media. There is another very significant moment in which you should remember, answering the question of how to reinstall Windows 7 without a disk on the ASUS, Lenovo, HP laptop, etc.
If in the section on which the new OS is installed is not enough space for two operating systems, the start process will fail. This is due to the fact that the old shell is not deleted and continues to occupy space. It is important to remember that the frequent reinstall "Operation" leads to the destruction of the disk. This can be avoided using various types of defragmenters. For example, Victoria program.
This problem is not as terrible for computers. There is nothing easier than buying a new hard drive and install it. It is easy to perform yourself. However, if the Winchester broke down on a laptop, then, in addition to the cost of the disc itself, repair services will also have to pay. This should be known if I interested the question of how to reinstall Windows 7 without a disk from a flash drive.
What will you need to enter after installation?
By selecting a disk (partition) for installation, click "Next", which will lead to unpacking and subsequent installation of new Windows 7. This process is fully automated. It will last for 25-30 minutes, depending on the power of the computer (laptop). After completing the installation, you need to enter the following parameters:
- Username (Your own name or desired pseudonym).
- Computer name (any name Latin or Russian letters).
If the input is incorrect, the system will tell about it and asked to correct the characters, indicating the error.
Input password and key

During installation, it will be prompted to assign a password and a prompt, in case of its loss. After that, the window falls out in which you should enter the key to activate the operating system. In the case of its absence, simply click "Next", after removing the checkbox near the inscription "Activation when connecting to the Internet". Then it will be possible to activate the system in any convenient way. This is done as follows:
- You need to find the "My Computer" folder.
- You must open by clicking on the right mouse button.
- You need to click on the "Properties" tab.
- You should select the "Change Product Key" item.
It is necessary to protect the computer from external threats
Let's go back to the question of how to reinstall Windows 7 without a disk on a computer or laptop. The next step is the protection parameters. You can use the recommended service, and you can postpone the solution and configure later. Computer protection is one of the most important points in the installation of the operating system. The fact is that from how well you limit the access parameters from other people's devices, the safety of the equipment will depend on. This menu is nothing more than a proposal for choosing a data protection set formed by Microsoft specialists. It should be understood that the recommended parameters are already provided and installed. I miss this item, many forget to continue to configure manually by exposing their hazard files.
So, determined by security, click "Next" and configure the time and date in the new window (time zone and the like).
Following the installer displays the network settings window. It can be either home or public. Due to this, the parameters are changed in the properties of the browser. As for the overall understanding, the home network looks more conservatively relative to the configuration. The public network, on the contrary, provides greater access to the laptop or computer resources.
What can be changed after installation?

It was the last step, after which you get a practically an empty desktop of the newly installed Windows 7 operating system. Basic settings (for example, add the "My Computer" folder or user files to the desktop) by clicking the left mouse button on the desktop of the desktop and After choosing the Personalization tab.
There you can also put another background pattern, change the default theme (usually this is Windows 7 Aero), change the screen resolution and much more.
Standard licensed Windows 7 is coming without additional programs. However, among numerous assemblies, you can find options in which many additional items are included, software and so on.
Conclusion
This article described how to reinstall Windows 7 without a disk and flash drive. You will install it on your computer - does not play a big role. The principle of the installation process of the new system is the same.
Now we will see how to reinstall Windows 7 without using the disk, flash drives and BIOS. When working on a computer, users are faced with the need to reinstall Windows 7 for some reasons.
In some situations, the user has no choice: the operating system works with failures, it is necessary to reinstall it urgently, but it is not possible to make it in standard ways. Consider possible situations in more detail.
To install the operating system, the computer uses a drive or USB connector in which an optical disk or USB flash drive is inserted to which Windows is recorded. To boot from these devices, you must log in to the BIOS settings.
Installing Windows 7 without disk, flash drives and BIOS
Usually, Windows 7 is installed with a DVD disk or loading flash drive. To select a bootable media, you must log in to the BIOS or the boot menu (Boot Menu). But for no hope, it may happen that it will be impossible to fulfill these conditions.
For example, a computer is broken on a computer, an optical drive or a drive is generally absent on the device, it means that we will not be able to use a DVD disk. How to reinstall Windows 7 without a disk?
Nothing, there is a backup option: create a bootable flash drive. And if there is no flash drive, and the system must urgently reinstall? How to reinstall Windows 7 without a flash drive?
Some users experience difficulties with the entrance to the BIOS, because it is not clear to them that they should be done to correctly select the desired drive to download Windows.
Even in this, it would seem hopeless situation. We will try to reinstall Windows 7 without a disk and flash drive from the desktop, without entering the BIOS.
In order for us everything happens, you must perform the following conditions:
- the computer must be installed Windows 7, which must be reinstalled;
- we will need the image of the Windows 7 operating system from which we will perform the reinstalling of the OS.
You can start installing Windows in two ways:
- Unpacking the image image in the ".iso" format using the archiver, and then the start of the "SETUP" file on behalf of the administrator.
- Perform Windows installation from a virtual drive.
In the first case, the file image of the Windows 7 disk is unpackled into the folder on the desktop, and the user will start the system setting from this folder.
To use the second method, you must install a special program on the computer - the virtual disk emulator, such as the free Daemon Tool Lite program. The program creates a virtual drive on the PC, which system determines how the usual physical CD / DVD / Blu-ray drive. Using a virtual drive, an operating system is installed.
Reinstalling Windows 7 without disk and flash drives
In this article, we will analyze the installation instructions directly from the operating system. We will use the Daemon Tools Lite program, which you want to install on a computer.
Before installing Windows, save the important data on the USB flash drive, an external hard disk, etc., because when reinstalling the operating system, all files will be deleted to the Windows.old folder. Experienced users will be able to get the files of the old system from there until this folder is removed from the computer.
To start installing Windows 7, click Windows 7 Right-click, select First Open With Help, and then "Daemon Tools Lite Agent".
The Windows 7 Installation Program window will open on the desktop. Click on the Set button.
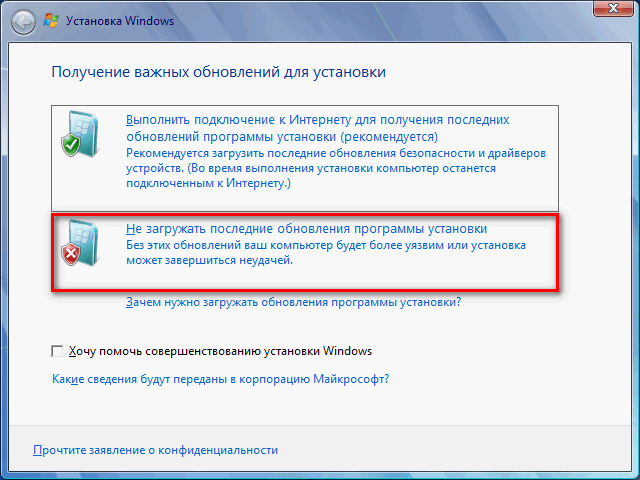
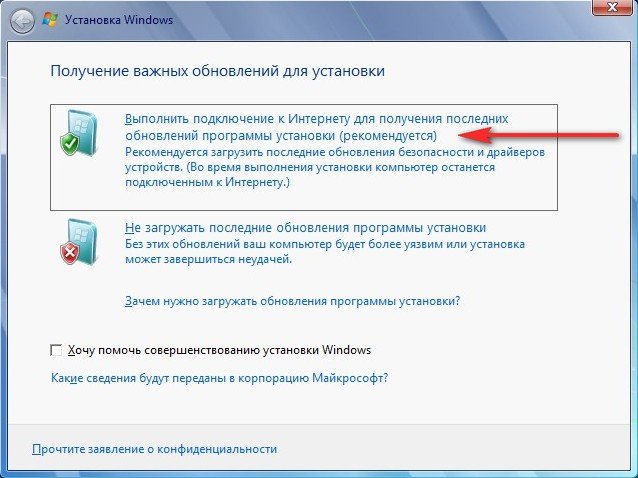
In the "Getting Important Updates" window, it is proposed to choose one of the options:
- Connect to the Internet to get the latest installation program updates (recommended).
- Do not upload the latest installation program updates.
We need to reinstall the operating system, and updates can be installed later. Therefore, you should select a second option, refusing downloading the latest updates to not delay the installation process of Windows 7.
In the View License Conditions window, check the checkbox in the "I accept license terms".

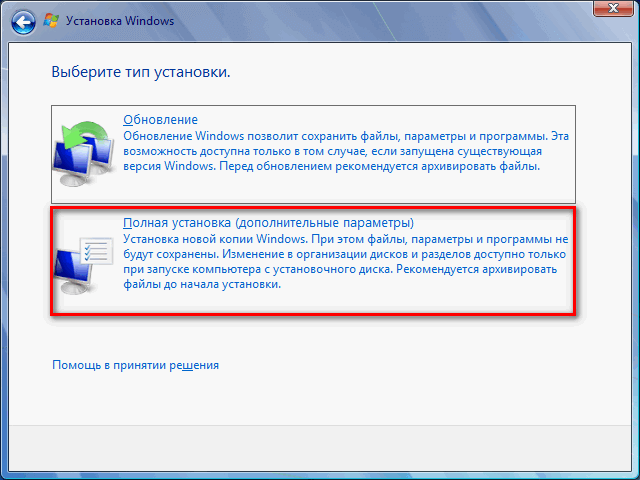
In the "Select Installation Type" window, two ways are offered:
- Update - Update the system on top of the previous installation with saving files, parameters and programs.
- Full setting (optional parameters) - setting a new system with deleting all data from the previous copy of Windows.
We need to reinstall the operating system, so we choose the full type of installation.
In the "Select Window To Set Windows" window, a section is selected in which the system will be installed. The system will be installed in the partition in which there was a previously installed Windows.

A warning window will open that the selected section contains the previous Windows installation files. This data will be transferred to the "Windows.old" folder, the user will be able to access files from this folder until it is removed from the PC.
Agree, click on the "OK" button.

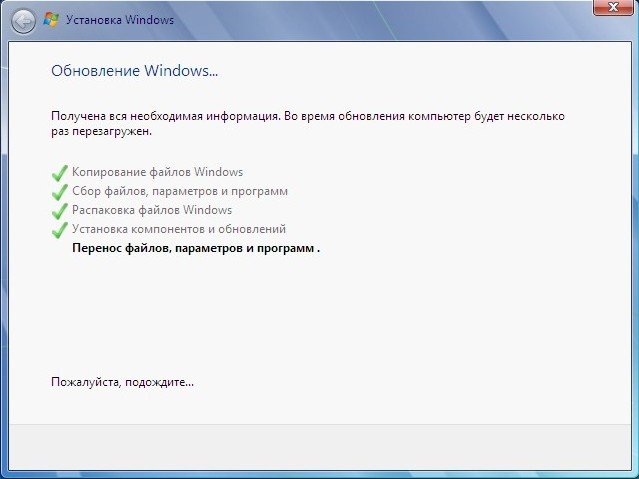
The Windows 7 installation process begins, during which the computer will be rebooted several times.

At the final stage of the installation, you will need to choose a country, time, monetary units and keyboard layouts.

Select the username for an account.

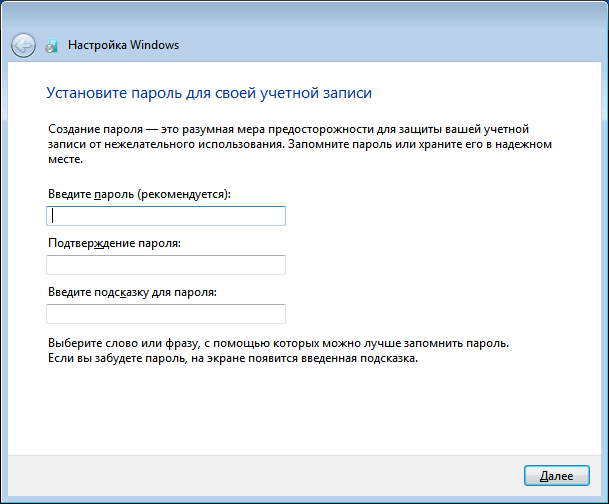
Enter the password for the account. If you do not use the password, leave all fields empty.
Entering a Windows product key can be skipped by performing the activation of the operating system later.

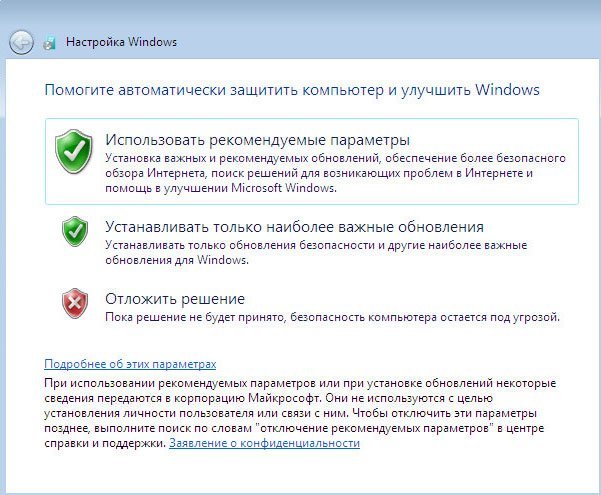
Select update options:
- Use recommended parameters - setting important and recommended updates.
- Install only the most important updates - setting only security updates and other most important updates.
- Postpone the solution - until you install updates.
Click on the preferred option to receive updates.

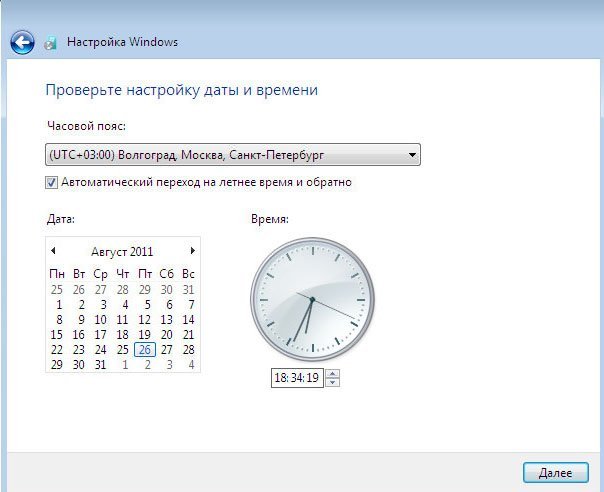
In the "Check Date and Time Setup" window, select the appropriate parameters corresponding to your location.

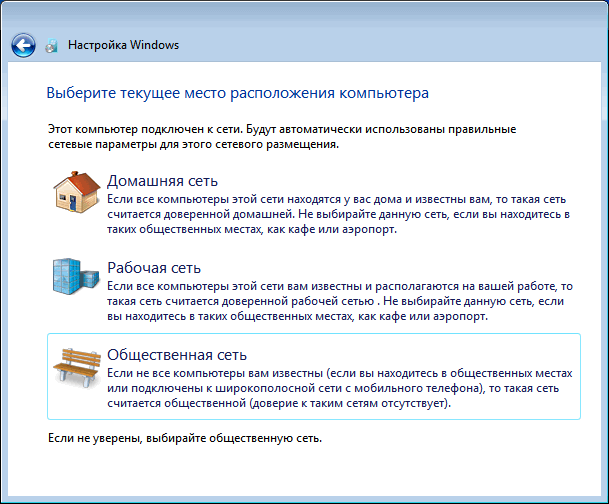
In the "Select Current Computer Location" window, you must select Network Accommodation Settings:
- Home network - computer is at home.
- Working network - a computer is at work.
- Public network - a computer is in a public place.
After completing the settings of the parameters, the "Clean" Windows 7 installed on the computer will start on the computer installed instead of the previous system.

Friends, many letters comes with a question how to correctly reinstall or update the Windows 7 operating system and what is actually the difference between these two concepts.
Letter number 1. Please make clarity into troubled for many. reinstalling Windows 7. Differs from the update and what is better to prefer? I installed on me operating system 7 behaves extremely unstable, long loaded, many programs have ceased to be installed, sometimes there are errors of such a content, for example, there are not enough system file or dynamic library. Rollback using the recovery point at a considerable period of time ago did not help. I do not want to reinstall, as many programs have been installed. You have said in your comments that you need to restore system files, to bring order in the startup, to optimize Windows 7 or in the extreme case to update or reinstall Windows 7, but I unfortunately heard anything.
I would like to know, firstly:
How to actually draw this update or reinstalling the operating system and what will happen to my personal files on the system section, will they miss?
Secondly: It is said that the update is started only from the operating system. Is it so? After all, in XP, it was possible to run an update even when the system was not at all loaded. For earlier thank you, Paul.
Reinstalling Windows 7.
So that everything is clear to you, I will spend the process of updating your operating system for you, and then show how to reinstall Windows 7 in two ways and you will see everything with your own eyes, but at first I will explain to you what update and Reinstalling Windows 7..

What is Windows 7 update?
this installation of the system is on top of the old, that is, you insert a disk with the Windows 7 distribution kit and directly run the system setting directly in the running seven, but you select not full installation in the setup menu, and the update. What does she give?
First of all, there will be a replacement of damaged system files, the operational system files will not be replaced, with your own personal data: installed applications, documents, music, nothing will happen, all your programs will be launched and all your farms on all disks will remain untouched. Also, user accounts will be transferred unchanged, to do all this will be a tool-tolerance of Windows data transfer (very important files, it is still better to move manually). I also want to say that you will have to re-enter the product key, choose the language, region, set the time and so on. A warning. If you have unlicensed windows 7, then after the update you will have a window in the lower right corner of the desktop with a warning that your copy of Windows is not genuine.
- Are you still asked about how the data transfer means works? When updating Windows 7, temporary folders of your data will be created, containing information about accounts and user parameters, your email, files in the Favorites folder, Personal files and user folders - Music, Images, video, as well as set programs installed . How your system will be updated, all the data will fall into place, and temporary folders will be deleted. When updating, the data transfer means does not allow you to select the user files for transfer, but when reinstalling you can choose what you want to transfer (details on).
Does the update solve all your problems associated with the work of Windows 7? In most cases, yes, unfortunately, 100%, no one can guarantee the result. In my opinion, if it is possible, it is better to delete and re-format a partition with a poorly running operating system, previously moved all the important files to other volumes of the Winchester or portable USB carrier and install the system with all programs again.
- Note: In Windows XP, there is the same update mechanism and you can run both in the operating system and in cases where you cannot log in to Windows XP, then you can boot from the HP mounting disk and select installation menu option. Know that in Windows 7 such an opportunity, unfortunately, there is no update and the update can be carried out only in the operating system.
What is Windows 7 reinstalling?
Reinstalling, it is a complete replacement of all operating system files, that is, the formatting of the partition with an unstable running system and installing Windows 7 is anew. Naturally, all your files and the system itself from the disk (C :) will be deleted. In order to transfer all your files from the system disk (C :), you will need to use Windows data transfer toolBut it will not work automatically work, as in the case of an update, and we use it yourself and what we need to be transferred from the old system to a new one, too, choose themselves.
- Now the question is already due: how is the reinstallation of the system from the installation is reinstalled? Friends are simple here. If you reinstall Windows 7, you can use the file transfer tool if you wish, since the system has already been once installed, but with a simple installation of the system again, you set the system to the new hard disk section of the new rigid disk. In short, here is how it is more clear to explain I do not know!
What to say, let's at first update my Windows 7 together, and at the end of the article we will reinstall the system using the file transfer means, it also works with errors lately and you will see with your own eyes, and then choose what you need.
Windows 7 update
Insert the installation disk with Windows 7 into the drive if you do not have autorun, press setup.exe.

Before upgrading, we can connect to the Internet and download the latest updates from the official site of Microsoft
Choose update

Compatibility check

Copy Windows files

Collect files, parameters and programs, unpacking Windows files, installing components and updates, transfer files of parameters and programs

The computer reboots.
In this place you need to boot from a hard disk, not a bootable flash drive or boot disk with Win 7.
Updating registry parameters

We enter the key

Exhibiting time
The update process is manufactured, accounts are saved
All files are in place, all programs are launched.

Reinstalling Windows 7.
Now let's learn what to reinstall Windows 7. According to the rules to re-install Windows 7, we will be on the same disk on which the old operating system is installed. If earlier Windows was set for example on the section (C :), then it is necessary to reinstall it, too, to the section (C :) and on no other section (and this will already install the second operating system). All your files on the section (C :) will be replaced by the files of the newly installed Windows 7 operating system.
- First of all, we will launch a data transfer tool that will copy all our personal data from the Windows 7 section to the portable media or other partition of the hard disk, then loaded from the Windows 7 installation disk (how to set B) and install the system again. Immediately after installing Windows 7, you will start the data transfer tool and copy all our files, as a result we will get a new operating system with you and all of our data: music, documents, personal folders and so on.
- Note: You can ask: And you can not start installing a new system directly from Windows 7 and not climb into the BIOS. Answer: This method is given at the end and we will also consider it.
Let's now see what will be transferred to the data transfer tool from our files, run it.
Start writing in the input field tool for data transfer

In this window, we see detailed information about what files we can transfer to you from the old operating system to the new, we will now choose.

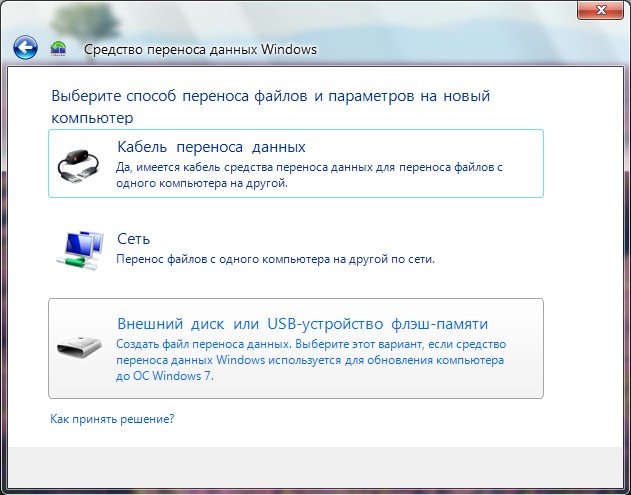
The data transfer means invites us to use:
- Data transfer cable - a cable specially designed for these purposes, which still needs to be bought, is used to transfer files between two computers, we don't need it in principle, because we have one computer.
- Network - transfer files over the network, also not our option.
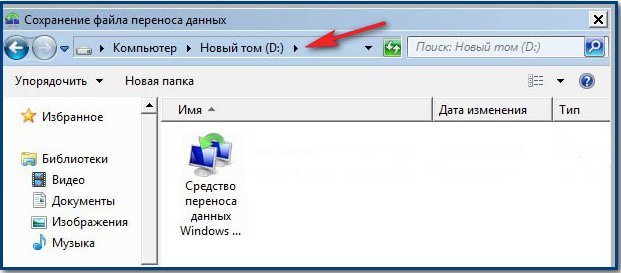
- External disk or USB flash memory device. What we need. If you have a little data, you can even use a 8GB flash drive or 16 GB. By the way, if you do not have a flash drive, nor a USB portable disk, you can use another section of your hard drive, as for example.
So you have chosen an external disk or a USB flash memory device, and I'm partition on a hard disk (D :).
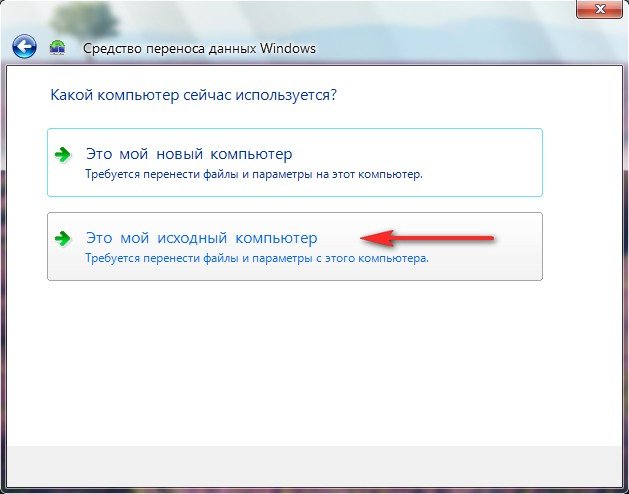
Choose this is my source computer, that is, the data must be transferred from it.
Analysis of data that can be transferred to a new system, in paragraph Name users And the general elements click the setting, as well as if you click additionally, the full picture will open that the data transfer tool will be included in the archive.

Note, the archive includes folders of both users of the operating system and personal data, it is correct. But these are the data on all sections of the hard disk, except for the systemic (C :), it is not necessary to transfer to us, since we will reinstall Windows 7 on (C :) and the reinstallation process in our case will only affect the system partition ( FROM:). Remove the ticks from all the hard drives.


However, if you decide to transfer data from all partitions, you can not clean the checkboxes, just keep in mind that the data transfer file in this case will occupy a very large volume ..
What else does not need to be included in the archive that will create a data transfer tool? For example, you may not include the C: \\ Program Files folder, it will be more reliable after reinstalling Windows 7 to install all programs again.
So click to save, you can assign a password


The process of transferring files occurs. On the disk (D :) Create a transfer file with extension (MIG)

Now it is a queue to reinstall Windows 7, insert the installation disk with a seven to the drive and reboot, at the beginning of the setting it is better to click on the Disk Setup button and select the format part with the previous Windows 7, and in general the entire process is stepdown, ranging from changing the priority of the boot device in BIOS and Before installing the operating system itself, is described in our article.
I think you coped and installed the system, now let's use our data transfer tool again.

Choose this my new computer (you need to transfer files and parameters to this computer)

Your external hard disk with data transfer file has already been connected.
In my turn, I specify the Winchester section (D :), I have a transfer file there.


We can click Configure and select files to transfer to a new system manually, as we have already done or simply press to transfer.

Transferred completed, we can see the report, as well as make sure that all your files are transferred to the new system.
Buying a new laptop, few people pay attention to the fact that modern models often cost without drive. It would seem that here is this? True, it is only worth reaching the installation / reinstalling Windows, as a question begins to sound differently. Do not run in the middle of the night for a new drive, just to take advantage of the licensed disk in advance with Windows 7?! But after all, and refuse because of this little things from buying a powerful laptop, too, it would be stupid! Really! In this case, it is easier to deal with how to install / reinstall Windows 7 on a PC without installation disk.
Let's immediately say that you can cope with this task in different ways. In particular, reinstall Windows on the computer is real:
- through the utility "system restoration";
- using the Recovery utility built into the laptop (if on the computer was initially);
- by installing windows from the boot flash drive.
At the same time, for each method of reinstalling Windows 7, the computer needs its own instruction, which, however, no problem if you are on this page. Well let's go!
Method number 1: System rollback
In the event that Windows 7 not only loads, but also normally responds to commands after restarting, you can try to reinstall it using the standard Windows rollback to the previous (working) state. How do you act? To begin with, open the "Start" menu, go to the control panel, and from there to the "Restore" section:

Then, in the window that appears, the "Running ..." button appears to launch the Windows Recovery Wizard and click Next. After that, we select the appropriate option to reinstall Windows 7 and click "Finish" by turning to this step using the "Next" button:

As a result of such simple manipulations, the system will automatically be updated without an installation disk without affecting the documents stored on the computer, media and other valuable files for users.
Method number 2: Re-installation of the system through the Recovery program
For those who are looking for a prompt to ask how to reinstall Windows without a disc, if the system is also not loaded, the long-awaited answer will be built into the Recovery Utility Laptop Software. It is represented almost on all modern leptopams, however, under different names. For example, on Toshiba laptops installed Recovery Wizard, on Samsung - Recovery Solution, on Hewlett Packard - HP Recovery Manager. However, regardless of the name assignment, they have the same thing - help without a disk reinstall Windows, returning it to the factory settings.
True, RECOVERY can be launched only on a laptop with a not formatted working hard drive, which was previously. To start it, in particular, you will need to restart the system and at the start of Windows several times press the corresponding hot key:

Further instructions will be determined by the prompts of the utility itself. For an example on Samsung, the action plan will look like this:

Method number 3: Installing the system from the boot flash drive
If OS Windows 7 cannot be installed / reinstalling on a computer without a disk, none of the above methods (PC does not load, malnutrition problems, etc.), to re-install the operating system, you can use a special loading flash drive. In this case, the instruction looks somewhat more complicated. In particular, in the process of installing windows, Windows will take:
- prepare a hard disk to formatting;
- download ISO image;
- write the drivers and distribution to the USB flash drive;
- configure the running system with USB;
- install (reinstall) on a Windows 7 computer;
Ready? Then let's get up!
Step number 1: PC preparation
Based on the fact that as a result of re-installing Windows 7, all data stored on the hard disk will be destroyed before installing (reinstall) the system stands in advance to transfer important information in a more reliable place, for example, to an external drive.
At the same stage, it is also worth worrying about the drivers for a laptop. You can download them absolutely free from the official website of the PC manufacturer, so there should not be any problems. At the same time, before reinstalling Windows, do not forget to make sure that the drivers did not remain stored on the hard disk, but successfully moved to the flash drive.
In parallel, you need to download to the computer and ISO image with Windows 7, while turning attention to its release. It must necessarily comply with the one that is recorded on the acquired licensed disk with Windows, otherwise it will not be able to activate it by the purchased key.
Step number 2: Record flash drive
You can prepare a loading flash drive in different ways (parts and), but it is easier to write it through the RUFUS utility. It is easy to work with her, it is worth only to connect a flash drive to a laptop and run the program. All that will be needed is: it is:

Step number 3: Setting the system startup
You can either set the appropriate parameters in the BIOS, or by pressing the special hotkeys when starting. The last option seems the easiest one. The only thing we need to click simultaneously with the system loading the desired button and install the boot option in the context menu that appears - from the USB drive. For example.