How to eat virtual disks. How to connect hard drives
When working with a computer, situations can often arise when you need to change the size of the hard drive partitions, or you want to combine them into one. For example, it is necessary to install a new operating system, first and foremost. Also, since there are 2 or more logical volumes in the system (not a dangerous partition from the installed operating system), it is better to combine them into one. To get the job done, you can use both native Windows features and third-party software. Let's take a look at the options.
Method 1: joining disk partitions using standard Windows utilities.
The first step in starting the procedure in this way is to copy all the data from the section that needs to be added to the other one, so that before the operation all information from it is deleted and subsequently erased. In Windows, the disk management console is used to carry out such operations. To open it, right-click on the “Computer” icon and select the “Keruvannya” item. The computer's storage console will open, and in the left menu you need to select the "Disk storage" item.The console displays all available drives. Now you need to select a section that will join with someone else. After this, click on it with the right mouse button and select the “View Volume” item. The operation is confirmed, after which the menu appears in a different place. Then open the context menu of the volume, before you need to select the unshared space, and select the Extend partition item.
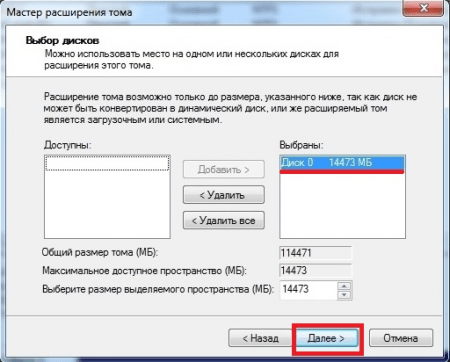
Next, the Extended Volume Master will open, where you will be prompted to select the disk for which you need to increase space on the local partition. Our version only has one volume, which is formerly a partition of the hard drive.
Method 2: merging disk partitions in Acronis Disk Director.
This method is more reliable because it is not obligatory to transfer data from one disk to another in Windows: the program automatically saves a number of partitions. Acronis Disk Director has an intuitive and intuitive interface that makes it easy for any user to use.Note: There are 2 versions of this program: for Windows OS and the most advanced version. It is recommended to use a different version to avoid errors that may appear during the procedure. Since there is no such possibility, make sure that your operating system works without hitches and failures.
The main window of the program will display information about all sections of the hard drive. To uncheck, see the section you need to merge, and click “Combine Sections” in the main menu.

There is a master who needs to select disks for the game, and also indicate which of them will be the main one, so that which disk will come before which.

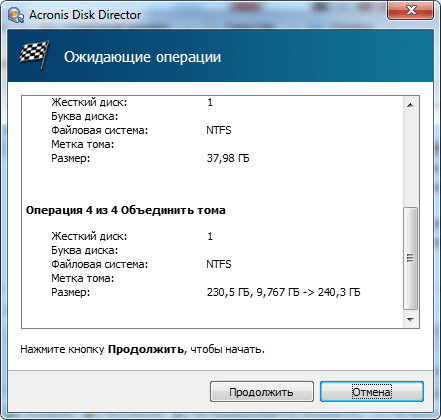
Having completed the necessary manipulations, you need to fix them by clicking the “OK” button. Now a new section will appear at the head window, like 2 in front. However, this does not mean that it has already been created. Acronis Disk Director verifies the operation to prevent incorrect actions by the user. After completing the necessary manipulations, the upper bank will have a number of operations that need to be completed.

When you click on it, a window with a list of operations will appear. The teacher can once again check the correctness of his actions. If everything is correct, then by pressing the “Continue” button, you can start the step-by-step routing of the disk according to the instructions given by the user.
This process is non-negotiable. If the program is running under Windows, the computer will be restarted to complete the operation.
To unite hard disk partitions, you can also use the Partition Magic and Paragon Partition Manager programs. The functionality is similar to Acronis Disk Director, so you can try one of them. All these programs for unplugging disks are suitable for any version of Windows.
Instructions
.
Install the program and restart your computer. This allows you to give the program full-fledged access to the sections of your loved ones. Launch the program and select one of the possible modes. Select “Combine of sections”.
Dzherela:
Business owners often need to combine a number of hard drives into an array, which is why they use RAID technology. Setting up a RAID array on most current motherboards is not accessible to anyone and does not involve significant difficulties.

Instructions
Go to the "SATA Configuration" section.
In the Configure SATA as item, set the RAID value.
Video on the topic
Regain respect
Start - Control Panel - Administration - Computer Control - Disk Control. See, the unnecessary things were divided and created one great thing. format.
Corisna porada
The Acronis Disk Director Suite program can help, as it can not only divide the hard drive into sections, but also combine several sections into one.
When purchasing a computer or an additional one, it is necessary to format it and create parts. If you are not comfortable with partitioning your hard drive, you can repeat this operation again.

You will need
- Acronis Disk Director Suite software.
Instructions
Before starting this operation on sections, it is necessary to close everything, as the robots can become violent under the hour. Launch the program and select the disk that needs to be combined. Press the right mouse button on the end and select “Combine”.

Select this folder and click “OK”.

At the main window of the program, click the menu "Operations" - "Visconti".

At the window, click the “Proceed” button.

The entire process of integration is carried out in MS-DOS mode, then. the operating system needs to be reinstalled. In the “Rewind” window, click the “Restart” button.

Video on the topic
Regain respect
This is supported by the Acronis Disk Director Suite program, which is designed for performing non-standard operations with partitions (for example, with drives C:, D:, E:, etc.). One of its functions is combining hard drive partitions.
Corisna porada
Press the right mouse button on “My computer”. Management - disk management, first remove disk D. And then increase the size of the disk in order to select the deleted disk D. If you have Windows XP, then you need a program.
Dzherela:
- combined divisions in 2018
Hard drives are one of the most popular parts in computers. They often burst into flames, flare up, or simply stop working. Most often, we have no respect for the visibility or number of partitions on the hard drive. Why work if you need 1-2 partitions, but your hard drive has more? Why do you need to connect the partitions on your hard drive? It is better to work with special programs, rather than with the standard features of operating systems.

You will need
- Work PC chi Laptop
- Paragon Partition Magic
Instructions
To increase the fluidity of the process of connecting the sections, you need to clean their outlets and them. Ideally, all areas that are affected by gluing should be empty. So if you can, copy all the important files on other media and format the ones you need. Note: this is not possible unless the loan process takes more than an hour (up to 10 years).

Please install a program called Paragon Partition Magic. It is important to choose a version no lower than version eight. Launch the program and go to the tab “Master” - “Additional functions” - “Combination of sections”. Now, following the instructions that are delivered to the skin by the program, select the required sections and press “further”. Note: The program can perform this operation only with partition formats (Fat32, Fat or NTFS). As a result, as the formats of sections will differ, actions will come from them, as if you don’t want anything. After completing the plan stage, click on the checkbox “Stop making changes”. In about an hour you will be re-interested.

After restarting, do not press the same keys until the system itself asks you to take part in the process. For about an hour (1-10 years) the program will be in DOS, after which the computer will reboot, and the process of merging the hard drive sections disk will be completed.

Regain respect
Check the availability of files before formatting sections.
Corisna porada
When working with a laptop, be sure to connect it to the charging station without removing the battery during the entire process.
Often, personal computer users have to split up a hard drive two times a day. The demand for this is being eliminated.

Instructions
For this type of operation with hard disks, it is called Partition Magic. It allows you not only to merge hard drives, but also to change their size and in this program for disks, you can also change the size of partitions with the NTFS and FAT file systems and you can transfer on others.
If the disk with data (namely drive D) cannot be deleted, then format it and delete it, and then, using additional programs, simply increase the size of the system. In this case, the data will not be lost, but it will be better, otherwise everything will become completely unreasonable.
To keep your computer healthy, format the offending disks and immediately reinstall Windows.
Video on the topic
Corisna porada
You can combine disks, but if possible, skip the procedure - the system will be simpler, since one disk will be local, and the other will save information.
Few people can be damaged by a hard disk, divided into a number of sections. It's a completely natural country rich in computers. Besides being trivial, this method helps eliminate a lot of problems associated with updating data after the release of the system. But few people know about the reverse process - adding partitions on the hard drive.

You will need
- Paragon Partition Magic
Instructions
Run the program in the completed account mode. Right-click on one of the sections you plan to merge. Click “Unified divisions” or “Swidka was divided.” Select another section you want to join.

After completing all operations with sections, press the “Stop” button and check. Please note that if your file sections are of the same type, then one of them will have to be formatted. To speed up the process of dividing them, it is recommended to format them. Ideally, there is no harm in misplacing identical files and directories.

What is important is the large number of stuck computers and laptops in order to share harshly і divided. This operation allows you to ensure additional reliability when finding the necessary information on your computer, as well as avoid wasting important data when reinstalling the operating system. It is recommended to create at least two partitions on your hard drive, one of which will have the OS installed. Otherwise, there is a need to connect partitions on the hard drive.

You will need
- Windows 7 installation disk
- Paragon Partition Magic
Instructions
The easiest way to connect broken local systems into one whole is to install the Windows 7 operating system. Press and press Del to enter the BIOS. Find the Boot Device Priority item and install your device first. Insert the Windows Seven installation disk and restart your computer.
Repeat this operation with other sections that need to be combined. Click “Create”, indicate the size of the upcoming section and click “Set”. Continue installing the operating system. Note: all information from the sections will be deleted.
If you don’t have to re-install the operating system, or you need to save important parts on the partitions after connecting them, then use the Paragon Partition Magic program. You can get it from this site: http://www.paragon.ru/home/pm-professional/.
Select the section or sections to which you want to connect the first area. Do not select the “Format” and “Change file system” items. Press the “Freeze” button.
Dzherela:
- How to combine hard disk partitions in Windows 7
Break up your hard drive separated It is possible for various purposes, for example, security, accessibility, or when installing several operating systems on your computer. However, if you need it, you will be able to use all the other parts of the disk as a whole, and this and the other process will not involve any special difficulties, especially - save data from wasting and follow the instructions clearly.

You will need
- PC, Acronis Disk Director Suite
Instructions
To unite partitions of your computer's hard drive, you need to use the Acronis Disk Director Suite program. The program has a simple, intuitive interface and is designed for performing non-standard operations on disk partitions that need to be completed manually.
Install Acronis Disk Director Suite on your computer, save all open documents and close all running programs. Launch Acronis Disk Director Suite.
Place your mouse over the partition (disk) you want to merge with the other one and select the menu item “Disk” - “Combine”.
Near the window you can see with a bear the partition (disk) that you want to share before the elections. Click the “Next” button and wait until the program finishes checking and blocking partitions (disks).
In the window, select or create a new folder where you will place the section to be merged. Click the “OK” button, and after clicking the command, exit the program.
Restore your computer. At the hour of restarting, the Acronis Disk Director Suite window will appear. Be sure to ensure that all necessary operations are completed and completed. Mighty, tsetrivatime deyaya hour.
Divide and unite separated(disks) is also possible with the help of other programs, such as Partition Magic. However, the most user-friendly program for beginners is Acronis Disk Director Suite.
Video on the topic
The capacity of hard drives, which are mass-produced today, is steadily increasing. Obligations of data saved by investors on their personal computers are growing. Of course, you should take a look at the settings of information storage devices that are suitable for comfortable work. Thus, when a new storage device is added to the computer, one often decides to use logical disks on the old hard drive to remove one, but not the least, place for saving information.

You will need
- - administrator rights for Windows.
Instructions
Copy valuable data from logical drives for storage. Create temporary folders on a disk that will not be shared. Take advantage of the capabilities of the file manager and explorer. Copy or transfer data that needs to be saved from disks to be stored in time folders.
Open the cupboard section. If necessary, highlight the checkbox “Keruvannya (local)” in the list located on the right side of the window. Light up the "Appliances" bottle. Go to the item "Cleaning with disks". The disk manager interface will appear.
See the logical things to eat. From the list of disk drives, find the one on which the logical options are based disks, which needs to be connected. Right-click on the area that represents one of the disks. In the context menu, select "Erase disk...". Show up early. Click the "So" button. Perform a similar operation with all the disks to be combined.
Start the process of creating a new logical thing in the space that has come together. Use the right mouse button to click on the area with the inscription “Vilno”. From the context menu, select "Create logical disk...". The master of the creation of divisions will be selected.
Create a logical disk. In order to create sections, press the “Next” button several times. Select where the disc will be displayed. Press "Distance". Select parameters. Press the “Next” button again and wait until the formatting process is completed. Click "Done".
Check to make sure the disc is aligned correctly. You are responsible for checking with the disk manager. Yogo stan maje buti "we'll help you."
Transfer the data to the creation disk. If necessary, transfer the data saved in the hour folders to a new disk. Also, as before, use the capabilities of the file manager and explorer.
Regain respect
You can connect more than one logical drive.
Corisna porada
Set the "Swedish format" option when creating the disk, as you have added to the new storage certificate. You can also change the hour format.
One physical hard drive can be divided into several logical and non-logical ones. For this operation, we rely on any utilities, one of which is Acronis Disk Director.

Instructions
Install Acronis Disk Director on your computer. The installation process is intuitive and does not imply that you are anything special. Restart your computer after installation is complete, then launch Disk Director and select manual operation mode.
Do you have any data on this? disks If you would like to save money, then concentrate all your needs on the partition on which you have the operating system installed, since it is necessary to complete this task of combining two local disks.
Once you have saved all the necessary files in one partition, delete the other partition. To do this, in the program window, right-click on this section in the list and select the “View” command in the context menu. Thus, the so-called unpartitioned area has been created in the memory of the hard disk.
Now press the right mouse button on the section that you have lost files, and select the “Change size” command from the context menu.
Drag the right between the marked disk space with the mouse to the right edge of the edge. Here you add the amount of memory unallocated to allocated, and as a result, the program will schedule an operation to merge.
The finishing icon is activated on the toolbar. Press to cancel the merge operation. Vimagatime program for rezavantazhenya computer. Confirm in the appropriate dialog box. When you select a wikiname, your two local drives will be merged into one.
Video on the topic
There are many ways to combine multiple sections. Some require the availability of special programs, others can be launched during the installation of the operating system.

You will need
- Partition Manager.
Instructions
Let's take a quick look at combining several local disks into one, similar to the Windows Seven operating system. Continue with the installation process for this OS using the standard method. Insert the disk, turn off the computer, select the disk drive as the main device for the hour of installation. Select your installed version of the operating system.
A menu will appear on the screen with a list of local disks that require OS installation. Press the "Adjust disk" button. Select one of the sections to combine and click the “Delete” button. You can do the same with another disk. Now press the “Create” button. Select the type of file system of the mobile disk (NTFS or FAT32), select the maximum possible size for the new one.
Regardless of the simplicity of the operation, this method has one drawback - information from both sections that are combined will be deleted. To avoid this, use a special utility.
Please install the Partition Manager program. Select the version that best suits your operating system. On the Internet it is easy to find out most versions of programs.
Launch the program and turn on the pending account mode. Open the “Master” tab on the program toolbar. Select “Additional activities” and click on the “Combination of sections” sub-item.
Select a number of local disks (at least two) that you want to combine into one. Click the "Next" button. On the main toolbar, find and click the “Freeze” button.
If one of the sections that are connected is system, then the program must continue to work in DOS mode after restarting.
Regain respect
Changing the hard drive partitions in Windows 7. Changing the main partition. When a partition is compressed, all simple files are automatically moved to another area of the disk to create additional space. There is no need to format the disk to compress the partition. Note: If the partition is an unformatted partition (that is, without any file system) that contains data (for example, a database file), constriction of the partition can lead to data exhaustion.
Dzherela:
- How to combine volumes on one disk on a computer
Divisions into a number of partitions on the hard disk are not always manually corrected, and it is often necessary to combine logical disks, creating one of two. Vikonati tse factory is not a warehouse of hardships.

Instructions
It is immediately clear that using the standard methods of the Windows operating system, we combine two logical disk If you don’t succeed, you will end up violating the security programs of third-party vendors. You can quickly access the cost-free demo version of the Acronis Disc Director program, download it on the official website or any other RuNet soft portal.
Once installed on your computer, launch the program. You will need to partition your hard drive. Click on one of them in the volume menu and select the “merge volume” command.
In the new dialog box, select another section as an ensign and click the “OK” button.
You will notice that on the top panel the button “Suspend completed operations” has changed color. Press on it to harden the change.
The program will require a computer restart in order to merge the selected logical drives. Before the time of re-installation, a procedure will be carried out, which may take a lot of time, since the disks are large in size and have a lot of files recorded on them.
To change the production mill A There are a number of ways. To simply merge multiple sections into one area, you don’t need to use any additional utilities.

You will need
- Partition Manager.
Instructions
Open the “Management” item disk mi." See one of the sections of the hard disk, what is the brotherly fate in the process of union. Click on it with the right mouse button and select “View Volume”.
Repeat this operation for the other section. Now click the “Create volume” button. Specify the file system format and the size of the current partition. Please note that this operation cannot be performed from the system partition. All files on both disk x will be deleted.
If you need to carry out this operation without data, or the system disk is damaged in the process, then use a special utility to speed things up. Use the Paragon Partition Manager program.
Install this program on your computer and restart the operating system. Launch Partition Manager. Activate the “Advance Customer Mode”.
Open the “Master” tab on the program toolbar. Go to the “Additional functions” menu and click “Combine partitions”.
Let us be clear about the fact that you will connect a non-systemic section with a systemic one. Click the “So” button to continue. A window will open that displays the size of the fat sections disk before and after consolidation. Click the "Next" button.
Click the “Done” button to complete the settings. To start the process of merging sections, click the “Set change intentions” button.
Regain respect
The computer will continue all operations after rebooting in DOS mode.
In a situation where there is a need for multiple local disks, they should be connected to one single partition. There are a number of ways you can do this.

You will need
- - Partition Manager;
- - Installation disk Vista or Seven.
Instructions
If you do not need to reinstall the operating system, use a special utility. Get the Partition Manager program from Paragon.
Install the downloaded program and restart your computer. Launch Partition Manager. Turn down the waiting mode. Find the “Master” menu on the main toolbar and open it.
Open the “Additional functions” submenu and select “Partition consolidation”. Click the "Next" button.
Indicate the first section that takes part in the process of evil. Restore respect: a new section goes to the same writer who gave the first meeting. Click the "Next" button. Select another section.
Once you have indicated the correct settings, press the “Next” button. At the next window, click the “Done” button to exit the section master.
On the “Virtual Operations” panel, find the “Set Change Intents” button. Click on them to display the process of merging sections.
If you need to connect the main partitions before reinstalling the operating system, then this operation can be done using Vikory disks s Windows Vista and Seven OS. Start installing a new operating system.
When you see a list of partitions, click the “Disk Setup” button. Select one of the sections to join, and click the “Delete” button. Repeat this step with another section.
Click the "Create" button. Indicate the size of the upcoming section. Select file system type. Continue installing the operating system on one of the other partitions.
Regain respect
If the disks are merged, all information will be deleted from them after the operating system is installed.
It has already been said a long time ago how many people have so many thoughts. Some are vlashtova, if it’s hard e There’s just one section and you can put all the information in a pile. Others wanted to systematize data and hard disk damage in the most obvious way: for the system, games, videos, music, etc. And the axis of how to divide the hard disk into logical parts is immediately clear to us.

Instructions
If the hard drive is new, you can share its partition with the operating system already installed. Select the disk on which to install the system, set the size of the logical disk. Then, in the same manner, divide the portion that was lost.
If the system is already installed and you need to partition the disk with the data, you will need a program to work with the disk partitions. You can find such a program on the Internet. Most of them have the same capabilities and only a little bit of functionality. Besides, they can stink because some of them are costless, and others will have to pay for the corruption.
Let’s take a cat-free program. For example, EASEUS Partition Master Home Edition. You can get it from the publisher’s website http://www.partition-tool.com/download.htm. Install the program following these instructions.
Launch the program and press the Go to main screen button. A screen will appear in front of you, showing all the hard drives. First of all, change the size of the main partition of the disk that you want to split. To do this, right-click on it and select Resize/Move Partition. In the Partition size row, set a new size for the first partition of the disk and click OK. Now right-click on and select Create partition. Specify the size of the new logical drive or select the entire area if you want to partition everything in the area. Write the disk name in the Partition Label row. When finished, click OK.
Go over again to make sure you have done everything correctly and click Apply at the top left corner of the screen. After the program finishes its work, restart the computer if necessary.
Video on the topic
If there is a need to combine local disks into one partition, it is recommended to use special programs. This process can also be carried out in another way.

You will need
- - Partition Manager.
Instructions
Try to get together Tomi Zhorstky disk under the hour of installation of the Windows Seven operating system. Start this process by inserting the disc into the DVD drive and rebooting the computer. Continue to scroll through the menu until a list of sections available for installation appears.
Now press the “Adjustment” button disk» And see one of the sections that share a part in the process of releasing volumes. Click the “View” button. Repeat this procedure with other sections disk. Now press the “Create” button. Please indicate the size of the future Tomi. Available in additional sizes for further sections. Select file system type.
Continue the OS installation process on one of the preparation sections. The disadvantage of this method is that everything Tomi will be formatted during the connection process. If you need to save files, then download and install the Partition Manager program.
Now find the “Master” tab on the toolbar and open it. Go to the “Additional functions” menu and in the submenu that opens, select the “Combination of sections” item.
Press the “Next” button, first setting the order to the “Advanced payment mode” item. Now select the section until you receive additional accessories Tomi. Click the "Next" button. Now select one section that you will combine with the one you selected earlier. Please note that the program allows you to connect up to 2 sections in one step. Click the "Next" button.
Find and press the “Set change intentions” button. Wait until the process of releasing volumes is completed.
Video on the topic
Logical drives are divided into sectors, each of which is formatted separately. Most often, people need the operation of combining sectors to establish work in a mode that is familiar to them. Unfortunately, the list of standard Windows programs does not include utilities for hard disk separation disk and the unification of its sections, therefore it is still necessary to use the programs of other producers.

You will need
- - a program for dividing a hard drive into sectors, for example, Acronis Disc Director.
Instructions
Download Acronis Disc Director from the official website. Complete the installation by following the Installation Master instructions.
Save all important data.
Launch the program. At the end of the day you will learn all the obvious parts of your cruelty. disk, select them and press the “Connect Volume” command, which is located in the evil menu. In this case, all existing logical disks are converted into one.
For a new window that has appeared, check another section. If you notice that the “Stop all operations” button on the top panel of the window has changed color, click on it to cancel the action.
Vikonte rezavantazhenya system on Vimogo programs.
If you are unable to merge the sections in a meaningful way, try the method of making the sections larger. Why save all this data from a logical point of view? disk, which you will happen to see. If you have previously installed programs, then, obviously, reinstall them, since copying the installation files will not give you the same results - if transferred, they will have different addresses.
Through the Acronis program menu, select a section that does not contain the information you need. In this case, there is an undefined area with the size of a very logical disk, remember this number. If you need to combine more than two disks, repeat the operation for other partitions, also taking into account those that deleted files will not be saved.
Enlarge for additional menu size logical disk by the amount of space that has been created (it will appear as an undivided area disk). If you previously had more than one partition, then increase the value by an amount equal to the sum of the sizes of the additional logical drives. Restore your computer.
Regain respect
Be careful when entering obligations: they are written in bytes.
Corisna porada
Make backup copies of important data from your computer at any time and write them to a storage disk.
There are many ways to connect hard disk partitions. In some cases, this process can be carried out even before the operating system is installed; in other situations, the availability of additional programs is required.

You will need
- - Partition Manager.
Instructions
If you are installing the Windows Seven or Vista operating system, combine the sections during this procedure. Please remember that all information that is saved in the sections that you want to use will be depleted. Close the computer and open the BIOS menu. Press the Delete button on the computer's front page.
Go to the Boot Device Priority menu and select Internal DVD-ROM as the first device in the list. Open the DVD drive and insert the Windows installation disc. Press the F10 button to save the settings of the Bios menu and restart the computer.
Now wait until the operating system installation menu docks until you select the local partition. Press the "Adjust disk" button. See one of the sections that needs to be combined with others. Click the “View” button. Select other required sections. Now press the “Create” button. Enter the size of your local disk and select the file system type. Format the new section. Select a local disk and continue installing the operating system. First of all, format the partition on which you are installing the OS.
If you need to merge partitions after installing the operating system, we recommend using the Partition Manager program. Check the version of this utility that matches your OS, and install it. Restore your computer.
Launch Partition Manager and select “Mode for accrediting clients”. Open the “Master” menu and go to the “Additional functions” submenu. Select section. Select the disk partition to which you will connect other partitions. Please note that this letter will be assigned to the end local drive. Click the "Next" button. Select the section you want to add first. Enter the name of the folder in which all data that is saved on another disk will be saved.
Video on the topic
Dzherela:
- How to connect a hard drive in Vista
If you need to combine a number of local disks into one, you have a number of methods available. These options should be updated to select partition options before installing the operating system.

You will need
- - Partition Manager;
- - Windows Seven installation disk.
Instructions
The installation programs for the Windows Seven and Vista operating systems have been significantly updated with Windows XP. One of the useful functions is the ability to fully customize hard drives. Shut down your computer by first inserting the Windows Vista or Seven installation disk. Press the F8 key and select DVD-Rom from the menu.
Now proceed to install the new operating system. When a menu appears that asks you to select the partition on which the OS will be installed, click the “Disk Setup” button. This is necessary to open additional parameters. Using the left mouse button, scroll to the section you want to combine with others, and click the “Delete” button. Please note that all information that is saved in this section will be lost.
Carry out the procedure for removing other sections of the hard drive that are required in one volume. Now click the “Create” button, enter the maximum possible size of the new local disk and select the file system format. Press the “Freeze” button. Now the list of sections will have a new volume. Click the “Format” button so as not to cancel the procedure after installing the operating system.
It is possible to merge partitions without having to reinstall the operating system. Download the Partition Manager program and install it. Restore your computer. Launch this utility. Go to the “Master” menu and select “Combination of sections”, located in the “Additional functions” submenu.
Select the partition to which you will connect other local drives. Ensure that the final volume will be assigned the letter of this section. Click the “Next” button and select the section that will be added first. Please note that these partitions have identical file systems. Otherwise, the disk that arrives will have to be formatted. Finish preparing the sections. Press the “Stop Changes” button and wait for the program to complete.
Video on the topic
To unite hard drive partitions, there are generally no-nonsense methods. It’s a pity that most of them can only be successfully converted with a new format of the hard drive.

You will need
- - Partition Manager.
Instructions
If you need to save information that is saved on local disks after merging them, use the Paragon Partition Manager utility. Select the version of this program that works with the operating system installed on the computer. Reboot your computer to collect the necessary information about hard drives.
Launch Partition Manager and wait for the installation to complete. Find the “Master” tab located above the toolbar, then open it. Go to the “Additional functions” submenu and select “Partition consolidation”. Click the “Next” button next to the menu.
Now select the partition before you add another local disk. The last volume takes away the letter of this section. Select the folder where you want to save all data on another local drive. Now select the section you want to add first. Remember that if you have an operating system installed on your hard disk, the first partitions must first be specified as a system volume. Otherwise, the OS will no longer be encrypted, so the drive letter will change. Click the “Next” button after selecting the section to join.
Look at the visual display of upcoming changes and click the “Next” button if you have set all the parameters correctly. Now just click the “Done” button. Find the “Set Change Destinations” button on the toolbar and click on it. Please contact us within an hour with additional information. Click the “Re-enable now” button. The program will continue the process of merging partitions in DOS mode.
Repeat this algorithm to bring the number of local disks up to the system one. You can eat up to two sections in one go.
To work with hard disk partitions (divided into partitions or combined into one) in the Windows 10 operating system, a utility is installed Disk management" This solution, in my opinion, is better than installing any third-party tools. How to use the power of the “dozens” to divide a hard disk or how to unite its parts can be read in the following articles on this site: divideі unite. Sometimes situations arise where it is difficult to do without third-party tools.
This article was written in response to many readers of the site who had problems dividing their hard drive or sharing volumes. The Disk Management utility introduced in Windows 10, despite all its advantages, has its shortcomings: sometimes it does not allow you to create a partition of the required size, sometimes it does not allow you to partition your hard drive, However, it is not possible to combine volumes into one volume. In these problematic situations (and only in them!) I recommend vikorism to a third party, but a cost-free program for carving up the hard disk partitions of the “ten”. Please remember that the use of any third-party device for the purpose of operating the operating system may pose a potential risk. I am not good at dramatizing the situation, but I respect that there are problems ahead of me, as the probability of possible problems becomes one chance in ten thousand. If possible, it would be better to use the “Disk Storage” utility introduced in Windows 10, which was dismantled by Microsoft.
When I prepared this article, I spent a lot of time trying to find an effective, cost-free, reliable and authoritative program for the hard drive in sections(or їхнє о'єдння). This sphere has a lot of blatant nonsense and dubious programs of foolish behavior. Let's finish off the point in my search was nutrition, so that there would be no problem finding a security program catless, ale i little Russian interface and also appeared outside great with Windows 10. The rest of the supply is far from empty - on the right, you can find information on the Internet about how many programs for the disk, created for Windows 7 or 8, were installed on Windows 10 users.
Well, as a result of long and careful searches, I finally know and have tried the program myself AOMEI Partition Assistant. Anyway, the new version of the Professional Edition costs 59 dollars and much more. Hello, it doesn’t hurt you, and even the functionality of the Standard Edition catless nail is completely removed in order to:
- Divide your hard drive into parts
- Combine hard drive volumes into one partition
The availability of the paid version has disappeared, and only speaks about the merits of its PZ. It is also worth mentioning the seriousness of the authors’ intentions. Those who create programs for pennies, melodiously and costlessly ruin the day’s decisions, even with a lot of interconnected functionality (then we need to get rid of them completely). Another proof of the authority of AOMEI Partition Assistant, in my opinion, is the presence of an article about it Wikipedia. Before speaking, if you doubt the reliability and safety of this program, always check through the sound system what you write about it on Wikipedia. This is, of course, not a 100% guarantee, but still, this electronic encyclopedia is intended to be as objective as possible, in the articles about PP there you can find information about possible “pitfalls” such as others oї programs. There, at Wikipedia, it’s better to send programs to the official website. The truth is that in sound systems, the first place is often occupied by completely unofficial sites of these and other programs.
On the official website AOMEI Tech I immediately know section, assignments of the Partition Assistant program. Let's go down this side a little, to another screen. There, to obtain a cost-free version of the program we need for hard disk storage, we find the item Partition Assistant Standard Edition And (knowingly) we press “Download”. Don’t worry that the site is in English, the program itself has official Russian localization. Return to your attention, there are options for downloading these programs for various needs on the download page - for a home-based, cat-free wiki, choose the version itself Standard Edition.

The process of installing programs is not at all difficult. From the very beginning you should choose a language, then as usual you will need to select a folder, where you will save the program - the axis, the folder, and that's all. Once installed, the program will automatically start if you uncheck the Run this program box at the last stage.
I won’t look at all the options for using AOMEI Partition Assistant for hard drive storage. Rozber reported depriving him of food, so he can Cost-free program to divide your hard drive into multiple sections in Windows 10. Rashta (zokrema, volume sharing) struggle for an analogy.
Partition of the hard drive for the partitioned AOMEI Partition Assistant program in Windows 10
When the program runs in the lower part, all physical hard drives installed on your computer or laptop will be displayed, as well as the partitions that run on them. In order to divide the disk into several volumes, you first need to pinch the squeegee from the already existing section. To do this, go to the donor volume and, by clicking on it with the right mouse button, select “ Change section size».

There is a new age where you need to indicate what size you want to give to the one who is sleeping. Please contact us for a new section. I have stripped the C drive of 150 GB. We press OK.

Now we are glad that we have a free space with a mark. Don't borrow" We need to create a new section (volume). To do this, click again with the right mouse button on the new one and select the item “ Creation of division».

The draining window appears again. We are left with a lot of worries and press OK.

After this, a new section will appear on the program screen. I wish I could be happy. Alas, that was not the case. Appears Change it to your hard drive while it's still intact! For the operation to be completed, you need to press the button “ Zastosuvati».

As a rule, to complete the operation it is necessary to restart the computer. The new development in the AOMEI Partition Assistant program tells us about this. We press “Go” with it. It would be better to uncheck the box next to Check partitions before execution. You can allow the program to check the sections for the presence of amends before the end.
After this, a new reminder will appear about restarting your computer. We wait and press “So.”

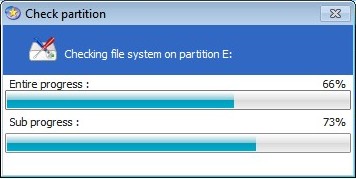
After restarting, the physical part of the hard drive begins to be divided into two sections. This is required before installing the Windows 10 operating system in PreOS mode.

This process has especially decreased due to the strength of the knuckles. Shvidshe for everything, on the right in the one on the hard disk, what to share, I had nothing except myself Fully installed Windows 10 so many programs It doesn't take a lot of time to move files. If the computer is weak, but there is a lot of information on the disk, the process may take more than an hour. My computer restarted for two days, and then started in default mode. After this, the conductor received a new section, and the current one became smaller.
Let me remind you that by analogy with the price instructions in Windows 10 with the additional cost-free AOMEI Partition Assistant program you can add hard drive partitions.
I transfer food from many valuable readers to my site, for which I looked at just one cost-free program for storing hard drives in tens of sections. Let me explain. On the right is that the decision of the programs I learned for a variety of reasons did not work: some of them did not have Russian language (and for the rich this is important), in other cases the functionality of the cost-free version was too severely reduced, and others screamed doubt in terms of security for operating system and the insanity of Windows 10. Besides, I absolutely do not care about the sense of jokes for high-level tasks that rarely fail, now. I appreciate that you look at the PZ with a bang, it copes with the assigned tasks and has incomparable advantages over other cost-free programs that I have learned. So what’s the point of filling yourself and others’ heads with so much information?)
How to combine two disks into one without losing information? I have a C: drive and the operating system is installed on it. There are also two more disks E: and F:, I want to combine them into one disk, and there is information on both disks. This means that I will not be able to use any additional Windows 7 features. Or I can, but you will need to transfer information from the F: drive and delete it, then add the unpartitioned space that is finished to the E: drive, resulting in one large E: drive.
In short, there is a lot of information on both disks and it is important to transfer it, but I don’t have enough portable hard drive. Know on your website articles about a cost-free section manager, these articles have practically everything: how to create a section, increase, change and more, all without losing information, so that before working with the information program It does not need to be transferred anywhere. You don’t have many articles on the topic of how to combine two disks into one, I think the numerical audience of your resource will appreciate you for such an article. Glib.
How to combine two disks into one
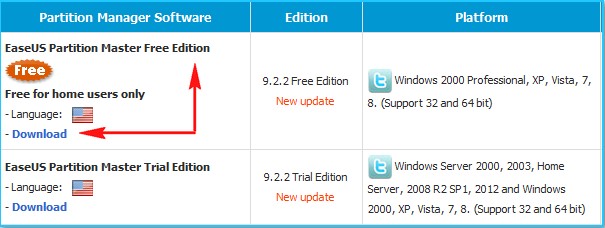
Hello, friends! Having properly respected our reader, you can quickly use the cost-free program “EaseUS Partition Master Free Edition”. With the help of additional programs, you can combine two disks into one without losing information on these disks.Our article is suitable for operating systems: Windows XP, Vista, Windows 7 and Windows 8.1.
Let's turn to today's statistics. statistic:
1) We combine two disks into one Using the additional program "EaseUS Partition Master Free Edition" is very simple, especially without wasting information.
2) We combine two disks into one, without going into any programs to help with the features that Windows 7 has. I think someone might need this part of the statistics. Unless we have to transfer data from the disk that we want to delete, otherwise, no way.
3) Friends, we also have a story about how to combine two disks into one using an additional program. This program is the leader among hard drive managers, but unfortunately it is paid.
How to combine two disks into one using EaseUS Partition Master Free EditionGo to the official website http://www.easeus.com/download.htm. Select " EaseUS Partition Master Free Edition and we press Download
Freeware Download

Download Now

The installer of the program is interested. Let's launch Yogo. Installing the program is simple, but there are a number of points that need to be respected.
If you do not need the TuneUp Utilities 2013 optimizer, uncheck the box and click Next.

Poshtu vkazuvati not obov'yazkovo

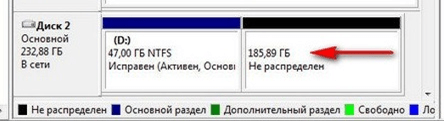
Before starting the program, go to disk management. Disk C: will not be separated, but disk E: (59 GB) and disk F: (59 GB) will be combined, resulting in one disk E: (119 GB).

We launch the program.

At the main window of the program, click once with the left mouse on the E: drive and press on the Merge tool,

In the window, indicate the drive where we want to merge the E: drive, the F: drive, put a check mark on F: and OK.

Our program operates in the sub-operation mode, press the Apply and OK button,


The process of merging disks has begun.

Let's go to disk management and see amazing results. Replacing two drives E: and F: now supports one drive E: (119 GB).

All data that was on the F: drive was moved to the E: drive, to the folder Local Disk F. 
How to combine two disks into one using the Windows 7, Windows 8 operating system without having to go through the same programs
It is possible that business owners do not want to install additional software on their computer and have to deal with the methods built into the operating system.

Go to Disk Management. To connect drives E: and F:, you need to first transfer all the data from drive F: to a portable hard drive or to a flash drive, or to drive E:, then select drive F:, right-click on the new one and select Delete volume, appropriate So.

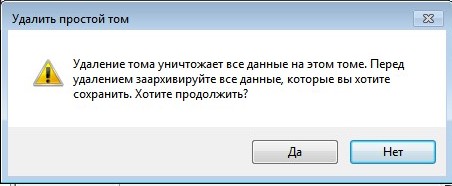
Once again, right-click on the “Vilno” space and select Section Visibility.

Are you sure you want to delete the section? We'll wait. So.
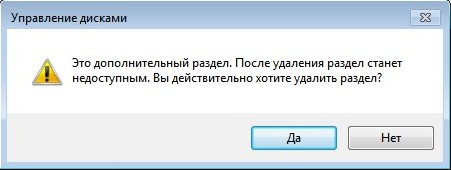
Unallocated space with a capacity of 59 GB is resolved. It is worth noting that this non-distribution extends to the E: drive. Click on drive E: use the right mouse button to select Expand volume.


Ready.

That's it. I will use more radium, if anyone can help.
To combine two disks, or rather to combine two volumes, means the same thing. Information can be recorded on two discs. When merged, one larger volume is removed. So, just like a volume sub-volume, it can be created using standard Windows methods or you can install special programs. With the help of software, you can download two volumes without losing information.
Method 1. You can combine two disks into one disk without losing information using the EaseUS Partition Master Free Edition program. Get them from the official website without any costs. Please run the program installer. Before the mail is installed, you can not specify it and uncheck the box from the TuneUp Utilities optimizer; it is not required. Launch the program. At the main window, enter “Disk1” to merge the command “Merge”. For example, if you have drives E: and F:, you want to remove drive E:, the size of which is equal to the sum of two drives E: and F:.


