Get Windows 7 to install from a flash drive. Installing windows from a flash drive via bios. Creation of a flash drive at Rufus'i
Today, more new computers and laptops do not come with a CD/DVD drive. This means that more programs, utilities and other software cannot be installed from the CD. What choice? Only USB- or flash-carriers. Zvіdsi vіdrazu go out the only option for installing Windows 7 - for an additional flash drive. I for readers, if you don’t know about the subtleties of installing software on a PC, peacefully, how to install Windows 7, victorious for your USB-carry.
Preparation before installing Windows 7
Before installing Windows 7, it is necessary to carry out a preliminary preparation. First of all, the koristuvach is guilty of transferring all necessary and important files to the same local disk, which cannot be formatted. Butt: if on your drive “C” you have the operating system and there are all the installed files of programs, photos, videos, etc., then it’s best to transfer the entire multimedia library to the local drive “D” (otherwise, be it another, different manifestations of this).
It's a good time, as we will be in good time for those who have installed Windows 7 from a flash drive: the distribution kit you have chosen (version and folding operating system) may not have drivers for the merging card. As a result - after installing from a flash drive, you will have a new system, even without access to the Internet. It is also necessary for you to know the drivers for your merging card on the Internet - only after that you can install Windows 7 from a USB flash drive without any problems.
Preparing USB-drive for OS installation
In order to install Windows 7 from a flash drive, you need to prepare as follows:
- The minimum memory capacity of a flash drive is 4 GB. Another option is to replace the flash drive of the card from the card reader.
- A version of Windows 7 has been prepared so that it can be removed from the *iso file.
- A program to allow reading the *iso format - either Alkohol 120%, UltraISO or other programs. The rest is the most handy and beautiful for beginners.
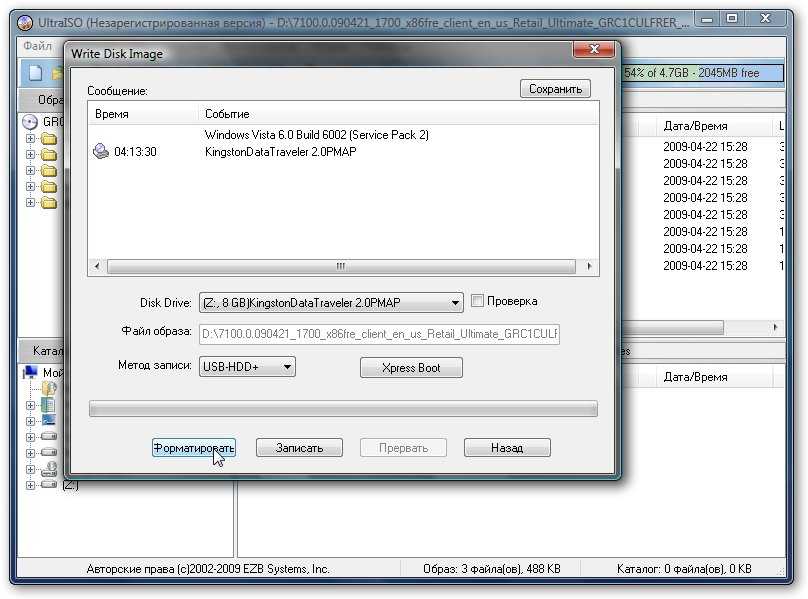
How to install Windows 7 from a flash drive? We will install a special UltraISO program in front of us. As soon as it is installed, you can notice it - you will see a window about the need to register the paid version. Select the "Trial period" item, after which you will be redirected to the smut program.
We select the “File” item in the menu, then “Vidkrity”, after which we set the path to the Windows 7 disk image saved on the computer in advance.
A flash drive is connected to the computer, and you choose to install Windows 7. If you need to format - for which you need to click on the icon of the flash drive with the bear, then select the “Format” item.

When the process is completed, select "Record" and select the key for recording.

You will have a USB-portable with Windows 7 ready for installation. If you can get access to a robot from a PC, you can create a USB flash drive, vikoristuyuchi less than your own operating system.
Front BIOS flashing before insertion
How to install Windows 7 from a flash drive? It is not enough to prepare a flash-carry and bring it to the computer - it is necessary to work in such a way that the PC is taken from the flash drive. For which BIOS is hacked. We need to add a lot of different functions to the new one - we need more than that, which is responsible for the order of zavantazhennya noses on the computer.
In order to get into the BIOS, when entering the PC (or laptop), you need to press the first key to enter. As a rule, on the first screen, at the bottom of the entry, it says "Press F2 (or the Esc key, or F12) for setup the BIOS". Click on the designated key, after which the BIOS window appears in front of you - a typical DOS-menu of blue-black-gray color. Even if you didn’t get far, try to know the key combination to enter the BIOS for your PC version.
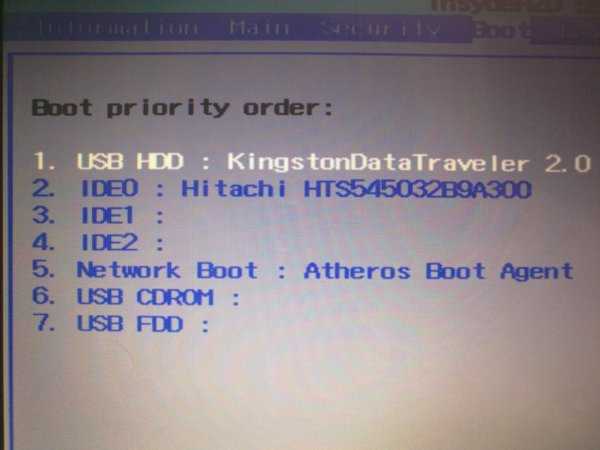
If you have already entered the BIOS, you need to know the section of the Boot menu, which shows the connection to the PC, if you carry that add-on.

As a rule, at the distribution of Boot є kіlka ptіv іz outbuildings, the order of distribution of these is determined by the order of acquisition. Let's explain the report: if you have an HDD VDCM 000-XXXX in the first place in the Boot distribution, it means that a hard drive will be in the first place. For help with arrows, you need to transfer your USB to the first place. Then press the F10 key to save the selected parameters (on some versions of the BIOS, you may need another key).

After you have installed a USB flash drive with Windows 7 first, you can proceed to the uninterrupted involvement of the operating system.
Installed Windows 7
If all the forward points are correct, after the automatic restart of the computer, you must press a key on the keyboard - immediately after that, the automatic download from the flash drive will start.
So, you have created everything that is necessary for installing Windows 7. After starting the flash drive, you will see the standard screen for installing this version of the OS in front of you. If so, follow these rules:
- Choose the parameters of the movie, the format of the pennies one and the country, and at the same time select the keyboard layout. Press the "Dal" button.
- To start installing Windows 7, click on the central button "Install". Before you once z'yavlyaetsya kіlka version of the operating system - pochatkova, basic, maximum thin. You must choose the one for which you have an activation key. Obviously, yoga can not be introduced at once, but it is necessary to work for 30 days. Press the "Next" button again.
- You will see a license agreement - put a tick on the required item and press the "Dal" button again.
- Coming soon, you need to choose the same installation and local disk, on which you need to install Windows 7 from a USB flash drive. Choose drive C, which you have prepared for this. Format it by pressing the "Format disks" button and selecting the "Format" parameter for the local disk. After the completion of the formatting process, you will replace the local disk "C" with an unallocated area of \u200b\u200bdisk space. Then press the "Create" button and select the required file for the new local disk.
- After that, like a new disk of creations, you see Yogo for the help of a mouse, and press the button "Dal".
- As soon as possible, the installation of Windows 7 from a flash drive will be promptly installed - you will copy files for the new OS, then - unpacking, installing components, etc.
- Once installed, you can choose a computer name and administrator name (new face record). Choose a password if necessary. Press "Dali".
- The next step is not for everyone - the introduction of a license key for the wiki. If there is no point, we should follow.
- Choice of parameters for oblіkovogo record koristuvach. Here you can see the activation of Windows 7 behind the firewall, the choice of automatic updating, the choice of the time zone, the date and other parameters.
What work after installation?
At this point, the installation of Windows 7 is completed. Obviously, as part of the installation, you can look at the remaining point, which is called "Fixing the fence" - we recommend that you skip it, and the patching itself can be done directly through the new cloud record. So it's much simpler, before that, you can install the drivers on the memory card in advance (for the availability of such) and reverse the operation of Windows 7.
After the installation is completed, you can remove the flash drive from the USB socket. Don't forget to re-enter the BIOS in order to reset the default settings. This means that you need to select an HDD (hard disk) to replace flash drives.
Hello my best friends and readers!
Since I installed the OS sound from a USB stick, I have written a report article that describes this aspect of the work of the report, including all the programs. Today I will tell you how to prepare a flash drive for installing Windows 7, using all available software, which is on the Internet. The material will be bulky and cicavi! Let's go!
What kind of flash drive is needed?
Otzhe, let's take a look at each other, which one is the best for us. We may be right with the distribution kit of the SIM card, it is important for us, so that the wines fit on our nose. Otzhe, back to back we will discuss obsyag. Vin may be no less than 4 gigabytes. I'm sure you need a device for 8 GB, so Windows was installed, and softin, and that driver was also on flash. With such a card, you can manually send it through the rufus program.
Koshtuyut stench inexpensively, especially as it is correct to choose the characteristics of that brand, so that the raja should be vibir on the merit of such flash drives.

USB type. Today's technologies have taken the job far ahead and laptop manufacturers are showing us computer models no longer with two standard USB 2.0, but with two additional USB 3.0. Vіdmіnnostі yakraz v svidkostі chitannya that record. In older typical connectors of another version, writing is at 21 megabits per second, and reading at 34 megabits per second.
And the axis of the new 3.0 is richer and smarter. Record on them the speed of 30 Mb/sec. read data at 68 Mb/sec. So on current ports and noses, we can fix the files, and shove the files there, and then transfer them to the hard drive when Windows is installed. This is more convenient, allowing you to quickly set up the new device in ultraiso.

Now let's take a look at the virobnik company. Best flash drives in Russia from Sony, Samsung and Apacer. So, the stench is more like a yakіsnі, a modest minimalistic design can be made, but one or more thousand wooden ones don't have a special banquet for them.
At the same time, Prestigio, Silicon Power, Pretec and PQI are cheap, but they are more expensive. Live like this for 1-2 years, and then slowly die and at the right moment your mobile container simply may not be designated as a laptop.
Raju robiti vibir on the merit of such firms as Transcend, ADATA and Kingstone. The stench is cheap to kill, with whom you can make a good quality. That design is different from other firms.
Distribution
Since it is peacefully enchanting mobile hard with an operating system, then we need the most Windows.
Under the old car varto swing 32 bit version.

For tight computers 64 bit version.

If you don’t know what to download, then axis of force to the torrent client program. Let's go and squeeze in here.

Let's go down and click here.

After the acquisition, click the axis of the acquisition file.

Vіknі tisne has a straight cut.


We'll let you see this please, just emboss far i all.


Everything is the same, we continue the installation of the axis with the button.
We put up all the jackdaws and embossed green squares.

Now those same, put the daws, emboss the button.

The installation of the software itself is to blame for the revisions of the hall of your computer.

Let's just finish it.

This is how the working interface of the program looks like.

Burn USB Flash Drive via Windows 7 USB/DVD Download Tool
Get the utility you can here.
Otzhe, vіdkrivaєmo program and we know through it our vanity image from vіndoyu and embossed next.

Now we choose what to write, a flash drive or a dummy. Since we have a mobile phone, then it’s a YUSB device.

We insert a card, select it in the software itself and click on it to continue copying.

At the end, it is confirmed by the button " So».

Check, dock files will be written.

Everything, the device is ready.
Burning a flash drive via WinSetupFromUSB
Axis here marveling respectfully.
- We choose our nose. Do not confuse with an optical drive.
- It is necessary to put a tick in the way that a little one is indicated. Do not have mercy, otherwise the computer simply does not pump the flash drive.
- At this position, set up a path to a zavantage image with Windows.
- Press start.

Since everything has gone far away, make such a picture.

Write flash drive via UltraISO
Zavantage UltraISO you can here.

Again, start the software in the name of the administrator.

Let's press the open button and we know our image.

Let's press on self-interest And then choose the position from the list.

The axis here is to install our USB flash drive, then we will write the method of recording and embossing it. It is not necessary to format it, the oscillators are worn all the same over and over again.

After the finale, you can win a flash drive as an exciting wearable from Windows 7.
Write flash drive via UNetBootin
Zavantage softinka you can here.

Run the security software as an administrator. At the interface, which is visible, we put ISO standard that we choose our image of the operating system.

After pressing the button OK rozpochnetsya process itself.

At the end, it will be prompted to immediately restart the laptop or just log out of the program.

Device is ready.
Entry via command line
As if you didn’t manage to be wonderful, but in the operating system you can create an exciting flash drive through the command line. Fight like that.
If you write through this Windows, then press the start and open the command row with the right button in the name of the administrator.

If you have tried to practice in the tenth operating system, then you need to type in the command in a joke and again, you will enter the name of the administrator.

At the black window we write a command from the keyboard diskpart.

Now type one of these commands. list disk», « list volume» ta « list partition, to help you find available logical disks on your laptop.

Now it is inscribed to command the yak to the little one below. Everything is in order and exactly as in the picture.
Be respectful, patient and drunkards.

That's it, the flash drive is ready, it's gone to roll up the distribution kit on it
For whom download the stars archiver 7-zip. Let's start yoga.

At the worker's vіknі choose the image with Windows, emboss the beast on the vityag archive, then choose the wearer himself and click OK.

From i all. So fight the flash drive through the command line.
Creation of a flash drive at Rufus'i
Download it yourself soft. Actually, through the rufus program, the flash drive is recorded more quickly, lower through the above described software security.
And so our Rufus is judged. At the first row, a device is selected. For another, we installed the recording method itself, like in the picture. The file system is overwhelmed like this. We tick the three lowest. Tisnemo on start.

Jump the axis in the same way at the end of the front. Let's wait with him and let's go far.


All is ready.
Recording via WinToBootic
Downloading the program star axis. Let's wait and see. The flash drive will show up by itself, we need to tick the box next to the formatting button and press the button.


The process of making but-wearing will begin. As soon as the wines are completed - sing the same vikno.

Done, you can use the flash drive.
Write via WinToFlash
Another little popular utility is WinToFlash. You can take axis here. Swinging and vіdkrivaєmo. Bachimo axis such an interface and emboss the axis qiu majestic green daw.

We have already enchanted Windows in the image, just select the bottom item in the menu.

Now we select the image of that flash drive itself. Well, I’ll tell you ahead of time, don’t confuse it with an optical drive.

To show up this way with knowledge of the license. Just click the axis here.

Everything, starting the recording process. It is necessary to check the end.

As soon as everything is over - emboss out.

All is ready.
Dodatkovі nalashtuvannya
You created a flash drive, but what did you give? Now you need to configure the capture through BIOS. Well, or through UEFI, so you have to reflash the chip of macros. In a different situation, the computer simply won't be able to work with your device, and Windows installation will be impossible.
Video axis . It will help you to figure out what to put in the system, so as not to damage the computer.
Visnovok
On which I will finish the article. As you can, you can create a USB flash drive without programs, but it will take more than an hour. All the ways I protested myself, I will do everything again. The only thing I want to get ahead of, is that I can’t use these methods on macbooks, because all the software has no purpose for the Windows operating system like Microsoft.
Do not forget to copy files from a flash drive, as if they stink, shards will irrevocably appear when formatted, and you won’t see them.
Share this article with friends in classmates, facebook and other social networks. Subscribe to my blog updates and you will always be aware of the publication of new materials. All the best to you and see you for new posts, my great readers and programmers!
You do not need to buy a disk or drive to install Windows 7, so you can install the operating system from a USB flash drive.
Insufficient koristuvachiv to put in a deaf kut power supply - how to install Windows 7 from a flash drive. Not everyone knows how to install from a disk, and even less knows from USB. In fact, there is nothing coherent, it is important to read the instructions clearly and not to break the sequence of the curves. It is important that you need a USB Flash or an older hard disk of at least 4 GB. The file system, which has been formatted, does not play a role. In addition, you can write the image to an SD card or an external attachment, for example, an MP3 player, which appears in the computer as a flash drive.
Sequence of installation
If you install the OS on the disk, then you don't need to worry about yoga. If you install the OS, then remember that the disk on which you install the system will be re-formatted, which means that all data from the disk will be deleted. Therefore, first of all, you need to think about those files that you need to save. Next, follow the next instructions:
- zavantazhuemo OS;
- Created by installation nose;
- Changing BIOS settings;
- We start the computer from the outside building;
- Dotrimuєmosya іnstruktsiї z vstanovlenya OS;
- Installing the driver and updating the installed OS;
Numerous details are similar for all versions of the operating system, the scheme is applicable for other versions of the OS, including for Windows Vista or Windows 8.
De zavantagey OS
You need to take not just the system files, you need an ISO image that is suitable for writing to a USB flash drive. You can invest in . Already you need to know which stage you need, which version of the OS you need. The food is not only in the fact that the victorist will take you to the “Home” or “Professional” version, but also to the fact that it will have a capacity of 32 or 64 bits. After you have chosen the version of the OS, put it on a hard drive.
How to write an OS to a flash drive
If you just write the distribution to a USB, then you cannot run the OS from it, nor run the installation from a USB flash drive. To create an exciting nose, you need to win specializations in software. One of the best programs for creation is . Let's take a look at the creation of the utility's butt. We are looking forward to our ISO image of Windows 7 in the middle of UltraISO:


You need to choose not only hoarding, but the recording method. We select USB-HDD+, otherwise it is not necessary to adjust the chip.
How to run the installation through the BIOS
Since you made a flash drive from a SIM card, you need to make a computer from it. For which you need to restart and start the system for an hour, go to the BIOS and specify the startup sequence. Depending on the BIOS version, the input is available for the additional keys F2, Del, Esc, but there may be other keys. Inside the BIOS, you need to know the BOOT tab to show the startup order. Your nose may be already at the annex, otherwise you will not be able to order yoga to start at the hour of starting the PC. The sequence of entanglement can be approximately the following:
After making changes to the BIOS, it is necessary to save and leave. Let the system automatically reboot and start from USB.
Installed
After the start, you will start installing the system itself. If you have chosen the Russian version, then the entire installation will be accompanied by Russian instructions and recommendations. Finish finishing the prompts that appear on the screen, and after 20-30 minutes, the operating system will be installed on your computer. If you are out of food, look at the instructions:
Do not forget that a hard disk, where you install the OS, will be formatted. This means that the data on the disk on which the new system is installed will be deleted. That is why you need to tell a long story about their savings.
Updating and updating
After you install Windows 7 on your computer, it's too early to relax. We gave you the time to set up the system, and then install all the necessary drivers. To fix that driver, you can use the following programs:
- driver pack solution;
The first program allows you to optimize the system's work. Another program will allow you to automatically install all the necessary drivers. It's time to set up an obov'yazkovo to create a backup copy of the OS, and also I'll change the point of renewal, as if you're in luck, if you have problems, for example, you'll get pardons.
Chergov's article will be about those How to write and install Windows 7 from a flash drive. Is it true that the way to install is up-to-date Windows 7, so it’s better with a flash drive, lower with a disk. In order to install windows 7 from flash drive It is necessary for the cob to create an exciting flash storage device, for which it is possible to install the operating system.
To create an exciting flash drive, we need:
1. Image of Windows 7 operating system
2. Flash drive minimum 4GB
3. Windows 7 USB/DVD Download Tool, download .
We create a flash drive:
1. Format the flash drive. Be careful, because when formatting all the data from the flash drive, you can see it. Idemo in "My computer" right-click on our flash drive, select "Format" and there, select the file system NTFS and press "Start"
2. Run Windows 7 USB/DVD Download Tool.
3. Click on "Browse" and select the disk image. I will say that it is not necessarily Windows 7, but XP is also possible.


5. Choose a flash drive, on which you want to write Windows 7 and press Begin copying

6. That's it, just need to download the completed flash drive for installing Windows 7.
Now you will have a flash drive at your fingertips, with which you can install the operating system. All new computers support the installation of flash storage devices, only you will need to select a special acquisition point.
It’s best to learn how to install the OS independently, and the price is low for reasons: savings, the ability to grow at any time and not to see anyone lie down, anonymity and safety (nothing crim you don’t respect your computer), etc. In this article, you know how to install windows 7 from a flash drive on a computer and laptop.
Write windows to flash drive
In order to write an iso image of windows 7 to a USB flash drive, I recommend the rufus program to everyone. Vaughn is the simplest, bezkoshtovna, quickly and correctly writes down the system, no matter how. I already wrote about all the advantages of the utility. The flooring is simple, so you can not go over to the pleas and win, but to take the opportunity - https://yadi.sk/d/DUW30yh93RLmZq
Preparation before installation
It is important that you format the "C" drive with the correct installation. Finally, it is necessary for a correct robotic system, as well as for additional formatting, all viruses and unneeded files can be seen. As you already understood, before starting the installation, you need to move all the information you need to another disk, so that everything can be erased from the “C” disk. Well, you only shared one, and move it anywhere, or save important information on a USB flash drive.
Installing Windows 7
All manuals on the Internet have a BIOS setup step, but we can do without it. Navіscho yogo cіpati vkotre, yakscho є mozhlivіst get along.
- After you have written Windows 7 to a USB flash drive and saved all the important information, insert the USB storage device and restart the laptop/computer. At the start of the PC, it is necessary to click on the BOOT menu, to select a USB flash drive to start, and not a hard drive.
Yak wiklikatiBOOT menu:
Did you get it? Now it's time to open the PC, click the boot menu and select the USB flash drive from the system.
- As everything that was said above was correctly broken, and after choosing a flash drive, you got the following:

Tse means that everything is good, and it is necessary to press the button once.
- We choose the right language and emboss "dali".

- A simple point, it is necessary to click on "insert" and go to the step-by-step installation button.


Better put the maximum.
- Check the box that suits you.

- Externally installed or upgraded. We need to press "povna".

- We select the required HDD partition for that. drive "C" that presses hard drive.

- Tisnemo "format". (All information on the new will be reduced). We talked about them more.

- Confirmation of formatting, and embossing distance.

- The installation is running. Now an hour is needed (3-15 min.) While the operating system is copied from the flash drive to your computer and installed.

12. Enter your name (nickname) and computer name and go further.

13. Set a password (for consumption), not obov'yazkovo.

14. You need to enter a license key for the product. Press further, we'll talk about it below.


16. Set the date and hour. So that the year does not break after skin re-adjustment, set your time zone.

17. Connect to the Internet. As a home computer, select 1 item.

- All! Vitayu, tse Vi zrobili. Windows 7 successfully installed.
Installation completed. What did you give?
Installing the operating system took about 20 minutes from you, it would have been all right, but embarrassing you. now you need to install everything else:
- Drivers. If you have lost disks, if they were in the kit with a computer / laptop, hurry up with them. Well, I recommend downloading the "DriverPack Solution" program and you will take all the necessary drivers and install them yourself.
- Please install all necessary programs for you, including: browsers, flash player, directx, microsoft visual c++ and microsoft net framework.
- Adjust the computer for yourself. Create the necessary shortcuts on the working table, change their scale (size), pressing ctrl and scrolling the mouse wheel, adjust the video card (if necessary), and all else.
So it goes without saying that you installed a non-licensed Windows, and obviously you don’t have an activation key. It’s not scary and it’s possible to activate it in 2 min. How tse robiti, I wrote.
How to install OS from USB: Video
Pouches of the vikonan roboti
The greater part of what has been written was not laborious, but it is recommended to install it correctly for proper installation. As a result, you took away a new working computer, which works like a new one and does not cost you much. Now you can independently install the OS and improve it less than a year (one hour, exactly the same time you spent on transportation to the service center).