Camera simulators for early bird photographers. DSLR camera simulator DSLR camera simulator torrent
If you have never used a SLR camera before, or only bought one and want to try taking photographs in manual mode, then you will not want to practice on the simulator. With this online SLR camera simulator you can try virtual photography. All necessary settings for recording are available. We will help you quickly learn the basic adjustments of a SLR camera, such as brightness, aperture, ISO, focal length, etc.
Managing a virtual camera:
Lighting:
Lighting is the most important factor, which means your camera needs to be brightened. There are also some important moments, if there is too much light in the frame, then it’s bad - even the frame will be overexposed. Vikorist this step for adjusting the camera under the song of the light source
Vidstan:
Check this step to see how close or far you are to the object.
Focus:
Moving this bar has the same effect as zooming in and out on your lens. at a small focal length of 18 mm there will be a greater focus and more objects will be captured in the frame, and a higher focal length of 50 mm will give a larger frame, which will help you create beautiful portraits in a better way Let's add a background.
Mode:
The exposure mode of a SLR camera allows you to adjust one parameter, while another parameter will be adjusted automatically. So in the aperture priority mode, you set the aperture yourself, and the display is adjusted automatically, and in the display priority mode, everything is the same. Turning to Manual mode (M) allows you to set all settings manually to achieve the desired effect. To ensure the correct exposure, look at the camera's light meter, so the drawing should be in the middle between the two indicators for correct exposure.
ISO:
ISO is adjusted to the light sensitivity of the camera, which indicates how bright the matrix will be. During the day, if the lighting is good, set ISO 100-200, which will give you a clean contrast picture without noise; in the evening, if the light is darker, you will need to set ISO 800 or higher, so that the frame is bright, but in any case At higher ISO levels, the graininess of the frame will increase.
Aperture:
The aperture controls how much light passes through the lens or what effect you want to achieve. If you are shooting a landscape, then for sharpness in every frame you need to set the aperture to 7 and above, if you are shooting a portrait and you want to maximize the background and create it within the frame, then you need to set aperture 2-4. At the same time, in the dark hour, add aperture value 7 to skip 3 times less light, lower value 2.
Vitrimka:
The window indicates how quickly the frame will be shot, and over time the shutter will no longer be able to open. A short-term value of 1/500 s or 1/2000 s allows you to freeze the object of capture. For example, a car that is collapsing, or a man in a haircut. Vitrimka bolsh dovga taka 1/15 sec or 2 sec allow to dissolve the roc. But keep in mind that the shorter the window, the less light it lets in. Then during the day the lighting is 1/15 s to make the frame overexposed, and in the evening 1/2000 s is to make it even darker.
A virtual camera simulator is a photographer's simulator that allows you to easily and accurately learn the relationships between the lens, aperture and ISO. With Vikorist’s virtual simulator as a photographer, you can easily figure out how to adjust the aperture to the depth of sharpness and exposure, and how to adjust the exposure and blur of the image. In addition, this camera simulator can be used to experiment with camera settings both in manual mode and in the modes of aperture and aperture priority.
Learn how to set up your camera on the photography simulator
Short instructions for setting up a virtual camera
Aperture - Aperture
Aperture (aperture) - a light-impermeable partition installed between the objective lenses. The aperture adjusts the opening at the center to transmit a beam of light from the subject to the camera matrix. The depth of sharpness changes depending on the size. The larger the aperture opening, the less. In addition, the size of the aperture opening influences the exposure of the frame - the larger the aperture, the more light passes to the matrix (or the film).
To change how the diaphragm works, move the motor Aperture Be careful of changes in the depth of sharpness and brightness of the photo. Above the engine there are digital aperture values, which indicate the size of the aperture opening, indicated for a small right-handed device.
Shutter - Shutter
Shutter (shutter) - adjusts the exposure of the photo. The longer the shutter curtains are open (longer window), the more light will be transmitted to the matrix. Move the engine Shutter And be careful how the brightness of the picture changes depending on the amount of shading indicated above the engine. In the picture, right-handed, you can see how the shutter operates at specific values of the shutter - press the button test speed.
When taking photos in manual mode, it is most important to know that the aperture and window settings are used to ensure that the frame appears with normal brightness.
When choosing a display, make sure that the display can bring you up to the objects that are especially crumbling, for example, a dog in the foreground that will run up to the eye.
ISO – matrix sensitivity
In the case where the range of windows and apertures of your camera does not allow you to retain the normal brightness of the frame, you need to change the sensitivity of the matrix - Restore the fact that at high ISO values the photos appear color dots
Light meter - exposure meter
Almost all digital cameras use a photoexposure meter. Light meter(Light meter). The exposure meter is an electronic device for adjusting the brightness of the photographed object. In many cameras, the exposure meter operates simultaneously with the exposure indicator. The exposure indicator on the photographer’s simulator is a scale under the picture frame. Just like in a real digital camera, it shows how many steps the photographer sets, the exposure is adjusted according to the camera’s automation.
Link Aperture / Shutter - A(Av)/S(Tv) mode
Switching the camera simulator to automatic
The aperture priority mode is indicated by Av or A and is selected for the camera. The photographer sets the required depth of sharpness (lens aperture), and the camera automatically adjusts the appropriate lighting for shooting, when The aperture value has already been set by the photographer.
The display priority mode is set to S or TV and works the same way as the aperture priority mode, but now the photographer sets the display, and the camera adjusts this setting and automatically selects the required aperture.
Thus, in priority modes, the aperture and windshield are linked to one of the camera’s controls and are subject to the settings selected by the photographer. That’s why such modes are called automatically. It’s easy to point out that the photographer doesn’t have enough information, or it just doesn’t take a lot of time to install through the window, and then the diaphragm.
Link Aperture/Shutter[Link aperture and aperture] - if you want to switch to automatic priority mode, then on the camera simulator, put a cross next to this box. Now, when you change the aperture, the aperture values change automatically, and when you change the aperture, the aperture automatically changes. So the interaction is equivalent depending on which engine of the camera simulator you use (Aperture or Shutter), the virtual simulator has a mode of either Vibration Priority or Aperture Priority, respectively.
This is a wonderful educational site from the largest manufacturer of photographic equipment. There are three sections. First, let us give you a quick overview of what exposure, brightness, aperture, sensitivity, and other parameters affect. Another section is a virtual simulator, with which you can practice training with different parameters. I, find the third section of purposes for verifying the findings in practice. Here you are instructed to quit photographing various objects at any time.
CameraSim

Another wonderful simulator that allows you to recover on a virtual mirror camera. You need to get acquainted with a pretty girl, because not only can she not stand still for a second, but she also holds something in her hand that turns around. There are a number of shooting modes (aperture priority, privacy priority and manual), as well as all the necessary controls. After pressing the release, you can immediately view the frame and you can analyze the tolerances of the cut.
Bokeh simulator

An advanced purpose simulator for understanding the concept of “depth of sharpness”. You, of course, took pictures in which the placement of the objects in front looks very clear, and the rear body is slightly spread out. To take such a photo, you need to correctly adjust the aperture, set the focus and select the correct position to the subject. A special simulator will help you learn these tricks, which allows you to select the most precise parameters to achieve the effect you have in mind.
Newbie to Expert Photo Editing in 5 hvilin

And the remaining resource of this small review will be available to you in the event that you want to edit photographs. I will help you effectively for 5 minutes, as the creators promise, you will learn about the most advanced adjustment of current photo editors and their inclusion in the appearance of the photo. And you can fix your memories on real photographs with a wonderful online editor from these retailers.
And finally food until the arrival of photographers. What resources do you consider most useful for developing the foundations of your mission?
There are plenty of amateur and amateur photographers who want a good SLR camera. This is a completely natural problem, even cheap compacts must limit the possibilities of taking pictures and do not allow you to get good clear pictures. Professional growth is entirely normal and commendable, but SLR cameras are of a very low standard, the likes of which no one has ever experienced. Having looked at the control panel of the mirror camera first, you can get angry, but not everything is as scary as it seems at first glance. Let's try to learn all the intricacies and adjustments, and also help with an online simulator of a professional camera Camera Simulator. The simulator has an English interface, but it’s not scary. We will look at the names and meanings of all functions in order.
By the way, you’ve already spent a couple of shots with the simulator. If not, then Raja will try to delve into the adjustments on his own. Just by trying to change the parameters and taking some small pictures, you can understand what the smell is about.
Setting up the simulator
Have you tried it? Now, let’s look at everything in order, since a good picture can be made with a great number of adjustment variations. First of all, we marvel at the translation option of the panel:
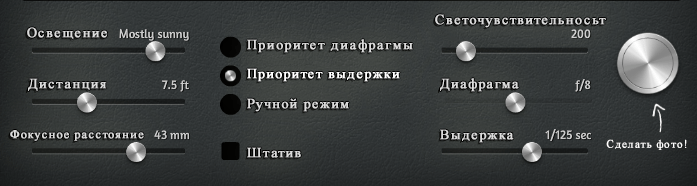
The skin function is similar to that of professional cameras. Of course, the control panel in the skin device is individual, the selection of functions is standard, and its functions are identical for all cameras.
The simulator allows you to master photography techniques in three main modes, which are used in professional cameras. This is Aperture priority, Shutter priority and Manual mode. It is recommended to use the manual mode itself, so as not to allow the robot to understand all the camera settings. The developers of the simulator are talking about this, adding a postscript to the name of the regime (go for it - vikorist this). The decision of modes often limits the possibilities of adjustment, placing restrictions on automation.
Let's take a brief look at all the adjustments:
- Lighting - brightening- This adjustment allows you to select a range of light and model different levels of lightness. In the simulator, unfortunately, the mental training does not change, so it is better to adjust it within the framework of the “Sleepy” and “Sun for the Dark” modes, if you want to try out your skills in more flexible minds, lightening, you can set the dark other modes. The mode icon can be found on the top left corner. In addition, the lighting priority mode and Lighting apertures are supported by automatic determination of the values of the corresponding adjustments.
- Distance - distance- This function is based on the proximity of the object being captured. You can somehow get closer to the girl.
- Focal Length - focal length- the pointed butt of the simulator has a zoom lens. Set your focal length to 18 – 55mm. This option allows you to frame a photo using additional zoom and change the depth of sharpness.
- Aperture Priority - aperture priority- This is automatic mode. The reason for this is that you set the aperture yourself, and the aperture is determined automatically by the camera. In photographic equipment this mode is designated as Av or A.
- Shutter Priority - display priority- this mode is similar to the previous one in its automation mode. In this setting, you can adjust the shutter's brightness, and the aperture is set automatically based on lightness analysis. This mode is designated on photographic equipment as Tv or S.
- Manual - manual mode- This mode gives you complete control over your hands. You will have to adjust both the aperture and the windshield yourself. On cameras, this mode is indicated by the letter M, which means Manual.
- Tripod - tripod- After checking the box, turn on the photographer’s hands. In portrait photography, the tripod is not often used, but its standstill allows you to take photographs with greater visibility. In this situation, the tripod does not play a special role, but in the minds of bad lighting, the results may be even darker.
- ISO - light sensitivity- This is important because the camera’s matrix is able to receive light. The higher the ISO value, the brighter the photo will be, but you have to pay for it. Raising the ISO number will cause grain and noise to appear. You can take the photo. In daylight it is better to set the ISO to a minimum. If the light is too bright, you can move the value, if necessary, so that the noise does not interfere with the photo.
- Aperture - aperture- This option simulates the operation of diaphragms (apertures). The larger the aperture, the more light is transferred to the camera matrix. This method can make the picture brighter or darker. The aperture also controls the depth of sharpness.
- Shutter - display window- this parameter allows you to change the speed of the shutter (increase and change the windshield). Vitrimka is an hour that is expressed in seconds, during which an image is projected onto the camera matrix. A long-term window allows you to take good photographs in poor lighting, but if any object in the frame or the photographer’s hand shakes while the shutter is open, the frame will appear blurry. The axis is here to help and a tripod comes, although in the face of all the troubles we don’t lie. With good lighting, a short window will allow you to “freeze the image.”
Snap photo! - take a photo!- This is an imitation of the shutter button. By pressing on it, you will see what kind of image will appear from the selected adjustments.
Theory
To capture a clear image, a small amount of light can be applied to the matrix. Regulate for additional help display cases which means that the passage of light through the lens is trivial, diaphragm, which indicates the intensity of light, the value ISO This regulates the sensitivity of the matrix to the light that is transmitted to its surface.
These three parameters have the greatest impact on the brightness of the photo.
Practice
Now that we're done with the practice, let's practice. Let’s finish modeling the lighting. Engine Lighting - lighting can be adjusted in a number of ways:- candle
- lamps roasting
- gloomy
- sun there
- sleepy
It is most logical to set the weather to sleepy or slightly gloomy, so that it will demonstrate effectiveness (the girl is definitely not with candles and not in the presence of frying lamps).
For the sake of clarity, we will all focus on the final result so that more clear details can be seen. Using Distance, move closer to the object by 5-3ft.
Focal Length (focal length) is better to set the values from 30 to 50mm, although you can set your values completely freely.
The capture mode is set to “Manual”, which allows you to better evaluate the values of all parameters.
Install the tripod no – this is not the case on the right side of the skin. When photographing children, especially on the street, this is not true, but in this case it is better to work with the program if the hands of the photographer do not create an additional hit in the frame.
Now let's get to the point.
Since photography is carried out in bright light, set the ISO value to 100. The increased value is justified in the minds of insufficient light or a change in vibrancy with increased brightness of the photo (in this case the photographer there will be noise).
We took a close-up of the girl, creating a classic portrait against the background. This can be done by opening the aperture as much as possible. When the aperture is open, the value is f/2.8, which allows the maximum amount of light to be absorbed into the matrix (the image is brighter) and the background is blurred.
The window must be set so that the exposure level is at the middle value of the indicator.

In case of a specific skin condition, it is necessary to lighten the mind, the importance of vitrim is raised.
The simulator makes a selection of display parameters between 1 and 1/4000 seconds. In real cameras, the viewing range may vary greatly. Most often there are cameras in which the maximum exposure is set to 15 or 30 seconds, and some models have modes in which the shutter may not be able to be opened for a long time or even worse.
Then, having set the normal exposure values using the slider, carefully take a photo.
Axis to go:

Under the photo, you can learn about the details that went into the photo.
Let's analyze the photo. The background is as we wanted. Lighting is normal. The toy in the girl’s hands appeared “frozen.”
Let's try to add more dynamics to the photo. It’s easy to spin the toy. How can you earn money? A single method means increased visibility.
By increasing the exposure by a few steps, it is important that as an indicator of the level of exposure, the positive value increases, and therefore, such a photo will be overexposed. To compensate, you need to close the aperture.
My result and wiki adjustment can be viewed on the following screenshot:

The girl looks practically the same. The background is slightly less visible through the diaphragm. The toy transmits the influence of increased vitrium.
Let's take a look at another butt, which demonstrates to the robot a maximally closed diaphragm. Open the aperture to the maximum. It’s not obligatory to set it to maximum, but let’s take a look at such a butt itself.
Closing the diaphragm completely changed the intensity of the light flow that flows into the matrix. The exposure indicator is set to a minus value. To compensate, you need to increase the visibility, otherwise you will make the girl more smeared. The thief effect will be very strong. Increasing the light sensitivity of the sensor (matrix) will help. It is necessary to select the optimal combination of windshield and ISO.
What happened to me was the axis. Your result is not to be greatly affected by the result.

The photo shows increased noise. We cannot look at the photo with great magnification, but take the word for it, and with zoomed-in noise, the photograph is greatly distorted.
To convey a large depth of field (the depth of a sharply depicted space), it is not obligatory to close the aperture completely. Experiment with adjustments. Only then will you be able to understand all the parameters on which to apply.
We compose the order
Having taken a number of photographs, you suddenly realized that you need to adjust your camera to take a good photograph. Now change the brightness to “roaring lamp” or “dark sky.” Try to take a photo. Look, how much has the principle of adjusting the camera changed in the minds of the filthy lighting. Now, behind the closed aperture, you will have to increase the ISO.
From virtuality to reality
It is necessary to remove knowledge in a practical manner. Only by practicing in real minds can one develop the technique of photography and learn the principle of taking pictures in a sharp place that gradually changes.
It is not obligatory to buy a professional SLR camera for all knowledge. Manual adjustment is found in many inexpensive, compact cameras.
In addition to all that has been described, you will have to learn about white balance, focusing rules, choosing a composition and framing photos. Photography is a mystery, but a science, which has its own basic rules and principles. The mystique of photography is added by the fact that the skin can be enhanced by its unique style and enhancement.
I wish everyone good luck in this difficult, but very rewarding, job.
The article is divided into parts
If you already have a SLR camera, and you only use it in “automatic” mode, if you were a high school miler, then you are spending a lot! The time has come to find out about all the capabilities of your DSLR. Here you can play with visibility, aperture, light sensitivity and be careful how these parameters affect the final result.
Understanding the interaction between windshield, aperture and ISO requires consistent practice. Much of it is based on intuition and luck, and most experienced photographers can adjust their camera on their own, without having to worry about all the options. Please note that changing the skin element does not only affect the change in the exposure of the image, but also other moments in the photograph. For example, changing the aperture, changing the depth of sharpness - the smaller the opening, the greater the depth of sharpness. A high ISO will add noise, and long exposure to hand-held motion will result in blurred images. We hope CameraSim will help you understand the fundamentals of exposure and hone your skills.
Canon Explains Exposure
Home site of the largest manufacturer of Canon photographic equipment. Є an online simulator, with the help of which you can practically learn photography during various adjustments. Your pictures will appear lower, so you can look at them and adjust the levels of adjustment that you did. Be sure to review Canon Explains Exposure.
Online simulator of depth and sharpness

Would you like to take a closer look at the concept of “depth of sharpness”? Polish photographer and programmer Michael Bemowski has created a fantastic and richly functional online depth of sharpness calculator and Bokeh simulator that will help you understand what happens when you change your focus and focus. diaphragm.
The depth of sharpness in the frame is determined by the aperture and focal length, which demonstrates this web supplement using an interactive calculator.
Є low parameters that you have to adjust to model a photograph on the screen, including focal length, aperture value, sensor size, view of the lens to the subject of capture, view of the subject Add to the background, framing. You can save the combinations set up for a later review.
Nikon lens simulator
