How can I set the BIOS to encrypt a flash drive? reporting aid! How to become interested in flash drives or disks
You have a valuable flash drive with a distribution kit of the operating system, and you want to complete the installation, but when you insert the USB drive into your computer, you find out that it won’t work. This indicates the need to make additional settings in the BIOS, and from there the hardware setup of the computer begins. Let us learn how to properly configure the OS to capture your accumulated information.
First, let’s figure out how to get to the BIOS. Apparently, the BIOS is located on the motherboard, and on each computer it is updated with the version and driver. Therefore, there is no single button to enter. Most often vikorystvoyutsya Delete, F2, F8 or else F1. Read the report about this in our statistics.
After going to the menu, you will no longer be able to access any additional settings. In different versions, its design varies, so let's take a look at a number of butts from popular generators.
Award
There is nothing special about the setup for flash drive integration in the Award BIOS. You need to carefully follow the simple instructions and everything will work out:

AMI
In the AMI BIOS, the process of setting up the system is slightly different, but it is still easy to install and does not require advanced knowledge from beginners. You need to sign up like this:

Other versions
The algorithm for working with BIOS for other versions of motherboards is similar:
- Start the BIOS now.
- Then find the menu with devices.
- After this, click on the item on the USB controller "Enable";
- In the order of launching devices, select the name of the flash drive first.
If Wikonian culture has been adjusted, but the obsession does not go away, the following possible reasons:
- The flash drive was recorded incorrectly. When the computer is turned on, the process of accumulating progresses (the cursor at the top left of the screen blinks) or a reset appears "NTLDR is missing".
- Problems with the USB socket. Which way should you connect the flash drive to the other socket?
- Incorrect BIOS settings. The main reason is that the USB controller is enabled. Previously, older versions of BIOS did not transfer data from flash drives. In such a situation, you need to update the BIOS firmware (version).
For a report on those that work when the BIOS appears to be very noisy, read our lesson dedicated to this topic.
It is possible that you incorrectly configured the USB storage device itself to install the operating system. In case of any problem, turn over all your actions following our instructions.
And these instructions will come in handy if you are recording the image not from Windows, but from another OS.
And don’t forget to turn the settings to exit mode after you no longer need to exit the private flash drive.
If you can’t set up the BIOS, it will be enough to just go to "Boot Menu". All devices may have different keys, so read the box at the bottom of the screen to see what is indicated there. After opening the window, select the desired device to download. I’ll call our device USB with a song.

We hope that our article has helped you understand all the intricacies of customizing the BIOS for installing flash drives. Today, we reviewed all the necessary actions on the BIOS of the two most popular computers, and also provided instructions for users on how to install computers with other versions of BIOS on them. .
You’ve already written down a valuable USB flash drive, but don’t know how to install it from the flash drive? There is nothing complicated here. Transferring Windows from a flash drive is even simpler, and all you need to do is go into the BIOS and change the settings.
If you haven’t yet recorded a licensed digital copy of Windows, I recommend reading –?
How to get started with flash drives?
If you simply connect the USB flash drive to your PC or laptop and restart it, you will not have to install Windows. For this you need to enable the flash drive in the BIOS.
It’s not easy to fight. There is a nuance here. On the other hand, the use of Windows with flash drives on PCs and laptops affects differently. First of all, it should be stored in the BIOS. Or in another way – the type of laptop brand (Asus, Acer, Samsung, Lenovo, HP etc.).
Thus, the Bios menu will be different from now on, and you may find it difficult to navigate. Below we will look at a number of applications so that you can understand and be able to independently navigate the BIOS menu (in case you have another option).
So let's see. To enter the BIOS, you need to press a button on the keyboard while your computer or laptop is turned on. Yaku yourself? You can find out when you are attracted to the screen.
You can find out about those who have gone to BIOS by opening the submenu in front of you. Check out the following options:


If you were unable to reset the BIOS, then make sure to turn off your PC or laptop, reset it and try again by pressing another key.

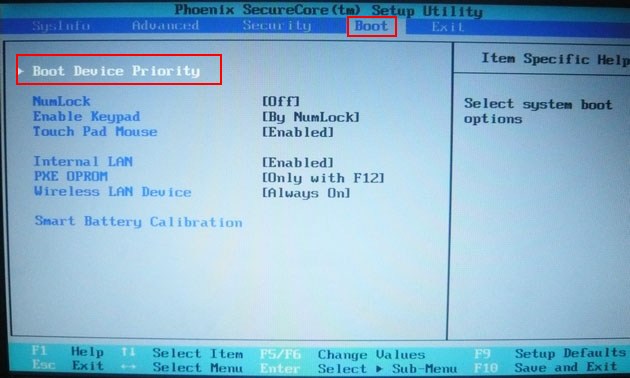
In this box the Boot item was selected, and then Boot Device Priority (this gives priority to the launch of devices). As a result, a menu similar to this will appear:


As you know, there is a stench of carnage, but in the case of skin problems, we need the rows - First (1st), Second (2nd) and Third (3rd) Boot Device. It is indicated here which device is attracted first, which one is attracted by the other and the third one after that. As a rule, the hard drive (HDD) comes first, and then the disk drive (CR-ROM).
When you connect a flash drive, another USB-HDD will appear. It is necessary to select the USB-HDD option in the First Boot Device section. Butt:

You still need to carefully save the changes, otherwise you will have to repeat everything from the beginning. Which button should I use to save? This information is written at the bottom of the screen. For example, in the screenshot you can see: F10 - “Save”, ESC - “Exit”. Save changing and exiting the BIOS. I see, setting up the BIOS for downloading the flash drive is complete.
The computer (or laptop) will automatically re-engage, after which the following sequence will appear:

Press any button and the Windows installation will begin.
If you have a BIOS UEFI then everything is as simple as shelling pears
Go to Bios and see a menu similar to this:

To set up a flash drive in UEFI, select the Boot Priority item. Drag the USB device icon to the top of the list (be the first) and exit (exit button in the upper right corner). When you exit, the system will power you up - save your changes. Wait until your PC or laptop is re-engaged.
Before we speak: it doesn’t matter at all what type of recordings you have on a USB flash drive – Windows 7, 8, 10 or XP. The price doesn’t add up to anything. Getting the OS from a flash drive will happen in any case (it’s clear that it’s written correctly).
And finally, another very important moment. Once the unpacking of Windows files is complete, the computer will restart.

After which you need to go into the Bios again and change the priority to launch devices. So, put the hard drive (HDD) in the first place, and the USB flash drive in the second place. These problems are not to blame.
In principle, you don’t have to bother anyone. Once a black screen appears, NOTHING don't push.
Otherwise, you will be interested in installing Windows again, and you will install the operating system again.
Once Windows is installed, you still need to go into Bios and change the priority to launch devices. Otherwise, the computer (or laptop) will first have to download data from the flash drive (for the reason that it is connected).
Friends, in this regard, we know the most advanced menus on laptops from Acer, Sony, Samsung, MSI, Toshiba, HP, ASUS, Packard Bell And most of the devices from my Corsair Voyager flash drive, which contains the Windows 7 operating system, have been carefully refurbished. Don’t forget, if you want to install Windows 7 or Windows XP on your new laptop, then connect the flash drive to the USB 2.0 port (black color), whichever you accept flash drive to the USB 3.0 port (blue color), then the system installation will end in failure, since the Windows 7 installer does not have USB 3.0 drivers.

We will also review the BIOS of these devices. Let's take a look at how to change the priority of attraction on these laptops, since we won't be able to get away from the attraction menu. There is no need to be afraid of the BIOS, if you configure it incorrectly, you can reset the configuration to default.
Much more respectful respect: I would like to thank you for the fact that you have a new laptop from any manufacturer (2013, 2014 with UEFI BIOS). If you have such a laptop and you read in rows, then you want. For this purpose, it is essential to secure the laptop.
Almost all laptops that are currently sold have a UEFI BIOS; such a laptop cannot be easily accessed from a flash drive, since the UEFI BIOS has a special protection - a secure boot protocol "Secure Boot" based on special certified keys (including for Windows 8) . The Secure Boot protocol will not allow your laptop to be captured from either a secure disk or flash drive or a Windows 8 installation disk. In order to download your laptop from a flash drive, the Secure Boot protocol needs to be enabled in the BIOS of your laptop, it’s very easy to do, read our article .
Let's return to this article. I think the information will be needed by a lot of owners of laptops and netbooks. This article will also help if you want to get interested in the disk but don’t know how to earn it.
Let's finish with the Acer laptop, first of all we bring our Corsair Voyager flash drive to the laptop, then press F12 when pressed,

Then you need to select our flash drive in the acquisition menu and press

If you are unable to access the Acer laptop menu using the additional F12 key when enabled, it means that the Boot Menu option is disabled in the BIOS and you need to enable it.
When pressing F2, go to the Information tab, go to the Main tab, select the F12 Boot Menu parameter, set it to Enabled,

Next, press F10 to save settings, restart, press when downloaded F12 and our menu will appear, select our flash drive and press Enter to download from the flash drive.
Since the menu of the Acer laptop still does not appear, it means that we go back to the BIOS (with F2 selected), the Boot tab. We select our flash drive and put it in the first position behind the additional F6 key, then press F10 to save setup, restart and download from the flash drive.


When the F12 laptop is installed, it is pressed into the import menu, and we select our flash drive here. If you brought the flash drive to the laptop, the name will be here. Press Enter and if your flash drive is acquired, the flash drive will be acquired.

If, for whatever reason, you can’t download a laptop from a flash drive using the backup menu, you can go to BIOS and change the priority of the backup device there. It is often embossed F2 when a Toshiba laptop is installed and is found in the BIOS of that laptop. Start the Main tab, go to the Boot tab (which indicates that the laptop is installed) and put our Corsair Voyager flash drive in the sixth position. We see them behind the other keyboard and press F6, thus transferring our flash drive to the first position, then press F10 to save the changes we have made, you will be re-installing and you will be importing the laptop from the flash drive shki.
Friends, if you have a new Samsung laptop, for example 2012-2013, then read this article, for all others follow these instructions.
Press Esc or F10 when pressed, go to the menu and select our flash drive. If the menu does not appear, then go to the BIOS and press F2 or DEL when selected. In the BIOS Boot tab, select the first parameter Boot Device Priority
I go to the next one, here we select our flash drive and use the F6 button to put it in the first position. Then press F10 to save settings and re-enable, re-enable, then re-enable from our flash drive.


And consumed until the final menu. The first thing we do is to install a disk drive, if your flash drive is attached to the laptop, then its name will be present here, we select our flash drive here and press Enter or F10 to re-enable and away from the flash drive.

If you can’t go to the menu of the HP laptop, then we go to the BIOS, press ESC when selected, select F-10, go to the BIOS,
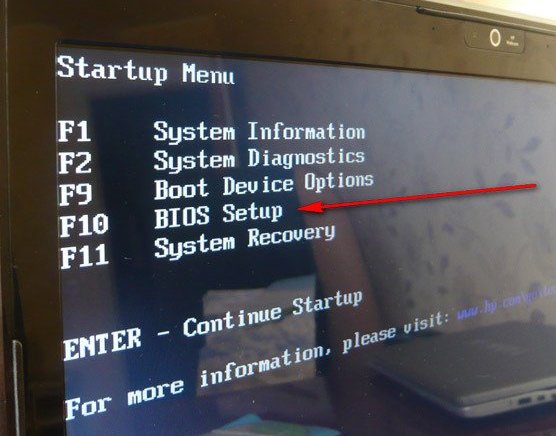
Go to the System Configuration tab, select Boot Options, press Enter


As the first device, install the hard drive of the Notebook Hard Drive laptop. If your flash drive is connected to the laptop, then there will be its name, select the flash drive and use the additional F6 key to move it to the first position. Next, we save the changes, press F10 to save settings, it will be re-enabled and the laptop will be assigned to the flash drive.


If the backup menu is not available, press the DEL key while it is selected and enter the BIOS, then go to the Boot tab, select the flash drive and press Shift on + without releasing it, thus transferring our flash drive to the first position. Press F10 to save settings, settings are saved and you can download the laptop from the flash drive.


Then go to the Boot tab and set the Fast Boot option to Disabled.


Once again, enter the BIOS and go to the Boot tab, set the Launch CSM option to Enabled,

Go down to the option Boot Option Priorities and Boot Option #1 and enter it by pressing Enter, in the menu using the arrows on the keyboard, select the name of our flash drive and press Enter. Here we also install our Corsair Voyager flash drive in the first place.


Embossed F10 to save setup, reset and our Asus laptop will use a flash drive.
You can also become a vikorist zavantazhuvalne menu Asus laptop, for which in the early stages of using a laptop you often press the key Esc, go to the storage menu, use the arrow keys on the keyboard to select your favorite flash drive and press Enter.

How to get a Packard Bell laptop from a flash drive

Embossed when the key is pressed F12 And go to the laptop acquisition menu, there we simply select our flash drive and assign the laptop from the flash drive.
Yakshcho F12 when infatuated, it doesn’t ask, then embossed F2, more F6 and can be used up to the laptop's UEFI BIOS,

here we go to the tab Boot.
If you connected a new flash drive before plugging in the laptop, then may not show up Immediately at this menu.
Set the Boot Mode option to the Legacy BIOS position.
And the option Secure Boot displayed at the camp Disabled.
Now the flash drive can be displayed. Insert the flash drive into the first position, save the setup and re-enable it. If the desired flash drive is divided up for our articles, the acquisition will be successful.
To install the operating system on your computer, you need to configure it from a flash drive or disk. So in today's statistics, we'll look at how you can install flash drives in the BIOS. This must be done to print the Windows installation. So, if you simply insert a foreign flash drive into the system, then nothing will happen. You are becoming more obsessed with the old OS. If you haven’t already picked up the latest version of the operating system, read the article - Yak. Now let's get down to the process of getting it right.
Vikorist's Boot Menu for downloading from a flash drive.
After rebooting your computer, you must always go to the motherboard BIOS to configure it. To get started, let's try to speed up the Boot Menu. To do this, before you fully activate the system, you must press the F8 key, which will open a special window with a list (enablement menu) of connected drives. From this menu you need to select our flash drive from the OS recorded on it.
After this, you are responsible for starting and copying the installation files to your hard drive. After the computer restarts itself, the Windows installation will be removed from the hard drive.
If for whatever reason you are unable to open the storage menu, then it’s time to figure out how to install storage from the flash drive in the BIOS. First of all, I want to briefly tell you what BIOS is. 
BIOS (basic input/output system - “basic input/output system”)— a special set of built-in software that implements the program programming interface, necessary for working with computer components and previously attached devices. 
In order to set up the BIOS, you need to press the Delete button or F2 or something else, which is necessary when the computer is fully installed. At this moment, the logo of the motherboard manufacturer and information about the processor, memory and hard drives will be displayed on the monitor. If so, something similar will be written at the bottom of the screen:
- "Press Del to enter Setup"
- "Press F2 for Settings" or something similar.
After pressing one of the buttons, you will have to set up the BIOS. Depending on the payment, the software for the basic input-withdrawal system may vary. Let’s take a look at the most popular options, and also set them up for downloading from a flash drive.
If AMI BIOS is installed on your board, then in order to install the problem of disk storage, we need to check the following steps:

Increase your respect! You need to connect the flash drive before you go into the BIOS, otherwise you won’t be able to see it.

If your motherboard has AWARD or Phoenix BIOS, then you can use the following steps to set up Windows from a flash drive:

Many current laptops have the InsydeH2O bios installed, and many are faced with the problem of installing bad disk drives. Let's look at this problem together. Vikonuvatimemo everything is point by point, without showing mercy.

Increase your respect! If you need to install storage from a CD or DVD disc, then first you need to check the Internal Optic Disc Drive option
- After completing the settings, go to the Exit menu section and select the Save and Exit Setup item, thereby saving the changes and exiting the BIOS.
Nowadays, many motherboard manufacturers install instead of the original BIOS, UEFI software, such as a graphical interface, as well as support for mouse control and Russian menus. Tim himself makes it easy for us to believe that the BIOS will install a flash drive.
As luck would have it, and having entered the BIOS, you see that the graphical interface is in front of you, you need to go to the advanced settings by pressing the “F7” key or the button in the main window. In the menu that appears, you need to go to the “Vanture” tab and in the “Variousness of disk acquisition” section, in the first place, insert our flash drive. 
After making the changes, press the “F10” key and select “Save settings and restart your computer.”
Let's bring the pouches.
In today's article, we looked at how you can install flash drives in the BIOS. That being said, I tried to show as clearly as possible how to work with different BIOS versions. As a rule, all setup is carried out before inserting the first flash drive or disk from the system. Rich people have difficulties with this because of the English interface. Ale, as you know, developers are working harder and harder to adapt the BIOS for all users. This is clearly visible in the new UEFI.
Do you still need to install an operating system from a flash drive?
And for this peace of mind you need installation disks.
On the right, in some models there are simply daily or malfunctions, and a reinstallation of the operating system is required.
It is much easier to carry (and save) a flash drive than a CD-RW.
The installation process itself, which goes into the power supply, is not so complicated.
This can be divided into several stages:
- Copy the operating system to a flash drive
- Prepare the computer before installation
- Customize the BIOS for modernization
- Install operating system
Of course, if you have a computer on “T”, then you can go wrong with the tasks you set up and spend almost an hour clarifying certain aspects of the process on the Internet.

If there is not enough knowledge on this topic, then this article will help you choose the right vector of work, and direct your energy and desire to work everything independently in the right direction.
Well, let's go through the skin point in more detail.
How to copy the Windows operating system to a flash drive

As the title suggests, we first need to copy everything somewhere. This is the image of a necessary operating system. Kudis is our flash drive, installed in the future.
For copying we need:
- A flash drive with a memory capacity of 4 Gb or more. Everything depends on the OS you want to download and then install on your laptop or computer.
- a program for recording an image (WinToFlash, WinSetupFromUSB), which can be downloaded from the Internet.
- the very image of the operating system.
You can get a new flash drive or get it from Vikorist immediately.
Program for installation
The program for recording the image can be downloaded from the Internet (there will be no problems with this point - you can find out if you need it)
The image of the operating system can be downloaded from less than a normal torrent tracker.
It is clearly memorized, where the image is saved on the computer: disk name, folder name.
For this purpose, you can create a special folder NOT on the desktop and NOT on drive C. You will find out why later.
Please: before starting work, transfer the information from the flash drive (as it’s not new), which you are going to do, to another device! In the process of transferring the operating system to a flash drive, all information on it will be erased forever.
We are interested in the program. For example, WinToFlash.
After the program is downloaded, we launch it.
In the window we select from the list of OSs that we need to copy.

In the window you can see the way to the image of the operating system (the one we remembered in the previous paragraph).
Then select a disk, a folder, and the file itself from the list.
And in the offensive row that falls out, until worn on which this image will be saved, like a flash.
The “Run” button is embossed and marked while the process of formatting the flash drive and copying files from the computer to it is ongoing.
The first document has been completed - we have a flash drive on which we can install the operating system.
There is another option for creating an image of the operating system - an image of your OS.
To do this, go to the “Control Panel” item through the “Start” button. Select the “Archiving and updating” section.

In the book, which appeared, we find the point “Creation of the image of the system.”

After clicking, a window will open in which we need to select where the image of our operating system will be saved.
It’s better not to save on your hard drive, but to use it for your important hard drive.
To do this, select the “Hard disk” item from the list of the device for which the image is copied.

After this, the program prompts you to select the disks from which the image will be copied.
We have to scrape system disks. We check the boxes opposite “With (system)” and “Reserved by the system (system)”. The information itself will be archived.
You will need to confirm archiving at the next window.
You will learn how to use the memory that you borrowed the image, as well as the disks that were stored.
Robomo archiving
If you have not forgotten at this stage, you can begin the process by pressing the “Archive” button in the lower right corner of the monitor.
The value of the information that is archived is stored. The capabilities of your computer will continue to play a role.
Since the machine supervises the robotic process, it does not fly during the archiving hour.
After the process is completed, the system will specify whether you want to write the archived files to a special disk. The doctors who collected data there appear to be based on this proposition.
At the moment, you are lucky enough to have a backup recorded on a dedicated disk. So, I have created an archive - WindowsImageBackup.
Preparing the computer before reinstallation
The computer operating system is the main part of the software.
The OS is responsible for using the resources of your computer. Crashing the operating system can cause the entire PC to malfunction.
It sounds serious, but it means that the reinstallation process itself is so complicated and foolish.
All preparation of the computer, after all, comes down to copying the files you need from the disk to another disk, for example - D or any other significant device.
It is possible to use the necessary programs, border card drivers, and save important files on disk.
At this stage, it’s better not to scroll down and look at all the files on drive C.
This is necessary in order not to grab your head and not waste an hour updating any important, but not saved, document.
Please: whatever files are not accounted for by the system, they should not be saved initially on the system drive C. If the desired files are initially stored in the “Accounts” (or “Download”) folder on the C drive (Fig. 4), then all of them - It’s better to transfer to another disk. Don't notice drive C.
Once everything is necessary has been duplicated on another disk, the space of the system disk has been checked once again, you can move on to the next step.
Customizing the BIOS for upgrading the OS
It’s clear from the beginning that it’s a BIOS. BIOS is a set of microprograms that indicate the configuration of components of the system unit, as well as the configuration of the operating system.
The BIOS on the motherboard is updated, which controls the operation of all components of the computer and ensures their correct interaction during operation.
Pleased: the mouse does not work in the BIOS, so it is not tormented to no avail, but is navigated with the keys and arrows, ENTER, or read the “Help” section in the same BIOS.
You can enter the BIOS at the time of booting up the computer, at the time of startup or restarting.
For this purpose, if a black screen with white letters and a logo appears on the monitor at the top right corner of the screen, press the Delete key, or ESC, or F2.
The system itself will indicate which key to press. The hint will be written in white letters on a black screen at the bottom or in the center, underneath the stamp (Fig. 5).
Having upgraded to BIOS, you need to know and go to the menu section Bootable Device Priority or menu item BOOT. BIOS window options vary .

In the Bootable Device Priority folder, select CD-ROM Boot Priority or JetFlashTranced or USB-HDD. The BIOS menu may look different from the driver.
If these options do not coincide with the options of your BIOS, then we focus on the menu, relying on our knowledge of English and intuition.
To avoid getting stuck at this stage, you can, before installing Windows OS on your laptop or computer, learn the operating principle of your BIOS on the Internet.
The measure has a lot of information, both text and video.
Having spent quite a few hours and dug through a number of specialized sites, you can retrieve the information that will allow you to complete the reinstallation process without any problems.
By selecting the option to notify the computer that it will now need to boot from the USB rather than the hard drive, you can clear the BIOS, saving all changes.
Installing the operating system from a flash drive
For the minds that all the front lines of Wikonan are correct, on the monitor, at the hour of re-engaging, it will appear so clearly.
Abo yak on baby 14:
Press any key...).

The Windows installation window appears and, first of all, asks you to select a language, country, and hour format.
Since the installation is the whole purpose for which the whole process begins, then we will press it without any fuss.
From the list you need to select the version of the operating system we need.
Ale is one moment. It is necessary to select the OS version that you are using the key for.
The key is a set of characters on a small paper that is attached to the bottom of the laptop or the body of the computer system unit.
Therefore, before installation, it is necessary to know this piece of paper and rewrite the key.
It’s not easy to twist the laptop or crash the processor at this stage of installation.
After selecting the operating system for installation, you will need to install it in the next window with licensed minds (without these minds, the system will not allow you to continue installing the OS from the flash drive) and in the next window, select the type of installation.
Click on the item Full installation.
Now we are prompted to select the partition where the Windows operating system from the flash drive will be installed.

From the obvious list, select an item whose type is called “System”.
I press “Adjust disk”. A number of points will appear at the bottom of the window.
From them you need to select “Format”. When you select this item, you will be warned about the possibility of losing files or programs from the system drive.

We'll be fine without a car! Before reinstalling the operating system, we copied everything we needed from a reliable place. The axis can all be updated in the new OS.
After the system disk is formatted, click the “Next” button at the bottom of the window. I humbly check until the installation is underway.
Then the system prompts you to enter your accountant's name and computer's name.
You will be given the opportunity to set a password and enter a hint about any problem.
Then you may need the same key, which is recommended to be written off from the sticker on the computer case.
Then select security mode, time and date. Obviously, if there is a necessary driver in the system, you will be prompted to select the type of circuit connection.
If this item does not appear during the installation process, the drivers for the connection will have to be installed properly.
This will complete the installation of the operating system from the flash drive.
Now you can begin to install the new system with the necessary (and not less) programs and drivers.
And finally: you must go back to the BIOS and turn the settings from the USB item to the Hard Drive item.
You don’t want to mess up your computer when you’re busy and search for the flash drive again and again to no avail?
Well, Windows is installed. What kind of upgrades can be made after going through the process of self-installing the OS from a flash drive?
Note: once an hour spent on your next day is compensated by saving money on the maintenance of a wireless computer.
It’s easy to know about the process of reinstalling the operating system. Known power.